Sr Technical Content Strategist and Team Lead

Introduction
With the launch of GPU Droplets powered by NVIDIA H100 GPUs, DigitalOcean provides an ideal solution for high-performance video editing. The NVIDIA H100, equipped with 640 Tensor Cores and 128 RT Cores, supports faster data processing, enabling high-resolution video scaling and encoding tasks.
This tutorial will walk you through setting up a GPU Droplet for video editing, utilizing FFmpeg with CUDA support to scale and encode a sample video file from 720p to 4K resolution. This tutorial is tailored for video editors and developers looking for an efficient way to handle video processing on cloud infrastructure.
Prerequisites
Before you start, ensure you have:
- A DigitalOcean Cloud account.
- A GPU Droplet deployed and running.
- Familiarity with the Linux command line. To learn more, you can visit this guide on Linux command line primer.
Understanding GPU Benchmarks for Video Editing
Effective video editing requires GPUs with specific capabilities:
- VRAM: With 80GB HBM2e, the NVIDIA H100 can handle 4K and 8K videos.
- CUDA Cores: 18,432 CUDA cores for high-speed processing and encoding.
- Tensor Cores: 640 Tensor Cores to support AI-enhanced tasks, such as noise reduction.
- RT Cores: 128 RT Cores for real-time processing and visual effects.
- Memory Bandwidth: Up to 2 TB/s, allowing for smooth playback and fast data transfers.
For video editing, these specifications translate to faster processing, efficient scaling, and real-time effects rendering.
Minimum Benchmark Goals
Here are benchmark targets based on resolution:
| Resolution | VRAM Required | CUDA Cores | Tensor Cores | Memory Bandwidth | RT Cores |
|---|---|---|---|---|---|
| 1080p | 8GB | 2,000+ | 100+ | 300+ GB/s | 20+ |
| 4K | 16GB | 4,000+ | 200+ | 500+ GB/s | 40+ |
| 8K | 32GB+ | 8,000+ | 400+ | 1+ TB/s | 80+ |
The NVIDIA H100 meets and exceeds these benchmarks for 4K and 8K video editing, making GPU Droplet an excellent choice for advanced video projects.
DigitalOcean GPU Droplet: NVIDIA H100 Specifications
The NVIDIA H100 offers extensive CUDA, Tensor, and RT cores, providing the necessary resources for high-resolution video editing workloads.
| GPU Model | VRAM | CUDA Cores | Tensor Cores | Memory Bandwidth | RT Cores |
|---|---|---|---|---|---|
| NVIDIA H100 | 80GB | 18,432 | 640 | 2TB/s | 128 |
The H100 can handle even the most intensive editing tasks with minimal lag and high-speed processing.
Setting Up Video Editing Workload on DigitalOcean GPU Droplets
In this section, let’s set up and deploy a video editing workload on a DigitalOcean GPU Droplet.
Step 1 - Set Up the GPU Droplet
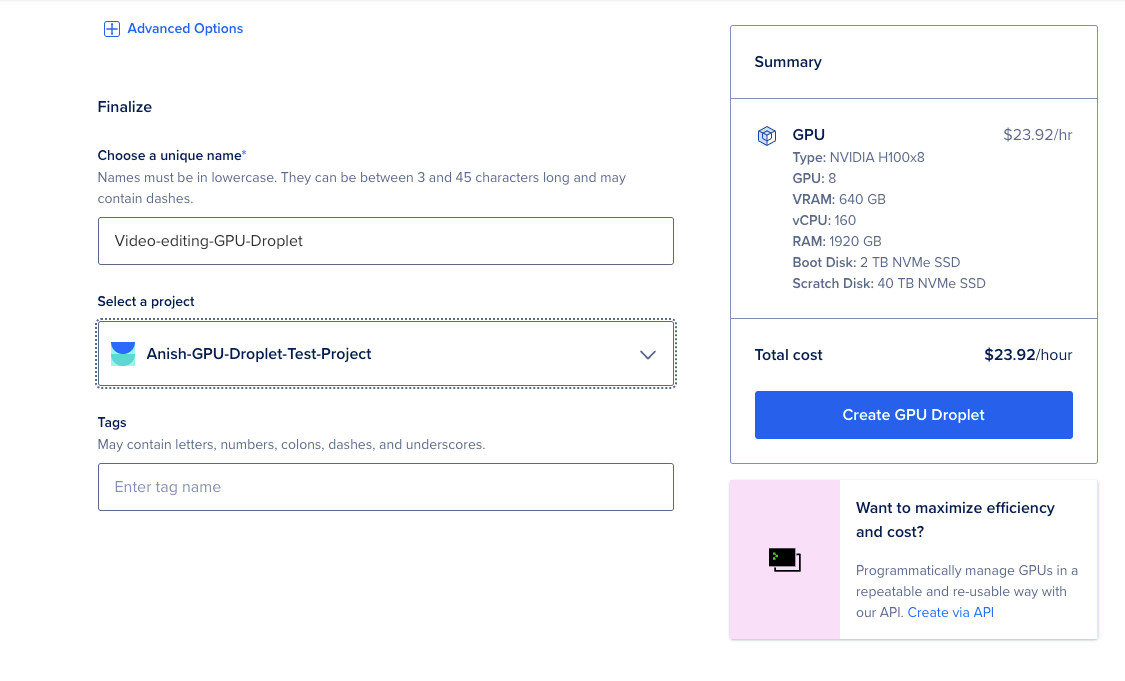
1.Create a New Project - You will need to create a new project from the cloud control panel and tie it to a GPU Droplet.
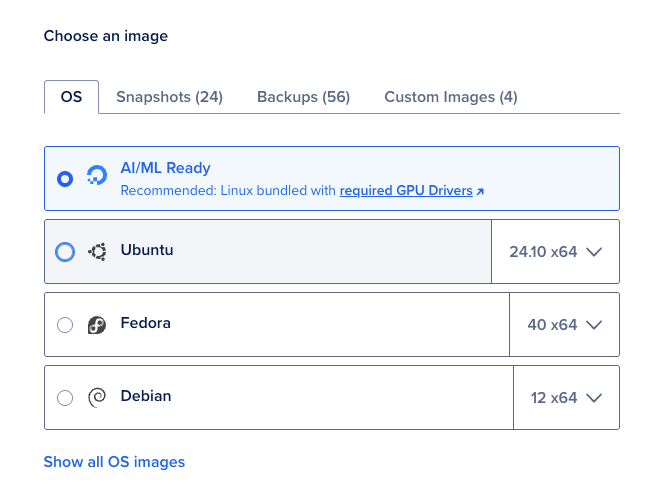
2.Create a GPU Droplet - Log into your DigitalOcean account, create a new GPU Droplet, and choose AI/ML Ready as the OS. This OS image installs all the necessary NVIDIA GPU Drivers. You can refer to our official documentation on how to create a GPU Droplet.
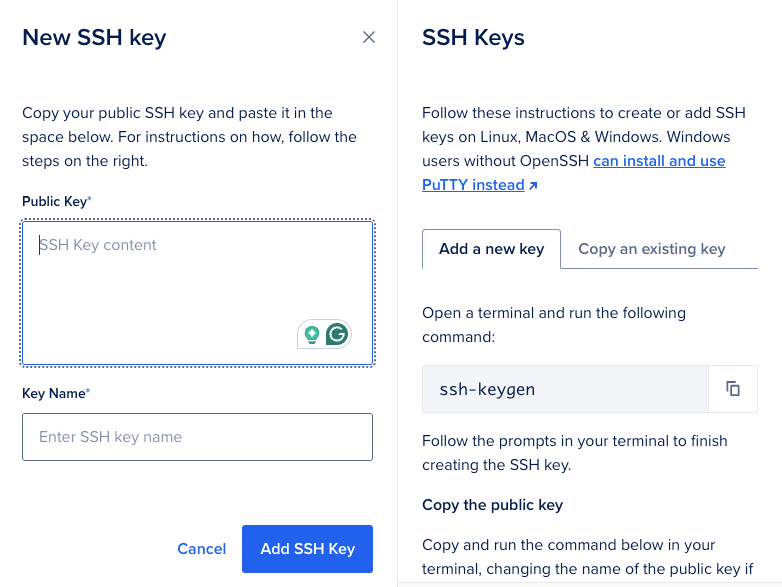
3.Add an SSH Key for authentication - An SSH key is required to authenticate with the GPU Droplet and by adding the SSH key, you can login to the GPU Droplet from your terminal.
4.Finalize and Create the GPU Droplet - Once all of the above steps are completed, finalize and create a new GPU Droplet.
Step 2 - Install Dependencies
Once the GPU Droplet is ready and deployed. You can SSH to the GPU Droplet from your terminal.
ssh root@<your-droplet-ip>
Ensure your Ubuntu-based GPU Droplet is up to date:
sudo apt update && sudo apt upgrade -y
Next, please reboot the GPU Droplet using the below command and wait for it to come online. Rebooting after running sudo apt update && sudo apt upgrade—y is often necessary to ensure that any updated system components, especially the kernel and hardware drivers, are fully loaded and applied.
Note: On most Linux systems, you can check if a reboot is needed by running:
[ -f /var/run/reboot-required ] && echo "Reboot is required"
If a reboot is required after a kernel and hardware drivers update, you will observe the following output of the above command:
OutputReboot is required
Now,let’s verify the NVIDIA driver and CUDA version with the following:
nvidia-smi
This command should display the details of your NVIDIA GPU and the driver version.
Output+---------------------------------------------------------------------------------------+
| NVIDIA-SMI 535.183.06             Driver Version: 535.183.06   CUDA Version: 12.2     |
|-----------------------------------------+----------------------+----------------------+
| GPU  Name                 Persistence-M | Bus-Id        Disp.A | Volatile Uncorr. ECC |
| Fan  Temp   Perf          Pwr:Usage/Cap |         Memory-Usage | GPU-Util  Compute M. |
|                                         |                      |               MIG M. |
|=========================================+======================+======================|
|   0  NVIDIA H100 80GB HBM3          Off | 00000000:00:09.0 Off |                    0 |
| N/A   28C    P0              67W / 700W |      0MiB / 81559MiB |      0%      Default |
|                                         |                      |             Disabled |
+-----------------------------------------+----------------------+----------------------+

+---------------------------------------------------------------------------------------+
| Processes:                                                                            |
|  GPU   GI   CI        PID   Type   Process name                            GPU Memory |
|        ID   ID                                                             Usage      |
|=======================================================================================|
|  No running processes found                                                           |
+---------------------------------------------------------------------------------------+
Verify the installation of CUDA:
nvcc --version
You should see information about the installed version of CUDA.
Outputnvcc: NVIDIA (R) Cuda compiler driver
Copyright (c) 2005-2023 NVIDIA Corporation
Built on Mon_Apr__3_17:16:06_PDT_2023
Cuda compilation tools, release 12.1, V12.1.105
Build cuda_12.1.r12.1/compiler.32688072_0
Note: From the above outputs, please ensure that the CUDA driver version from the output of the command nvidia-smi and the command nvcc -v matches. If there is a version mismatch between the output of both commands, you must re-install both and again reboot the GPU Droplet.
Next, you will install FFmpeg. FFmpeg enables GPU-accelerated video processing, which you will use to scale the video.
sudo apt install -y ffmpeg
Run the following to check if FFmpeg detects CUDA support.
ffmpeg -hwaccels
This command should list cuda, vdpau, and vappi, indicating that GPU acceleration is available.
Outputffmpeg version 4.4.2-0ubuntu0.22.04.1 Copyright (c) 2000-2021 the FFmpeg developers
  built with gcc 11 (Ubuntu 11.2.0-19ubuntu1)
  configuration: --prefix=/usr --extra-version=0ubuntu0.22.04.1 --toolchain=hardened --libdir=/usr/lib/x86_64-linux-gnu --incdir=/usr/include/x86_64-linux-gnu --arch=amd64 --enable-gpl --disable-stripping --enable-gnutls --enable-ladspa --enable-libaom --enable-libass --enable-libbluray --enable-libbs2b --enable-libcaca --enable-libcdio --enable-libcodec2 --enable-libdav1d --enable-libflite --enable-libfontconfig --enable-libfreetype --enable-libfribidi --enable-libgme --enable-libgsm --enable-libjack --enable-libmp3lame --enable-libmysofa --enable-libopenjpeg --enable-libopenmpt --enable-libopus --enable-libpulse --enable-librabbitmq --enable-librubberband --enable-libshine --enable-libsnappy --enable-libsoxr --enable-libspeex --enable-libsrt --enable-libssh --enable-libtheora --enable-libtwolame --enable-libvidstab --enable-libvorbis --enable-libvpx --enable-libwebp --enable-libx265 --enable-libxml2 --enable-libxvid --enable-libzimg --enable-libzmq --enable-libzvbi --enable-lv2 --enable-omx --enable-openal --enable-opencl --enable-opengl --enable-sdl2 --enable-pocketsphinx --enable-librsvg --enable-libmfx --enable-libdc1394 --enable-libdrm --enable-libiec61883 --enable-chromaprint --enable-frei0r --enable-libx264 --enable-shared
  libavutil      56. 70.100 / 56. 70.100
  libavcodec     58.134.100 / 58.134.100
  libavformat    58. 76.100 / 58. 76.100
  libavdevice    58. 13.100 / 58. 13.100
  libavfilter     7.110.100 /  7.110.100
  libswscale      5.  9.100 /  5.  9.100
  libswresample   3.  9.100 /  3.  9.100
  libpostproc    55.  9.100 / 55.  9.100
Hardware acceleration methods:
vdpau
cuda
vaapi
qsv
drm
opencl
Step 3 - Download Sample Video Data for Testing
For this tutorial, you will use a sample video from the Blender Foundation to demonstrate GPU-accelerated video processing. Blender is a free and open-source 3D creation suite that supports the entirety of the 3D pipeline—modeling, rigging, animation, simulation, rendering, etc.
Download it with the below command:
wget https://download.blender.org/demo/movies/ToS/tears_of_steel_720p.mov
Step 4 - Upscale the Video to 4K with FFmpeg
You can now process the video with FFmpeg installed and the GPU configured.
The basic syntax of the ffmpeg command is:
ffmpeg -i <input_file> -vf "scale=width:height" -c:v <codec_name> -preset <encoding_preset> -b:v <bitrate> <output_file>
Here is what each of the parameters mean:
input_file: The name of the input video file.scale=width:height: The scaling filter, where width and height are the desired dimensions for resizing.codec_name: The codec to be used for encoding the video (e.g.,libx264forH.264).encoding_preset: The speed vs. compression efficiency preset for encoding (e.g., fast, medium, slow).bitrate: The target video bitrate (e.g., 10M for 10 Mbps).output_file: The name of the output file, including format and extension.
In this example, you will upscale the Video from 720p to 4K resolution.
Run the following FFmpeg command to upscale the video to 4K (3840x2160 resolution):
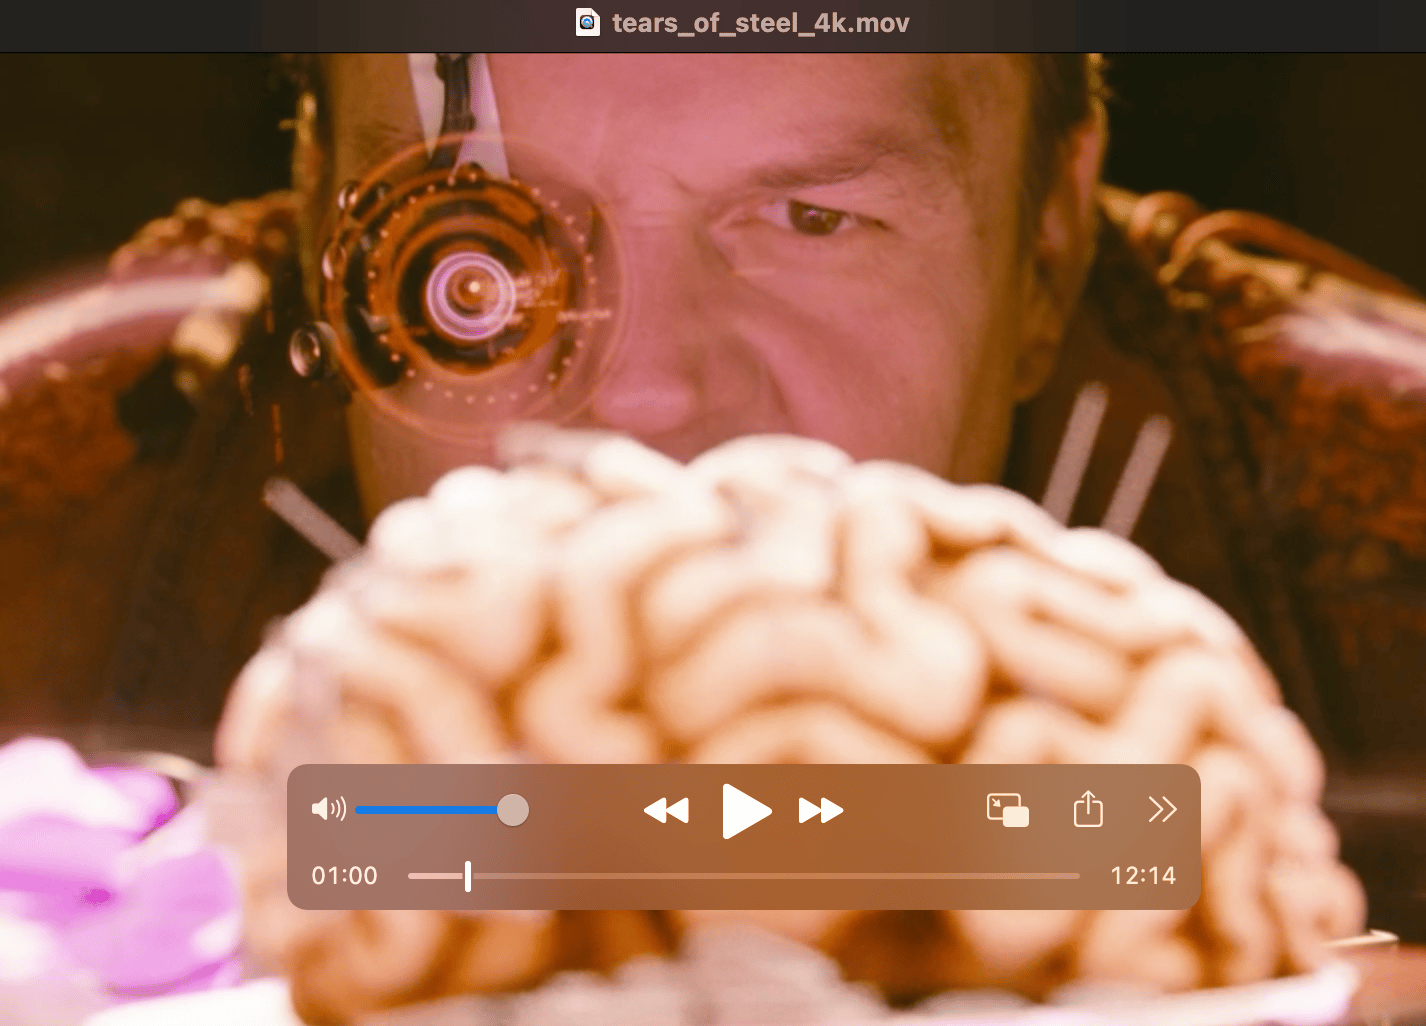
ffmpeg -i tears_of_steel_720p.mov -vf "scale=3840:2160" -c:v libx264 -preset fast -b:v 10M tears_of_steel_4k.mov
Once the processing finishes, you should observe the following output:
OutputOutput #0, mov, to 'tears_of_steel_4k.mov':
  Metadata:
    major_brand     : qt
    minor_version   : 512
    compatible_brands: qt
    encoder         : Lavf58.76.100
  Stream #0:0(eng): Video: h264 (avc1 / 0x31637661), yuv420p(tv, progressive), 3840x2160 [SAR 120:89 DAR 640:267], q=2-31, 10000 kb/s, 24 fps, 12288 tbn (default)
    Metadata:
      handler_name    : VideoHandler
      vendor_id       : FFMP
      encoder         : Lavc58.134.100 libx264
    Side data:
      cpb: bitrate max/min/avg: 0/0/10000000 buffer size: 0 vbv_delay: N/A
  Stream #0:1(eng): Audio: aac (LC) (.mov / 0x6134706D), 44100 Hz, stereo, fltp, 128 kb/s (default)
    Metadata:
      handler_name    : SoundHandler
      vendor_id       : [0][0][0][0]
      encoder         : Lavc58.134.100 aac
frame=17620 fps= 69 q=-1.0 Lsize=  949201kB time=00:12:14.07 bitrate=10592.7kbits/s speed=2.88x
video:937125kB audio:11532kB subtitle:0kB other streams:0kB global headers:0kB muxing overhead: 0.057354%
[libx264 @ 0x564504ee7f40] frame I:223   Avg QP:22.07  size:180259
[libx264 @ 0x564504ee7f40] frame P:5973  Avg QP:25.97  size: 92140
[libx264 @ 0x564504ee7f40] frame B:11424 Avg QP:27.21  size: 32306
[libx264 @ 0x564504ee7f40] consecutive B-frames:  8.2% 14.4%  5.4% 72.0%
[libx264 @ 0x564504ee7f40] mb I  I16..4: 20.9% 75.8%  3.2%
[libx264 @ 0x564504ee7f40] mb P  I16..4:  9.4% 21.2%  1.1%  P16..4: 29.5%  4.3%  1.4%  0.0%  0.0%    skip:33.0%
[libx264 @ 0x564504ee7f40] mb B  I16..4:  0.9%  1.4%  0.1%  B16..8: 25.0%  1.3%  0.2%  direct: 1.8%  skip:69.3%  L0:44.6% L1:53.4% BI: 2.0%
[libx264 @ 0x564504ee7f40] final ratefactor: 25.73
[libx264 @ 0x564504ee7f40] 8x8 transform intra:66.4% inter:91.8%
[libx264 @ 0x564504ee7f40] coded y,uvDC,uvAC intra: 30.5% 41.4% 7.3% inter: 6.3% 10.8% 0.3%
[libx264 @ 0x564504ee7f40] i16 v,h,dc,p: 31% 23%  7% 38%
[libx264 @ 0x564504ee7f40] i8 v,h,dc,ddl,ddr,vr,hd,vl,hu: 34% 16% 23%  3%  5%  6%  4%  5%  3%
[libx264 @ 0x564504ee7f40] i4 v,h,dc,ddl,ddr,vr,hd,vl,hu: 37% 17% 10%  4%  8%  9%  6%  6%  4%
[libx264 @ 0x564504ee7f40] i8c dc,h,v,p: 55% 16% 22%  6%
[libx264 @ 0x564504ee7f40] Weighted P-Frames: Y:2.2% UV:1.1%
[libx264 @ 0x564504ee7f40] ref P L0: 62.5% 12.6% 18.5%  6.3%  0.1%
[libx264 @ 0x564504ee7f40] ref B L0: 90.1%  8.2%  1.7%
[libx264 @ 0x564504ee7f40] ref B L1: 96.5%  3.5%
[libx264 @ 0x564504ee7f40] kb/s:10456.65
[aac @ 0x564504f67ec0] Qavg: 259.313
Here is the command’s breakdown:
-i tears_of_steel_720p.mov: Specifies the input video file.-vf "scale=3840:2160": Sets the scale filter to upscale the video to 4K resolution (3840x2160).-c:v libx264: Uses the libx264 codec to encode the video.-preset medium: Specifies the encoding speed/quality balance (fast is a good balance).-b:v 10M: Sets the target video bitrate to 10 Mbps to maintain quality.
To learn more about the FFmpeg command, you can refer to its official documentation.
Step 5 - Download the Processed Video to Your Local System
Once the video is processed, download it from the droplet to your local machine using scp. Replace <your_droplet_ip> with your droplet’s IP address.
scp root@<your_droplet_ip>:~/tears_of_steel_4k.mov ~/Downloads/
This command copies the 4K scaled video file to your Downloads folder on your local desktop.
Conclusion
DigitalOcean’s GPU Droplets, powered by NVIDIA H100 GPUs, offer a high-performance environment for video editing. With GPU-accelerated scaling and encoding via FFmpeg, you can achieve significant improvements in processing time, enabling real-time adjustments and fast video exports. This setup is ideal for video editors and developers handling high-resolution workloads.
Thanks for learning with the DigitalOcean Community. Check out our offerings for compute, storage, networking, and managed databases.
About the author
I help Businesses scale with AI x SEO x (authentic) Content that revives traffic and keeps leads flowing | 3,000,000+ Average monthly readers on Medium | Sr Technical Writer(Team Lead) @ DigitalOcean | Ex-Cloud Consultant @ AMEX | Ex-Site Reliability Engineer(DevOps)@Nutanix
Still looking for an answer?
This textbox defaults to using Markdown to format your answer.
You can type !ref in this text area to quickly search our full set of tutorials, documentation & marketplace offerings and insert the link!
This does not mentione anything about doing any video editing. Upscaling and rendering video is not part of the video editing process. Video Editing involves some form of UI and selecting cuts and effects and applying them at very specific points using specialised tools. You mention Blender it wasn’t even used and that has nothing to do with video editing. I would have appreciated this article if Premiere Pro or Final Cut were involved in the process.
 This work is licensed under a Creative Commons Attribution-NonCommercial- ShareAlike 4.0 International License.
Become a contributor for community
Get paid to write technical tutorials and select a tech-focused charity to receive a matching donation.

DigitalOcean Documentation
Full documentation for every DigitalOcean product.

Resources for startups and AI-native businesses
The Wave has everything you need to know about building a business, from raising funding to marketing your product.
The developer cloud
Scale up as you grow — whether you're running one virtual machine or ten thousand.

Start building today
From GPU-powered inference and Kubernetes to managed databases and storage, get everything you need to build, scale, and deploy intelligent applications.
