Sr Technical Content Strategist and Team Lead

Introduction
PHP-FPM with NGINX is the standard way to run PHP on Nginx. Nginx has no
built-in PHP module like Apache’s mod_php. Nginx serves static files and
forwards .php requests to PHP-FPM over FastCGI, usually through a Unix socket.
In this tutorial you install PHP-FPM on Ubuntu,
create a dedicated pool, connect Nginx with fastcgi_pass, test the stack, and
troubleshoot 502 errors.
Host PHP sites on a DigitalOcean Droplet and manage DNS in the control panel.
Version note: Commands were checked against Ubuntu 22.04 LTS (Jammy),
24.04 LTS (Noble Numbat), and 26.04 LTS (Resolute Raccoon) with PHP
from the default Ubuntu repositories. Default PHP versions per release:
8.1 on 22.04, 8.3 on 24.04, and 8.5 on 26.04. Confirm your host
with lsb_release -rs and php -v before you edit paths or service names.
Ubuntu LTS version reference
Use this table to swap package names, sockets, and config paths on your server. Default PHP versions come from the Ubuntu archive. See php-fpm on Noble (24.04) and php-fpm on Resolute (26.04).
| Ubuntu | Codename | PHP | FPM package | Service | Socket |
|---|---|---|---|---|---|
| 22.04 | Jammy | 8.1 | php8.1-fpm | php8.1-fpm | /run/php/php8.1-fpm.sock |
| 24.04 | Noble | 8.3 | php8.3-fpm | php8.3-fpm | /run/php/php8.3-fpm.sock |
| 26.04 | Resolute | 8.5 | php8.5-fpm | php8.5-fpm | /run/php/php8.5-fpm.sock |
Pool configs live under /etc/php/<version>/fpm/pool.d/. On 24.04 and 26.04,
sudo apt install php-fpm installs the default metapackage for that release.
The step-by-step examples below use PHP 8.1 on Ubuntu 22.04. Replace 8.1
with 8.3 or 8.5 when you work on 24.04 or 26.04.
Key takeaways
- Nginx does not execute PHP. PHP-FPM runs worker processes and receives requests through FastCGI.
- Install the FPM package for your PHP version:
php8.1-fpmon 22.04,php8.3-fpmon 24.04, orphp8.5-fpmon 26.04. - Point Nginx at the pool socket with
fastcgi_pass unix:/run/php/php8.1-fpm.sock(swap8.1for8.3or8.5as needed) inside alocation ~ \.php$block. - Pool files live in
/etc/php/<version>/fpm/pool.d/. Each[pool_name]section controls user, socket path, and process manager settings. - A 502 Bad Gateway usually means a socket mismatch, stopped PHP-FPM service, or wrong file permissions on the socket.
- Unix sockets work for Nginx and PHP-FPM on the same server. TCP port
9000fits containers or remote FPM hosts. - Separate pools let you run different sites under different Unix users and PHP versions.
Prerequisites
Before you start, confirm you have:
- An Ubuntu 22.04, 24.04, or 26.04 LTS server with SSH access as a sudo-enabled user.
- Nginx installed. On 22.04, follow
How To Install Nginx on Ubuntu 22.04.
On 24.04 or 26.04, run
sudo apt install nginxaftersudo apt update. - PHP installed, or plan to install the LEMP stack. The full 22.04 walkthrough is How To Install Linux, Nginx, MySQL, PHP (LEMP stack) on Ubuntu 22.04. The same package names apply on newer LTS releases when you use the version table above.
What is PHP-FPM?
PHP-FPM (FastCGI Process Manager) is a PHP SAPI that manages a pool of worker processes. A master process listens on a socket or TCP port. Worker processes execute PHP scripts and return output to the web server.
| Role | Responsibility |
|---|---|
| Nginx | Terminates HTTP, serves static files, proxies PHP to FPM |
| PHP-FPM master | Manages workers, listens on socket or port |
| PHP-FPM workers | Run index.php and other scripts |
PHP-FPM vs mod_php
| PHP-FPM + Nginx | mod_php + Apache | |
|---|---|---|
| Architecture | Separate PHP worker processes | PHP inside Apache workers |
| Memory | PHP memory isolated from web server | Shared Apache process memory |
| Typical use | Nginx, high-traffic PHP sites | Legacy Apache stacks |
| Nginx support | Required pattern | Not available |
How PHP-FPM and Nginx work together
- A browser requests
https://example.com/index.php. - Nginx matches
location ~ \.php$and passes the request to PHP-FPM through FastCGI. - PHP-FPM assigns an idle worker or spawns one based on pool settings.
- The worker runs the script and sends the response back to Nginx.
- Nginx returns the response to the client.
For the official Nginx integration notes, see Nginx on Unix systems.
Step 1: Install PHP-FPM
Check your Ubuntu and PHP versions:
lsb_release -rs
php -v
Install the FPM package that matches your release:
| Ubuntu LTS | Install command |
|---|---|
| 22.04 | sudo apt install php8.1-fpm |
| 24.04 | sudo apt install php8.3-fpm |
| 26.04 | sudo apt install php8.5-fpm |
On 24.04 and 26.04 you also have the option to run sudo apt install php-fpm,
which installs the default PHP FPM metapackage for that release.
The 22.04 example continues below:
sudo apt update
sudo apt install php8.1-fpm
Enable and start the service. Swap the service name on 24.04 (php8.3-fpm) or
26.04 (php8.5-fpm):
sudo systemctl enable php8.1-fpm
sudo systemctl start php8.1-fpm
sudo systemctl status php8.1-fpm
You should see active (running). Confirm the default socket:
ls -l /run/php/php8.1-fpm.sock
Expected socket paths by release:
| Ubuntu LTS | Default socket |
|---|---|
| 22.04 | /run/php/php8.1-fpm.sock |
| 24.04 | /run/php/php8.3-fpm.sock |
| 26.04 | /run/php/php8.5-fpm.sock |
Step 2: Configure a PHP-FPM pool
The default pool file is /etc/php/8.1/fpm/pool.d/www.conf on Ubuntu 22.04. On
24.04 use /etc/php/8.3/fpm/pool.d/www.conf. On 26.04 use
/etc/php/8.5/fpm/pool.d/www.conf. For a single site, editing www is enough.
For multiple apps, create one pool per site.
This example creates a pool named wordpress_site under a dedicated user.
Create the user and group:
sudo groupadd wordpress_user
sudo useradd -g wordpress_user -d /var/www/wordpress -s /usr/sbin/nologin wordpress_user
Create the pool file:
sudo nano /etc/php/8.1/fpm/pool.d/wordpress_pool.conf
Add the following configuration. Keep the PHP version consistent in the socket path:
[wordpress_site]
user = wordpress_user
group = wordpress_user
listen = /run/php/php8.1-fpm-wordpress.sock
listen.owner = www-data
listen.group = www-data
listen.mode = 0660

php_admin_value[disable_functions] = exec,passthru,shell_exec,system
php_admin_flag[allow_url_fopen] = off

pm = dynamic
pm.max_children = 20
pm.start_servers = 4
pm.min_spare_servers = 2
pm.max_spare_servers = 8
pm.max_requests = 500
Pool directives explained:
| Directive | Purpose |
|---|---|
[wordpress_site] |
Unique pool name |
user / group |
Unix account for worker processes |
listen |
Socket file Nginx connects to |
listen.owner / listen.group |
Must allow Nginx (www-data) to connect |
pm |
Process manager mode: dynamic, static, or ondemand |
pm.max_children |
Upper limit on concurrent workers |
pm.max_requests |
Recycle workers after N requests |
Reload PHP-FPM after changes. Use the service name for your PHP version:
sudo systemctl reload php8.1-fpm
On 24.04 run sudo systemctl reload php8.3-fpm. On 26.04 run
sudo systemctl reload php8.5-fpm.
Verify the new socket exists:
ls -l /run/php/php8.1-fpm-wordpress.sock
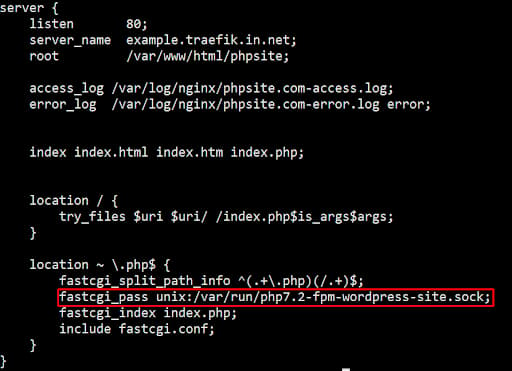
Step 3: Configure Nginx for PHP-FPM
Create or edit a server block in /etc/nginx/sites-available/. Point
fastcgi_pass at the pool socket from Step 2.
server {
    listen 80;
    server_name example.com;
    root /var/www/wordpress;
    index index.php index.html;

    access_log /var/log/nginx/example.com-access.log;
    error_log  /var/log/nginx/example.com-error.log;

    location / {
        try_files $uri $uri/ /index.php?$query_string;
    }

    location ~ \.php$ {
        include snippets/fastcgi-php.conf;
        fastcgi_pass unix:/run/php/php8.1-fpm-wordpress.sock;
    }

    location ~ /\.ht {
        deny all;
    }
}
snippets/fastcgi-php.conf ships with the Ubuntu Nginx package. It sets
fastcgi_split_path_info and SCRIPT_FILENAME using
$document_root$fastcgi_script_name.
Enable the site and test the config:
sudo ln -s /etc/nginx/sites-available/example.com /etc/nginx/sites-enabled/
sudo nginx -t
sudo systemctl reload nginx
Set ownership on the web root so the pool user reads the files:
sudo chown -R wordpress_user:wordpress_user /var/www/wordpress
For Nginx troubleshooting patterns, see Nginx Essentials.
Step 4: Test the PHP-FPM and Nginx setup
Create a test file in the web root:
echo '<?php phpinfo(); ?>' | sudo tee /var/www/wordpress/info.php
Open http://example.com/info.php in a browser. Confirm $_SERVER['USER']
shows wordpress_user, which means Nginx routed the request through your custom
pool.

Delete info.php after testing. phpinfo() exposes server details to anyone
who visits the URL.
sudo rm /var/www/wordpress/info.php
Socket vs TCP for fastcgi_pass
| Method | Example (22.04) | When to use |
|---|---|---|
| Unix socket | unix:/run/php/php8.1-fpm.sock |
Same server |
| TCP | 127.0.0.1:9000 |
Docker, remote FPM, or custom listen |
On 24.04 use unix:/run/php/php8.3-fpm.sock. On 26.04 use
unix:/run/php/php8.5-fpm.sock.
Socket example (default pool):
fastcgi_pass unix:/run/php/php8.1-fpm.sock;
TCP example (set listen = 127.0.0.1:9000 in the pool file first):
fastcgi_pass 127.0.0.1:9000;
Fix 502 Bad Gateway errors
Nginx returns 502 Bad Gateway when PHP-FPM is unreachable or fails to respond. Work through these checks in order.
1. Confirm PHP-FPM is running. On 22.04:
sudo systemctl status php8.1-fpm
On 24.04 check php8.3-fpm. On 26.04 check php8.5-fpm.
2. Match the socket path in Nginx and the pool listen directive. Swap
8.1 for your PHP version:
grep -r fastcgi_pass /etc/nginx/sites-enabled/
grep listen /etc/php/8.1/fpm/pool.d/*.conf
3. Check socket permissions. Nginx runs as www-data and needs read/write
access to the socket:
ls -l /run/php/
4. Read the logs:
sudo tail -f /var/log/nginx/error.log
sudo journalctl -u php8.1-fpm -f
On 24.04 replace the unit with php8.3-fpm. On 26.04 use php8.5-fpm.
5. Raise timeouts if scripts run long. Add inside the location ~ \.php$
block:
fastcgi_read_timeout 300;
Tune PHP-FPM performance
Start with conservative pm values and raise them based on RAM and traffic.
Each PHP worker uses memory. A rough starting point on a 2 GB Droplet:
pm = dynamic
pm.max_children = 10
pm.start_servers = 2
pm.min_spare_servers = 1
pm.max_spare_servers = 4
pm.max_requests = 500
Enable the built-in status page for monitoring. Add to the pool file:
pm.status_path = /fpm-status
Add a matching Nginx location (restrict access to your IP):
location ~ ^/fpm-status$ {
    access_log off;
    allow 127.0.0.1;
    deny all;
    include fastcgi_params;
    fastcgi_pass unix:/run/php/php8.1-fpm.sock;
}
For WordPress on the same stack, follow How To Install WordPress with LEMP on Ubuntu 22.04. The Nginx and PHP-FPM wiring is the same on 24.04 and 26.04 when you use the correct socket path from the version table.
Ubuntu 24.04 and 26.04 LTS notes
Ubuntu 24.04 LTS (Noble) and 26.04 LTS (Resolute) use the same Nginx
layout as 22.04: server blocks in /etc/nginx/sites-available/, the
snippets/fastcgi-php.conf include, and www-data as the Nginx user.
Differences to watch on newer LTS releases:
| Item | 24.04 LTS | 26.04 LTS |
|---|---|---|
| Default PHP | 8.3 | 8.5 |
| FPM package | php8.3-fpm or php-fpm |
php8.5-fpm or php-fpm |
| Pool directory | /etc/php/8.3/fpm/pool.d/ |
/etc/php/8.5/fpm/pool.d/ |
| Default socket | /run/php/php8.3-fpm.sock |
/run/php/php8.5-fpm.sock |
DigitalOcean LEMP tutorials currently target Ubuntu 22.04. The install and
config steps in this guide apply to 24.04 and 26.04 when you substitute package
names, service units, and socket paths from the version table. I have not
re-tested every command on a fresh 26.04 image in this refresh, so run
php -v and ls -l /run/php/ on your Droplet to confirm paths before you
go live.
FAQs
1. Does NGINX use PHP-FPM?
Yes. Nginx has no embedded PHP engine. For .php files, Nginx forwards the
request to PHP-FPM through FastCGI. You wire the connection with fastcgi_pass
in a location ~ \.php$ block.
2. How do you install NGINX and PHP-FPM on Ubuntu?
Install Nginx, then the FPM package for your LTS release:
| Ubuntu LTS | Commands |
|---|---|
| 22.04 | sudo apt install nginx php8.1-fpm |
| 24.04 | sudo apt install nginx php8.3-fpm |
| 26.04 | sudo apt install nginx php8.5-fpm |
Enable both services (example for 22.04):
sudo apt update
sudo systemctl enable --now nginx php8.1-fpm
Add a server block with fastcgi_pass pointing at the socket for your PHP
version. The full LEMP walkthrough for 22.04 is in
How To Install Linux, Nginx, MySQL, PHP (LEMP stack) on Ubuntu 22.04.
3. What does PHP-FPM do?
PHP-FPM is a process manager for PHP. A master process controls worker processes that execute scripts. Pools define sockets, users, and scaling rules. PHP-FPM is the required PHP handler when you use Nginx.
4. What causes a 502 error with PHP-FPM?
A 502 means Nginx could not get a valid response from PHP-FPM. Common causes
include a stopped PHP-FPM service (php8.1-fpm, php8.3-fpm, or
php8.5-fpm), a wrong socket path in fastcgi_pass, socket permission errors,
or PHP crashes in the worker. Check /var/log/nginx/error.log and
journalctl -u php8.1-fpm (swap the unit name for your PHP version).
5. Is PHP-FPM necessary with NGINX?
Yes, if you want Nginx to run PHP. Without PHP-FPM (or another FastCGI PHP handler), Nginx serves only static files. PHP-FPM also separates PHP memory from the web server process, which is why most production Nginx stacks use it instead of older CGI methods.
Conclusion
You installed PHP-FPM, created a custom pool, connected Nginx with
fastcgi_pass, and learned how to test the stack and fix 502 errors. Separate
pools give you per-site users, sockets, and worker limits.
For multiple PHP versions on one host, see multiple PHP versions on Ubuntu. For HTTPS, follow How To Secure Nginx with Let’s Encrypt on Ubuntu 22.04.
What’s next
Keep building with these PHP tutorials and Nginx tutorials:
- How To Install Linux, Nginx, MySQL, PHP (LEMP stack) on Ubuntu 22.04 (swap PHP package names per the version table on 24.04 or 26.04)
- How To Install WordPress with LEMP on Ubuntu 22.04
- How To Install PHP 8.1 on Ubuntu 22.04
- Nginx Essentials: Installation and Configuration Troubleshooting
- Initial Server Setup with Ubuntu
Deploy from GitHub with DigitalOcean App Platform or run the full stack on a Droplet. Choose an Ubuntu 26.04 LTS image when you create the VM if you want the newest LTS with PHP 8.5 in the default repositories.
Thanks for learning with the DigitalOcean Community. Check out our offerings for compute, storage, networking, and managed databases.
About the author
Anish is a Sr Technical Content Strategist and Team Lead at DigitalOcean with 7+ years of experience as an DevOps SRE at Nutanix and Cloud consultant at AMEX, and technical writing at DOCN, and shipping deep infra and AI inference tutorials that help developers deploy production‑ready applications on DigitalOcean.
Still looking for an answer?
Thank you for your tutorial. I am plan to install Nginx server separately with PHP server. Meaning Nginx in one server and PHP is in another server…And the NGINX server will located at DMZ zone and will face the internet. My question is: 1) Which server we need to install PHP-FPM? In Nginx server or in php server? 2) And how these two server will communicate? Which confuguration files need to alter? Sorry if my question is sound silly :). I am new to php-fpm and still in the midst of understanding it. Thank you.
- Paklah
when ever i m trying to execute php file from browser it gets download
- aditya
I have deployed a web app to AWS and php-fpm is occupied most of the CPU cores. sometimes it makes the server crash. Can there be something wrong with the configuration?
- vishal
Please add - if necessary: $ cd /project/path $ sudo chwon -R wordpress_user:wordpress_user . Because without that PHP-FPM can’t access to the files ;/
- Piotr
 This work is licensed under a Creative Commons Attribution-NonCommercial- ShareAlike 4.0 International License.
Become a contributor for community
Get paid to write technical tutorials and select a tech-focused charity to receive a matching donation.

DigitalOcean Documentation
Full documentation for every DigitalOcean product.

Resources for startups and AI-native businesses
The Wave has everything you need to know about building a business, from raising funding to marketing your product.
The developer cloud
Scale up as you grow — whether you're running one virtual machine or ten thousand.

Start building today
From GPU-powered inference and Kubernetes to managed databases and storage, get everything you need to build, scale, and deploy intelligent applications.
