
Spring Controller annotation is a specialization of @Component annotation. Spring Controller annotation is typically used in combination with annotated handler methods based on the RequestMapping annotation.
Spring Controller
Spring Controller annotation can be applied on classes only. It’s used to mark a class as a web request handler. It’s mostly used with Spring MVC application.
Spring RestController
Spring @RestController is a convenience annotation that is itself annotated with @Controller and @ResponseBody. This annotation is used to mark a class as request handler for RESTful web services.
Spring Controller Example
Let’s create a simple spring application where we will implement standard MVC controller as well as REST controller. Create a “Dynamic Web Project” in Eclipse and then convert it to Maven project. This will provide us with maven based web application structure and we can build our application on top of it. Below image shows the final project structure of our Spring MVC Controller application. 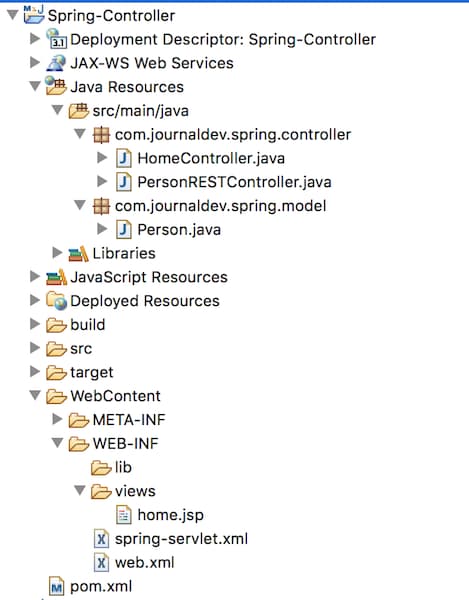 We would need following dependencies for our application.
<dependency>
	<groupId>org.springframework</groupId>
	<artifactId>spring-webmvc</artifactId>
	<version>5.0.7.RELEASE</version>
</dependency>
<dependency>
	<groupId>org.springframework</groupId>
	<artifactId>spring-web</artifactId>
	<version>5.0.7.RELEASE</version>
</dependency>

<!-- Jackson for REST -->
<dependency>
	<groupId>com.fasterxml.jackson.core</groupId>
	<artifactId>jackson-databind</artifactId>
	<version>2.9.6</version>
</dependency>
Let’s look at the deployment descriptor (web.xml) where we will configure DispatcherServlet servlet as the front controller.
<?xml version="1.0" encoding="UTF-8"?>
<web-app xmlns:xsi="https://www.w3.org/2001/XMLSchema-instance" xmlns="https://xmlns.jcp.org/xml/ns/javaee"
 xsi:schemaLocation="https://xmlns.jcp.org/xml/ns/javaee https://xmlns.jcp.org/xml/ns/javaee/web-app_3_1.xsd" id="WebApp_ID" version="3.1">
  <display-name>Spring-Controller</display-name>
  <!-- Add Spring MVC DispatcherServlet as front controller -->
	<servlet>
        <servlet-name>spring</servlet-name>
        <servlet-class>
                org.springframework.web.servlet.DispatcherServlet
        </servlet-class>
        <init-param>
       		<param-name>contextConfigLocation</param-name>
       		<param-value>/WEB-INF/spring-servlet.xml</param-value>
    		</init-param>
        <load-on-startup>1</load-on-startup>
    </servlet>

    <servlet-mapping>
        <servlet-name>spring</servlet-name>
        <url-pattern>/</url-pattern>
    </servlet-mapping>
</web-app>
Finally, we have following spring context file. Here we are configuring our application to be annotation-based and providing root package for scanning spring components. We are also configuring InternalResourceViewResolver bean and providing details of view pages.
<?xml version="1.0" encoding="UTF-8"?>
<beans:beans xmlns="https://www.springframework.org/schema/mvc"
	xmlns:xsi="https://www.w3.org/2001/XMLSchema-instance" xmlns:beans="https://www.springframework.org/schema/beans"
	xmlns:context="https://www.springframework.org/schema/context"
	xsi:schemaLocation="https://www.springframework.org/schema/mvc https://www.springframework.org/schema/mvc/spring-mvc.xsd
		https://www.springframework.org/schema/beans https://www.springframework.org/schema/beans/spring-beans.xsd
		https://www.springframework.org/schema/context https://www.springframework.org/schema/context/spring-context.xsd">

	<!-- Enables the Spring MVC @Controller programming model -->
	<annotation-driven />

	<context:component-scan base-package="com.journaldev.spring" />

	<!-- Resolves views selected for rendering by @Controllers to JSP resources
		in the /WEB-INF/views directory -->
	<beans:bean
		class="org.springframework.web.servlet.view.InternalResourceViewResolver">
		<beans:property name="prefix" value="/WEB-INF/views/" />
		<beans:property name="suffix" value=".jsp" />
	</beans:bean>

</beans:beans>
Our configuration XML files are ready, let’s move on to the Controller class now.
package com.journaldev.spring.controller;

import java.text.DateFormat;
import java.util.Date;
import java.util.Locale;

import org.springframework.stereotype.Controller;
import org.springframework.ui.Model;
import org.springframework.web.bind.annotation.GetMapping;

@Controller
public class HomeController {

	@GetMapping("/hello")
	public String home(Locale locale, Model model) {
		Date date = new Date();
		DateFormat dateFormat = DateFormat.getDateTimeInstance(DateFormat.LONG, DateFormat.LONG, locale);
		String formattedDate = dateFormat.format(date);
		model.addAttribute("serverTime", formattedDate);
		return "home";
	}

}
We have defined a single request handler method, it’s accepting GET requests with URI “/hello” and returning “home.jsp” page as the response. Notice that we are setting an attribute to the model, which will be used in the home.jsp page. Here is our simple home.jsp page code.
<%@ page language="java" contentType="text/html; charset=UTF-8"
	pageEncoding="UTF-8"%>
<html>
<head>
<title>Home</title>
</head>
<body>
	<h1>Hello world!</h1>

	<p>The time on the server is ${serverTime}.</p>

</body>
</html>
Spring MVC Controller Test
Our conventional servlet based Spring MVC application with a simple controller is ready, just export it as the WAR file and deploy on Tomcat or any other servlet container. Then go to URL https://localhost:8080/Spring-Controller/hello and you should see the following screen as output. 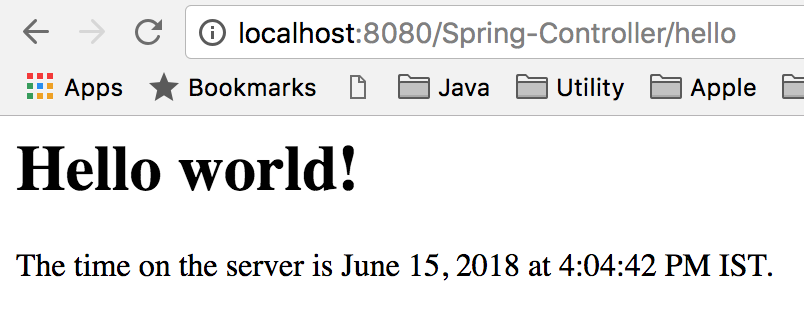
Spring RestController Example
Now let’s extend our application to expose REST APIs too. Create a model class that will be sent as JSON response.
package com.journaldev.spring.model;

public class Person {

	private String name;

	public String getName() {
		return name;
	}

	public void setName(String name) {
		this.name = name;
	}

}
Here is our simple REST Controller class.
package com.journaldev.spring.controller;

import org.springframework.web.bind.annotation.RequestMapping;
import org.springframework.web.bind.annotation.RequestParam;
import org.springframework.web.bind.annotation.RestController;

import com.journaldev.spring.model.Person;

@RestController
public class PersonRESTController {

	@RequestMapping("/rest")
	public String healthCheck() {
		return "OK";
	}

	@RequestMapping("/rest/person/get")
	public Person getPerson(@RequestParam(name = "name", required = false, defaultValue = "Unknown") String name) {
		Person person = new Person();
		person.setName(name);
		return person;
	}

}
Redeploy the application again to test our REST APIs.
Spring REST Controller Test
Go to URL https://localhost:8080/Spring-Controller/rest and you should get following output. 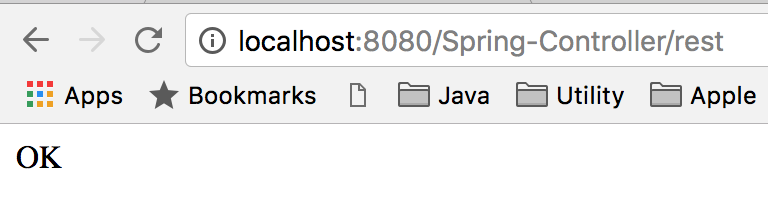 Go to URL
 https://localhost:8080/Spring-Controller/rest/person/get and you will get following JSON response: 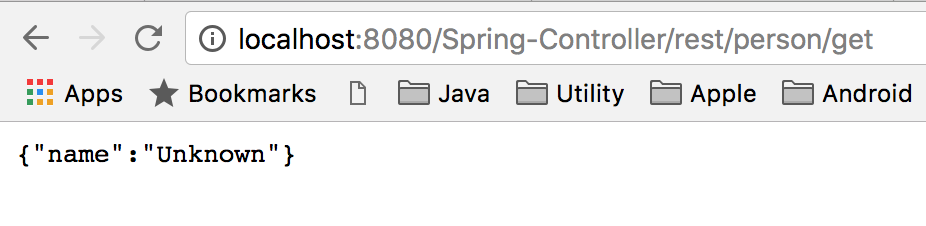 Now let’s provide the name parameter value in the URL, go to
 https://localhost:8080/Spring-Controller/rest/person/get?name=Pankaj and you will get following JSON response. 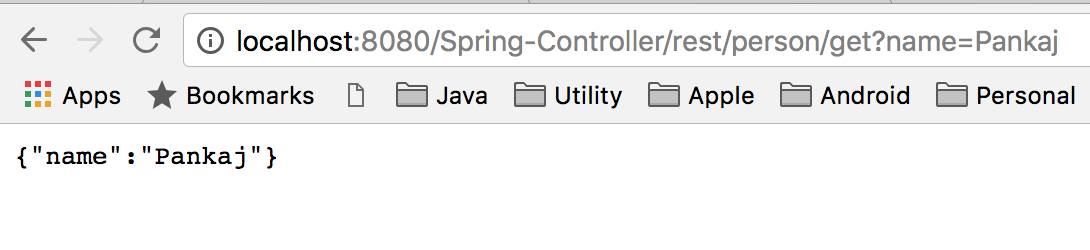
Summary
Spring Controller is the backbone of Spring MVC applications. This is where our business logic starts. Furthermore, RestController helps us in creating rest based web services easily.
You can download the example project code from our GitHub Repository.
Thanks for learning with the DigitalOcean Community. Check out our offerings for compute, storage, networking, and managed databases.
About the author
Java and Python Developer for 20+ years, Open Source Enthusiast, Founder of https://www.askpython.com/, https://www.linuxfordevices.com/, and JournalDev.com (acquired by DigitalOcean). Passionate about writing technical articles and sharing knowledge with others. Love Java, Python, Unix and related technologies. Follow my X @PankajWebDev
Still looking for an answer?
I would like to note that putting “get” in your route endpoint isn’t very RESTful. In REST, the verb is expected to be the HTTP action. In that sense, your endpoint would just be “rest/people”.
- Patrick
 This work is licensed under a Creative Commons Attribution-NonCommercial- ShareAlike 4.0 International License.
Become a contributor for community
Get paid to write technical tutorials and select a tech-focused charity to receive a matching donation.

DigitalOcean Documentation
Full documentation for every DigitalOcean product.

Resources for startups and AI-native businesses
The Wave has everything you need to know about building a business, from raising funding to marketing your product.
The developer cloud
Scale up as you grow — whether you're running one virtual machine or ten thousand.

Start building today
From GPU-powered inference and Kubernetes to managed databases and storage, get everything you need to build, scale, and deploy intelligent applications.
