By Pankaj Kumar and Manikandan Kurup

What is Telnet?
Telnet (Teletype Network) is an early network protocol used for accessing and managing remote computers or network devices via a command-line interface. It operates on a client-server model, establishing a virtual terminal connection over TCP/IP, typically on port 23. Users can send commands to the remote server and receive text-based output.
Let’s take a look at Telnet command usage.
Disclaimer
- Telnet is not a secure protocol and is thus NOT RECOMMENDED!. This is because data sent over the protocol is unencrypted and can be intercepted by hackers.
- Instead of using telnet, SSH is a more preferred protocol to use as it is encrypted and more secure.
Let’s see how you can install and use Telnet.
Installing Telnet
In this section, we will walk you through the process of installing telnet in RPM and DEB systems.
Installing Telnet in CentOS/RHEL-based distros
To begin the installation process on CentOS 7/RHEL 7, run the command:
- yum install telnet telnet-server -y
For systems using DNF (like newer Fedora, RHEL 8+, CentOS Stream 8+), run the following:
- dnf install telnet telnet-server -y
Output:

Next, start and enable the telnet service by issuing the command below:
- systemctl start telnet.socket
- systemctl enable telnet.socket
Output:

Next, allow port 23 which is the native port that telnet uses on the firewall.
- firewall-cmd --permanent --add-port=23/tcp
Finally, reload the firewall for the rule to take effect.
- firewall-cmd --reload
Output:

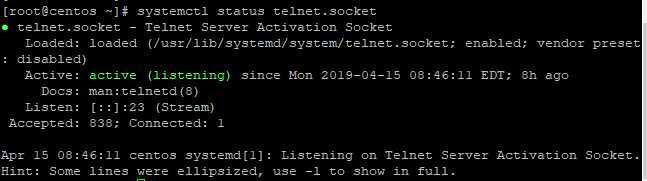
To verify the status of telnet, run:
- systemctl status telnet.socket
Output:
Telnet is now ready for use. Next, we are going to create a login user.
Creating a Login User
In this example, we will create a login user for logging in using telnet.
- adduser telnetuser
Create a password for the user.
- passwd telnetuser
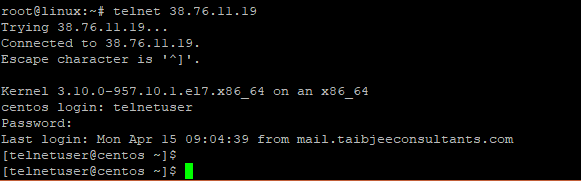
Specify the password and confirm. To use the telnet command to log in to a server, use the following syntax:
- telnet [hostname/IP] [port]
[hostname/IP] is a required argument that specifies the remote device or server you want to connect to. For hostname, you can use the human-readable name of the remote system (e.g., myserver.example.com, router1). Your system will use DNS (Domain Name System) to resolve this hostname to an IP address. Alternatively, you can directly use the IP address of the remote system (e.g., 192.168.1.100, 203.0.113.45). This bypasses the DNS lookup.
[port] is an optional argument that specifies the network port number on the remote host to which the Telnet client should attempt to connect. Each service on a server (like Telnet, HTTP, FTP) listens on a specific port. If you omit the [port] argument, the Telnet client will default to port 23, which is the standard, well-known port for the Telnet protocol itself (i.e., connecting to a Telnet server). You would specify a different port if you’re using Telnet to test connectivity to another service.
For example:
- telnet 38.76.11.19
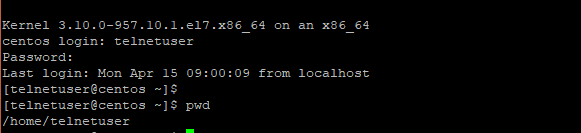
In the console, specify the username and password.
To login using PuTTy, enter the server’s IP address and click on the ‘Telnet’ radio button as shown.
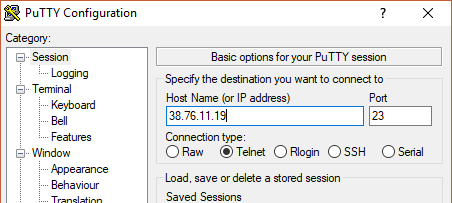
Finally, click on the ‘Open’ button. On the console screen, provide the username and password of the user.
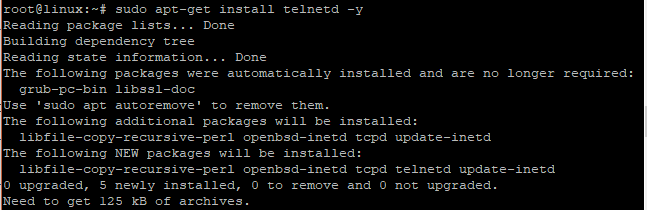
Installing Telnet in Ubuntu
To install Telnet in Ubuntu, use the following command:
- sudo apt install telnetd -y
Output:
To check whether telnet service is running, execute the command:
- systemctl status inetd
Output:

Next, we need to open port 23 in ufw firewall.
- ufw allow 23/tcp
Output:

Finally, reload the firewall to effect the changes.
- ufw reload

Telnet has been successfully installed and ready for use. Like in the previous example in CentOS 7, you need to create a login user and log in using the same syntax.
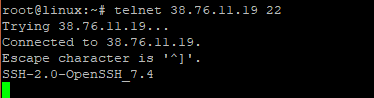
Using Telnet to Check for Open Ports
Telnet can also be used to check if a specific port is open on a server. To do so, use the syntax below.
- telnet server-IP port
For example, to check if port 22 is open on a server, run
- telnet 38.76.11.19 22
Output:
Telnet Use Cases
Here are some of the practical use cases of Telnet:
-
Testing Mail Server (SMTP Port 25): You can use Telnet to manually connect to a mail server on port 25 (the standard SMTP port) and issue SMTP commands directly. This allows you to verify if the mail server is listening and responding, check the server’s greeting banner, and manually step through an email sending process (e.g.,
EHLO,MAIL FROM:,RCPT TO:,DATA) to diagnose issues with email delivery or server configuration. A limitation, however, is that you need to know SMTP commands. It’s also insecure, so you wouldn’t typically send actual sensitive emails this way, but it’s great for checking server responsiveness and basic command support. -
Testing Database or Web Server Connectivity:
-
Web Server (HTTP/HTTPS Ports 80/443): You can Telnet to a web server on port 80 (HTTP) to see if it’s listening. You can even manually type an HTTP
GETrequest to retrieve a webpage’s raw HTML. For example, you can typetelnet www.example.com 80and then typeGET / HTTP/1.1and press Enter twice (once after the command, and again on an empty line) to see the content. For HTTPS (port 443), Telnet can only tell you if the port is open, as the subsequent communication is encrypted and Telnet won’t understand it. -
Database Server (various ports, e.g., MySQL 3306, PostgreSQL 5432): Telnet can check if a database server is listening on its designated port. However, you generally can’t interact meaningfully with the database protocol itself using Telnet beyond verifying the initial connection, as database protocols are complex and often binary. It is primarily for checking if a service is up and accepting connections on a specific port, which is useful for network troubleshooting or verifying firewall rules.
-
-
Debugging Custom Applications: If you’re developing a custom network application that listens on a specific TCP port and communicates using a simple text-based protocol, Telnet can be an invaluable debugging tool. You can act as a client, send custom commands, and observe the raw responses from your application as it allows direct, unadulterated interaction with your application’s network interface.
Telnet Deprecation and Modern Security Concerns
While the Telnet client is still available on many systems (and can be useful for the testing scenarios above), Telnet servers are heavily deprecated and strongly discouraged. Most modern operating systems do not enable Telnet servers by default, and many have removed them entirely from default installations.
-
No Encryption (Fatal Flaw): Telnet transmits all data, including usernames, passwords, commands, and session content, in plain text. This means anyone can “sniff” or monitor network traffic between the client and server and easily intercept and read this sensitive information. This makes it trivial for attackers to steal credentials and gain unauthorized access.
-
Vulnerability to Eavesdropping and Session Hijacking: Because of the lack of encryption, active sessions are susceptible to eavesdropping. Attackers can monitor the entire interaction. It’s also possible for attackers to hijack an active Telnet session.
-
Susceptibility to Man-in-the-Middle (MitM) Attacks: An attacker can position themselves between the Telnet client and server, intercepting, reading, and even modifying the communication without either party realizing it. They could inject malicious commands or capture data.
-
Weak Authentication: Telnet typically relies only on username and password authentication, which, as mentioned, is transmitted insecurely. It lacks support for stronger authentication methods commonly found in modern protocols (like public key cryptography used in SSH).
-
Compliance and Security Policy Violations: Using Telnet for administrative access or handling any sensitive data would violate most modern cybersecurity best practices, organizational security policies, and regulatory compliance standards (e.g., PCI DSS, HIPAA, GDPR).
-
Availability of Secure Alternatives: SSH (Secure Shell) has become the de facto standard for secure remote command-line access. SSH provides strong encryption for the entire session, robust authentication mechanisms, and data integrity, addressing all the major security shortcomings of Telnet.
Telnet Alternatives
While Telnet once served as a go-to tool for remote access and network testing, its security flaws have led to its deprecation for most uses. Fortunately, a suite of powerful and secure alternatives has risen to prominence, each offering specialized capabilities for modern network interactions. Let’s explore some of the leading replacements: SSH, netcat (nc), and cURL.
SSH
When it comes to securely logging into and managing remote systems, SSH (Secure Shell) is the top choice and the direct successor to Telnet’s administrative functions. Unlike Telnet, which transmits all data, including sensitive credentials, in plain text, SSH encrypts the entire communication channel. This robust encryption protects against eavesdropping and man-in-the-middle attacks, making it the industry standard for remote command-line access, secure file transfers (via SCP or SFTP), and even tunneling other network traffic securely. If your goal is to administer a remote server, SSH isn’t just an alternative; it’s the essential tool.
Netcat (nc)
For tasks involving network exploration, debugging, and raw data transfer, netcat (or nc) offers a level of versatility that Telnet can’t match. Netcat can read from and write to network connections using both TCP and UDP protocols, a step up from Telnet’s TCP-only limitation. It excels at quickly checking port connectivity (often with more informative output than Telnet), acting as a simple server for testing purposes, transferring files, or even being scripted for more complex network interactions. Its flexibility makes it an essential tool for network administrators and developers needing to perform low-level network diagnostics or data manipulation.
cURL
When your focus shifts to interacting with web servers, APIs, or any resource identified by a URL, cURL (Client URL) is the command-line tool of choice. While one might use Telnet to manually issue HTTP commands to a web server on port 80, cURL is purpose-built for such tasks and vastly more capable. It natively supports a multitude of protocols including HTTP, HTTPS, FTP, and SFTP, seamlessly handling complexities like SSL/TLS certificates, redirects, cookies, and various authentication methods. Whether you need to download a file, test an API endpoint by sending GET or POST requests, or inspect HTTP headers, cURL provides the power and precision required for efficient web-based data transfer and debugging.
FAQs
1. What is the Telnet command used for in Linux?
The telnet command in Linux is primarily used to connect to remote servers or devices using the Telnet protocol (typically on port 23). Earlier, it was used for remote login and command-line access. Nowadays, due to its lack of security, it’s discouraged for remote login. However, the Telnet client is still sometimes used as a basic tool to test if a specific TCP port is open and listening on a remote (or local) host.
2. How do I install Telnet on Linux?
The installation command depends on your Linux distribution:
-
If you’re using Debian/Ubuntu and derivatives, use the following command:
- sudo apt update && sudo apt install telnet
-
If you’re on RHEL, CentOS, Fedora, and derivatives, use:
- sudo dnf install telnet
-
If you’re installing on older RHEL/CentOS versions, like CentOS 7, you can use:
- sudo yum install telnet
3. Can Telnet be used to test a port?
Yes, Telnet can be used to test if a TCP port is open on a host. You can do this by typing:
- telnet [hostname/IP_address] [port_number]
If the screen goes blank or you see a banner from the service, the port is likely open and a connection was established. If you get a "Connection refused" or similar error, the port is likely closed or no service is listening on it.
4. How do I exit a Telnet session?
To exit a Telnet session and return to your local command prompt:
- Press
Ctrl+]. This should take you to thetelnet>prompt. - Type
quit(orclose) and press Enter. If you are logged into a remote system via Telnet, typingexitorlogoutat the remote system’s prompt will usually close the connection as well.
5. What are alternatives to Telnet in Linux?
Due to Telnet’s security vulnerabilities (it transmits data in plain text, including passwords), several more secure and versatile alternatives are preferred:
ssh(Secure Shell): The standard for secure remote command-line login and administration. It encrypts all traffic.nc(Netcat): A powerful networking utility for testing TCP/UDP port connectivity, sending/receiving data, and port scanning. It’s more flexible than Telnet for port testing.curl: A command-line tool for transferring data with URLs, excellent for testing HTTP/HTTPS and other web-based services.nmap: A comprehensive network scanning tool that can identify open ports, services, and operating systems.openssl s_client: Useful for testing SSL/TLS connections to a specific port.
Conclusion
This educational guide explains the Telnet protocol, a tool originally for remote command-line access, and covers its installation on Linux systems. While the article demonstrates Telnet’s utility for basic network connectivity tests like checking open ports, we STRONGLY DISCOURAGE its general use due to severe security risks stemming from its lack of data encryption. It thoroughly details these vulnerabilities and strongly advocates for secure, modern alternatives such as SSH for remote administration, alongside other tools like nc and curl for specific network tasks, positioning Telnet primarily as a legacy protocol with very limited and cautious application today.
To learn more about accessing and managing remote computers or network devices, check out the following articles:
Thanks for learning with the DigitalOcean Community. Check out our offerings for compute, storage, networking, and managed databases.
About the author(s)
Java and Python Developer for 20+ years, Open Source Enthusiast, Founder of https://www.askpython.com/, https://www.linuxfordevices.com/, and JournalDev.com (acquired by DigitalOcean). Passionate about writing technical articles and sharing knowledge with others. Love Java, Python, Unix and related technologies. Follow my X @PankajWebDev
With over 6 years of experience in tech publishing, Mani has edited and published more than 75 books covering a wide range of data science topics. Known for his strong attention to detail and technical knowledge, Mani specializes in creating clear, concise, and easy-to-understand content tailored for developers.
Still looking for an answer?
why we use TELNET then??instead of using SSH where we can use TELNET?? i want to know plz help me…
- rishav
a very simple, yet complete/easy to understand/easy to use guide about telnet. thanks!
- David Zambrano
 This work is licensed under a Creative Commons Attribution-NonCommercial- ShareAlike 4.0 International License.
Become a contributor for community
Get paid to write technical tutorials and select a tech-focused charity to receive a matching donation.

DigitalOcean Documentation
Full documentation for every DigitalOcean product.

Resources for startups and AI-native businesses
The Wave has everything you need to know about building a business, from raising funding to marketing your product.
The developer cloud
Scale up as you grow — whether you're running one virtual machine or ten thousand.

Start building today
From GPU-powered inference and Kubernetes to managed databases and storage, get everything you need to build, scale, and deploy intelligent applications.
