
The author selected No Kid Hungry to receive a donation as part of the Write for DOnations program.
Introduction
NestJS is a powerful framework for building efficient, scalable Node.js server-side applications Reference. Guards are one of the important features of NestJS, as they allow you to enforce various types of authorization and authentication in your application. They allow you to set up and enforce specific rules to limit users that can access certain routes in the application. With guard implementation, you can be sure that only authorized users are able to access routes that cannot be publicly accessed. This helps to prevent unauthorized user access and also protects against potential attacks such as data breaches.
In this tutorial, you will take a deep dive into understanding what Guards are, how they work, and how you can use them effectively in your application. First, you will be implementing an AuthGuard and understanding how it works in protecting endpoints from unauthorized access.
Secondly, you will explore how to bind guards at different scoped levels (global, controller, and method level), which will allow you to implement granular authentication checks. Next, you will learn how to use multiple guards and skip authentication checks for specific endpoints to make them publicly accessible without the need for authorization.
At the end of this guide, you will have a thorough understanding of how to implement Guards in NestJS applications effectively and build secured and scalable applications that are protected from unauthorized access.
Prerequisites
To follow this tutorial, you will need:
- To install Node.js (version >= 12) on your operating system. You can follow How to Install Node.js and Create a Local Development Environment.
- A Code Editor and API Testing Tool like VSCode and PostMan Respectively.
- To be familiarized with NestJS basics. See Getting Started with NestJS.
Step 1 - Installing NestJS and Setting up Project Directory
The name of the project folder that will be created will be called guard. The NestJS application will be bootstrapped from the Nest CLI using the command:
nest new guard
This will bootstrap the NestJS application and provide the necessary files that are needed for the implementation of guards in NestJS. You will see the following output in your CLI once your application has been created:
🚀  Successfully created project guard
👉  Get started with the following commands:
$ cd guard
$ yarn run start
Once the installation is complete, change your directory to the new directory folder(guard) that you have just created using the command.
cd guard
Then start the application with:
yarn start:dev
This will start the development server at port 3000, and you will see an output like below in your terminal:
OutputFile change detected. Starting incremental compilation...

 Found 0 errors. Watching for file changes.

[Nest] 48025  - 05/14/2023, 9:13:33 AM     LOG [NestFactory] Starting Nest application...
[Nest] 48025  - 05/14/2023, 9:13:33 AM     LOG [InstanceLoader] AppModule dependencies initialized +34ms
[Nest] 48025  - 05/14/2023, 9:13:33 AM     LOG [RoutesResolver] AppController {/}: +5ms
[Nest] 48025  - 05/14/2023, 9:13:33 AM     LOG [RouterExplorer] Mapped {/, GET} route +4ms
[Nest] 48025  - 05/14/2023, 9:13:33 AM     LOG [RouterExplorer] Mapped {/test, GET} route +0ms
[Nest] 48025  - 05/14/2023, 9:13:33 AM     LOG [RouterExplorer] Mapped {/public, GET} route +1ms
[Nest] 48025  - 05/14/2023, 9:13:33 AM     LOG [NestApplication] Nest application successfully started +4ms
Once the application is up and running at port 3000, go to your postman and request the URL http://localhost:3000 and you’ll see the page successfully loaded as shown below:

After the bootstrapping of the project, open the project folder in your favorite code editor and create a new folder under the src folder called guards. Then, create a file inside the guard’s folder called auth.guard.ts. The implementation of the AuthGuard will be done inside this auth.guard.ts file.

Next, you will create an AuthGuard that will protect the routes in the application.
Step 2 - Implementation of Authentication Guard
To start the auth guard implementation, the canActivate interface will be implemented. Every guard created in NestJS must implement the canActivate function. The canActivate function usually returns a boolean, i.e. it specifies if the current request being sent by the user to an endpoint should go through or not. The returned boolean value (whether true or false) is what NestJS uses to control the next action i.e:
- if the return value is false, the request will be denied and an unauthorized error will be thrown
- if the return value is true, the request will be processed and the user have access to the endpoint.
The below code block shows the implementation of the AuthGuard in the auth.guard.ts file created earlier:
import { CanActivate, ExecutionContext, Injectable } from '@nestjs/common';
import { Observable } from 'rxjs';

@Injectable()
export class AuthGuard implements CanActivate {
  canActivate(
    context: ExecutionContext,
  ): boolean | Promise<boolean> | Observable<boolean> {
    const request = context.switchToHttp().getRequest();
    const apiKey = request.headers;
    if (apiKey && apiKey.api_key === 'MY_API_KEY') {
      return true;
    }
    return false;
  }
}
Here is a simple AuthGuard that implements an authorization guard which allows the request to a route handler or endpoint to be processed if the user has a valid api_key. The ExecutionContext interface has access to the request object through the switchToHttp().getRequest() method. The headers needed to perform the guard authentication can be accessed from this request object. The request object is retrieved from the context params, and then a variable named apiKey is used to store the request.headers value that the user is passing when making the request. Suppose the apiKey value is present in the request headers, and it is equal to MY_API_KEY, which represents the secret api_key value to access that route. In that case, the request should proceed, if the user inputs another value apart from our secret api_key the request should not be processed and an unauthorized error should be thrown as explained earlier.
To make the guard protect the routes in the app.controller.ts file, import the AuthGuard function and bind it to the scope of the controller using the @UseGuards decorator as shown below:
@Controller()
@UseGuards(AuthGuard)
export class AppController {
  constructor(private readonly appService: AppService) {}
  @Get()
  getHello(): string {
    return this.appService.getHello();
  }

  @Get('test')
  test(): string {
    return 'This is a Test Route';
  }
}
Let’s test this out by requesting PostMan:
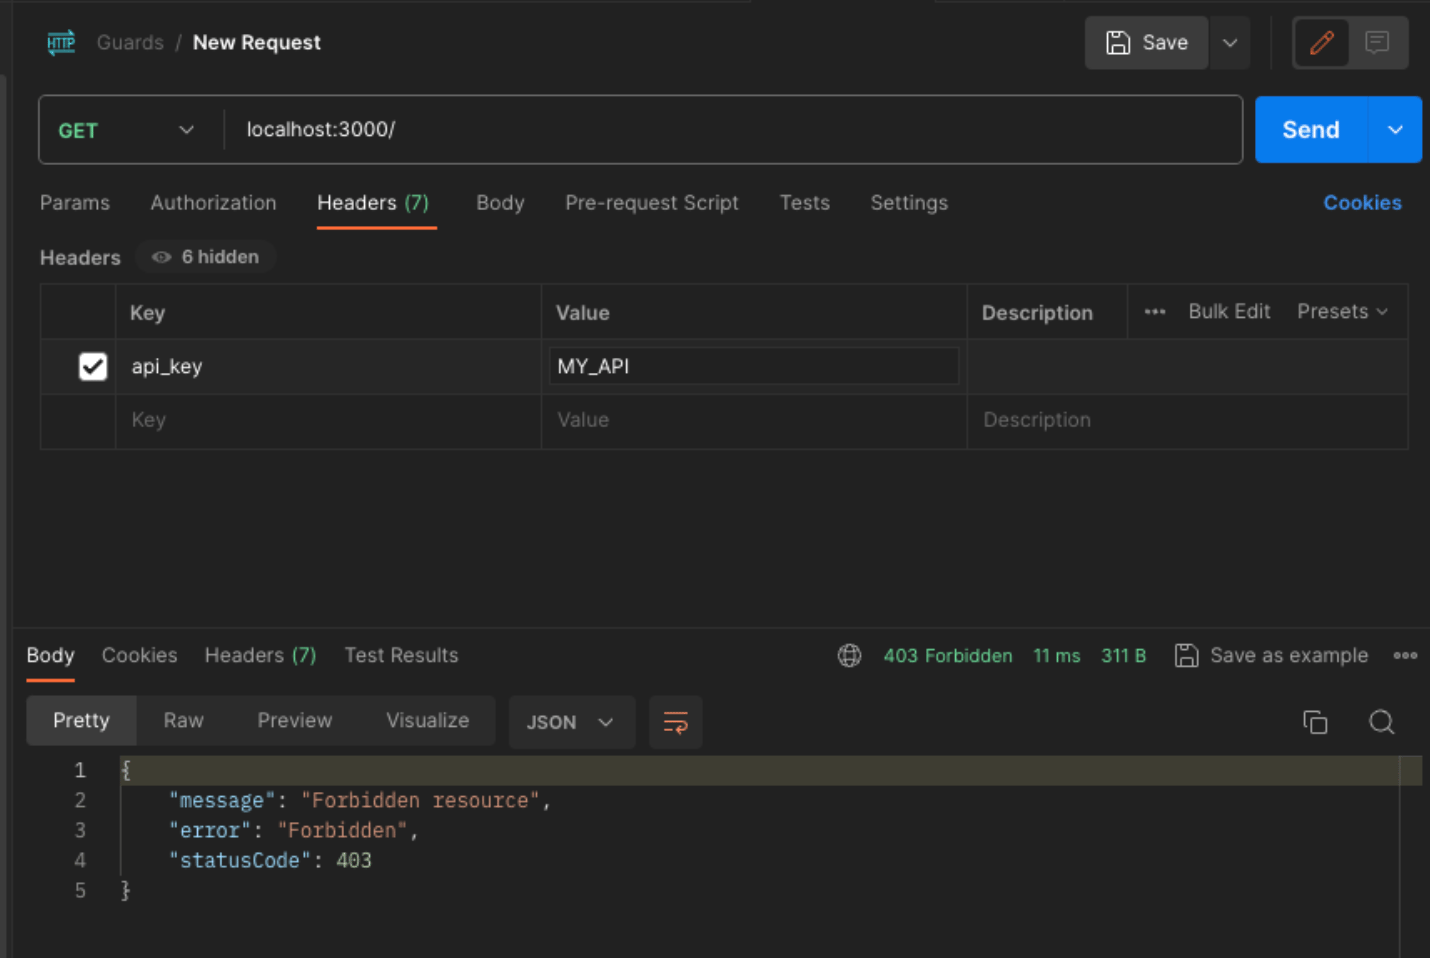

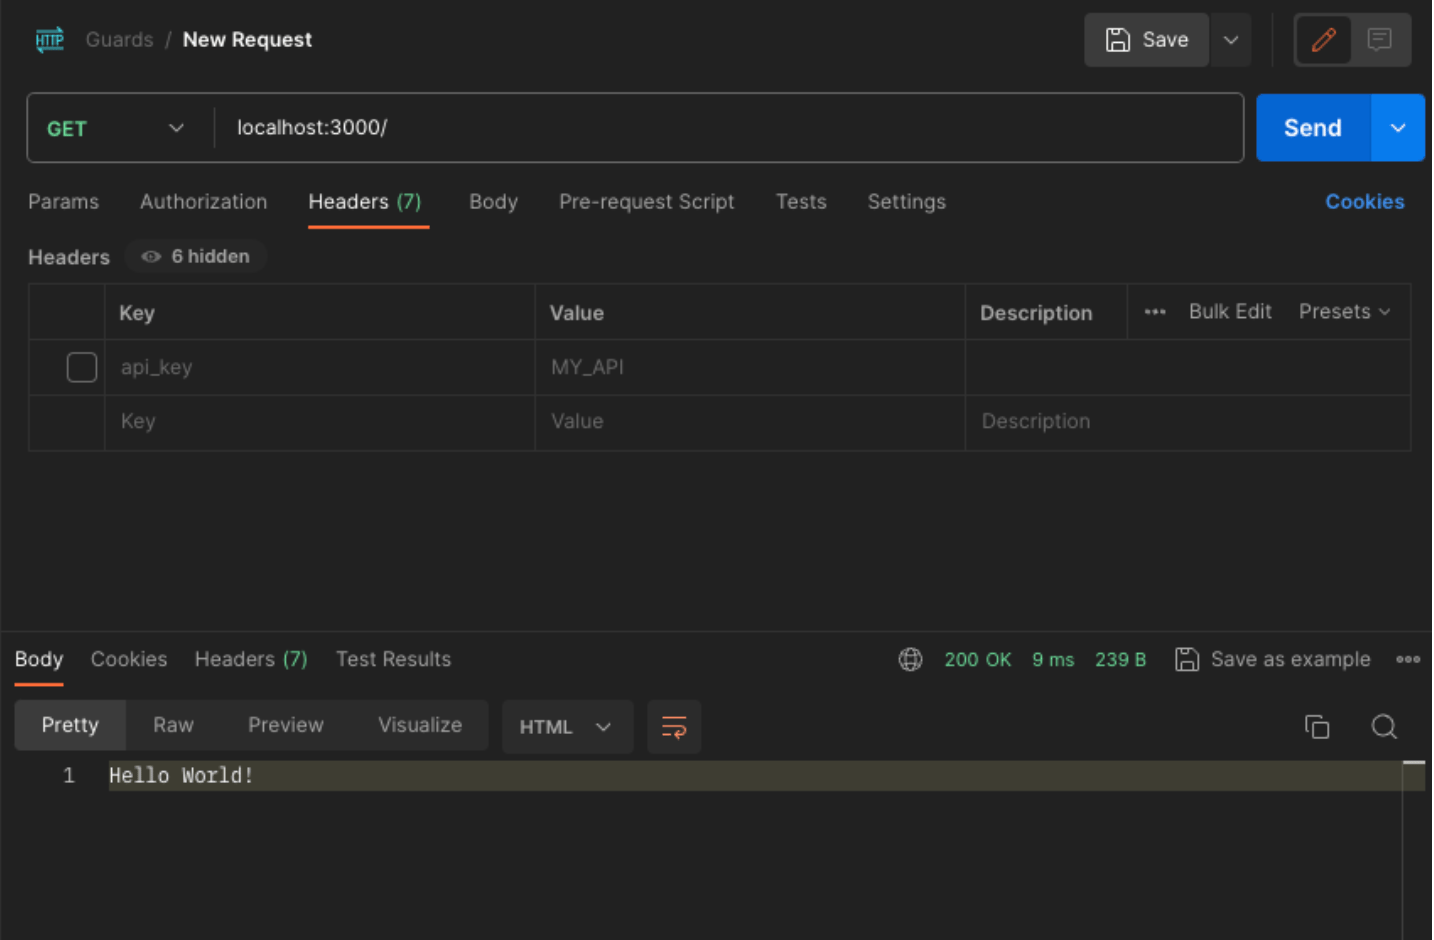
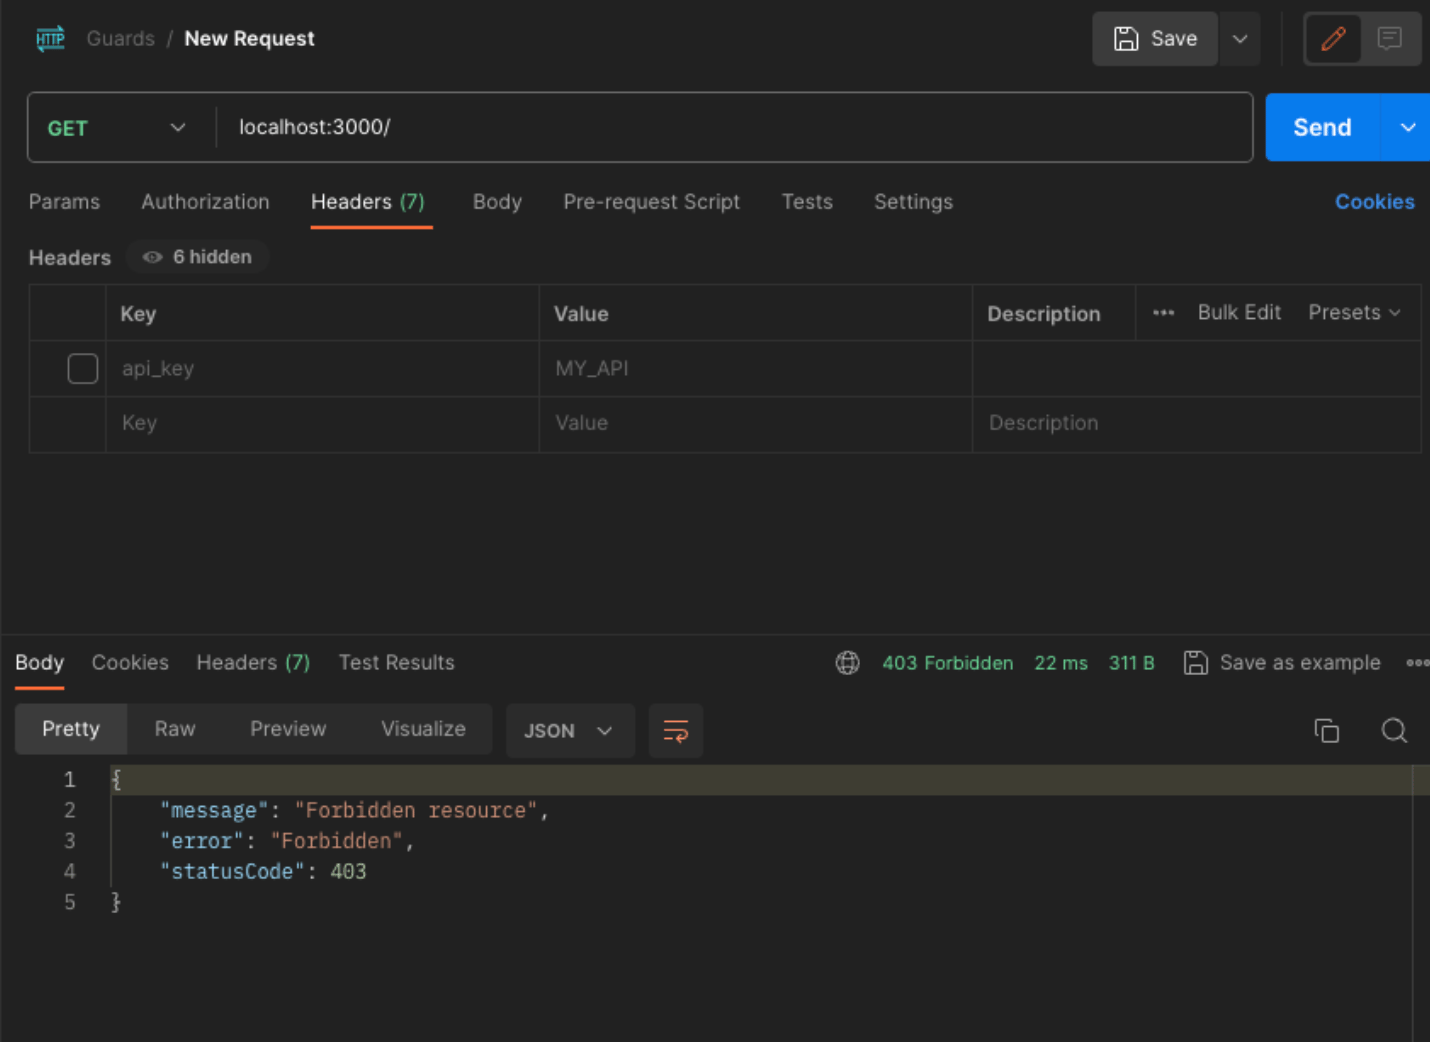
In the first image, the request is made to the endpoint localhost:3000 which is expected to return a string: Hello World. The api_key passed in the headers has a value of MY_API. When the request is sent, a 403 Forbidden Error is thrown. This is because the AuthGuard have a return value of false, since the value passed (MY_API) does not match the correct apiKey value we specify in the guard. For the second image, the correct api_key was passed in the request headers with the correct apiKey value (MY_API_KEY) and the request went through with a response of Hello Guards returned. This implies that only users with the secret key - MY_API_KEY can access the routes in this controller file of the application.
Next, you will explore the ways of binding guards.
Step 3 - Binding of Guards
What does the binding of guards mean? Basically, when we created the AuthGuard function in the previous step, the guard is standalone and cannot protect any routes unless we bind it at the global level using the useGlobalGuards method or to the controller or method level using the UseGuards decorator
Just like interceptors, pipes and exception filters, guards can be global-scoped, controller-scoped or method-scoped.
The @UseGlobalGuards method is used to bind guards globally and the AuthGuard can be bound globally in the main.ts file as shown below:
import { NestFactory } from '@nestjs/core';
import { AppModule } from './app.module';
import { AuthGuard } from './guards/auth.guard';

async function bootstrap() {
  const app = await NestFactory.create(AppModule);
  app.useGlobalGuards(new AuthGuard());
  await app.listen(3000);
}
bootstrap();
Here, the AuthGuard is bound at the global level using the useGlobalGuards() method of the Nest application instance. If we go to any route in the application and pass in the wrong api_key value, a forbidden resource error for unauthorized access will be thrown, if the right api_key is passed to the request headers, it will return a 200 success message and the endpoint will be accessed successfully.
For controller-scoped guard binding, the @UseGuards decorator will be applied under the Controller decorator to guard all the routes in that particular controller only as shown below:
import { Controller, Get, UseGuards } from '@nestjs/common';
import { AppService } from './app.service';
import { AuthGuard } from './guards/auth.guard';

@Controller()
@UseGuards(AuthGuard)
export class AppController {
  constructor(private readonly appService: AppService) {}
  @Get()
  getHello(): string {
    return this.appService.getHello();
  }

  @Get('test')
  test(): string {
    return 'This is a Test Route';
  }
}
The above piece of code infers that the AuthGuard will be applied to the two routes in the app.contorller.ts file.
The binding guard at the method level is similar to the controller-level binding, the @UseGuards decorator is used to guard a specific route in this case as shown below:
@Controller()
export class AppController {
  constructor(private readonly appService: AppService) {}
  @Get()
  getHello(): string {
    return this.appService.getHello();
  }

  @Get('test')
  @UseGuards(AuthGuard)
  test(): string {
    return 'This is a Test Route';
  }
}
In this case only the route /test will be guarded by the AuthGuard, while the other route Get() will be publicly accessed as shown in the image below:
Next is understanding how multiple guards can be used in NestJS.
Step 4 - Using Multiple Guards
NestJS allows us to apply more than one guard at a time, either at the controller or method level, and these guards will be executed in the order in which they are bound. Let’s create a new file in the guards folder called business.guard.ts and create a guard that prevents users from accessing routes if they do not have a businessID.
import { Injectable, CanActivate, ExecutionContext } from '@nestjs/common';
import { Observable } from 'rxjs';

@Injectable()
export class BusinessGuard implements CanActivate {
  canActivate(
    context: ExecutionContext,
  ): boolean | Promise<boolean> | Observable<boolean> {
    const request = context.switchToHttp().getRequest();
    const businessID = request.headers['business_id'];
    if (businessID && businessID === '892367480') {
      return true;
    }
    return false;
  }
}
The BusinessGuard function implements the canActivate method which is used to extract the business_id in the request header from the request object using the getRequest method of the context object. As mentioned earlier, this guard checks whether the business_id exist in the header of the request and if the value passed by the user matches the predefined business_id value (892367480). If the business_id key is not passed or the value passed does not match the predefined value, the guard returns false, indicating that access to the route should be denied, otherwise it returns true, which means that access should be allowed.
Now, let’s bind the BusinessGuard and the AuthGuard on the ‘/test’ route.
@Controller()
export class AppController {
  constructor(private readonly appService: AppService) {}
  @Get()
  getHello(): string {
    return this.appService.getHello();
  }

  @Get('test')
  @UseGuards(AuthGuard, BusinessGuard)
  test(): string {
    return 'This is a Test Route';
  }
}
When a request is being made to the /test route, the AuthGuard is called first to ensure the conditions specified in the AuthGuard is good for the request to be processed if it returns true (i.e. api_key is passed in the request header), then BusinessGuard will then be applied. This is demonstrated below:
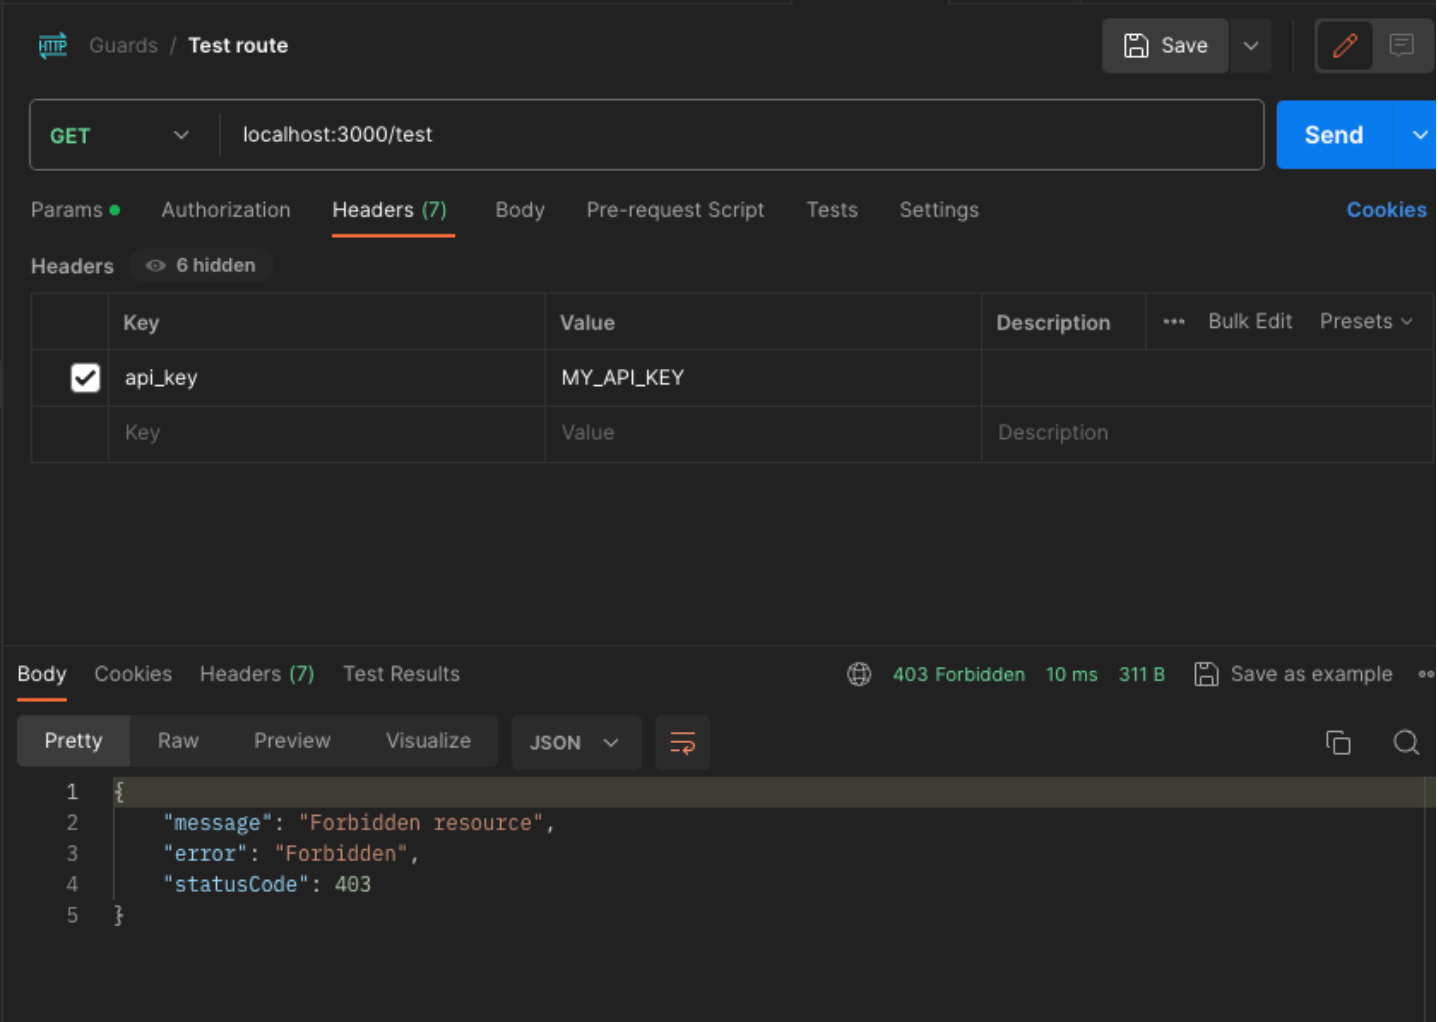
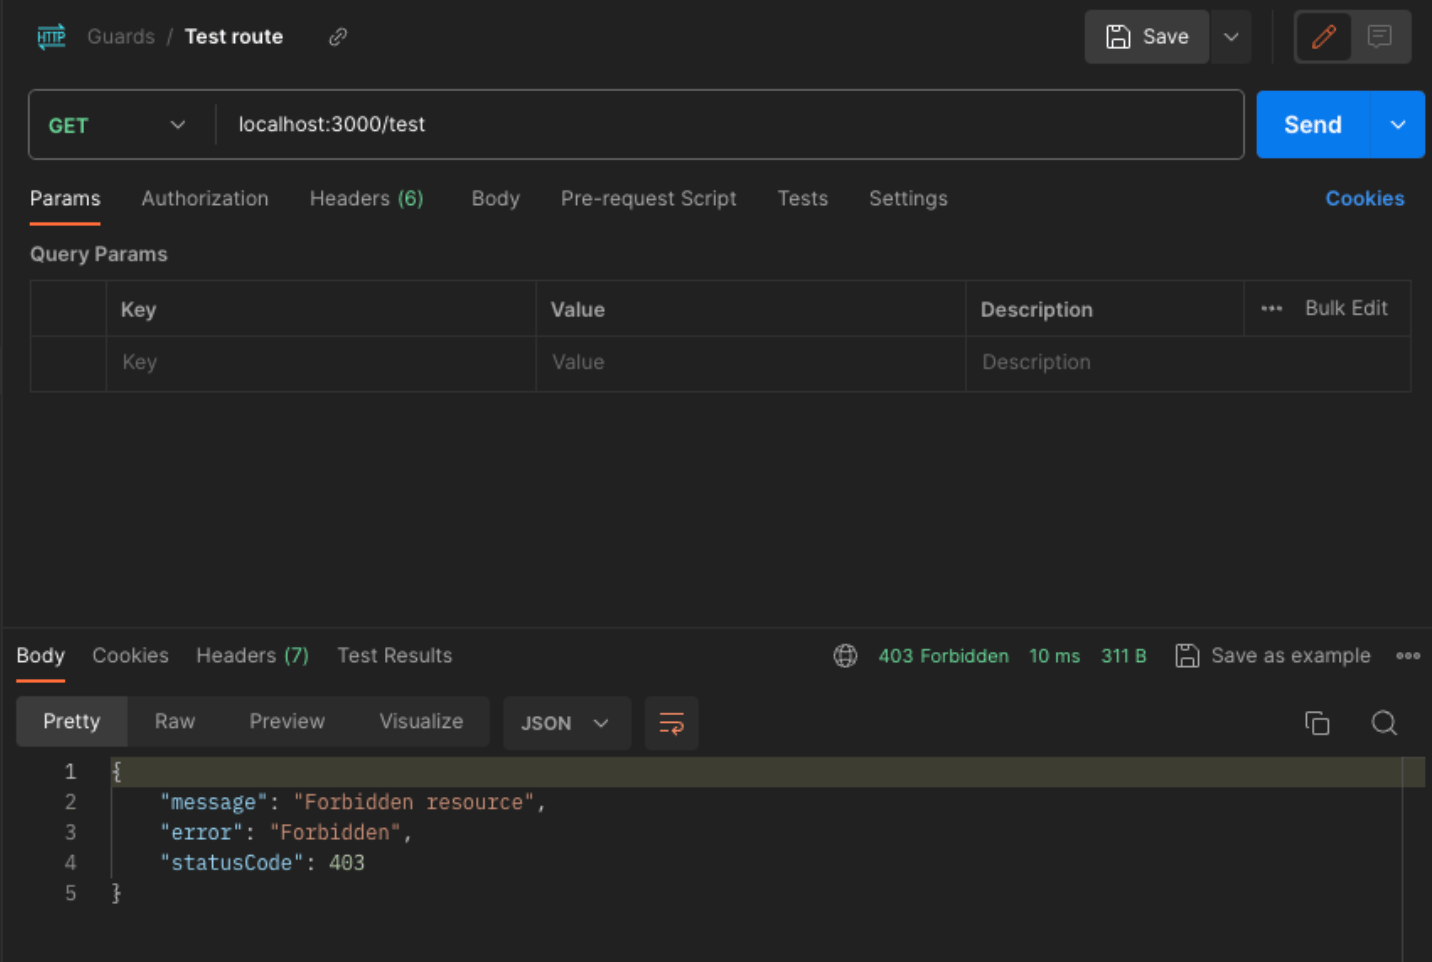
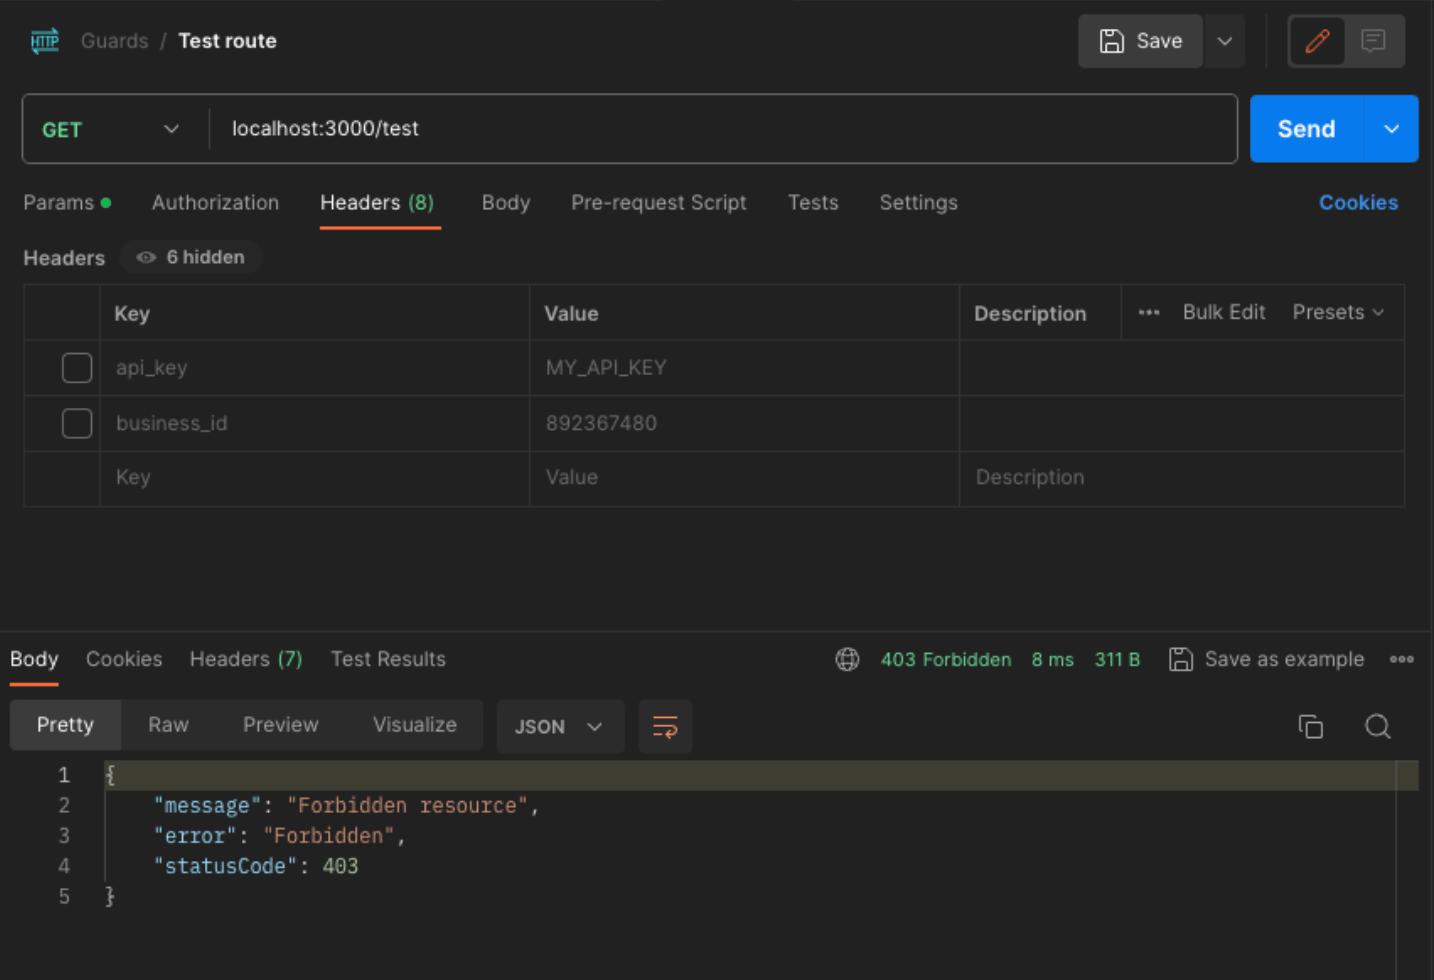
In the first image, only the api_key was passed, hence the unauthorized access error, while in the second image, both the api_key and business_id was passed passing the multiple guards that were specified for the ‘/test’ route.
Next is implementing Authorization Check Skipping for specific endpoints.
Step 5 - Skipping Authorization Checks
When developing a NestJS application and implementing guards for endpoint authorization, you may have a controller that uses a guard on all routes. Still, there may be a specific endpoint where you want to omit authorization and make it publicly accessible while the guard is protecting the others.
To achieve this, a metadata that provides extra information and context will be added to the guard instance. Create an auth.metadata.decorator file in the src directory. The metadata will be set with the key - authorized for the endpoint that will be skipped.
import { SetMetadata } from '@nestjs/common';
export const AuthMetaData = (...metadata: string[]) =>
  SetMetadata('authorized', metadata);
In the piece of code above, there is an AuthMetaData function that calls the SetMetaData decorator, which takes in two arguments, the authorized string and the metadata array, which was passed in as an argument in the AuthMetaData function.
Then, the auth.guard.ts file will be modified to check if any authorization metadata is being set to any controller or method that is being guarded before processing the request.
 const authMetaData = this.reflector.getAllAndOverride<string[]>(
      'authorized',
      [context.getHandler(), context.getClass()],
    );

    if (authMetaData?.includes('SkipAuthorizationCheck')) {
      return true;
    }
Here, the reflector and the getAllAndOverride function are used to get the metadata that was set in the AuthMetaData decorator. The method takes two arguments, first one is the metadata key needed to be retrieved (authorized) and then, an array of objects the getAllAndOverride function will look at to get the metadata.
Inside the getAllAndOverride method, the handler and class of the current execution context are passed so that when the method runs, it checks for the metadata with the key “authorized” associated with the current handler. Then a check is made that if the authMetaData retrieved includes the string SkipAuthorizationCheck, then the authorization should be skipped for that route.
Now, in the app.controller.ts file, create a new route called public; the guard will be bound at the controller level, while the AuthMetaData decorator will be used to skip the authorization guard/check with the metadata string for the public route only.
@Controller()
@UseGuards(AuthGuard)
export class AppController {
  constructor(private readonly appService: AppService) {}
  @Get()
  getHello(): string {
    return this.appService.getHello();
  }

  @Get('test')
  test(): string {
    return 'This is a Test Route';
  }

  @Get('public')
  @AuthMetaData('SkipAuthorizationCheck')
  getPublic(): string {
    return 'public';
  }
}
Let’s test this out:
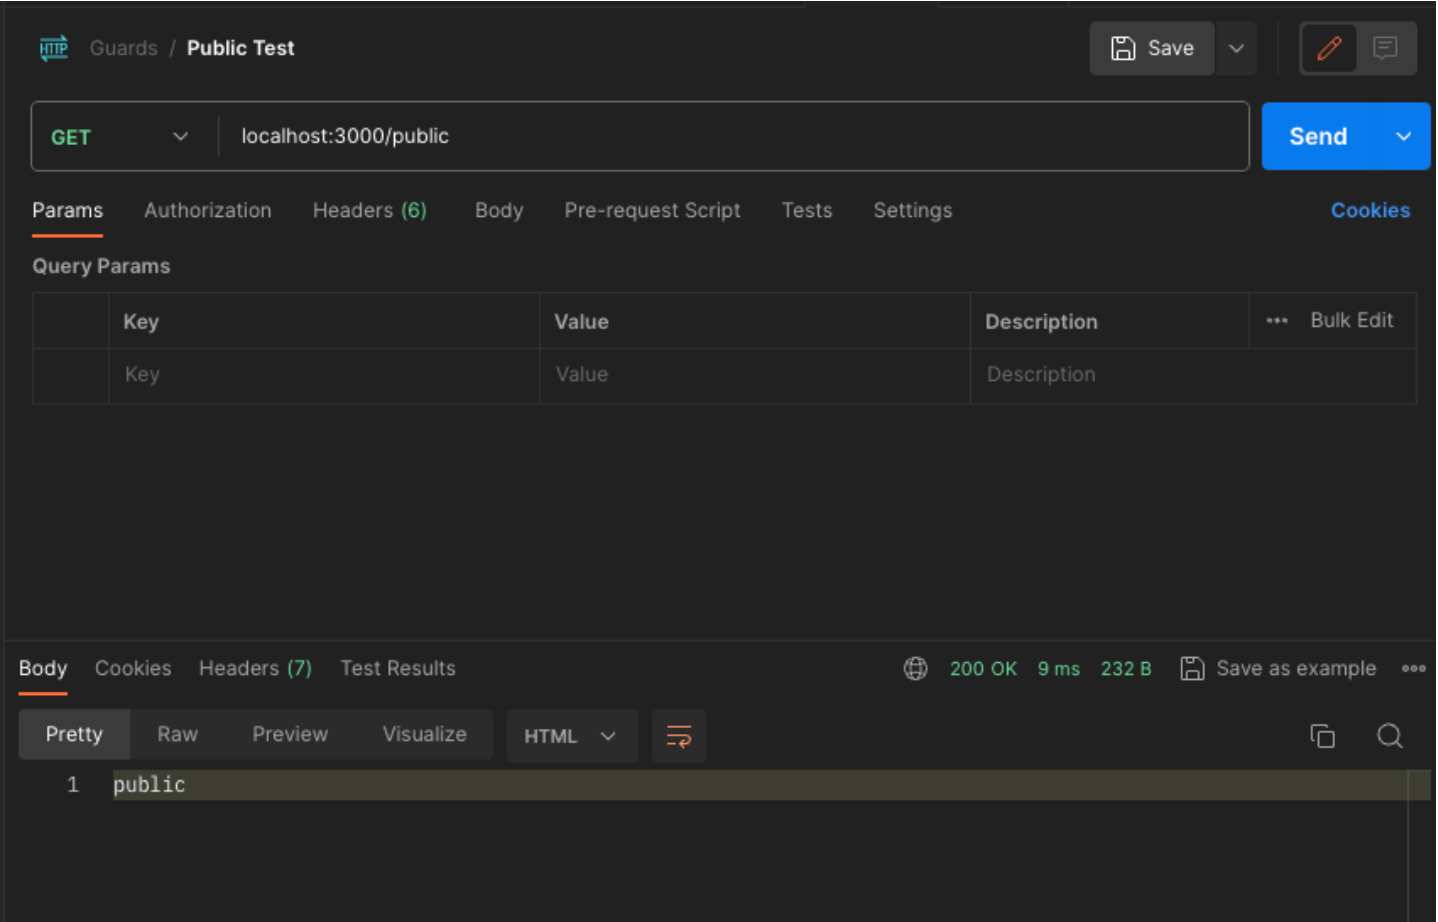
In the first image, a request is being made to the / endpoint and an unauthorized error was thrown, for the second image, the request was made to the /test route, and the same error was thrown. In the last image where the request is being made to the /public endpoint, a 200 success response was returned, which shows that the AuthGuard has been bypassed for this route only using the AuthMetada decorator.
Note: All the examples used in this guide are basic examples for you to understand the fundamentals of guards in NestJS. In your real-world applications, the guard may vary from basic to complex, depending on the application you are building, and you will also need to store sensitive information in an env file (such as the API keys) so it is not being made available to the public.
Conclusion
In this article, you took a deep dive into understanding what Guards are in NestJS, how to create an Authentication guard, binding of guards, using multiple guards in the NestJS application, and Skipping Guard checks.
From here, you can learn how to create Role-Based Access Control Authorization as well as learn about Authentication in NestJS.
You will find the complete source code of this tutorial here on GitHub.
Note: The Github repository consists of 4 branches. A master branch and one branch for each step starting from Steps 2-5. Switch in between branches for code testing. Thank you.
Thanks for learning with the DigitalOcean Community. Check out our offerings for compute, storage, networking, and managed databases.
About the author(s)
Anish is a Sr Technical Content Strategist and Team Lead at DigitalOcean with 7+ years of experience as an DevOps SRE at Nutanix and Cloud consultant at AMEX, and technical writing at DOCN, and shipping deep infra and AI inference tutorials that help developers deploy production‑ready applications on DigitalOcean.
Still looking for an answer?
This textbox defaults to using Markdown to format your answer.
You can type !ref in this text area to quickly search our full set of tutorials, documentation & marketplace offerings and insert the link!
Great article and very helpful! I was not sure where to put the following code inthe auth.guard.ts though.
const authMetaData = this.reflector.getAllAndOverride<string[]>(
      'authorized',
      [context.getHandler(), context.getClass()],
    );

    if (authMetaData?.includes('SkipAuthorizationCheck')) {
      return true;
    }
I tried placing it within the canActivate but, it was throwing an error on the reflector.
Thanks!
 This work is licensed under a Creative Commons Attribution-NonCommercial- ShareAlike 4.0 International License.
Become a contributor for community
Get paid to write technical tutorials and select a tech-focused charity to receive a matching donation.

DigitalOcean Documentation
Full documentation for every DigitalOcean product.

Resources for startups and AI-native businesses
The Wave has everything you need to know about building a business, from raising funding to marketing your product.
The developer cloud
Scale up as you grow — whether you're running one virtual machine or ten thousand.

Start building today
From GPU-powered inference and Kubernetes to managed databases and storage, get everything you need to build, scale, and deploy intelligent applications.
