By Cristian Marius Tiutiu, Bikram Gupta and Easha Abid

Introduction
Navigating container orchestration often requires establishing routes for external traffic to get to applications within a Kubernetes cluster. One fundamental component that addresses this challenge is the Ingress Controller. An Ingress Controller acts as the gateway between external requests and apps residing inside, efficiently managing external access to services running on the cluster.
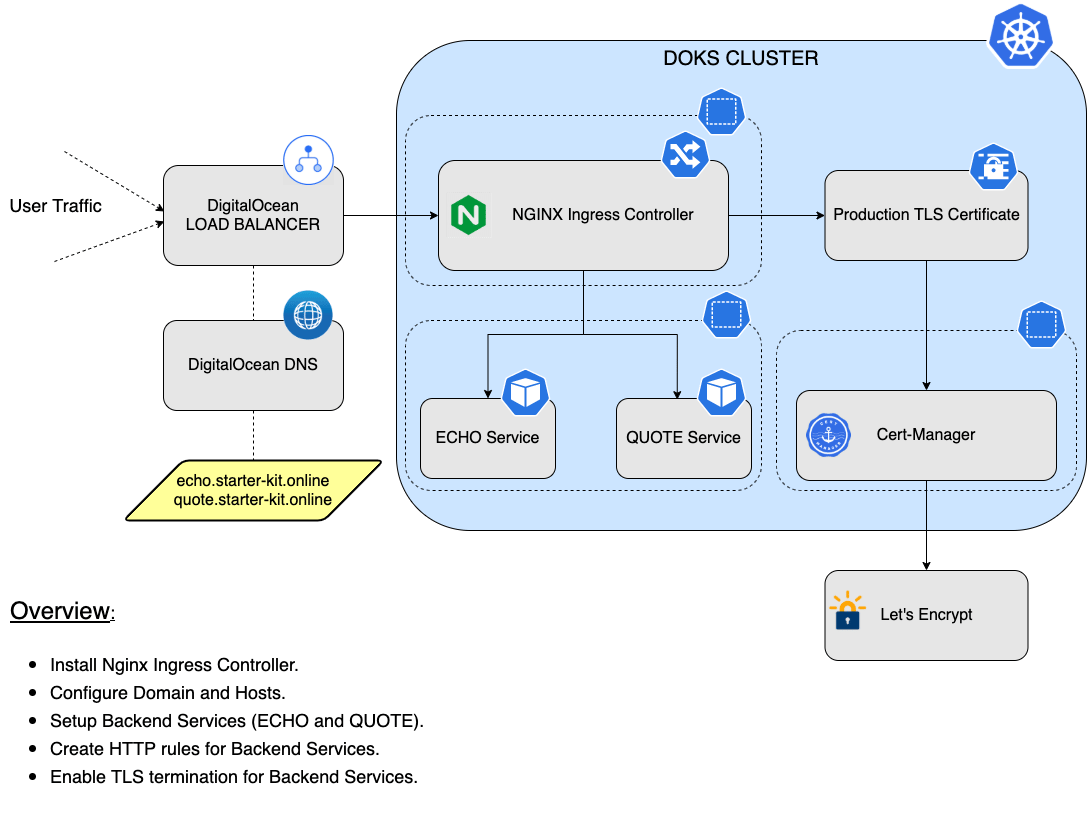
In this tutorial, you will learn how to use the Kubernetes-maintained Nginx Ingress Controller. Then, you’re going to discover how to have TLS certificates automatically deployed and configured for your hosts (thus enabling TLS termination), and route traffic to your backend applications.
Table of contents
- Prerequisites
- Step 1 - Installing the Nginx Ingress Controller
- Step 2 - Configuring DNS for Nginx Ingress Controller
- Step 3 - Creating the Nginx Backend Services
- Step 4 - Configuring Nginx Ingress Rules for Backend Services
- Step 5 - Configuring Production Ready TLS Certificates for Nginx
- Step 6 - Enabling Proxy Protocol
- Conclusion
Prerequisites
To complete this tutorial, you will need:
- A Git client to clone the Starter Kit repository.
- Helm for managing Nginx releases and upgrades.
- Doctl for DigitalOcean API interaction.
- Kubectl for Kubernetes interaction.
- Curl for testing the examples (backend applications).
- Please make sure that
doctlandkubectlcontext is configured to point to yourKubernetescluster. Refer to Step 2 - Authenticating to DigitalOcean API and Step 3 - Creating the DOKS Cluster from the DOKS setup tutorial.
Step 1 - Installing the Nginx Ingress Controller
In this step, you will deploy the Nginx Ingress Controller to your DOKS cluster via Helm.
Steps to follow:
First, clone the Starter Kit repository and change the directory to your local copy.
git clone https://github.com/digitalocean/Kubernetes-Starter-Kit-Developers.git

cd Kubernetes-Starter-Kit-Developers
Next, add the Helm repo and list the available charts:
helm repo add ingress-nginx https://kubernetes.github.io/ingress-nginx

helm repo update ingress-nginx

helm search repo ingress-nginx
The output looks similar to the following:
NAME                            CHART VERSION   APP VERSION     DESCRIPTION
ingress-nginx/ingress-nginx     4.1.3           1.2.1           Ingress controller for Kubernetes using NGINX
The chart of interest is ingress-nginx/ingress-nginx, which will install Kubernetes-maintained Nginx on the cluster. Please visit the kubernetes-nginx page for more details about this chart.
Then, open and inspect the 03-setup-ingress-controller/assets/manifests/nginx-values-v4.1.3.yaml file provided in the Starter Kit repository using an editor of your choice (preferably with YAML lint support).
code 03-setup-ingress-controller/assets/manifests/nginx-values-v4.1.3.yaml
There are times when you want to reuse the existing load balancer. This is for preserving your DNS settings and other configurations. If so, make sure to modify the nginx-values-v4.1.3.yaml file, and add the annotation for your existing load balancer. Please refer to the DigitalOcean Kubernetes guide - How To Migrate Load Balancers for more details.
Finally, install the Nginx Ingress Controller using Helm (a dedicated ingress-nginx namespace will be created as well):
NGINX_CHART_VERSION="4.1.3"

helm install ingress-nginx ingress-nginx/ingress-nginx --version "$NGINX_CHART_VERSION" \
  --namespace ingress-nginx \
  --create-namespace \
  -f "03-setup-ingress-controller/assets/manifests/nginx-values-v${NGINX_CHART_VERSION}.yaml"
A specific version for the ingress-nginx Helm chart is used. In this case 4.1.3 was picked, which maps to the 1.2.1 release of Nginx (see the output from Step 2.). It’s a good practice to lock on a specific version. This helps to have predictable results, and allows versioning control via Git.
You can verify Nginx deployment status via:
helm ls -n ingress-nginx
The output looks similar to the following. Notice that the STATUS column value is deployed.
NAME            NAMESPACE       REVISION   UPDATED                                 STATUS     CHART                   APP VERSION
ingress-nginx   ingress-nginx   1          2021-11-02 10:12:44.799499 +0200 EET    deployed   ingress-nginx-4.1.3     1.2.1
Next check Kubernetes resources created for the ingress-nginx namespace (notice the deployment and replicaset resources which should be healthy, as well as the LoadBalancer resource having an external IP assigned):
kubectl get all -n ingress-nginx
The output looks similar to:
NAME                                            READY   STATUS    RESTARTS   AGE
pod/ingress-nginx-controller-5c8d66c76d-m4gh2   1/1     Running   0          56m

NAME                                         TYPE           CLUSTER-IP     EXTERNAL-IP       PORT(S)                      AGE
service/ingress-nginx-controller             LoadBalancer   10.245.27.99   143.244.204.126   80:32462/TCP,443:31385/TCP   56m
service/ingress-nginx-controller-admission   ClusterIP      10.245.44.60   <none>            443/TCP                      56m

NAME                                       READY   UP-TO-DATE   AVAILABLE   AGE
deployment.apps/ingress-nginx-controller   1/1     1            1           56m

NAME                                                  DESIRED   CURRENT   READY   AGE
replicaset.apps/ingress-nginx-controller-5c8d66c76d   1         1         1       56m
Finally, list all load balancer resources from your DigitalOcean account, and print the IP, ID, Name and Status:
doctl compute load-balancer list --format IP,ID,Name,Status
The output looks similar to the following. It should contain the new load balancer resource created for Nginx Ingress Controller in a healthy state.
IP                 ID                                      Name                                Status
143.244.204.126    0471a318-a98d-49e3-aaa1-ccd855831447    acdc25c5cfd404fd68cd103be95af8ae    active
In the next step, you will prepare DNS for your Nginx Ingress Controller setup.
Step 2 - Configuring DNS for Nginx Ingress Controller
In this step, you will configure DNS within your DigitalOcean account, using a domain that you own. Then, you will create the domain A records for each host: echo and quote. Please bear in mind that DigitalOcean is not a domain name registrar. You need to buy a domain name first from Google, GoDaddy, etc.
First, please issue the below command to create a new domain (starter-kit.online, in this example):
doctl compute domain create starter-kit.online
The output looks similar to the following:
Domain                TTL
starter-kit.online    0
You need to ensure that your domain registrar is configured to point to DigitalOcean name servers.
Next, you will add the required A records for the hosts you created earlier. First, you need to identify the load balancer external IP created by the Nginx deployment:
kubectl get svc -n ingress-nginx
The output looks similar to the following. Notice the EXTERNAL-IP column value for the ingress-nginx-controller service.
NAME                                 TYPE           CLUSTER-IP     EXTERNAL-IP       PORT(S)                      AGE
ingress-nginx-controller             LoadBalancer   10.245.27.99   143.244.204.126   80:32462/TCP,443:31385/TCP   96m
ingress-nginx-controller-admission   ClusterIP      10.245.44.60   <none>            443/TCP                      96m
Then, add the records (please replace the <> placeholders accordingly). You can change the ttl value as per your requirement:
doctl compute domain records create starter-kit.online --record-type "A" --record-name "echo" --record-data "<YOUR_LB_IP_ADDRESS>" --record-ttl "30"

doctl compute domain records create starter-kit.online --record-type "A" --record-name "quote" --record-data "<YOUR_LB_IP_ADDRESS>" --record-ttl "30"
If you only have one load balancer in your account, then please use the following:
LOAD_BALANCER_IP=$(doctl compute load-balancer list --format IP --no-header)

doctl compute domain records create starter-kit.online --record-type "A" --record-name "echo" --record-data "$LOAD_BALANCER_IP" --record-ttl "30"

doctl compute domain records create starter-kit.online --record-type "A" --record-name "quote" --record-data "$LOAD_BALANCER_IP" --record-ttl "30"
List the available records for the starter-kit.online domain:
doctl compute domain records list starter-kit.online
The output looks similar to the following:
ID           Type    Name     Data                    Priority    Port    TTL     Weight
164171755    SOA     @        1800                    0           0       1800    0
164171756    NS      @        ns1.digitalocean.com    0           0       1800    0
164171757    NS      @        ns2.digitalocean.com    0           0       1800    0
164171758    NS      @        ns3.digitalocean.com    0           0       1800    0
164171801    A       echo     143.244.204.126         0           0       3600    0
164171809    A       quote    143.244.204.126         0           0       3600    0
At this point, the network traffic will reach the Nginx enabled cluster, but you need to configure the backend service paths for each of the hosts. All DNS records require a minimum TTL value of 30 seconds.
Please visit the How to Create, Edit and Delete DNS Records page for more information.
In the next step, you will create two simple backend services, to help you test the Nginx ingress setup.
Step 3 - Creating the Nginx Backend Services
In this step, you will deploy two example backend services (applications), named echo and quote to test the Nginx ingress setup.
First, you define a new namespace for the quote and echo backend applications. This is a good practice in general because you don’t want to pollute the Nginx namespace (or any other) with application-specific stuff.
First, change the directory (if not already) where the Starter Kit repository was cloned:
cd Kubernetes-Starter-Kit-Developers
Next, create the backend namespace:
kubectl create ns backend
Then, create the echo and quote deployments:
kubectl apply -f 03-setup-ingress-controller/assets/manifests/nginx/echo_deployment.yaml

kubectl apply -f 03-setup-ingress-controller/assets/manifests/nginx/quote_deployment.yaml
Finally, create the corresponding services:
kubectl apply -f 03-setup-ingress-controller/assets/manifests/nginx/echo_service.yaml

kubectl apply -f 03-setup-ingress-controller/assets/manifests/nginx/quote_service.yaml
Inspect the deployments and services you just created:
kubectl get deployments -n backend
The output looks similar to the following (notice the echo and quote deployments):
NAME    READY   UP-TO-DATE   AVAILABLE   AGE
echo    1/1     1            1           2m22s
quote   1/1     1            1           2m23s
Now run:
kubectl get svc -n backend
The output looks similar to the following. Notice the echo and quote services.
NAME    TYPE        CLUSTER-IP       EXTERNAL-IP   PORT(S)   AGE
echo    ClusterIP   10.245.115.112   <none>        80/TCP    3m3s
quote   ClusterIP   10.245.226.141   <none>        80/TCP    3m3s
In the next step, you will create the Nginx ingress rules to route external traffic to quote and echo backend services.
Step 4 - Configuring Nginx Ingress Rules for Backend Services
To expose backend applications (services) to the outside world, you need to tell your Ingress Controller what host each service maps to. Nginx follows a simple pattern in which you define a set of rules. Each rule associates a host to a backend service via a corresponding path prefix.
Typical ingress resource for Nginx looks like below (example given for the echo service):
apiVersion: networking.k8s.io/v1
kind: Ingress
metadata:
  name: ingress-echo
  namespace: backend
spec:
  rules:
    - host: echo.starter-kit.online
      http:
        paths:
          - path: /
            pathType: Prefix
            backend:
              service:
                name: echo
                port:
                  number: 8080
  ingressClassName: nginx
Explanations for the above configuration:
spec.rules: A list of host rules used to configure the Ingress. If unspecified, or no rule matches, all traffic is sent to the default backend.spec.rules.host: Host is the fully qualified domain name of a network host (e.g.:echo.starter-kit.online).spec.rules.http: List of HTTP selectors pointing to backends.spec.rules.http.paths: A collection of paths that map requests to backends. In the above example, the/path prefix is matched with theechobackend service running on port8080.
You can have multiple ingress controllers per cluster if desired, hence there’s an important configuration element present that defines the ingress class name:
ingressClassName: nginx
The above ingressClassName field is required to differentiate between multiple ingress controllers present in your cluster. For more information please read What is ingressClassName field from the Kubernetes-maintained Nginx documentation.
You can always access the built-in documentation page for a Kubernetes object field via kubectl like below (notice that you need to specify the fully qualified path for the ingressClassName field):
kubectl explain ingress.spec.ingressClassName
The output looks similar to:
KIND:     Ingress
VERSION:  networking.k8s.io/v1

FIELD:    ingressClassName <string>

DESCRIPTION:
  IngressClassName is the name of the IngressClass cluster resource. The
  associated IngressClass defines which controller will implement the
  resource. This replaces the deprecated `kubernetes.io/ingress.class`
  annotation. For backwards compatibility, when that annotation is set, it
  must be given precedence over this field. The controller may emit a warning
  if the field and annotation have different values. Implementations of this
  API should ignore Ingresses without a class specified. An IngressClass
  resource may be marked as default, which can be used to set a default value
  for this field. For more information, refer to the IngressClass
  documentation.
You can define multiple rules for different hosts and paths in a single ingress resource. To keep things organized (and for better visibility), Starter Kit tutorial provides two ingress manifests for each host: echo and quote.
First, open and inspect each backend service ingress manifest using a text editor of your choice (preferably with YAML lint support).
code 03-setup-ingress-controller/assets/manifests/nginx/echo_host.yaml

code 03-setup-ingress-controller/assets/manifests/nginx/quote_host.yaml
Next, go ahead and apply each ingress resource using kubectl:
kubectl apply -f 03-setup-ingress-controller/assets/manifests/nginx/echo_host.yaml

kubectl apply -f 03-setup-ingress-controller/assets/manifests/nginx/quote_host.yaml
Verify ingress resources status:
kubectl get ingress -n backend
The output looks similar to the following. Notice the ADDRESS column pointing to the load balancer resource external IP.
NAME            CLASS   HOSTS                      ADDRESS           PORTS   AGE
ingress-echo    nginx   echo.starter-kit.online    143.244.204.126   80      22h
ingress-quote   nginx   quote.starter-kit.online   143.244.204.126   80      22h
Finally, test the Nginx setup using curl (or web browser) for each backend service.
First, the echo service:
curl -Li http://echo.starter-kit.online/
The output looks similar to:
HTTP/1.1 200 OK
Date: Thu, 04 Nov 2021 15:50:38 GMT
Content-Type: text/plain
Content-Length: 347
Connection: keep-alive

Request served by echo-5d8d65c665-569zf

HTTP/1.1 GET /

Host: echo.starter-kit.online
X-Real-Ip: 10.114.0.4
X-Forwarded-Port: 80
User-Agent: curl/7.77.0
X-Forwarded-Host: echo.starter-kit.online
X-Forwarded-Proto: http
X-Forwarded-Scheme: http
X-Scheme: http
Accept: */*
X-Request-Id: f45e2c0b8efed70b4692e1d76001286d
X-Forwarded-For: 10.114.0.4
Then, quote service:
curl -Li http://quote.starter-kit.online/
The output looks similar to:
HTTP/1.1 200 OK
Date: Thu, 04 Nov 2021 15:48:20 GMT
Content-Type: application/json
Content-Length: 151
Connection: keep-alive

{
  "server": "ellipsoidal-elderberry-7kwkpxz5",
  "quote": "A late night does not make any sense.",
  "time": "2021-11-04T15:48:20.198059817Z"
}
If the output looks like this, then you configured Nginx ingress successfully.
In the next step, you will enable Nginx to use proper TLS termination.
Step 5 - Configuring Production Ready TLS Certificates for Nginx
In the default setup, Nginx comes with self-signed TLS certificates. For live environments, you will want to enable Nginx to use production-ready TLS certificates. The recommended way is via Cert-Manager. In the next steps, you will learn how to quickly install cert-manager via Helm, and then configure it to issue Let’s Encrypt certificates.
First, change the directory (if not already) where you cloned the Starter Kit repository:
cd Kubernetes-Starter-Kit-Developers
Next, add the Jetstack Helm repository:
helm repo add jetstack https://charts.jetstack.io
Next, update the jetstack chart repository:
helm repo update jetstack
Then, open and inspect the 03-setup-ingress-controller/assets/manifests/cert-manager-values-v1.8.0.yaml file provided in the Starter Kit repository, using an editor of your choice (preferably with YAML lint support).
code 03-setup-ingress-controller/assets/manifests/cert-manager-values-v1.8.0.yaml
Finally, you can install the jetstack/cert-manager chart using Helm:
CERT_MANAGER_HELM_CHART_VERSION="1.8.0"

helm install cert-manager jetstack/cert-manager --version "$CERT_MANAGER_HELM_CHART_VERSION" \
  --namespace cert-manager \
  --create-namespace \
  -f 03-setup-ingress-controller/assets/manifests/cert-manager-values-v${CERT_MANAGER_HELM_CHART_VERSION}.yaml
Check Helm release status:
helm ls -n cert-manager
The output looks similar to the following. Notice the STATUS column which has the deployed value.
NAME            NAMESPACE       REVISION        UPDATED                                 STATUS          CHART                   APP VERSION
cert-manager    cert-manager    1               2021-10-20 12:13:05.124264 +0300 EEST   deployed        cert-manager-v1.8.0     v1.8.0
Inspect Kubernetes resources created by the cert-manager Helm release:
kubectl get all -n cert-manager
The output looks similar to the following. Notice the cert-manager pod and webhook service, which should be UP and RUNNING.
NAME                                           READY   STATUS    RESTARTS   AGE
pod/cert-manager-5ffd4f6c89-ckc9n              1/1     Running   0          10m
pod/cert-manager-cainjector-748dc889c5-l4dbv   1/1     Running   0          10m
pod/cert-manager-webhook-5b679f47d6-4xptd      1/1     Running   0          10m

NAME                           TYPE        CLUSTER-IP       EXTERNAL-IP   PORT(S)   AGE
service/cert-manager-webhook   ClusterIP   10.245.227.199   <none>        443/TCP   10m

NAME                                      READY   UP-TO-DATE   AVAILABLE   AGE
deployment.apps/cert-manager              1/1     1            1           10m
deployment.apps/cert-manager-cainjector   1/1     1            1           10m
deployment.apps/cert-manager-webhook      1/1     1            1           10m

NAME                                                 DESIRED   CURRENT   READY   AGE
replicaset.apps/cert-manager-5ffd4f6c89              1         1         1       10m
replicaset.apps/cert-manager-cainjector-748dc889c5   1         1         1       10m
replicaset.apps/cert-manager-webhook-5b679f47d6      1         1         1       10m
Inspect the available CRDs:
kubectl get crd -l app.kubernetes.io/name=cert-manager
The output looks similar to:
NAME                                  CREATED AT
certificaterequests.cert-manager.io   2022-01-07T14:17:55Z
certificates.cert-manager.io          2022-01-07T14:17:55Z
challenges.acme.cert-manager.io       2022-01-07T14:17:55Z
clusterissuers.cert-manager.io        2022-01-07T14:17:55Z
issuers.cert-manager.io               2022-01-07T14:17:55Z
orders.acme.cert-manager.io           2022-01-07T14:17:55Z
Next, you will configure a certificate Issuer resource for cert-manager, which is responsible for fetching the TLS certificate for Nginx to use. The certificate issuer is using the HTTP-01 challenge provider to accomplish the task.
A typical Issuer manifest looks like this:
---
apiVersion: cert-manager.io/v1
kind: Issuer
metadata:
  name: letsencrypt-nginx
  namespace: backend
spec:
  # ACME issuer configuration
  # `email` - the email address to be associated with the ACME account (make sure it's a valid one)
  # `server` - the URL used to access the ACME server’s directory endpoint
  # `privateKeySecretRef` - Kubernetes Secret to store the automatically generated ACME account private key
  acme:
    email: <YOUR_VALID_EMAIL_ADDRESS_HERE>
    server: https://acme-v02.api.letsencrypt.org/directory
    privateKeySecretRef:
      name: letsencrypt-nginx-private-key
    solvers:
      # Use the HTTP-01 challenge provider
      - http01:
          ingress:
            class: nginx
You can create the above Issuer resource using the template provided in the Starter Kit repository (make sure you change the directory where the Starter Kit repository was cloned on your local machine first):
kubectl apply -f 03-setup-ingress-controller/assets/manifests/nginx/cert-manager-issuer.yaml
Check that the Issuer resource was created and that no error is reported:
kubectl get issuer -n backend
The output looks similar to:
NAME                READY   AGE
letsencrypt-nginx   True    16m
Next, you need to configure each Nginx ingress resource to use TLS. A typical manifest looks like below:
apiVersion: networking.k8s.io/v1
kind: Ingress
metadata:
  name: ingress-echo
  namespace: backend
  annotations:
    cert-manager.io/issuer: letsencrypt-nginx
spec:
  tls:
    - hosts:
        - echo.starter-kit.online
      secretName: letsencrypt-nginx
  rules:
    - host: echo.starter-kit.online
...
Explanation for the above configuration:
cert-manager.io/issuer: Annotation that takes advantage of cert-manager ingress-shim to create the certificate resource on your behalf. Notice that it points to theletsencrypt-nginxIssuer resource created earlier.spec.tls.hosts: List of hosts included in the TLS certificate.spec.tls.secretName: Name of the secret used to terminate TLS traffic on port 443.
Now, open echo_host.yaml and quote_host.yaml. Then, uncomment annotations and spec.tls.
code 03-setup-ingress-controller/assets/manifests/nginx/echo_host.yaml

code 03-setup-ingress-controller/assets/manifests/nginx/quote_host.yaml
Save the echo_host.yaml and quote_host.yaml files, and apply changes using kubectl:
kubectl apply -f 03-setup-ingress-controller/assets/manifests/nginx/echo_host.yaml

kubectl apply -f 03-setup-ingress-controller/assets/manifests/nginx/quote_host.yaml
After a few moments, inspect ingress object state:
kubectl get ingress -n backend
The output looks similar to the following. Notice that the echo.starter-kit.online and quote.starter-kit.online hosts now have proper TLS termination, denoted by the 443 port number presence in the PORTS column.
ingress-echo    nginx   echo.starter-kit.online    157.230.66.23   80, 443   11m
ingress-quote   nginx   quote.starter-kit.online   157.230.66.23   80, 443   11m
Check that the certificate resource was created as well:
kubectl get certificates -n backend
The output looks similar to the following. Notice the READY column status which should be True.
letsencrypt-nginx-echo    True    letsencrypt-nginx-echo    3m50s
letsencrypt-nginx-quote   True    letsencrypt-nginx-quote   38s
Finally, test the echo and quote services via curl (notice that you receive a redirect to use HTTPS instead):
curl -Li http://echo.starter-kit.online/
The output looks similar to:
HTTP/1.1 308 Permanent Redirect
Date: Thu, 04 Nov 2021 16:00:09 GMT
Content-Type: text/html
Content-Length: 164
Connection: keep-alive
Location: https://echo.starter-kit.online

HTTP/2 200
date: Thu, 04 Nov 2021 16:00:10 GMT
content-type: text/plain
content-length: 351
strict-transport-security: max-age=15724800; includeSubDomains

Request served by echo-5d8d65c665-569zf

HTTP/1.1 GET /

Host: echo.starter-kit.online
X-Forwarded-Port: 443
X-Request-Id: c5b0593a12dcda6c10698edfbd349e3b
X-Real-Ip: 10.114.0.4
X-Forwarded-For: 10.114.0.4
X-Forwarded-Host: echo.starter-kit.online
X-Forwarded-Proto: https
X-Forwarded-Scheme: https
X-Scheme: https
User-Agent: curl/7.77.0
Accept: */*
curl -Li http://quote.starter-kit.online/
The output looks similar to:
HTTP/1.1 308 Permanent Redirect
Date: Tue, 07 Jun 2022 06:10:26 GMT
Content-Type: text/html
Content-Length: 164
Connection: keep-alive
Location: https://quote.starter-kit.online

HTTP/2 200
date: Tue, 07 Jun 2022 06:10:27 GMT
content-type: application/json
content-length: 159
strict-transport-security: max-age=15724800; includeSubDomains

{
    "server": "lumbering-mulberry-30bd7l5q",
    "quote": "A principal idea is omnipresent, much like candy.",
    "time": "2022-06-07T06:10:27.046014854Z"
}
You can also test the service using a web browser of your choice. Notice that you’re redirected to use HTTPS instead and that the certificate is a valid one, issued by Let’s Encrypt.
For more information about cert-manager ingress support and features, please visit the official ingress-shim documentation page.
In the next step, you will learn how to use the DigitalOcean Proxy Protocol with Nginx Ingress Controller.
Step 6 - Enabling Proxy Protocol
An L4 load balancer replaces the original client IP with its IP address. You will lose the client IP visibility in the application, so you need to enable proxy protocol. Proxy protocol enables an L4 Load Balancer to communicate to the original client IP. For this to work, you need to configure both DigitalOcean Load Balancer and Nginx.
After deploying the Backend Services, you need to configure the nginx Kubernetes Service to use the proxy protocol and tls-passthrough. This annotations are made available by the DigitalOcean Cloud Controller:
service.beta.kubernetes.io/do-loadbalancer-enable-proxy-protocolservice.beta.kubernetes.io/do-loadbalancer-tls-passthrough
First, you need to edit the Helm values file provided in the Starter Kit repository.
code 03-setup-ingress-controller/assets/manifests/nginx-values-v4.1.3.yaml
Then, uncomment the annotations settings from the service section, like in the example below:
service:
  type: LoadBalancer
  annotations:
    # Enable proxy protocol
    service.beta.kubernetes.io/do-loadbalancer-enable-proxy-protocol: "true"
    # Specify whether the DigitalOcean Load Balancer should pass encrypted data to backend droplets
    service.beta.kubernetes.io/do-loadbalancer-tls-passthrough: "true"
You must NOT create a load balancer with Proxy support by using the DigitalOcean web console, as any setting done outside DOKS is automatically overridden by DOKS reconciliation.
Then, uncomment the config section as seen below to allow Nginx to receive client connection information:
config:
  use-proxy-protocol: "true"
Then, save the values file and apply changes using Helm:
NGINX_CHART_VERSION="4.1.3"

helm upgrade ingress-nginx ingress-nginx/ingress-nginx --version "$NGINX_CHART_VERSION" \
  --namespace ingress-nginx \
  -f "03-setup-ingress-controller/assets/manifests/nginx-values-v${NGINX_CHART_VERSION}.yaml"
Finally, test the echo service via curl (notice that your Public IP will be present in X-Forwarded-For and X-Real-Ip headers):
curl -Li https://echo.starter-kit.online/
HTTP/2 200
date: Thu, 23 Dec 2021 10:26:02 GMT
content-type: text/plain
content-length: 356
strict-transport-security: max-age=15724800; includeSubDomains

Request served by echo-5d8d65c665-fpbwx

HTTP/1.1 GET /echo/

Host: echo.starter-kit.online
X-Real-Ip: 79.119.116.72
X-Forwarded-For: 79.119.116.72
X-Forwarded-Host: echo.starter-kit.online
X-Forwarded-Proto: https
User-Agent: curl/7.77.0
X-Request-Id: b167a24f6ac241442642c3abf24d7517
X-Forwarded-Port: 443
X-Forwarded-Scheme: https
X-Scheme: https
Accept: */*
For different DigitalOcean load balancer configurations, please refer to the examples from the official DigitalOcean Cloud Controller Manager documentation.
Conclusion
In this tutorial, you learned how to set up an Ingress Controller for your DOKS cluster using Nginx. Then, you discovered how cert-manager simplifies TLS certificate management for your applications.
Learn More
- Set Up an Nginx Ingress on DigitalOcean Kubernetes Using Helm
- Set Up an Nginx Ingress with Cert-Manager on DigitalOcean Kubernetes
Next, observability plays a key role in every production-ready system. In the next step, you will Set up Observability to enable monitoring for your DOKS cluster using Prometheus.
Thanks for learning with the DigitalOcean Community. Check out our offerings for compute, storage, networking, and managed databases.
About the author(s)
Still looking for an answer?
This textbox defaults to using Markdown to format your answer.
You can type !ref in this text area to quickly search our full set of tutorials, documentation & marketplace offerings and insert the link!
Completed the steps above on a DO cluster, but I find the challenge never completes, and the TLS connection is never authorised.
 This work is licensed under a Creative Commons Attribution-NonCommercial- ShareAlike 4.0 International License.
Become a contributor for community
Get paid to write technical tutorials and select a tech-focused charity to receive a matching donation.

DigitalOcean Documentation
Full documentation for every DigitalOcean product.

Resources for startups and AI-native businesses
The Wave has everything you need to know about building a business, from raising funding to marketing your product.
The developer cloud
Scale up as you grow — whether you're running one virtual machine or ten thousand.

Start building today
From GPU-powered inference and Kubernetes to managed databases and storage, get everything you need to build, scale, and deploy intelligent applications.
