By Taofiq Aiyelabegan and Easha Abid

The author selected Open Source Initiative to receive a donation as part of the Write for DOnations program.
Introduction
Dependency Injection (DI) means to inject dependency. It refers to a pattern where the dependencies of a component are provided as input by an external entity which is usually referred to as the injector. NestJS uses the DI as a core feature on which its architecture was built. DI allows the creation of dependent objects outside of a class provider and provides these created objects to the class that needs them (as the dependency).
Prerequisites
To follow this guide, you need the following:
- Node.js (version >= 16) installed on your operating system. You can follow the How to Install Node.js and Create a Local Development Environment guide.
- A code editor and API testing tool like VSCode and Postman.
- To be familiarized with NestJS basics such as Providers, Controllers, and Modules.
A Quick Refresher on JavaScript Classes
classes are like blueprint/template for creating objects in JavaScript. Classes create objects using the new operator. When you define a class and use the new operator on it, you are creating an instance of that class. Each instance is an object instantiated based on the structure of the class defined. The objects created have properties which can be the data or method props added by the class.
class Greeting {
  sayGoodMorning() {
    return "Hello, Good Morning";
  }
}

const morningGreeting = new Greeting().sayGoodMorning();
console.log(morningGreeting);
When you run this piece of code, you will notice the following output:
Hello, Good Morning
Here, the Greeting class was defined using the class keyword with a sayGoodMorning method that returns a string when called. When you create an instance of the Greeting class, it returns an object that is created based on the Greeting class structure defined earlier. Now, the morningGreeting object created has access to the encapsulated method sayGoodMorning defined in the class structure. That is why you can do Greeting().sayGoodMorning().
Another important method is the constructor that is used for creating and initializing an object created with a class.
Note: There can only be one constructor method.
class Greeting {
  constructor(message) {
    this.message = message;
  }

  sayGoodMorning() {
    return this.message;
  }
}

const morningGreeting = new Greeting(
  "Hello, Good Morning to you."
).sayGoodMorning();

console.log(morningGreeting);
In this example, a constructor method is introduced which creates and initializes the instance of the Greeting class. In the first example, an instance of the Greeting class was created even when the constructor method was not defined because, by default, JavaScript provides a constructor if none is specified. Also, this instance encapsulates specific data message because the constructor method was defined to accept a parameter and set the instance of the message property, unlike the first example where the instance did not encapsulate any specific data as no property was set within the object. The second example with a constructor allows you to return a flexible and dynamic message, unlike the first example that will always return a static Hello Good Morning.
const morningGreeting = new Greeting(
  "Hello, Good Morning to you."
).sayGoodMorning();

const morningGreeting2 = new Greeting(
  "Hi, Good Morning to you."
).sayGoodMorning();
If you log these two object instances, you will have these in your console:
Hello, Good Morning to you.
Hi, Good Morning to you.
For better understanding, look at a real-world scenario of a blog system that does not use DI. Say there is a file called BlogService class that handles CURD operation for blog posts. This class will depend on a Database service (DatabaseService) class for it to be able to interact with the database.
class DatabaseService {
  constructor() {
    this.connectionString = "mongodb://localhost:27017";
  }

  connect() {
    console.log(`Database Connection initiated${this.connectionString}`);
  }

  createPost(post) {
    console.log("Post created");
    return `Creating ${post.title} to the database`;
  }

  getAllPosts() {
    console.log("All posts returned");
    return [];
  }
}

class BlogService {
  constructor() {
    this.databaseService = new DatabaseService();
  }

  createPost(title, content) {
    return this.databaseService.createPost({ title, content });
  }

  getAllPosts() {
    return this.databaseService.getAllPosts();
  }
}

const blogService = new BlogService();
const createdPost = blogService.createPost("DI NestJS", "Hello World");
const posts = blogService.getAllPosts();

console.log("blogService", blogService);
console.log("createdPost", createdPost);
In this code, there are two main actions to note. First, the BlogService is tightly coupled with the DatabaseService which means the BlogService will not be able to work without the DatabaseService. And second, the BlogService directly creates an instance of the DatabaseService, which restricts the BlogService to a single database module.
Now, this is how the previous code can be reformed using DI in NestJS:
import { Injectable } from '@nestjs/common';

@Injectable()
class DatabaseService {
  constructor() {
    this.connectionString = 'db connection string';
  }

  createPost(post) {
    console.log(`Creating post "${post.title}" to the database.`);
  }

  getAllPosts() {
    console.log("Fetching all posts from the database.");
    return [{ title: 'My first post', content: 'Hello world!' }];
  }
}

@Injectable()
class BlogService {
  constructor(private databaseService: DatabaseService) {}

  createPost(title, content) {
    const post = { title, content };
    this.databaseService.save(post);
  }

  listPosts() {
    return this.databaseService.getAllPosts();
  }
}
In NestJS, you don’t manually instantiate classes with new keyword, NestJS framework’s DI container does it for you under the hood. In this piece of code, you use the @Injectable() decorator to declare the DatabaseService and BlogService indicating that they are both providers that NestJS can inject.
Inversion of Control (IoC) and Dependency Injection (DI)
Nest architecture is built around strong design patterns known as dependency injection. Dependency Injection (DI) is a pattern that NestJS uses to achieve IoC. DI allows the creation of dependent objects outside of a class and provides those objects to another class that depends on it through injection at runtime rather than the dependent class creating it. The benefit of this is that it creates a more modular and maintainable code.
Based on the previous code sample, DatabaseService is a dependency of BlogService. With DI in NestJS, you can create an instance of the DatabaseService object outside of the BlogService and provide it to the BlogService through constructor injection rather than instantiating the DatabaseService directly in the BlogService class.
IoC is a technique used for inverting the control flow of a program. Instead of the app controlling objects’ flow and creation, NestJS controls inversion. The NestJS IoC container manages the instantiation and injection of dependencies, where it creates a loosely coupled architecture by managing the dependencies between objects.
In short, IoC inverts the flow of control for the program design. Instead of your code calling and managing every dependency, you outsource the control to a container or a framework, to allow your application to be more modular and flexible to changes due to it being loosely coupled.
Dependency Injection in NestJS
Ensure you have Node installed on your machine. Also, you will need to globally install the Nest CLI using the command:
npm i -g @nestjs/cli
Create a new nest project using the Nest CLI:
nest new nest-di
Navigate to your project directory:
cd nest-di
By default, you have an AppModule that has AppService as the provider and AppController as the controller.
Generate an additional resource called players using the command:
nest g resource players
This will set up the players resource by generating boilerplate code for a CRUD resource. It creates the players.module, players.controller, and player.service files by default.
import { Controller, Get } from '@nestjs/common';
import { PlayersService } from './players.service';

@Controller('players')
export class PlayersController {
  constructor(private readonly playersService: PlayersService) {}

  @Get()
  getPlayers(): string {
    return this.playersService.getPlayers();
  }
}
import { Injectable } from '@nestjs/common';

@Injectable()
export class PlayersService {
  private readonly players = [
    { id: 1, name: 'Lionel Messi' },
    { id: 2, name: 'Christiano Ronaldo' },
  ];
  getPlayers(): any {
    return this.players;
  }
}
In the preceding sets of code, you can see that the PlayerController depends on the PlayersService class to complete the operation of getting the list of players. This means that PlayersService is a dependency of PlayerController. In the players.module file, the PlayersService is listed in the providers array. NestJS treats providers as classes that can be instantiated and shared across the app. Here, by listing PlayersService as a provider, NestJS creates an instance of PlayersService that can be injected into other components (in this case, PlayerController).
import { Module } from "@nestjs/common";
import { PlayersService } from "./players.service";
import { PlayersController } from "./players.controller";

@Module({
  controllers: [PlayersController],
  providers: [PlayersService],
})
export class PlayersModule {}
PlayersController is listed in the controllers array inside the players.module.ts file. NestJS also creates an instance of this controller when the PlayerModule is loaded. As previously mentioned, the PlayersController depends on the PlayersService as specified in the constructor parameter:
constructor(private readonly playersService: PlayersService) {}
When NestJS instantiates the PlayerController, it sees the constructor parameter and immediately understands that it depends on PlayersService. NestJS then looks for the PlayersService within the PlayersModule and resolves this dependency by creating an instance of PlayersService and injecting it into the PlayersController instance.
Typically, NestJS instantiates PlayersService first since it is a dependency of PlayersController. Once it is instantiated, NestJS keeps the instance of PlayersService in the application’s dependency injection container. This container manages the instances of all the classes that NestJS creates and is key to Nest’s DI system.
When the PlayersService instance is ready, Nest instantiates the PlayersController and injects the PlayersService instance into its constructor. This injection will allow PlayersController to use PlayersService so it can handle the HTTP requests to fetch the players list when /players is called. Request that route and monitor the response:
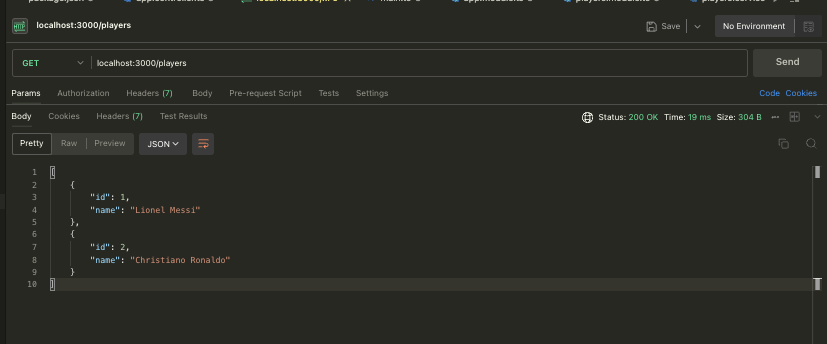
The AppModule imports the PlayersModule, so when the application starts, NestJS loads and processes PlayersModule, analyzes its imports, controllers, providers, and exports to understand how they should be instantiated and relate to one another.
@Module({
  imports: [PlayersModule],
  controllers: [AppController],
  providers: [AppService],
})
export class AppModule {}
When you request to /players endpoint, Nest routes the request to getPlayers() method of the PlayersController. The controller in turn calls the getPlayers() method on its dependency PlayersService instance to get the list of players and return the data as the response.
Note: The import array takes in the imported module list.
Decorators
The Nest framework uses TypeScript decorators extensively to improve its modularity and code maintainability. In TypeScript, decorators provide a way to programmatically tap into the process of defining a class. As previously explained, when an instance of a class is created, the classes’ properties and methods become available on the class instance. Decorators then allow you to inject code into the actual definition of a class even before the class instance is created.
Here’s an example:
function exampleDecorator(constructor: Function) {
  console.log("exampleDecorator invoked");
}

@exampleDecorator
class ClassWithExampleDecorator {}
In this code, a function exampleDecorator takes in a single parameter constructor, and logs a message to the console to indicate that it has been invoked. The exampleDecorator function is then used as a class decorator function. The ClassWithExampleDecorator is annotated with the exampleDecorator using the @ symbol followed by the decorator’s name. When you run this piece of code you have this result:
exampleDecorator invoked
Here you can see that even without creating an instance of the ClassWithExampleDecorator, the exampleDecorator function has been invoked. Ideally, you would set up and run this simple code example by creating a basic node project with TypeScript support. You can learn more about decorators in TypeScript.
In NestJS, Decorators are used to annotate and modify classes during design time. They also define metadata that NestJS uses to organize the application structure and dependencies. Take a look at the core decorators from NestJS:
Injectable
The @Injectable() decorator is used in NestJS to mark a class as a provider that can be managed by the NestJS DI system. It tells NestJS that this particular class is a dependency and is available to be injected by the class that uses it.
When you annotate a class in NestJS with the @Injectable() decorator, you are telling NestJS that the particular class should be available to be instantiated and injected as a dependency where it is needed. The NestJS IoC container manages all the classes in a NestJS app that are marked with @Injectable(). When an instance of that class is needed, NestJS looks to the IoC container and resolves any dependencies that the class might have and instantiates the class, if it has not been instantiated yet, and then provides the instantiated class where it is required.
Take a look at this code:
@Injectable()
export class AppService {
  getHello(): string {
    return "Hello";
  }
}
Here, the AppService file is marked with the @Injectable() decorator which makes it available for injection by the NestJS DI system. NestJS uses a library called reflect-metadata library to define the metadata for the AppService class (decorated by the @Injectable()) so that it can be managed by the NestJS DI system.
This metadata includes the information about the class, its constructor params (dependencies), and methods that the DI system uses to resolve and inject required dependencies at runtime.
In the example above, the metadata will have information about the AppService class, and its method. Assuming AppService has a dependency passed to its constructor method, the metadata will also include this information.
Module
The @Module() decorator provides metadata that NestJS uses to organize the application structure. @Module() decorator takes an object that can have properties like imports, controllers, providers, and exports.
NestJS uses the IoC container for dependency injection and managing dependencies. The providers are registered within the container and injected into their dependents as needed. For example, AppService will be registered and injected into the AppController that needs it.
Here’s an example to understand the @Module() decorator properly:
@Module({
  imports: [PlayersModule],
  controllers: [AppController],
  providers: [AppService],
})
export class AppModule {}
As shown here, this is the root module that is specified in the main.ts file when you bootstrap the NestJS app. The root module has an imported module called PlayerModule, a controller AppController, and a provider AppService.
When you start up your app, Nest looks at the import prop of the AppModule to know other modules that need to be loaded. In this case, PlayersModule is imported so NestJS will load and configure the PlayersModule. Say PlayersModule also has imported modules that are passed in PlayersModule imports array, NestJS will recursively load these modules as well so that all modules and their dependencies are loaded and configured. Once all the modules have been loaded, NestJS instantiates the providers that have been specified in the providers properties for each module. This means that the AppService and the PlayersService will be instantiated and added to the IoC container. Next, NestJS handles the dependency injection by injecting providers into the controllers and services using the constructor injection.
@Controller()
export class AppController {
  constructor(private readonly appService: AppService) {}

  @Get()
  getHello(): string {
    return this.appService.getHello();
  }
}
@Injectable()
export class AppService {
  getHello(): string {
    return "Hello";
  }
}
As mentioned earlier, NestJS injects the AppService which is a provider into the AppController using the constructor injection. The same will happen between PlayersService and PlayersControllers.
Once Dependencies have been injected, Nest initializes controllers specified in the controller’s property of each module to handle incoming requests and returning responses.
Controller
The @Controller() decorator in NestJS is used to define and organize the routes and requests handling logic in your app. Controllers help to separate handling HTTP requests from the business logic of the application which makes the codebase more modular and maintainable.
When you decorate a class with @Controller(), you are providing metadata to NestJS which indicates that the class serves as a controller. Nest, in turn, will inspect the methods within the controllers and look for HTTP method decorators like @Get(), @Post() etc. NestJS creates an internal routing table based on the decorators applied to the controller methods. This routing table maps incoming requests to the appropriate controller methods based on the requested route and HTTP method. For example, based on your current codebase, if you make a GET request to localhost:3000, the routing table maps your incoming GET request to the appropriate controller which in this case is AppController. It looks up the controller and looks for the @Get() decorator, processes the request, interacts with its dependency appService, and returns a response.
Note: The imports field used in the module’s metadata is for importing internal and external modules. When you import a module, you are importing the module’s context which includes its providers, controllers, and exported entities. This allows you to compose your application to be modular and maintainable.
Logging Components Metadata
Here is how you can log a module’s metadata:
async function bootstrap() {
  const app = await NestFactory.create(AppModule);
  //log metadata
  const metadata = Reflect.getMetadataKeys(AppModule);
  console.log(metadata);
  await app.listen(3000);
}
bootstrap();
In this code, the Reflect object, which provides reflection capabilities for inspecting metadata, is used to get the metadata keys associated with the AppModule using the getMetadataKeys method.
The resulting log returns an array of the module decorator key values:
[ 'imports', 'controllers', 'providers' ]
Other methods can be called on the Reflect object like: getMetadata, getOwnMetadata, getOwnMetadataKeys.
Inside the imports property of the module:
async function bootstrap() {
  const app = await NestFactory.create(AppModule);
  //log metadata
  const metadata = Reflect.getMetadataKeys(AppModule);
  console.log(metadata);

  for (const key of metadata) {
    if (key === "imports") {
      const imports = Reflect.getMetadata(key, AppModule);
      console.log("Imports", imports);
    }
  }
  await app.listen(3000);
}
Here, you get the metadata keys associated with the AppModule, then iterate over these keys and check if any of the metadata inside the array equals imports. If a key named imports is found, you then use the getMetadata function to get the array of the imported modules. You can do the same for controllers, providers, and exported entities by changing the value of the key.
Troubleshooting
Take a look at this code:
import { Module } from "@nestjs/common";
import { PlayersService } from "./players.service";
import { PlayersController } from "./players.controller";

@Module({
  controllers: [PlayersController],
  providers: [],
})
export class PlayersModule {}
When you run this code, you will notice the following error:
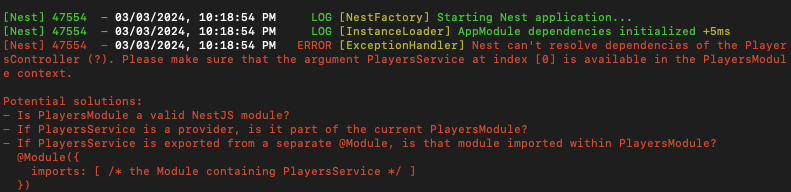
This error is common for developers new to NestJS. This error states it can’t resolve the dependency of PlayersControllers. The dependency in this instance is the PlayersService injected through constructor injection. To resolve this error, check if the PlayersModule is a valid NestJS module. Next, since PlayersService is a provider, check if it is being listed as part of the providers in the PlayersModule.
The third option is to check if a third-party module is part of the imported module within the AppModule.
Conclusion
In this tutorial, you have learned the basics of Dependency Injection, Inversion of Control and how they apply to the context of NestJS. You also learned what Decorators are and what they mean whenever they are used to decorate a class.
You will find the complete source code of this tutorial here on GitHub.
Thanks for learning with the DigitalOcean Community. Check out our offerings for compute, storage, networking, and managed databases.
About the author(s)
Still looking for an answer?
This textbox defaults to using Markdown to format your answer.
You can type !ref in this text area to quickly search our full set of tutorials, documentation & marketplace offerings and insert the link!
 This work is licensed under a Creative Commons Attribution-NonCommercial- ShareAlike 4.0 International License.
Become a contributor for community
Get paid to write technical tutorials and select a tech-focused charity to receive a matching donation.

DigitalOcean Documentation
Full documentation for every DigitalOcean product.

Resources for startups and AI-native businesses
The Wave has everything you need to know about building a business, from raising funding to marketing your product.
The developer cloud
Scale up as you grow — whether you're running one virtual machine or ten thousand.

Start building today
From GPU-powered inference and Kubernetes to managed databases and storage, get everything you need to build, scale, and deploy intelligent applications.
