Microsoft MVP

Shell scripting is an essential skill for IT professionals working in Linux environments. Although many users are familiar with the basics of scripting, mastering advanced techniques can elevate your ability to automate tasks, optimize workflows, and manage complex systems efficiently. This article goes beyond scripting fundamentals to explore how advanced shell scripting can solve real-world challenges in Linux-based infrastructures.
Advanced shell scripting requires technical skill and also adherence to best practices that ensure your scripts are robust, maintainable, and efficient. As scripts grow in complexity, structuring them thoughtfully and implementing techniques like error handling and debugging becomes essential. By following these practices, IT professionals can create scripts that are reliable and adaptable, especially in dynamic Linux environments where automation is key to productivity.
Key Takeaways
- Robust Error Handling: Implement
set -efor immediate error termination, usetrapcommands for cleanup actions, and provide meaningful error messages to improve script reliability and debugging - Advanced Data Structures: Leverage associative arrays with
declare -Afor key-value mappings and simulate multidimensional arrays for complex data management scenarios - Powerful Pattern Matching: Use Bash’s built-in regular expressions with
=~operator and[[ ]]tests for efficient text processing without external tools like grep or awk - Process Management: Utilize subshells
()for variable isolation and process substitution<()for seamless command integration without temporary files - Performance Optimization: Implement parallelization using
xargs -P, background processes with&, andwaitcommands to maximize multicore system utilization - Comprehensive Testing: Use BATS (Bash Automated Testing System) for unit testing, implement proper logging with
teeand trace files, and profile scripts withtime,strace, andperftools - Version Control Best Practices: Organize scripts logically, use meaningful commit messages, implement
.gitignorefor sensitive data, leverage branching for features, and tag releases for production deployments
You can also refer to our Top 50+ Bash commands tutorial for more information on Bash commands.
Readability and Maintainability
The foundation of a good script lies in its structure. A well-organized script is easier to understand, debug, and extend. Start by clearly separating different sections of the script, such as initialization, variable declarations, functions, and the main execution block. Use comments generously to explain the purpose of each section and any non-obvious logic. For instance, a comment before a function to describe its input, output, and role in the script makes it much easier for others (and future you) to comprehend.
Readable code often follows consistent naming conventions for variables, functions, and files. Use descriptive names that convey their purpose. For example, instead of naming a variable x, opt for something like log_file_path. To further enhance clarity, group related commands into functions. Functions encapsulate logic, reducing duplication and making your script modular. For example, if you are implementing a backup script, you might have functions like create_backup(), verify_backup(), and cleanup_old_backups().
Indentation and spacing are equally critical. Although shell scripts don’t enforce indentation, using consistent spacing (such as two or four spaces per level) improves readability. Tools like shellcheck can help enforce coding standards and identify potential issues in your script.
Error Handling
Handling errors effectively is one of the hallmarks of advanced scripting. Shell scripts often interact with the system, where failures like missing files or incorrect permissions can occur. By default, many shells continue executing commands even after encountering an error, which can lead to unpredictable results. To prevent this, use set -e at the beginning of your script. This command ensures that the script exits immediately upon encountering an error, minimizing potential damage.
For more granular error handling, use the trap command. Traps allow you to define cleanup actions or custom behaviors when specific signals or errors occur. For instance, you can ensure that temporary files are deleted if a script exits prematurely:
trap 'rm -f /tmp/tempfile; echo "Script interrupted. Cleaning up." >&2' EXIT
This example sets a trap for the EXIT signal, executing cleanup tasks regardless of whether the script succeeds or fails.
Custom error messages are another effective way to guide users or administrators when something goes wrong. Instead of allowing a cryptic failure, include messages that explain what happened and why. Use constructs like:
if ! cp /source/file /destination/; then
  echo "Error: Failed to copy file from /source/ to /destination/. Please check permissions." >&2
  exit 1
Fi
By including these messages, you provide valuable context that simplifies troubleshooting.
Debugging Techniques
Debugging complex scripts can be challenging, especially when they interact with external systems or execute multiple conditional branches. The set -x command is a powerful tool for debugging. When enabled, set -x prints each command to the terminal as it executes, including its arguments. This is invaluable for tracing the flow of the script and pinpointing where things go wrong:
set -x
# Your script here
set +x
Use set +x to turn off debugging after the problematic section if you don’t want to clutter the output with unnecessary details.
Verbose logging is another key technique. By including meaningful log messages throughout your script, you can monitor the script’s progress and identify potential issues. Use echo or logger commands to write logs to a file or system journal. For instance:
log_file="/var/log/myscript.log"
echo "Starting backup process at $(date)" >> "$log_file"
For more detailed tracking, especially in scripts with loops or conditional branches, consider generating trace files. Trace files capture the script’s execution flow and variable states, providing a historical view of what happened. A simple example might be:
exec > >(tee /var/log/myscript_trace.log) 2>&1
This command redirects both standard output and error streams to a trace file while still displaying them on the terminal. By analyzing the trace file, you can reconstruct the script’s execution and identify subtle issues.
Leveraging Advanced Shell Features
Mastering the advanced features of Bash and other shells can dramatically improve the power and efficiency of your scripts. These features, including associative arrays, built-in regular expressions, and advanced shell constructs like subshells and process substitution, enable IT professionals to handle complex data manipulations, optimize workflows, and build scalable automation solutions. In this part, I will explore these features in-depth, demonstrating their practical applications and explaining the underlying concepts.
Assosciative and Multidimensioinal Arrays
Associative arrays in Bash allow you to create key-value pairs, enabling more intuitive data storage and retrieval compared to traditional indexed arrays. Associative arrays are especially useful when working with configurations, logs, or structured data that require quick lookups. To use associative arrays, declare them explicitly with declare -A. Listing 1 shows an example that demonstrates their power.
- declare -A server_ips
- server_ips["web"]="192.168.1.10"
- server_ips["db"]="192.168.1.20"
- server_ips["cache"]="192.168.1.30"
- # Access values
- echo "Web Server IP: ${server_ips["web"]}"
- # Iterate over keys and values
- for key in "${!server_ips[@]}"; do
- echo "$key -> ${server_ips[$key]}"
- done
This script stores IP addresses of different servers and retrieves them dynamically. This approach is especially useful in environments where server configurations change frequently or need to be programmatically managed, such as in cloud deployments or dynamic DNS setups. Associative arrays also allow for quick lookups and simplify the management of mappings, such as DNS configurations or user-role assignments, reducing the need for hardcoding and enhancing script flexibility.
Bash does not natively support multidimensional arrays, but you can simulate them using associative arrays or by embedding delimiters in keys. For instance:
declare -A matrix
matrix["0,0"]="10"
matrix["0,1"]="20"
matrix["1,0"]="30"
matrix["1,1"]="40"
echo "Matrix Element [1,1]: ${matrix["1,1"]}"
Although other shells like Zsh might provide extended array support, this approach is portable across most Linux distributions.
Regular Expressions and Pattern Matching
Bash includes powerful pattern matching and regular expression capabilities that can simplify text processing tasks without relying on external tools like grep or awk. These features are particularly useful when parsing logs, validating input, or extracting data.
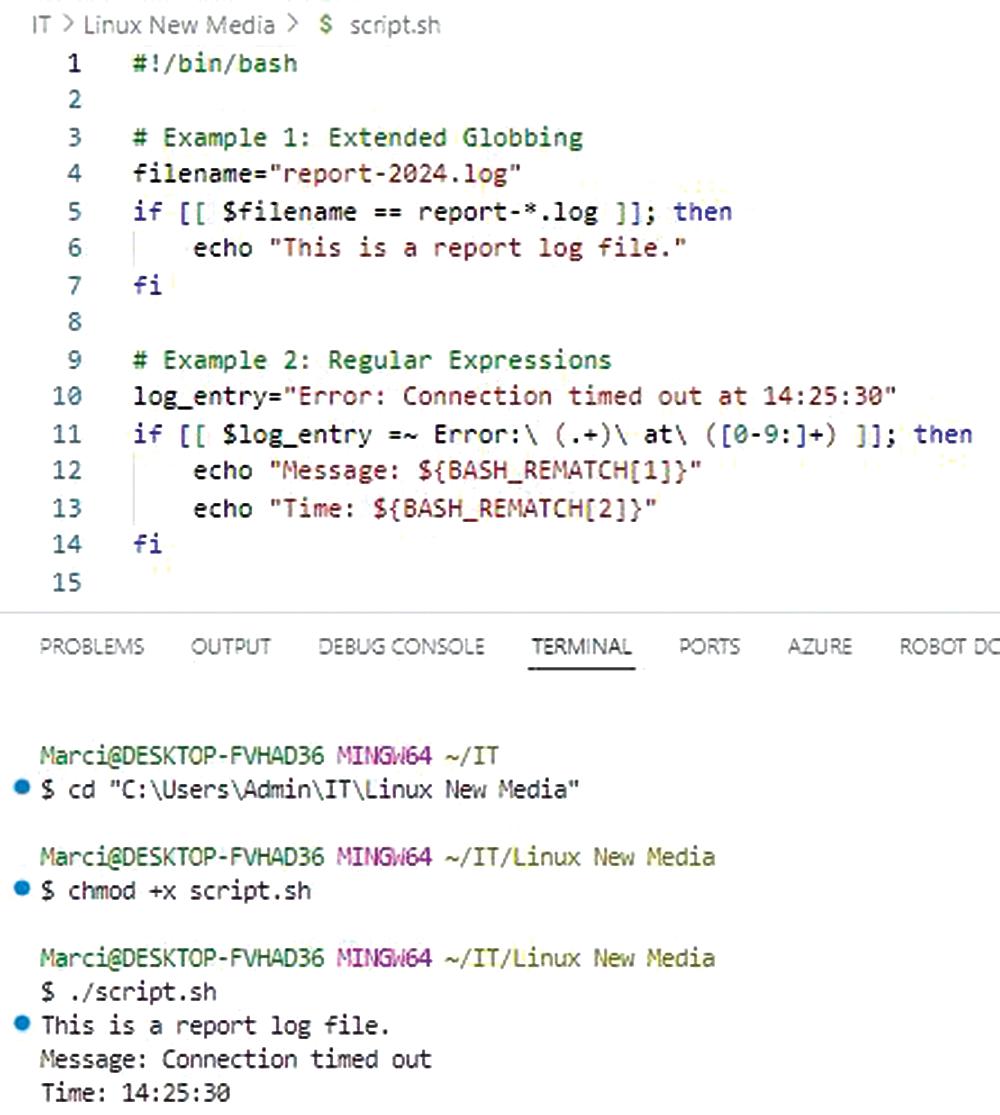
The [[ ]] conditional test command supports extended globbing and pattern matching. For instance:
filename="report-2024.log"
if [[ $filename == report-*.log ]]; then
  echo "This is a report log file."
fi
For more complex text processing, Bash also provides support for regular expressions with the =~ operator (Listing 2).
- log_entry="Error: Connection timed out at 14:25:30"
- if [[ $log_entry =~ Error:\ (.+)\ at\ ([0-9:]+) ]]; then
- echo "Message: ${BASH_REMATCH[1]}"
- echo "Time: ${BASH_REMATCH[2]}"
-
- fi
In this example, BASH_REMATCH is an array that stores the matches from the regular expression, enabling you to extract specific parts of a string directly within your script.
Advanced pattern matching and regular expressions can also be combined with string manipulation tools in Bash, such as ${variable##pattern} for trimming prefixes or ${variable//pattern/replacement} for substitutions. These built-in capabilities eliminate the need for external utilities in many cases, improving script performance and portability.
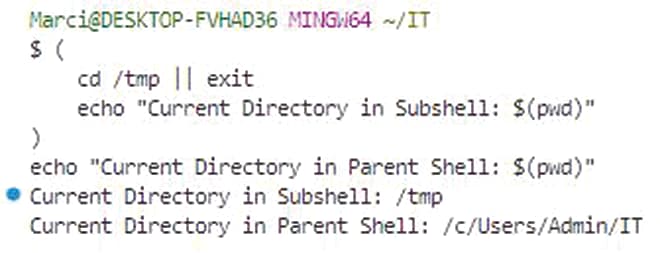
Subshells and Process Substitution
Subshells in Bash allow you to run commands in a separate execution environment, making them ideal for isolating variables or capturing command outputs. A common use case is encapsulating logic to prevent side effects (Listing 3).
- (
- cd /tmp || exit
- echo "Current Directory in Subshell: $(pwd)"
- )
-
- echo "Current Directory in Parent Shell: $(pwd)"
Here, changes made in the subshell, such as switching directories, do not affect the parent shell. This isolation is particularly useful in complex scripts where you want to maintain a clean environment.
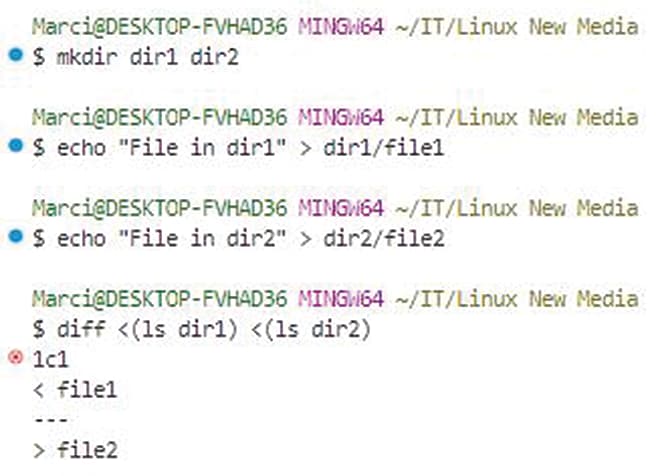
Process substitution is another powerful Bash feature that allows you to treat the output of a command as if it were a file. This capability enables seamless integration of commands that expect file inputs:
diff <(ls /dir1) <(ls /dir2)
The ls commands generate directory listings, which diff compares as if they were regular files. Process substitution enhances script efficiency by avoiding the need for intermediate temporary files.
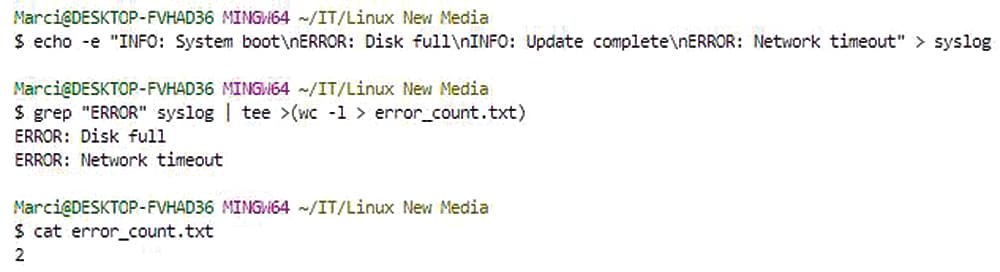
For scenarios involving data pipelines, process substitution can be combined with tee to simultaneously capture and process output:
grep "ERROR" /var/log/syslog | tee >(wc -l > error_count.txt)
This command filters error messages from a logfile, then tee allows you to count and log the errors simultaneously, demonstrating both flexibility and efficiency.
Scripting for Automation
Automation is at the heart of managing complex Linux environments, where tasks like parsing logs, updating systems, and handling backups must be executed reliably and efficiently. Shell scripting provides the flexibility to streamline these operations, ensuring consistency, scalability, and security. In this part, I will explore practical examples of dynamic logfile parsing, automated system updates, and efficient backup management, with a focus on real-world applications that IT professionals encounter in their daily workflows.
Logfile Parsing and Data Extraction
Logs are invaluable for monitoring system health, diagnosing issues, and maintaining compliance. However, manually analyzing logfiles in production environments is both impractical and error-prone. Shell scripts can dynamically parse logs to extract relevant data, highlight patterns, and even trigger alerts for specific conditions.
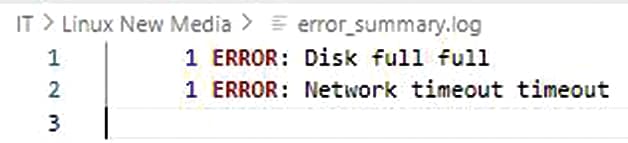
Consider the example of extracting error messages from a system log (/var/log/syslog) and generating a summary report. A script can achieve this dynamically (Listing 4).
- #!/bin/bash
- log_file="/var/log/syslog"
- output_file="/var/log/error_summary.log"
- # Check if log file exists
- if [[ ! -f $log_file ]]; then
- echo "Error: Log file $log_file does not exist."
- exit 1
- fi
- # Extract error entries and count occurrences
- grep -i "error" "$log_file" | awk '{print $1, $2, $3, $NF}' | sort | uniq -c > "$output_file"
-
- echo "Error summary generated in $output_file"
This script checks for the presence of the logfile, extracts lines containing ``error,‘’ processes them with awk to focus on specific fields (like timestamps and error codes), and generates a summarized output. The use of sort and uniq ensures that recurring errors are grouped and counted. This approach can be extended to handle different log formats or integrate with tools like jq for JSON-based logs.
In a cloud environment, similar scripts can be used to parse logs from multiple instances via SSH or integrated with centralized logging systems like Elastic Stack.
System Updates and Packages
Keeping systems updated is crucial for security and stability, but managing updates across diverse Linux distributions can be challenging. A well-crafted shell script can automate the update process, including dependency resolution, repository updates, and version checks.
Listing 5 is an example script for automating package updates on systems using Apt (Debian-based) or Yum (RHEL-based):
- #!/bin/bash
- # Detect package manager
- if command -v apt >/dev/null 2>&1; then
- package_manager="apt"
- elif command -v yum >/dev/null 2>&1; then
- package_manager="yum"
- else
- echo "Error: Supported package manager not found."
- exit 1
- fi
- # Perform updates
- echo "Updating system using $package_manager..."
- if [[ $package_manager == "apt" ]]; then
- sudo apt update && sudo apt upgrade -y
- elif [[ $package_manager == "yum" ]]; then
- sudo yum update -y
- fi
- echo "System update complete."
This script automatically detects the appropriate package manager and runs the update commands, simplifying the process for administrators managing heterogeneous environments. For advanced setups, you can integrate such
Managing Backups
Backup management is critical for disaster recovery, yet inefficient strategies can lead to excessive storage usage or missed data. Shell scripts provide an efficient way to automate backups with rotation and incremental options, balancing redundancy and resource utilization.
Listing 6 is an example of a backup script that performs incremental backups using Rsync and manages rotation to retain only the last seven days of backups.
- #!/bin/bash
- backup_src="/home/user/data"
- backup_dest="/backups"
- date=$(date +%Y-%m-%d)
- max_backups=7
- # Create today's backup
- rsync -a --delete "$backup_src/" "$backup_dest/$date/
- # Rotate backups
- cd "$backup_dest" || exit
- backup_count=$(ls -1d */ | wc -l)
- if (( backup_count > max_backups )); then
- oldest_backup=$(ls -1d */ | head -n 1)
- echo "Removing oldest backup: $oldest_backup"
- rm -rf "$oldest_backup"
- fi
- echo "Backup complete. Current backups:"
-
- ls -1d */
This script uses Rsync to create incremental backups by synchronizing only changes, minimizing storage and network usage. The --delete flag ensures that deletions in the source are mirrored in the backup. To manage rotation, the script calculates the number of backups, removes the oldest if the limit is exceeded, and provides a summary of current backups.
In cloud environments, you can adapt this strategy to utilize object storage solutions like DigitalOcean Spaces.
System Utilities
The integration of shell scripts with core Linux utilities allows IT professionals to build powerful, efficient workflows for system management and automation. Utilities like awk, sed, and grep provide advanced text-processing capabilities, whereas tools such as cron and systemd enable precise scheduling and monitoring of tasks. Additionally, utilities like lsof, ps, and kill allow for effective resource management and troubleshooting. I’ll explore some advanced use cases for these utilities and demonstrate how to integrate them into robust scripts for real-world scenarios.
Advanced awk, sed, and grep
Awk, sed, and grep are essential tools for text processing, and their advanced features allow for complex data manipulation with minimal overhead. These utilities are indispensable for parsing logs, extracting configuration details, and automating repetitive tasks.
Consider a scenario where you need to analyze a web server log (/var/log/nginx/access.log) to identify the most frequent IP addresses accessing the server:
awk '{print $1}' /var/log/nginx/access.log | sort | uniq -c | sort -nr |head -10
In this command, awk extracts the first field (the IP address), sort organizes the addresses, and uniq -c counts occurrences. The final sort -nr ranks the results numerically in descending order, and head displays the top 10 IP addresses. This approach is both efficient and scalable, making it ideal for large logfiles.
Sed excels in stream editing, allowing you to modify text in-place without manual intervention. For example, you can replace all instances of http with https in a configuration file as follows:
sed -i 's/http/https/g' /etc/nginx/sites-available/default
The -i flag applies changes directly to the file, and the g flag ensures all occurrences on a line are replaced. This is particularly useful for bulk updates across multiple configuration files.
For targeted text searches, grep provides unmatched speed and precision. To extract only error lines from a system log while excluding debug messages, you can use:
grep -i "error" /var/log/syslog | grep -v "debug"
Here, the -i flag makes the search case-insensitive and grep -v excludes lines containing debug. Combined with other utilities, grep becomes a versatile tool for data filtering and extraction.
Scheduling
Task scheduling is vital for automation, ensuring that jobs like backups, updates, or log rotations run at specified intervals. The cron utility has been a traditional choice for scheduling, whereas systemd timers offer enhanced flexibility in modern Linux distributions.
To schedule a daily backup using cron, edit the crontab file:
crontab -e
Add the following line to schedule a backup script (/usr/local/bin/backup.sh) to run at 2:00am daily:
0 2 * * * /usr/local/bin/backup.sh
This format specifies the minute, hour, day of the month, month, and day of the week. You can verify scheduled jobs with:
crontab -l
Managing System Resources
Resource management is a cornerstone of system administration, ensuring optimal performance and quick resolution of issues. Commands like lsof, ps, and kill enable effective monitoring and control over system resources.
lsof (list open files) is invaluable for identifying processes using specific files or ports. For instance, to identify the process occupying port 80:
lsof -i :80
This command provides details about the process, including its PID, user, and associated files, which are critical for troubleshooting service conflicts.
The ps command provides detailed information about running processes. To display processes in a tree format, showing parent-child relationships, use:
ps -e --forest
This view is particularly useful for understanding dependencies or investigating rogue processes. To monitor resource usage, combine ps with sorting:
ps -eo pid,comm,%cpu,%mem --sort=-%cpu | head
This command lists processes by their CPU usage, making it easy to identify resource-hungry tasks. When processes become unresponsive, kill offers a straightforward way to terminate them. To gracefully stop a process:
kill -15 <PID>
The -15 signal requests termination, allowing the process to clean up before exiting. If the process ignores this signal, force termination with -9:
kill -9 <PID>
Combining these utilities into scripts allows for automated monitoring and intervention. For example, a script to restart a service if its memory usage exceeds a threshold might use ps to detect the condition, followed by kill and a systemctl restart command.
Parallelization and Performance Optimization
Efficient use of system resources and the ability to execute multiple tasks in parallel are critical for IT professionals managing Linux environments. Whether deploying applications, processing large datasets, or running maintenance scripts, parallelization and performance optimization techniques can significantly improve speed and scalability. You can run tasks in parallel using xargs, background processes, and synchronization tools like wait, as well as profiling scripts for performance bottlenecks and monitoring memory and CPU usage.
xargs and wait
Linux utilities such as xargs and shell operators like & are essential for executing tasks in parallel. These tools allow administrators to maximize resource utilization, especially in multicore systems and cloud environments.
The xargs command is particularly powerful for parallel execution. For example, you can compress multiple files simultaneously using gzip:
find /data -type f -name "*.log" | xargs -n 1 -P 4 gzip
Here, -n 1 specifies that each command operates on a single file, and -P 4 allows up to four processes to run in parallel. This approach balances performance and resource usage, leveraging multicore processors effectively.
Alternatively, you can achieve parallelism with background processes using the & operator. Consider a script that processes several files independently:
for file in /data/*.log; do
  gzip "$file" &
done
wait
In this example, each gzip operation runs in the background, and the wait command ensures that the script does not proceed until all background tasks are complete. This method is straightforward but requires careful management to avoid overwhelming system resources.
For more sophisticated control, GNU Parallel offers a robust solution, handling complex parallel execution scenarios with ease:
find /data -type f -name "*.log" | parallel -j 4 gzip
The -j option limits the number of concurrent jobs, providing a more intuitive and scalable alternative to xargs.
Profiling and Optimizing
Optimizing script performance requires identifying and eliminating bottlenecks. Tools like time, strace, and perf can provide valuable insights into script execution and system interactions.
The time command measures the runtime of a script or command, breaking down execution into real (wall-clock), user (CPU spent in user space), and system (CPU spent in kernel space) time:
time ./backup_script.sh
If a script performs poorly, further analysis with strace can reveal inefficiencies. strace traces system calls made by a script, helping to identify issues like excessive file operations or unnecessary resource consumption:
strace -c ./backup_script.sh
The -c option provides a summary of system call usage, allowing you to focus on the most expensive operations.
For more granular profiling, perf captures detailed performance data, including CPU cycles, cache misses, and memory access patterns:
perf stat ./backup_script.sh
This tool is particularly useful for computationally intensive scripts, enabling optimization through code refactoring or algorithm changes.
Memory and CPU
Monitoring memory and CPU usage is essential for maintaining system stability, especially in environments with high workloads or limited resources. Tools like top, htop, and vmstat provide real-time monitoring, whereas ps and /proc offer data for programmatic analysis.
For example, to monitor the memory and CPU usage of a specific process, use ps:
ps -o pid,comm,%cpu,%mem -p <PID>
This command displays the process ID, the command, and its percentage of CPU and memory usage. In a script, you can automate resource monitoring and trigger alerts if thresholds are exceeded (Listing 7).
- pid=1234
- cpu_usage=$(ps -o %cpu= -p $pid)
- mem_usage=$(ps -o %mem= -p $pid)
- if (( $(echo "$cpu_usage > 80" | bc -l) )); then
- echo "Warning: Process $pid is using $cpu_usage% CPU."
- fi
- if (( $(echo "$mem_usage > 70" | bc -l) )); then
- echo "Warning: Process $pid is using $mem_usage% memory."
-
- fi
For long-term monitoring, the sar utility (part of the sysstat package) records system activity, providing historical data for performance tuning. To view CPU and memory usage trends, use:
sar -u 1 5    # CPU usage
sar -r 1 5    # Memory usage
This data can guide decisions on scaling, such as upgrading hardware or distributing workloads across multiple servers.
Unit Testing
Unit testing is a critical step in verifying the correctness of your shell scripts. The Bash Automated Testing System (bats) is a lightweight testing framework specifically designed for shell scripts. You can use bats to write test cases for individual script functions or commands, ensuring they behave as expected under various conditions. ` To get started, install bats on your Linux system. For most distributions, you can install it via a package manager:
sudo apt install bats  # Debian-based
sudo yum install bats  # RHEL-based
Alternatively, you can install bats using Git:
git clone https://github.com/bats-core/bats-core.git
cd bats-core
sudo ./install.sh /usr/local
Once bats is installed, create a test file with the .bats extension. For example, if you are testing a script called my_script.sh that calculates the sum of two numbers, your test file might look like the file in Listing 8.
- # test_my_script.bats
- @test "Addition works correctly" {
- result=$(./my_script.sh add 2 3)
- [ "$result" -eq 5 ]
- }
- @test "Handles missing arguments" {
- result=$(./my_script.sh add 2)
- [ "$result" = "Error: Missing arguments" ]
- }
Run the tests with:
bats test_my_script.bats
The framework outputs a clear pass/fail summary, making it easy to identify issues. You can extend tests to cover edge cases, invalid inputs, and integration scenarios.
Version Control Best Practices
Version control systems like Git are indispensable for managing changes in shell scripting projects. Proper version control enables you to track modifications, collaborate with team members, and roll back to previous versions if necessary.
To begin, initialize a Git repository in your project directory:
git init
Follow these best practices for managing shell scripting projects in version control:
- Organize scripts logically: Group related scripts into directories and include a README.md file describing each script’s purpose and usage.
- Use meaningful commit messages: Each commit should focus on a specific change and have a descriptive message:
git commit -m "Add logging to backup script" - Include a .gitignore file: Prevent sensitive data, temporary files, or system-specific artifacts from being committed. A typical .gitignore for shell scripts might include:
*.log,*.tmp, or.env - Leverage branching: Use branches to isolate development, testing, and production versions of your scripts. For example, create a feature/add-logging branch for new features:
git checkout -b feature/add-logging - Tag releases: For production-ready versions, use Git tags to mark release points:
git tag -a v1.0 -m "First stable release"
Frequently Asked Questions
1. How do I handle errors effectively in Bash scripts?
Effective error handling in Bash involves multiple techniques:
-
Enable strict mode: Add
set -eat the beginning of your script to exit immediately on any command failure#!/bin/bash set -e # Exit on any error set -u # Exit on undefined variables set -o pipefail # Exit on pipe failures # Example: This will exit if the file doesn't exist cat /nonexistent/file.txt echo "This line won't execute" -
Use trap commands: Implement cleanup actions with
trap 'cleanup_function' EXITto ensure resources are properly released#!/bin/bash temp_file="/tmp/backup_$(date +%s).tmp" # Cleanup function cleanup() { echo "Cleaning up temporary files..." rm -f "$temp_file" } # Set trap for cleanup on exit trap cleanup EXIT # Create temp file touch "$temp_file" echo "Processing with temp file: $temp_file" # Script continues... cleanup will run automatically on exit -
Check exit codes: Use
$?to check the exit status of commands and implement conditional logic:#!/bin/bash # Method 1: Check exit code explicitly cp /source/file.txt /destination/ if [ $? -ne 0 ]; then echo "Error: Failed to copy file" >&2 exit 1 fi # Method 2: Use if statement directly if ! cp /source/file.txt /destination/; then echo "Error: Failed to copy file from /source/ to /destination/" >&2 echo "Please check if source file exists and destination is writable" >&2 exit 1 fi # Method 3: Using || operator cp /source/file.txt /destination/ || { echo "Error: Copy operation failed" >&2 exit 1 } -
Provide meaningful messages: Include descriptive error messages that explain what went wrong and suggest solutions
#!/bin/bash config_file="/etc/myapp/config.conf" if [[ ! -f "$config_file" ]]; then echo "Error: Configuration file not found: $config_file" >&2 echo "Please ensure the configuration file exists or run setup script" >&2 echo "Expected location: $config_file" >&2 exit 1 fi if [[ ! -r "$config_file" ]]; then echo "Error: Cannot read configuration file: $config_file" >&2 echo "Please check file permissions (current: $(ls -l "$config_file"))" >&2 echo "Run: chmod 644 $config_file" >&2 exit 1 fi -
Use
set -u: Enable undefined variable detection to catch typos in variable names#!/bin/bash set -u # Exit on undefined variables # This will cause script to exit with error echo "Value: $UNDEFINED_VARIABLE" # Safe way to handle potentially undefined variables echo "Value: ${UNDEFINED_VARIABLE:-"default_value"}" # Check if variable is set before using if [[ -n "${MY_VAR:-}" ]]; then echo "MY_VAR is set to: $MY_VAR" else echo "MY_VAR is not set, using default" fi -
Implement logging: Use
loggeror redirect output to log files for better debugging#!/bin/bash LOG_FILE="/var/log/myscript.log" # Function to log with timestamp log_message() { echo "[$(date '+%Y-%m-%d %H:%M:%S')] $1" >> "$LOG_FILE" } # Log to system journal logger "Starting backup process" # Log to file log_message "INFO: Starting backup process" # Log errors if ! cp /source/file /backup/; then log_message "ERROR: Failed to copy file" logger -p user.err "Backup failed: file copy error" exit 1 fi log_message "INFO: Backup completed successfully"
2. What are the best practices for optimizing Bash script performance?
To optimize Bash script performance:
-
Minimize external commands: Use built-in Bash features instead of calling external tools when possible
-
Implement parallelization: Use
xargs -Pfor parallel processing:find /data -name "*.log" | xargs -n 1 -P 4 gzip -
Use background processes: Run independent tasks in parallel with
&andwait:for file in *.log; do process_file "$file" & done wait -
Profile your scripts: Use
time,strace -c, andperf statto identify bottlenecks -
Avoid unnecessary subshells: Use
{ }instead of( )when you don’t need variable isolation -
Use efficient data structures: Prefer associative arrays over multiple variables for related data
-
Optimize loops: Minimize operations inside loops and use
printfinstead ofechofor better performance
3. How do I use associative arrays and regular expressions in Bash?
Associative Arrays:
# Declare associative array
declare -A server_config
server_config["web"]="192.168.1.10"
server_config["db"]="192.168.1.20"

# Access values
echo "Web server: ${server_config[web]}"

# Iterate over keys and values
for key in "${!server_config[@]}"; do
  echo "$key -> ${server_config[$key]}"
done
Regular Expressions:
# Pattern matching with [[ ]]
if [[ $filename == *.log ]]; then
  echo "This is a log file"
fi

# Regular expressions with =~
if [[ $log_entry =~ Error:\ (.+)\ at\ ([0-9:]+) ]]; then
  echo "Message: ${BASH_REMATCH[1]}"
  echo "Time: ${BASH_REMATCH[2]}"
fi
4. How can I implement unit testing for my Bash scripts?
Use the BATS (Bash Automated Testing System) framework:
-
Install BATS:
sudo apt install bats # Debian-based sudo yum install bats # RHEL-based -
Create test files with
.batsextension:# test_my_script.bats @test "Addition works correctly" { result=$(./my_script.sh add 2 3) [ "$result" -eq 5 ] } @test "Handles missing arguments" { result=$(./my_script.sh add 2) [ "$result" = "Error: Missing arguments" ] } -
Run tests:
bats test_my_script.bats -
Best practices:
- Write functions to isolate testable code
- Test both success and failure scenarios
- Use descriptive test names
- Mock external dependencies when possible
5. What are the essential debugging techniques for complex Bash scripts?
Effective debugging techniques include:
-
Enable debug mode: Use
set -xto print each command before execution:set -x # Your script commands here set +x -
Implement verbose logging: Add meaningful log messages throughout your script:
log_file="/var/log/myscript.log" echo "Starting backup process at $(date)" >> "$log_file" -
Use trace files: Capture both output and errors:
exec > >(tee /var/log/myscript_trace.log) 2>&1 -
Check variable values: Use
echoorprintfto display variable contents at critical points -
Test incrementally: Run small sections of your script to isolate issues
-
Use shellcheck: Install and run
shellcheckto catch common scripting errors and style issues -
Implement error boundaries: Use
trapcommands to catch and handle specific signals or errors gracefully
Conclusion
Mastering Linux-based technologies is an ongoing journey that demands continuous learning, experimentation, and adaptation to evolving challenges. Throughout this tutorial, I’ve delved into advanced shell scripting, performance optimization, and integration with system utilities, equipping you with the tools and techniques to manage Linux environments effectively. However, the true strength of these skills lies in applying them to real-world problems and embracing the opportunities to expand your expertise.
This content is based on an article from Linux Magazine and is available to you through a collaboration with DigitalOcean.
Thanks for learning with the DigitalOcean Community. Check out our offerings for compute, storage, networking, and managed databases.
About the author
Marcin Gastol is a senior DevOps engineer and Microsoft Certified Trainer with extensive experience in Azure technologies and teaching various IT subjects. He writes about multiple IT topics on his blog, https://marcingastol.com/.
Still looking for an answer?
This textbox defaults to using Markdown to format your answer.
You can type !ref in this text area to quickly search our full set of tutorials, documentation & marketplace offerings and insert the link!
 This work is licensed under a Creative Commons Attribution-NonCommercial- ShareAlike 4.0 International License.
Become a contributor for community
Get paid to write technical tutorials and select a tech-focused charity to receive a matching donation.

DigitalOcean Documentation
Full documentation for every DigitalOcean product.

Resources for startups and AI-native businesses
The Wave has everything you need to know about building a business, from raising funding to marketing your product.
The developer cloud
Scale up as you grow — whether you're running one virtual machine or ten thousand.

Start building today
From GPU-powered inference and Kubernetes to managed databases and storage, get everything you need to build, scale, and deploy intelligent applications.
