Sr Technical Content Strategist and Team Lead

Introduction
In this tutorial, you will learn how to build a real-time AI chatbot with vision and voice capabilities using OpenAI, LiveKit and Deepgram deployed on DigitalOcean GPU Droplets. This chatbot will be able to engage in real-time conversations with users, analyze images captured from your camera, and provide accurate and timely responses.
Enhancing Chatbot Capabilities with Advanced Technologies
In this tutorial, you will leverage three powerful technologies to build your real-time AI chatbot, each serving a specific purpose that enhances the chatbot’s capabilities, all while utilizing the robust infrastructure provided by DigitalOcean’s GPU Droplets:
-
OpenAI API: The OpenAI API will generate human-like text responses based on user input. By employing advanced models like GPT-4o, our chatbot will be able to understand context, engage in meaningful conversations, and provide accurate answers to user queries. This is crucial for creating an interactive experience where users feel understood and valued.
-
LiveKit: LiveKit will facilitate real-time audio and video communication between users and the chatbot. It allows us to create a seamless interaction experience, enabling users to speak to the chatbot and receive voice responses. This is essential for building a voice-enabled chatbot that can naturally engage users, making the interaction feel more personal and intuitive.
-
Deepgram: Deepgram will be employed for speech recognition, converting spoken language into text. This allows the chatbot to process user voice inputs effectively. By integrating Deepgram’s capabilities, you can ensure that the chatbot accurately understands user commands and queries, enhancing the overall interaction quality. This is particularly important in a real-time setting where quick and accurate responses are necessary for maintaining user engagement.
Why GPU Droplets?: Utilizing DigitalOcean’s GPU Droplets is particularly beneficial for this setup as they provide the necessary computational and GPU infrastructure to power and handle the intensive processing required by these AI models and real-time communication. The GPUs are optimized for running AI/ML workloads, significantly speeding up model inference and video processing tasks. This ensures the chatbot can deliver responses quickly and efficiently, even under heavy load, improving user experience and engagement.
Prerequisites
Before you begin, ensure you have:
- A DigitalOcean Cloud account.
- A GPU Droplet deployed and running.
- Basic knowledge of Python programming.
- An OpenAI API key set up for using the GPT-4o model.
- A LiveKit server up and running on your GPU Droplet.
- A Deepgram API Key.
Step 1 - Set Up the GPU Droplet
1.Create a New Project - You will need to create a new project from the cloud control panel and tie it to a GPU Droplet.
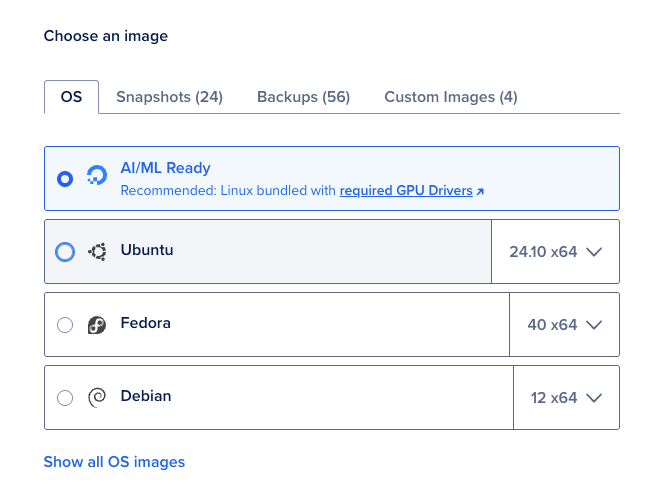
2.Create a GPU Droplet - Log into your DigitalOcean account, create a new GPU Droplet, and choose AI/ML Ready as the OS. This OS image installs all the necessary NVIDIA GPU Drivers. You can refer to our official documentation on how to create a GPU Droplet.
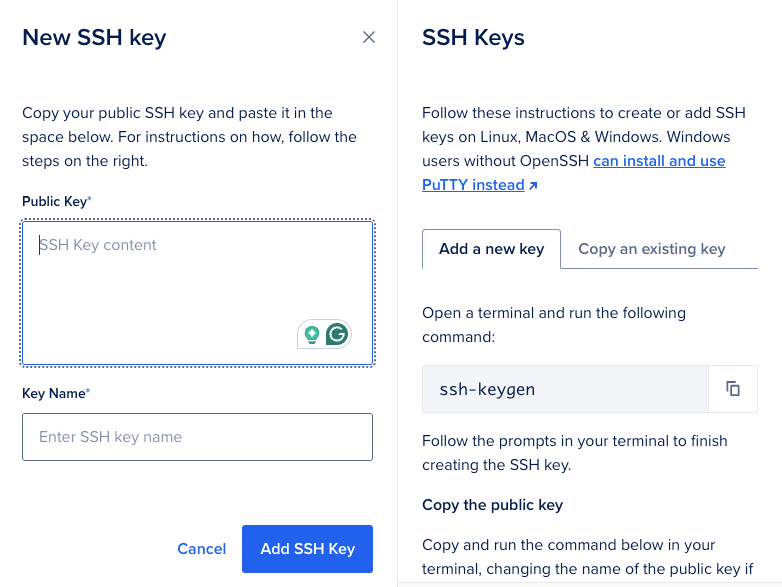
3.Add an SSH Key for authentication - An SSH key is required to authenticate with the GPU Droplet and by adding the SSH key, you can login to the GPU Droplet from your terminal.
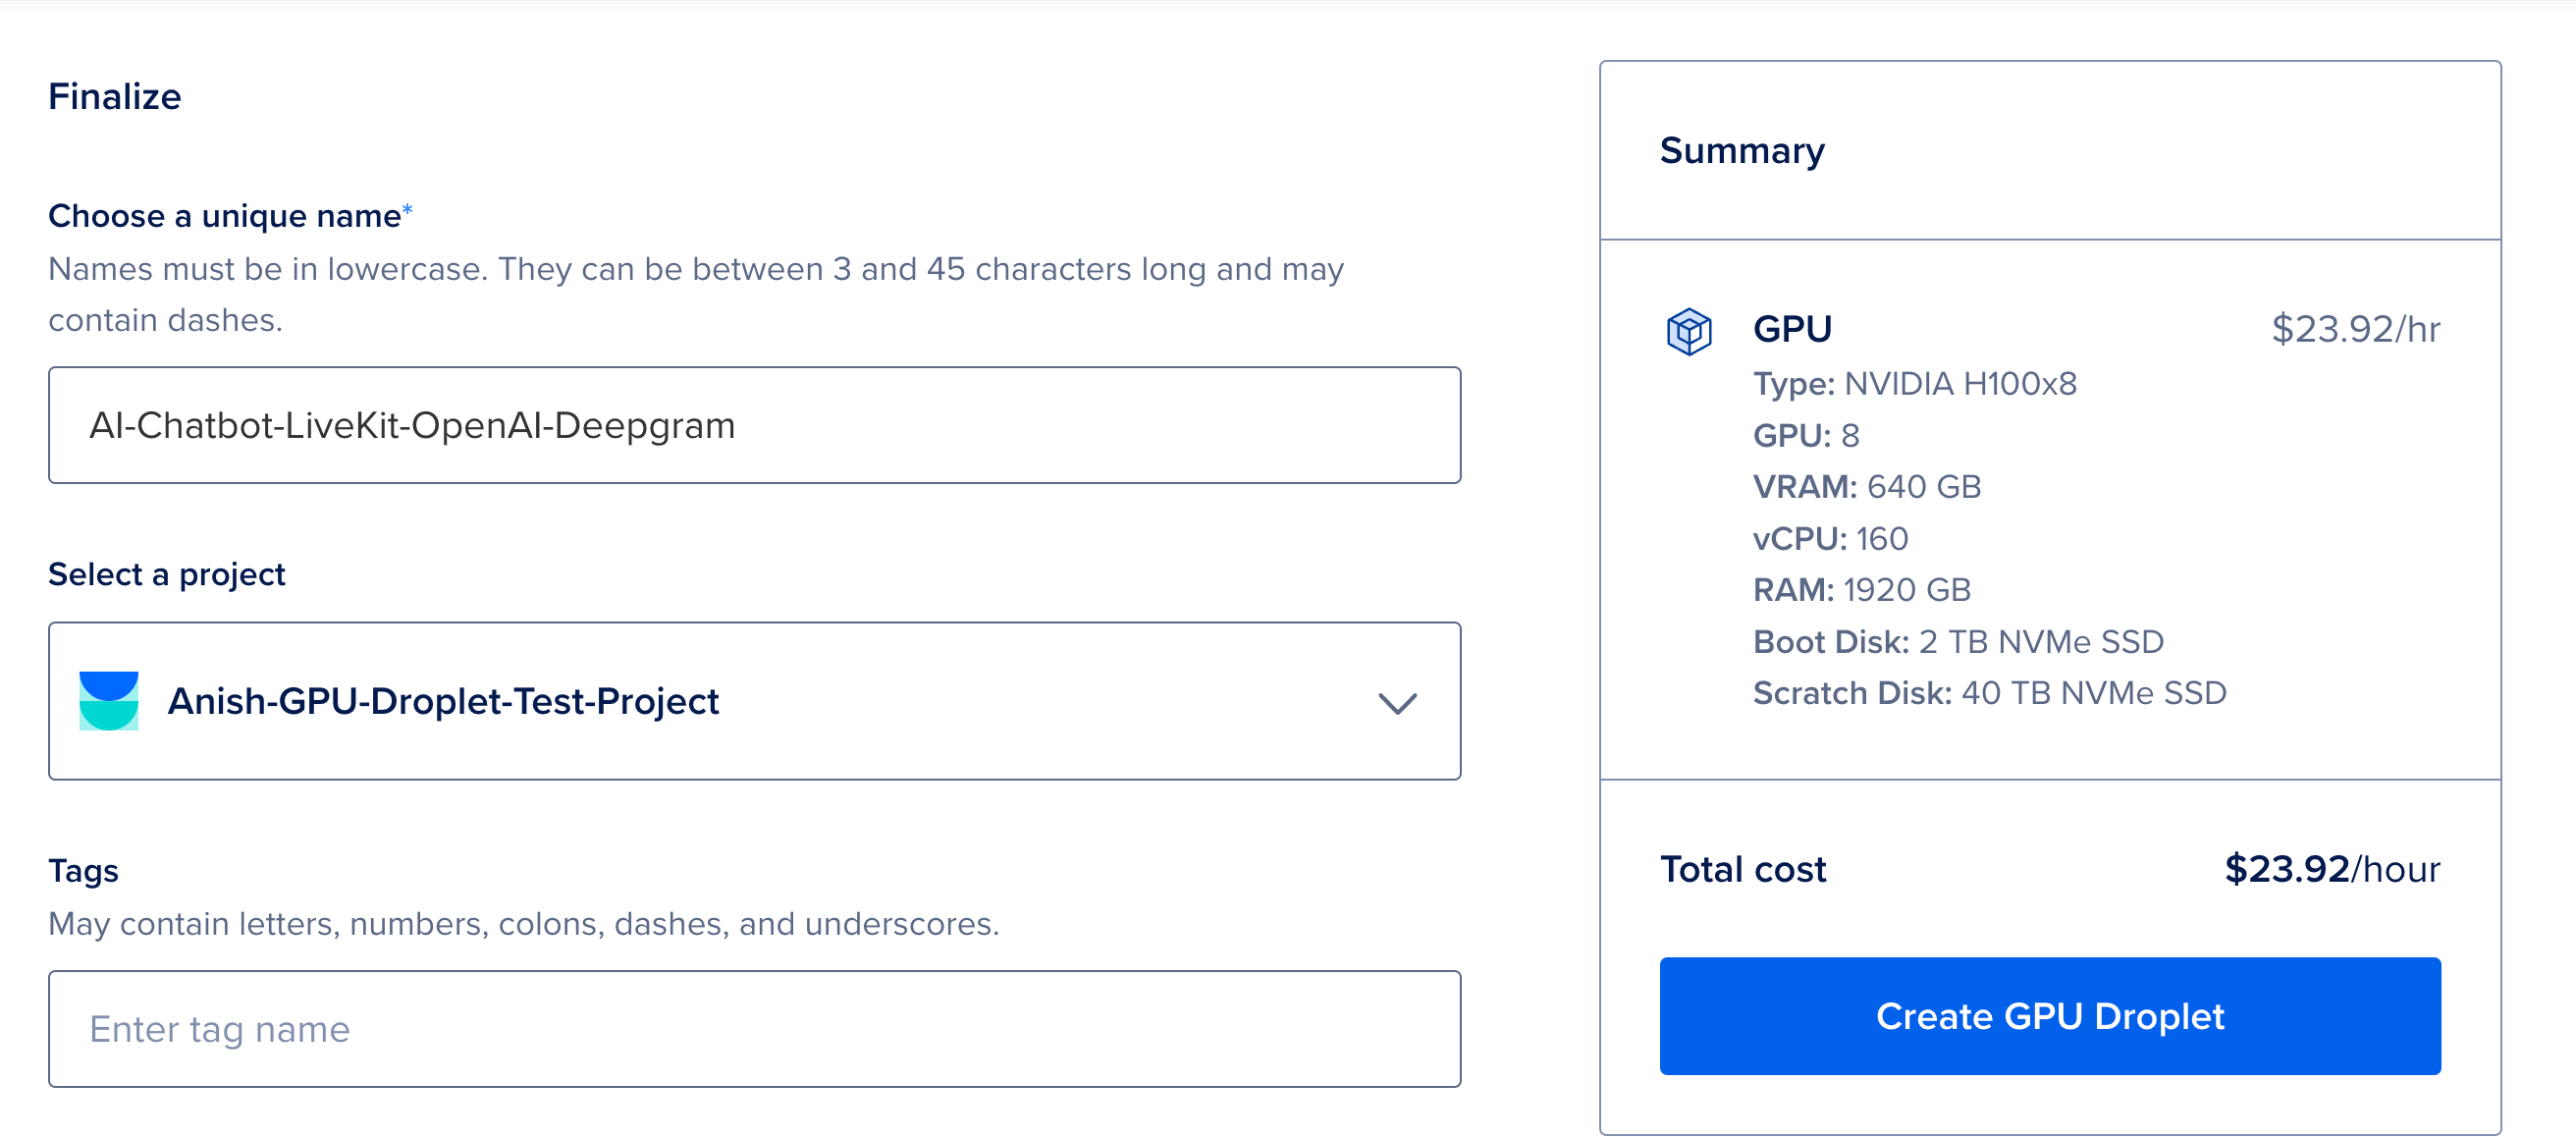
4.Finalize and Create the GPU Droplet - Once all of the above steps are completed, finalize and create a new GPU Droplet.
Step 2 - Setup a LiveKit account and install the CLI on GPU Droplet
Firstly, you will need to create an account or sign in to your LiveKit Cloud account and create a LiveKit Project. Please note down the LIVEKIT_URL, LIVEKIT_API_KEY and the LIVEKIT_API_SECRET environment variables from the Project Settings page as you will need them later in the tutorial.
Install the LiveKit CLI
The below command will install the LiveKit CLI on your GPU Droplet.
curl -sSL https://get.livekit.io/cli | bash
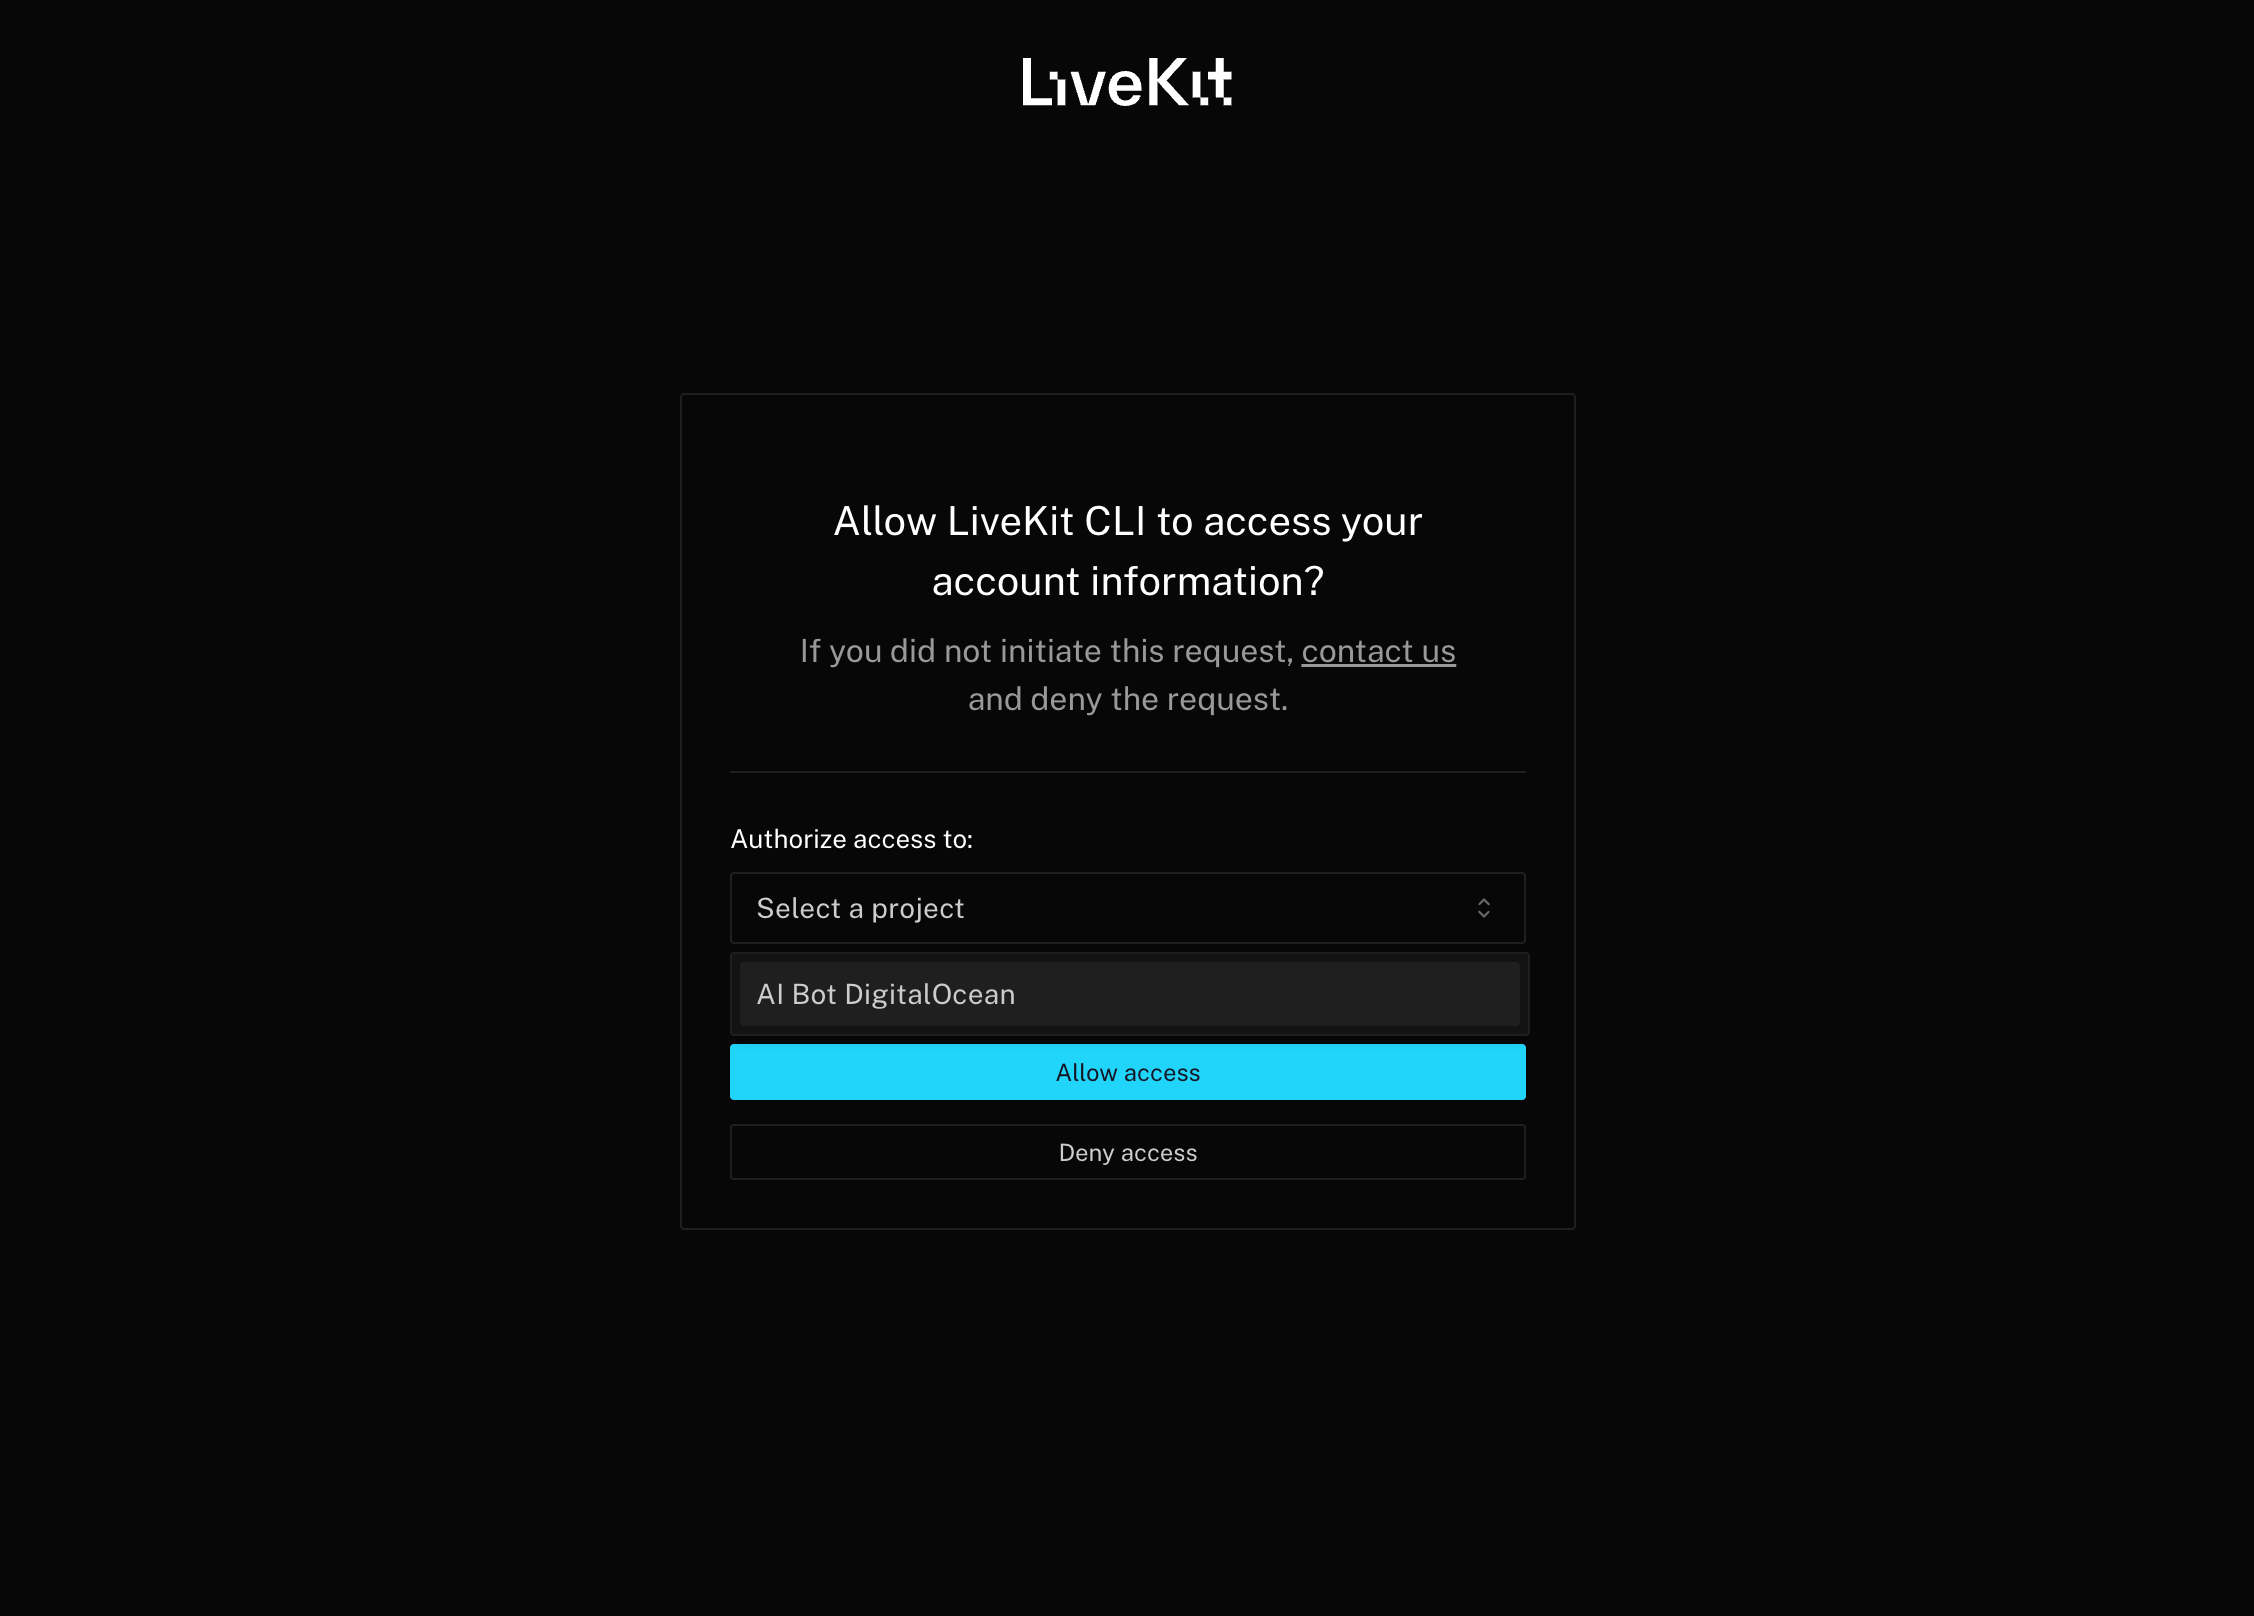
For LiveKit Cloud users, you can authenticate the CLI with your Cloud project to create an API key and secret. This allows you to use the CLI without manually providing credentials each time.
lk cloud auth
Then, follow instructions and log in from a browser.
You will be asked to add the device and authorize access to your LiveKit Project you creted earlier in this step.
Step 3 - Bootstrap an agent from an existing LiveKit template
The template provides a working voice assistant to build on. The template includes:
- Basic voice interaction
- Audio-only track subscription
- Voice activity detection (VAD)
- Speech-to-text (STT)
- Language model (LLM)
- Text-to-speech (TTS)
Note: By default, the example agent uses Deepgram for STT and OpenAI for TTS and LLM. However, you aren’t required to use these providers.
Clone the starter template for a simple Python voice agent:
lk app create
This will give you multiple existing LiveKit templates that you can use to deploy an app.
Outputvoice-assistant-frontend
transcription-frontend
token-server
multimodal-agent-python
multimodal-agent-node
voice-pipeline-agent-python
voice-pipeline-agent-node
android-voice-assistant
voice-assistant-swift
outbound-caller-python
You will use the voice-pipeline-agent-python template.
lk app create --template voice-pipeline-agent-python
Now, enter your Application name, OpenAI API Key and Deepgram API Key when prompted. If you aren’t using Deepgram and OpenAI, you can checkout other supported plugins.
OutputCloning template...
Instantiating environment...
Cleaning up...
To setup and run the agent:

       cd /root/do-voice-vision-bot
       python3 -m venv venv
       source venv/bin/activate
       pip install -r requirements.txt
       python3 agent.py dev
Step 4 - Install dependencies and create a Virtual Environment
First, switch to your applications’s directory which was created in the last step.
cd <app_name>
You can list the files that were created from the template.
ls
OutputLICENSE README.md agent.py requirements.txt
Here agent.py is the main application file which contains the logic and source code for the AI chatbot.
Now, you will create and activate a python virtual environment using the below commands:
apt install python3.10-venv
python3 -m venv venv
Add the following API keys in your environment:
export LIVEKIT_URL=<>
export LIVEKIT_API_KEY=<>
export LIVEKIT_API_SECRET=<>
export DEEPGRAM_API_KEY=<>
export OPENAI_API_KEY=<>
You can find the LIVEKIT_URL, LIVEKIT_API_KEY and the LIVEKIT_API_SECRET on the LiveKit Projects Settings page.
Activate the virtual environment:
source venv/bin/activate
Note: On Debian/Ubuntu systems, you need to install the python3-venv package using the following command.
apt install python3.10-venv
Now, let’s install the dependencies required for the app to work.
python3 -m pip install -r requirements.txt
Step 5 - Add Vision Capabilities to your AI agent
To add the vision capabilities to your agent you will need to modify the agent.py file with the below imports and functions.
First, let’s start off by adding these imports alongside the existing ones. Open your agent.py file using a text editor like vi or nano.
vi agent.py
Copy the below imports alongside the existing ones:
from livekit import rtc
from livekit.agents.llm import ChatMessage, ChatImage
These new imports include:
rtc: Access to LiveKit’s video functionalityChatMessageandChatImage: Classes you’ll use to send images to the LLM
Enable video subscription
Find the ctx.connect() line in the entrypoint function. Change AutoSubscribe.AUDIO_ONLY to AutoSubscribe.SUBSCRIBE_ALL:
await ctx.connect(auto_subscribe=AutoSubscribe.SUBSCRIBE_ALL)
Note: If it is difficult for you to edit and modify agent.py file using the vi or nano text editor on the GPU Droplet. You can copy the agent.py file content to your local system and make the required edits in a Code editor like VSCode etc, and then copy-paste the updated code.
This will enable the assistant to receive video tracks as well as audio.
Add video frame handling
Add these two helper functions after your imports but before the prewarm function:
async def get_video_track(room: rtc.Room):
   """Find and return the first available remote video track in the room."""
   for participant_id, participant in room.remote_participants.items():
       for track_id, track_publication in participant.track_publications.items():
           if track_publication.track and isinstance(
               track_publication.track, rtc.RemoteVideoTrack
           ):
               logger.info(
                   f"Found video track {track_publication.track.sid} "
                   f"from participant {participant_id}"
               )
               return track_publication.track
   raise ValueError("No remote video track found in the room")
This function searches through all participants to find an available video track. It’s used to locate the video feed to process.
Now, you will add the frame capture function
async def get_latest_image(room: rtc.Room):
   """Capture and return a single frame from the video track."""
   video_stream = None
   try:
       video_track = await get_video_track(room)
       video_stream = rtc.VideoStream(video_track)
       async for event in video_stream:
           logger.debug("Captured latest video frame")
           return event.frame
   except Exception as e:
       logger.error(f"Failed to get latest image: {e}")
       return None
   finally:
       if video_stream:
           await video_stream.aclose()
The purpose of this function is to capture a single frame from the video track and ensures proper cleanup of resources. Using aclose() releases system resources like memory buffers and video decoder instances, which helps prevent memory leaks.
Add the LLM Callback
Now, inside the entrypoint function, add the below callback function which will inject the latest video frame just before the LLM generates a response. Search for the entrypoint function inside the agent.py file:
async def before_llm_cb(assistant: VoicePipelineAgent, chat_ctx: llm.ChatContext):
       """
       Callback that runs right before the LLM generates a response.
       Captures the current video frame and adds it to the conversation context.
       """
       try:
           if not hasattr(assistant, '_room'):
               logger.warning("Room not available in assistant")
               return
           latest_image = await get_latest_image(assistant._room)
           if latest_image:
               image_content = [ChatImage(image=latest_image)]
               chat_ctx.messages.append(ChatMessage(role="user", content=image_content))
               logger.debug("Added latest frame to conversation context")
           else:
               logger.warning("No image captured from video stream")
       except Exception as e:
           logger.error(f"Error in before_llm_cb: {e}")
This callback is the key to efficient context management — it will only add visual information when the assistant is about to respond. If visual information was added to every message, it would quickly fill up the LLMs context window which would be highly inefficient and costly.
Update the system prompt
Find the initial_ctx creation inside the entrypoint function and update it to include vision capabilities:
initial_ctx = llm.ChatContext().append(
   role="system",
   text=(
       "You are a voice assistant created by LiveKit that can both see and hear. "
       "You should use short and concise responses, avoiding unpronounceable punctuation. "
       "When you see an image in our conversation, naturally incorporate what you see "
       "into your response. Keep visual descriptions brief but informative."
   ),
)
Update the assistant configuration
Find the VoicePipelineAgent creation inside the entrypoint function and add the callback:
assistant = VoicePipelineAgent(
   vad=ctx.proc.userdata["vad"],
   stt=openai.STT(),
   llm=openai.LLM(),
   tts=openai.TTS(),
   chat_ctx=initial_ctx,
   before_llm_cb=before_llm_cb
)
The major update here is the before_llm_cb parameter, which uses the callback created earlier to inject the latest video frame into the conversation context.
Final agent.py file with voice & vision capabilities
This is how the agent.py file would look after adding all the necessary functions and imports:
from asyncio.log import logger
from livekit import rtc
from livekit.agents.llm import ChatMessage, ChatImage
import logging
from dotenv import load_dotenv
from livekit.agents import (
   AutoSubscribe,
   JobContext,
   JobProcess,
   WorkerOptions,
   cli,
   llm,
)
from livekit.agents.pipeline import VoicePipelineAgent
from livekit.plugins import openai, deepgram, silero

async def get_video_track(room: rtc.Room):
   """Find and return the first available remote video track in the room."""
   for participant_id, participant in room.remote_participants.items():
       for track_id, track_publication in participant.track_publications.items():
           if track_publication.track and isinstance(
               track_publication.track, rtc.RemoteVideoTrack
           ):
               logger.info(
                   f"Found video track {track_publication.track.sid} "
                   f"from participant {participant_id}"
               )
               return track_publication.track
   raise ValueError("No remote video track found in the room")

async def get_latest_image(room: rtc.Room):
   """Capture and return a single frame from the video track."""
   video_stream = None
   try:
       video_track = await get_video_track(room)
       video_stream = rtc.VideoStream(video_track)
       async for event in video_stream:
           logger.debug("Captured latest video frame")
           return event.frame
   except Exception as e:
       logger.error(f"Failed to get latest image: {e}")
       return None
   finally:
       if video_stream:
           await video_stream.aclose()

def prewarm(proc: JobProcess):
   proc.userdata["vad"] = silero.VAD.load()

async def entrypoint(ctx: JobContext):

   async def before_llm_cb(assistant: VoicePipelineAgent, chat_ctx: llm.ChatContext):
       """
       Callback that runs right before the LLM generates a response.
       Captures the current video frame and adds it to the conversation context.
       """
       try:
           if not hasattr(assistant, '_room'):
               logger.warning("Room not available in assistant")
               return
           latest_image = await get_latest_image(assistant._room)
           if latest_image:
               image_content = [ChatImage(image=latest_image)]
               chat_ctx.messages.append(ChatMessage(role="user", content=image_content))
               logger.debug("Added latest frame to conversation context")
           else:
               logger.warning("No image captured from video stream")
       except Exception as e:
           logger.error(f"Error in before_llm_cb: {e}")

   initial_ctx = llm.ChatContext().append(
       role="system",
       text=(
           "You are a voice assistant created by LiveKit that can both see and hear. "
           "You should use short and concise responses, avoiding unpronounceable punctuation. "
           "When you see an image in our conversation, naturally incorporate what you see "
           "into your response. Keep visual descriptions brief but informative."
       ),
   )

   logger.info(f"connecting to room {ctx.room.name}")
   await ctx.connect(auto_subscribe=AutoSubscribe.SUBSCRIBE_ALL)

   # Wait for the first participant to connect
   participant = await ctx.wait_for_participant()
   logger.info(f"starting voice assistant for participant {participant.identity}")

   # Configure the voice pipeline agent
   agent = VoicePipelineAgent(
       vad=ctx.proc.userdata["vad"],
       stt=deepgram.STT(),
       llm=openai.LLM(),
       tts=openai.TTS(),
       chat_ctx=initial_ctx,
       before_llm_cb=before_llm_cb  # Add the callback here
   )

   agent.start(ctx.room, participant)

   # Greet the user when the agent starts
   await agent.say("Hey, how can I help you today?", allow_interruptions=True)

if __name__ == "__main__":
   cli.run_app(
       WorkerOptions(
           entrypoint_fnc=entrypoint,
           prewarm_fnc=prewarm,
       ),
   )
Testing your agent
Start your assistant and test the below:
python3 agent.py dev
-
Test Voice Interaction: Speak into your microphone and see the chatbot respond.
-
Test Vision Capability: Ask the chatbot to identify objects through your video cam stream.
You would obeseve the following logs in your console:
Output2024-12-30 08:32:56,167 - DEBUG asyncio - Using selector: EpollSelector
2024-12-30 08:32:56,168 - DEV  livekit.agents - Watching /root/do-voice-vision-bot
2024-12-30 08:32:56,774 - DEBUG asyncio - Using selector: EpollSelector
2024-12-30 08:32:56,778 - INFO livekit.agents - starting worker {"version": "0.12.5", "rtc-version": "0.18.3"}
2024-12-30 08:32:56,819 - INFO livekit.agents - registered worker {"id": "AW_cjS8QXCEnFxy", "region": "US East", "protocol": 15, "node_id": "NC_OASHBURN1A_BvkfVkdYVEWo"}
Now, you will need to connect the app to the LiveKit room with a client that publishes both audio and video. The easiest way to do this is by using the hosted agent playground.

Since, this agent requires a frontend application to communicate with. You can use one of our example frontends in livekit-examples, create your own following one of the client quickstarts, or test instantly against one of the hosted Sandbox frontends.
In this example you will use an existing hosted agent playground. Simply open this https://agents-playground.livekit.io/ in your system’s browser and connect your LiveKit Project. It should auto-populate with your Project.
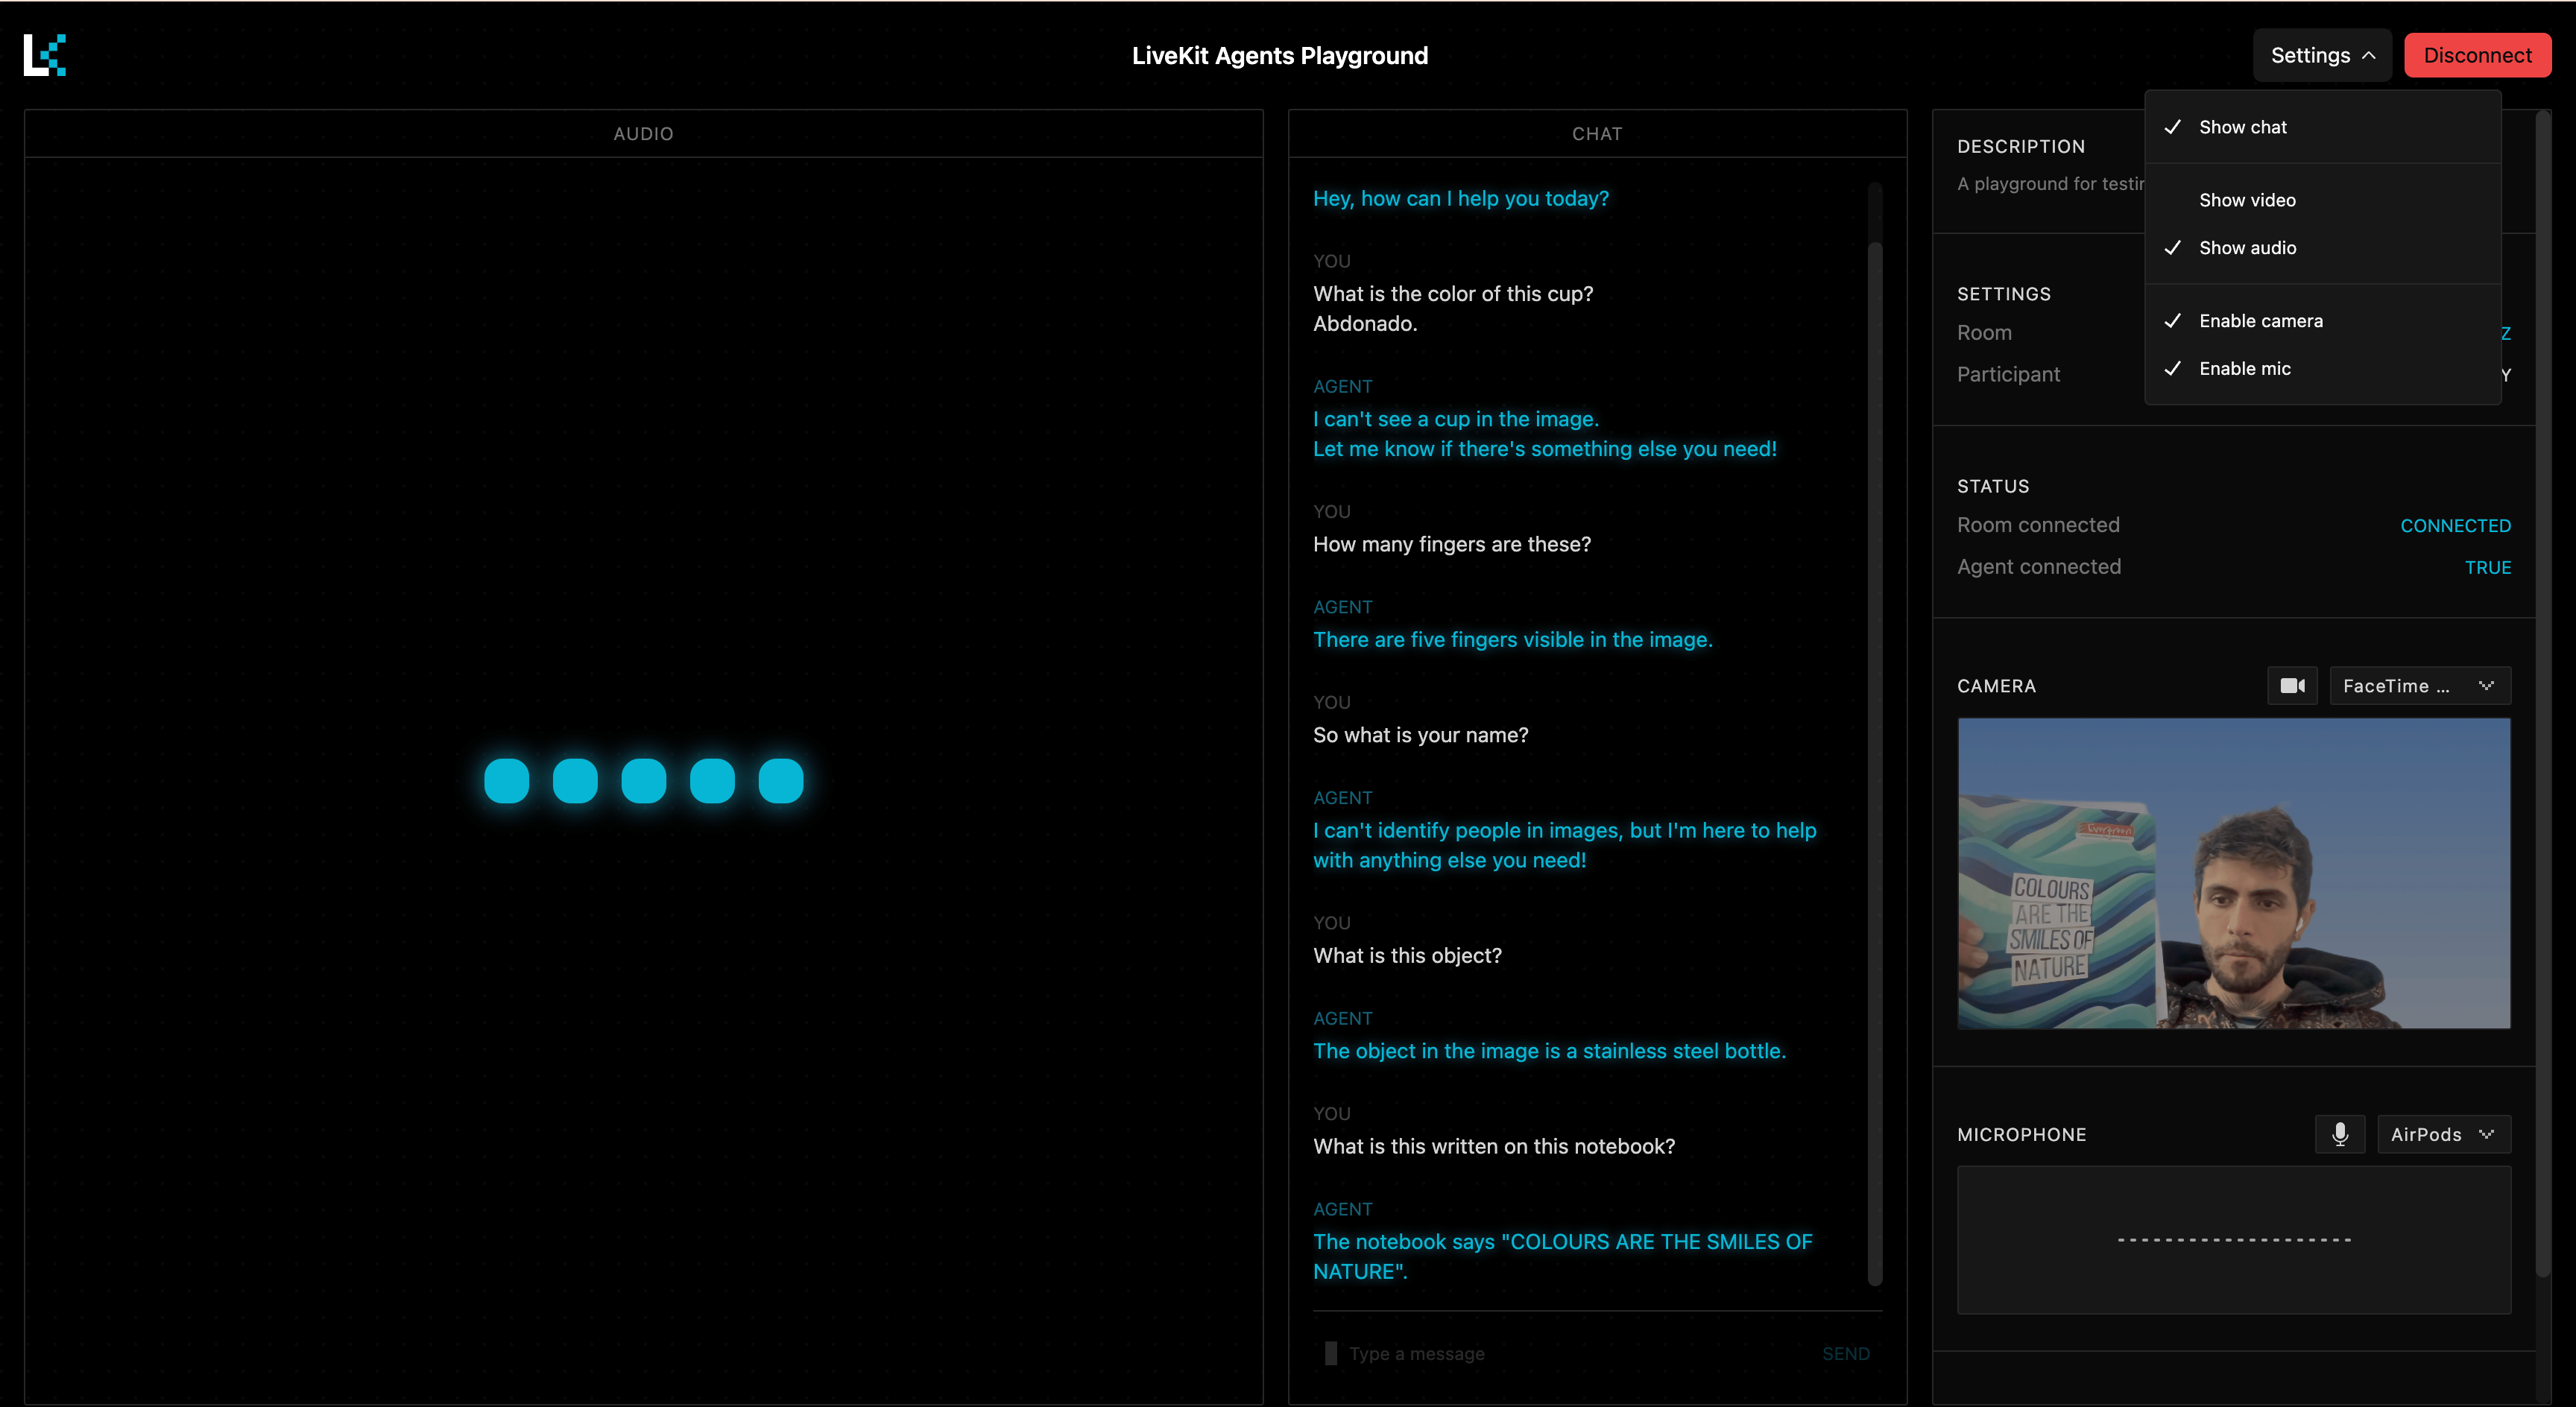
How it works
With these above changes to your agent, your assistant can now:
-
Connects to both audio and video streams.
-
Listens for user speech as before.
-
Just before generating each response:
- Captures the current video frame.
- Adds it to the conversation context.
- Uses it to inform the response.
4.Keep the context clean by only adding frames when needed.
Conclusion
Congratulations! You have successfully built a real-time AI chatbot with vision and voice capabilities using OpenAI, LiveKit, and Deepgram on DigitalOcean GPU Droplets. This powerful combination enables efficient, scalable and real-time interactions for your applications.
You can refer to LiveKit’s official documentation and it’s API reference for more details on building AI agents.
Thanks for learning with the DigitalOcean Community. Check out our offerings for compute, storage, networking, and managed databases.
About the author
I help Businesses scale with AI x SEO x (authentic) Content that revives traffic and keeps leads flowing | 3,000,000+ Average monthly readers on Medium | Sr Technical Writer(Team Lead) @ DigitalOcean | Ex-Cloud Consultant @ AMEX | Ex-Site Reliability Engineer(DevOps)@Nutanix
Still looking for an answer?
This textbox defaults to using Markdown to format your answer.
You can type !ref in this text area to quickly search our full set of tutorials, documentation & marketplace offerings and insert the link!
This is a very helpful tutorial, thanks Anish!
I noticed that this guide seems to be based on an older version of LiveKit (v0.x). With the release of LiveKit v1.0, some of the functions and classes used here, like ChatImage are replaced with ImageContent, and many of other functions seems to be deprecated.
It would be fantastic if you could publish an updated version of this tutorial for LiveKit v1.0. I’m particularly interested in learning how to integrate camera feeds with the Agents Playground. Additionally, it would be incredibly useful to see how the LLM could also view a screen share in a similar manner to the camera feed.
Thanks again for the great content!
 This work is licensed under a Creative Commons Attribution-NonCommercial- ShareAlike 4.0 International License.
Become a contributor for community
Get paid to write technical tutorials and select a tech-focused charity to receive a matching donation.

DigitalOcean Documentation
Full documentation for every DigitalOcean product.

Resources for startups and AI-native businesses
The Wave has everything you need to know about building a business, from raising funding to marketing your product.
The developer cloud
Scale up as you grow — whether you're running one virtual machine or ten thousand.

Start building today
From GPU-powered inference and Kubernetes to managed databases and storage, get everything you need to build, scale, and deploy intelligent applications.
