Technical Writer

Introduction
Nginx is a popular web server that can host many large and high-traffic sites on the internet. Nginx connection errors can be difficult to debug because there are many possible causes and solutions. Moreover, there aren’t always many hints to point you in the right direction to fix the error. Since the nature of these errors involves failing to establish a connection with Nginx to begin with, these errors often appear at the browser level instead of as an Nginx-level specific error. In fact, many common errors with Nginx have to do with some aspect of the connection, such as ports or firewalls.
The examples in this guide were tested on an Ubuntu 22.04 server but should be applicable to most Nginx installations. Most of these errors can be resolved within the scope of Nginx’s standardized configuration file, though directories and paths may differ slightly.
In this tutorial, you will learn about what a browser connection error means for your Nginx web server and the various steps you can take to identify and correct the issue to get your server back up and running.
Inspecting Your Nginx Error Log
The errors and solutions presented in this tutorial are common cases but not exhaustive. Due to the nature of syntax errors breaking the structure of what Nginx recognizes as valid statements, the following errors are only guidelines for how Nginx responds. Oftentimes, one error can cascade into another, and an error can be symptomatic of a larger or separate issue. Your specific circumstance and setup may vary.
Please note that you can always refer to the Nginx error log to view a running list of errors:
- sudo cat /var/log/nginx/error.log
Addressing “This site can’t be reached” Error
When browsing online, you’ve likely encountered a web page that reads something like The site can’t be reached. There are potentially many causes to this issue, but this tutorial will focus on the common errors from the perspective of a user who is setting up Nginx. Sometimes refreshing your browser can solve the issue, but in the case of your own web server, there may be other factors impacting your server’s connection on the backend.
Here is an example of the error message you may receive on your web browser:
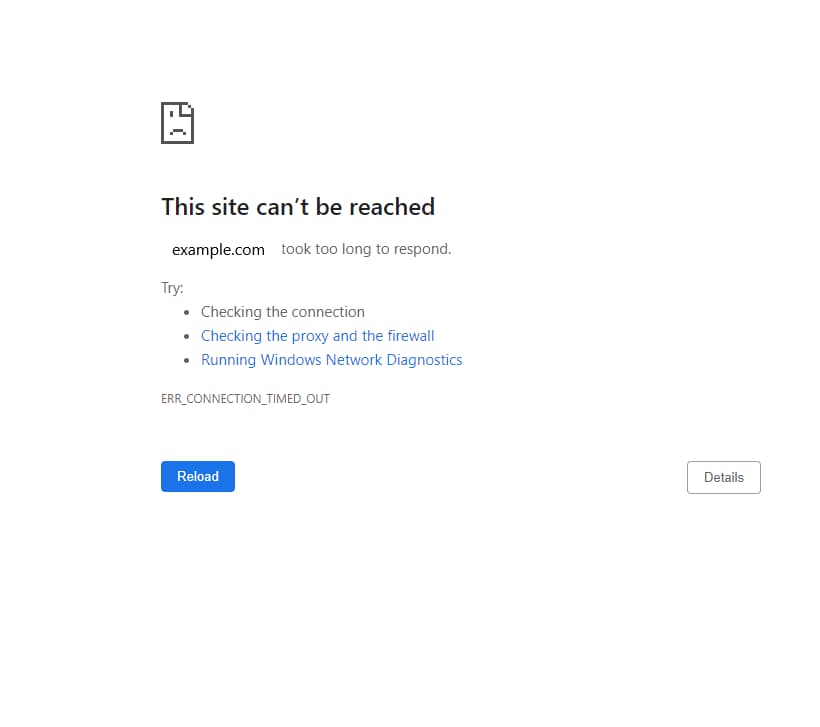
Before we begin, let’s discuss what this error is saying about your web server. First, example.com address is taking too long to respond, therefore, the ERR_CONNECTION_TIMED_OUT is referenced at the end of the message. However, remember that this is a browser-level error, not a direct error from your Nginx server. This error message can be interpreted as the possible cause of why the connection to your server cannot be established. Furthermore, the solutions suggested here are given from a client-side end user’s perspective.
Again, this is a scenario where you are running your own web server, not visiting any given website on the internet. To truly diagnose your problem, you will have to inspect your Nginx setup yourself in a process of elimination via a list of probable causes.
Since you’re using Nginx, you can assess several items that could be causing this error by running certain commands and checking your firewall and configuration settings.
Verifying your Nginx Web Server is Active
The first step you can take is to verify that Nginx is active on your system, and that there were no installation issues. You can check this by running the systemd init system to check the status of the Nginx service running on your machine:
- systemctl status nginx
If your Nginx web server is running properly, you receive the following output:
● nginx.service - A high performance web server and a reverse proxy server
     Loaded: loaded (/lib/systemd/system/nginx.service; enabled; preset: enable>
     Active: active (running) since Thu 2022-11-03 16:37:22 UTC; 1 week 4 days >
       Docs: man:nginx(8)
   Main PID: 3253 (nginx)
      Tasks: 2 (limit: 1116)
     Memory: 3.7M
        CPU: 1.250s
     CGroup: /system.slice/nginx.service
             ├─3253 "nginx: master process /usr/sbin/nginx -g daemon on; master>
             └─3254 "nginx: worker process"
In the output, there’s a line that says Active and says whether or not the web server is running or not. In this example, it is successfully up and running. If it weren’t, this line would read as inactive (dead).
Note: If your output returns inactive (dead), you may want to try starting your server again with sudo systemctl start nginx. If you recently made any configuration changes, make sure to reload those by running sudo systemctl reload nginx, and then check the status again. You can learn more about this in our tutorial that discusses how to manage various Nginx processes.
Once you’ve confirmed your Nginx service is running, you can enter your server address in the browser again as http://example.com to test if the connection issue still persists. If you’re not certain of your IP address, you can use the icanhazip.com tool to locate your IP address:
- curl -4 icanhazip.com
If your site still cannot be reached at this point, then the next step is to check your firewall settings.
Verifying and Adjusting your Firewall Settings
Another step you can take to check your web server’s connection is to verify that your firewall settings are properly configured to accept requests via the appropriate port connection. If it isn’t, you’ll need to adjust your firewall settings to allow for connections to the port. By default, an Nginx web server will listen for any incoming requests on port 80, and with SSL certificates set up it listens to secure connections on port 443. For the purposes of this tutorial, however, we will focus on the default port 80.
In this example, we are using Ubuntu 22.04 and the Uncomplicated Firewall, UFW. Note, this may be different depending on your specific distribution. Begin by checking your firewall’s current settings. Keep in mind that you will have to run the following command with root user privileges. Here we recommend using a user with sudo privileges to do so:
- sudo ufw status
Status: active

To                         Action      From
--                         ------      ----
OpenSSH                    ALLOW       Anywhere
OpenSSH (v6)               ALLOW       Anywhere (v6)
This output lists the current open port connections on this machine. Unfortunately, port 80 is not on the list and therefore needs to be added to allow for Nginx access. If you’re uncertain about what application configurations are available, you can run ufw app list:
- sudo ufw app list
Available applications:
  Nginx Full
  Nginx HTTP
  Nginx HTTPS
  OpenSSH
Since Nginx is successfully installed, this lists various Nginx profiles available for configuration. Here is a quick overview of what each of these profiles signifies:
Nginx Full: opens both ports80(normal, unencrypted traffic) and443(TLS/SSL encrypted traffic)Nginx HTTP: opens only port80Nginx HTTPS: opens only port443
Since you only need to open port 80 to get your connection configured properly, you can add the Nginx HTTP application with the following command:
- sudo ufw allow 'Nginx HTTP'
Note: It’s recommended that when adjusting your firewall settings you should enable the most restrictive profile that allows for the traffic you’ve configured. This will depend on your needs. In this example, we allow traffic for Nginx HTTP for port 80, but if you want to learn more about how to set it up for Nginx HTTPS for port 443 you can read more in our tutorial on securing Nginx with Let’s Encrypt.
If this command is successful, it will return an output of Rule added. To confirm the Nginx HTTP application was added to the list, check the status again with sudo ufw status:
Status: active

To                         Action      From
--                         ------      ----
OpenSSH                    ALLOW       Anywhere
Nginx HTTP                 ALLOW       Anywhere
OpenSSH (v6)               ALLOW       Anywhere (v6)
Nginx HTTP (v6)            ALLOW       Anywhere (v6)
This output now lists the Nginx HTTP application that has been added and port 80 is open to receive connections.
Verifying your Nginx Configuration File
Before testing your web browser, it’s recommended you check your configuration settings to ensure that your server domain block is set up to listen on port 80. Setting the appropriate port and IP address in your Nginx configuration is essential and must be paired with the proper open port in your firewall. If any component is missing, the connection will fail.
You can open your Nginx configuration file in your preferred text editor. Here we’ll use nano:
- sudo nano /etc/nginx/sites-available/example.com
Once the file is open the first couple of lines consist of the listen directive:
server {
       listen 80;
         listen [::]:80;

       root /var/www/example.com/html;
        index index.html index.htm index.nginx-debian.html;

        server_name example.com www.example.com;

        location / {
                try_files $uri $uri/ =404;
        }
}
The listen directive specifies the port that the server can accept requests from. Additionally, the bracketed listen [::] represents the IPv6 addresses. If you prefer, you can also include your IP address information after the listen directive. However, in this particular example, connection to the domain is represented by the root path and server_name directives. As mentioned earlier, you must make sure your domain or IP address information is accurate in this configuration file, or it will not work. Therefore, double check that the root and sever_name directives are exact in the domain you want to connect to.
After confirming the configuration for the listen directive is set correctly to port 80, you can save and close the file. If you’re using nano, you can do this by pressing CTRL + X and Y and ENTER.
To ensure your configuration file is free of any syntax errors, run the following:
- sudo nginx -t
Please note that if you made changes to your configuration file and received no syntax errors after running this command, make sure to restart Nginx to enable your changes with sudo systemctl restart nginx.
After you’ve done this, open up your browser and navigate to http://example.com. If you receive the following web page, then your adjusted firewall settings were successful for port 80 to accept requests:
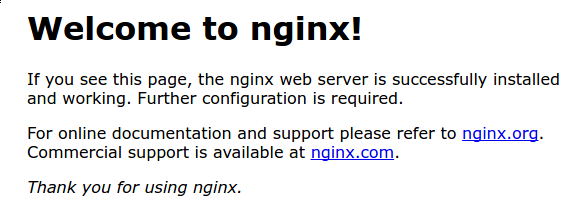
This web page confirms that your Nginx web server is installed and working correctly.
Conclusion
In this tutorial, you learned how to verify if your Nginx service is active and firewall and port connections that may be causing your common This site cannot be reached error when using an Nginx web server. If you’re interested in learning more about Nginx, you can check out our tagged Community page, or jump into learning how to install Nginx on Ubuntu 22.04.
Thanks for learning with the DigitalOcean Community. Check out our offerings for compute, storage, networking, and managed databases.
About the author
Educator and writer committed to empowering our community by providing access to the knowledge and tools for making creative ideas into a reality
Still looking for an answer?
This textbox defaults to using Markdown to format your answer.
You can type !ref in this text area to quickly search our full set of tutorials, documentation & marketplace offerings and insert the link!
 This work is licensed under a Creative Commons Attribution-NonCommercial- ShareAlike 4.0 International License.
Become a contributor for community
Get paid to write technical tutorials and select a tech-focused charity to receive a matching donation.

DigitalOcean Documentation
Full documentation for every DigitalOcean product.

Resources for startups and AI-native businesses
The Wave has everything you need to know about building a business, from raising funding to marketing your product.
The developer cloud
Scale up as you grow — whether you're running one virtual machine or ten thousand.

Start building today
From GPU-powered inference and Kubernetes to managed databases and storage, get everything you need to build, scale, and deploy intelligent applications.
