By Amit Jotwani
Developer Educator
 - Saving Attachments to DigitalOcean Spaces")
Welcome back to Day 10 of the 12 Days of DigitalOcean! Yesterday, we taught your app to extract information from email content using DigitalOcean’s GenAI agent. That was a huge step, but let’s face it—receipts and invoices don’t always live in the email body. More often than not, they’re attachments.
Today, we’re going to handle that. We’ll teach your app how to extract these attachments, save them securely to DigitalOcean Spaces, and generate public URLs for each file. These URLs will eventually be stored in our database, allowing you to preview the attached files when reviewing expenses.
Let’s dive in.
🚀 What You’ll Learn
By the end of today’s session, you’ll know how to:
- Create a DigitalOcean Space to store attachments.
- Extract and decode Base64-encoded attachments from Postmark emails.
- Upload attachments to DigitalOcean Spaces using boto3.
- Generate unique file names with uuid to prevent overwrites.
- Orchestrate the entire workflow to handle multiple attachments seamlessly.
🛠 What You’ll Need
To get the most out of this tutorial, we assume the following:
- A Flask App Already Deployed on DigitalOcean: If you haven’t deployed a Flask app yet, you can follow the instructions in Day 7 - Building and Deploying the Email-Based Receipt Processor.
- Postmark Configured for Email Testing: To test the email-to-receipt processing pipeline, you’ll need Postmark set up to forward emails to your Flask app. See Day 8 - Connecting Postmark to Your Flask App for a step-by-step guide.
- DigitalOcean Spaces Setup: We’ll store processed attachments in a DigitalOcean Space. If you don’t have a Space yet, we’ll guide you through creating one in this tutorial.
<$> [info] Note: Even if you don’t have everything set up, you’ll still learn how to:
-
Create a DigitalOcean Space to store attachments.
-
Decode Base64-encoded attachments programmatically.
-
Upload files to DigitalOcean Spaces using
boto3. -
Seamlessly integrate attachment handling into your Flask app.
<$>
Step 1: Create a DigitalOcean Space
First, we need a place to store our attachments. DigitalOcean Spaces is an object storage service, perfect for securely handling files like receipts and invoices. It’s scalable, secure, and integrates seamlessly with our app.
Create the Space
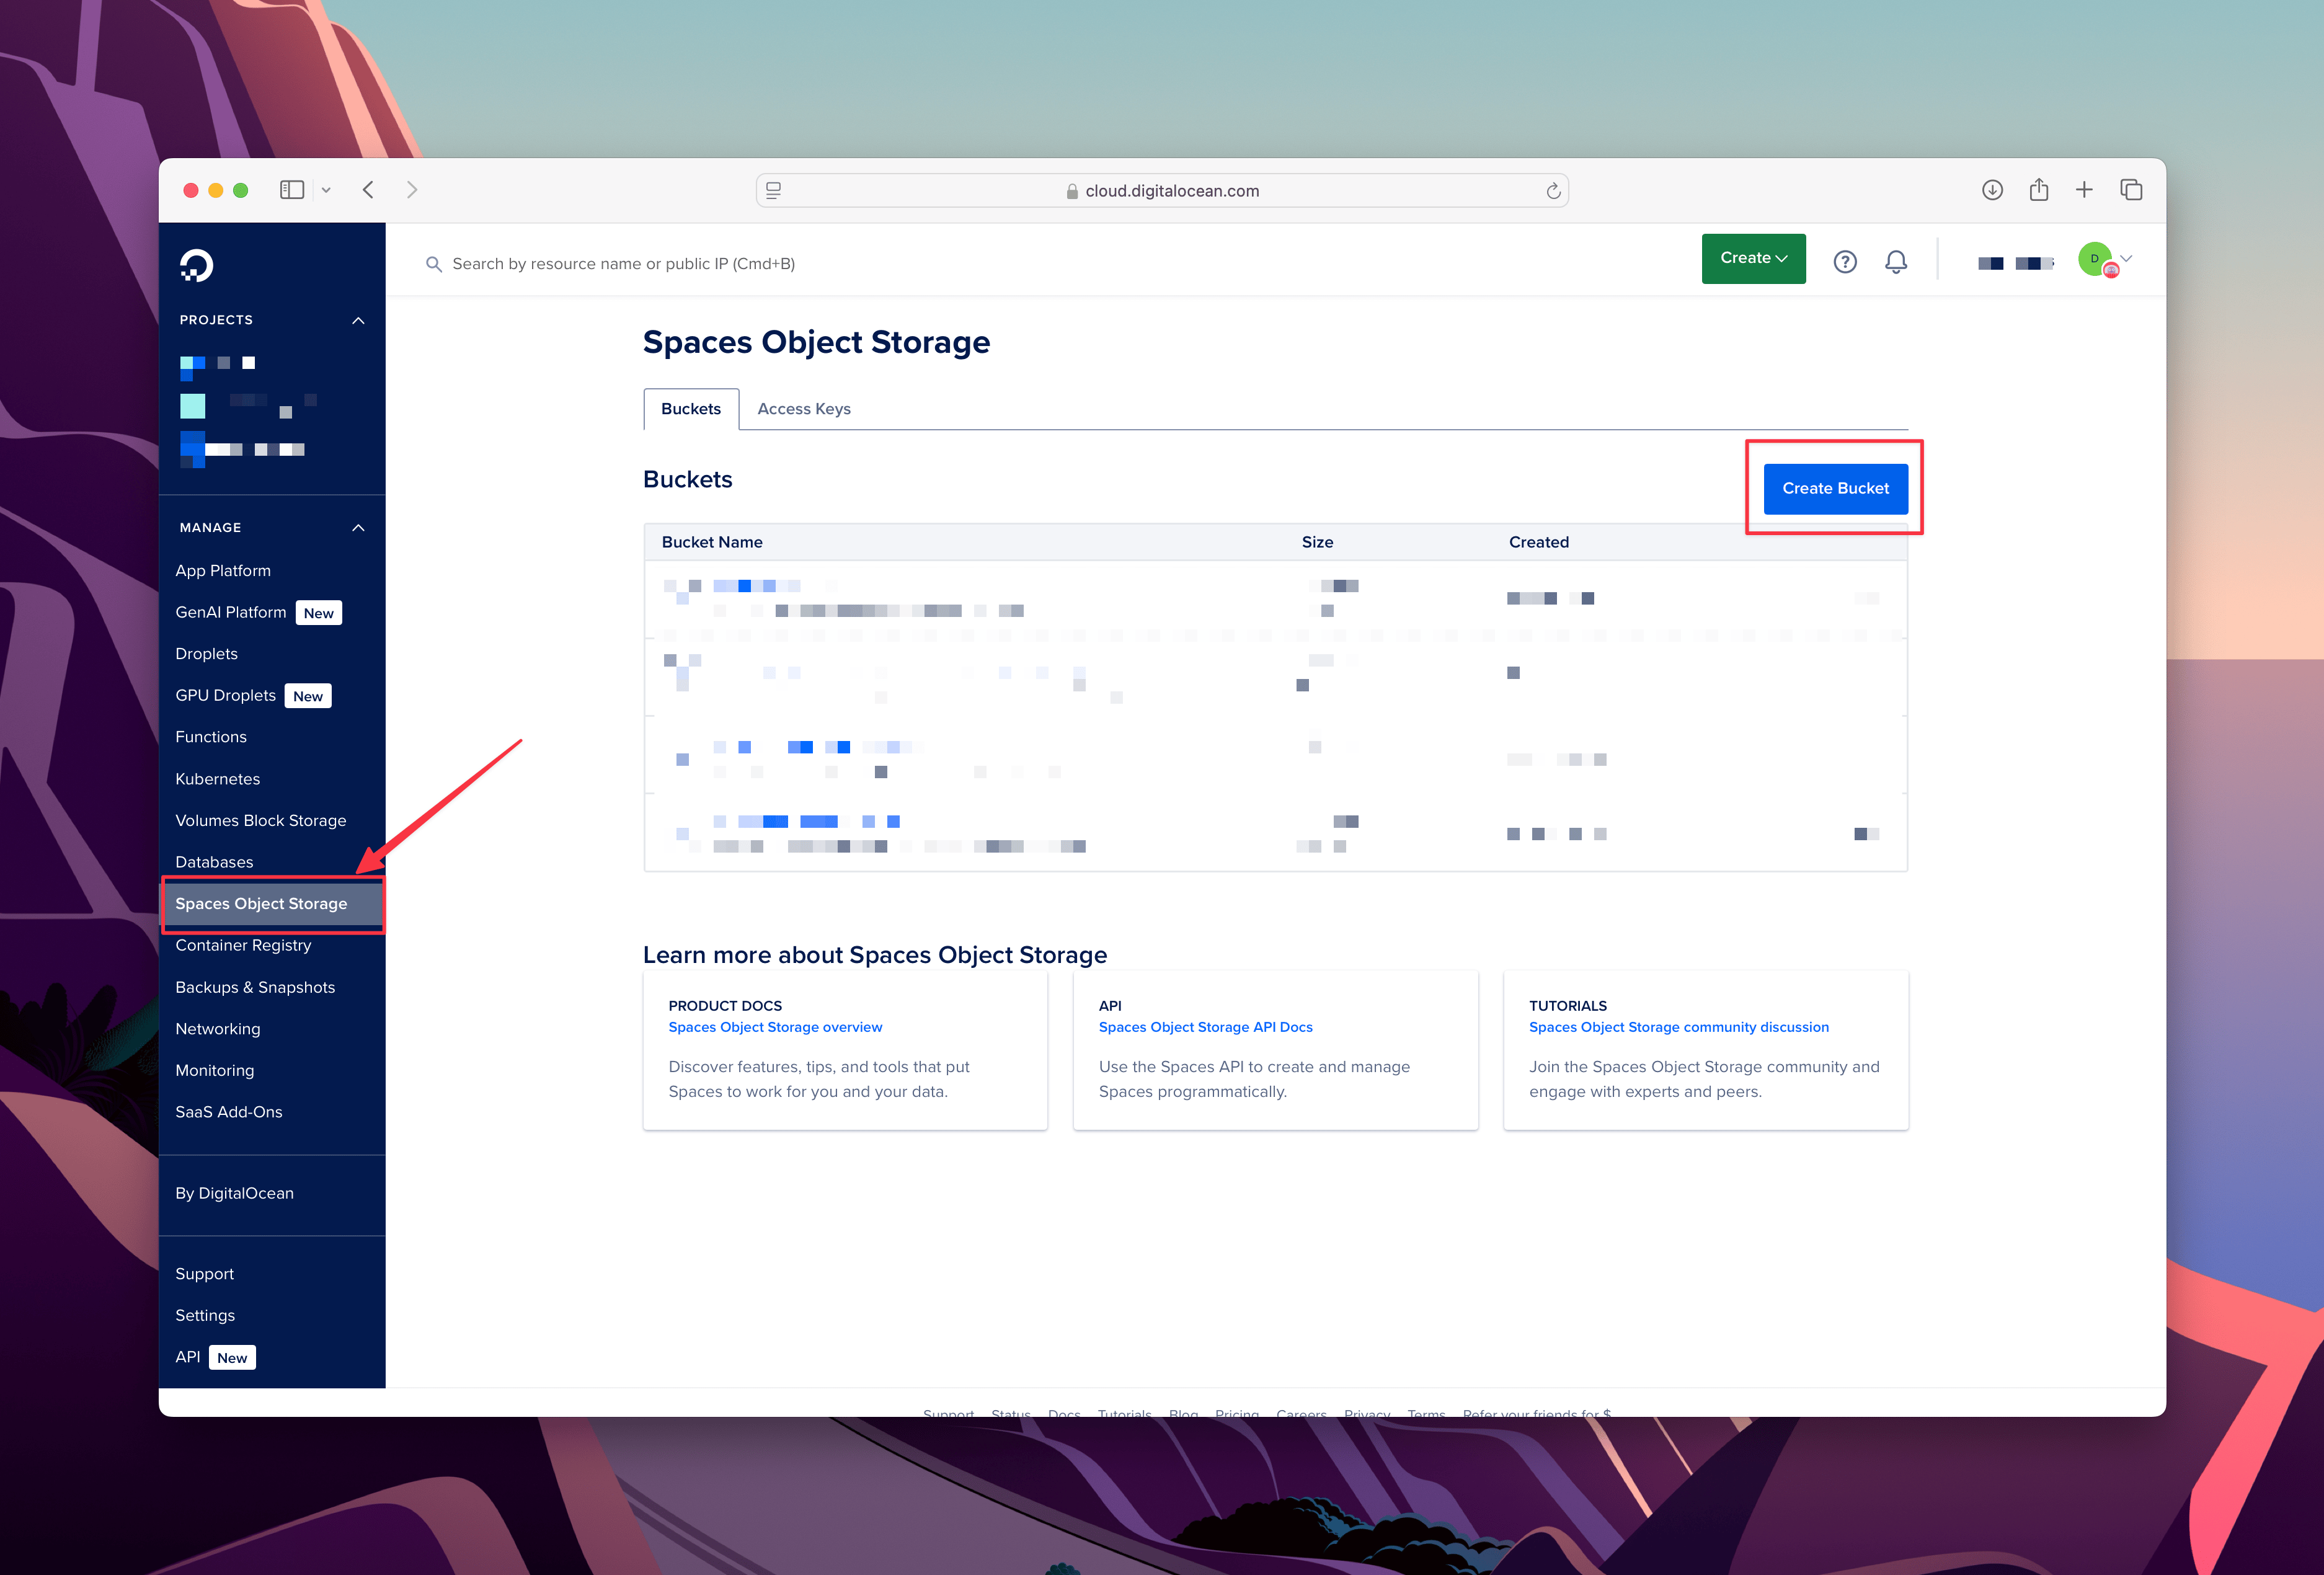
-
Log in to the DigitalOcean dashboard, and click on Spaces Object Storage.
-
Then, click Create Bucket.
-
Choose a Region close to your users (e.g.,
nyc3for New York). -
Name your Space (e.g.,
email-receipts)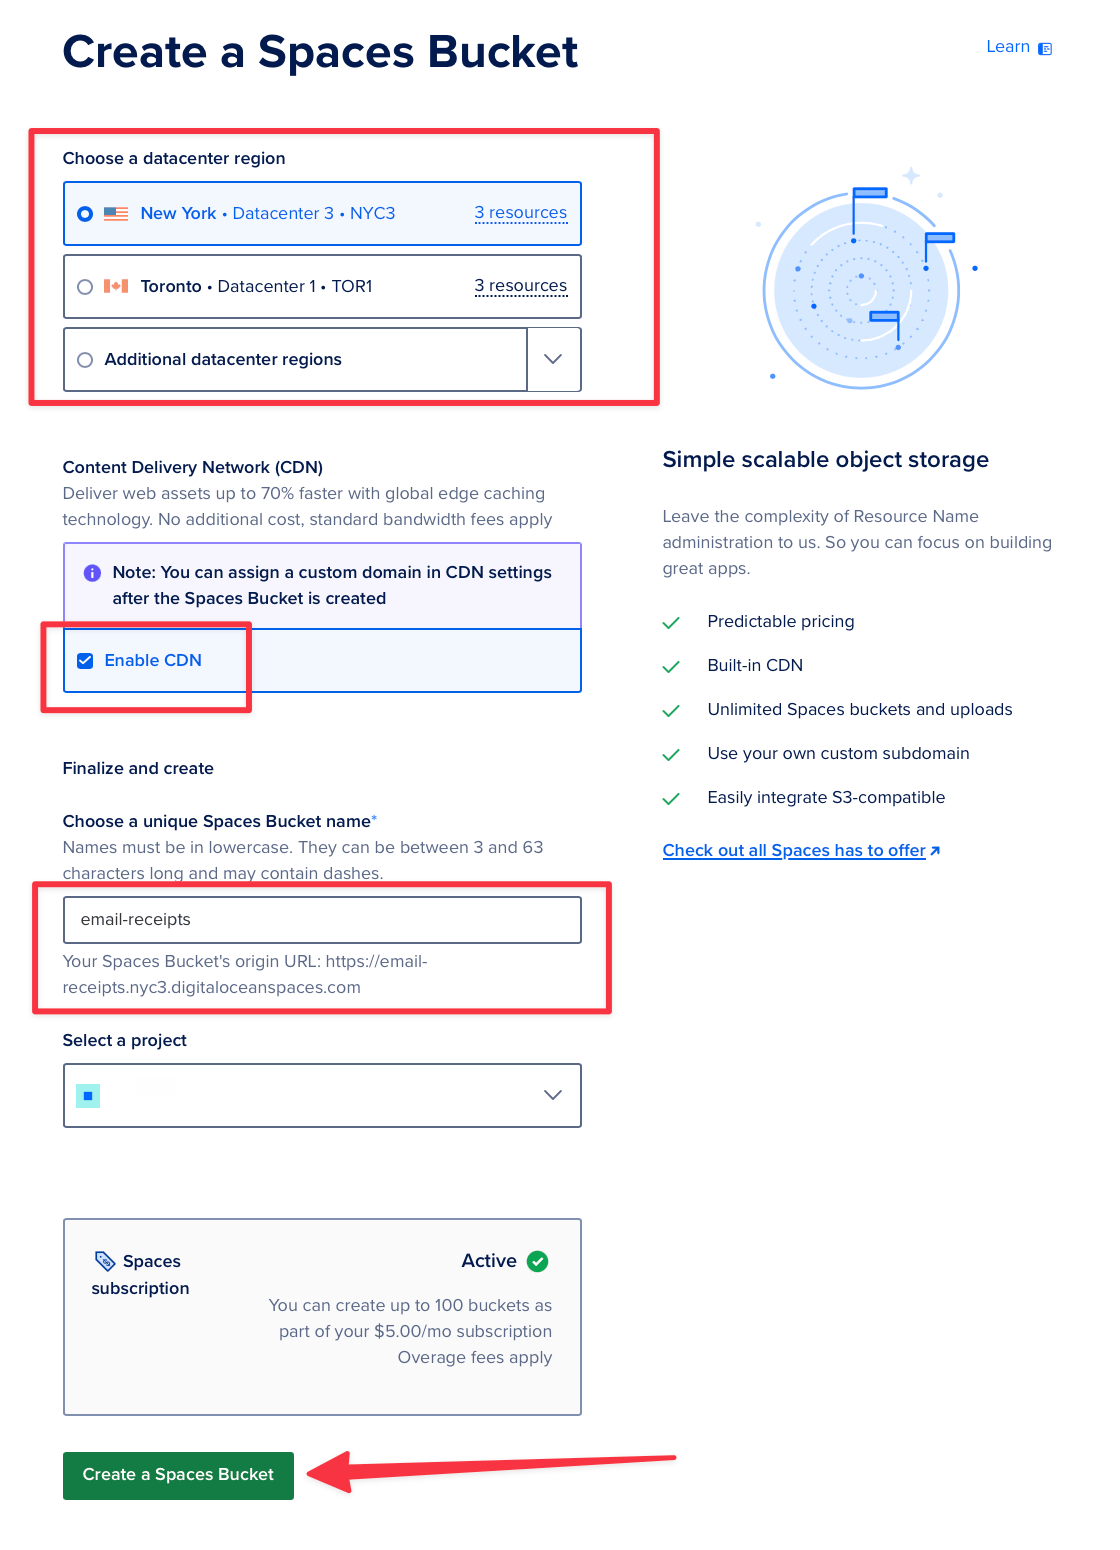
This will create your bucket named email-receipts available at a URL like https://email-receipts.nyc3.digitaloceanspaces.com
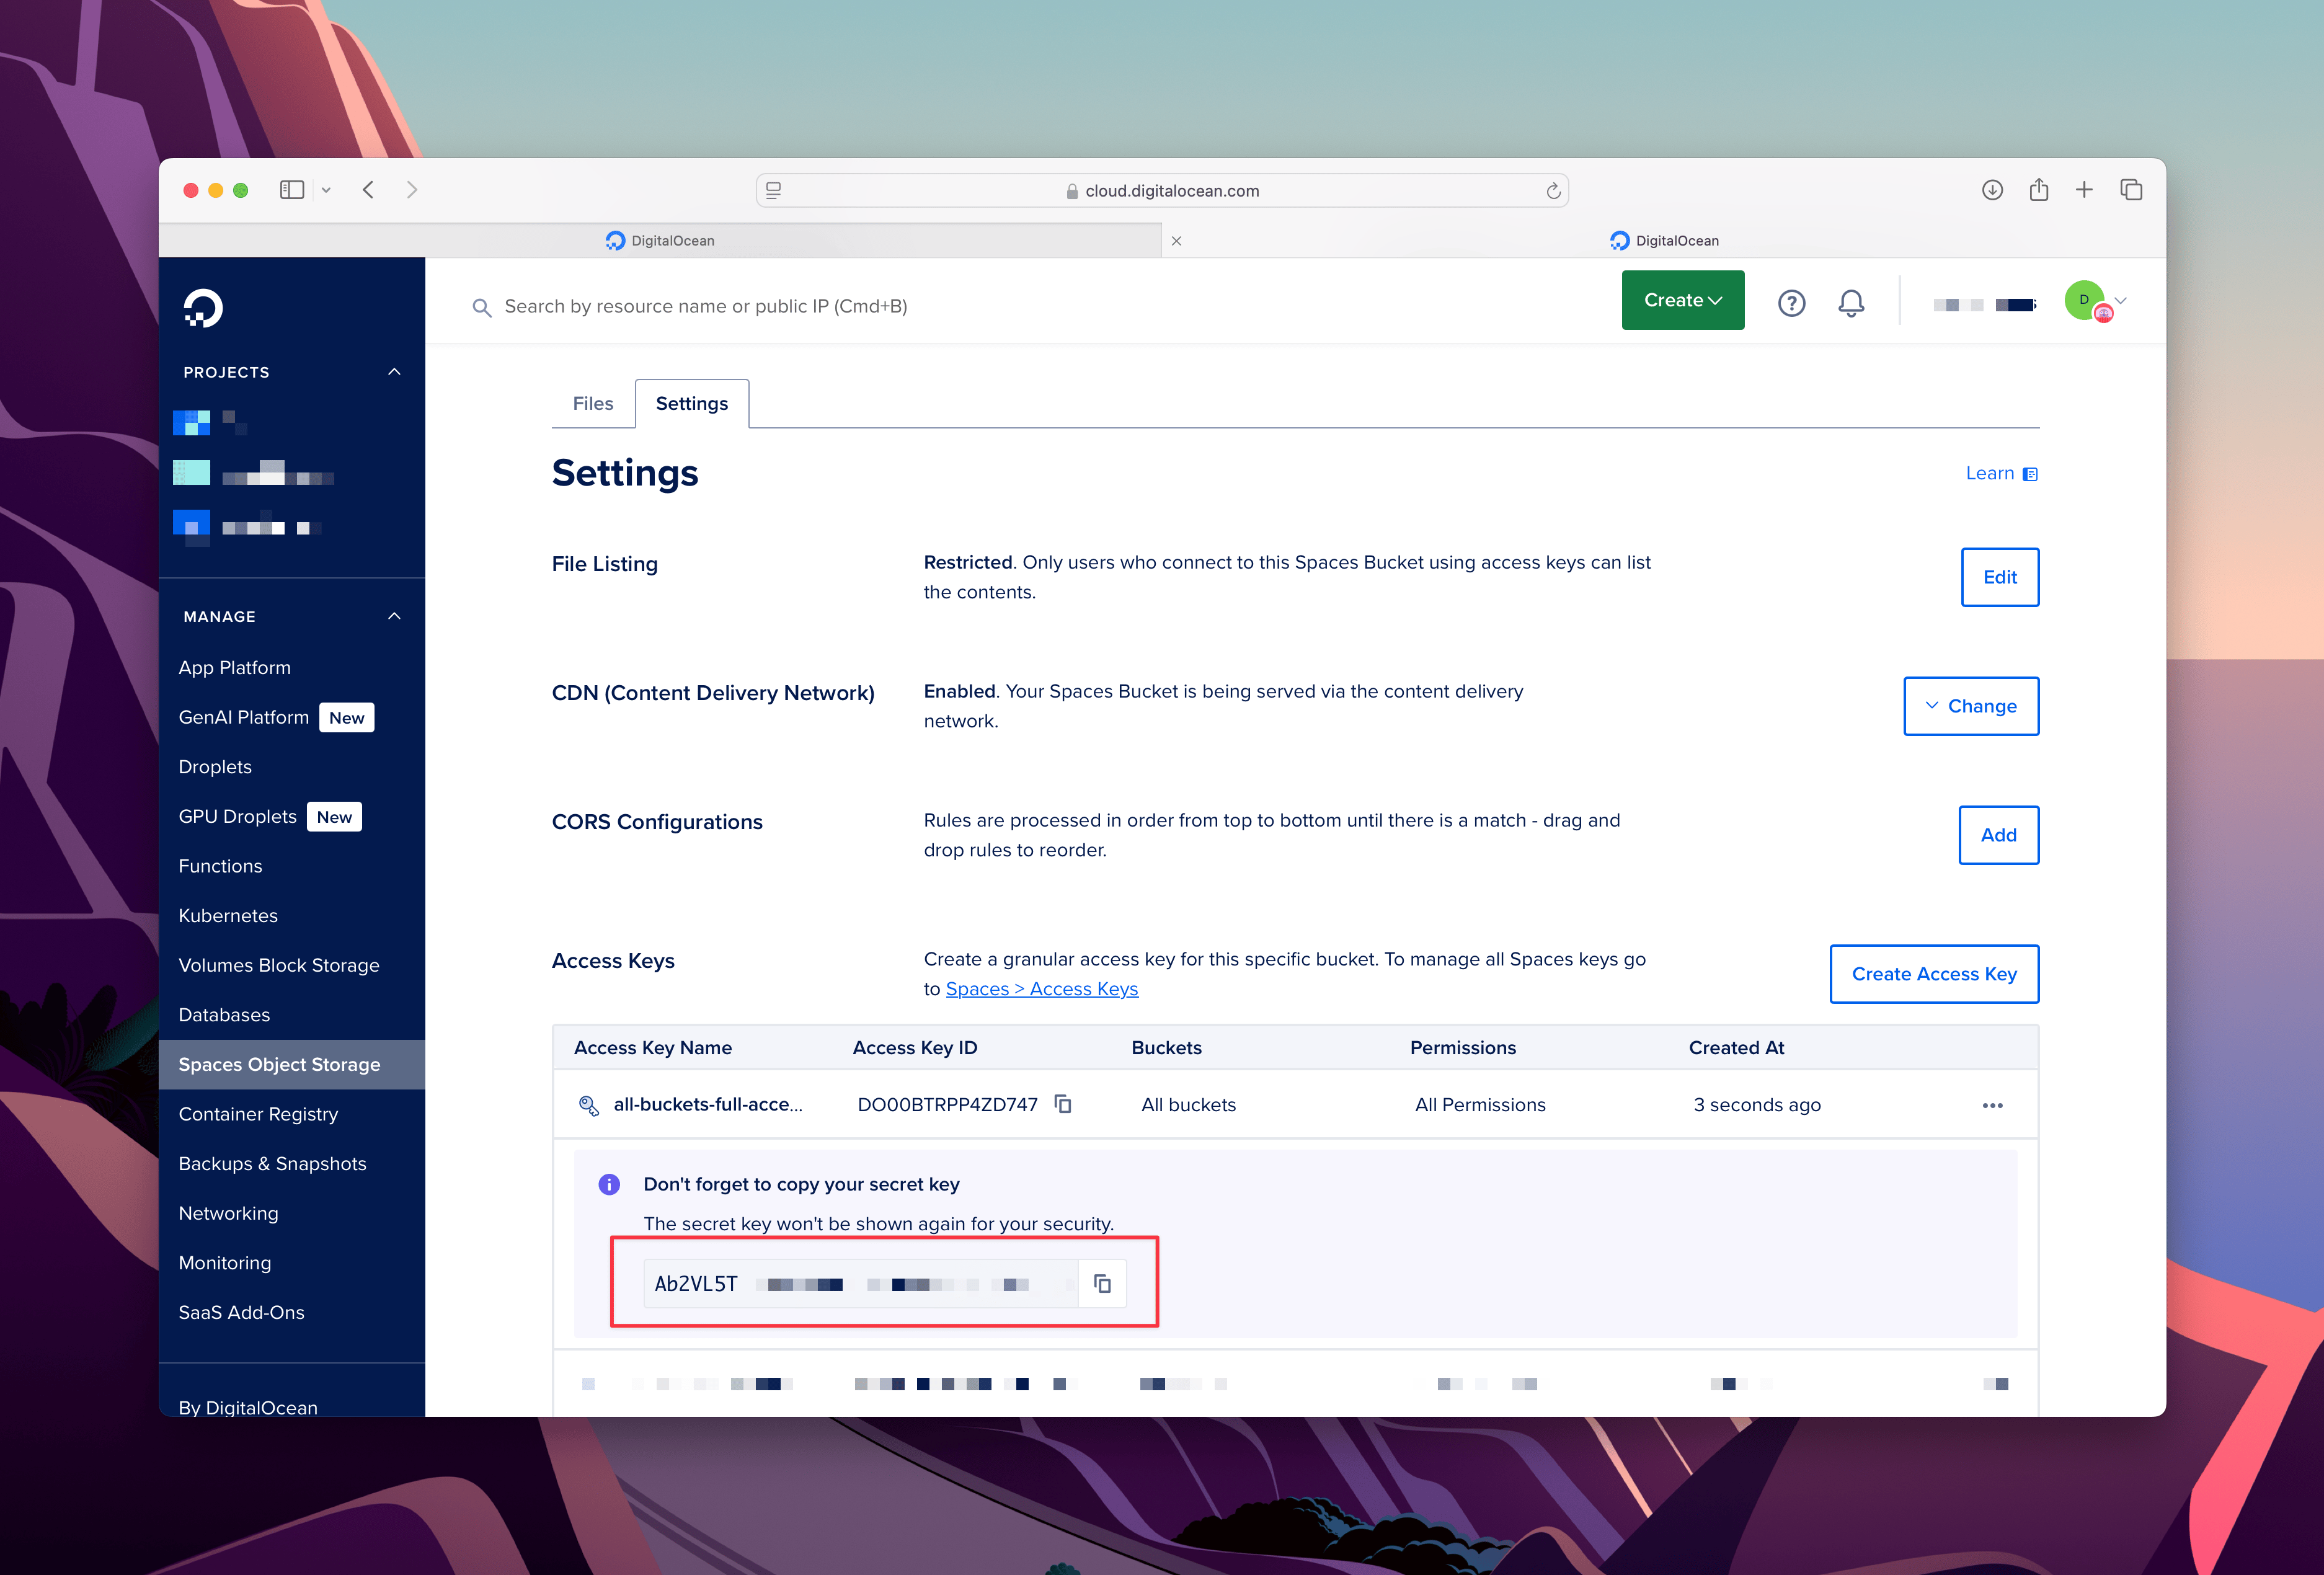
Generate Access Keys
To interact with your Space programmatically (e.g., via boto3), you’ll need an Access Key and Secret Key.
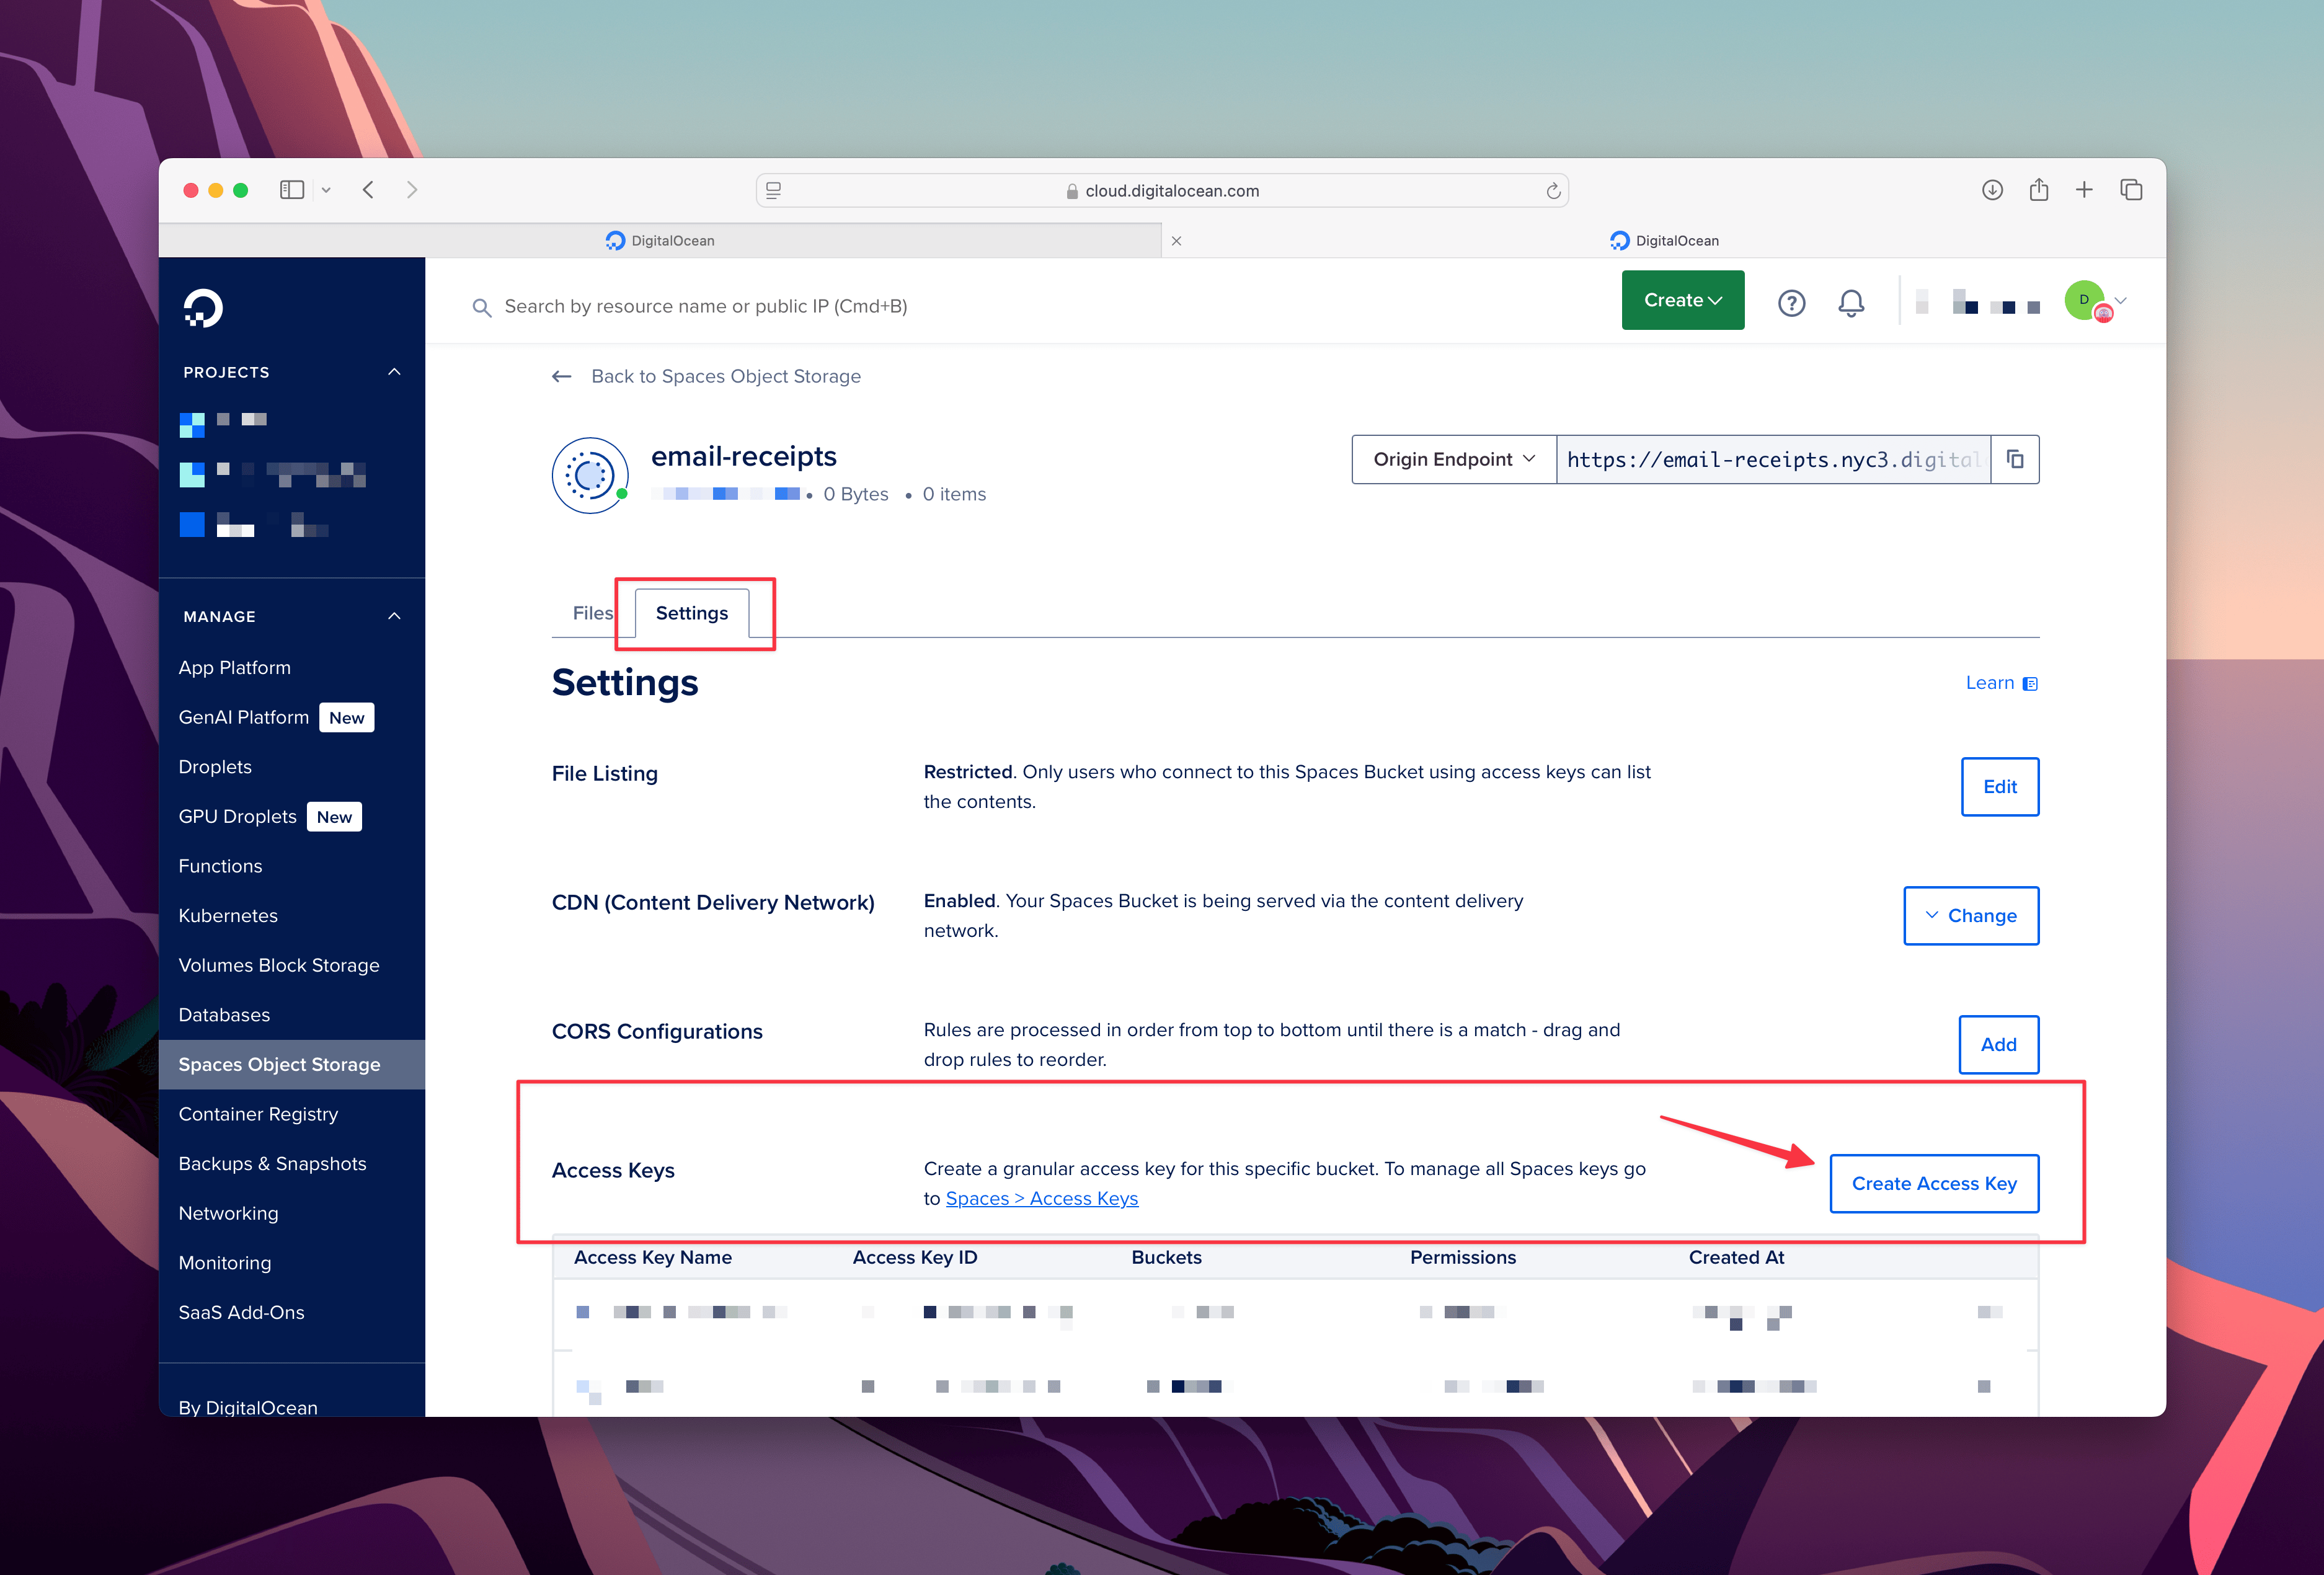
-
Open your Space, click Settings, and scroll to Access Keys.
-
Click Create Access Key.
-
Set Permissions to All Permissions, so our app can read, write, and delete files.
-
Name the key (or use the default) and click Create Access Key.
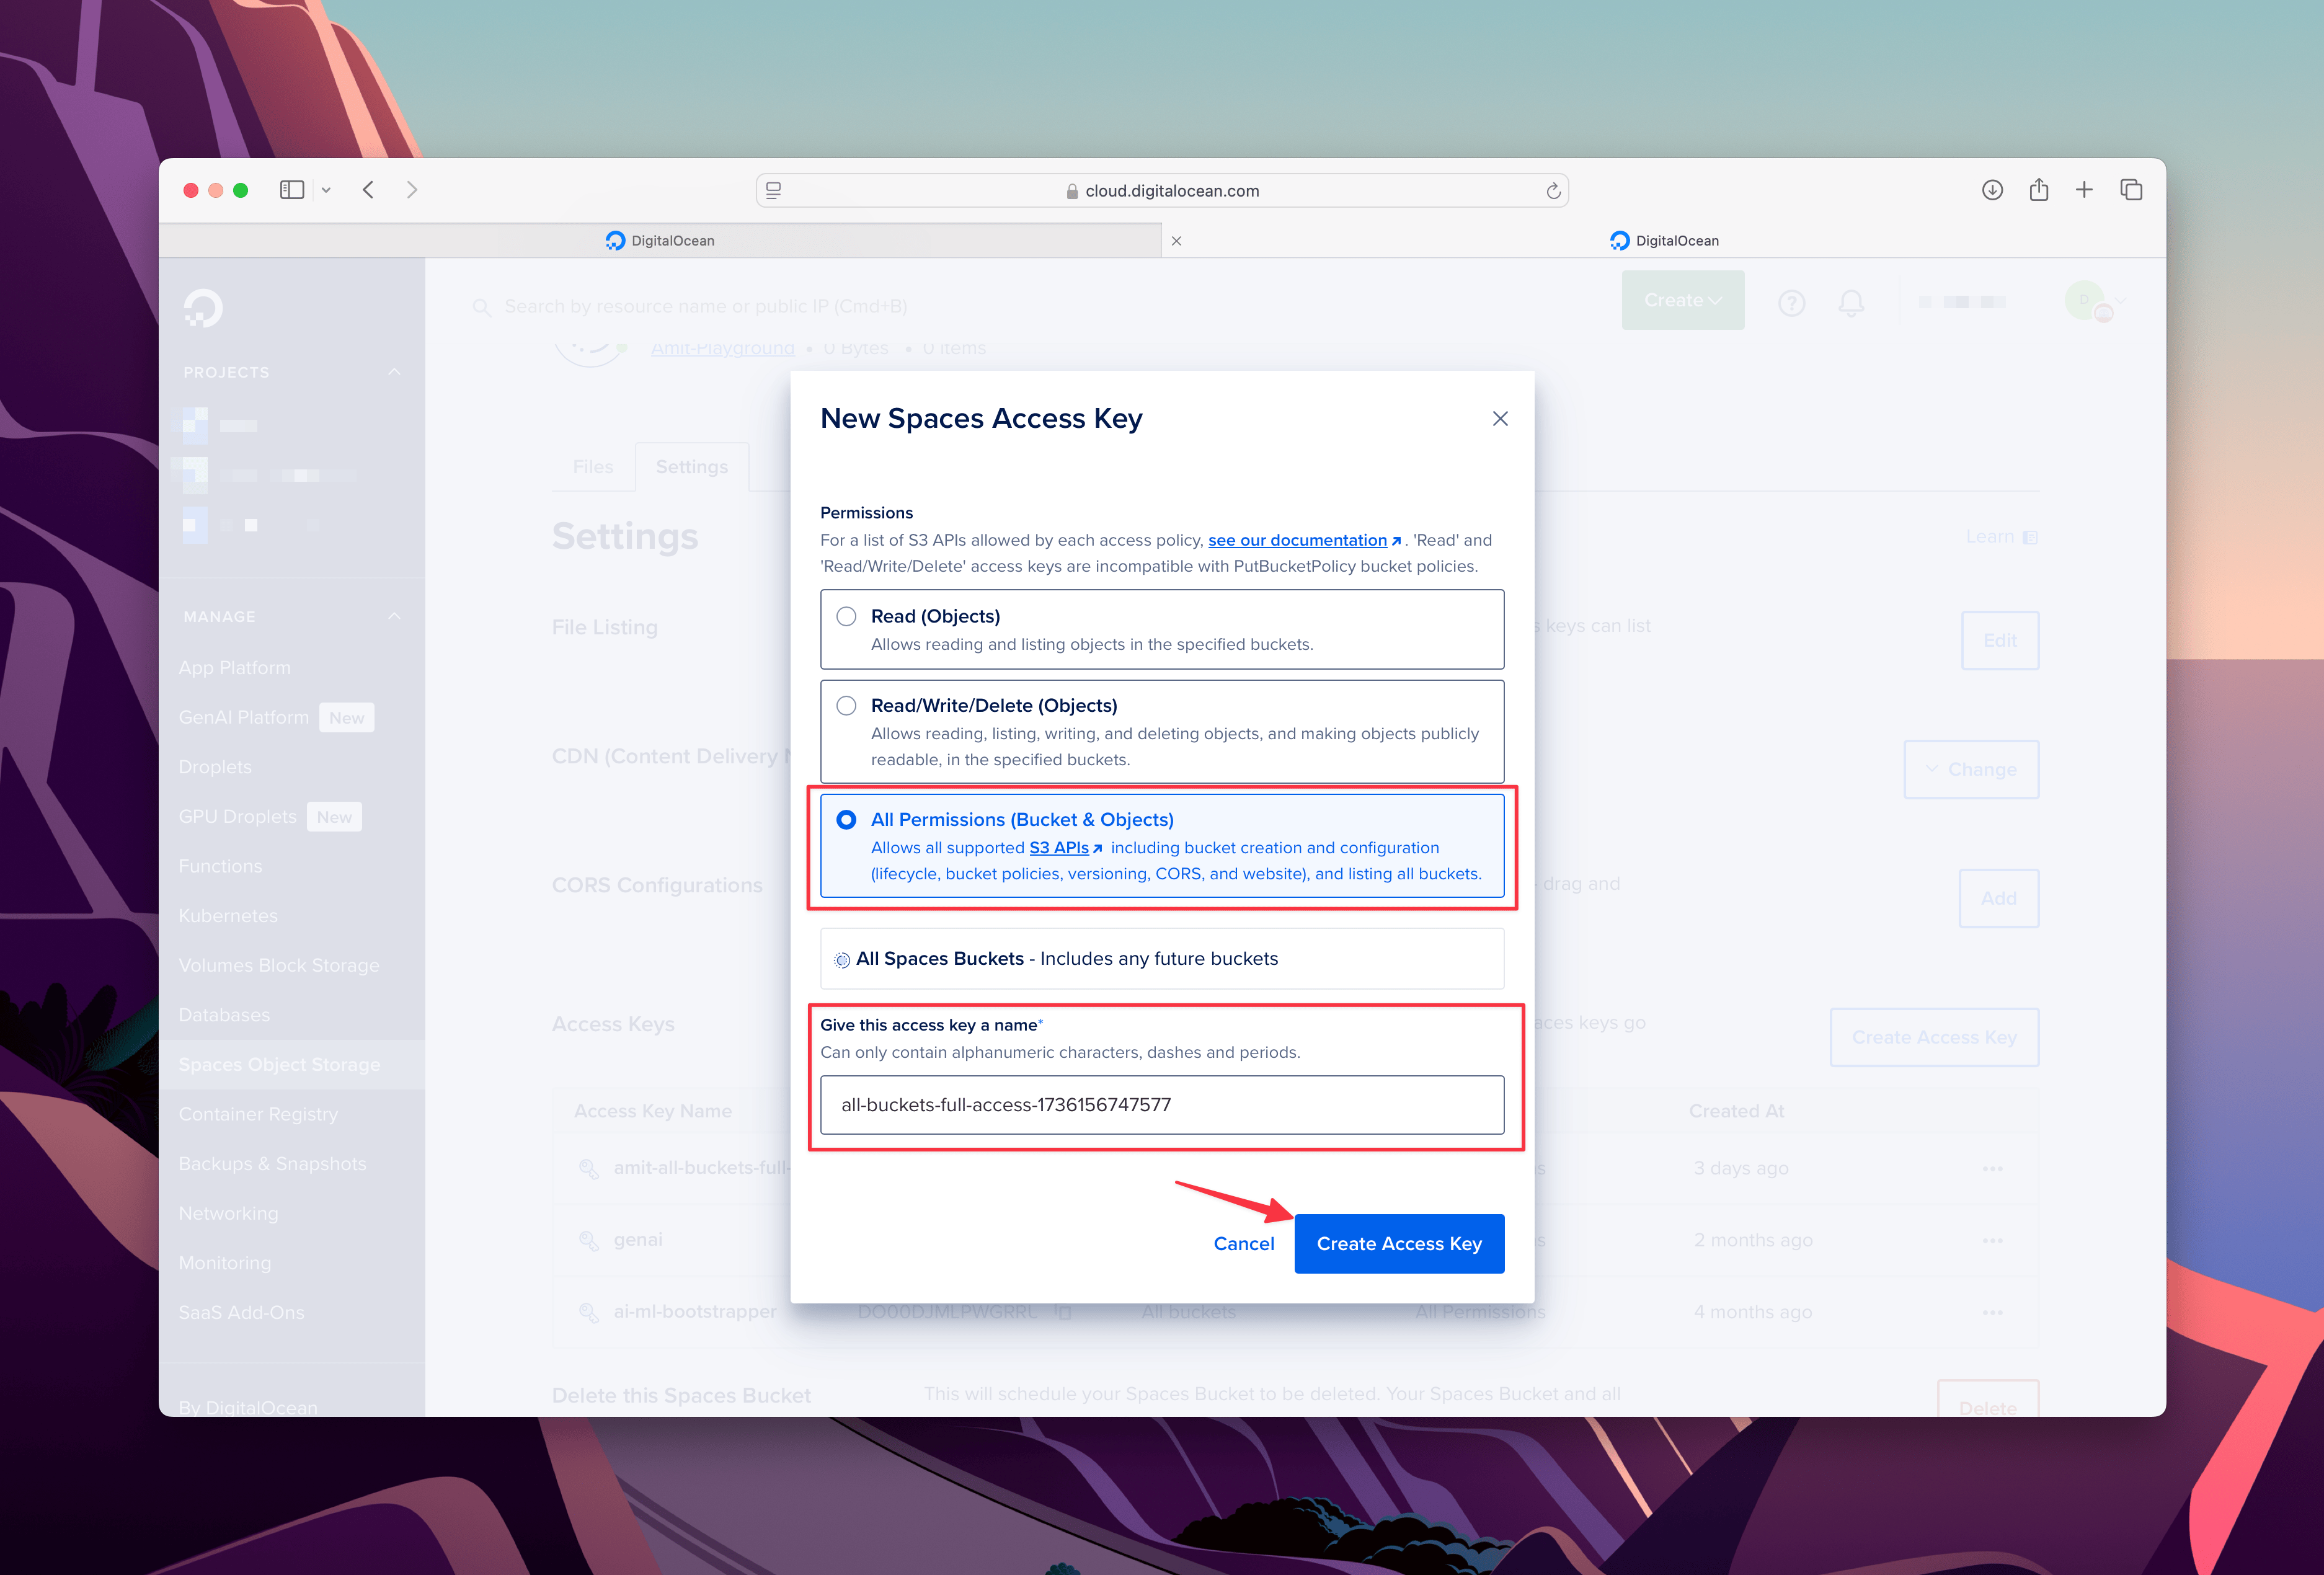
-
Save the Access Key and Secret Key—this is the only time you’ll see the Secret Key!
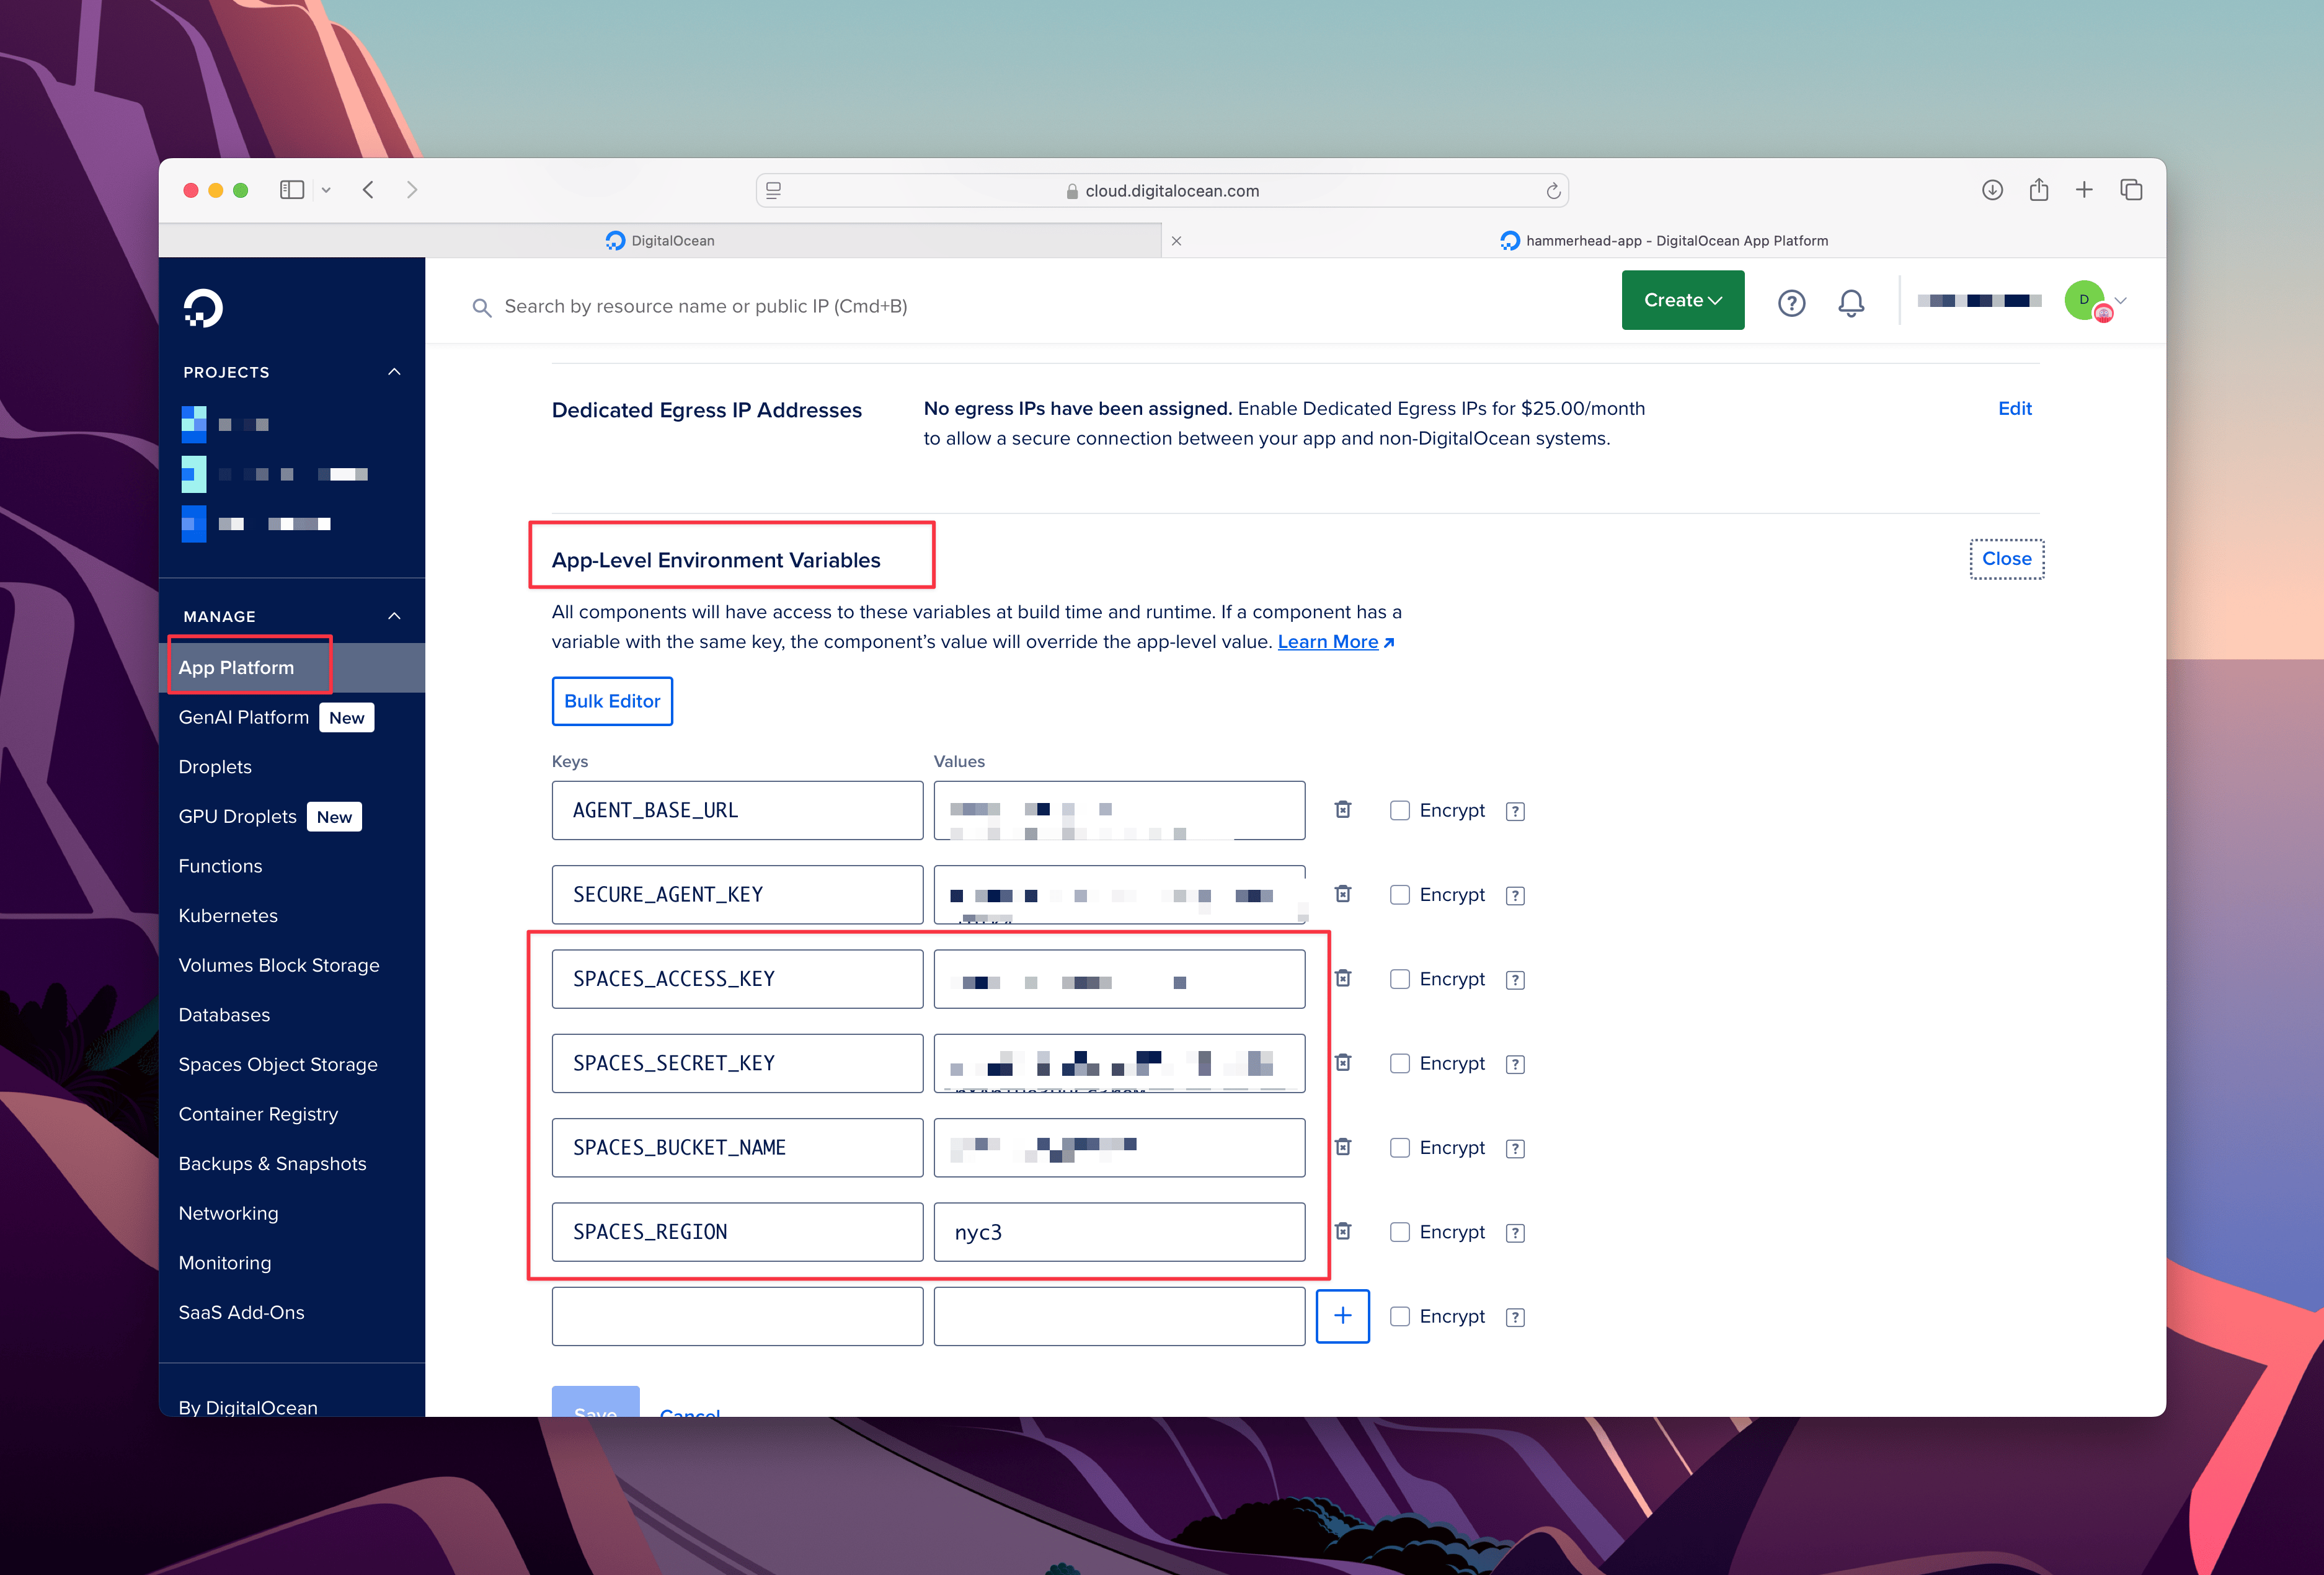
Update Environment Variables
In the DigitalOcean App Platform dashboard:
-
Go to Settings > Environment Variables.
-
Add the following:
-
SPACES_ACCESS_KEY: Your Spaces Access Key ID. -
SPACES_SECRET_KEY: Your Spaces Secret Key. -
SPACES_BUCKET_NAME: The name of your Space (e.g.,email-receipts). -
SPACES_REGION: The region of your Space (e.g.,nyc3).
-
Step 2: Process and Upload Attachments to DigitalOcean Spaces
To handle attachments in your app, we’ll update our app.py and write a few new functions. Each function serves a specific purpose, from decoding attachments to uploading them to DigitalOcean Spaces. Let’s walk through these one by one.
Note: If you don’t already have the app set up, follow the instructions in Day 7 - Building and Deploying the Email-Based Receipt Processor to create and deploy it to DigitalOcean’s App Platform.
Decode and Save Attachments
Postmark sends attachments as Base64-encoded data inside the JSON payload. The first step is decoding this data and saving it locally using Python’s base64 library. This function ensures each file gets a unique name with the help of the uuid library.
What is Base64? It’s like a translator for binary files (like PDFs). It converts them into a plain text format that’s safe to send over the web. Once we decode it back into binary, we can handle it just like any regular file.
Where Do Files Get Saved?: We’ll temporarily save the decoded files in /tmp. It’s a short-term storage directory available on most systems. Think of it like a scratchpad—it’s perfect for short-term use, and everything gets cleared once the app stops running.
Here’s the function to decode the attachment, ensure the filename is unique (thanks to uuid), and save it in /tmp.
import os
import base64
import uuid

def decode_and_save_attachment(attachment):
    """Decode base64-encoded attachment and save it locally with a unique name."""
    file_name = attachment.get("Name")
    encoded_content = attachment.get("Content")

    if not file_name or not encoded_content:
        logging.warning("Invalid attachment, skipping.")
        return None

    unique_file_name = f"{uuid.uuid4()}_{file_name}"
    file_path = os.path.join("/tmp", unique_file_name)

    try:
        with open(file_path, "wb") as file:
            file.write(base64.b64decode(encoded_content))
        logging.info(f"Attachment saved locally: {file_path}")
        return file_path
    except Exception as e:
        logging.error(f"Failed to decode and save attachment {file_name}: {e}")
        return None
Upload Attachments to DigitalOcean Spaces
Now that we’ve decoded and saved the files, the next step is uploading them to DigitalOcean Spaces. We’ll use boto3, a powerful Python SDK for working with AWS-compatible APIs, to handle the upload. Spaces works just like an S3 bucket, so it’s a perfect fit.
This function uploads the file to your Space and returns a public URL.
import boto3

def upload_attachment_to_spaces(file_path):
    """Upload a file to DigitalOcean Spaces and return its public URL."""
    file_name = os.path.basename(file_path)
    object_name = f"email-receipt-processor/{file_name}"
    try:
        s3_client.upload_file(file_path, SPACES_BUCKET, object_name, ExtraArgs={"ACL": "public-read"})
        file_url = f"https://{SPACES_BUCKET}.{SPACES_REGION}.cdn.digitaloceanspaces.com/{object_name}"
        logging.info(f"Attachment uploaded to Spaces: {file_url}")
        return file_url
    except Exception as e:
        logging.error(f"Failed to upload attachment {file_name} to Spaces: {e}")
        return None
Process Multiple Attachments
Let’s bring it all together. This function orchestrates everything:
- Decodes each attachment.
- Uploads it to Spaces.
- Collects the URLs for the uploaded files.
def process_attachments(attachments):
    """Process all attachments and return their URLs."""
    attachment_urls = []
    for attachment in attachments:
        file_path = decode_and_save_attachment(attachment)
        if file_path:
            file_url = upload_attachment_to_spaces(file_path)
            if file_url:
                attachment_urls.append({"file_name": os.path.basename(file_path), "url": file_url})
            os.remove(file_path)  # Clean up local file
    return attachment_urls
Update the /inbound Route
Finally, update the /inbound route to include attachment handling. This route will now handle email content processing, attachment decoding and uploading, and returning the final response.
@app.route('/inbound', methods=['POST'])
def handle_inbound_email():
    """Process inbound emails and return extracted JSON."""
    logging.info("Received inbound email request.")
    data = request.json

    email_content = data.get("TextBody", "")
    attachments = data.get("Attachments", [])

    if not email_content:
        logging.error("No email content provided.")
        return jsonify({"error": "No email content provided"}), 400

    extracted_data = extract_text_from_email(email_content)
    attachment_urls = process_attachments(attachments)

    response_data = {
        "extracted_data": extracted_data,
        "attachments": attachment_urls
    }

    # Log the final combined data
    logging.info("Final Response Data: %s", response_data)

    return jsonify(response_data)
Final Complete Code
Here’s the full app.py file with all the updates:
from flask import Flask, request, jsonify
import os
import base64
import uuid
import boto3
from dotenv import load_dotenv
from openai import OpenAI
import logging

# Load environment variables
load_dotenv()

# Initialize Flask app
app = Flask(__name__)

# Configure logging
logging.basicConfig(level=logging.INFO, format='%(asctime)s - %(levelname)s - %(message)s')

# Initialize DigitalOcean GenAI client
SECURE_AGENT_KEY = os.getenv("SECURE_AGENT_KEY")
AGENT_BASE_URL = os.getenv("AGENT_BASE_URL")
AGENT_ENDPOINT = f"{AGENT_BASE_URL}/api/v1/"
client = OpenAI(base_url=AGENT_ENDPOINT, api_key=SECURE_AGENT_KEY)

# DigitalOcean Spaces credentials
SPACES_ACCESS_KEY = os.getenv("SPACES_ACCESS_KEY")
SPACES_SECRET_KEY = os.getenv("SPACES_SECRET_KEY")
SPACES_BUCKET = os.getenv("SPACES_BUCKET_NAME")
SPACES_REGION = os.getenv("SPACES_REGION")
SPACES_ENDPOINT = f"https://{SPACES_BUCKET}.{SPACES_REGION}.digitaloceanspaces.com"

# Initialize DigitalOcean Spaces client
session = boto3.session.Session()
s3_client = session.client(
    's3',
    region_name=SPACES_REGION,
    endpoint_url=SPACES_ENDPOINT,
    aws_access_key_id=SPACES_ACCESS_KEY,
    aws_secret_access_key=SPACES_SECRET_KEY
)

def extract_text_from_email(email_content):
    """Extract relevant details from the email content using DigitalOcean GenAI."""
    logging.debug("Extracting details from email content.")
    prompt = (
        "Extract the following details from the email:\n"
        "- Date of transaction\n"
        "- Amount\n"
        "- Currency\n"
        "- Vendor name\n\n"
        f"Email content:\n{email_content}\n\n"
        "Ensure the output is in JSON format with keys: date, amount, currency, vendor."
    )
    response = client.chat.completions.create(
        model="your-model-id",  # Replace with your GenAI model ID
        messages=[{"role": "user", "content": prompt}]
    )
    logging.debug("GenAI processing completed.")
    return response.choices[0].message.content

def decode_and_save_attachment(attachment):
    """Decode base64-encoded attachment and save it locally with a unique name."""
    file_name = attachment.get("Name")
    encoded_content = attachment.get("Content")

    if not file_name or not encoded_content:
        logging.warning("Invalid attachment, skipping.")
        return None

    unique_file_name = f"{uuid.uuid4()}_{file_name}"
    file_path = os.path.join("/tmp", unique_file_name)

    try:
        with open(file_path, "wb") as file:
            file.write(base64.b64decode(encoded_content))
        logging.info(f"Attachment saved locally: {file_path}")
        return file_path
    except Exception as e:
        logging.error(f"Failed to decode and save attachment {file_name}: {e}")
        return None

def upload_attachment_to_spaces(file_path):
    """Upload a file to DigitalOcean Spaces and return its public URL."""
    file_name = os.path.basename(file_path)
    object_name = f"email-receipt-processor/{file_name}"
    try:
        s3_client.upload_file(file_path, SPACES_BUCKET, object_name, ExtraArgs={"ACL": "public-read"})
        file_url = f"https://{SPACES_BUCKET}.{SPACES_REGION}.cdn.digitaloceanspaces.com/{object_name}"
        logging.info(f"Attachment uploaded to Spaces: {file_url}")
        return file_url
    except Exception as e:
        logging.error(f"Failed to upload attachment {file_name} to Spaces: {e}")
        return None

def process_attachments(attachments):
    """Process all attachments and return their URLs."""
    attachment_urls = []
    for attachment in attachments:
        file_path = decode_and_save_attachment(attachment)
        if file_path:
            file_url = upload_attachment_to_spaces(file_path)
            if file_url:
                attachment_urls.append({"file_name": os.path.basename(file_path), "url": file_url})
            os.remove(file_path)  # Clean up local file
    return attachment_urls

@app.route('/inbound', methods=['POST'])
def handle_inbound_email():
    """Process inbound emails and return extracted JSON."""
    logging.info("Received inbound email request.")
    data = request.json

    email_content = data.get("TextBody", "")
    attachments = data.get("Attachments", [])

    if not email_content:
        logging.error("No email content provided.")
        return jsonify({"error": "No email content provided"}), 400

    extracted_data = extract_text_from_email(email_content)
    attachment_urls = process_attachments(attachments)

    response_data = {
        "extracted_data": extracted_data,
        "attachments": attachment_urls
    }

    # Log the final combined data
    logging.info("Final Response Data: %s", response_data)

    return jsonify(response_data)

if __name__ == "__main__":
    logging.info("Starting Flask application.")
    app.run(port=5000)
Step 3: Deploy to DigitalOcean
To deploy the updated Flask app, follow the steps from Day 7. Here’s a quick summary:
-
Push Your Updated Code to GitHub: After making the necessary changes to your Flask app, commit and push the updated code to GitHub. This will trigger an automatic deployment in DigitalOcean’s App Platform.
git add . git commit -m "Add attachment processing with DigitalOcean Spaces" git push origin main -
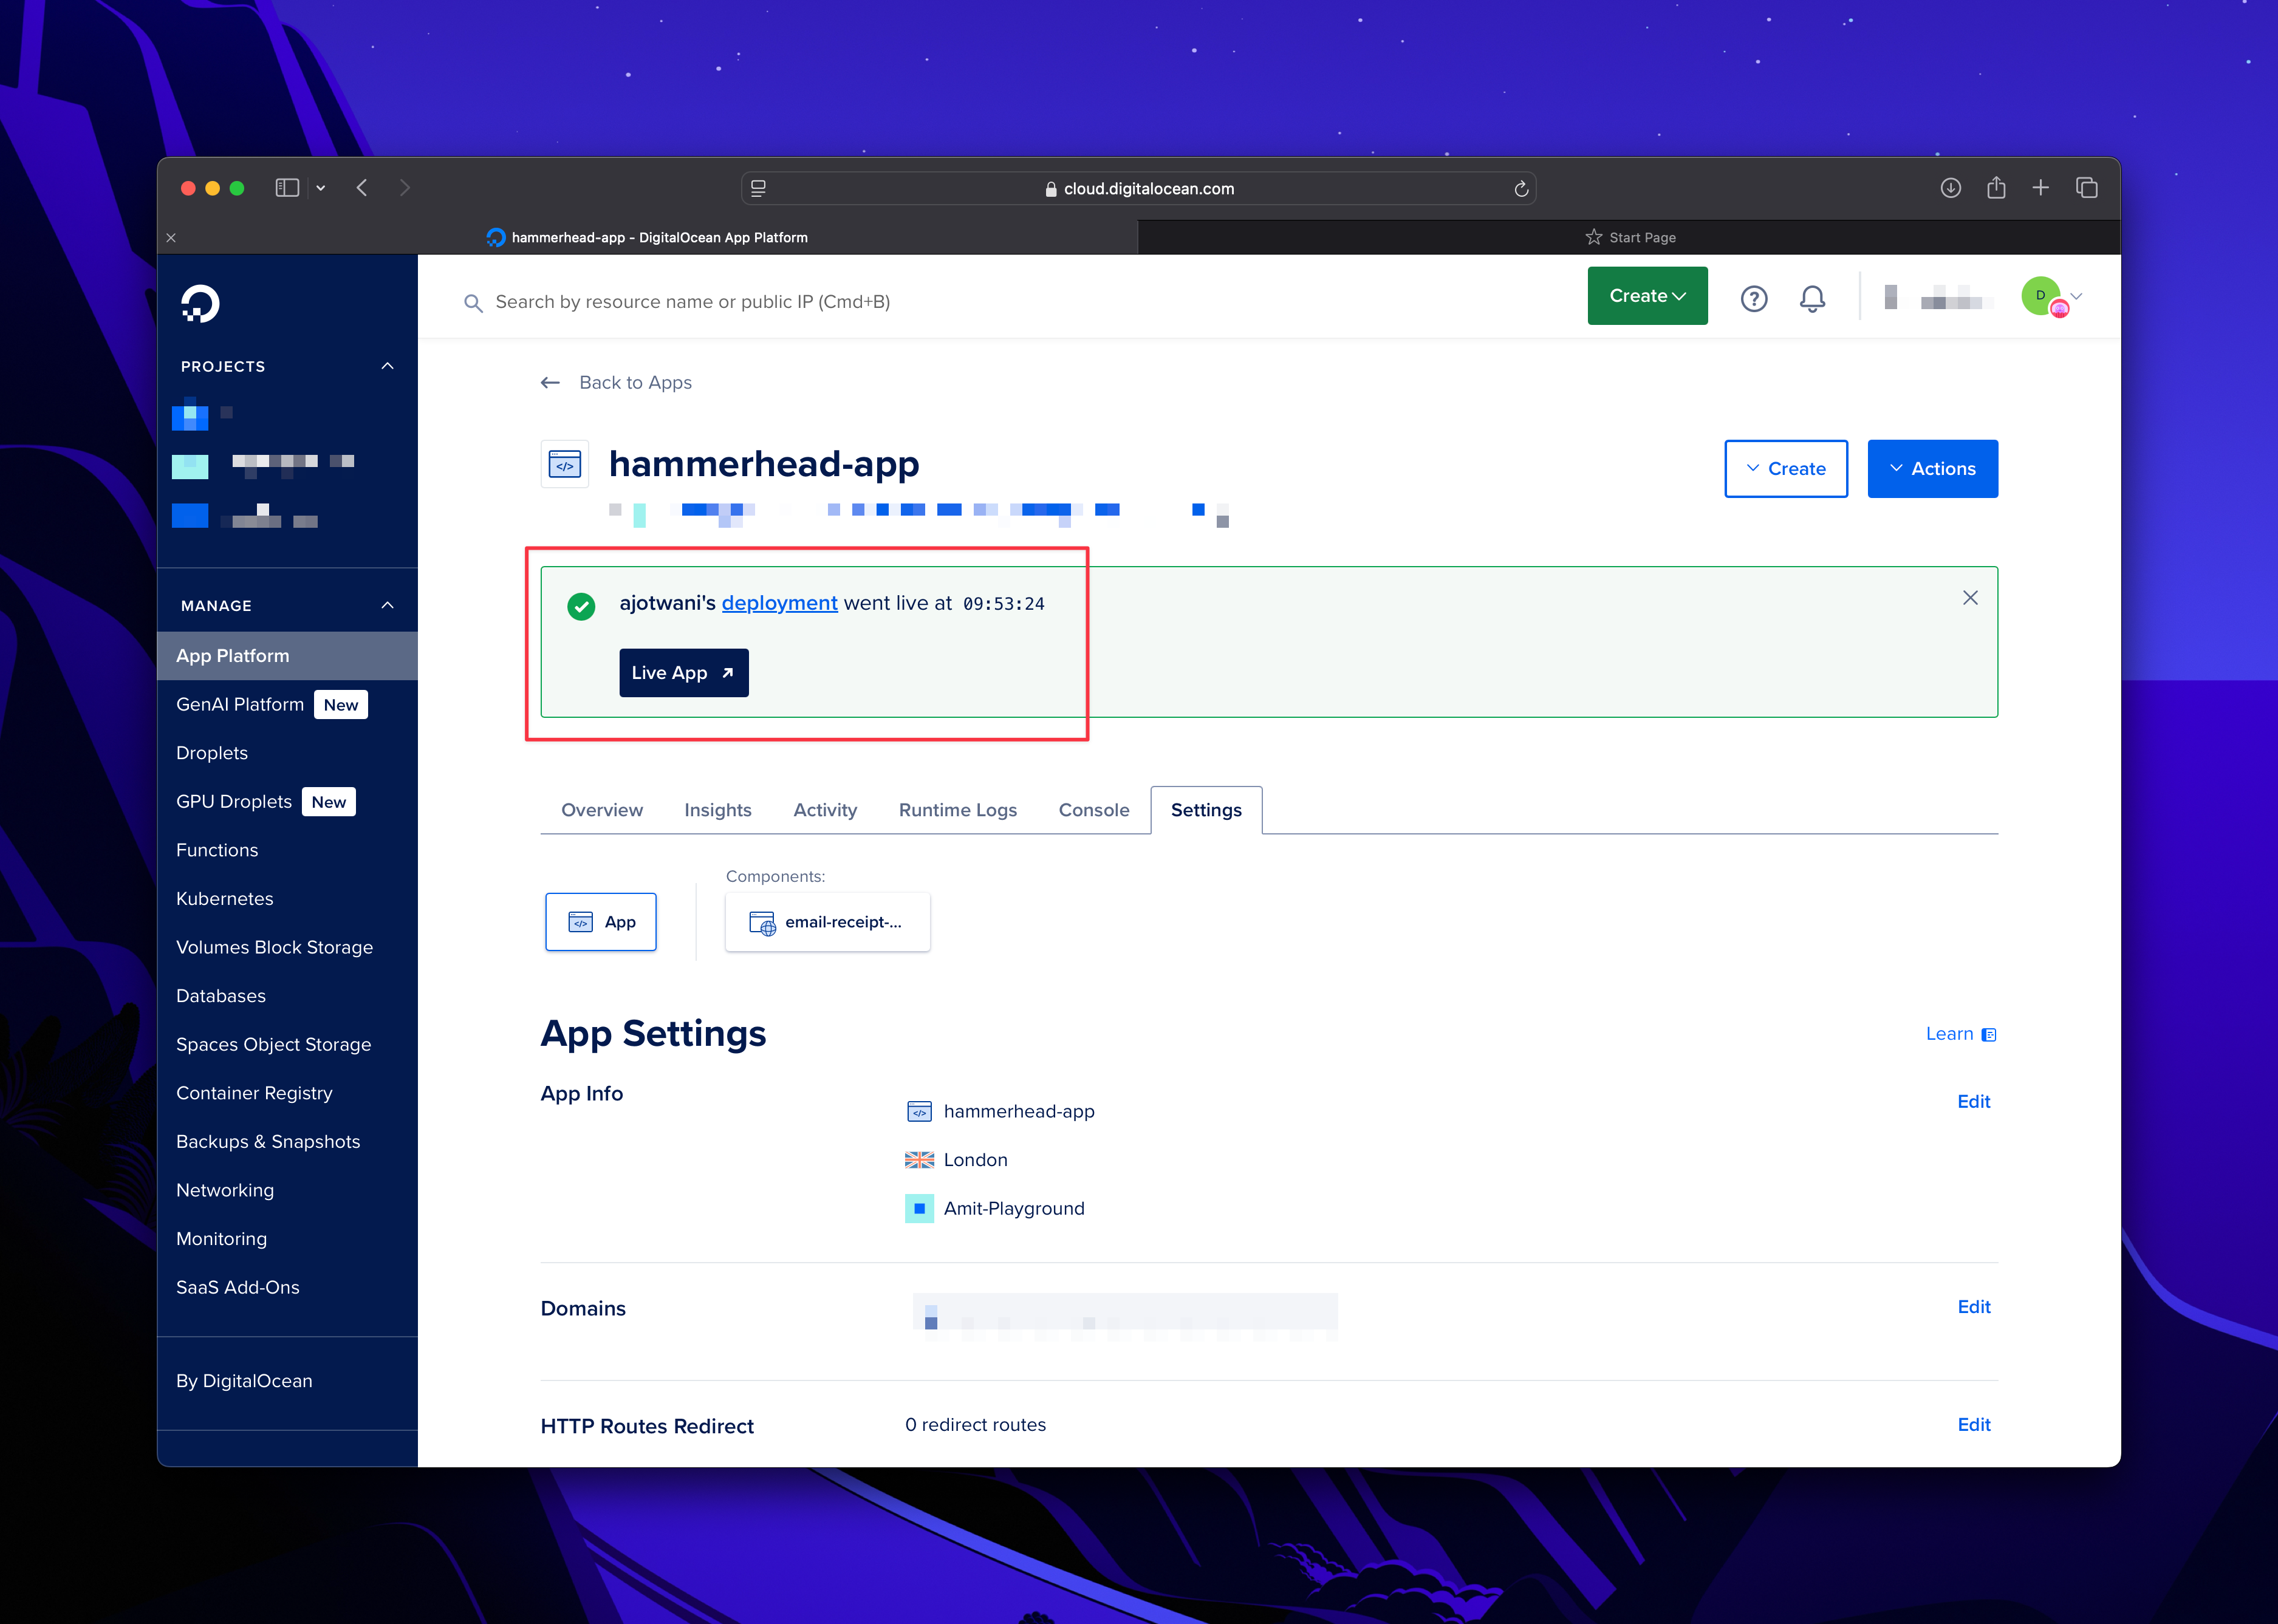
Monitor Deployment: You can track the progress in the Deployments section of your app’s dashboard.
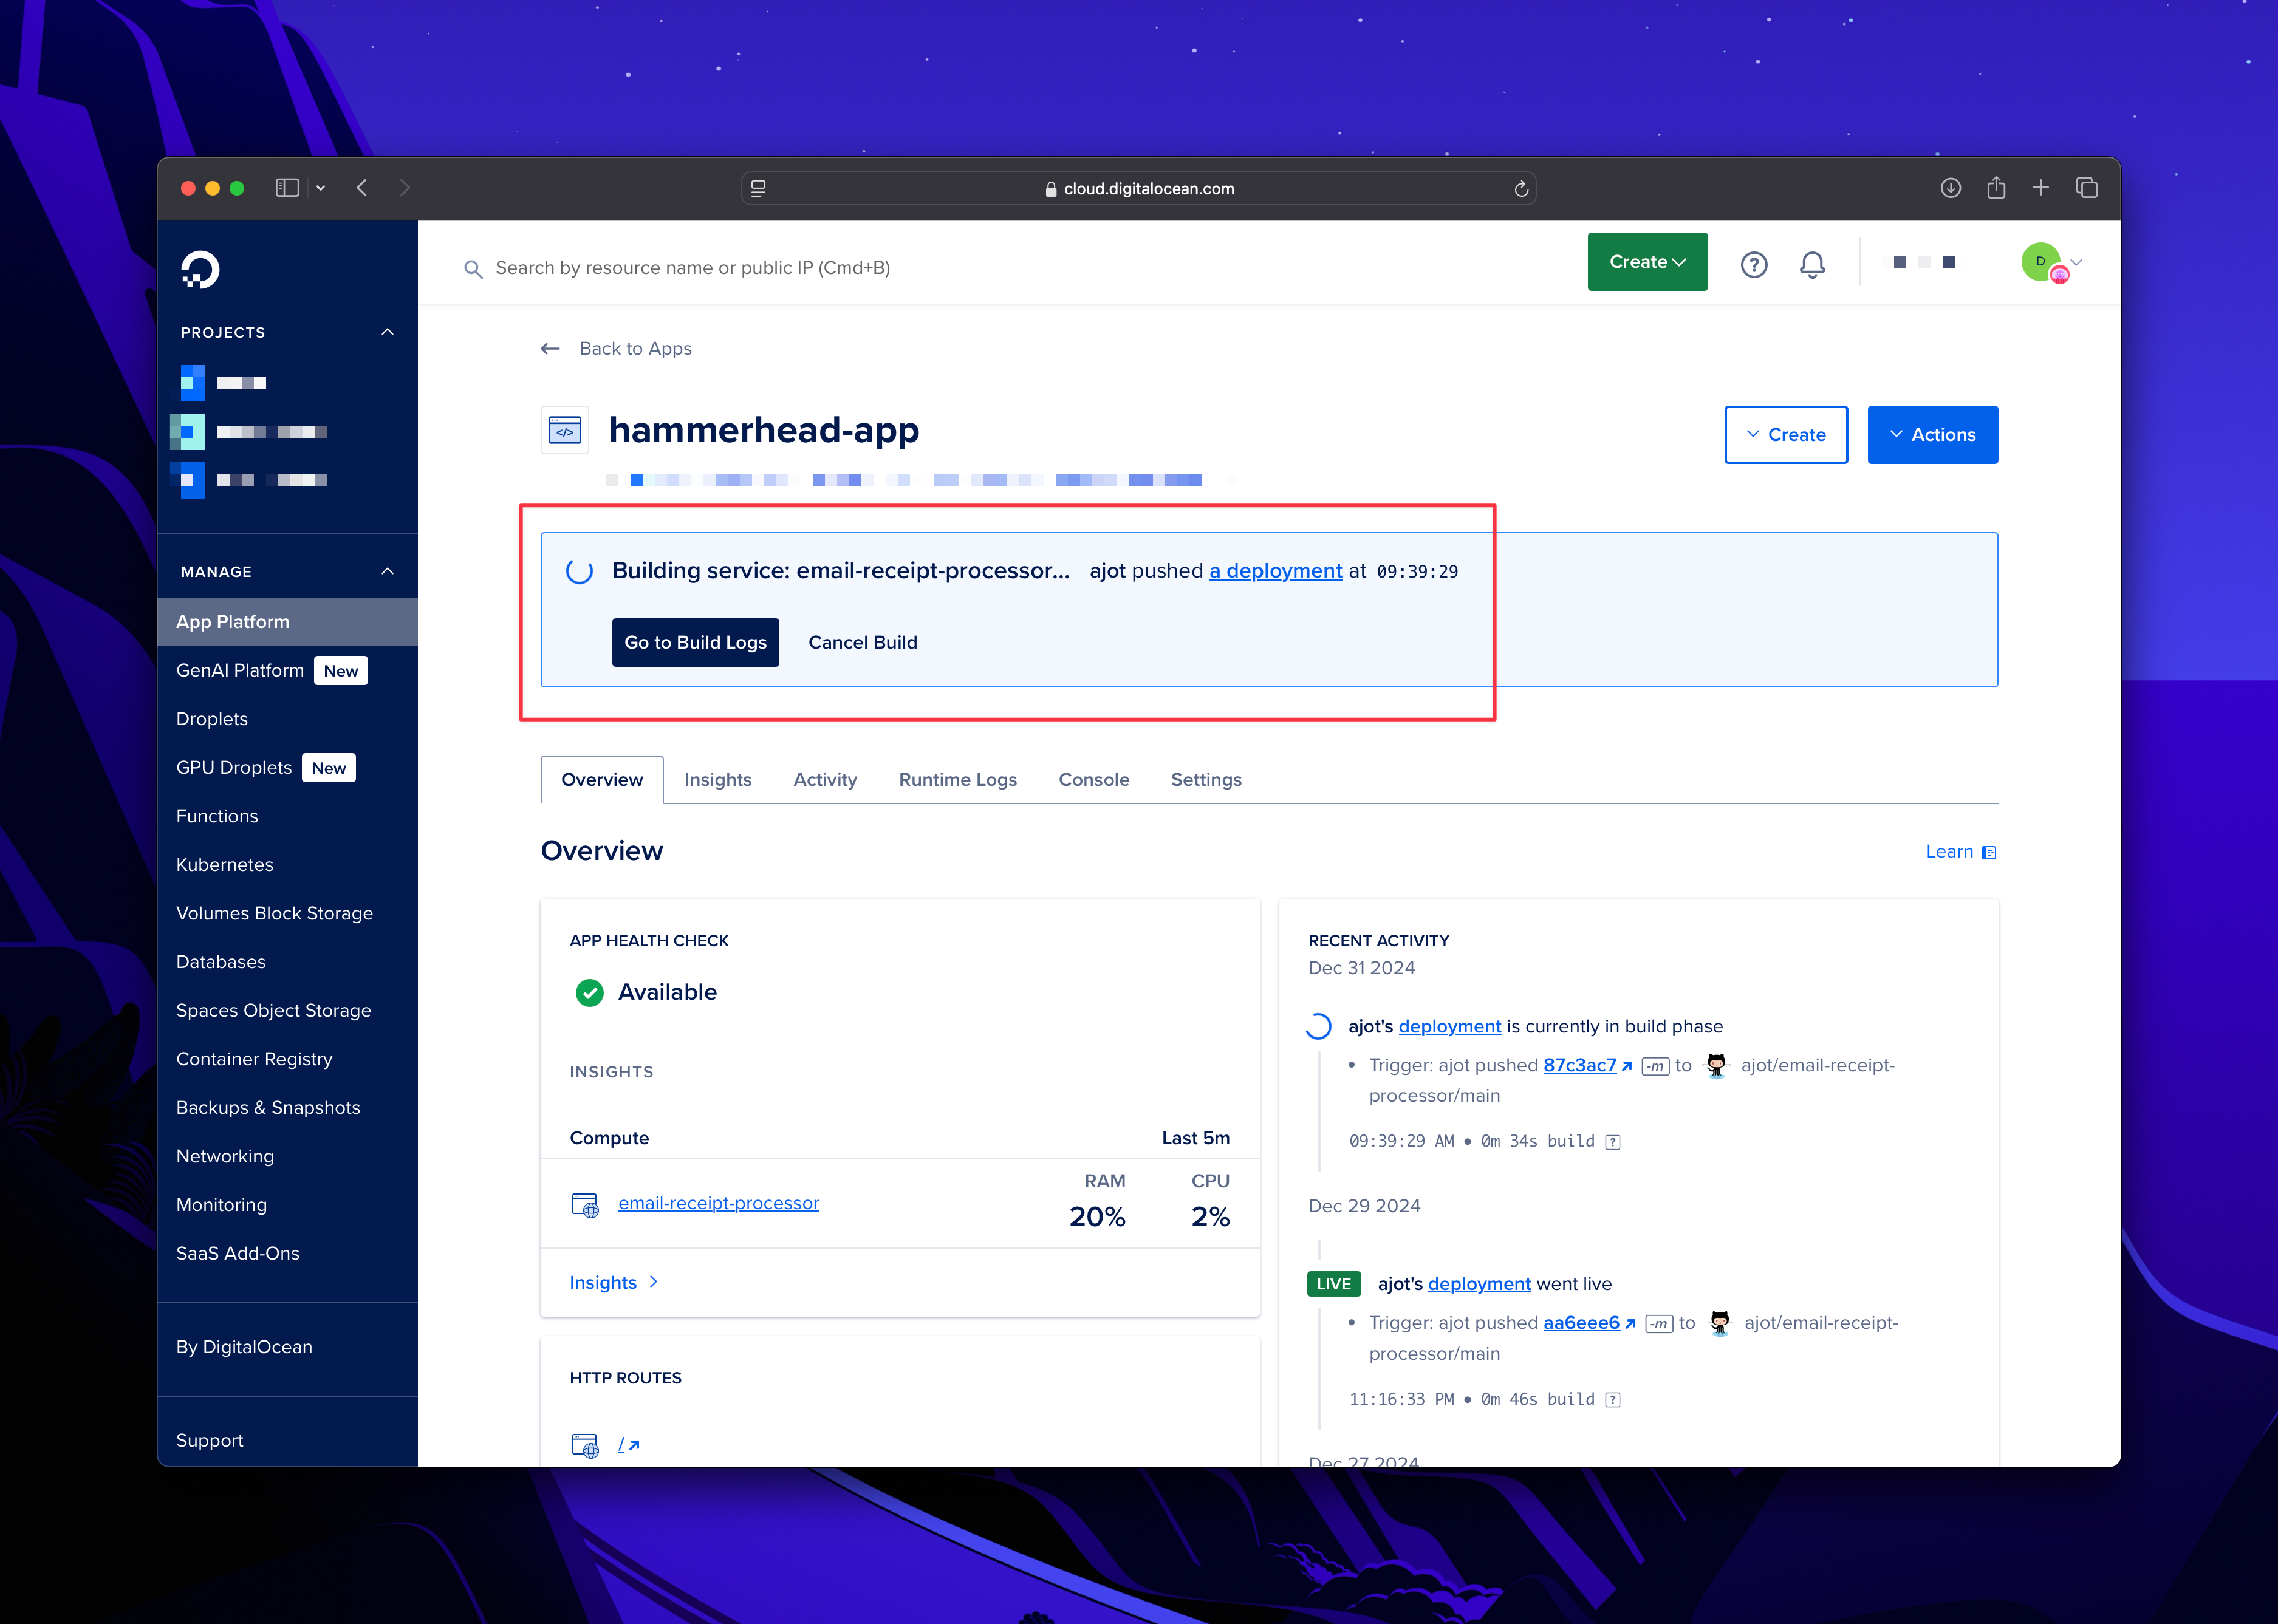
-
Verify Your Deployment: After the deployment completes, navigate to your app’s public URL and test its functionality. You can also check the runtime logs in the dashboard to confirm that the app started successfully.
Step 4: Test the Entire Workflow
Now that your app is fully configured and ready, it’s time to test the entire workflow. We’ll ensure that the email body is processed, attachments are decoded and uploaded to DigitalOcean
Spaces, and the final output includes everything we need.
Here’s how you can test step by step:
-
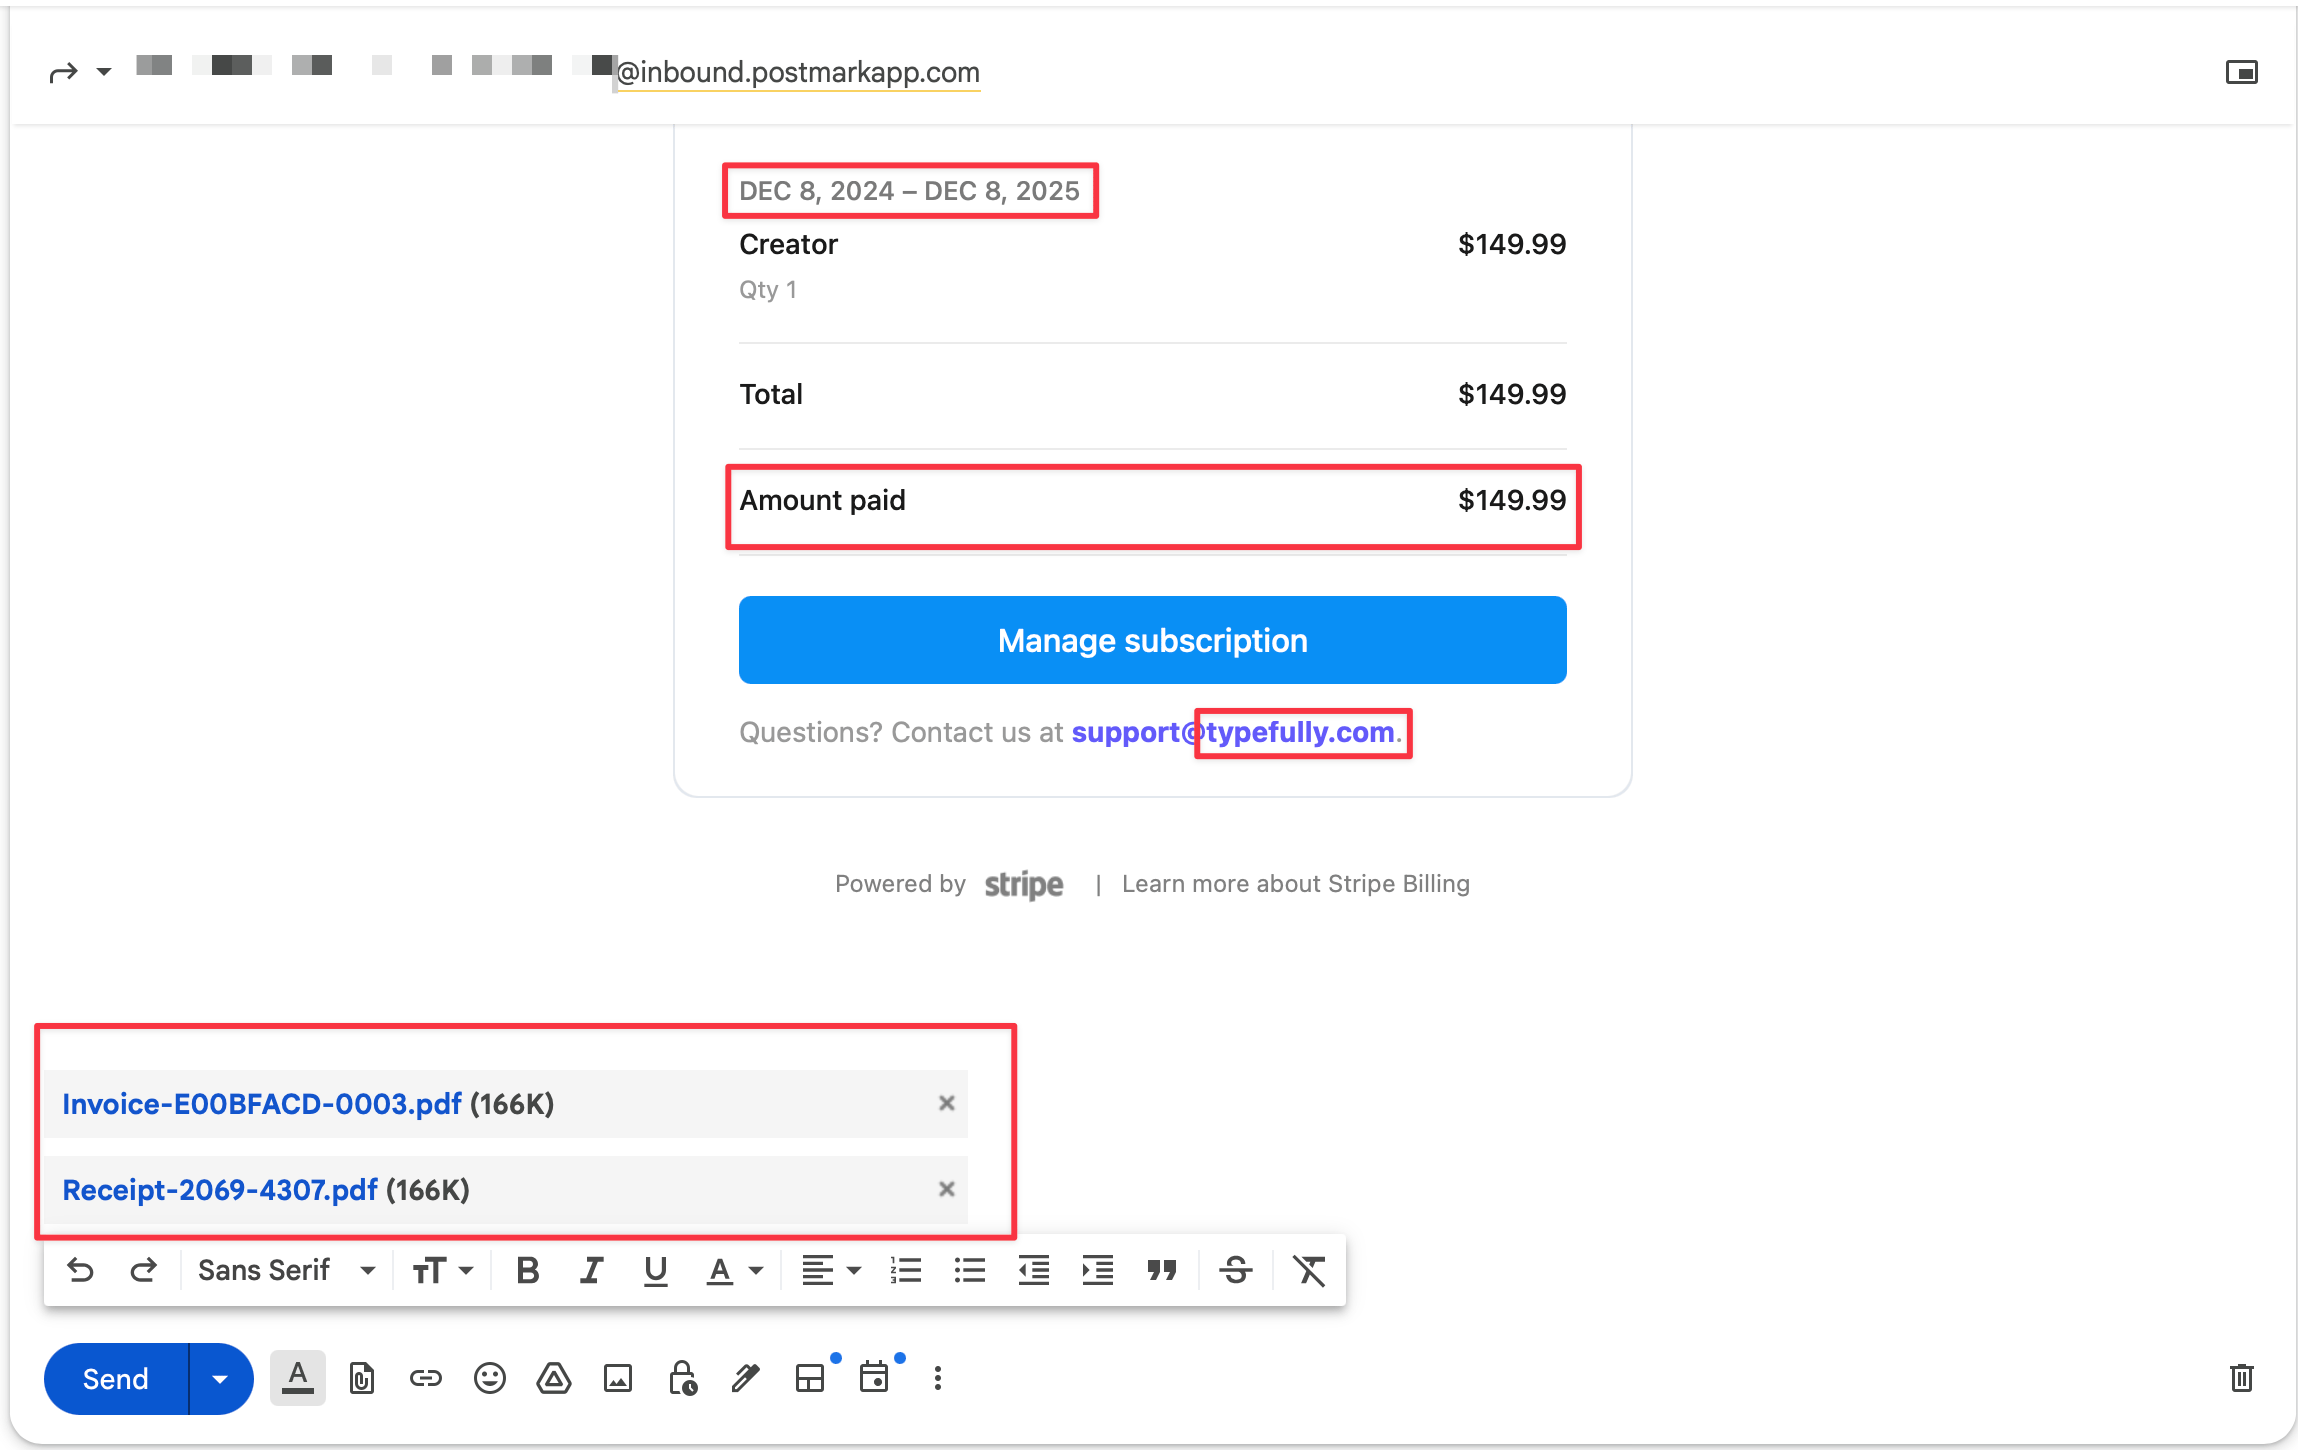
Send a Test Email: Send an email to Postmark with a text body and an attachment. If you’re unsure how to configure Postmark, check Day 8: Connecting Postmark to Your Flask App where we walked through setting up Postmark to forward emails to your app.
-
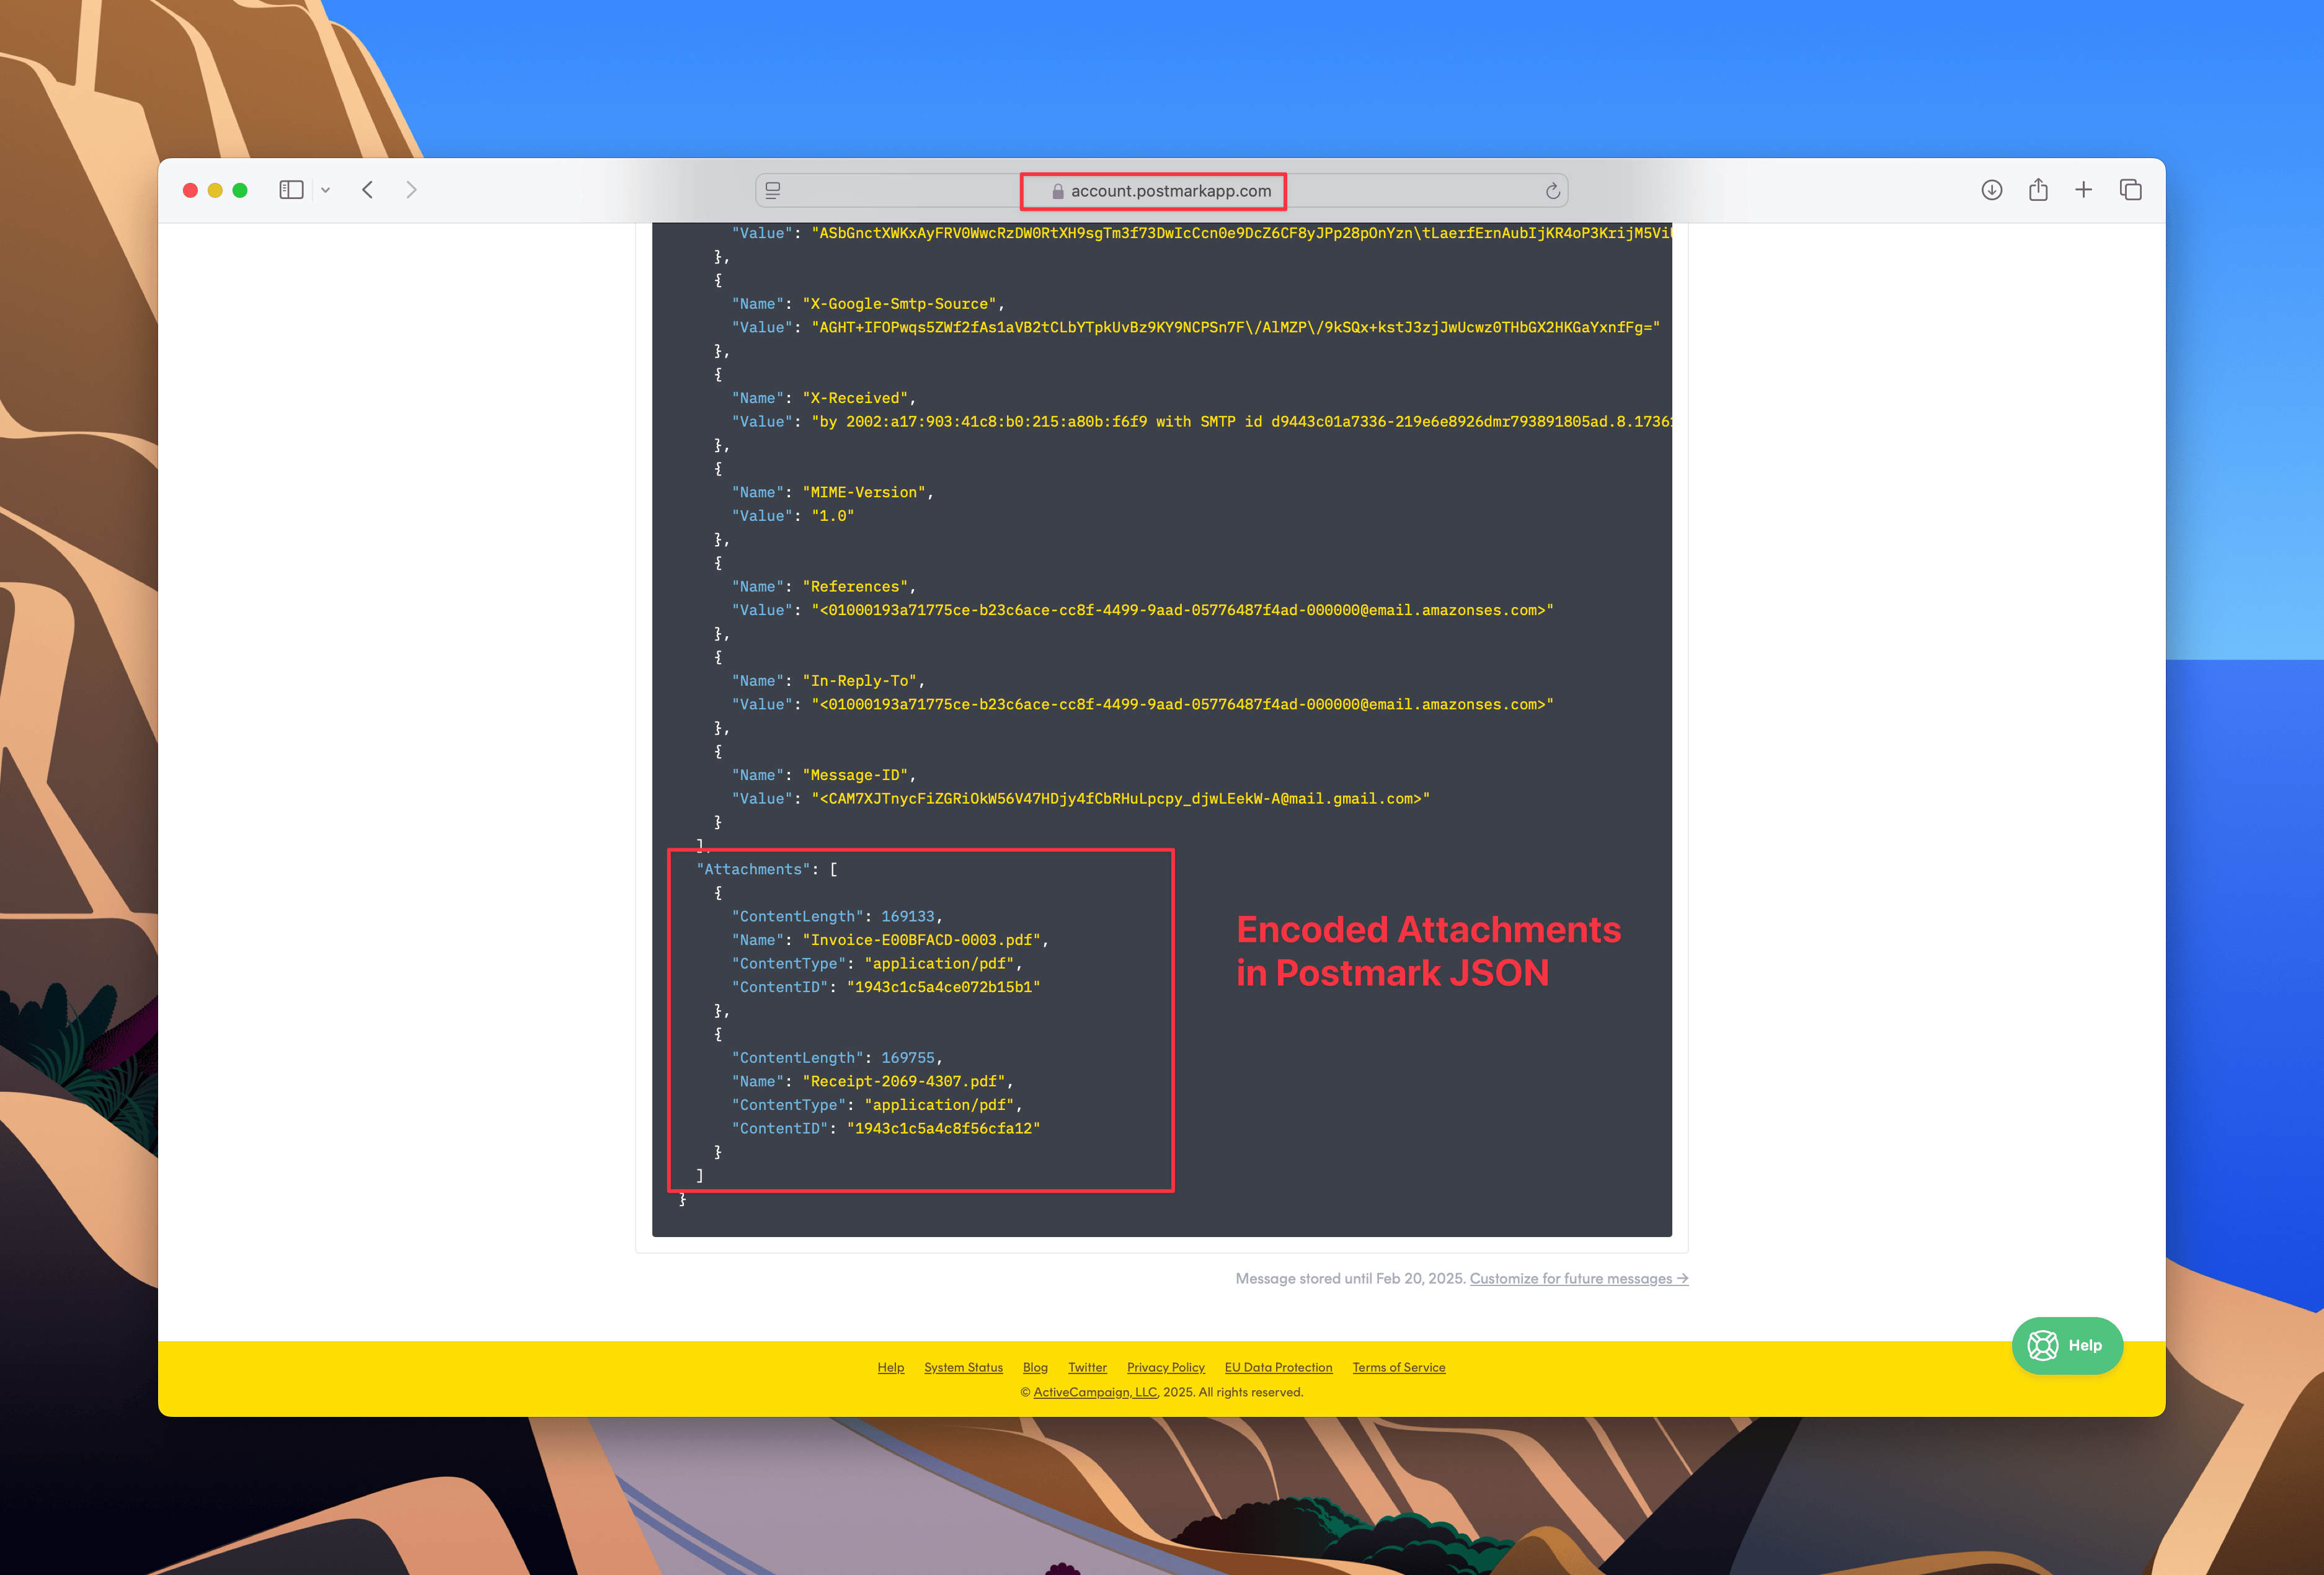
Check Postmark Activity JSON: In the Postmark dashboard, navigate to the Activity tab. Locate the email you sent, and ensure that the JSON payload includes the text body and Base64-encoded attachment data. This confirms Postmark is correctly forwarding the email data to your app.
-
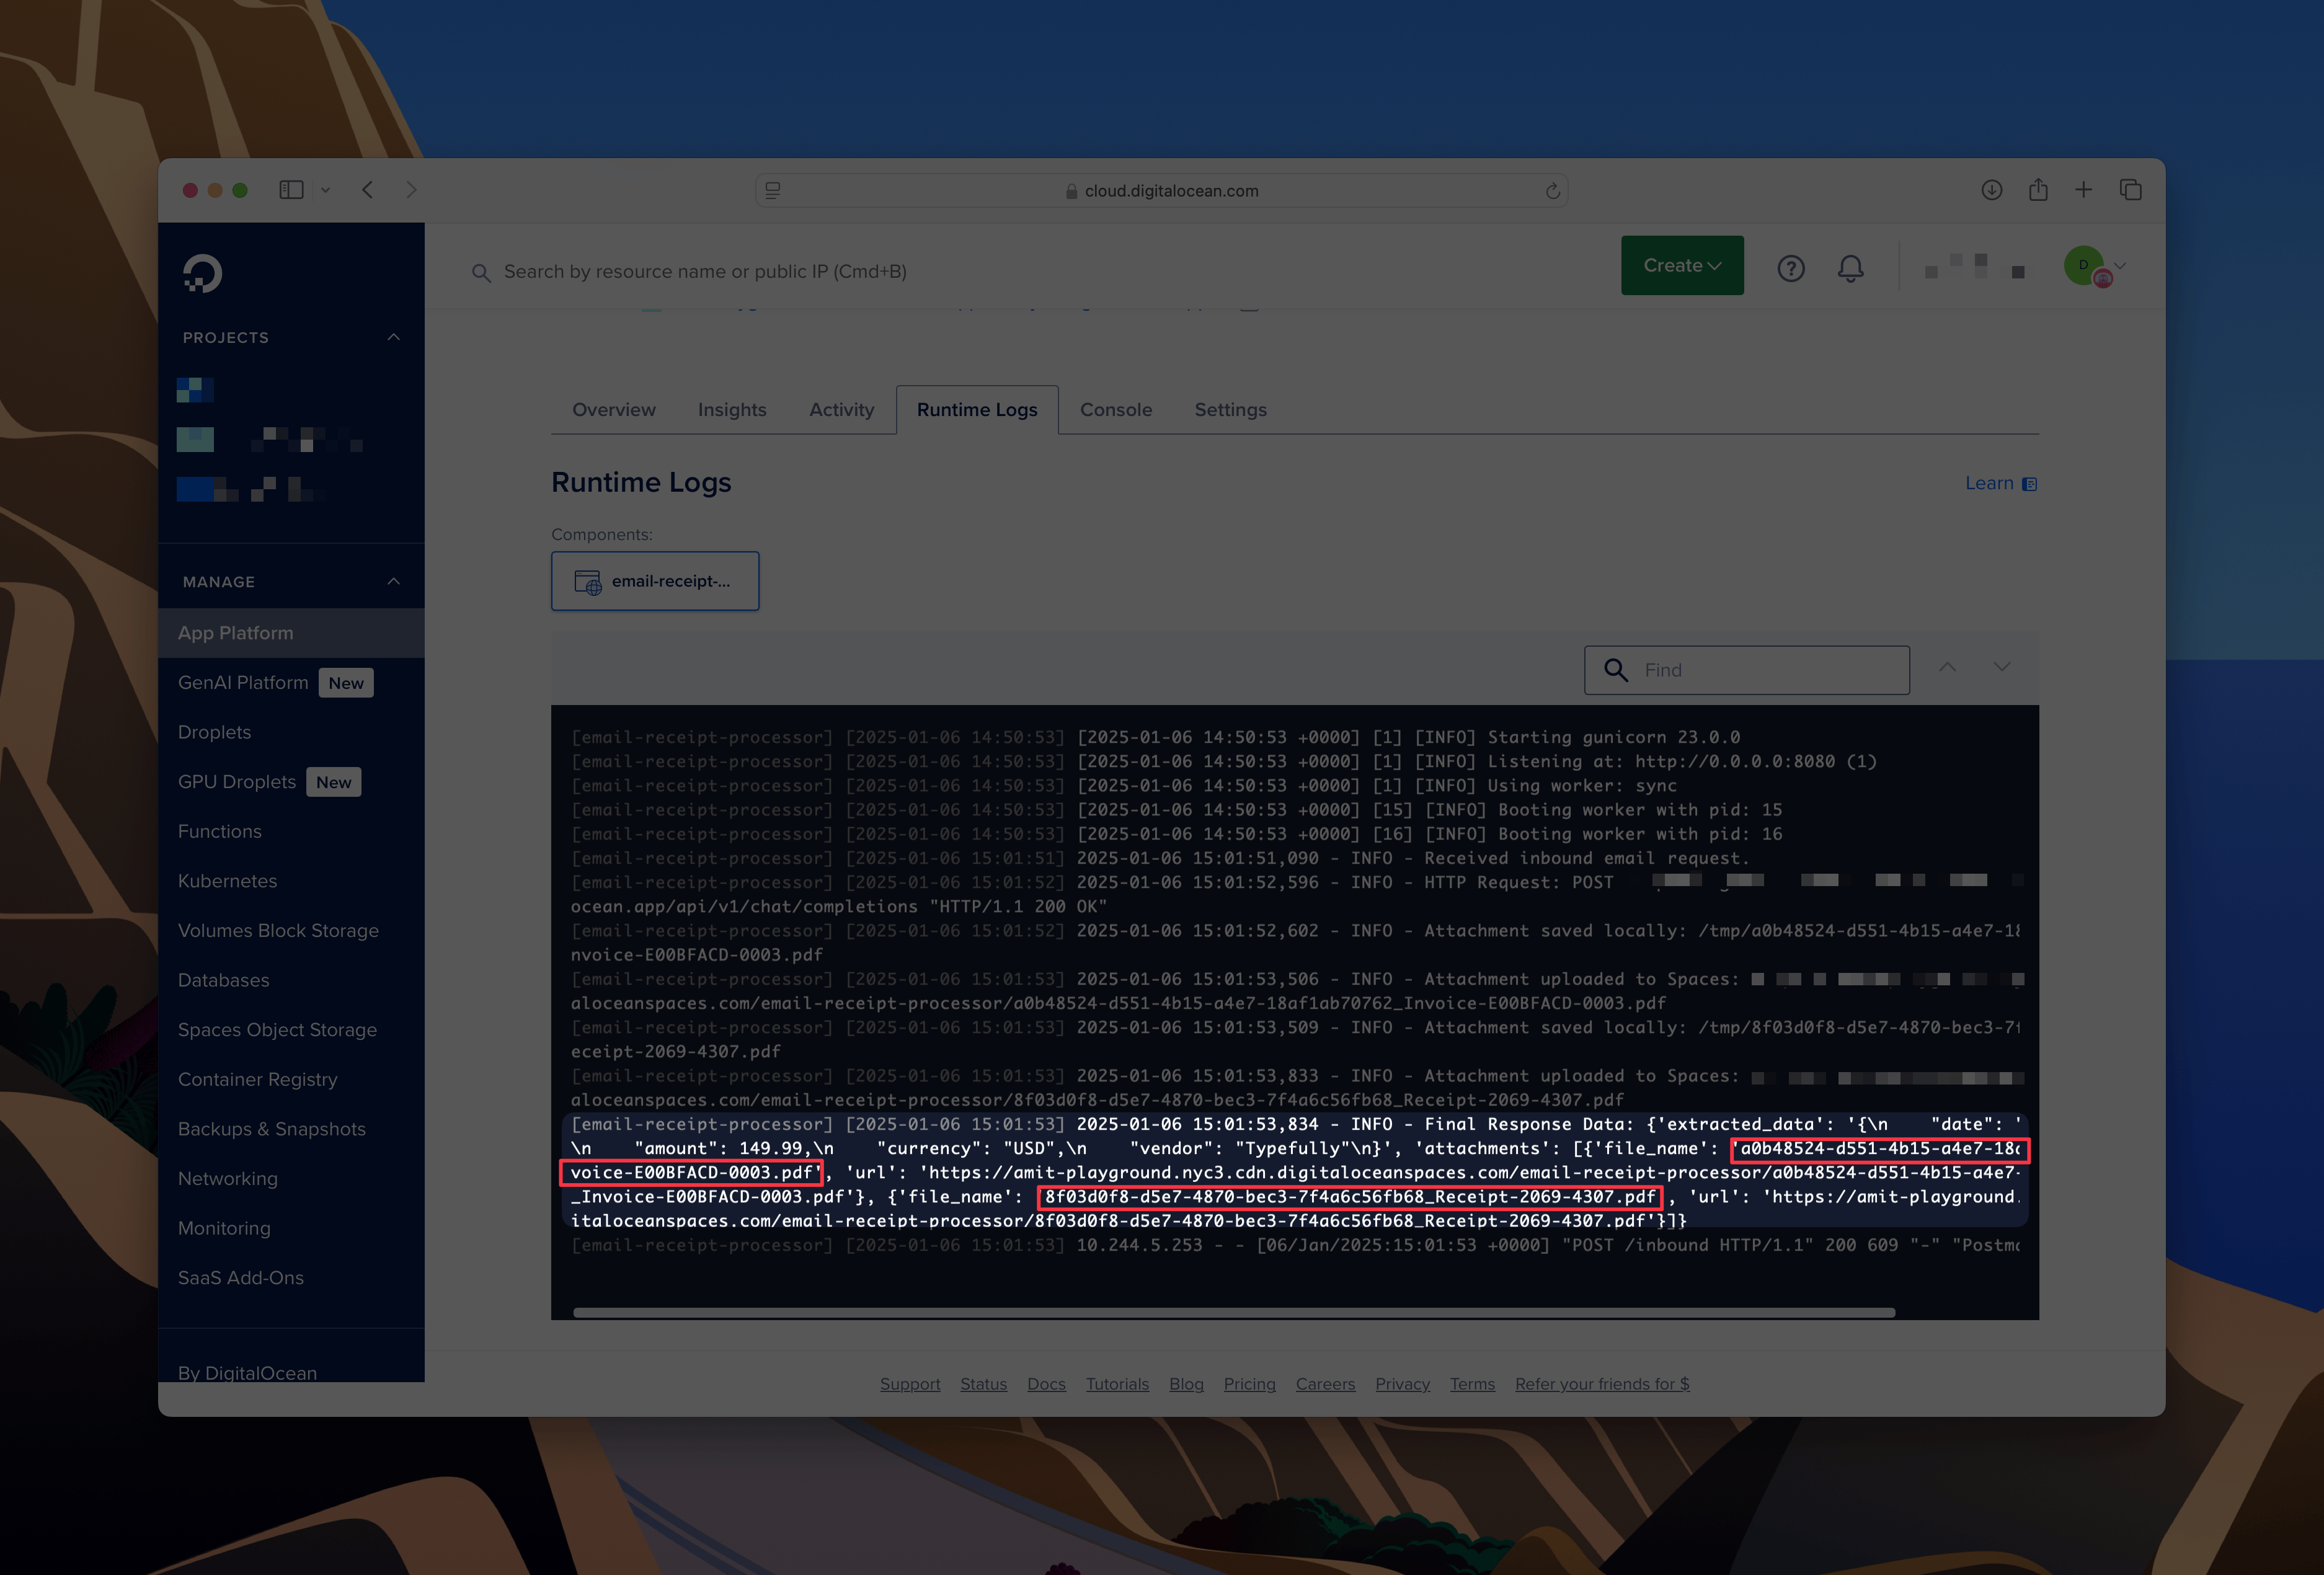
Monitor the Logs: Check the runtime logs in your DigitalOcean App Platform dashboard to ensure the app processes the JSON payload. We covered how to access runtime logs in Day 9.
-
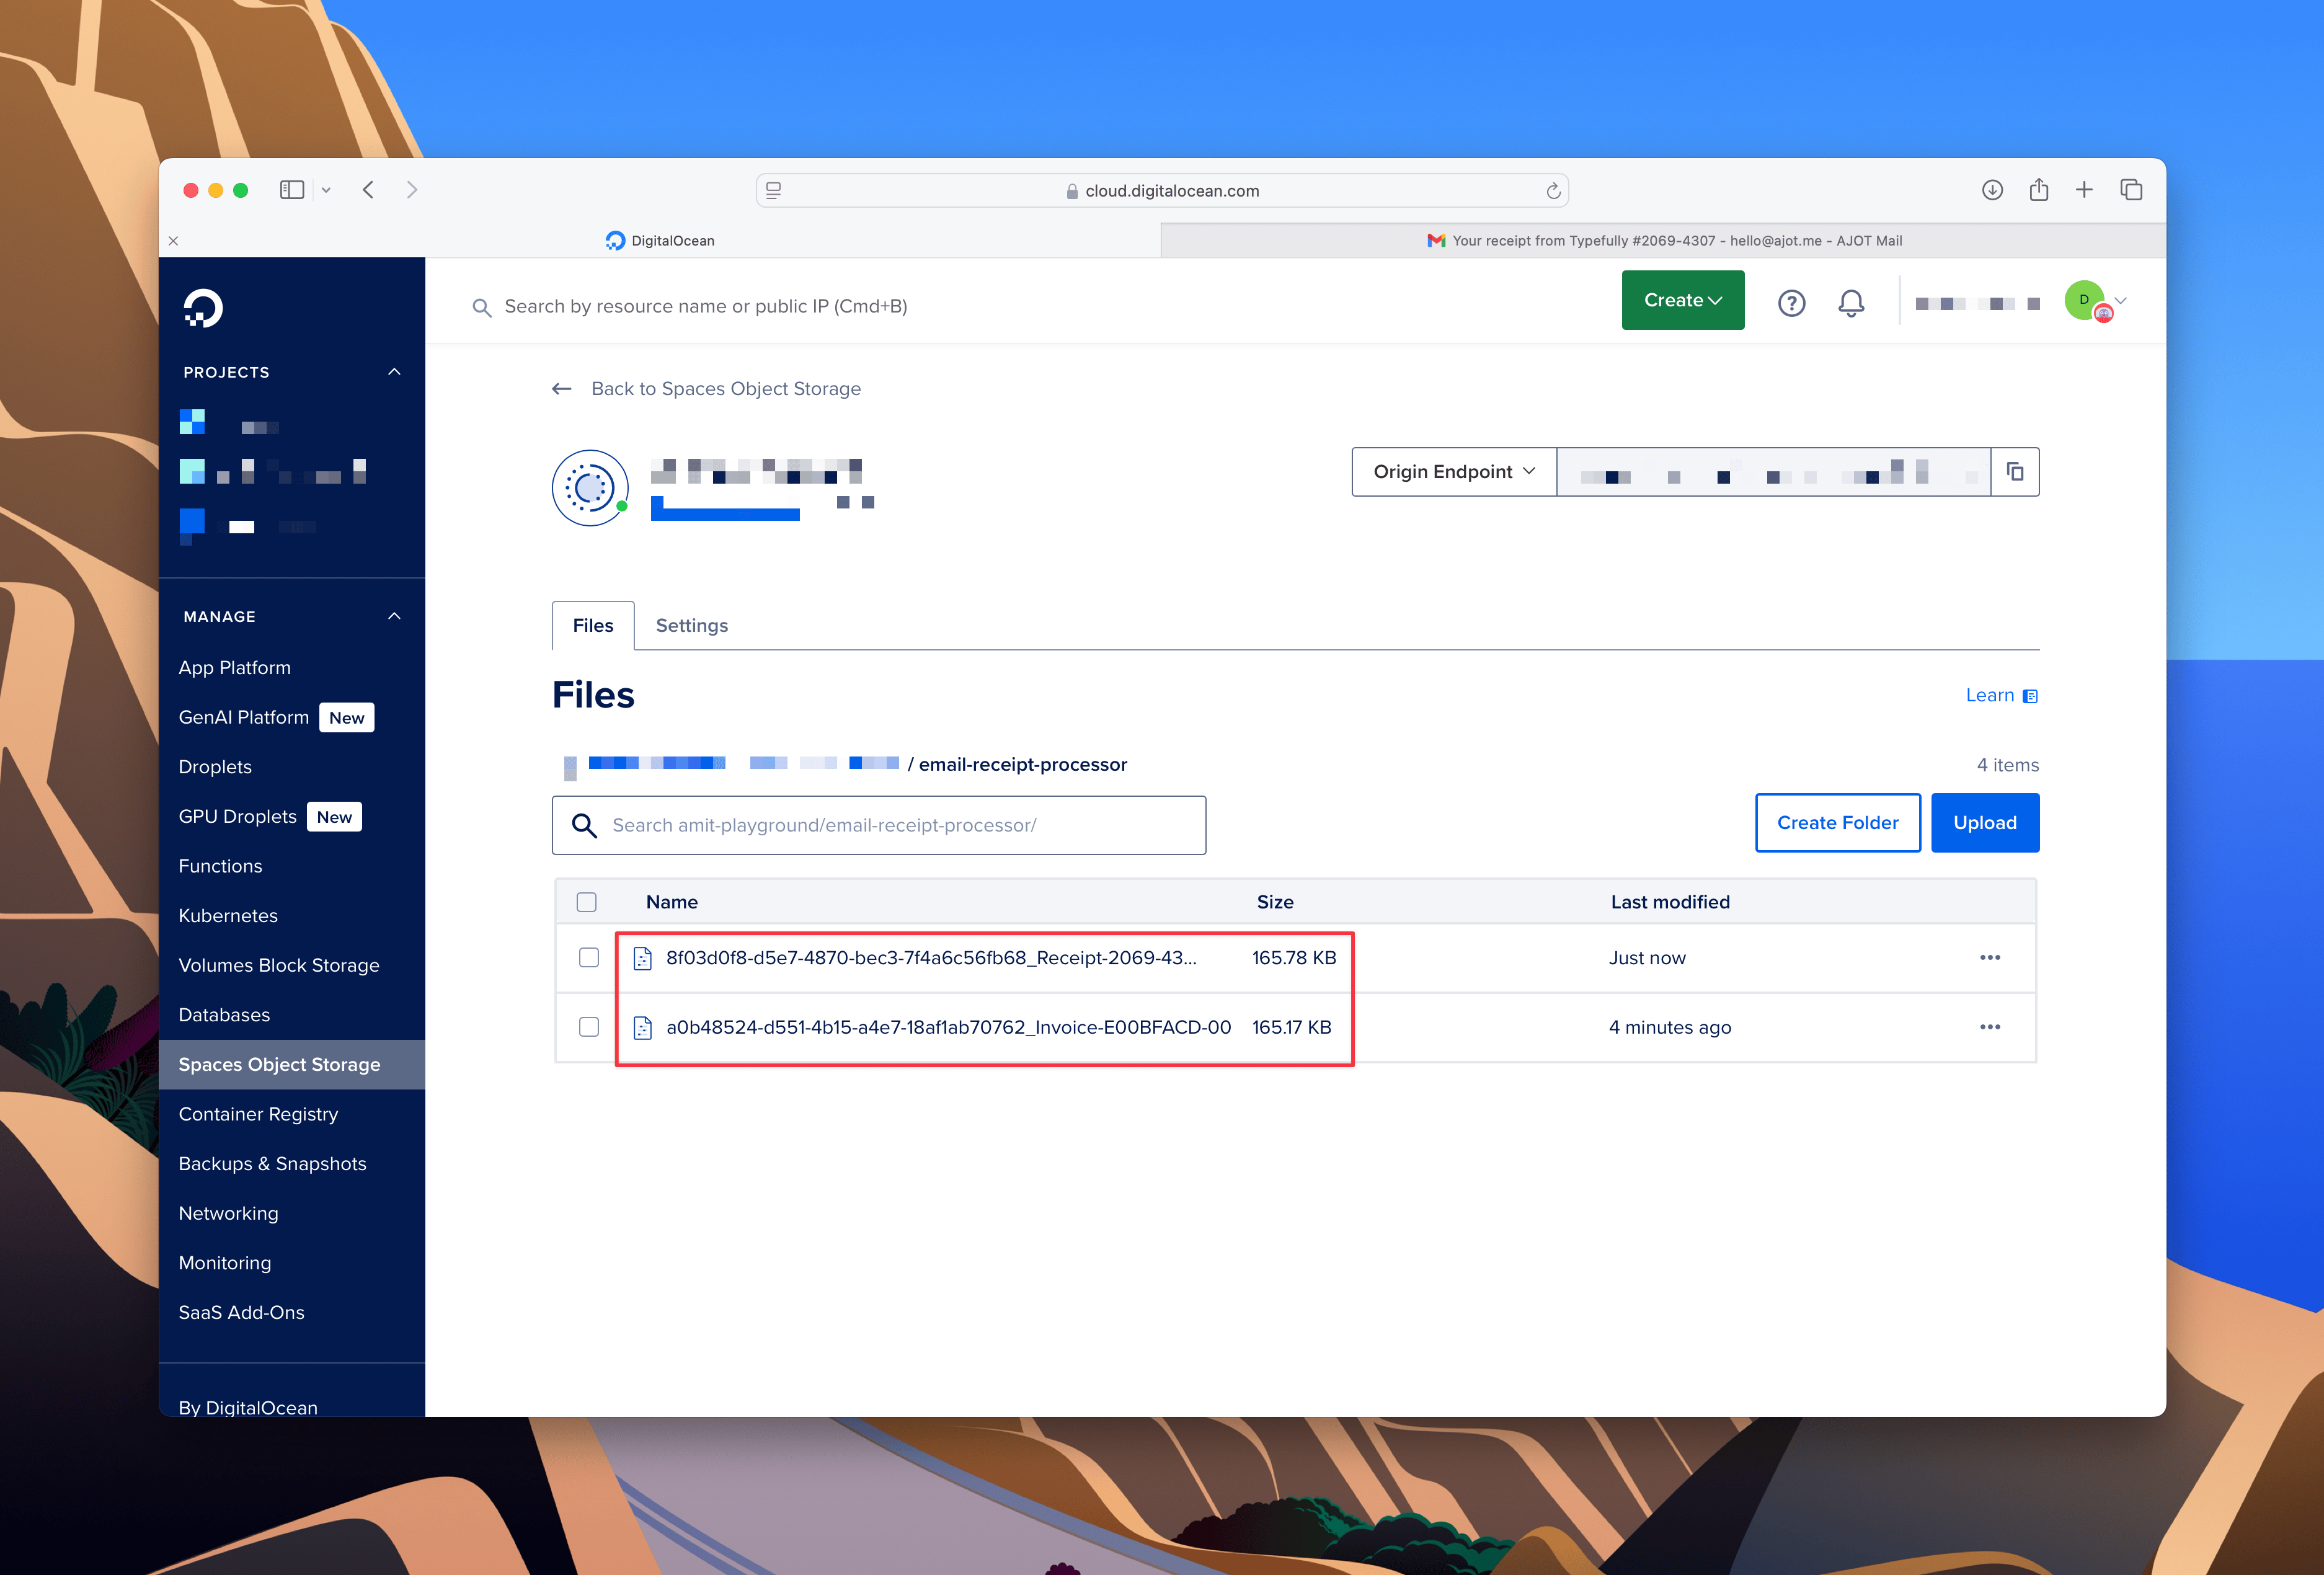
Verify Spaces Upload: Visit your DigitalOcean Space to confirm that the files were uploaded successfully. You should see the attachments in your bucket.
-
Check the Final Output: The app should log the extracted data and the attachment URLs. These logs will include:
- Details extracted from the email body.
- Public URLs for the uploaded attachments.
Refer to Day 9 for tips on inspecting runtime logs.
By the end of these steps, your workflow will be ready to save data to a database, which we’ll tackle next.
🎁 Wrap-Up
Today, we taught your app to handle attachments like a pro. Here’s what we did:
- Created a DigitalOcean Space for secure, scalable storage.
- Decoded Base64-encoded attachments from Postmark JSON.
- Ensured unique filenames with
uuid. - Uploaded attachments to DigitalOcean Spaces using
boto3. - Generated public URLs for each file, ready to be used in your receipt processor.
Up next, we’ll integrate this data into a database. This will allow you to store extracted email details and attachment URLs for long-term use, making your receipt processor even more powerful. Stay tuned!
Thanks for learning with the DigitalOcean Community. Check out our offerings for compute, storage, networking, and managed databases.
About the author
Amit is a Developer Advocate at DigitalOcean 🐳, where he helps developers build and ship better apps on the cloud. Compulsive Seinfeld quoter. LEGO nerd. 🧱 AMA.
Still looking for an answer?
This textbox defaults to using Markdown to format your answer.
You can type !ref in this text area to quickly search our full set of tutorials, documentation & marketplace offerings and insert the link!
 This work is licensed under a Creative Commons Attribution-NonCommercial- ShareAlike 4.0 International License.
Become a contributor for community
Get paid to write technical tutorials and select a tech-focused charity to receive a matching donation.

DigitalOcean Documentation
Full documentation for every DigitalOcean product.

Resources for startups and AI-native businesses
The Wave has everything you need to know about building a business, from raising funding to marketing your product.
The developer cloud
Scale up as you grow — whether you're running one virtual machine or ten thousand.

Start building today
From GPU-powered inference and Kubernetes to managed databases and storage, get everything you need to build, scale, and deploy intelligent applications.
