By Andrew Dugan
Senior AI Technical Content Creator II

Introduction
OpenClaw is an open-source AI-powered chatbot framework that enables you to build sophisticated conversational agents with access to external tools and services. By integrating with Google services like Gmail, Calendar, and Drive, OpenClaw can automate tasks such as email management, scheduling, and document handling. In this tutorial, you will deploy OpenClaw on a DigitalOcean Droplet and configure it to work with Google services using OAuth (Open Authorization) authentication.
Setting up OpenClaw involves creating a dedicated Gmail account for security purposes, configuring Google Cloud Console to enable API (Application Programming Interface) access, and establishing secure authentication through OAuth credentials. You’ll learn how to transfer credentials to your Droplet, install the necessary tools, and establish an SSH (Secure Shell) tunnel for secure browser-based authentication from your remote server.
By the end of this tutorial, you will have a fully functional OpenClaw installation running on DigitalOcean with authenticated access to Google services.
Key Takeaways
- OpenClaw is an AI-powered chatbot framework that can integrate with Google services like Gmail, Calendar, and Drive to automate tasks.
- Using a dedicated Gmail account for your OpenClaw bot improves security and isolates bot activities from personal accounts.
- Google Cloud Console requires OAuth 2.0 credentials and API enablement for services your bot will access.
- The
gogclitool simplifies Google service authentication on headless servers through SSH tunneling. - SSH tunneling allows you to authenticate browser-based OAuth flows from a remote server without a graphical interface.
Warning: Granting OpenClaw access to your Google services carries inherent security risks. If your server is compromised, malicious actors could potentially gain access to your Gmail, Google Calendar, and other connected services. For this reason, you should not use your personal Google account with OpenClaw. Instead, you should create a Gmail account specifically for your bot, isolating it from your personal data and limiting potential damage in case of a security breach. OpenClaw is not a secure platform by default, so do not use this Google account for confidential communication, files, or calendar events.
Note: This setup process is lengthy and involves multiple steps across different platforms. Additionally, OpenClaw is under active development, and changes to the application may cause these instructions to become outdated. If you encounter issues or find that steps no longer work as described, please leave a comment below. Community feedback helps keep this tutorial accurate and up-to-date.
Step 1 — Creating an OpenClaw Droplet
To begin, sign in to your DigitalOcean account and create a standard Ubuntu Droplet with 4-8 GB of RAM where you’ll install OpenClaw manually.
Once your Droplet is created, note its IP address from the DigitalOcean Control Panel. You’ll use this throughout the tutorial.
SSH into your Droplet from a terminal using the following command, replacing your_server_ip with your Droplet’s IP address:
- ssh root@your_server_ip
If this is your first time connecting to the Droplet, you may see a message about host authenticity. Type yes to continue.
Once connected, run the following command to install OpenClaw.
- curl -fsSL https://openclaw.ai/install.sh | bash
Follow the on-screen prompts in the text-based user interface (TUI). Select an AI option and add the API key for your selection. You can optionally connect a communication channel at this stage, though this tutorial focuses on Google service integration.
Step 2 — Creating a Dedicated Gmail Account
Go to Google’s account creation page and follow the steps to create a new Gmail account. Choose a descriptive name that identifies it as your bot’s account, such as yourproject-openclaw@gmail.com. Do not add any personal information, contacts, or sensitive data to this account.
Complete the account setup process, including phone verification if required. Make note of the email address and password, as you’ll use this account for all subsequent Google Cloud Console configuration. You do not need to add any skills yet.
Step 3 — Setting Up Google Cloud Console and OAuth
With your dedicated Gmail account created, you’ll now configure Google Cloud Console to enable API access and create OAuth credentials.
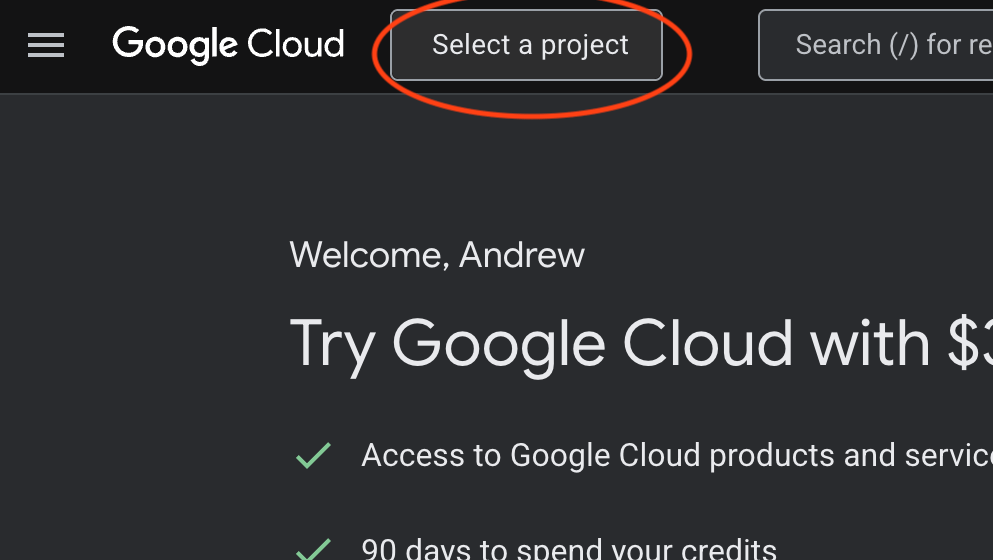
Navigate to the Google Cloud Console and ensure you’re signed in with your bot’s Gmail account. If multiple accounts are available, verify the correct account is active by checking the profile icon in the top-right corner.
Creating a Google Cloud Project
Click Select a project at the top of the page.
Then click New Project in the top right of the dialog box that appears.
Enter a project name such as OpenClaw Google Integration and click Create. After the project is created (this may take a few seconds), switch to it by clicking Select a project again and choosing your newly created project from the list.
Enabling Google APIs
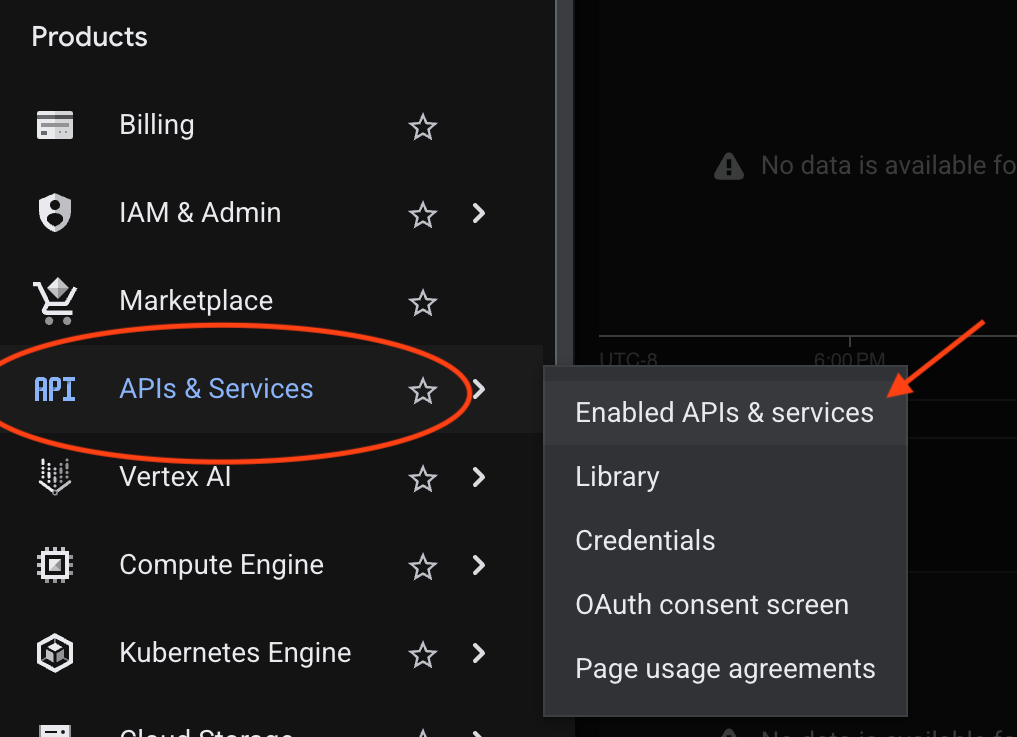
Click the hamburger menu icon (three horizontal lines) in the top-left corner, hover over APIs & Services, and select Enabled APIs & Services.

Click + ENABLE APIS AND SERVICES at the top of the page.
Search for and enable the following APIs:
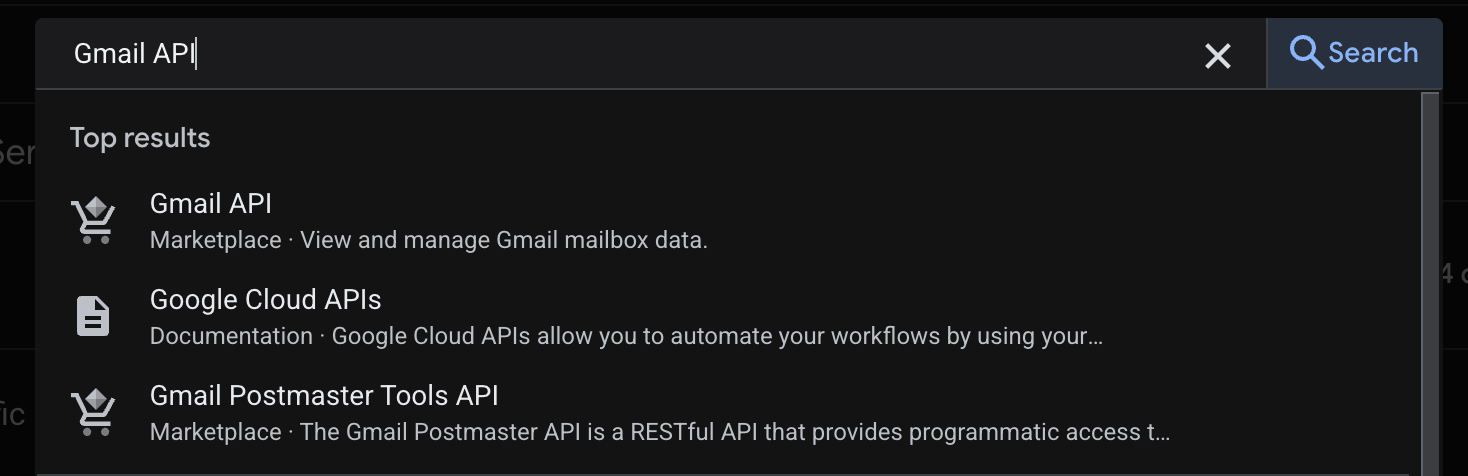
- Gmail API: Search for “Gmail API”, click it, and click Enable.
- Google Calendar API: Search for “Google Calendar API”, click it, and click Enable.
- Google Drive API: Search for “Google Drive API”, click it, and click Enable.
You can enable additional Google APIs based on your needs. Each API you enable will later be accessible to your OpenClaw bot.
Configuring OAuth Consent Screen
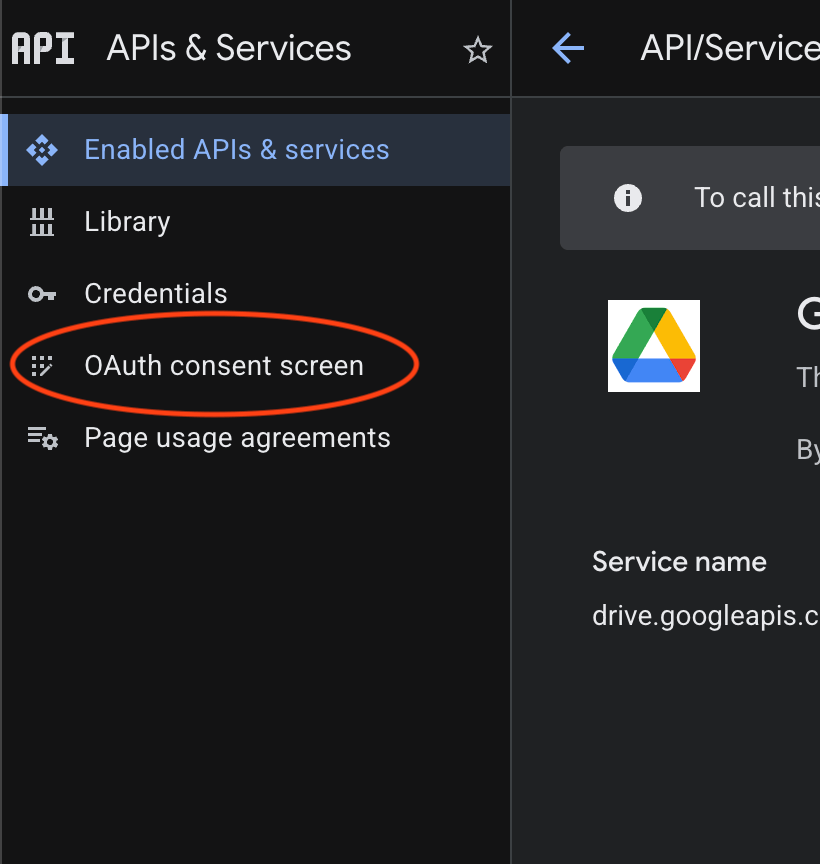
After enabling the necessary APIs, navigate to OAuth consent screen from the left sidebar under APIs & Services.
Click Get Started and configure the consent screen with the following settings:
- App name: Enter a name like
OpenClaw Google - User support email: Select your bot’s email address from the dropdown
- Click Next
- Audience: Choose External to allow the bot to access the account
- Developer contact information: Enter your bot’s email address
- Click Next through the remaining screens
- Click Create
After creating the consent screen configuration, click Publish App in the left sidebar under Audience.
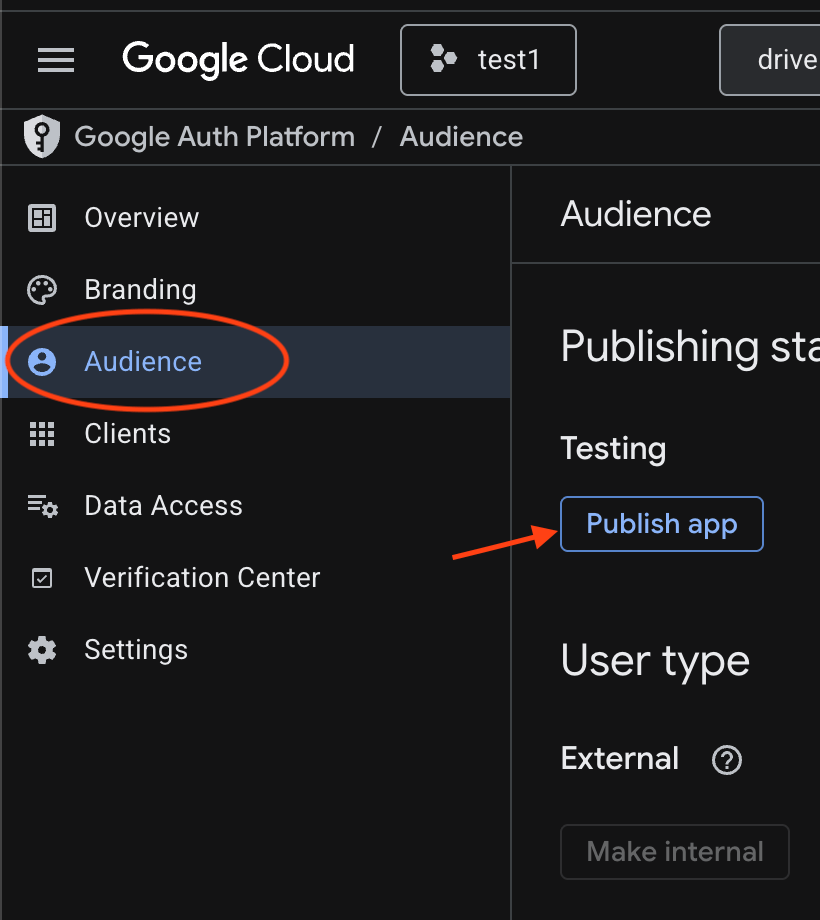
Then click Confirm to make the app available for use.
Creating OAuth Credentials
Return to the left navigation menu and select Credentials under APIs & Services.
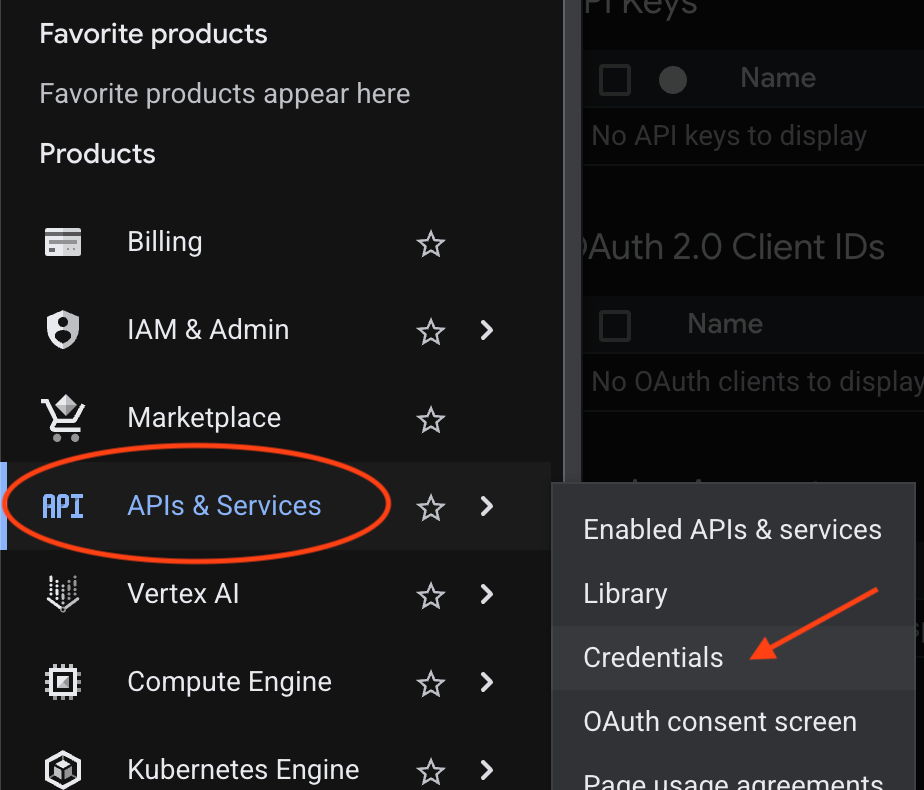
Click + CREATE CREDENTIALS at the top and choose OAuth client ID.
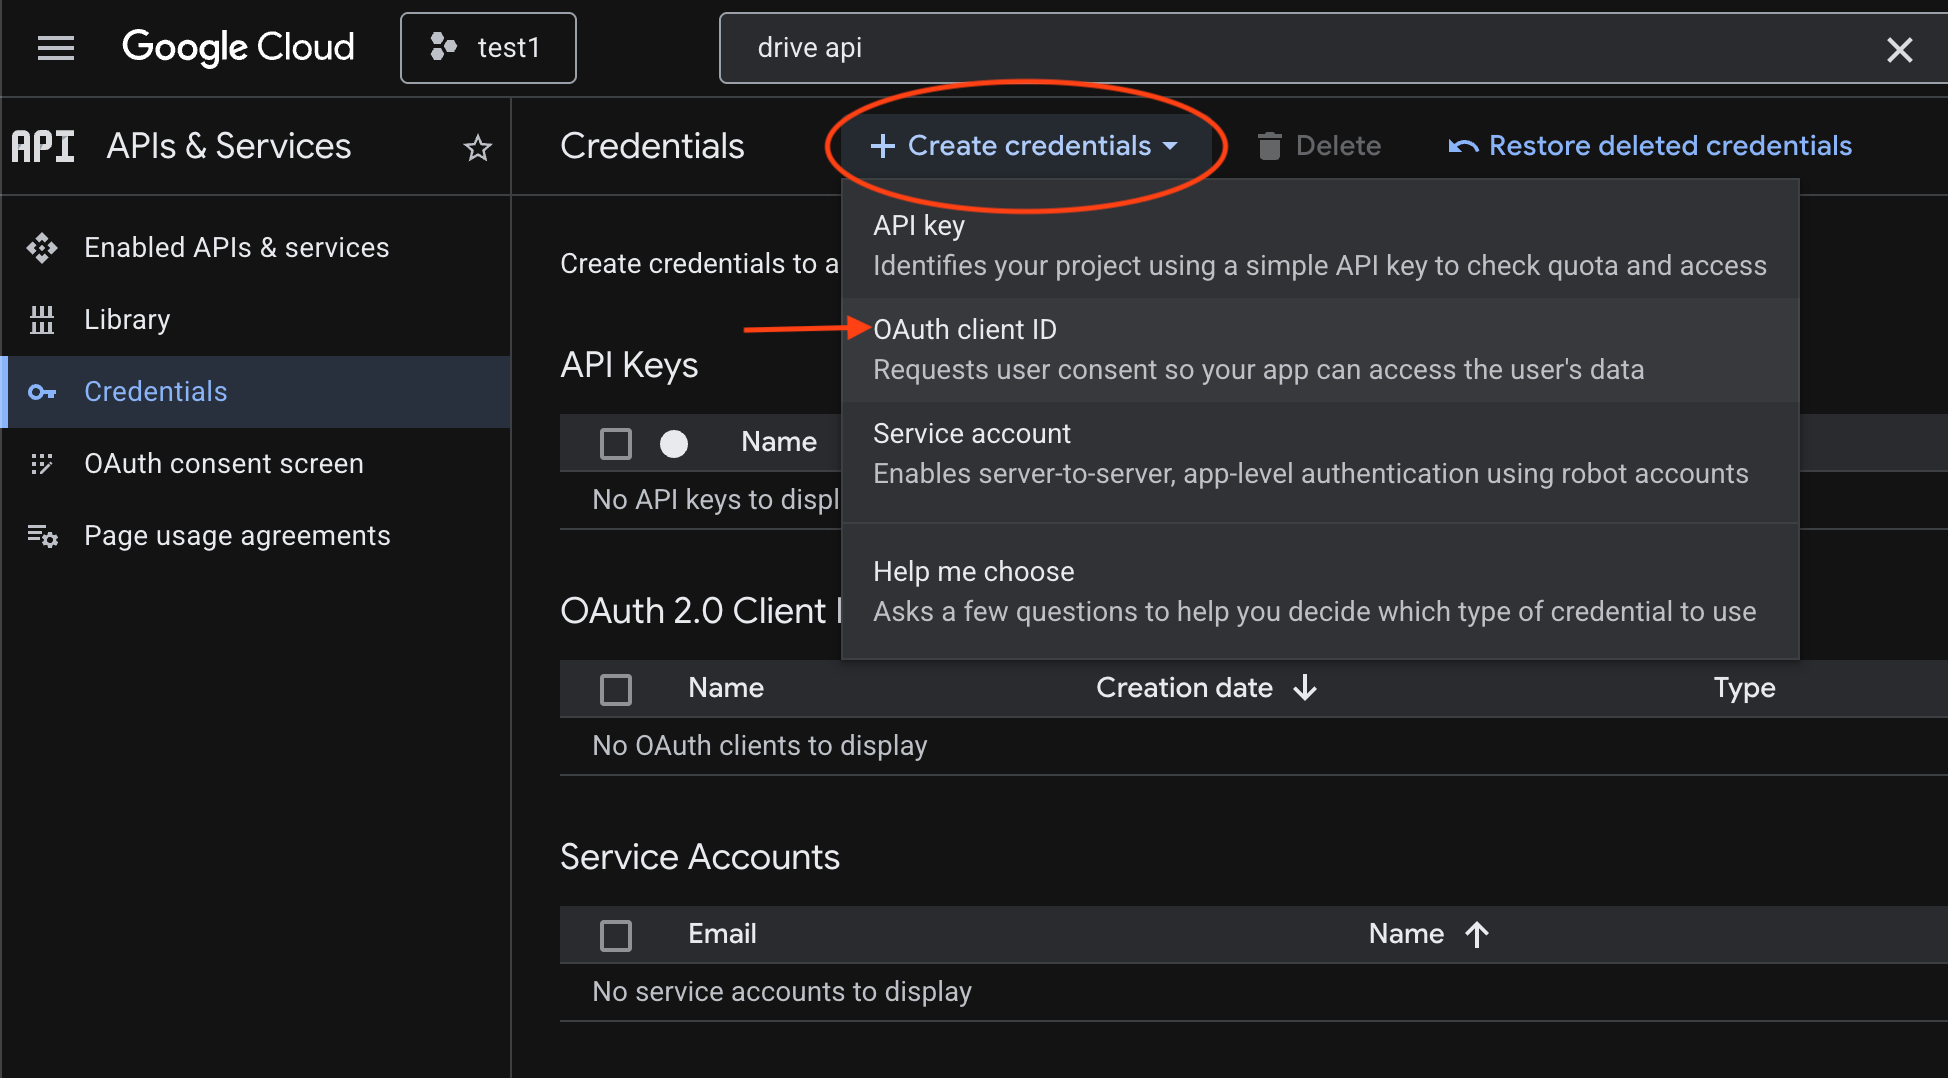
For Application type, select Desktop app, give it a descriptive name like OpenClaw Desktop Client, and click Create.
A dialog appears showing your client ID and client secret. Click Download JSON to download the credentials file. This file contains your OAuth credentials and must be kept secure.
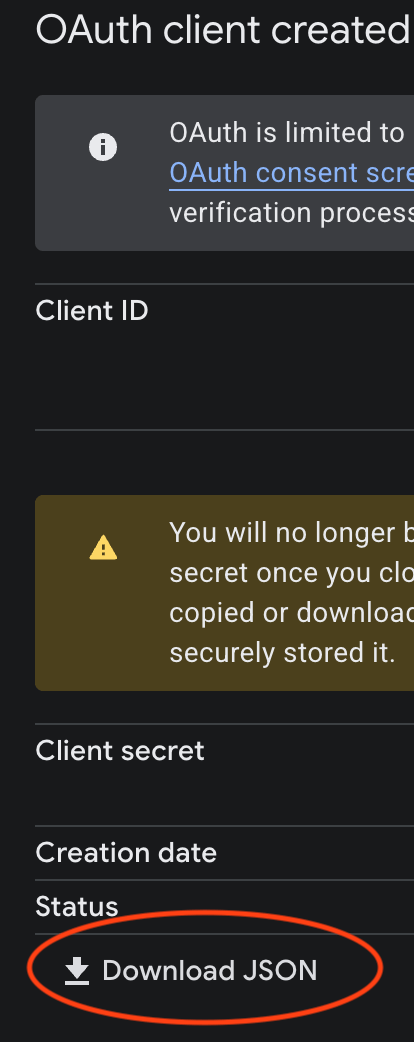
Save the downloaded file with a recognizable name on your local computer, such as google_oauth_client.json.
Step 4 — Transferring Credentials and Installing gogcli
Now you’ll transfer the OAuth credentials file to your Droplet and install gogcli, a command-line tool for authenticating Google services.
Transferring the Credentials File
Open a new terminal window on your local computer (not your Droplet SSH session) and use the scp command to copy the JSON file to your Droplet from your local machine. Replace path/to/your/file.json with the actual path to your downloaded JSON credentials file and your_server_ip with your Droplet’s IP address:
- scp "path/to/your/file.json" root@your_server_ip:~/google_oauth_client.json
For example:
- scp "~/Downloads/client_secret_123456.json" root@203.0.113.10:~/google_oauth_client.json
This command copies the file to your Droplet’s home directory and renames it to google_oauth_client.json.
Installing gogcli
Return to your Droplet SSH session and install gogcli. This tool simplifies Google service authentication on headless servers.
First, download the prebuilt gogcli binary (version 0.11.0):
- cd /tmp
- wget https://github.com/steipete/gogcli/releases/download/v0.11.0/gogcli_0.11.0_linux_amd64.tar.gz
Extract the archive:
- tar -xzf gogcli_0.11.0_linux_amd64.tar.gz
Install the binary to /usr/local/bin to make it available system-wide:
- sudo install -m 0755 gog /usr/local/bin/gog
Verify the installation:
- gog --version
You should see output indicating version 0.11.0 or similar.
Configuring gogcli with Your Credentials
Create the gogcli configuration directory and move your credentials file into it:
- mkdir -p ~/.config/gogcli
- mv ~/google_oauth_client.json ~/.config/gogcli/credentials.json
- chmod 600 ~/.config/gogcli/credentials.json
The chmod command sets secure permissions on the credentials file, making it readable only by your user account.
Register the credentials with gogcli:
- gog auth credentials ~/.config/gogcli/credentials.json
Step 5 — Authenticating Google Services via SSH Tunnel
The final step is to authenticate your bot’s Google account with the services you’ve enabled. This process requires a browser, but since your Droplet doesn’t have a graphical interface, you’ll create an SSH tunnel to complete authentication on your local machine.
Initiating Authentication
In your Droplet SSH session, run the following command, replacing your_bot_gmail_address with your bot’s email address and listing the services you enabled (separated by commas):
- gog auth add your_bot_gmail_address --services gmail,calendar,drive
For example:
- gog auth add myproject-openclaw@gmail.com --services gmail,calendar,drive
The command will output a long URL beginning with https://accounts.google.com/o/oauth2/auth?.... Do not open this URL yet.
Extracting the Port Number
Examine the URL provided by the command. Find the redirect_uri parameter, which contains a port number. The URL will look similar to this:
- Outputhttps://accounts.google.com/o/oauth2/auth?...redirect_uri=http%3A%2F%2F127.0.0.1%3A35817%2Foauth2%2Fcallback...
The five-digit number after 127.0.0.1%3A is the port number (in this example, 35817). Note this number.
Creating the SSH Tunnel
Important: The authentication URL expires quickly, so complete the following steps without delay. If the URL expires, you can run the gog auth add... command again to generate a new one.
Open a new terminal window on your local computer (keep the Droplet SSH session open) and create an SSH tunnel with the following command. Replace PORT with the port number you extracted, and your_server_ip with your Droplet’s IP address:
- ssh -N -L PORT:127.0.0.1:PORT root@your_server_ip
For example:
- ssh -N -L 35817:127.0.0.1:35817 root@203.0.113.10
This command creates a tunnel that forwards traffic from your local machine’s port to the same port on your Droplet. The command will not produce output and will appear to hang—this is expected. Leave it running.
Completing Browser Authentication
With the SSH tunnel active, copy the full authentication URL from your Droplet terminal and paste it into your local web browser.
Follow the authentication flow:
- Select your account: Choose your bot’s Google account
- Verification warning: If you see a “Google hasn’t verified this app” warning, click Advanced, then click Go to [Your App Name]
- Permissions: Click Select all to grant access to all requested services, then click Continue
- You should see a success message indicating authentication is complete
Finalizing Authentication
Return to your Droplet SSH terminal. You should see the message:
- OutputAuthorization received. Finishing...
The tool will prompt you to enter a passphrase to encrypt the stored credentials. Enter a secure passphrase and press ENTER. Remember this passphrase. You will need it again later.
Once complete, your OpenClaw bot is authenticated and can access the Google services you configured.
You can now close the SSH tunnel on your local machine by pressing CTRL + C in the terminal where it’s running.
Step 6 — Configuring OpenClaw Environment Variables
Now that you’ve authenticated your Google account with gogcli, you need to configure OpenClaw to access these credentials. This requires setting the passphrase you created in Step 5 as an environment variable that OpenClaw can use.
Creating the OpenClaw Environment File
First, open the OpenClaw environment configuration file using the nano text editor. This file stores environment variables that OpenClaw needs to function:
- nano /root/.openclaw/.env
This command opens the .env file located in OpenClaw’s configuration directory. If the file doesn’t exist, nano will create it.
Add the following line to the file, replacing your_password with the actual passphrase you created during the gogcli authentication process. Make sure you add it on a new line if you already have another API key in the file.
- GOG_KEYRING_PASSWORD=your_password
This line stores your gogcli keyring password as an environment variable, allowing OpenClaw to decrypt and access your Google service credentials.
Save the file by pressing CTRL + O, then press ENTER to confirm. Exit the editor by pressing CTRL + X.
Next, set secure permissions on the environment file to ensure only your user account can read it:
- chmod 600 /root/.openclaw/.env
The chmod 600 command sets the file permissions to read and write for the owner only, preventing other users on the system from viewing your sensitive password.
Adding the Variable to Your Shell Environment
Export the environment variable to your shell by adding it to your .bashrc file:
- echo 'export GOG_KEYRING_PASSWORD=$(grep GOG_KEYRING_PASSWORD /root/.openclaw/.env | cut -d= -f2)' >> ~/.bashrc
This command does several things:
grep GOG_KEYRING_PASSWORD /root/.openclaw/.envsearches the.envfile for the line containing your passwordcut -d= -f2extracts just the password value (everything after the=sign)export GOG_KEYRING_PASSWORD=$()sets it as an environment variable in your shell>> ~/.bashrcappends this export command to your.bashrcfile so it runs automatically whenever you start a new shell session
Configuring the OpenClaw Gateway Service
OpenClaw’s gateway service also needs access to this environment variable. Open the systemd service configuration file:
- nano ~/.config/systemd/user/openclaw-gateway.service
This opens the systemd unit file that defines how the OpenClaw gateway service runs. Systemd is the service manager on most Linux systems and controls background processes.
Scroll down to the [Service] section of the file. Add a new line with the Environment directive, replacing your_password with your actual passphrase:
Environment=GOG_KEYRING_PASSWORD=your_password
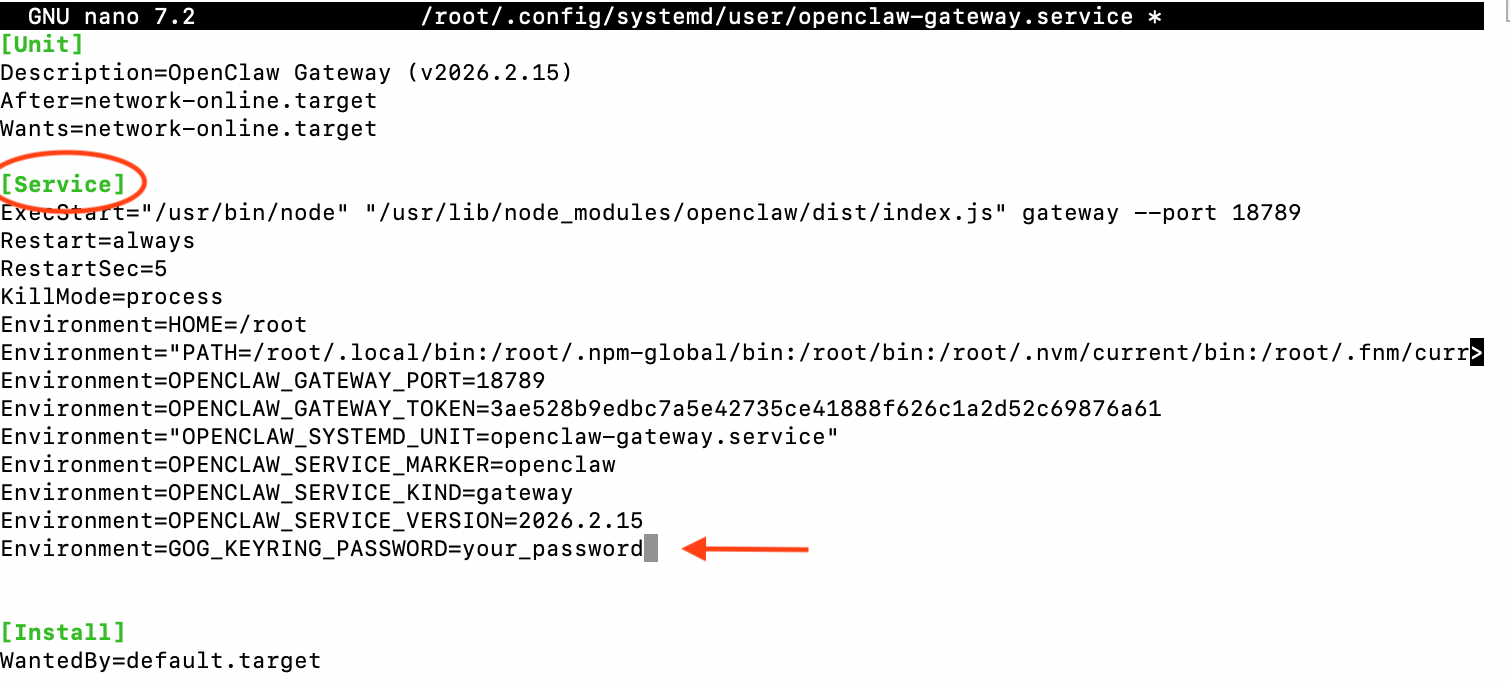
This Environment directive tells systemd to set the GOG_KEYRING_PASSWORD environment variable when it starts the OpenClaw gateway service, ensuring the service has access to your Google credentials.
Save the file with CTRL + O, press ENTER, then exit with CTRL + X.
Restarting the OpenClaw Service
For the changes to take effect, reload the systemd configuration and restart the OpenClaw gateway service:
- systemctl --user daemon-reload
- systemctl --user restart openclaw-gateway
The systemctl --user daemon-reload command tells systemd to reload all unit file configurations, which is necessary after editing a service file. Without this, systemd would continue using the old configuration from memory.
The systemctl --user restart openclaw-gateway command stops and restarts the OpenClaw gateway service, applying the new environment variable you added. The --user flag ensures the command operates on user-level services rather than system-level services.
Step 7 — Confirming the Google Connection Functions
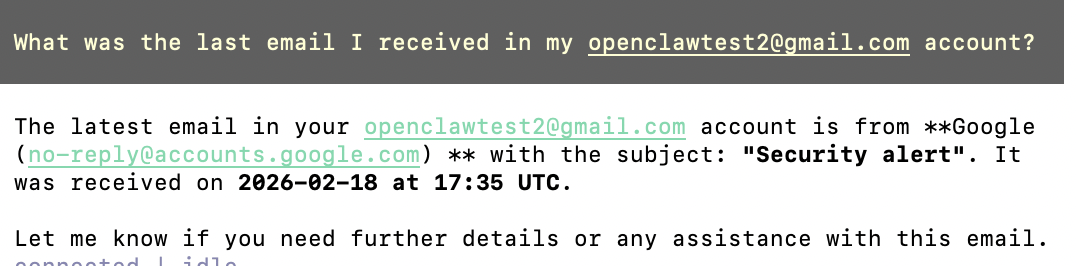
Now, go to the text user interface with the following command:
- openclaw tui
Then ask what your most recent email received in your OpenClaw email address was, and OpenClaw should show you. This request might take a couple of tries, depending on the LLM you are using in your settings. OpenClaw can sometimes be inconsistent with responses/actions and hit API rate limits quickly.
FAQ
Why should I create a dedicated Gmail account for OpenClaw instead of using my personal account?
Using OpenClaw with Google services poses security risks. If your server is compromised, attackers could potentially access any Google account connected to OpenClaw, including reading your emails, viewing your calendar, accessing your files, and performing actions as you. Using a dedicated account limits the blast radius of a potential security breach to only the bot’s account, protecting your personal data. Never use your personal Gmail account with OpenClaw or any similar automation tool unless you fully understand and accept the security implications.
What happens if the OAuth authentication URL expires before I complete the SSH tunnel setup?
The authentication URL has a short expiration time for security. If it expires, simply run the gog auth add command again to generate a new URL and port number. Then quickly set up the SSH tunnel and complete the browser authentication.
Can I enable additional Google APIs after initial setup?
Yes, you can return to Google Cloud Console at any time to enable additional APIs. After enabling new APIs, you may need to re-authenticate by running the gog auth add... command again with the updated list of services.
How secure is storing OAuth credentials on my Droplet?
The gogcli tool encrypts stored credentials using the passphrase you provide during authentication. Additionally, setting file permissions to 600 ensures only your user account can read the credentials file. For production environments, consider additional security measures such as hardware security modules or secret management services.
What if I see connection errors when trying to use Google services?
First, verify that the relevant APIs are enabled in Google Cloud Console. Check that your OAuth consent screen is published (not in testing mode). Ensure your gogcli authentication hasn’t expired by running gog auth list to view active authentications. If issues persist, try re-authenticating using the gog auth add command.
Can I use OpenClaw with other cloud services besides Google?
Yes, OpenClaw supports integration with various services beyond Google. The specific integration steps will vary based on the service’s authentication requirements. Consult the OpenClaw documentation for guidance on connecting to other platforms.
Conclusion
In this tutorial, you deployed OpenClaw on a DigitalOcean Droplet and configured it to work with Google services including Gmail, Calendar, and Drive. You created a dedicated Gmail account for security, set up OAuth credentials through Google Cloud Console, installed the gogcli authentication tool, and used SSH tunneling to complete browser-based authentication from a remote server.
With OpenClaw now configured and authenticated, you can build sophisticated AI agents that automate email management, calendar scheduling, document handling, and other tasks across Google’s ecosystem. Next, you can explore building parallel agentic workflows to handle complex, multi-step automation tasks.
Related Links
Thanks for learning with the DigitalOcean Community. Check out our offerings for compute, storage, networking, and managed databases.
About the author
Andrew is an NLP Scientist with 8 years of experience designing and deploying enterprise AI applications and language processing systems.
Still looking for an answer?
This textbox defaults to using Markdown to format your answer.
You can type !ref in this text area to quickly search our full set of tutorials, documentation & marketplace offerings and insert the link!
Thanks Andrew. I actually had my openclaw containerised so had to do some extra steps with a second tunnel from the host to the container. Used a fixed port number from my local machine to the host then back to the URL port number in the container…
In the DO container: node -e “const net = require(‘net’); net.createServer(s => { const r = net.connect(41939, ‘127.0.0.1’); s.pipe®; r.pipe(s); }).listen(9999, ‘0.0.0.0’);” In the DO host: socat TCP-LISTEN:9999,fork TCP:172.18.0.2:9999 On the local machine: ssh -N -L 41939:127.0.0.1:9999 root@do-host-ip
All before google timed out!
 This work is licensed under a Creative Commons Attribution-NonCommercial- ShareAlike 4.0 International License.
Become a contributor for community
Get paid to write technical tutorials and select a tech-focused charity to receive a matching donation.

DigitalOcean Documentation
Full documentation for every DigitalOcean product.

Resources for startups and AI-native businesses
The Wave has everything you need to know about building a business, from raising funding to marketing your product.
The developer cloud
Scale up as you grow — whether you're running one virtual machine or ten thousand.

Start building today
From GPU-powered inference and Kubernetes to managed databases and storage, get everything you need to build, scale, and deploy intelligent applications.
