By Hugo Vaz and Anish Singh Walia

Introduction
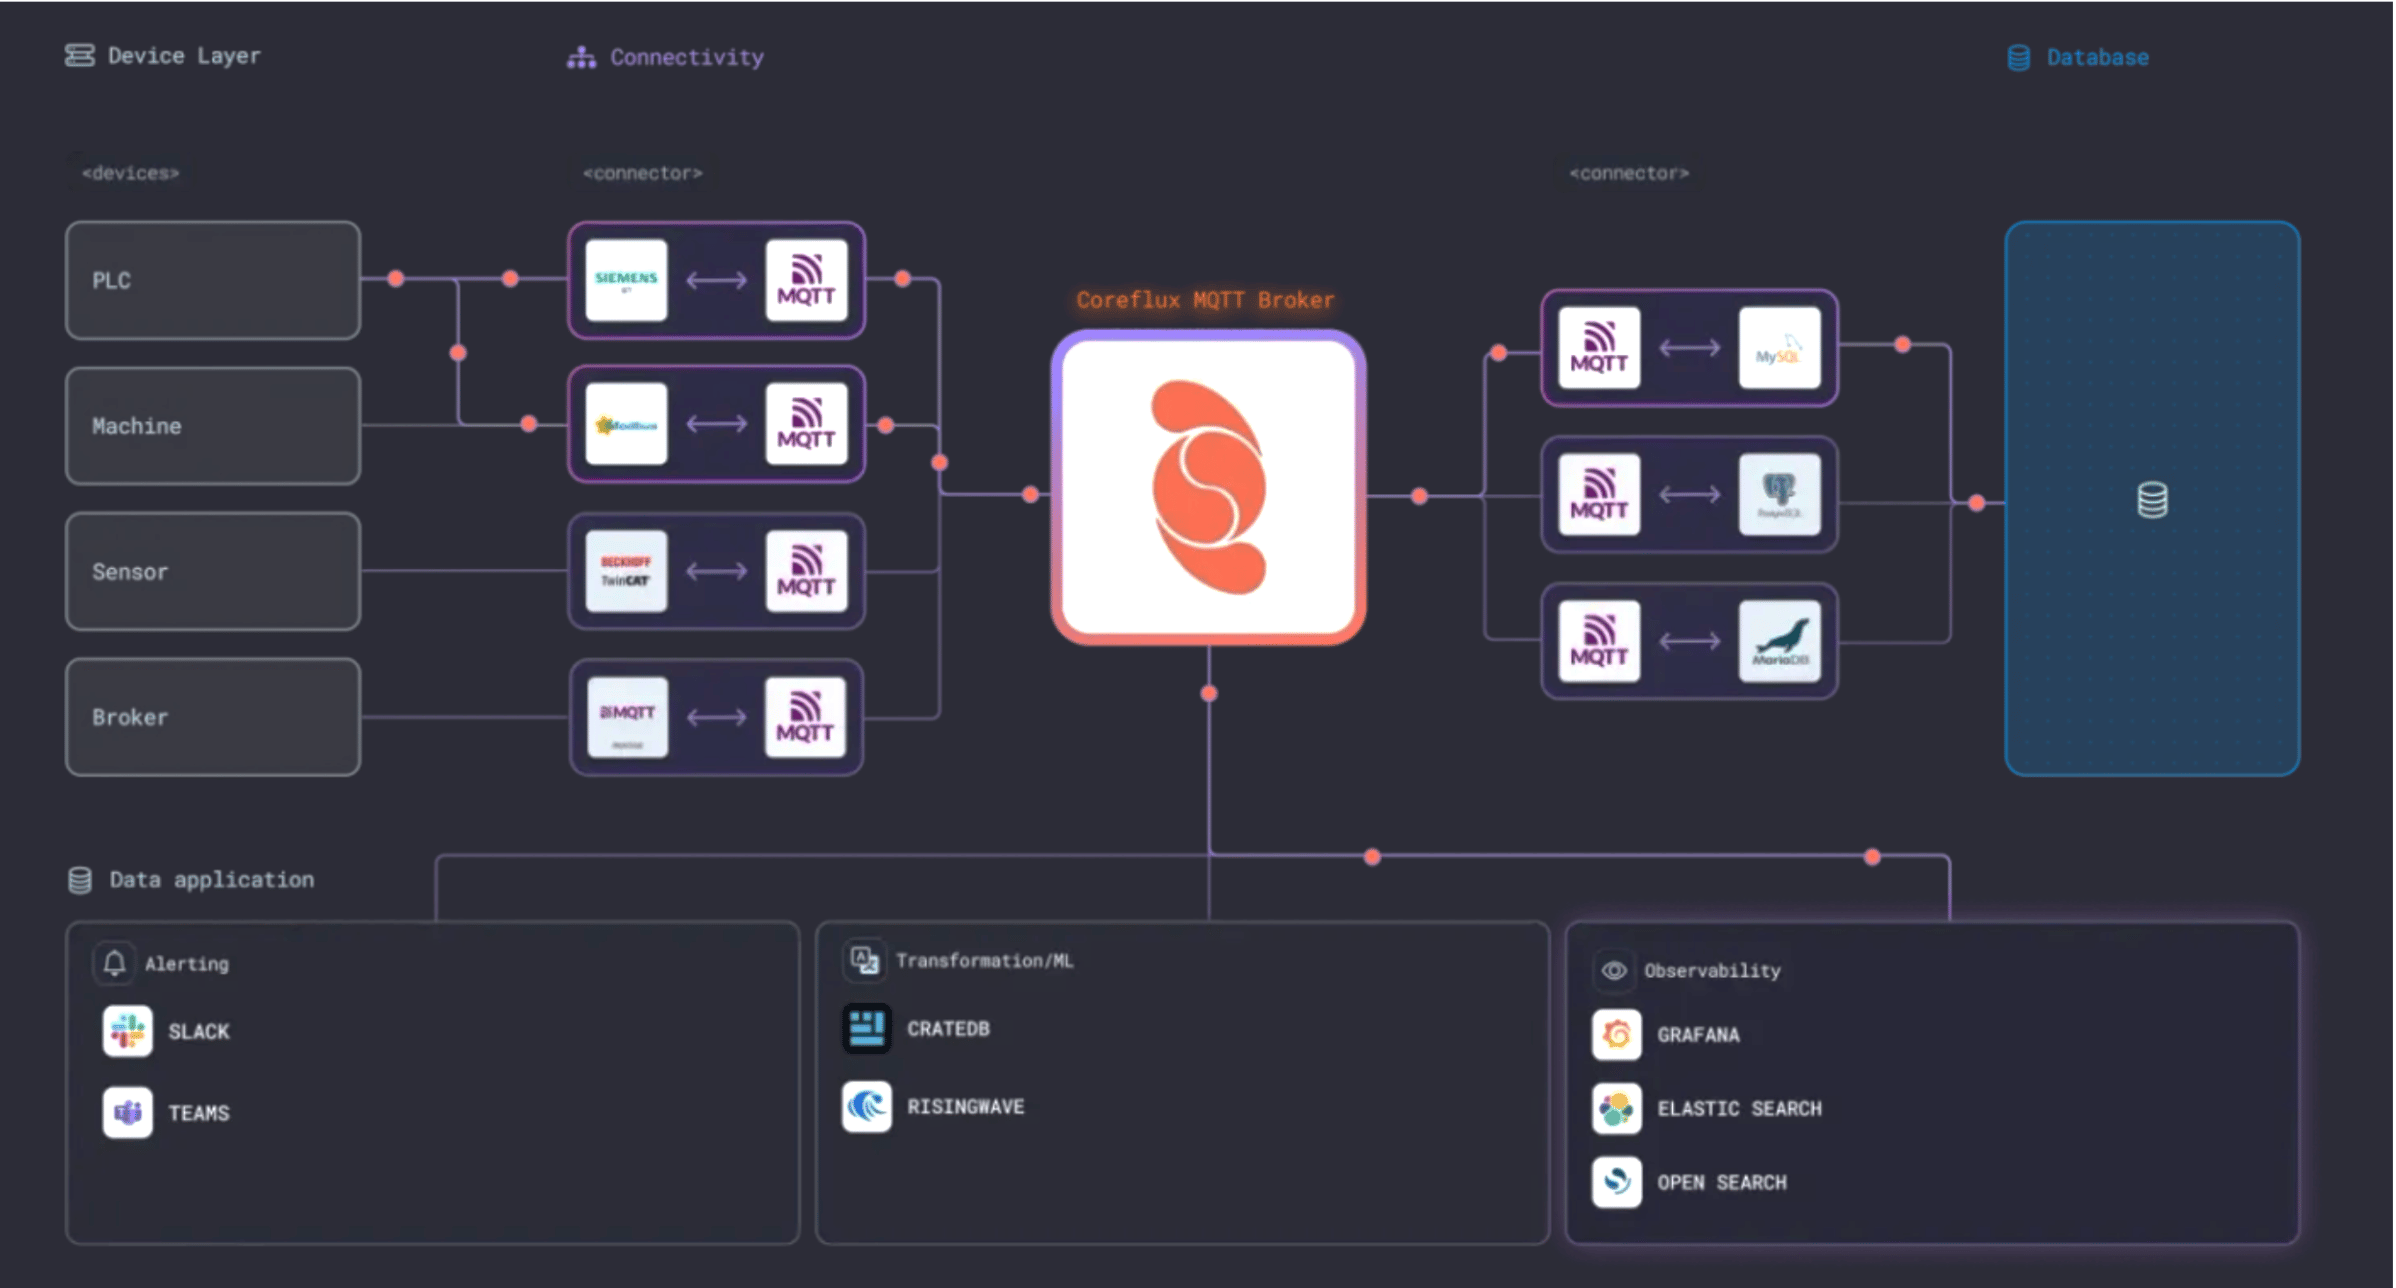
MQTT brokers are essential for modern IoT infrastructure and automation systems, where the need for a centralized, unified, and fast data hub is the key part for system interoperability and data exchange. Coreflux is a powerful, low code MQTT broker that expands the traditional MQTT broker to a system that provides advanced features for real-time data processing, transformation, and seamless integration with DigitalOcean managed databases including MongoDB, PostgreSQL, MySQL, and OpenSearch.
In this comprehensive DevOps tutorial, you will deploy a complete IoT automation pipeline using Coreflux MQTT broker integrated with MongoDB on DigitalOcean. This scalable storage and processing solution enables you to collect, transform, and store IoT data efficiently while maintaining enterprise-grade reliability and performance.
Key Takeaways
Before diving into the step-by-step deployment process, here are the key points you’ll learn:
- Deploy a managed MongoDB database cluster on DigitalOcean for scalable IoT data storage.
- Set up Coreflux MQTT broker on a DigitalOcean Droplet using the Marketplace image or Docker.
- Create secure VPC networking to connect your MQTT broker and database without public exposure.
- Build real-time data pipelines using Coreflux’s Language of Things (LoT) for low-code IoT automation.
- Transform and store IoT data automatically from MQTT topics to MongoDB collections.
- Verify end-to-end data flow from simulated sensors through transformation models to database storage.
This tutorial provides a production-ready foundation for IoT applications that need real-time messaging combined with persistent data storage.
What You Will Build
By the end of this automation guide, you will have deployed:
- A managed MongoDB database cluster for scalable storage
- A DigitalOcean droplet running Coreflux MQTT broker
- A Virtual Private Cloud (VPC) network for secure IoT communication
- Real-time data simulation using LoT Notebook extension
- Low code data transformation models and database integration routes
- Complete Data Integration & Transformation pipeline for IoT automation
Coreflux & DigitalOcean Partnership
Coreflux provides a Lightweight MQTT Broker and Data Pipeline tools through Language-of-Things programming language for Efficient IoT Communication on DigitalOcean.
What is MQTT?
MQTT (Message Queuing Telemetry Transport) is a lightweight, publish-subscribe network protocol widely adopted in IoT ecosystems. Designed for constrained devices and low-bandwidth, high-latency, or unreliable networks, MQTT enables efficient, real-time messaging in bandwidth-constrained environments.
About Coreflux
Coreflux offers a lightweight MQTT broker to facilitate efficient, real-time communication between IoT devices and applications, including real-time data transformation capabilities necessary for each use-case. Built for scalability and reliability, Coreflux is tailored for environments where low latency and high throughput are critical.
Coreflux provides the robust messaging backbone to ensure smooth data flow between devices, whether developing a small-scale IoT project or deploying a large-scale industrial monitoring system.
With Coreflux on DigitalOcean, you get:
Data Processing: Centralization of your data processing needs where your data lives, ensuring real-time data processing.
Data Integration: Easily integrate with other DigitalOcean services like Managed Databases, ensuring a single and simple ecosystem for all your data needs.
Scalability: Easily handle growing amounts of data and devices without compromising performance.
Reliability: Ensure consistent and dependable messaging across all connected devices.
Prerequisites
Before you begin this MQTT broker deployment tutorial, you’ll need:
- A DigitalOcean account with billing enabled
- Understanding of MQTT protocol concepts and IoT architecture
- Visual Studio Code (for LoT Notebook extension)
Step 1 - Creating the Network Infrastructure for IoT Automation
Creating a VPC Network for Secure MQTT Communication
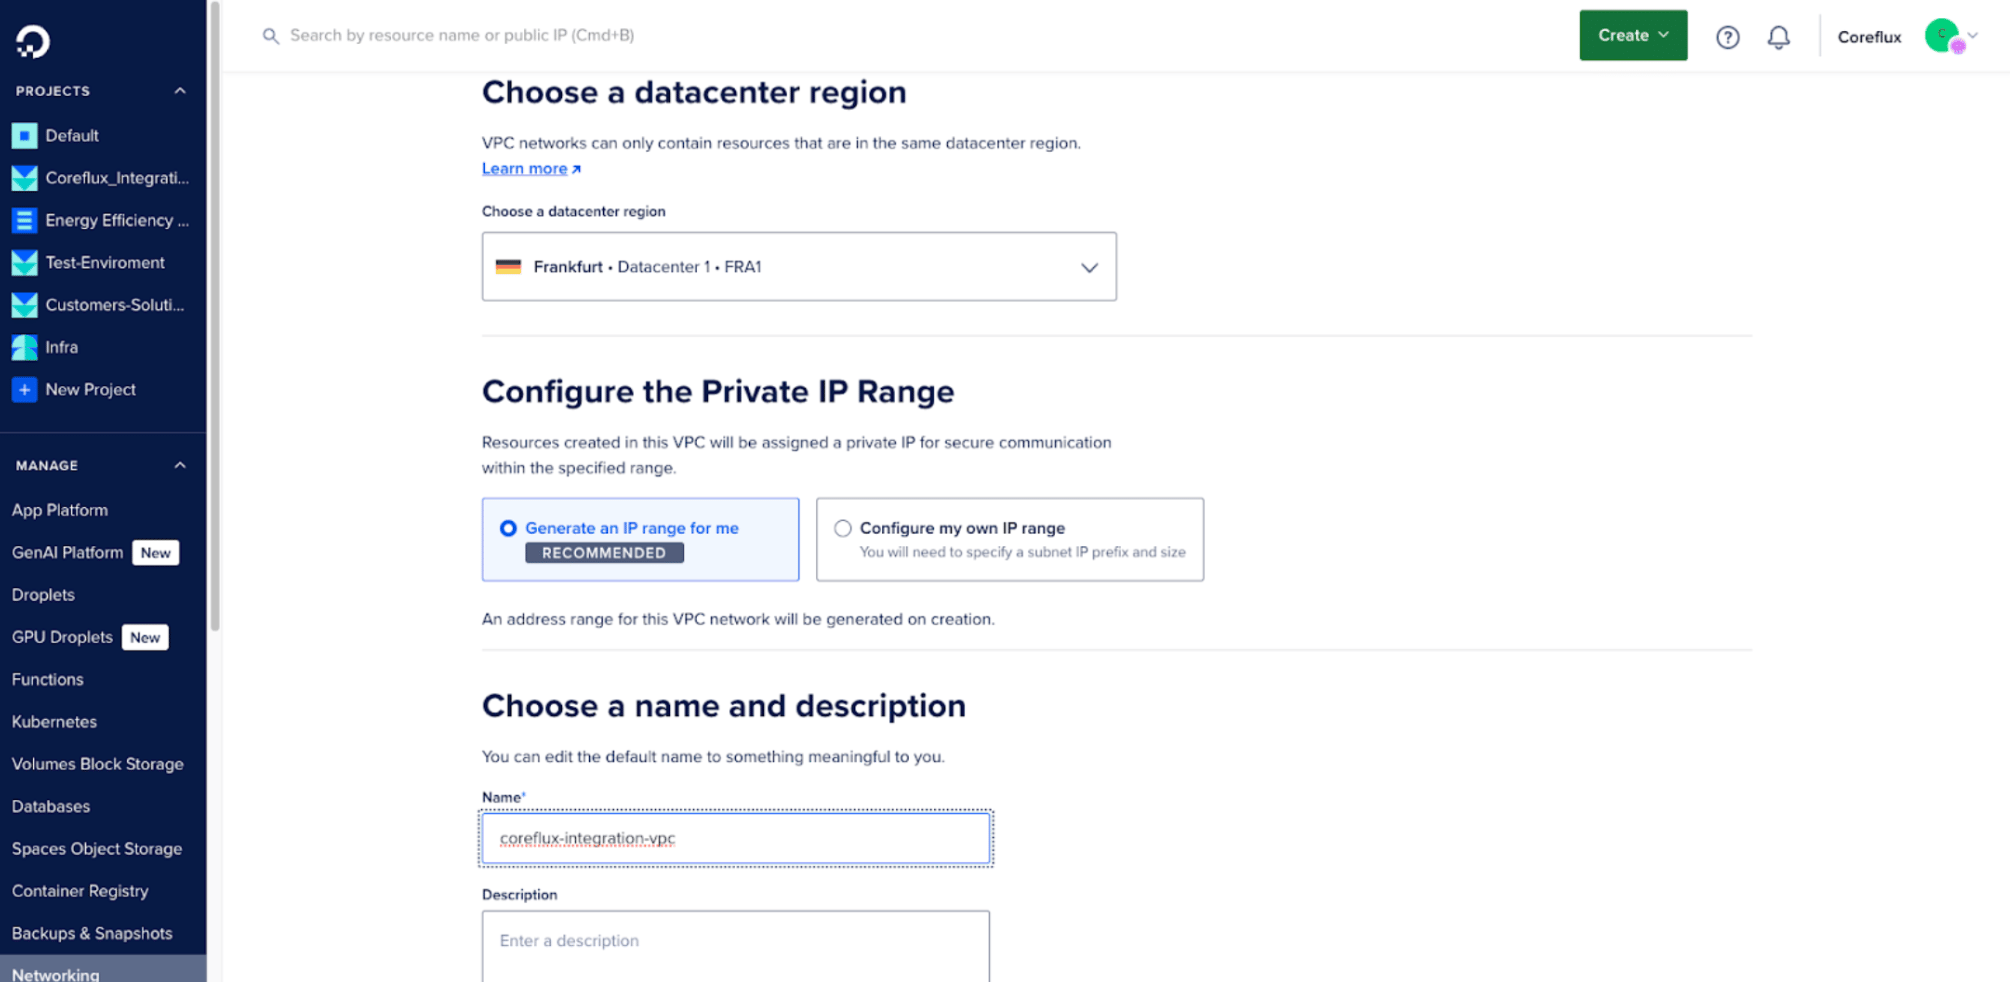
First, you’ll create a Virtual Private Cloud (VPC) to ensure secure communication between your IoT services and MQTT broker, without the need for public access.
- Log in to your DigitalOcean control panel
- Navigate to Networking → VPC from the left sidebar
- Click Create VPC Network
-
Configure your VPC for IoT automation:
- Name: coreflux-integrations-vpc (or your VPC name)
- Datacenter region: Choose Frankfurt (or your preferred region)
- IP Range: Use the default or configure as needed
- Description: Add a meaningful description for your MQTT broker and Databases network
-
Click Create VPC Network
The VPC will provide isolated networking for all your IoT resources, ensuring secure communication between the Coreflux MQTT broker and managed databases.
Step 2 — Setting Up MongoDB Managed Database for Scalable Storage
Creating a Managed MongoDB Cluster
DigitalOcean managed databases provide automated backups, monitoring, and maintenance, making them ideal for production IoT workloads and scalable storage requirements.
-
From the DigitalOcean control panel, navigate to Databases
-
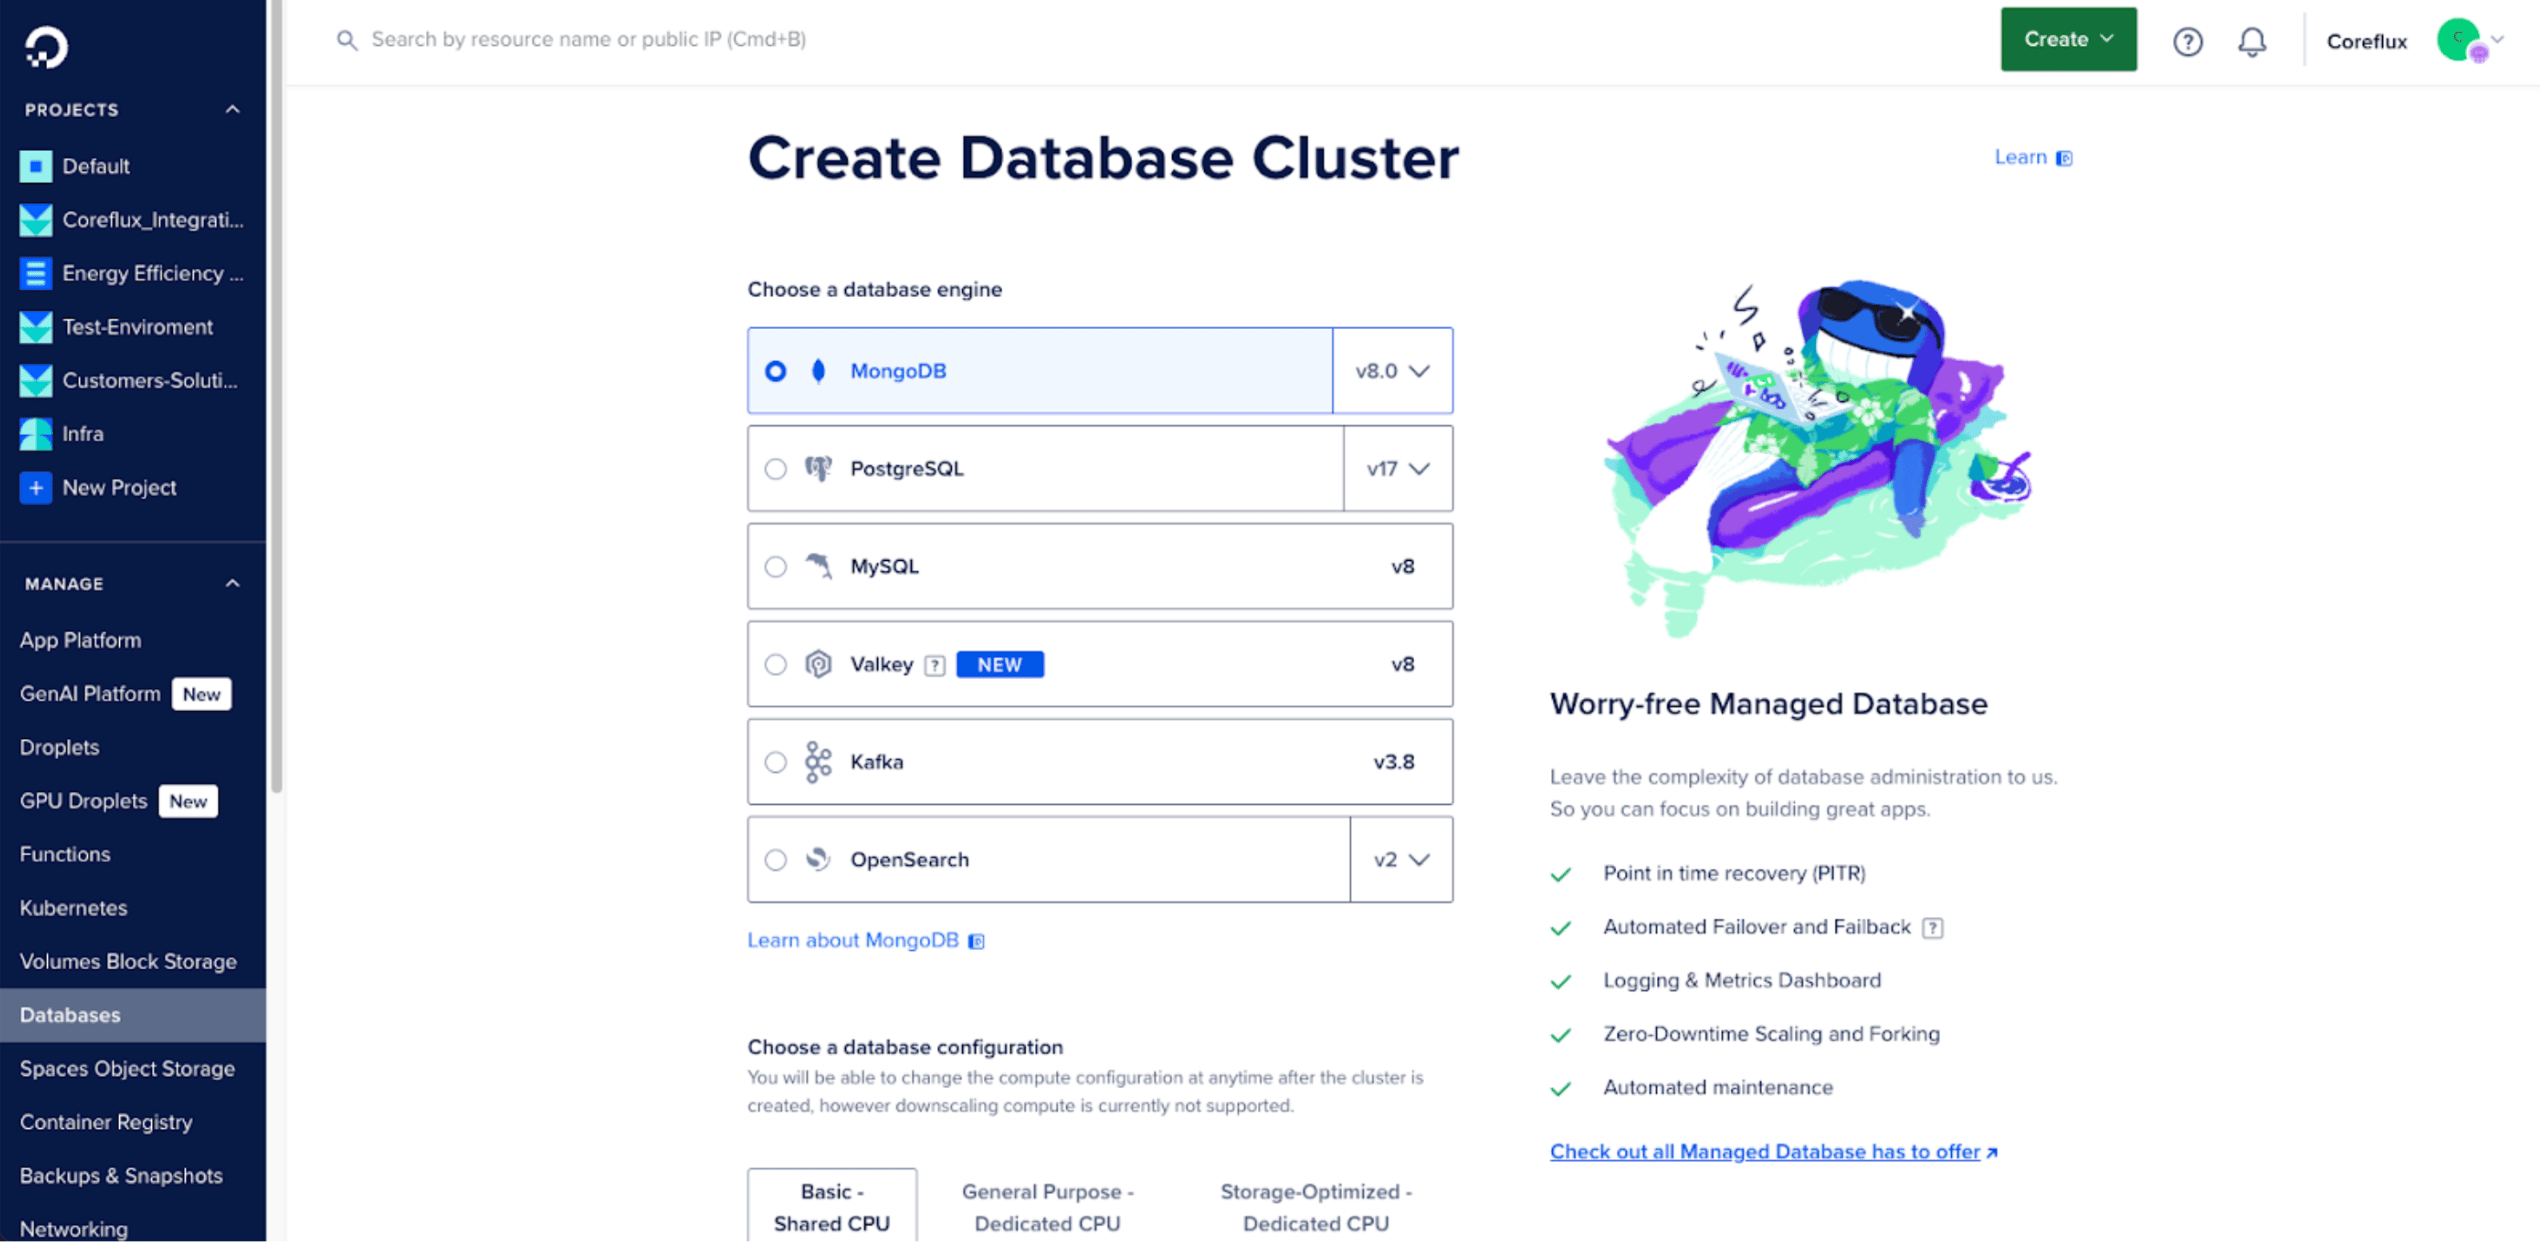
Click Create Database Cluster
-
Configure your MongoDB cluster for IoT automation:
- Database engine: Select MongoDB
- Version: Choose the latest stable version
- Datacenter region: Select Frankfurt (same as your VPC)
- VPC Network: Select the coreflux-integrations-vpc you created
- Database cluster name: mongodb-coreflux-test
- Project: Select your target project
-
Choose your plan based on your IoT requirements:
- For development: Basic plan with 1 GB RAM
- For production: General Purpose or higher for scalable storage
-
Click Create Database Cluster
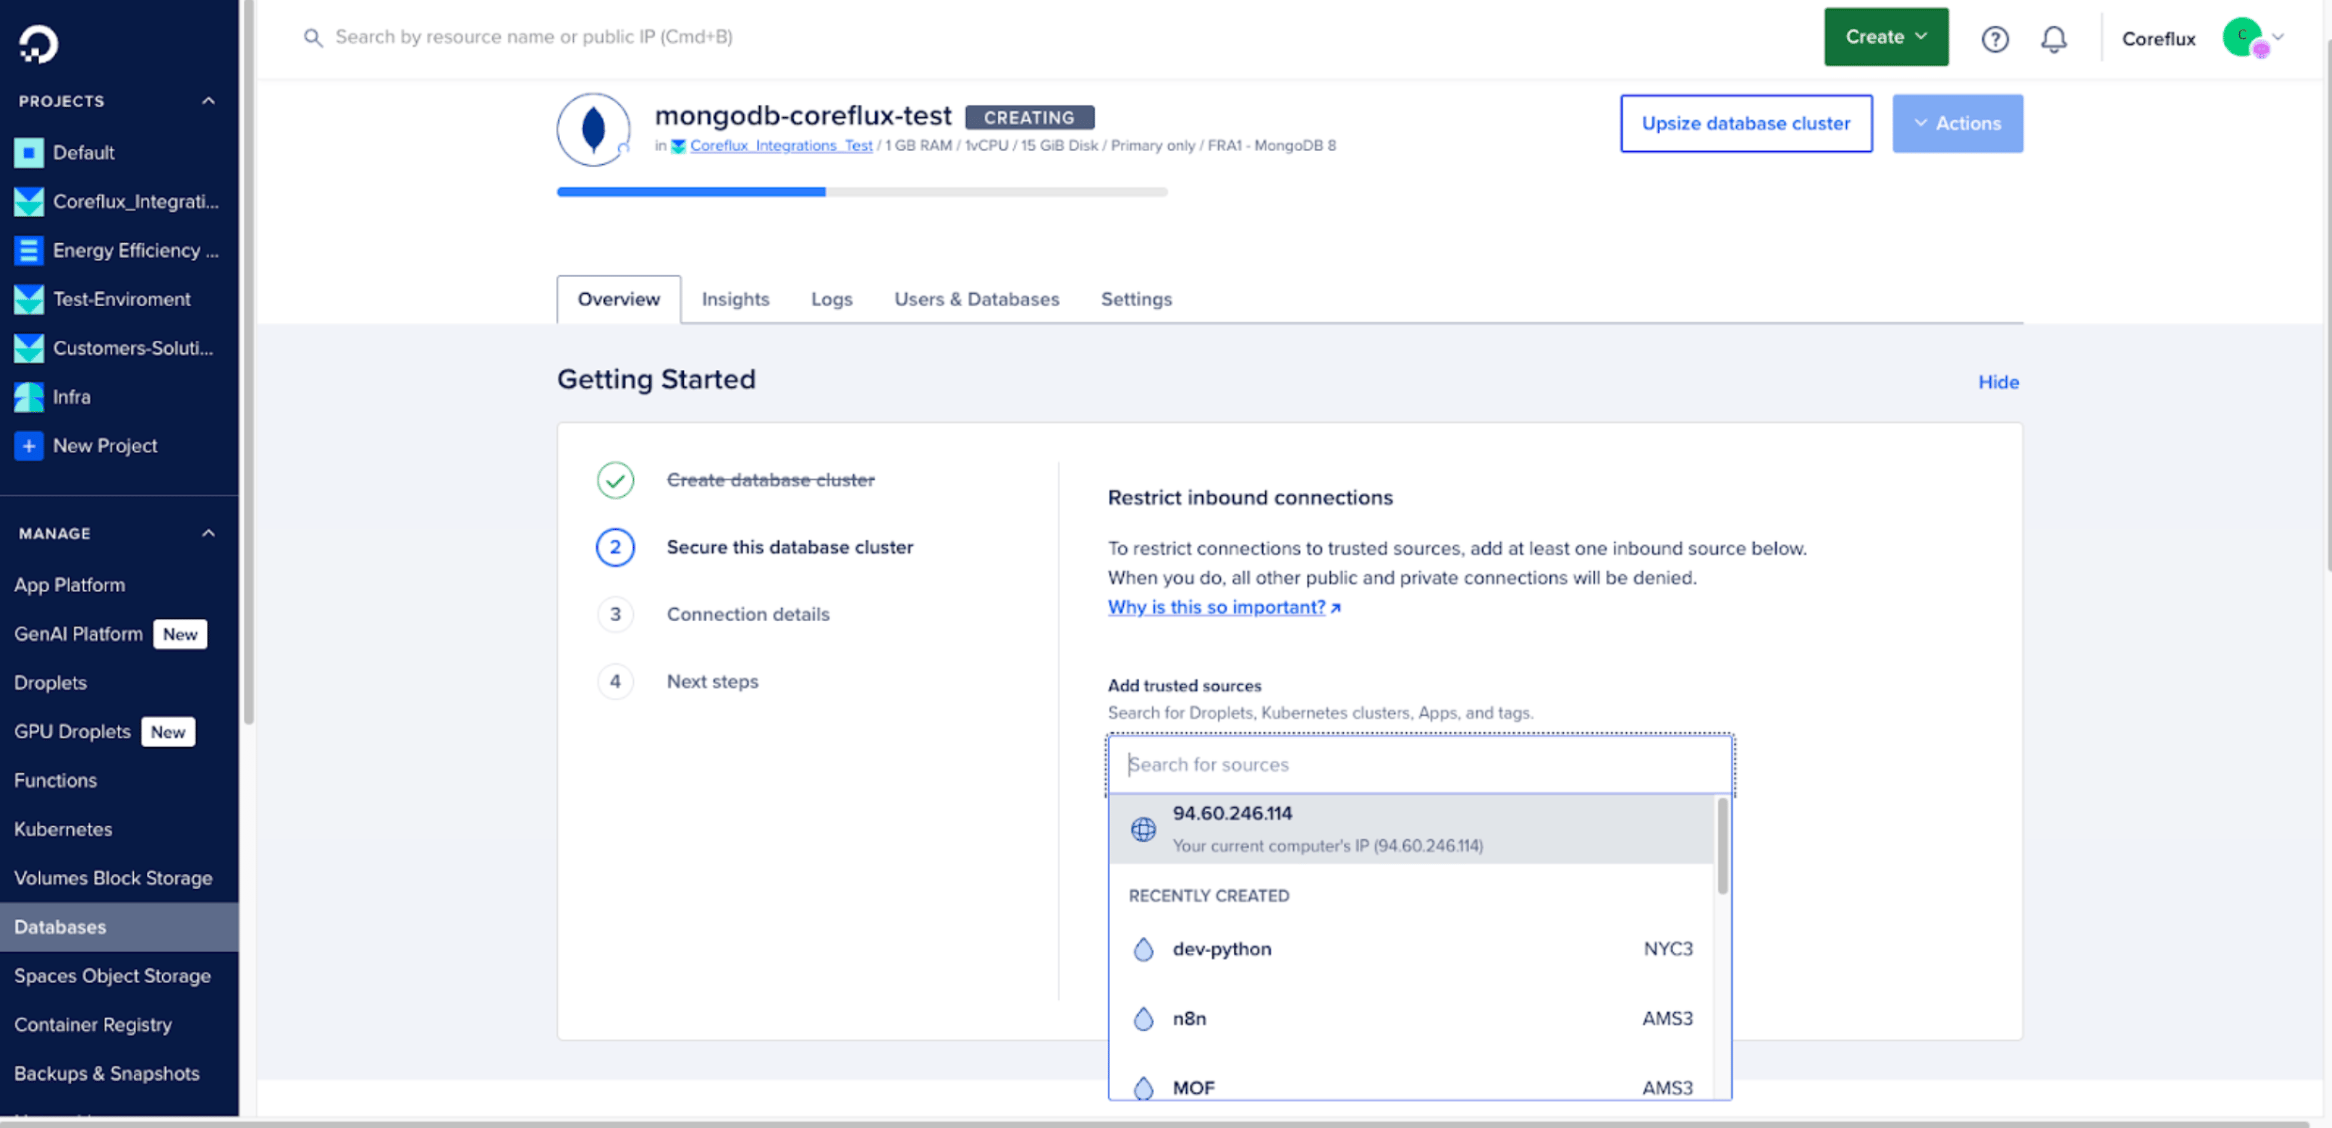
The managed database creation process typically takes 1-5 minutes. Once complete, you’ll be redirected to the database overview page, where you can see the connection details and perform administrative actions.
Configuring Database Access for MQTT Broker Integration
You’ll be prompted with Getting Started steps, where your connection details are shown and you can configure the inbound access rules (recommended to limit to your IP and VPC-only).
- Click Get Started to configure your MongoDB database
- [Optional] Restrict inbound connections:
- Add your local computer’s IP for management access
- The droplet will be automatically allowed through VPC networking
For connection details, you’ll be able to see two options: Public Network and VPC Network. The first is for external access for tools like MongoDB Compass, while the second will be used by the Coreflux service to access the database.
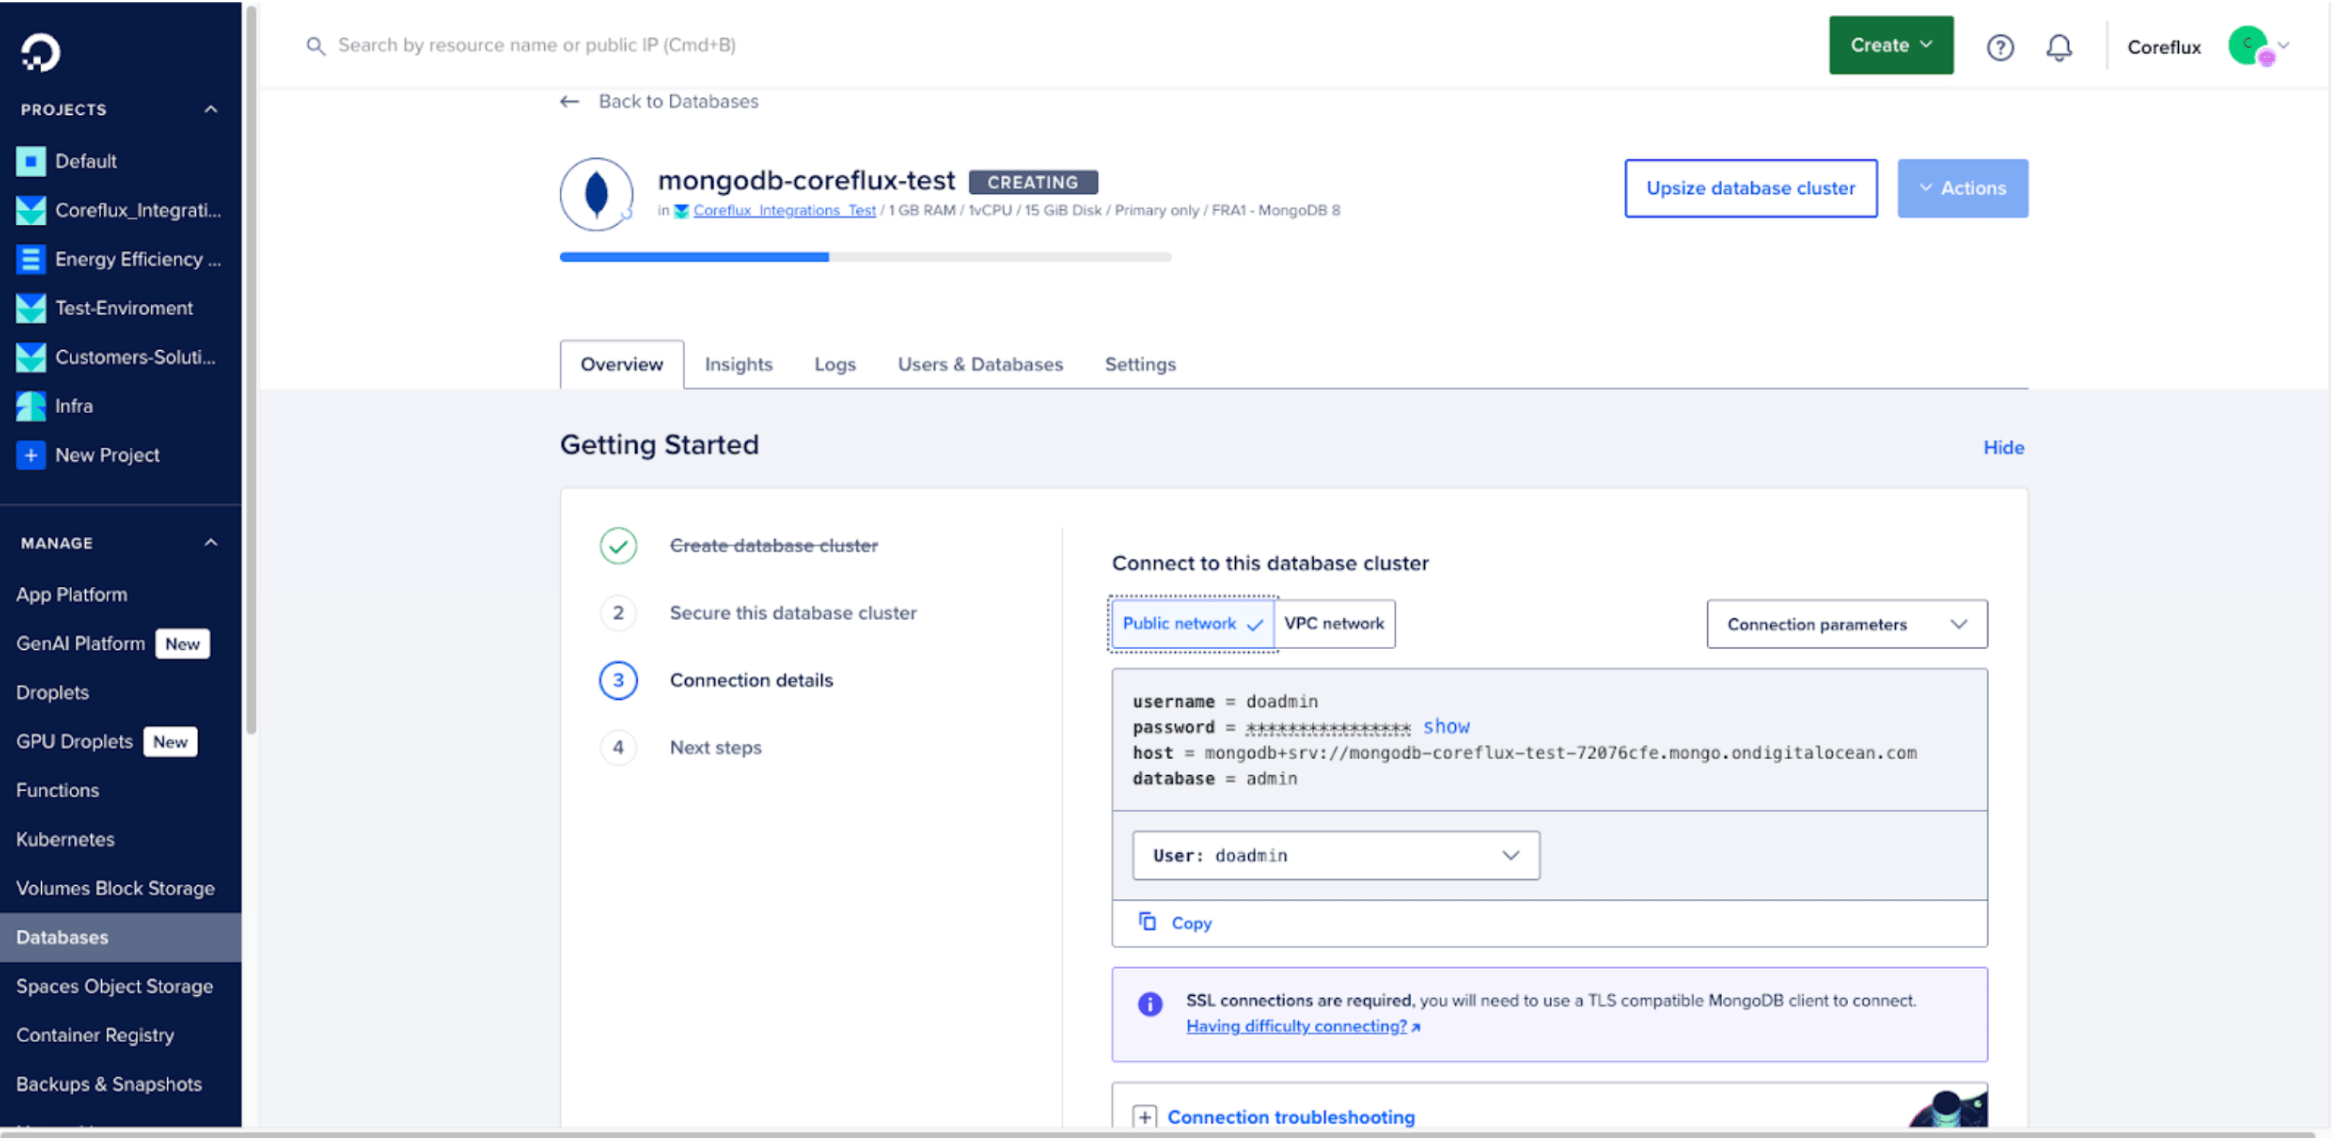
- Note the connection details provided, both for public access and for VPC access (distinct details for each):
- Host: Your database hostname
- User: Default admin user
- Password: Auto-generated secure password
- Database: Authentication database name
Testing Database Connection
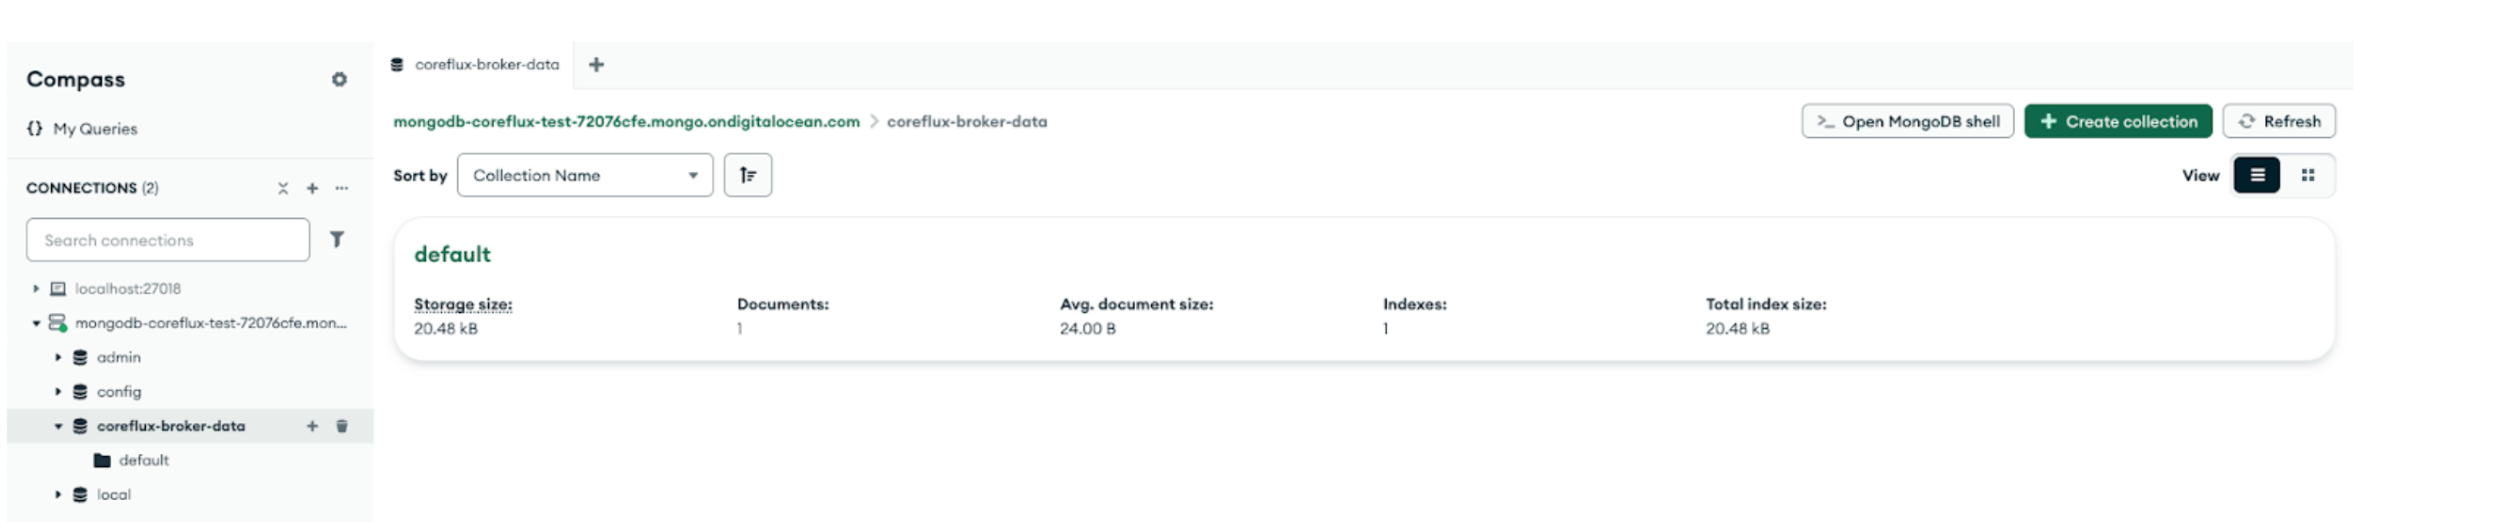
You can test the MongoDB connection using MongoDB Compass or the provided connection string, using public access credentials:
mongodb://username:password@mongodb-host:27017/defaultauthdb?ssl=true
Creating Application Database and User (Optional)
For better security and organization, create a dedicated user and database for your IoT automation application. This can also be done through MongoDB Compass or CLI, but DigitalOcean provides a user-friendly approach:
- Go to Users & Databases tab in your managed database cluster
- Create User:
- Username: coreflux-broker-client
- Password: Autogenerated
- Create Database:
- Database name: coreflux-broker-data
Step 3 - Deploying the Coreflux MQTT Broker on DigitalOcean Droplet
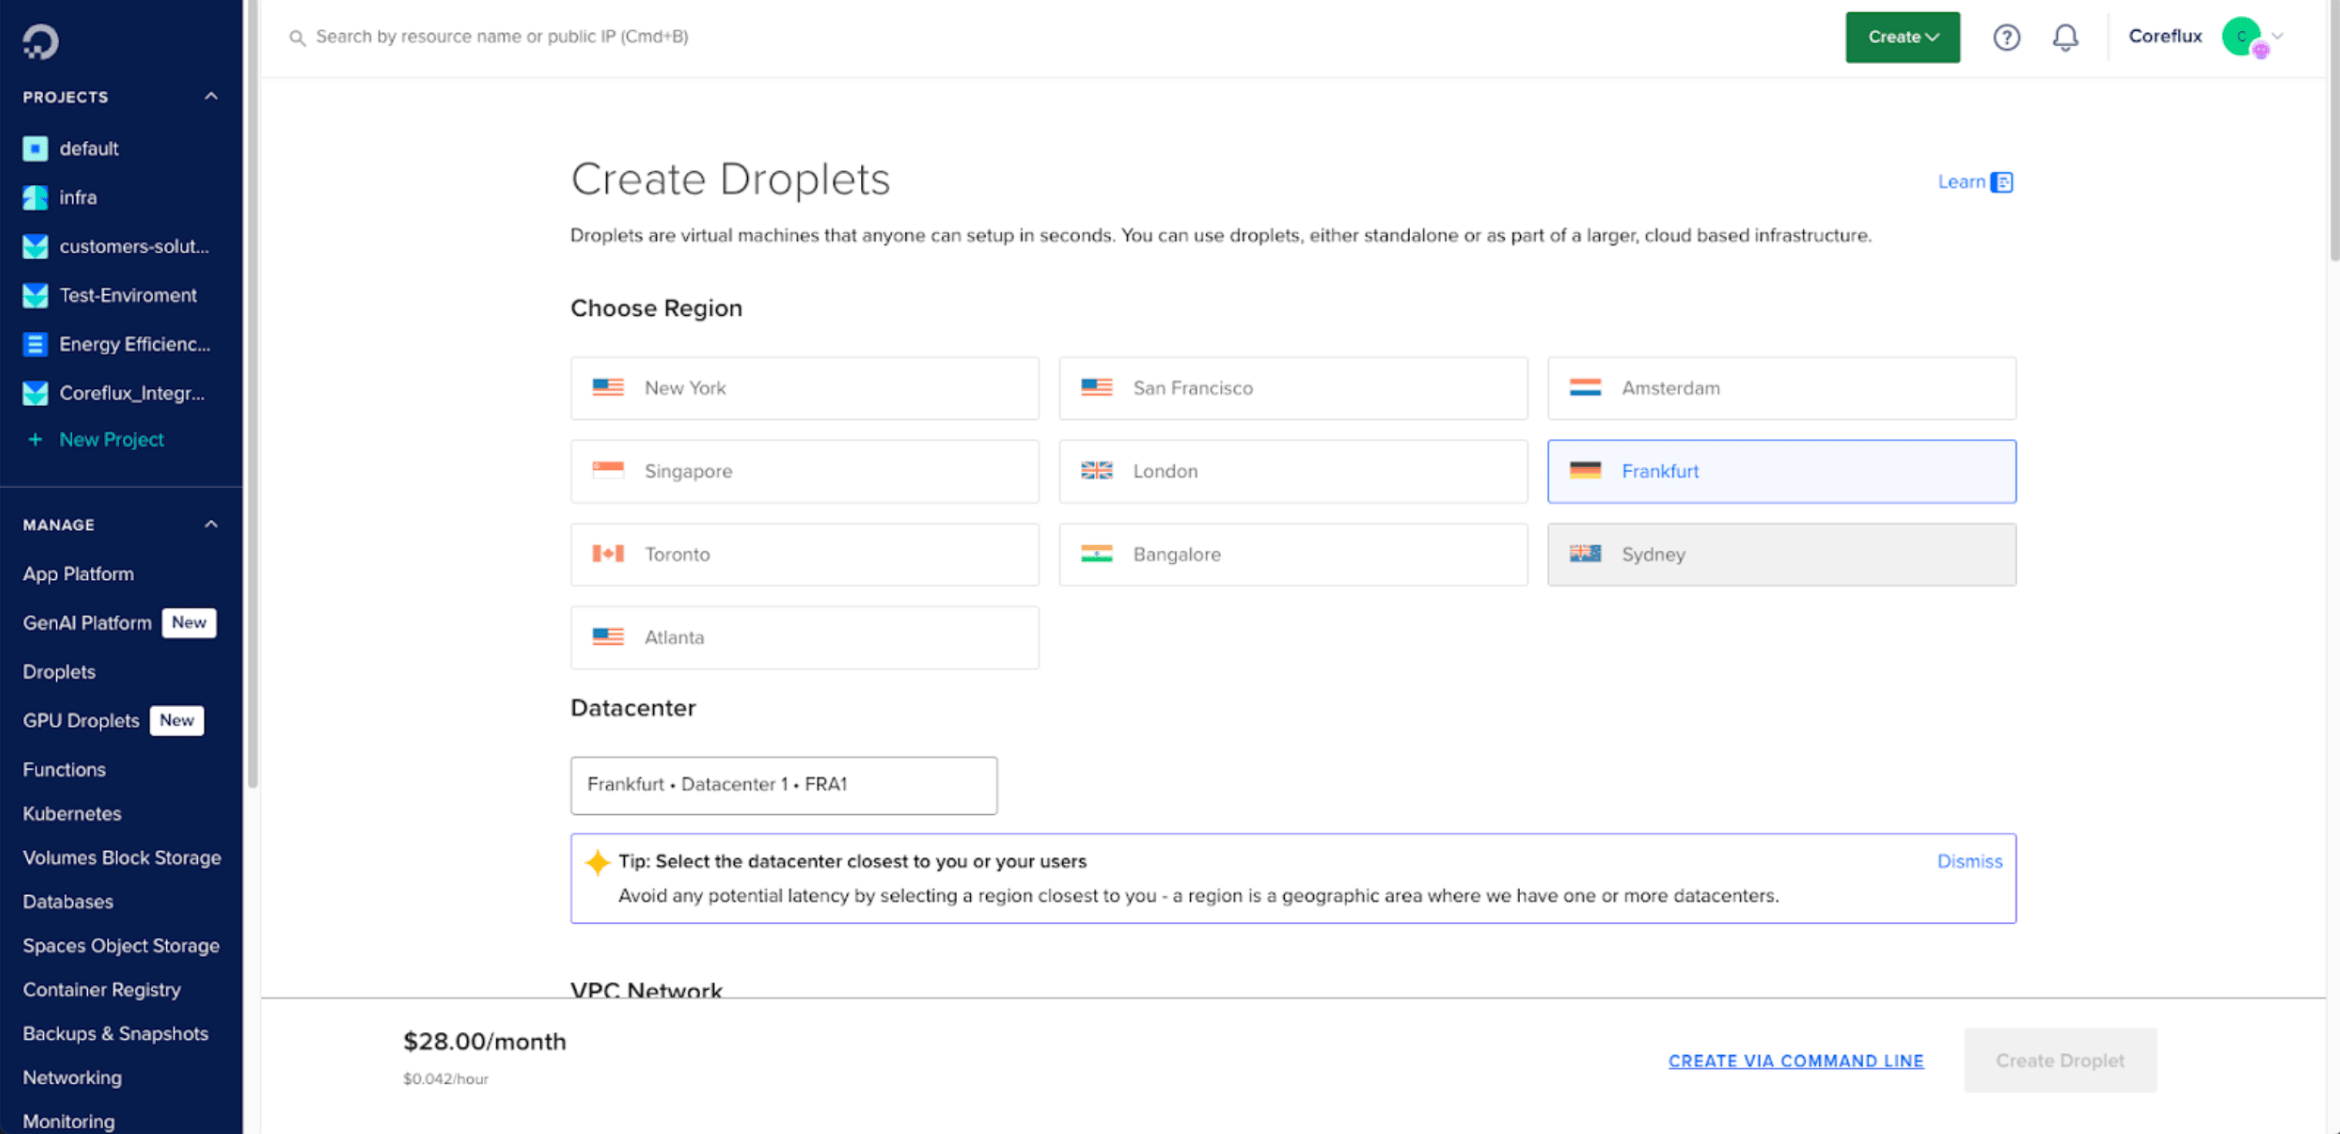
Creating the DigitalOcean Droplet
- Navigate to Droplets in your DigitalOcean control panel
- Click Create Droplet
-
Configure your droplet for MQTT broker deployment:
- Choose Region: Frankfurt (same as your managed database)
- VPC Network: Select coreflux-integrations-vpc
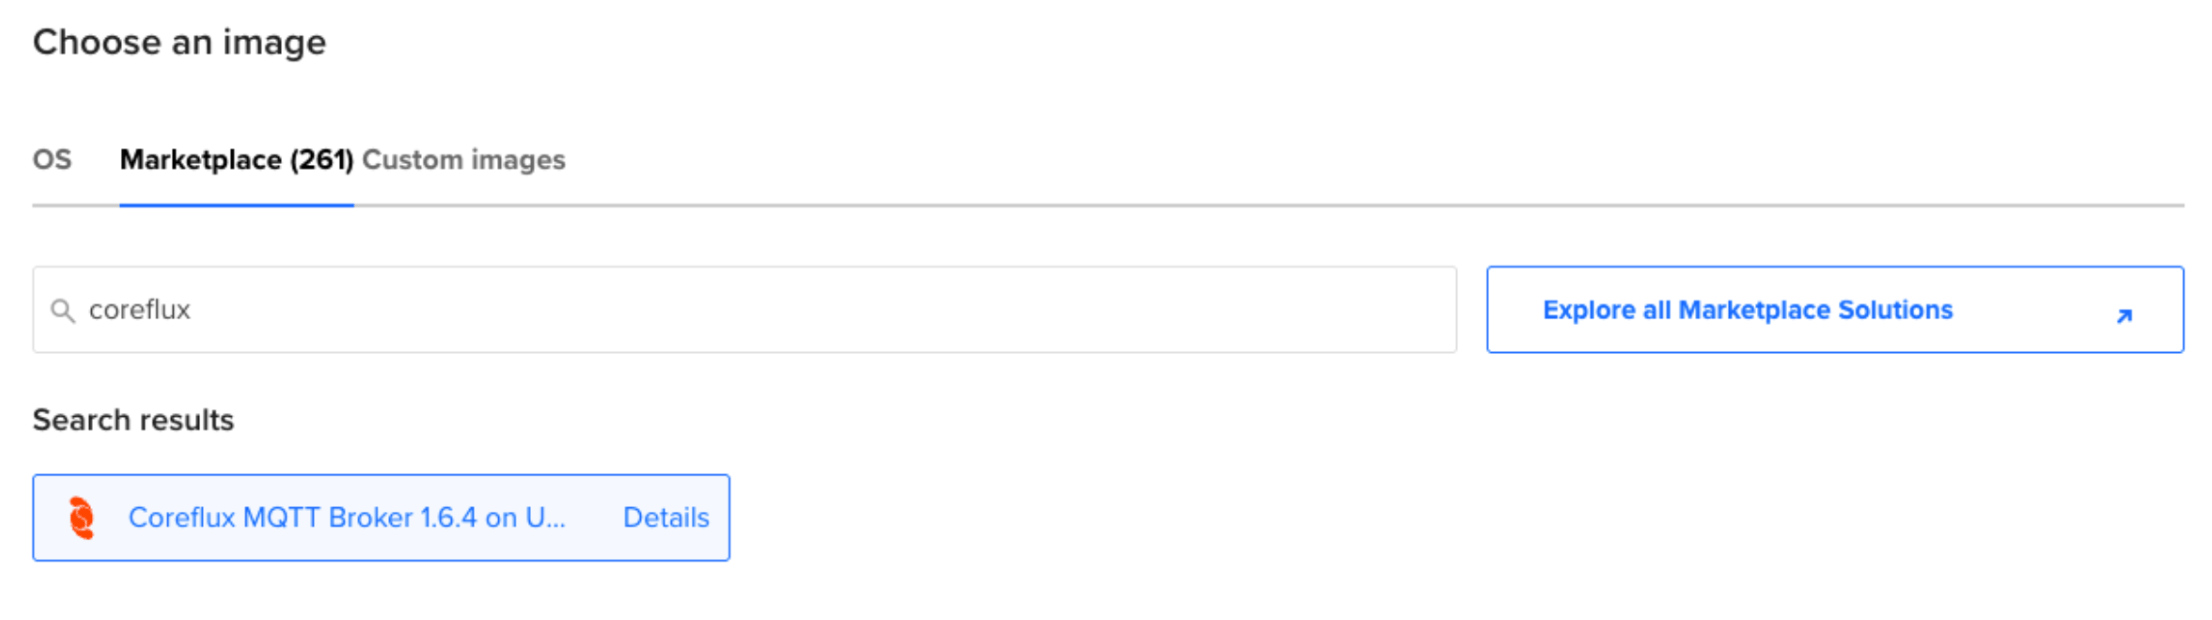
- Choose an image: Go to Marketplace tab
- Search for “Coreflux” and select Coreflux from the marketplace
-
Choose Size for your IoT workload:
- For development: Basic plan with 2 GB memory
- For production: Basic or General Purpose plan with 4+ GB memory for scalable performance
-
Choose Authentication Method:
- SSH Key: Recommended for improved security
- A key can be created locally using ssh-keygen
- Password: Alternative option
- SSH Key: Recommended for improved security
-
Finalize Details:
- Hostname: coreflux-test-broker
- Project: Select your project
- Tags: Add relevant tags for DevOps organization
-
Click Create Droplet
-
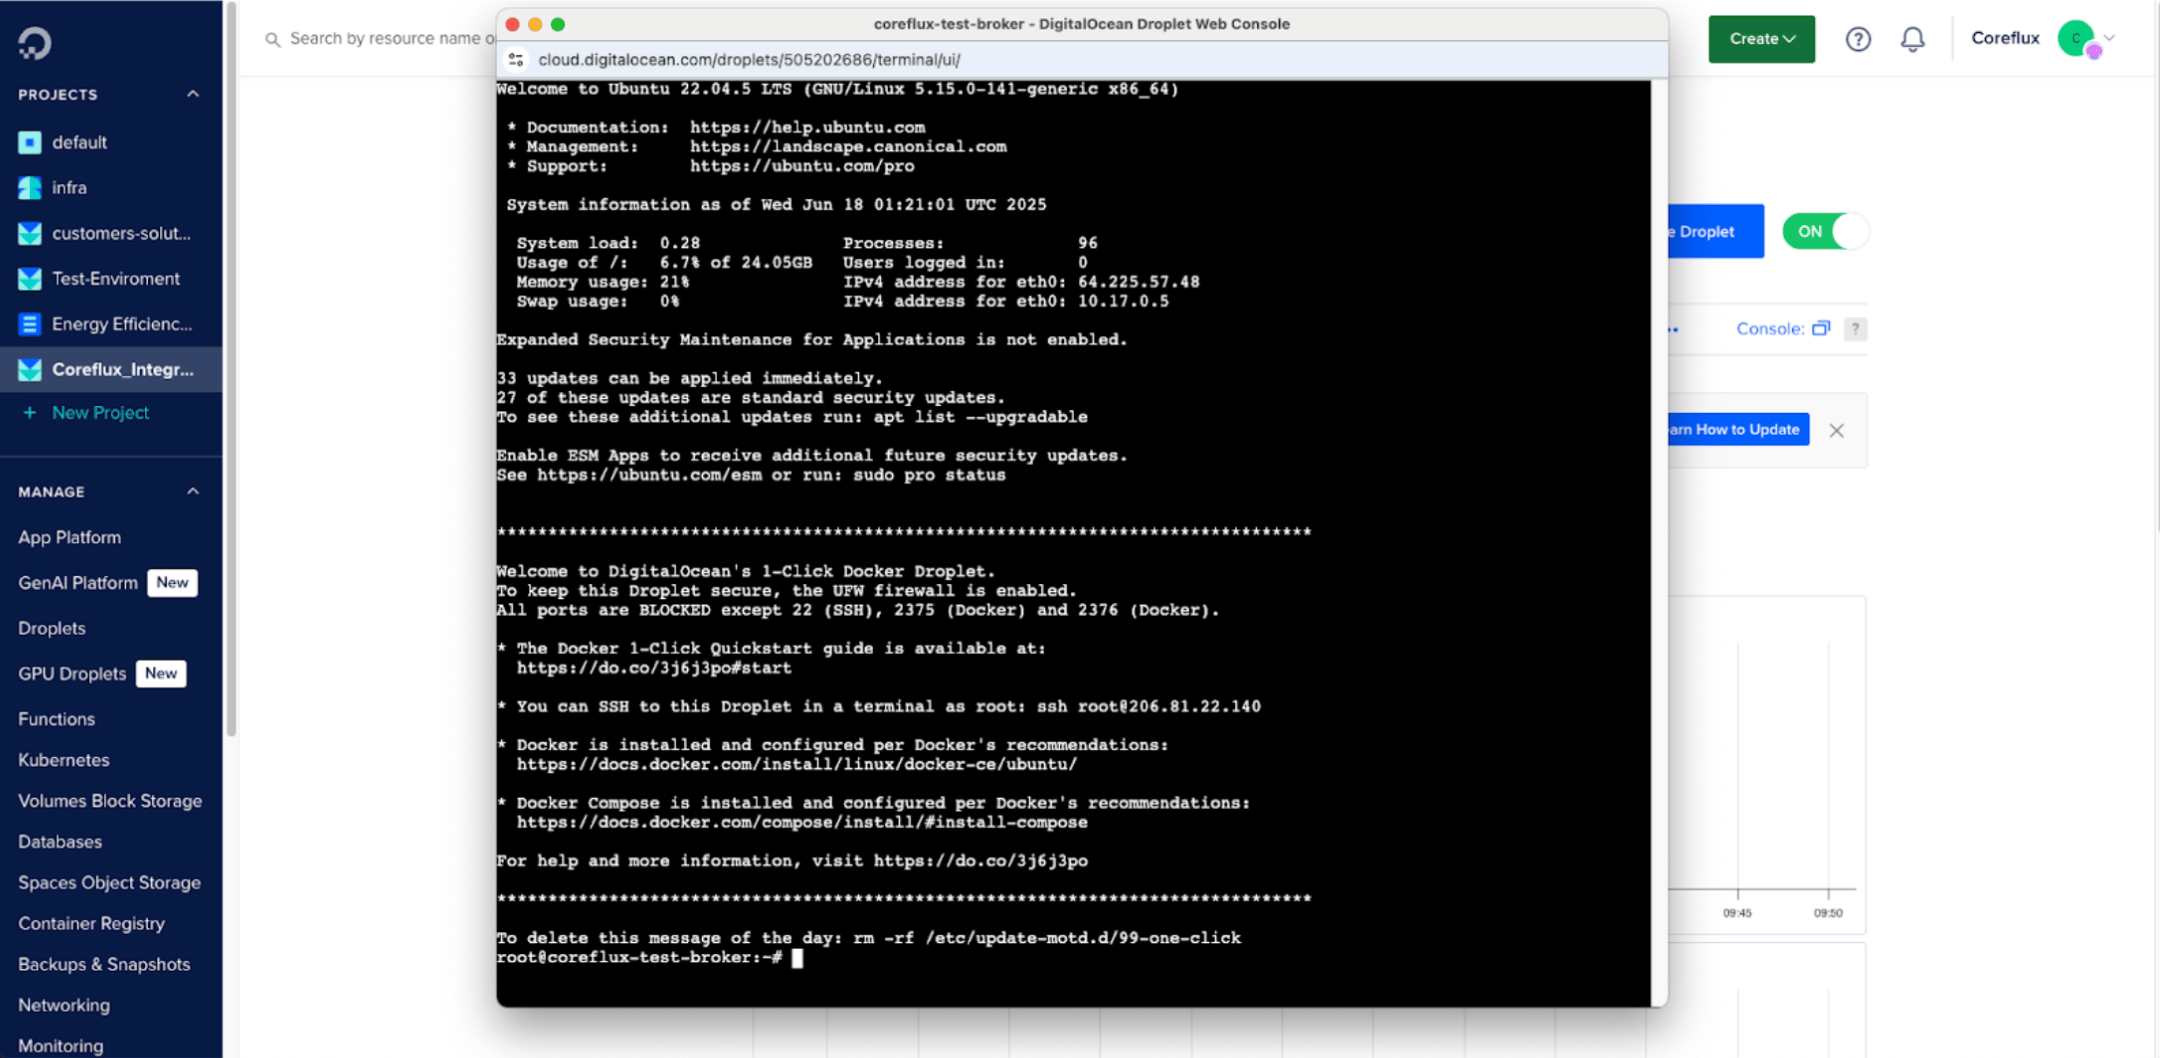
See the Droplet Home Page and wait for it to finish deploying

Alternative - Installing Coreflux MQTT Broker with Docker on Docker Image Droplet
Using the same approach as for Coreflux Droplet, select Docker as the Marketplace image.
Once your droplet is running, connect to it via SSH with the defined authentication method or the web console available in the Droplet home page:
ssh root@your-droplet-ip
Run the Coreflux MQTT broker using Docker:
docker run -d \
  --name coreflux \
  -p 1883:1883 \
  -p 1884:1884 \
  -p 5000:5000 \
  -p 443:443 \
  coreflux/coreflux-mqtt-broker-t:1.6.3
This Docker command:
- Runs the container in detached mode (-d)
- Names the container coreflux
- Exposes necessary ports for MQTT and web interface
- Uses the latest Coreflux image
Verify the MQTT broker is running:
docker ps
You should see a container running:

Validating the MQTT Broker deployment by connecting to it with default values
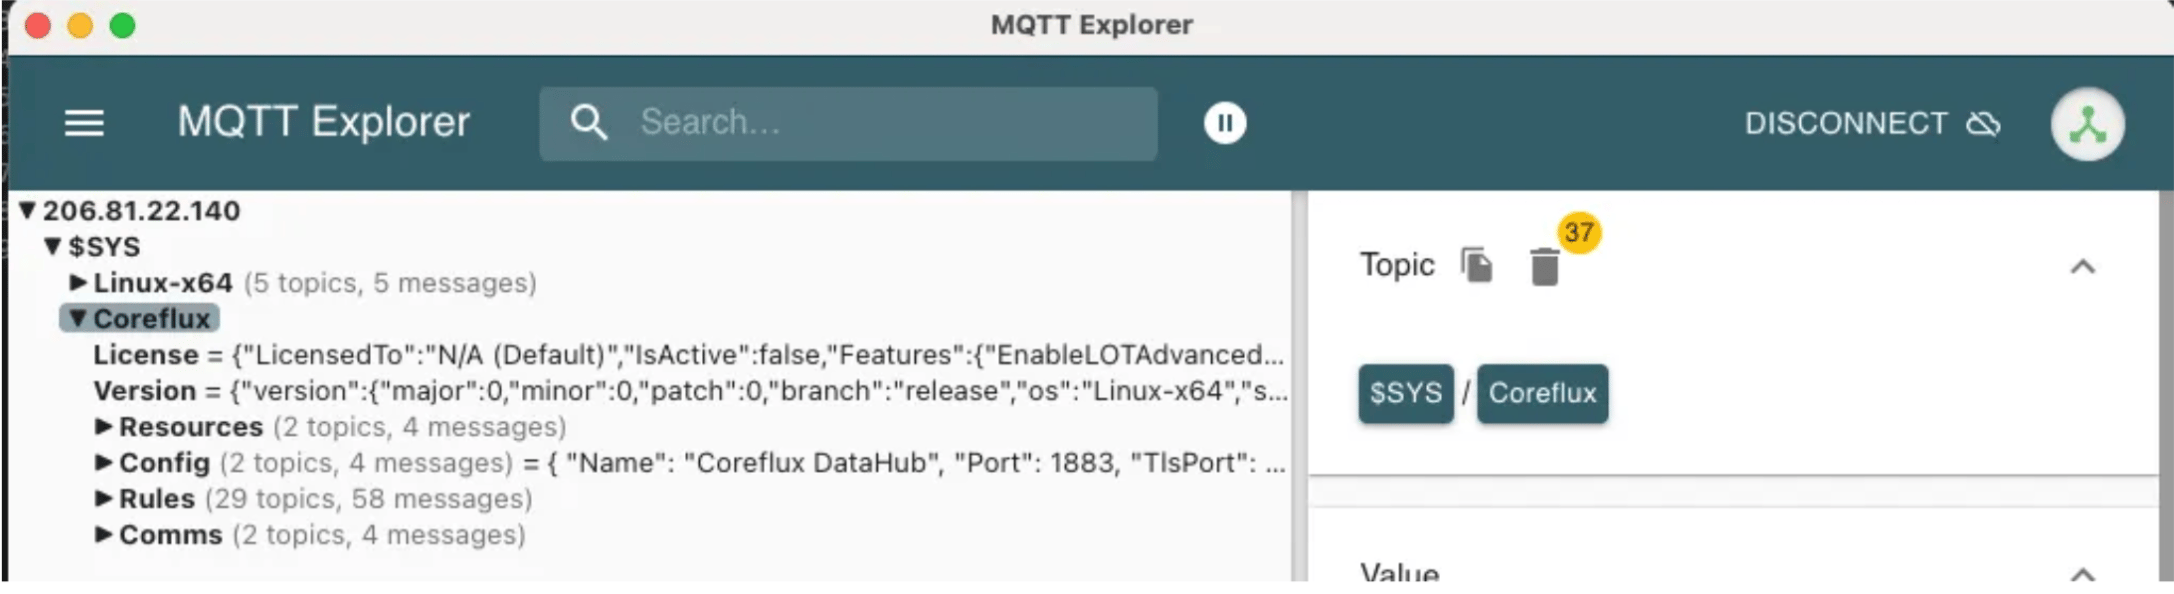
You can access the MQTT broker through a MQTT client like MQTT Explorer to validate the access to the broker, regardless of the approach taken to deploy it.
Step 4 — Configuring Firewall Rules for Secure IoT Communication (Optional)
For production IoT automation deployments, configure firewall rules to restrict access:
-
Navigate to Networking → Firewalls
-
Click Create Firewall
-
Configure inbound rules for MQTT broker security:
- SSH: Port 22 from your IP
- MQTT: Port 1883 from your IoT application sources
- MQTT with TLS: Port 1884 for secure MQTT with TLS
- WebSocket: Port 5000 for MQTT through WebSocket
- WebSocket with TLS: Port 443 for MQTT through WebSocket with TLS
-
Apply the firewall to your droplet
For detailed firewall configuration, refer to DigitalOcean’s firewall quickstart guide.
Step 5 — Setting Up IoT Data Integration with Coreflux’s Language of Things
Installing the LoT Notebook Extension
The LoT (Language of Things) Notebook extension for Visual Studio Code provides an integrated low code development environment for MQTT broker programming and IoT automation.
- Open Visual Studio Code
- Go to Extensions (Ctrl+Shift+X)
- Search for “LoT Notebooks”
- Install the LoT VSCode Notebooks Extension by Coreflux
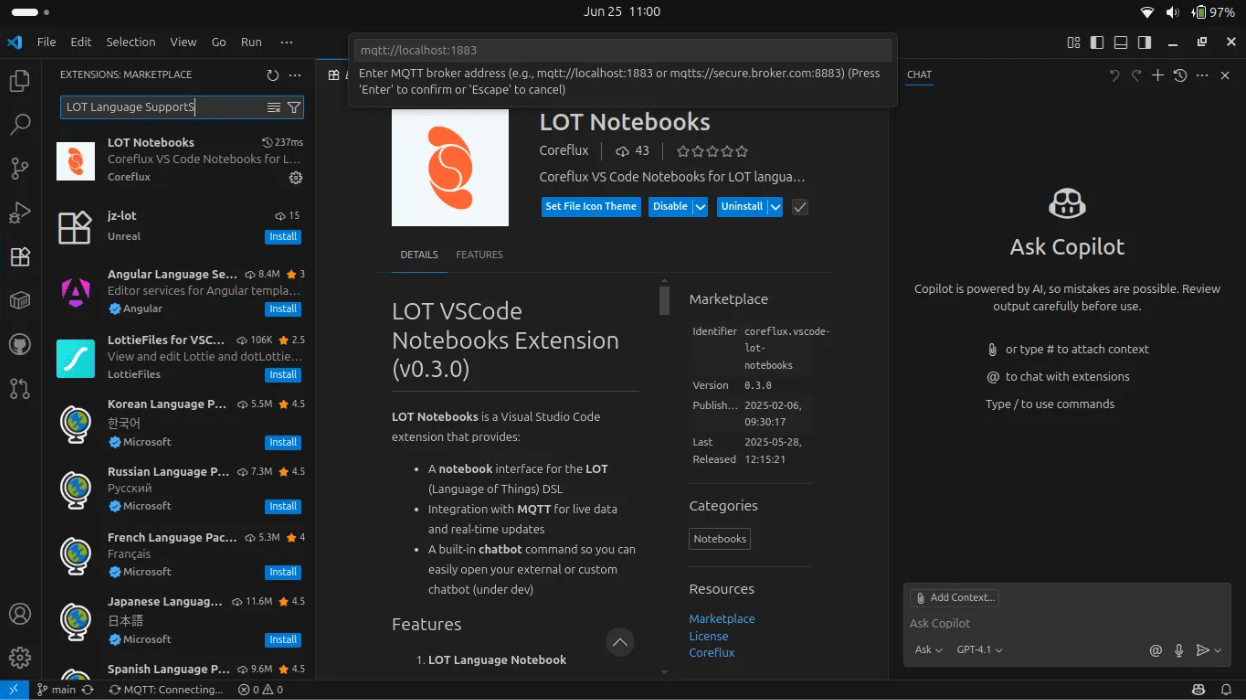
Connecting to Your MQTT Broker
Configure the connection to your Coreflux MQTT broker, using default credentials, when prompted on the top bar or by clicking the MQTT button on the bottom bar on the left:
- User: root
- Password: coreflux
Assuming no errors, you’ll see the status of the MQTT connectivity to the broker in the bottom bar, on the left.

Step 6 — Creating Data in MQTT Broker through Actions
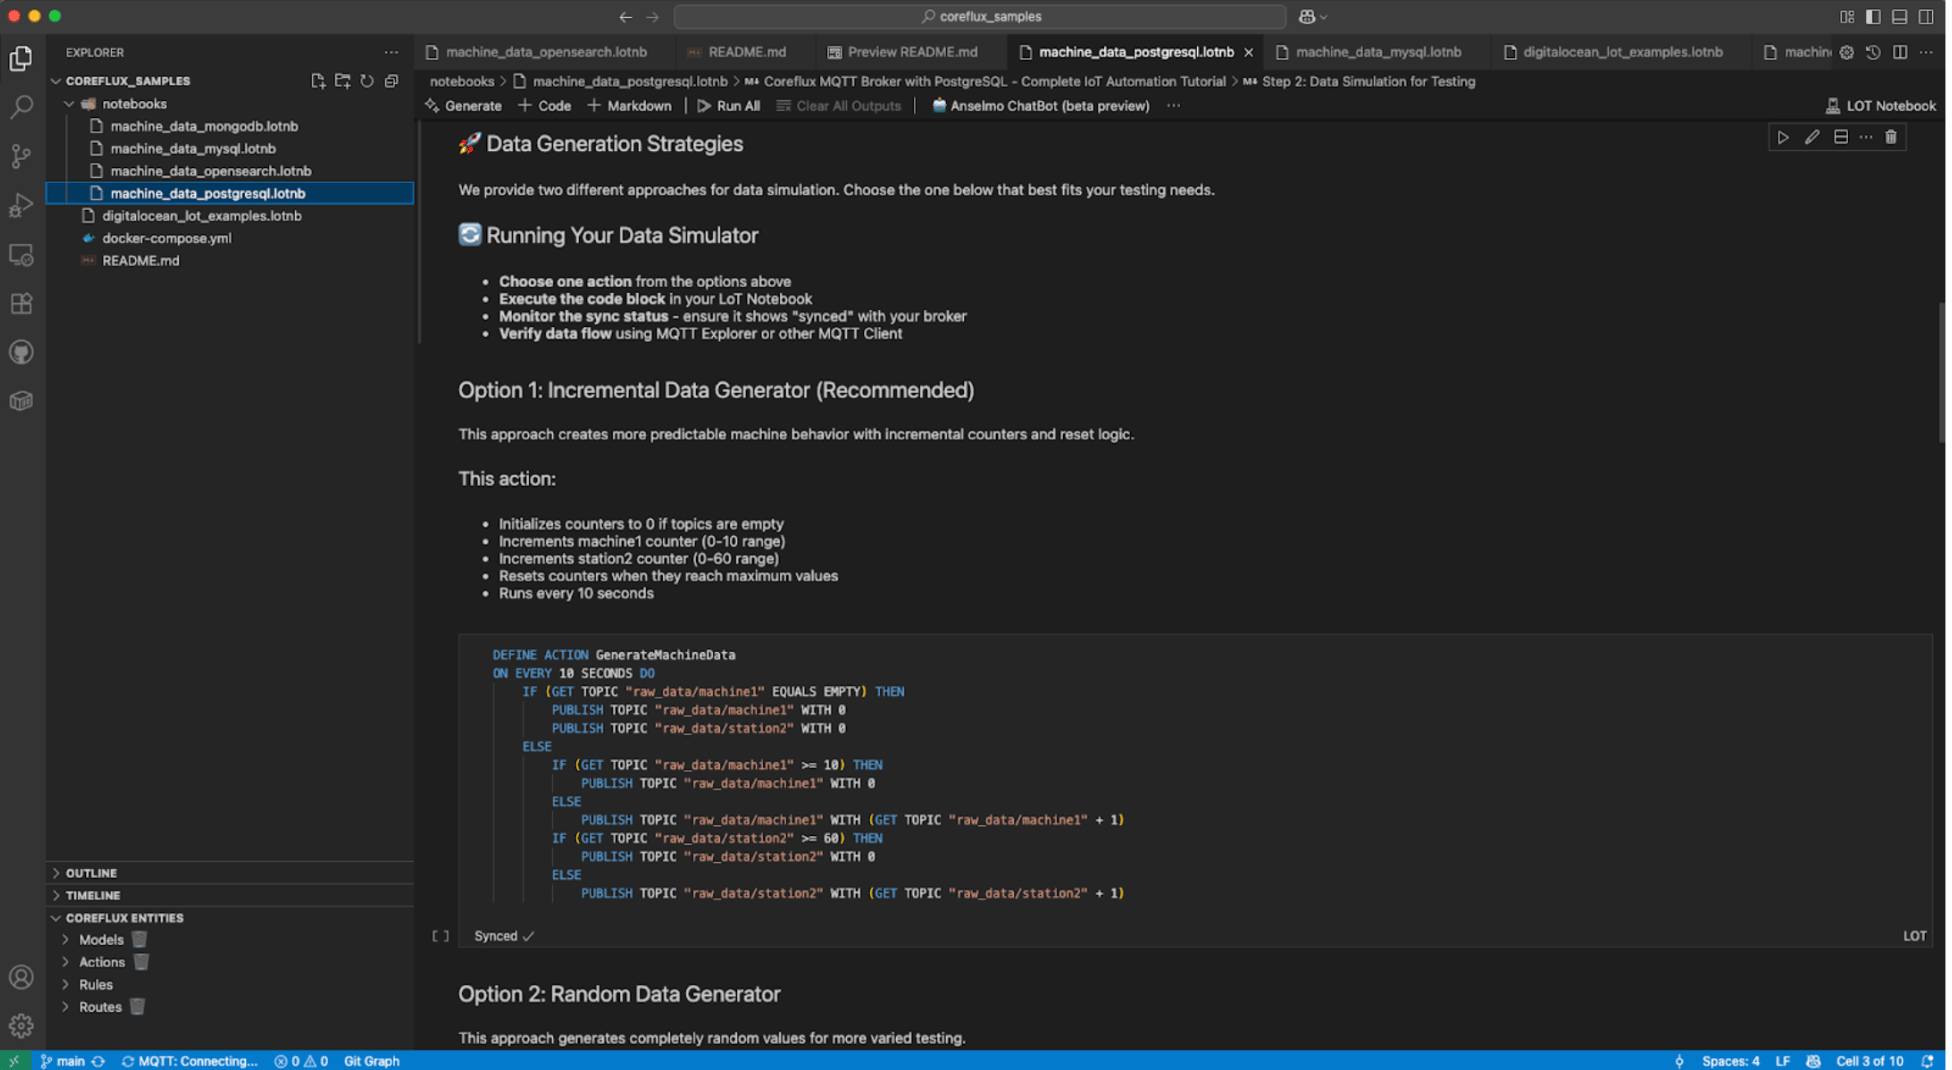
For this use-case, we will build an integration of raw-data, through a transformation pipeline, into a Database. However, as we are not connected to any MQTT devices in the demo, we will take advantage of IoT’s capabilities and use an Action to simulate device data.
In LoT, an Action is an executable logic that is triggered by specific events such as timed intervals, topic updates, or explicit calls from other actions or system components. Actions allow dynamic interaction with MQTT topics, internal variables, and payloads, facilitating complex IoT automation workflows.
As such, we can use an Action that generates data in certain topics in a defined time interval, that can then be used by the rest of the pipeline we will define below.
You can download the github repo with the sample project.
Generating Simulated IoT Data
Create an Action to generate simulated sensor data using the low code LoT (Language of Things) interface:
DEFINE ACTION RANDOMIZEMachineData
ON EVERY 10 SECONDS DO
    PUBLISH TOPIC "raw_data/machine1" WITH RANDOM BETWEEN 0 AND 10
    PUBLISH TOPIC "raw_data/station2" WITH RANDOM BETWEEN 0 AND 60
In the Notebook provided you also have an Action that does an incremental counter to simulate data, as an alternative to the provided Action.
When you run this Action, it will:
- Deploy automatically to the MQTT broker
- Generate simulated IoT sensor data every 10 seconds
- Publish real-time data to specific MQTT topics
- Show sync status in the LoT Notebook interface
- This status shows if the code on the LoT Notebook differs from the one running in the broker, or if it is missing entirely
Step 7 — Creating Data Transformation Models for Real-Time Processing
Defining Data Models with Language of Things
Models in Coreflux are used to transform, aggregate, and compute values from input MQTT topics, publishing the results to new topics. They serve the foundation for the creation of the Unified Namespace, of your system, applicable to your several data sources.
This way, a Model allows you to define how raw Language of Things data should be structured and transformed, both for a single device or for multiple devices simultaneously (through the use of the wildcard +). A model also serves as the key data schema used for scalable storage to the managed database.
DEFINE MODEL MachineData WITH TOPIC "Simulator/Machine/+/Data"
    ADD "energy" WITH TOPIC "raw_data/+" AS TRIGGER
    ADD "energy_wh" WITH (energy * 1000)
    ADD "production_status" WITH (IF energy > 5 THEN "active" ELSE "inactive")
    ADD "production_count" WITH (IF production_status EQUALS "active" THEN (production_count + 1) ELSE 0)
    ADD "stoppage" WITH (IF production_status EQUALS "inactive" THEN 1 ELSE 0)
    ADD "maintenance_alert" WITH (IF energy > 50 THEN TRUE ELSE FALSE)
    ADD "timestamp" WITH TIMESTAMP "UTC"
This low code model:
- Uses wildcard
+to apply to all machines automatically - Converts energy values to watt-hours (energy_wh) by multiplying by 1000
- Determines production status based on energy thresholds
- Tracks production counts and stoppage events
- Adds timestamps to all real-time data points
- Extracts machine ID from the topic structure
- Publishes structured data to the Simulator/Machine/+/Data topics (replacing the
+with each topic that matches the format for the trigger/source data)
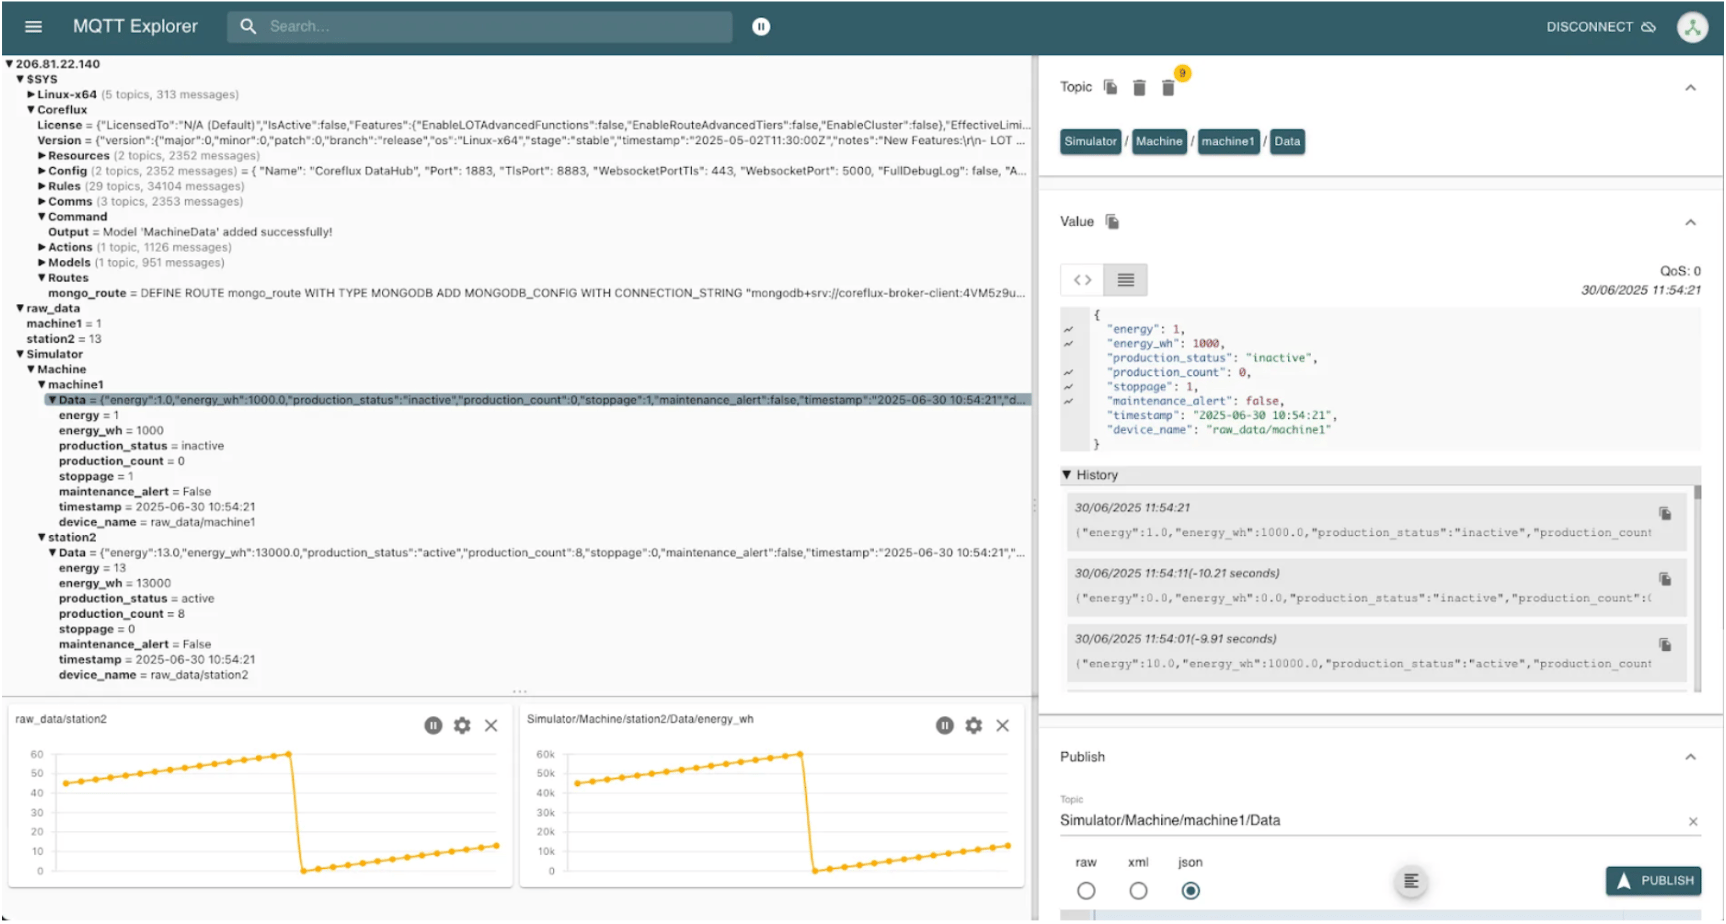
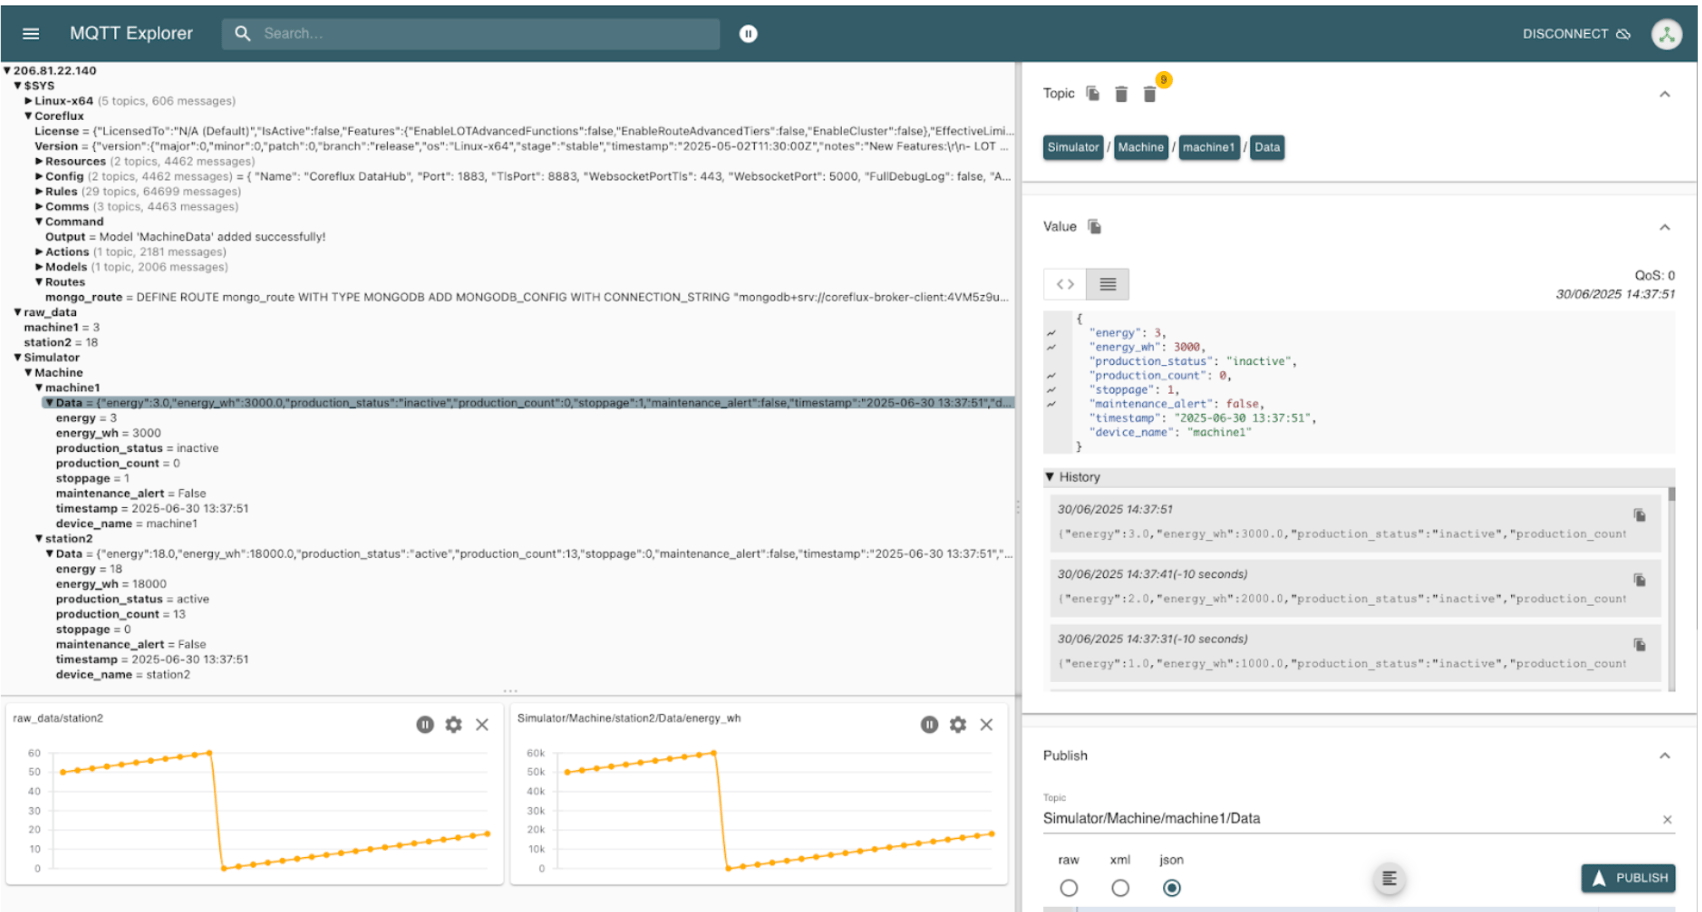
As we generated two simulated sensors/machines with the Action, we can see the Model structure being applied automatically to both, generating both a json object and the individual topics.
Step 8 — Setting Up Database Integration for Scalable Storage
Creating a Database Route
Routes define how processed real-time data flows to external systems like managed databases. They are defined with the following low code format:
DEFINE ROUTE mongo_route WITH TYPE MONGODB
    ADD MONGODB_CONFIG
        WITH CONNECTION_STRING "mongodb+srv://<username>:<password>@<cluster-uri>/<database>?tls=true&authSource=admin&replicaSet=<replica-set>"
        WITH DATABASE "admin"
Replace with your MongoDB connection details from DigitalOcean and run the Route in your IoT Notebook.
Updating the Model for Database Storage
Modify your LoT model to use the database route for scalable storage, by adding this to the end of the Model:
STORE IN "mongo_route"
    WITH TABLE "MachineProductionData"
Additionally, add a parameter with the topic, to have a unique identifier for each entry in your managed database.
DEFINE MODEL MachineData WITH TOPIC "Simulator/Machine/+/Data"
    ADD "energy" WITH TOPIC "raw_data/+" AS TRIGGER
    ADD "device_name" WITH REPLACE "+" WITH TOPIC POSITION 2 IN "+"
    ADD "energy_wh" WITH (energy * 1000)
    ADD "production_status" WITH (IF energy > 5 THEN "active" ELSE "inactive")
    ADD "production_count" WITH (IF production_status EQUALS "active" THEN (production_count + 1) ELSE 0)
    ADD "stoppage" WITH (IF production_status EQUALS "inactive" THEN 1 ELSE 0)
    ADD "maintenance_alert" WITH (IF energy > 50 THEN TRUE ELSE FALSE)
    ADD "timestamp" WITH TIMESTAMP "UTC"
    STORE IN "mongo_route"
        WITH TABLE "MachineProductionData"
After you deploy this updated action, all data should be automatically stored in the database when updated.
Step 9 — Verifying the Complete IoT Automation Pipeline
Monitoring Real-Time Data Flow
- MQTT Explorer: Use an MQTT client to verify real-time data publication
- MongoDB Compass: Connect to verify the storage of data
Checking Database Storage
Connect to your MongoDB managed database using MongoDB Compass to verify scalable storage:
- Use the connection string from your DigitalOcean database
- Navigate to the coreflux-broker-data database (or the name you gave to the database)
- Check the MachineProductionData collection for stored documents
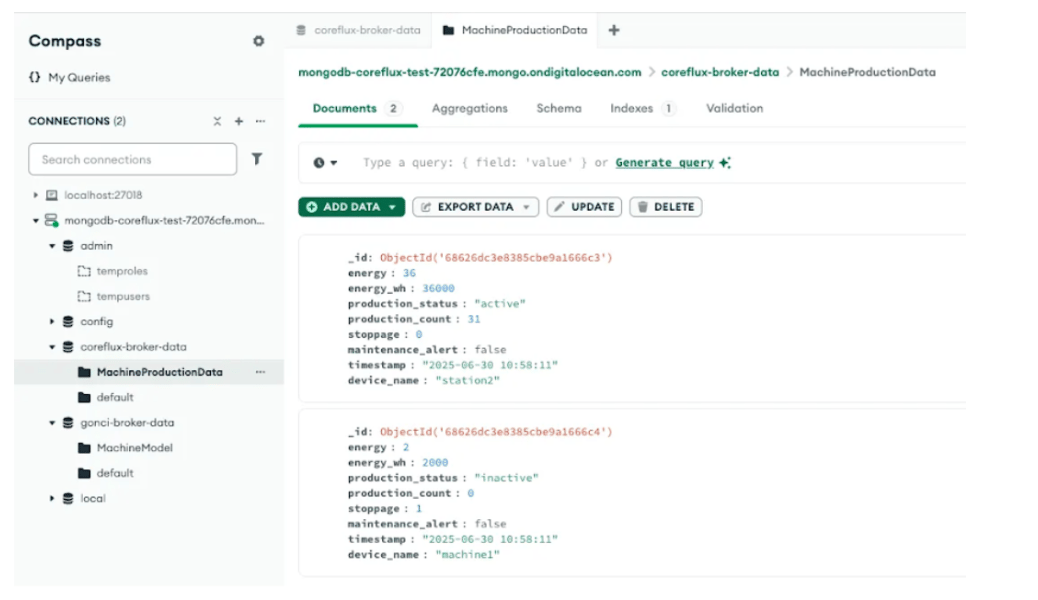
You should see real-time data documents with structure similar to:
{
  "_id": {
    "$oid": "68626dc3e8385cbe9a1666c3"
  },
  "energy": 36,
  "energy_wh": 36000,
  "production_status": "active",
  "production_count": 31,
  "stoppage": 0,
  "maintenance_alert": false,
  "timestamp": "2025-06-30 10:58:11",
  "device_name": "station2"
}
As we’ve seen before, all of the data is available in the MQTT Broker for other uses and integrations.
Step 10 - Expand Your Use Case and Integrations
Test Language of Things Capabilities
- Publish Sample Data: Use MQTT Explorer to publish sample datasets to your Coreflux broker. Experiment with different payload structures and different Models/Actions to see how they are processed and stored in MongoDB.
- Data Validation: Verify that the data in MongoDB matches the payloads you published. Check for consistency and accuracy using MongoDB Compass, ensuring your IoT automation integration is working as expected. Compare timestamps, field transformations, and data types to validate your real-time data pipeline. For more MongoDB setup guidance, see our MongoDB tutorial collection.
- Real-Time Monitoring: Set up a continuous real-time data feed using another datasource of MQTT data, like a simple sensor with MQTT connectivity. Watch how Coreflux and MongoDB handles incoming IoT data streams and explore response times for data retrieval and queries.
Build Analytics and Visualizations
- Create Dashboards: Integrate with visualization tools like Grafana to create dynamic dashboards that display your IoT data, both from the MQTT Broker live data or from the stored data in the Database. Track metrics like device uptime, sensor readings, production counts, or maintenance alerts from your automation systems. Learn how to set up monitoring with our guide on setting up monitoring for DigitalOcean managed databases with Prometheus and Grafana.
- Trend Analysis: Leverage MongoDB’s aggregation framework to analyze trends over time. Look for patterns, spikes, or anomalies in your real-time data that could indicate system issues or optimization opportunities.
- Multi-Database Integration: Explore integrating additional managed databases like PostgreSQL for relational data, MySQL for structured queries, or OpenSearch for advanced analytics and search capabilities. Use Coreflux routes to send data to multiple destinations simultaneously. For OpenSearch integration examples, see our tutorial on deploying OpenSearch with Coreflux MQTT broker.
Optimize and Scale Your IoT Infrastructure
- Load Testing: Simulate high traffic by publishing many messages simultaneously using LoT Notebook or automated scripts. Monitor how your Coreflux MQTT broker and MongoDB cluster handle the load and identify any bottlenecks in your Data Pipeline.
- Scaling: DigitalOcean offers vertical and horizontal scaling options. Increase droplet resources (CPU, RAM, or storage) as your IoT data needs grow. Scale your managed database cluster to handle larger datasets and configure auto-scaling alerts to notify you when approaching resource limits.
Frequently Asked Questions
How do I integrate an MQTT broker with MongoDB?
You integrate an MQTT broker with MongoDB by creating a database route in Coreflux that connects to your MongoDB instance. The route uses a connection string with authentication credentials and automatically stores MQTT message payloads into MongoDB collections. Coreflux handles the connection management, allowing you to focus on data transformation logic using the Language of Things (LoT) syntax.
Can I save MQTT data directly to MongoDB without custom code?
Yes, Coreflux provides a low-code solution through its MongoDB route feature. You define a route with your MongoDB connection string, then add a STORE IN directive to your data models. This automatically persists all processed MQTT messages to MongoDB without writing custom database integration code. The route handles connection pooling, error handling, and retry logic automatically.
What are the benefits of using MongoDB with MQTT for IoT applications?
MongoDB’s flexible document structure makes it ideal for IoT data because sensor readings often have varying schemas. Unlike relational databases, MongoDB doesn’t require predefined tables, allowing you to store different device types and data formats in the same collection. Combined with MQTT’s lightweight messaging protocol, this creates an efficient pipeline for high-volume, real-time IoT data streams. DigitalOcean’s managed MongoDB adds automated backups, scaling, and monitoring to simplify operations.
How secure is the connection between Coreflux and MongoDB?
When deploying on DigitalOcean, you can use VPC networking to keep all communication between your Coreflux MQTT broker and MongoDB database private. The VPC isolates your resources from public internet access, and DigitalOcean managed databases support TLS encryption for connections. Additionally, you can create dedicated database users with limited permissions for your Coreflux application, following the principle of least privilege.
Can I use this setup for production IoT deployments?
Yes, this architecture is production-ready. DigitalOcean managed databases provide automated backups, high availability, and monitoring out of the box. Coreflux MQTT broker scales horizontally and handles high message throughput. For production deployments, ensure you configure firewall rules, use strong authentication credentials, enable TLS for MQTT connections, and set up monitoring alerts. Start with appropriate resource sizing based on your expected message volume and scale up as needed.
Conclusion
Integrating Coreflux MQTT broker with DigitalOcean’s managed MongoDB service provides a powerful solution for real-time IoT data processing and scalable storage. Following this tutorial, you have set up a seamless automation pipeline that allows you to collect, process, and store IoT data efficiently using low code development practices.
With Coreflux’s scalable architecture and MongoDB’s robust document storage capabilities, you can handle large volumes of real-time data and gain valuable insights instantly. Whether you are monitoring industrial systems, tracking environmental sensors, or managing smart city infrastructure, this IoT automation integration empowers you to make data-driven decisions quickly and effectively.
The Language of Things (LoT) notebook approach combined with DigitalOcean’s managed services creates an IoT & DevOps-ready foundation that scales with your business needs. Your MQTT broker deployment is now ready for production workloads and can be extended to support PostgreSQL, MySQL, OpenSearch, and other database technologies as your requirements evolve.
Next Steps
Now that you’ve deployed your Coreflux MQTT broker with MongoDB, explore these resources to extend your IoT automation capabilities:
-
Explore Related Tutorials: Learn more about deploying OpenSearch with Coreflux in our deploying OpenSearch with Coreflux MQTT broker tutorial, or dive deeper into MongoDB with our MongoDB tutorial collection.
-
Try DigitalOcean Managed Databases: Simplify your database operations with DigitalOcean Managed Databases, which provide automated backups, scaling, and high availability for MongoDB, PostgreSQL, MySQL, and Redis.
-
Deploy Coreflux from Marketplace: Get started quickly with the Coreflux MQTT Broker available in the DigitalOcean Marketplace, or explore other Marketplace applications for additional IoT and automation tools.
-
Review Coreflux Documentation: Deepen your understanding of Language of Things and advanced Coreflux features in the Coreflux documentation.
-
Try the Sample Project: Experiment with the sample IoT automation project to see additional use cases and integration patterns.
Additional Resources and Documentation
DigitalOcean Setup Guides
Project Management
- How to Create and Manage Projects on DigitalOcean - Organize your IoT infrastructure resources effectively.
Network Infrastructure
- How to Create a VPC Network - Set up secure private networking for your MQTT broker and databases
- Firewall Quickstart Guide - Configure security rules for production IoT deployments
Droplet Deployment
- How to Create a Droplet - Complete guide for deploying virtual machines
- Docker 1-Click Application - Deploy pre-configured Docker environment from DigitalOcean Marketplace
- Using Docker 1-Click Install Tutorial - Step-by-step Docker setup instructions
Database Management
- How to Manage MongoDB Databases - Create and manage MongoDB databases and users
- How to Connect to MongoDB - Connect to your managed MongoDB cluster from applications
Server Management
- Recommended Droplet Setup - Best practices for server security and configuration
- Connect to Droplet via Console - Access your droplet through the web-based console
Alternative Installation Methods
Note: While this tutorial uses the Coreflux or Docker Marketplace image for simplified deployment, you can also install the Coreflux MQTT broker directly on Ubuntu. For manual installation instructions, visit the Coreflux Installation Guide.
Related DigitalOcean Tutorials
- Deploying OpenSearch with Coreflux MQTT Broker - Learn how to integrate Coreflux with OpenSearch for advanced search and analytics
- How to Install MongoDB on Ubuntu - Manual MongoDB installation guide for self-managed deployments
- Introduction to MongoDB - Understand MongoDB concepts and document database fundamentals
Thanks for learning with the DigitalOcean Community. Check out our offerings for compute, storage, networking, and managed databases.
About the author(s)
I help Businesses scale with AI x SEO x (authentic) Content that revives traffic and keeps leads flowing | 3,000,000+ Average monthly readers on Medium | Sr Technical Writer(Team Lead) @ DigitalOcean | Ex-Cloud Consultant @ AMEX | Ex-Site Reliability Engineer(DevOps)@Nutanix
Still looking for an answer?
This textbox defaults to using Markdown to format your answer.
You can type !ref in this text area to quickly search our full set of tutorials, documentation & marketplace offerings and insert the link!
For certbot with the DigitalOcean DNS plugin, you only need a token with write access to DNS records.
In practice, the minimal required scope is:
- Read and write access to Domains / DNS
You do NOT need full account access or billing permissions. Certbot only needs to create and remove temporary TXT records for the DNS-01 challenge.
If you’re unsure, creating a restricted token with DNS read/write is the safest option and works reliably for automated renewals.
 This work is licensed under a Creative Commons Attribution-NonCommercial- ShareAlike 4.0 International License.
Become a contributor for community
Get paid to write technical tutorials and select a tech-focused charity to receive a matching donation.

DigitalOcean Documentation
Full documentation for every DigitalOcean product.

Resources for startups and AI-native businesses
The Wave has everything you need to know about building a business, from raising funding to marketing your product.
The developer cloud
Scale up as you grow — whether you're running one virtual machine or ten thousand.

Start building today
From GPU-powered inference and Kubernetes to managed databases and storage, get everything you need to build, scale, and deploy intelligent applications.
