By James Skelton and Shaoni Mukherjee

In our previous tutorial, we demonstrated how to use DreamBooth with Stable Diffusion to fine-tune a model and create a consistent baseline concept—enabling it to better generate images that reflect a specific object or artistic style from a set of input images. While other fine-tuning approaches, such as using Guided Diffusion with glid-3-XL-stable, have also shown promising results, they tend to be extremely resource-intensive and require high-end data center GPUs to run.
DreamBooth, on the other hand, offers a much more efficient alternative, needing only 16 GB of GPU RAM—dramatically lowering the hardware requirements. Thanks to this, users can now leverage cloud-based solutions like DigitalOcean GPU Droplets to run DreamBooth efficiently without investing in expensive hardware. This opens up a much more accessible and budget-friendly pathway for creators and developers to explore the growing world of Stable Diffusion and custom AI-generated content.
Another popular technique for achieving similar results is Textual Inversion. While it is also computationally intensive, it offers a valuable alternative for customizing image generation. Despite the name, Textual Inversion doesn’t fine-tune the diffusion model itself. Instead, it teaches the model to associate new, user-defined concepts—such as personal objects or unique artistic styles—with newly created tokens in the model’s embedding space.
These tokens act like words that represent the concept and can be used in prompts just like any other word. This gives users a different kind of control over the image generation process—one that focuses on precision and flexibility in crafting textual prompts. When used alongside DreamBooth-trained concepts, Textual Inversion enhances the inference process by combining visual specificity with linguistic nuance, enabling more accurate and expressive outputs.
In this tutorial, we will show how to train Textual Inversion on a pre-made set of images from the same data source we used for Dreambooth. Once we have walked through the code, we will demonstrate how to combine our new embedding with our DreamBooth concept in the Stable Diffusion Web UI launched from a Jupyter Notebook.
Set up & installations
#@title Install the required libraries
!pip install -qq accelerate tensorboard ftfy
!pip install -qq -U transformers
!pip install -qq -U diffusers
!pip install -qq bitsandbytes
!pip install gradio

#create the directories we will use for the task
!mkdir inputs_textual_inversion

!git clone https://github.com/AUTOMATIC1111/stable-diffusion-webui
Once we are in our Notebook, we can scroll to the first code cell to begin the necessary installs for this Notebook. We will also create a directory to hold our input files for training. In the next cell, we import these packages and define a useful helper function for displaying our images later.
#@title Import required libraries
import argparse
import itertools
import math
import os
import random

import numpy as np
import torch
import torch.nn.functional as F
import torch.utils.checkpoint
from torch.utils.data import Dataset

import PIL
from accelerate import Accelerator
from accelerate.logging import get_logger
from accelerate.utils import set_seed
from diffusers import AutoencoderKL, DDPMScheduler, PNDMScheduler, StableDiffusionPipeline, UNet2DConditionModel
from diffusers.hub_utils import init_git_repo, push_to_hub
from diffusers.optimization import get_scheduler
from diffusers.pipelines.stable_diffusion import StableDiffusionSafetyChecker
from PIL import Image
from torchvision import transforms
from tqdm.auto import tqdm
from transformers import CLIPFeatureExtractor, CLIPTextModel, CLIPTokenizer


## Instantiate helper function
def image_grid(imgs, rows, cols):
    assert len(imgs) == rows*cols

    w, h = imgs[0].size
    grid = Image.new('RGB', size=(cols*w, rows*h))
    grid_w, grid_h = grid.size

    for i, img in enumerate(imgs):
        grid.paste(img, box=(i%cols*w, i//cols*h))
    return grid
Now that we have set up the workspace, we need to load our models.
Loading in the Stable Diffusion v1-5 models
To access the models, we can clone the repository directly from HuggingFace. Use the following code in the terminal to clone the repo:
apt-get install git-lfs && git-lfs clone https://huggingface.co/stable-diffusion-v1-5/stable-diffusion-v1-5
Settings for teaching your new concept
Textual inversion in Stable Diffusion creates a new word token associated with distinct features of a set of images. This allows the model to recreate those features when generating new images. The first step is to collect data that embodies the desired concept.
For this demonstration, we are going to use images of a plastic toy Groot from the Guardians of the Galaxy film. We have provided a sample code to make accessing these images easy.
#@markdown Add here the URLs to the images of the concept you are adding. 3-5 should be fine
urls = [
      "https://datasets-server.huggingface.co/assets/valhalla/images/--/valhalla--images/train/7/image/image.jpg",
      "https://datasets-server.huggingface.co/assets/valhalla/images/--/valhalla--images/train/5/image/image.jpg",
      "https://datasets-server.huggingface.co/assets/valhalla/images/--/valhalla--images/train/7/image/image.jpg"]
Now that we have our URLs, use the block of code below to download them to your desired save_path. We will use inputs_textual_inversion that we created earlier.
# @title Setup and check the images you have just added
import requests
import glob
from io import BytesIO

def download_image(url):
  try:
    response = requests.get(url)
  except:
    return None
  return Image.open(BytesIO(response.content)).convert("RGB")

images = list(filter(None,[download_image(url) for url in urls]))
save_path = "./inputs_textual_inversion"
if not os.path.exists(save_path):
  os.mkdir(save_path)
[image.save(f"{save_path}/{i}.jpeg") for i, image in enumerate(images)]
image_grid(images, 1, len(images))
This will save the files to your directory and display a grid example of their selection like so:
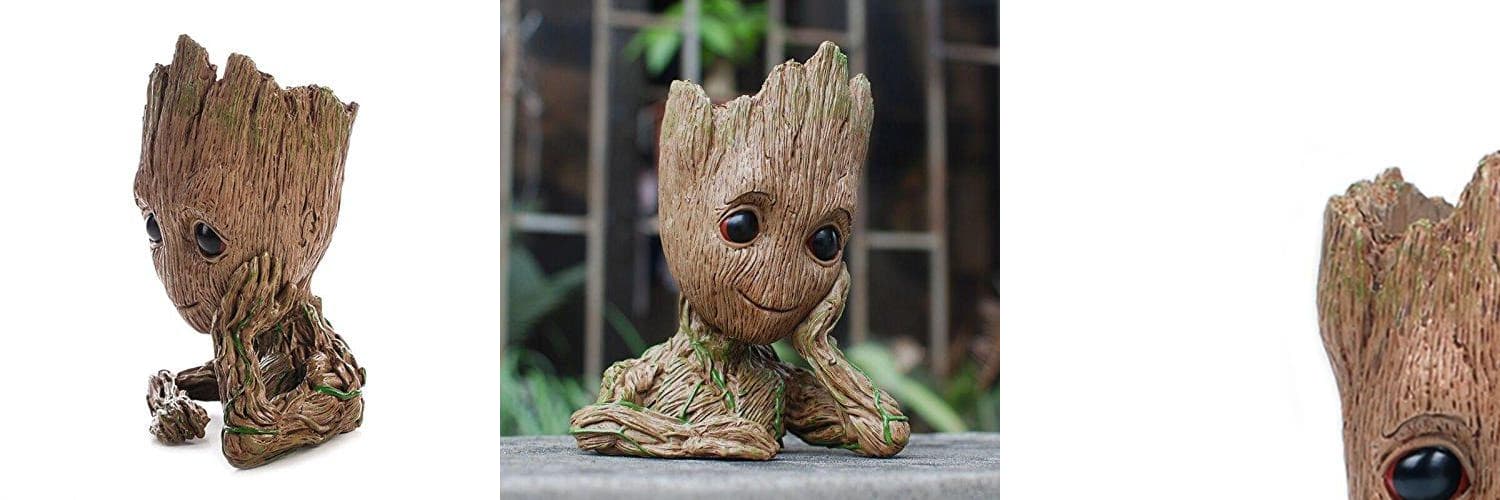
Sample Groot photos
What is it that we are teaching
#@title Settings for your newly created concept

concept_name = "grooty"

#@markdown `initializer_token` is a word that can summarise what your
new concept is, to be used as a starting point

initializer_token = "groot" #@param {type:"string"}

#@markdown `what_to_teach`: what is it that you are teaching? `object` enables you to teach the model a new object to be used, `style` allows you to teach the model a new style one can use.

what_to_teach = "object" #@param ["object", "style"]

#@markdown `placeholder_token` is the token you are going to use to represent your new concept (so when you prompt the model, you will say "A `<my-placeholder-token>` in an amusement park"). We use angle brackets to differentiate a token from other words/tokens, to avoid collision.

placeholder_token = f'<{concept_name}>'
We now need to define our concept for the model to be understood. We first establish our concept_name and initializer_token variables. The initializer token acts as a word that summarizes as closely as possible the object or style of the concept. We then define whether or not the concept is an object, likely a physical object in the selection of images, or a style, a consistent pattern or style across each of the images.
The concept name is also used as our placeholder_token. This is used in place of other words across a selection of standardized sentences that help the model physically place the features with the prompts. We will name our concept ‘grooty’ and use the initializer token ‘groot’.
If you would like to use your custom data in place of the demonstration values, you may upload them to the directory “./inputs_textual_inversion” and change the variables above as needed.
Create the dataset
The sample sentences we create for our placeholder token will significantly impact the effectiveness of the textual inversion process. It’s important to customize these sentences to align with the specific image types you’re using. The provided examples will work well for this demonstration but would be inadequate for generating a textual inversion embedding of a person.
#@title Setup the prompt templates for training
imagenet_templates_small = [
    "a photo of a {}",
    "a rendering of a {}",
    "a cropped photo of the {}",
    "the photo of a {}",
    "a photo of a clean {}",
    "a photo of a dirty {}",
    "a dark photo of the {}",
    "a photo of my {}",
    "a photo of the cool {}",
    "a close-up photo of a {}",
    "a bright photo of the {}",
    "a cropped photo of a {}",
    "a photo of the {}",
    "a good photo of the {}",
    "a photo of one {}",
    "a close-up photo of the {}",
    "a rendition of the {}",
    "a photo of the clean {}",
    "a rendition of a {}",
    "a photo of a nice {}",
    "a good photo of a {}",
    "a photo of the nice {}",
    "a photo of the small {}",
    "a photo of the weird {}",
    "a photo of the large {}",
    "a photo of a cool {}",
    "a photo of a small {}",
]

imagenet_style_templates_small = [
    "a painting in the style of {}",
    "a rendering in the style of {}",
    "a cropped painting in the style of {}",
    "the painting in the style of {}",
    "a clean painting in the style of {}",
    "a dirty painting in the style of {}",
    "a dark painting in the style of {}",
    "a picture in the style of {}",
    "a cool painting in the style of {}",
    "a close-up painting in the style of {}",
    "a bright painting in the style of {}",
    "a cropped painting in the style of {}",
    "a good painting in the style of {}",
    "a close-up painting in the style of {}",
    "a rendition in the style of {}",
    "a nice painting in the style of {}",
    "a small painting in the style of {}",
    "a weird painting in the style of {}",
    "a large painting in the style of {}",
]
These prompt templates are separated into object and style listings. Now, we can use them with custom dataset classes to facilitate passing them to the model.
#@title Setup the dataset
class TextualInversionDataset(Dataset):
    def __init__(
        self,
        data_root,
        tokenizer,
        learnable_property="object",  # [object, style]
        size=512,
        repeats=100,
        interpolation="bicubic",
        flip_p=0.5,
        set="train",
        placeholder_token="*",
        center_crop=False,
    ):

        self.data_root = data_root
        self.tokenizer = tokenizer
        self.learnable_property = learnable_property
        self.size = size
        self.placeholder_token = placeholder_token
        self.center_crop = center_crop
        self.flip_p = flip_p

        self.image_paths = [os.path.join(self.data_root, file_path) for file_path in os.listdir(self.data_root)]

        self.num_images = len(self.image_paths)
        self._length = self.num_images

        if set == "train":
            self._length = self.num_images * repeats

        self.interpolation = {
            "linear": PIL.Image.LINEAR,
            "bilinear": PIL.Image.BILINEAR,
            "bicubic": PIL.Image.BICUBIC,
            "lanczos": PIL.Image.LANCZOS,
        }[interpolation]

        self.templates = imagenet_style_templates_small if learnable_property == "style" else imagenet_templates_small
        self.flip_transform = transforms.RandomHorizontalFlip(p=self.flip_p)

    def __len__(self):
        return self._length

    def __getitem__(self, i):
        example = {}
        image = Image.open(self.image_paths[i % self.num_images])

        if not image.mode == "RGB":
            image = image.convert("RGB")

        placeholder_string = self.placeholder_token
        text = random.choice(self.templates).format(placeholder_string)

        example["input_ids"] = self.tokenizer(
            text,
            padding="max_length",
            truncation=True,
            max_length=self.tokenizer.model_max_length,
            return_tensors="pt",
        ).input_ids[0]

        # default to score-sde preprocessing
        img = np.array(image).astype(np.uint8)

        if self.center_crop:
            crop = min(img.shape[0], img.shape[1])
            h, w, = (
                img.shape[0],
                img.shape[1],
            )
            img = img[(h - crop) // 2 : (h + crop) // 2, (w - crop) // 2 : (w + crop) // 2]

        image = Image.fromarray(img)
        image = image.resize((self.size, self.size), resample=self.interpolation)

        image = self.flip_transform(image)
        image = np.array(image).astype(np.uint8)
        image = (image / 127.5 - 1.0).astype(np.float32)

        example["pixel_values"] = torch.from_numpy(image).permute(2, 0, 1)
        return example
This dataset object ensures that the image inputs are optimally run with textual inversion by transforming them and reshaping them as needed to increase overall model acuity during training.
Downloading the model files
#@title Load the Stable Diffusion model

#@markdown set `pretrained_model_name_or_path` to which Stable Diffusion checkpoint you want to use

## Use local files
pretrained_model_name_or_path = "stable-diffusion-v1-5/stable-diffusion-v1-5" #@param {type:"string"}

## Download online files
#@markdown Please read and, if you agree, accept the LICENSE [here](https://huggingface.co/runwayml/stable-diffusion-v1-5) if you see an error
# pretrained_model_name_or_path = "runwayml/stable-diffusion-v1-5" #@param {type:"string"}
Now, if we are running this on a Jupyter Notebook, then we have two choices. Earlier, we mounted the models in the Public Datasets directory, and they can be accessed at ../datasets/stable-diffusion-diffusers/stable-diffusion-v1-5 from the working directory.
If we want to use the online version from the Runway ML repo, then we can hash out the lower line. This will download the models to the cache and will count toward storage. You will need to paste your Huggingface token in the cell at the top of the Notebook titled “Alternate access: log in to HuggingFace for online access to models.”
Set up our new token
#@title Load the tokenizer and add the placeholder token as a additional special token.
#@markdown Please read and, if you agree, accept the LICENSE [here](https://huggingface.co/runwayml/stable-diffusion-v1-5) if you see an error
tokenizer = CLIPTokenizer.from_pretrained(
    pretrained_model_name_or_path,
    subfolder="tokenizer")

# Add the placeholder token in tokenizer
num_added_tokens = tokenizer.add_tokens(placeholder_token)
if num_added_tokens == 0:
    raise ValueError(
        f"The tokenizer already contains the token {placeholder_token}. Please pass a different"
        " `placeholder_token` that is not already in the tokenizer."
    )
Next, we will load the CLIPTokenizer from the model’s directory. We can then add our new token in as a novel token. This way, as we train, the new token will be able to become associated with the features in the images.
#@title Get token ids for our placeholder and initializer token. This code block will complain if initializer string is not a single token
# Convert the initializer_token, placeholder_token to ids
token_ids = tokenizer.encode(initializer_token, add_special_tokens=False)
# Check if initializer_token is a single token or a sequence of tokens
if len(token_ids) > 1:
    raise ValueError("The initializer token must be a single token.")

initializer_token_id = token_ids[0]
placeholder_token_id = tokenizer.convert_tokens_to_ids(placeholder_token)
We will then encode the initializer_token and placeholder_token to get their token IDs. If more than one token is generated, then it will prompt us to enter a single token instead. This would likely be caused by something like entering a phrase or sentence as the placeholder token.
#@title Load the Stable Diffusion model
# Load models and create wrapper for stable diffusion
text_encoder = CLIPTextModel.from_pretrained(
    pretrained_model_name_or_path, subfolder="text_encoder",

)
vae = AutoencoderKL.from_pretrained(
    pretrained_model_name_or_path, subfolder="vae",

)
unet = UNet2DConditionModel.from_pretrained(
    pretrained_model_name_or_path, subfolder="unet",

)
Finally, we load in our text_encoder, vae, and unet subcomponents of the Stable Diffusion V1-5 model.
text_encoder.resize_token_embeddings(len(tokenizer))

token_embeds = text_encoder.get_input_embeddings().weight.data
token_embeds[placeholder_token_id] = token_embeds[initializer_token_id]
Since we have added the placeholder_token in the tokenizer, we need to re-size the token embeddings here and create a new embedding vector in the token embeddings for our placeholder_token. We can then initialize the newly added placeholder token with the embeddings of the initializer token.
def freeze_params(params):
    for param in params:
        param.requires_grad = False

# Freeze vae and unet
freeze_params(vae.parameters())
freeze_params(unet.parameters())
# Freeze all parameters except for the token embeddings in text encoder
params_to_freeze = itertools.chain(
    text_encoder.text_model.encoder.parameters(),
    text_encoder.text_model.final_layer_norm.parameters(),
    text_encoder.text_model.embeddings.position_embedding.parameters(),
)
freeze_params(params_to_freeze)
Since we are only training the newly added embedding vector, we can then freeze the rest of the model parameters here. With this, we have completed setting up the training dataset and can load it in. We will use this to create our dataloader for training.
train_dataset = TextualInversionDataset(
      data_root=save_path,
      tokenizer=tokenizer,
      size=512,
      placeholder_token=placeholder_token,
      repeats=100,
      learnable_property=what_to_teach, #Option selected above between object and style
      center_crop=False,
      set="train",
)

def create_dataloader(train_batch_size=16):
    return torch.utils.data.DataLoader(train_dataset, batch_size=train_batch_size, shuffle=True)
Training set up
Before we can begin running training, we need to define our noise scheduler and training hyperparameters and create the training function itself.
noise_scheduler = DDPMScheduler(
    beta_start=0.00085, beta_end=0.012, beta_schedule="scaled_linear", num_train_timesteps=1000, tensor_format="pt"
)
We will use the DDPMScheduler for this example, but other schedulers like PLMS may yield better results. Consider choosing different schedulers to see how the training results differ.
hyperparameters = {
    "learning_rate": 5e-04,
    "scale_lr": True,
    "max_train_steps": 1000,
    "train_batch_size": 1,
    "gradient_accumulation_steps": 1,
    "seed": 42,
    "output_dir": f'/notebooks/concepts/{concept_name}-concept',
}
We next set our hyperparameters for training. In particular, consider altering the max_train_steps and seed to better control the outcome of the embedding. Higher training step values will lead to a more accurate representation of the concept, and altering the seed will change the ‘randomness’ the diffusion model is using to construct the sample images to calculate the loss. Additionally, we can change the train_batch_size if we are on a GPU with more than ~16GB of VRAM, and change the output_dir to wherever we choose.
The training function
def training_function(text_encoder, vae, unet):
    logger = get_logger(__name__)

    train_batch_size = hyperparameters["train_batch_size"]
    gradient_accumulation_steps = hyperparameters["gradient_accumulation_steps"]
    learning_rate = hyperparameters["learning_rate"]
    max_train_steps = hyperparameters["max_train_steps"]
    output_dir = hyperparameters["output_dir"]

    accelerator = Accelerator(
        gradient_accumulation_steps=gradient_accumulation_steps,
        # distributed_type='MULTI_GPU'
        # distribute_type: Accelerate.DistributedType.MULTI_GPU
        # fp16=True,
        # cpu=True,
    )

    train_dataloader = create_dataloader(train_batch_size)

    if hyperparameters["scale_lr"]:
        learning_rate = (
            learning_rate * gradient_accumulation_steps * train_batch_size * accelerator.num_processes
        )

    # Initialize the optimizer
    optimizer = torch.optim.AdamW(
        text_encoder.get_input_embeddings().parameters(),  # only optimize the embeddings
        lr=learning_rate,
    )


    text_encoder, optimizer, train_dataloader = accelerator.prepare(
        text_encoder, optimizer, train_dataloader
    )

    # Move vae and unet to device
    vae.to(accelerator.device)
    unet.to(accelerator.device)

    # Keep vae and unet in eval model as we don't train these
    vae.eval()
    unet.eval()

    # We need to recalculate our total training steps as the size of the training dataloader may have changed.
    num_update_steps_per_epoch = math.ceil(len(train_dataloader) / gradient_accumulation_steps)
    num_train_epochs = math.ceil(max_train_steps / num_update_steps_per_epoch)

    # Train!
    total_batch_size = train_batch_size * accelerator.num_processes * gradient_accumulation_steps

    logger.info("***** Running training *****")
    logger.info(f"  Num examples = {len(train_dataset)}")
    logger.info(f"  Instantaneous batch size per device = {train_batch_size}")
    logger.info(f"  Total train batch size (w. parallel, distributed & accumulation) = {total_batch_size}")
    logger.info(f"  Gradient Accumulation steps = {gradient_accumulation_steps}")
    logger.info(f"  Total optimization steps = {max_train_steps}")
    # Only show the progress bar once on each machine.
    progress_bar = tqdm(range(max_train_steps), disable=not accelerator.is_local_main_process)
    progress_bar.set_description("Steps")
    global_step = 0

    for epoch in range(num_train_epochs):
        text_encoder.train()
        for step, batch in enumerate(train_dataloader):
            with accelerator.accumulate(text_encoder):
                # Convert images to latent space
                latents = vae.encode(batch["pixel_values"]).latent_dist.sample().detach()
                latents = latents * 0.18215

                # Sample noise that we'll add to the latents
                noise = torch.randn(latents.shape).to(latents.device)
                bsz = latents.shape[0]
                # Sample a random timestep for each image
                timesteps = torch.randint(0, noise_scheduler.num_train_timesteps, (bsz,), device=latents.device).long()

                # Add noise to the latents according to the noise magnitude at each timestep
                # (this is the forward diffusion process)
                noisy_latents = noise_scheduler.add_noise(latents, noise, timesteps)

                # Get the text embedding for conditioning
                encoder_hidden_states = text_encoder(batch["input_ids"])[0]

                # Predict the noise residual
                noise_pred = unet(noisy_latents, timesteps, encoder_hidden_states).sample

                loss = F.mse_loss(noise_pred, noise, reduction="none").mean([1, 2, 3]).mean()
                accelerator.backward(loss)

                # Zero out the gradients for all token embeddings except the newly added
                # embeddings for the concept, as we only want to optimize the concept embeddings
                if accelerator.num_processes > 1:
                    grads = text_encoder.module.get_input_embeddings().weight.grad
                else:
                    grads = text_encoder.get_input_embeddings().weight.grad
                # Get the index for tokens that we want to zero the grads for
                index_grads_to_zero = torch.arange(len(tokenizer)) != placeholder_token_id
                grads.data[index_grads_to_zero, :] = grads.data[index_grads_to_zero, :].fill_(0)

                optimizer.step()
                optimizer.zero_grad()

            # Checks if the accelerator has performed an optimization step behind the scenes
            if accelerator.sync_gradients:
                progress_bar.update(1)
                global_step += 1

            logs = {"loss": loss.detach().item()}
            progress_bar.set_postfix(**logs)

            if global_step >= max_train_steps:
                break

        accelerator.wait_for_everyone()


    # Create the pipeline using using the trained modules and save it.
    if accelerator.is_main_process:
        pipeline = StableDiffusionPipeline(
            text_encoder=accelerator.unwrap_model(text_encoder),
            vae=vae,
            unet=unet,
            tokenizer=tokenizer,
            scheduler=PNDMScheduler(
                beta_start=0.00085, beta_end=0.012, beta_schedule="scaled_linear", skip_prk_steps=True
            ),
            safety_checker=StableDiffusionSafetyChecker.from_pretrained("CompVis/stable-diffusion-safety-checker"),
            feature_extractor=CLIPFeatureExtractor.from_pretrained("openai/clip-vit-base-patch32"),
        )
        pipeline.save_pretrained(output_dir)
        # Also save the newly trained embeddings
        learned_embeds = accelerator.unwrap_model(text_encoder).get_input_embeddings().weight[placeholder_token_id]
        learned_embeds_dict = {placeholder_token: learned_embeds.detach().cpu()}
        torch.save(learned_embeds_dict, os.path.join(output_dir, "learned_embeds.bin"))
Here is a rough breakdown of what is happening in the block above:
- First, we initialize our optimizer, dataset, and text_encoder and load them into accelerate.
- Next, we move the
VAEandUNETto the GPU and set them to.eval()as they aren’t to be trained. - We then recalculate our total training steps, as the size of the training data loader may have changed, and calculate our
total_batch_sizefrom thetrain_batch_sizemultiplied times the numbers of ongoing processes (machines doing training) and gradient_accumulation_steps. - Then, we run training for the
num_train_epochswe calculated from the total training steps. - For each epoch, we call train on the
text_encoderand proceed to step through each of the inputs batch by batch. - For each batch, the images are first converted to latent space. We then use these latents to generate sample noise for the diffusion process.
- We then sample a random timestamp for each image and add the sample noise at the magnitude determined by the noise at each timestamp to the latents. This is functionally known as forward diffusion.
- We then get the text embedding and use it to predict the noise residuals to calculate the loss for that step.
- Finally, we zero out the gradients for all token embeddings except the newly added embeddings for the concept. Because we only want to optimize the concept embeddings, this will prevent any confounding influence.
- We then get the index for the tokens that we want to zero the grads for, and zero the optimizer, and go on to the next loop.
- After the training loop is complete, we use S
tableDiffusionPipelineto save the model files andlearned_embeds.binfile to the directory we defined asoutput_dir.
Run training
Now that we have run and tried to understand each of the steps the code is taking to generate our embedding, we can run our training function with Accelerate to get our image embedding using the code cell below:
import accelerate

accelerate.notebook_launcher(training_function, args=(text_encoder, vae, unet), num_processes=1)
The embedding for this demo is saved to concepts/grooty-demo/learned_embeds.bin.
Run inference code with your newly trained embedding
We can use the StableDiffusionPipeline function to sample Stable Diffusion models with our newly trained image embedding. First, we need to instantiate the pipeline.
#@title Set up the pipeline
pipe = StableDiffusionPipeline.from_pretrained(
    hyperparameters["output_dir"],
    # "downloaded_embedding",
    torch_dtype=torch.float16,
    device_map="auto",
).to("cuda")
This code will initialize a StableDiffusionPipeline using the pre-trained model from a specified directory, likely containing a fine-tuned version of Stable Diffusion (such as one trained with DreamBooth or Textual Inversion). The torch_dtype=torch.float16 setting enables mixed-precision computation, which reduces memory usage and speeds up inference on compatible GPUs. The device_map="auto" option automatically assigns parts of the model to the appropriate device (e.g., GPU), optimizing performance. Finally, the .to("cuda") call explicitly moves the pipeline to the GPU, ensuring that all computations run on the CUDA-enabled device for faster processing.
#@title Run the Stable Diffusion pipeline
#@markdown Don't forget to use the placeholder token in your prompt

prompt = f"a translucent jade chinese figurine of {placeholder_token}, HDR, productshot render, Cinema4D, caustics" #@param {type:"string"}

num_samples = 5 #@param {type:"number"}
num_rows = 4 #@param {type:"number"}

# prevent safety checking
def dummy(images, **kwargs):
    return images, False
pipe.safety_checker = dummy

all_images = []
for _ in range(num_rows):
    images = pipe([prompt] * num_samples, num_inference_steps=50, guidance_scale=7.5).images
    all_images.extend(images)

grid = image_grid(all_images, num_samples, num_rows)
grid
If everything runs correctly, you should get a 5x4 grid of images like those below:
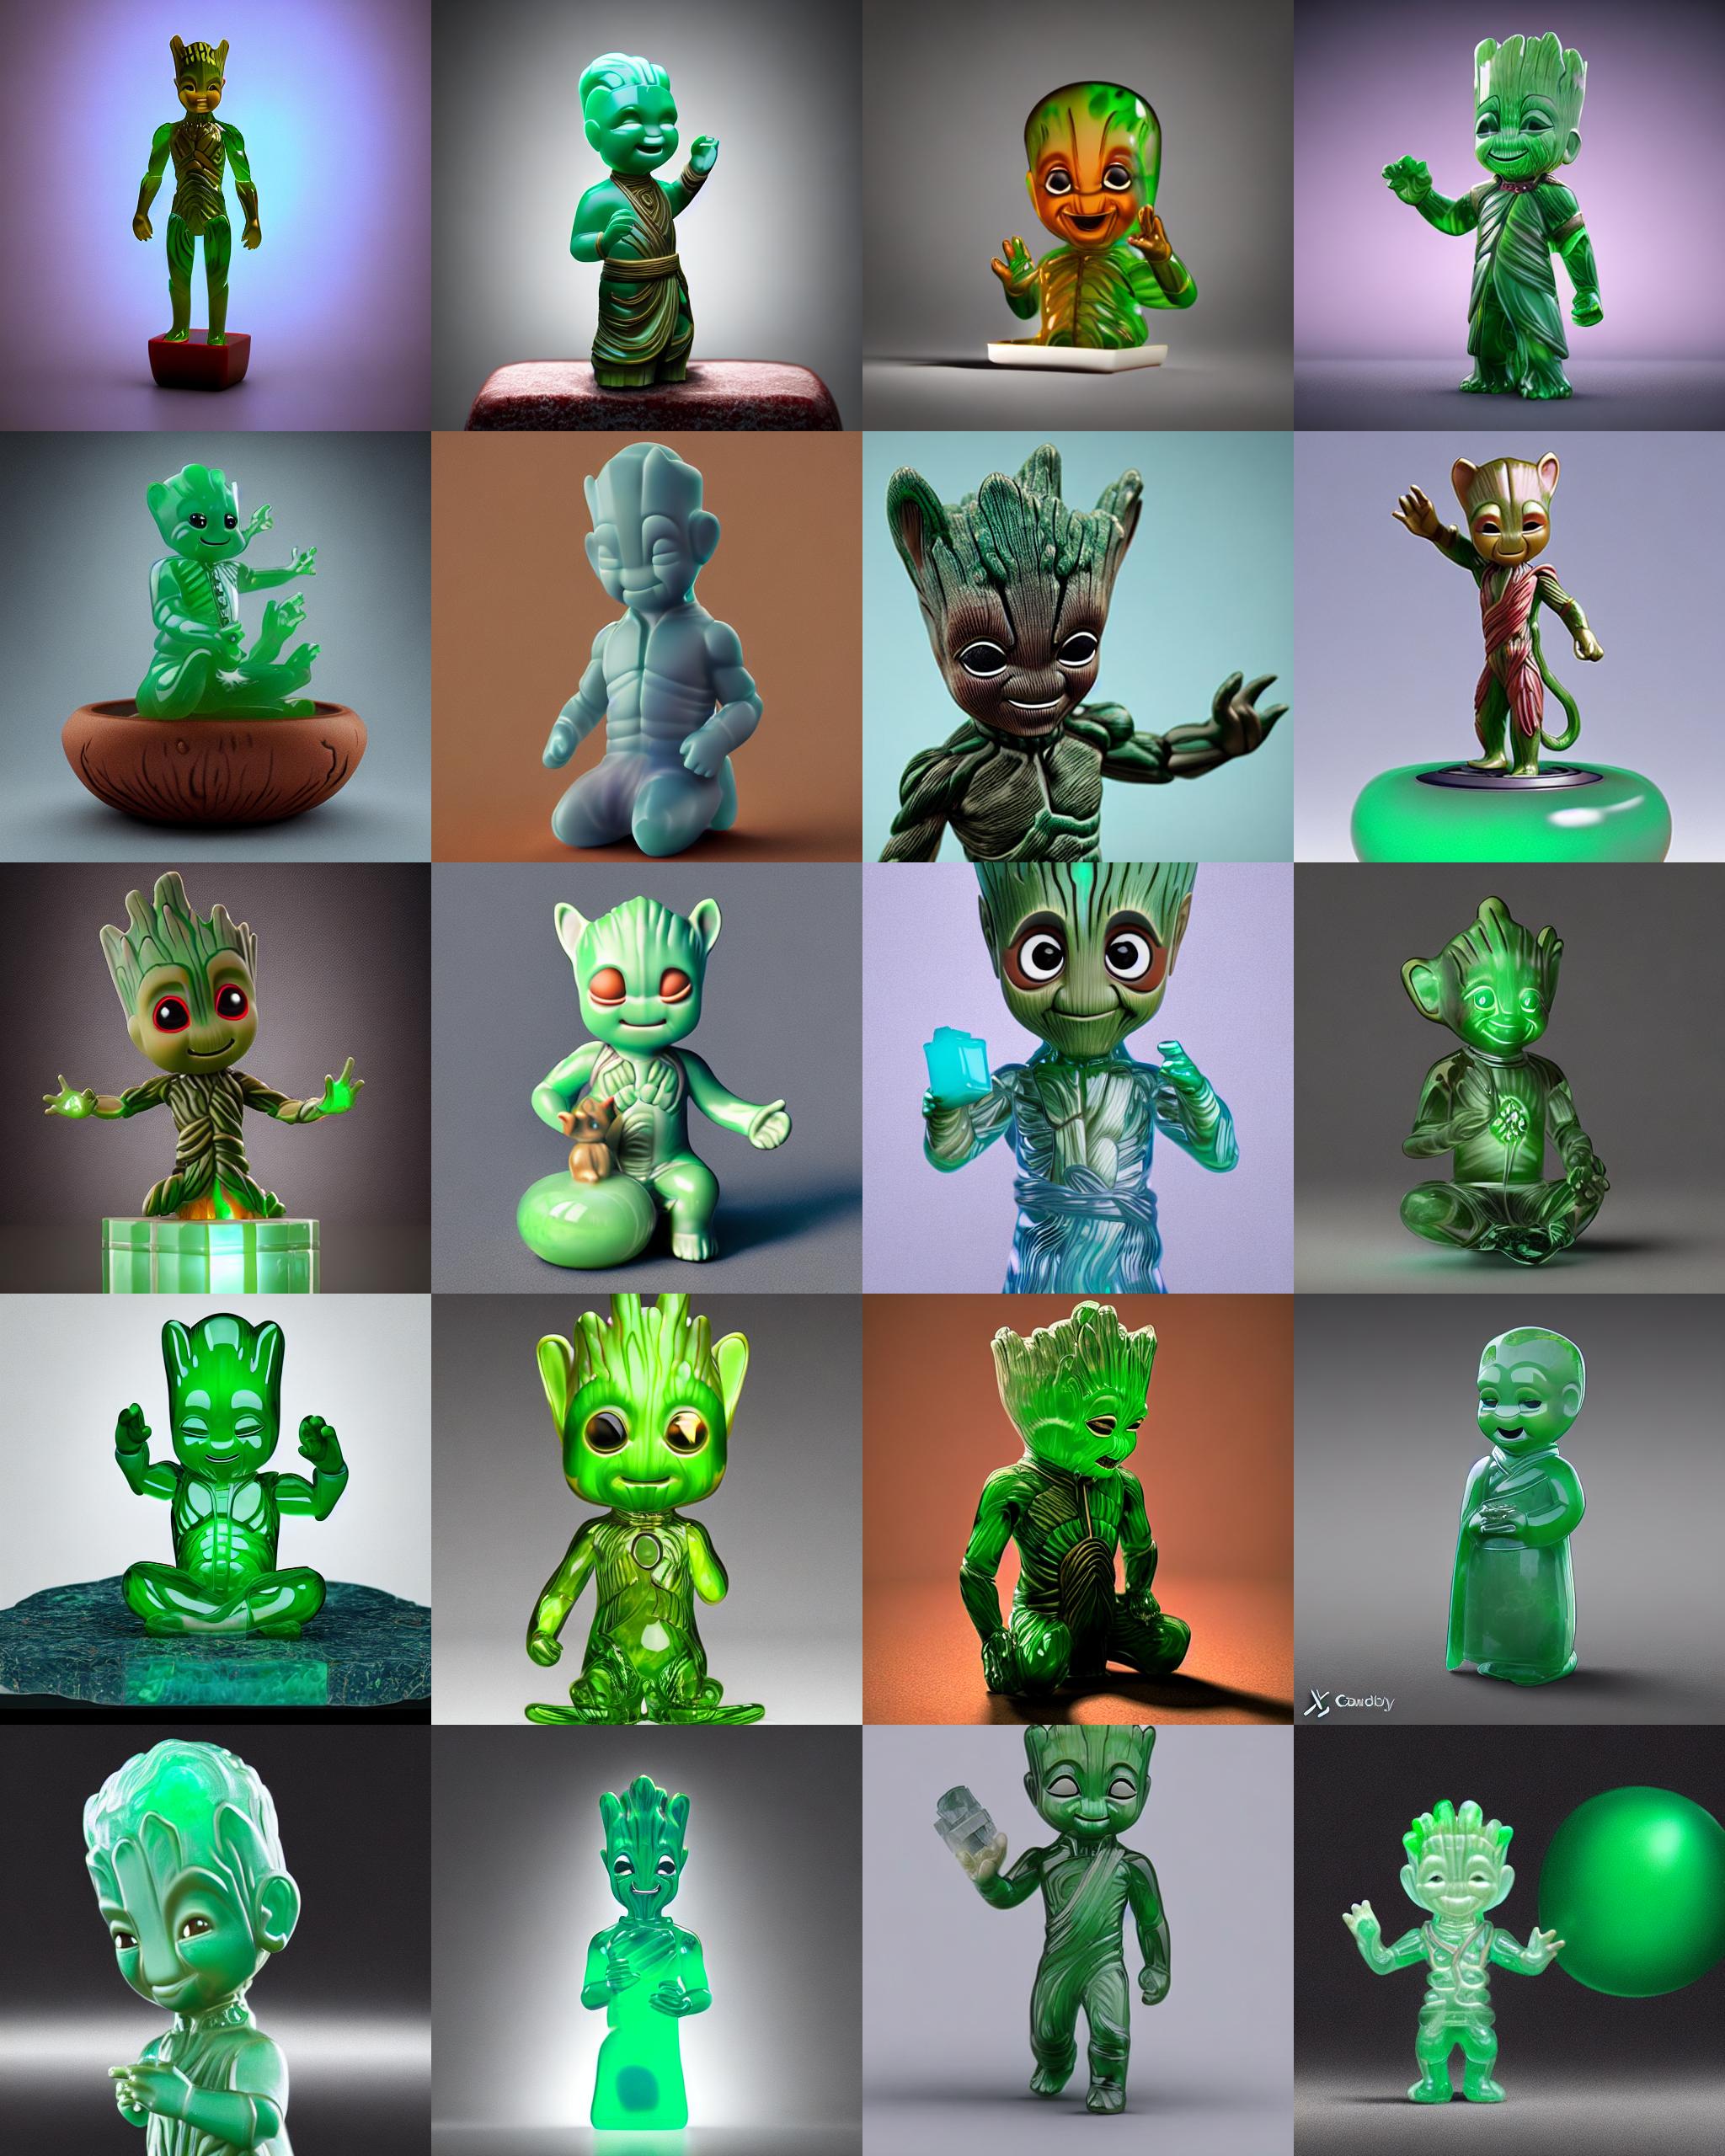
A 4x5 grid of samples from this demo
As we can see, the model has clearly been able to understand the features of the Groot toy. Notably, the large pupil-less eyes and pointy head structure came through in nearly every photo.
Try increasing or decreasing the max_train_steps variable to see how the fit of the embedding is affected by increased training. Be wary of overfitting as well, as there is a possibility that the model will become unable to generalize things like background features if there is too much consistency in the features in your image. For example, a training dataset composed of people standing outside a specific building in every photo will likely yield that building as a feature of the embedding in addition to the object.
Using our new embedding with Stable Diffusion Web UI
Now that we have our new embedding, we can also use it with our DreamBooth model trained in the last session using the Stable Diffusion Web UI. All we need to do is move it to the Web UI’s embeddings folder, and we can use this embedding with any model we have with the Web UI, including DreamBooth checkpoints.
- First, let’s locate our
learned_embed.binfile in the concept folder,concepts/grooty-concept, if you followed the demo. - Second, you will want to rename it to something reflecting your concept. I chose
grooty.bin. - Third, move the file to the Web UI’s embeddings folder.
Then, use your placeholder token in any prompt to get your embedding featured! Use the cell below to move the demo textual inversion embedding to the Stable Diffusion Web UI repo:
!mv concepts/grooty-concept/learned_embeds.bin stable-diffusion-webui/embeddings/grooty.bin
Launch the Web UI with the pre-trained embedding and Public Dataset model files
%cd stable-diffusion-webui
# launch the webui
!python launch.py --share --ckpt ../../datasets/stable-diffusion-classic/v1-5-pruned-emaonly.ckpt
Finally, we can launch the Web UI. Here, if you have saved your DreamBooth concept as well, we can now combine the effects of the two different training methods. Here is an example using the prompt “a translucent jade Chinese figurine of a grooty sks, HDR, product shot render, Cinema4D, caustics” using our toy Cat Dreambooth model. Remember that grooty represents our new image embedding, and sks prompts the Cat toy object.
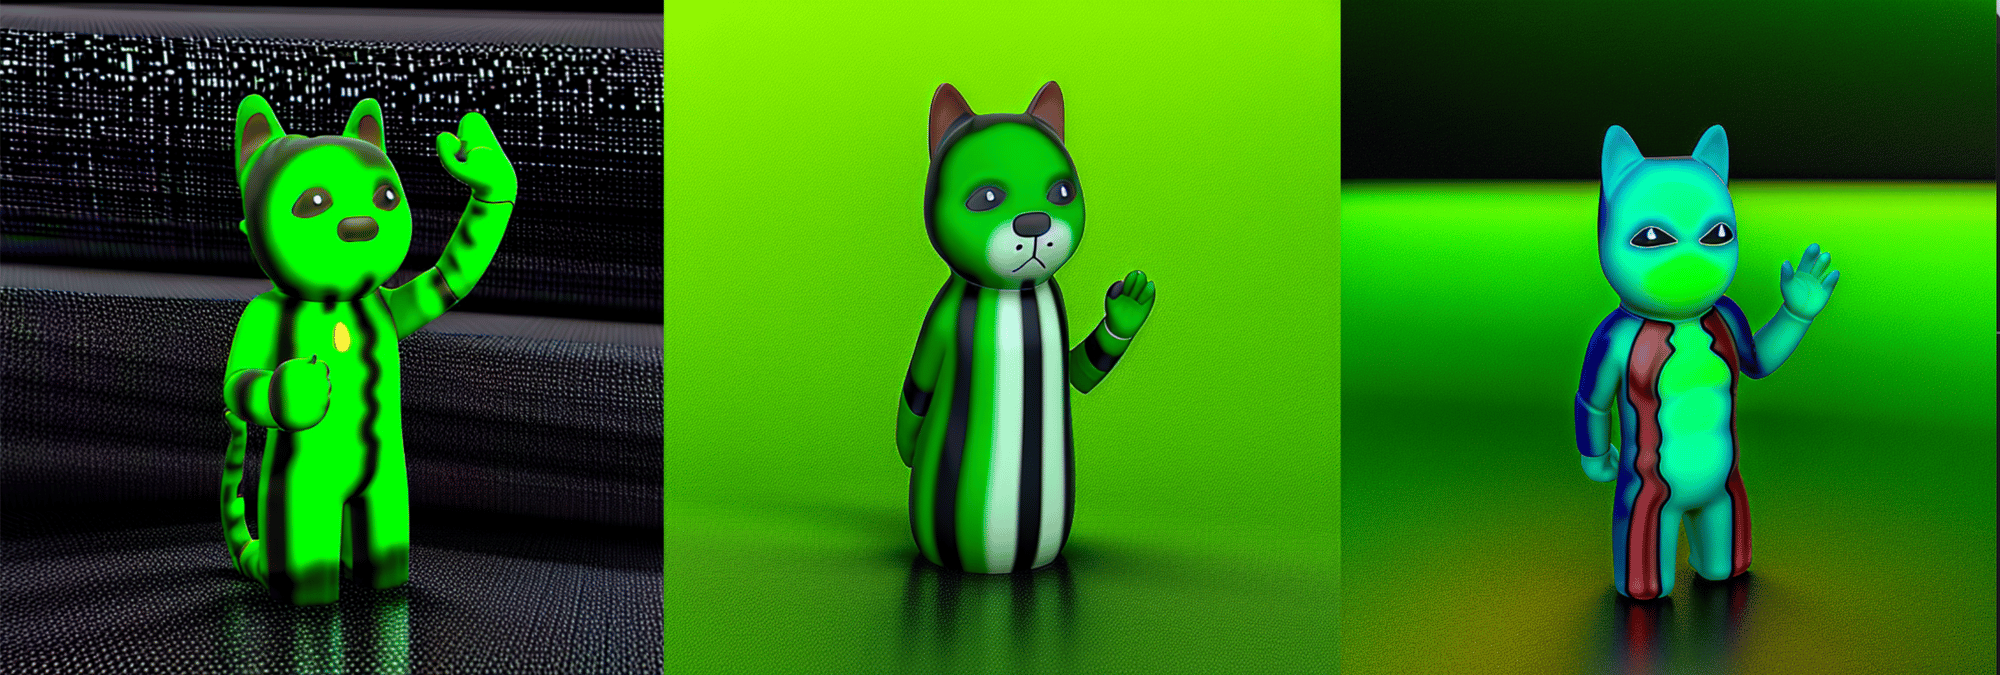
Textual Inversion on Groot toy with Dreambooth run on Cat toy
As we can see, we are getting a primary presentation of the cat toy object with distinct features like color, and the eyes and hand beginning to look more like the Groot toy. If we were to increase the weight on either prompt (which is done using parentheses “()” like around this interjection), we could increase the presentation of either feature.
Closing thoughts
In the past two articles, we explored two powerful methods for fine-tuning Stable Diffusion. The first, DreamBooth, involved full model fine-tuning to create a new checkpoint tailored to specific concepts. In this tutorial, we focused on Textual Inversion, a technique that teaches the model to associate unique concepts—like personal objects or artistic styles—with new tokens in the embedding space without altering the core model.
With this knowledge, you’re now ready to train your Textual Inversion embeddings using custom images and use them to generate outputs through both the StableDiffusionPipeline and the Stable Diffusion Web UI. For an efficient and scalable training experience, we recommend trying this on DigitalOcean GPU Droplets powered by H100 GPUs, which offer the performance needed for faster iteration and experimentation. By combining DreamBooth and Textual Inversion, you can gain the power to control your image generations and push the boundaries of what Stable Diffusion can do.
Thanks for learning with the DigitalOcean Community. Check out our offerings for compute, storage, networking, and managed databases.
About the author(s)
With a strong background in data science and over six years of experience, I am passionate about creating in-depth content on technologies. Currently focused on AI, machine learning, and GPU computing, working on topics ranging from deep learning frameworks to optimizing GPU-based workloads.
Still looking for an answer?
This textbox defaults to using Markdown to format your answer.
You can type !ref in this text area to quickly search our full set of tutorials, documentation & marketplace offerings and insert the link!
 This work is licensed under a Creative Commons Attribution-NonCommercial- ShareAlike 4.0 International License.
Become a contributor for community
Get paid to write technical tutorials and select a tech-focused charity to receive a matching donation.

DigitalOcean Documentation
Full documentation for every DigitalOcean product.

Resources for startups and AI-native businesses
The Wave has everything you need to know about building a business, from raising funding to marketing your product.
The developer cloud
Scale up as you grow — whether you're running one virtual machine or ten thousand.

Start building today
From GPU-powered inference and Kubernetes to managed databases and storage, get everything you need to build, scale, and deploy intelligent applications.
