
Introduction
The share plugin allows you to provide users with the ability to share content using native platform share dialogs.
In this article, you will build an example Flutter app that contains a list of alligators and add the ability to share the alligators with other users.
Prerequisites
To complete this tutorial, you will need:
- To download and install Flutter.
- To download and install Android Studio or Visual Studio Code.
- It is recommended to install plugins for your code editor:
This tutorial was verified with Flutter v2.0.6, Android SDK v31.0.2, and Android Studio v4.1.
Step 1 — Setting Up the Project
Once you have your environment set up for Flutter, you can run the following to create a new application:
- flutter create flutter_share_example
Navigate to the new project directory:
- cd flutter create flutter_share_example<^>
Using flutter create will produce a demo application that will display the number of times a button is clicked.
Step 2 — Adding the share Plugin
share PluginOpen pubspec.yaml in your code editor and add the following plugin:
dependencies:
  flutter:
    sdk: flutter

  share: 2.0.1
Then, save the changes to your file.
Step 3 — Scaffolding the Project
We can then go ahead and update our main.dart file to contain a HomePage found at home_page.dart:
import 'package:flutter/material.dart';
import 'home_page.dart';
void main() {
runApp(MyApp());
}
class MyApp extends StatelessWidget {
Widget build(BuildContext context) {
return MaterialApp(
title: 'Flutter Demo',
theme: ThemeData(
primarySwatch: Colors.blue,
),
home: MyHomePage(),
);
}
}
Create a new home_page.dart file and open it with a code editor. Add the following lines of code:
import 'package:flutter/material.dart';
class MyHomePage extends StatefulWidget {
MyHomePage({Key key}) : super(key: key);
_MyHomePageState createState() => _MyHomePageState();
}
class _MyHomePageState extends State<MyHomePage> {
Widget build(BuildContext context) {
return Scaffold(
appBar: AppBar(
title: Text('My favourite Alligators'),
),
body: Container(),
);
}
}
MyHomePage will be a StatefulWidget that contains an AppBar and an empty Container.
Then, save the changes to your files.
Step 4 — Creating an Example Class
Next, you will need an Alligator class that contains a name and description, we’ll use this to generate our list of alligators.
Create a new alligator_model.dart file and open it in your code editor. Add the following lines of code:
import 'package:flutter/foundation.dart';
class Alligator {
String name;
String description;
Alligator({ this.name, this.description});
}
We can then create a List<Alligator> inside of MyHomePage and display them on screen:
import 'package:flutter/material.dart';
import 'alligator_model.dart';
class MyHomePage extends StatefulWidget {
MyHomePage({Key key}) : super(key: key);
_MyHomePageState createState() => _MyHomePageState();
}
class _MyHomePageState extends State<MyHomePage> {
List<Alligator> alligators = [
Alligator(
name: 'Crunchy',
description: 'A fierce Alligator with many teeth.',
),
Alligator(
name: 'Munchy',
description: 'Has a big belly, eats a lot.',
),
Alligator(
name: 'Grunchy',
description: 'Scaly Alligator that looks menacing.',
),
];
Widget build(BuildContext context) {
return Scaffold(
appBar: AppBar(
title: Text('My favourite Alligators'),
),
body: Column(
children: alligators
.map((Alligator alligator) => Card(
child: Column(
children: <Widget>[
ListTile(
title: Text(alligator.name),
subtitle: Text(alligator.description),
),
],
),
))
.toList()
),
);
}
}
Add the List and map the contents of the List.
Step 5 — Adding the Share Functionality
In order to make it so that whenever the user clicks on a ListTile, we’ll hook into the onTap functionality, calling a share function:
import 'package:flutter/material.dart';
import 'package:share/share.dart';
import 'alligator_model.dart';
class MyHomePage extends StatefulWidget {
MyHomePage({Key key}) : super(key: key);
_MyHomePageState createState() => _MyHomePageState();
}
class _MyHomePageState extends State<MyHomePage> {
List<Alligator> alligators = [
Alligator(
name: 'Crunchy',
description: 'A fierce Alligator with many teeth.',
),
Alligator(
name: 'Munchy',
description: 'Has a big belly, eats a lot.',
),
Alligator(
name: 'Grunchy',
description: 'Scaly Alligator that looks menacing.',
),
];
share(BuildContext context, Alligator alligator) {
final RenderBox box = context.findRenderObject();
Share.share("${alligator.name} - ${alligator.description}",
subject: alligator.description,
sharePositionOrigin: box.localToGlobal(Offset.zero) & box.size);
}
Widget build(BuildContext context) {
return Scaffold(
appBar: AppBar(
title: Text('My favourite Alligators'),
),
body: Column(
children: alligators
.map((Alligator alligator) => Card(
child: Column(
children: <Widget>[
ListTile(
title: Text(alligator.name),
subtitle: Text(alligator.description),
onTap: () => share(context, alligator),
),
],
),
))
.toList()
),
);
}
}
This code will import share, define a share method, and have it called with onTap.
Note: We need to ensure that we pass in the sharePositionOrigin for iPad devices by capturing the context.findRenderObject().
Compile your code and have it run in an emulator:
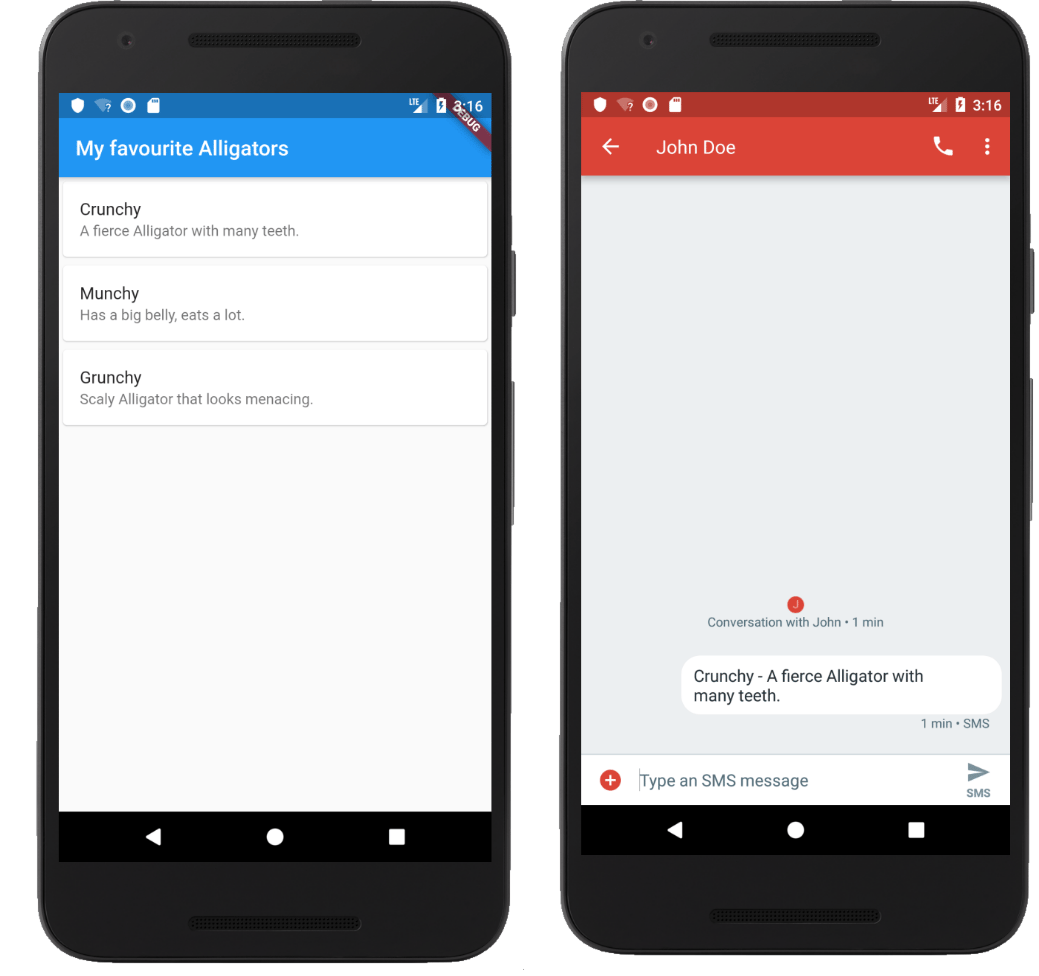
The main part of this is the Share function where we can supply a text and optional subject, which we’re using to pass this to our messaging app in this example.
Conclusion
In this article, you built an example Flutter app that contains a list of alligators and added the ability to share the alligators with other users.
If you’d like to learn more about Flutter, check out our Flutter topic page for exercises and programming projects.
Thanks for learning with the DigitalOcean Community. Check out our offerings for compute, storage, networking, and managed databases.
About the author
I create educational content over at YouTube and https://developer.school.
Still looking for an answer?
This textbox defaults to using Markdown to format your answer.
You can type !ref in this text area to quickly search our full set of tutorials, documentation & marketplace offerings and insert the link!
 This work is licensed under a Creative Commons Attribution-NonCommercial- ShareAlike 4.0 International License.
Become a contributor for community
Get paid to write technical tutorials and select a tech-focused charity to receive a matching donation.

DigitalOcean Documentation
Full documentation for every DigitalOcean product.

Resources for startups and AI-native businesses
The Wave has everything you need to know about building a business, from raising funding to marketing your product.
The developer cloud
Scale up as you grow — whether you're running one virtual machine or ten thousand.

Start building today
From GPU-powered inference and Kubernetes to managed databases and storage, get everything you need to build, scale, and deploy intelligent applications.
