
Introduction
State management involves tracking state changes throughout an application.
The provider package is one solution for state management needs.
In this article, you will learn how to apply provider to a sample Flutter application to manage state for user account information.
Prerequisites
To complete this tutorial, you will need:
- To download and install Flutter.
- To download and install Android Studio or Visual Studio Code.
- It is recommended to install plugins for your code editor:
- Familiarity with navigation and routes will be beneficial, but not required.
- Familiarity with form state will also be beneficial, but not required.
This tutorial was verified with Flutter v2.0.6, Android SDK v31.0.2, and Android Studio v4.1.
Understanding the Problem
Consider a situation where you want to build an app that customizes some of its screens with some of the user’s data, like their name. The normal methods for passing down data between screens would quickly become a tangled mess of callbacks, unused data, and unnecessarily rebuilt widgets. With a front-end library like React this is a common problem called prop drilling.
If we wanted to pass data up from any of those widgets then you need to further bloat every intermediate widget with more unused callbacks. For most small features, this may make them almost not worth the effort.
Luckily for us, the provider package allows us to store our data in a widget that is higher up, like wherever we initialize our MaterialApp, then access and change it directly from sub-widgets, regardless of nesting and without rebuilding everything in between.
Step 1 — Setting Up the Project
Once you have your environment set up for Flutter, you can run the following to create a new application:
- flutter create flutter_provider_example
Navigate to the new project directory:
- cd flutter_provider_example
Using flutter create will produce a demo application that will display the number of times a button is clicked.
Step 2 — Adding the provider Plugin
provider PluginNext up, we’ll need to add the provider plugin within our pubspec.yaml:
dependencies:
  flutter:
    sdk: flutter

  provider: ^3.1.0
Then, save the changes to your file.
Note: If you are using VS Code, you may want to consider using the Pubspec Assist extension for quickly adding dependencies.
We can now go ahead and run this on the iOS or Android simulator or device of your choice.
Step 3 — Scaffolding the Project
We’re going to need 2 screens, our router, and a navbar. We’re setting up a page to display our account data and another to update it with the state itself being stored, changed, and passed down from our router.
Open main.dart in your code editor and modify the following lines of code:
import 'package:flutter/material.dart';
import 'package:provider/provider.dart';
import './screens/account.dart';
import './screens/settings.dart';
void main() {
runApp(MyApp());
}
class MyApp extends StatelessWidget {
Widget build(BuildContext context) {
return MaterialApp(
title: 'Flutter Provider Demo',
home: MyHomePage(),
);
}
}
class MyHomePage extends StatefulWidget {
_MyHomePageState createState() => _MyHomePageState();
}
class _MyHomePageState extends State<MyHomePage> {
Widget build(BuildContext context) {
return MaterialApp(home: AccountScreen(), routes: {
'account_screen': (context) => AccountScreen(),
'settings_screen': (context) => SettingsScreen(),
});
}
}
Create a navbar.dart file and open it with your code editor:
import 'package:flutter/material.dart';
import './screens/account.dart';
import './screens/settings.dart';
class Navbar extends StatelessWidget {
Widget build(BuildContext context) {
return Container(
color: Colors.blue,
child: Row(
mainAxisAlignment: MainAxisAlignment.spaceAround,
children: <Widget>[
TextButton(
onPressed: () =>
Navigator.pushReplacementNamed(context, AccountScreen.id),
child: Icon(Icons.account_circle, color: Colors.white)
),
TextButton(
onPressed: () =>
Navigator.pushReplacementNamed(context, SettingsScreen.id),
child: Icon(Icons.settings, color: Colors.white)
),
],
),
);
}
}
In the lib directory, create a new screens subdirectory:
- mkdir lib/screens
In this subdirectory, create a settings.dart file. This will be used for creating our form state, setting a map to store our inputs, and adding a submit button that we’ll use later:
import 'package:flutter/material.dart';
import 'package:provider/provider.dart';
import '../main.dart';
import '../navbar.dart';
class SettingsScreen extends StatelessWidget {
static const String id = 'settings_screen';
final formKey = GlobalKey<FormState>();
final Map data = {'name': String, 'email': String, 'age': int};
Widget build(BuildContext context) {
return Scaffold(
bottomNavigationBar: Navbar(),
appBar: AppBar(title: Text('Change Account Details')),
body: Center(
child: Container(
padding: EdgeInsets.symmetric(vertical: 20, horizontal: 30),
child: Form(
key: formKey,
child: Column(
mainAxisAlignment: MainAxisAlignment.center,
crossAxisAlignment: CrossAxisAlignment.center,
children: <Widget>[
TextFormField(
decoration: InputDecoration(labelText: 'Name'),
onSaved: (input) => data['name'] = input,
),
TextFormField(
decoration: InputDecoration(labelText: 'Email'),
onSaved: (input) => data['email'] = input,
),
TextFormField(
decoration: InputDecoration(labelText: 'Age'),
onSaved: (input) => data['age'] = input,
),
TextButton(
onPressed: () => formKey.currentState.save(),
child: Text('Submit'),
style: TextButton.styleFrom(
primary: Colors.white,
backgroundColor: Colors.blue,
),
)
]
),
),
),
),
);
}
}
Also in this subdirectory, create an account.dart file. This will be used to display account information:
import 'package:flutter/material.dart';
import 'package:provider/provider.dart';
import '../main.dart';
import '../navbar.dart';
class AccountScreen extends StatelessWidget {
static const String id = 'account_screen';
Widget build(BuildContext context) {
return Scaffold(
bottomNavigationBar: Navbar(),
appBar: AppBar(
title: Text('Account Details'),
),
body: Center(
child: Column(
mainAxisAlignment: MainAxisAlignment.center,
children: <Widget>[
Text('Name: '),
Text('Email: '),
Text('Age: '),
],
),
),
);
}
}
Compile your code and have it run in an emulator:
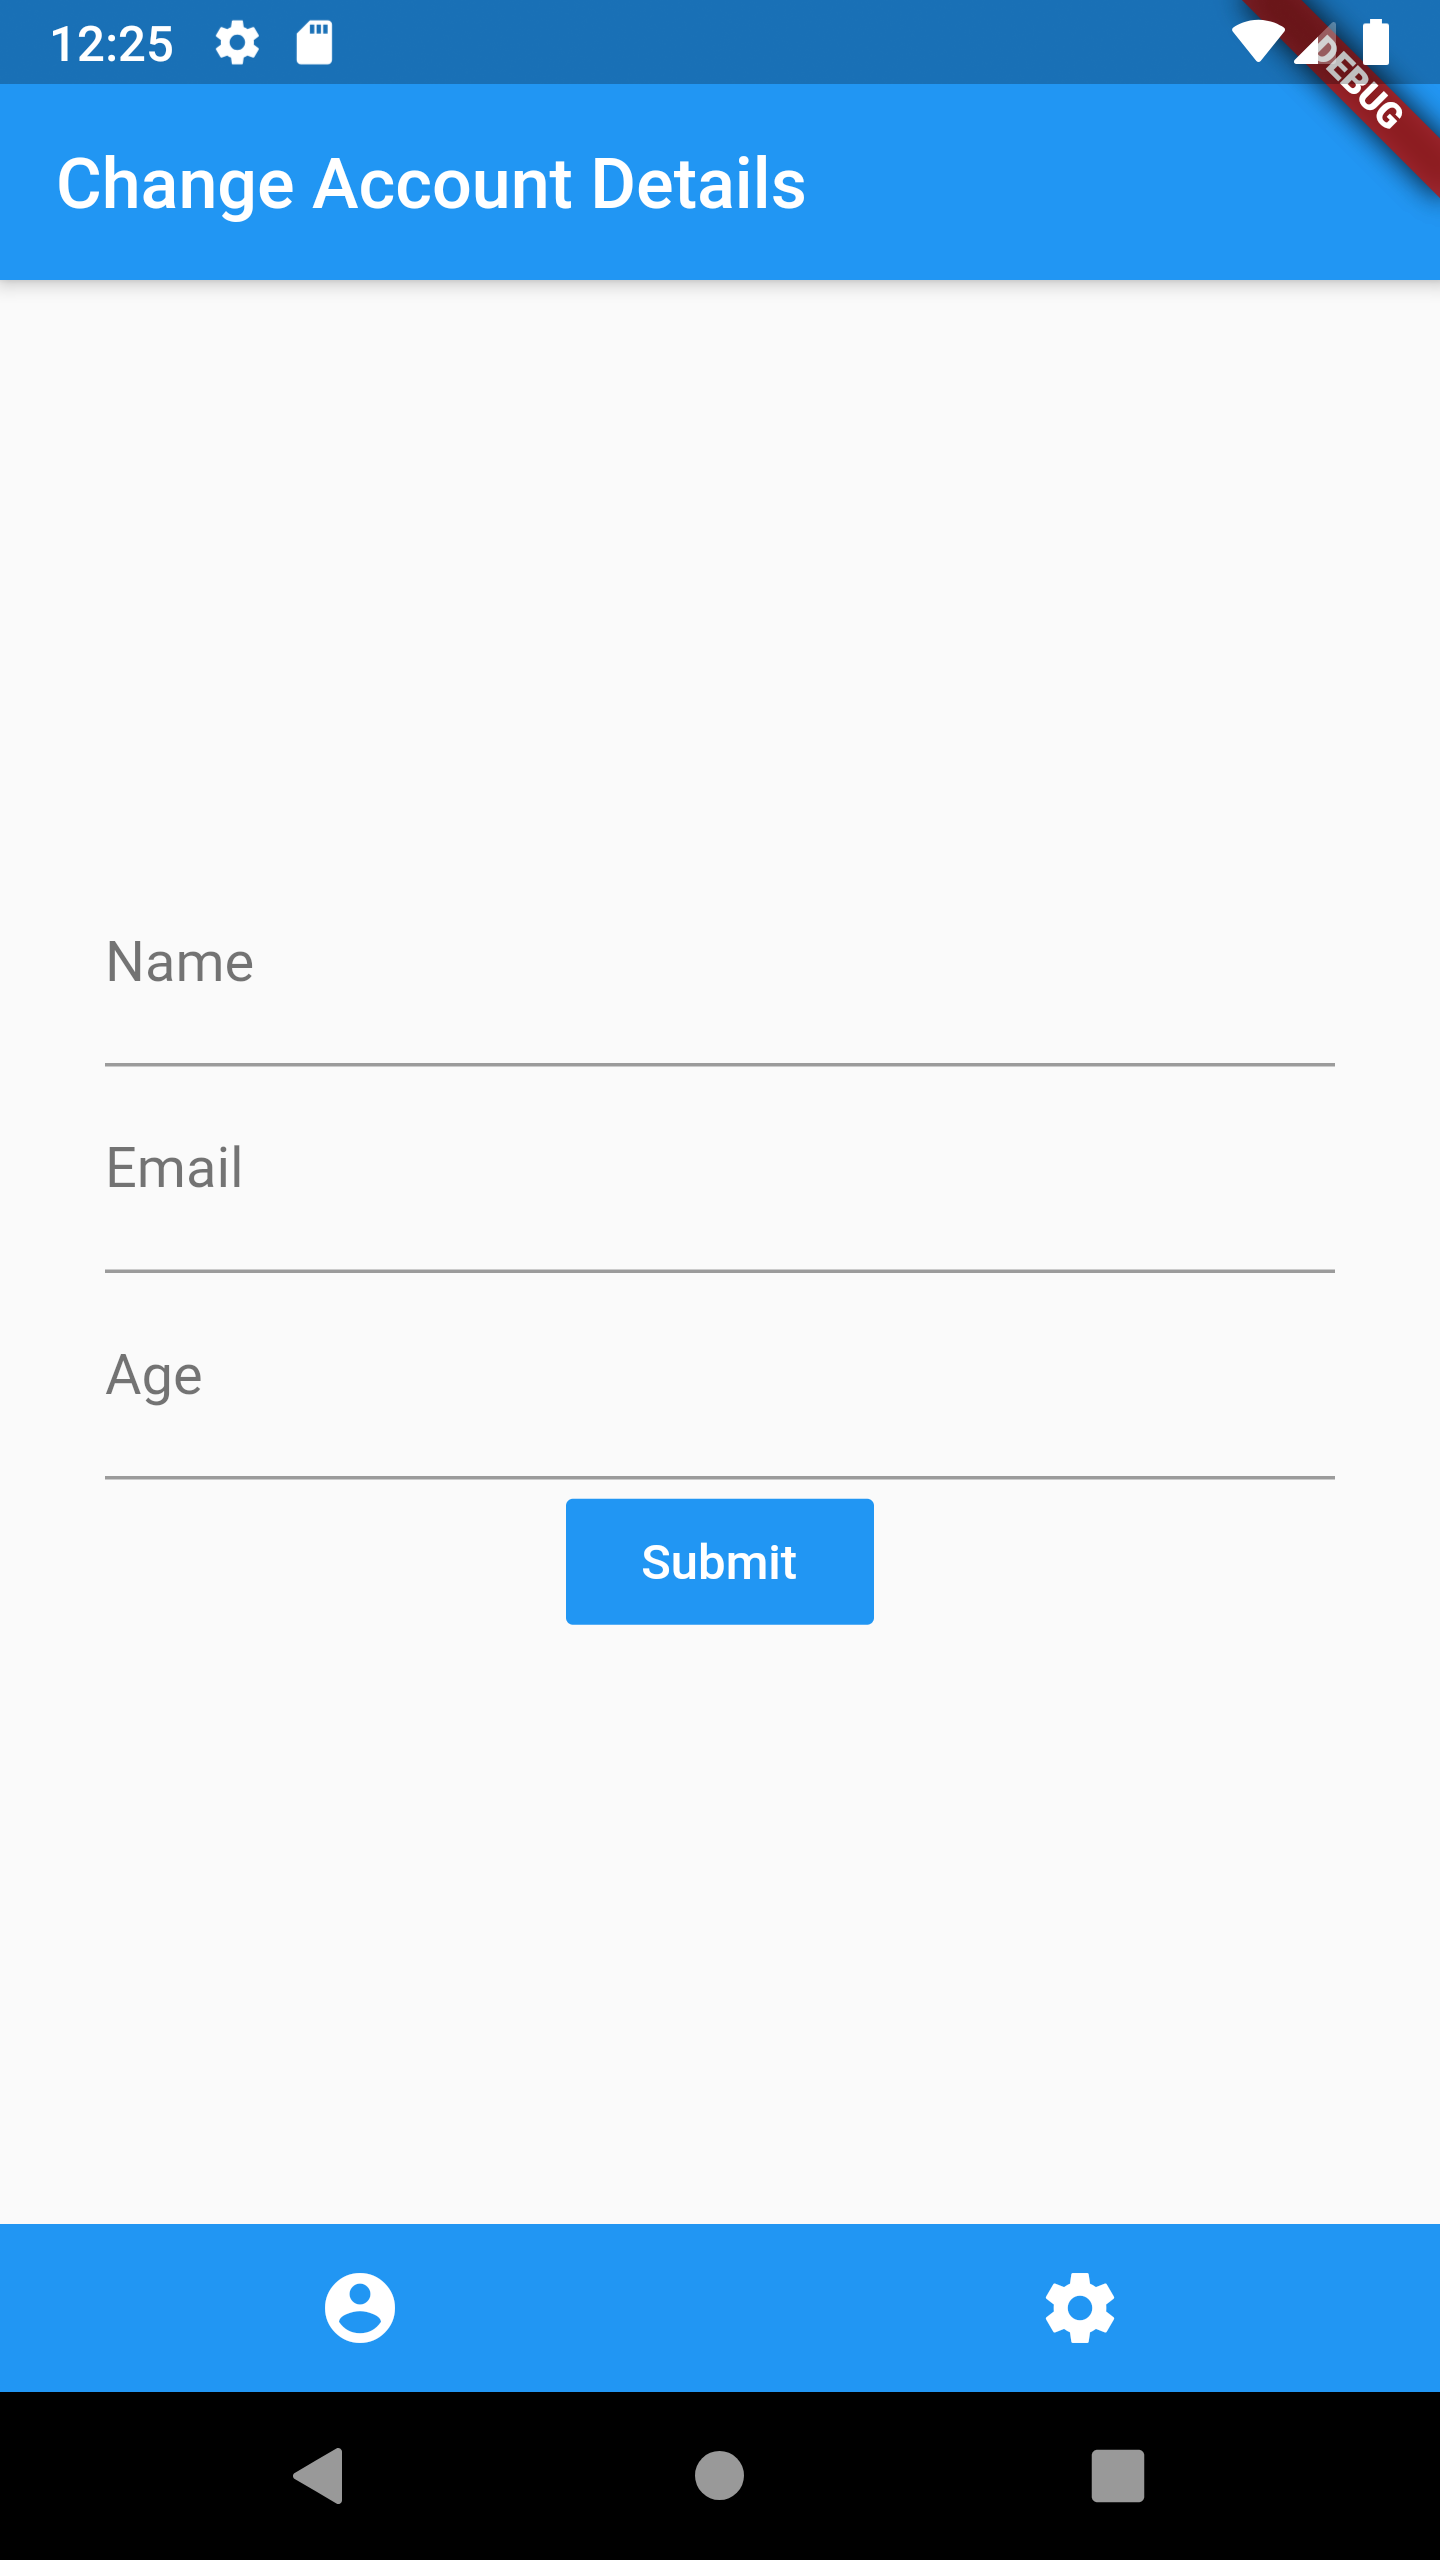
At this point, you have an application with an Account screen and a Settings screen.
Step 4 — Using Provider
ProviderSetting up a provider will require wrapping our MaterialApp in a Provider with the type of our data.
Revisit main.dart and open it in your code editor. For this tutorial, the data type is a Map. Finally, we need to set create to then use our context and data:
// ...
class _MyHomePageState extends State<MyHomePage> {
Map data = {
'name': 'Sammy Shark',
'email': 'example@example.com',
'age': 42
};
Widget build(BuildContext context) {
return Provider<Map>(
create: (context) => data,
child: MaterialApp(home: AccountScreen(), routes: {
'account_screen': (context) => AccountScreen(),
'settings_screen': (context) => SettingsScreen(),
}),
);
}
}
The data map is now available in every other screen and widget that main.dart calls and imports the provider package.
Everything we passed to our Provider creator is now available on Provider.of<Map>(context). Note that the type you pass in must match the type of data our Provider is expecting.
Note: If you are using VS Code, you may want to consider using snippets since you’ll probably be accessing provider a lot:
"Provider": {
  "prefix": "provider",
  "body": [
    "Provider.of<$1>(context).$2"
  ]
}
Revisit account.dart and open it in your code editor. Add the following lines of code:
// ...

body: Center(
  child: Column(
    mainAxisAlignment: MainAxisAlignment.center,
    children: <Widget>[
      Text('Name: ' + Provider.of<Map>(context)['name'].toString()),
      Text('Email: ' + Provider.of<Map>(context)['email'].toString()),
      Text('Age: ' + Provider.of<Map>(context)['age'].toString()),
    ]),
  ),
)

// ...
Compile your code and have it run in an emulator:
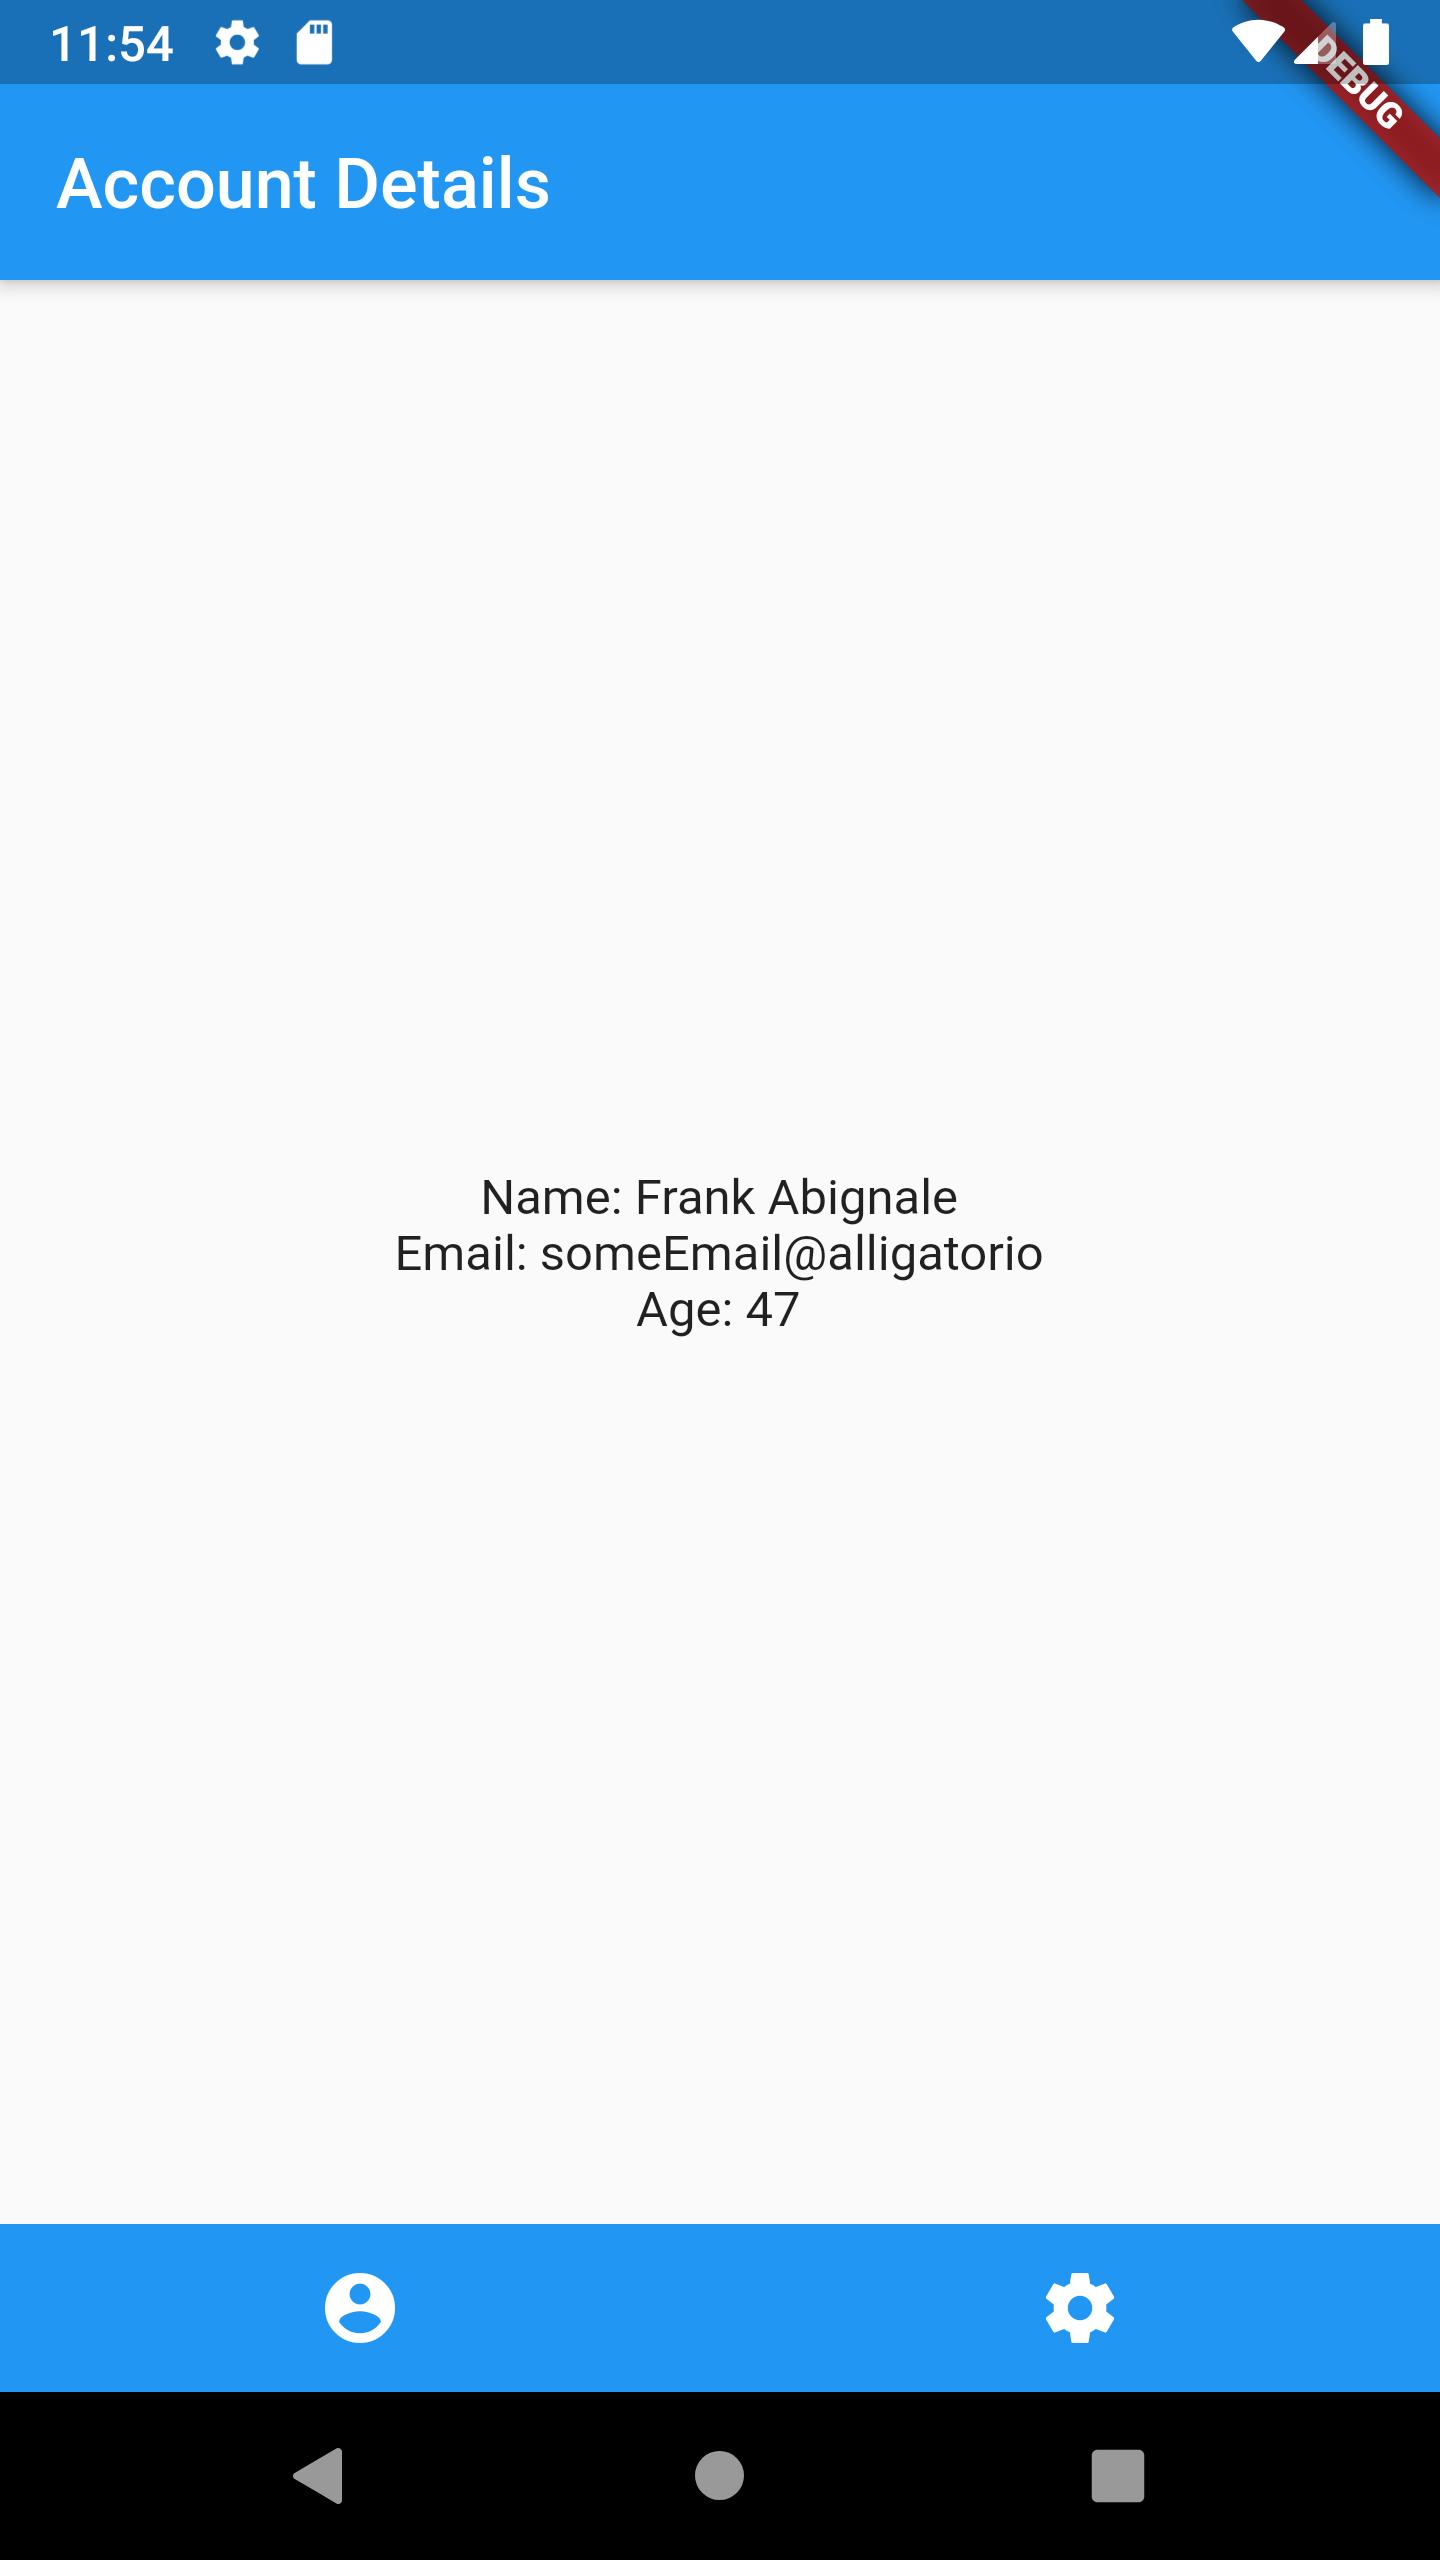
At this point, you have an application with hardcoded user data that is displayed on the Account screen.
Step 5 — Using ChangeNotifier
ChangeNotifierUsing Provider this way seems very top-down, what if we want to pass data up and alter our map? The Provider alone isn’t enough for that. First, we need to break down our data into its own class that extends ChangeNotifier. Provider won’t work with that, so we need to change it to a ChangeNotifierProvider and pass in an instance of our Data class instead.
Now we’re passing down a whole class and not just a single variable, this means that we can start creating methods that can manipulate our data, which will also be available to everything that accesses Provider.
After we change any of our global data we want to use notifyListeners, which will rebuild every widget that depends on it.
Revisit main.dart and open it in your code editor:
// ...
class _MyHomePageState extends State<MyHomePage> {
Widget build(BuildContext context) {
return ChangeNotifierProvider<Data>(
create: (context) => Data(),
child: MaterialApp(home: AccountScreen(), routes: {
'account_screen': (context) => AccountScreen(),
'settings_screen': (context) => SettingsScreen(),
}),
);
}
}
class Data extends ChangeNotifier {
Map data = {
'name': 'Sammy Shark',
'email': 'example@example.com',
'age': 42
};
void updateAccount(input) {
data = input;
notifyListeners();
}
}
Since we changed our Provider type, we need to update our calls to it. Revisit account.dart and open it in your code editor:
// ...

body: Center(
  child: Column(
    mainAxisAlignment: MainAxisAlignment.center,
    children: <Widget>[
      Text('Name: ' + Provider.of<Data>(context).data['name'].toString()),
      Text('Email: ' + Provider.of<Data>(context).data['email'].toString()),
      Text('Age: ' + Provider.of<Data>(context).data['age'].toString()),
    ]),
  ),
)

// ...
To pass data up, we will need to access the Provider use our method that was passed down in the Data class. Revisit settings.dart and open it in your code editor:
TextButton(
  onPressed: () {
    formKey.currentState.save();
    Provider.of<Data>(context, listen: false).updateAccount(data);
    formKey.currentState.reset();
  },
)
Compile your code and have it run in an emulator:

At this point, you have an application that supports updating user information on the Settings screen and displaying the changes on the Account screen.
Conclusion
In this article, you learned how to apply provider to a sample Flutter application to manage state for user account information.
If you’d like to learn more about Flutter, check out our Flutter topic page for exercises and programming projects.
Thanks for learning with the DigitalOcean Community. Check out our offerings for compute, storage, networking, and managed databases.
About the author
Still looking for an answer?
This textbox defaults to using Markdown to format your answer.
You can type !ref in this text area to quickly search our full set of tutorials, documentation & marketplace offerings and insert the link!
 This work is licensed under a Creative Commons Attribution-NonCommercial- ShareAlike 4.0 International License.
Become a contributor for community
Get paid to write technical tutorials and select a tech-focused charity to receive a matching donation.

DigitalOcean Documentation
Full documentation for every DigitalOcean product.

Resources for startups and AI-native businesses
The Wave has everything you need to know about building a business, from raising funding to marketing your product.
The developer cloud
Scale up as you grow — whether you're running one virtual machine or ten thousand.

Start building today
From GPU-powered inference and Kubernetes to managed databases and storage, get everything you need to build, scale, and deploy intelligent applications.
