
Introduction
Geddy is a full stack open source MVC framework based on ruby on rails methodology with built-in authentication module, passportjs and socket.io integration. Creating realtime secure applications in Geddy takes only a few commands; it gives a a very large set of generator commands which work through a command line interface , automating most of the non-trivial tasks such as creating models, controllers, views and even authentication or socket.io integration. In Geddy, you have to only focus on main application logic and let geddy take care of the rest.
It also supports a wide range of templates engines, with EJS being the default. You can specify the template engine for a project when creating a new project or resource.
Geddy uses Node’s built in cluster module which makes use of your multicore processor. So your node.js application is no-longer a single thread application, but leverages multiple cores automatically.
Installation
Pre-requisites to install nodejs and npm :
sudo apt-get install python-software-properties python g++ make
If you are using Ubuntu 12.10 or later , you will need to do the following as well:
sudo apt-get install software-properties-common
Add the PPA Repository, which is recommended by Joyent (the maintainers of Node.js):
sudo add-apt-repository ppa:chris-lea/node.js
Update the System package list:
sudo apt-get update
Install Node.js including npm:
sudo apt-get install nodejs
Install geddy globally along with jake
sudo npm install -g geddy
Here we install geddy globally so we can use geddy generators.
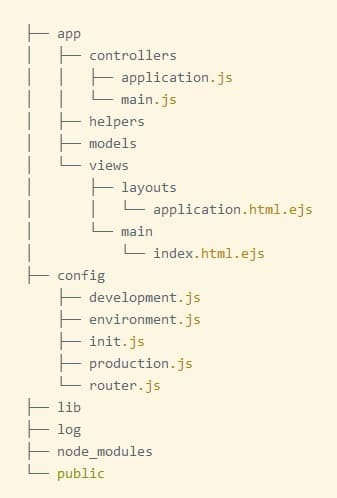
Understanding Geddy Structure
Each geddy app being based on MVC principle has a separate directory and files for each: model, controller and views.
A typical structure of geddy app is like
Geddy Generators
Geddy generators are a list of commands available to us to facilitate our development process.
Geddy gen command - It is used to generate a new app, model,controller and does various other daily development chores for you.
geddy gen app your_app
This will create a geddy app named your_app in a directory named your_app in your working directory .
geddy gen resource profile name:string
This will create a resource (model+controller+route) called “profile” with the model having a property name and of type string. If you do not mention the type, it is automatically set to string type . You can either mention your attributes here, or later manually enter them in the model file located at app/models/profile.js .
geddy gen secret
This command deletes any existing secret and creates a new secret for your application. Session Secret are used to compute hash so without the secret, access to a session would be denied, thus protecting you against session hijacking etc. This commands takes no arguments
geddy gen controller
This command creates a controller along with an index view and a route to access the controller
geddy gen model notes title:default content:string
This command generates a model with 2 string property called title and content. Here, default property is used when displaying the model. You could have done title:int:default if you wanted an integer type to be default property. In geddy, an ID property is always created and is the default property if none is mentioned. This ID matches the corresponding mongodb document created.
geddy gen scaffold personal_detail name:string
This command scaffolds a resource called personal_detail plus a mockup view of personal_detail where you can add,view, and delete individual entry from the browser itself.
When scaffolding, you also have the option to specify the template engine you want to use for the views created.You can use swig, jade, handle or mustache template engine whereas EJS is used if none is mentioned. For example:
geddy gen scaffold personal_detail --jade
Creating an App with Facebook Authentication Built In
Scaffold a sample application.
geddy gen app Edupi
Move into the directory.
cd Edupi
Scaffold passport.js based authentication into your application.
Note: You should not scaffold authentication into an old application as it may override your codes.
geddy auth
Go to developers.facebook.com and get the Secret key of your application by following the steps below.
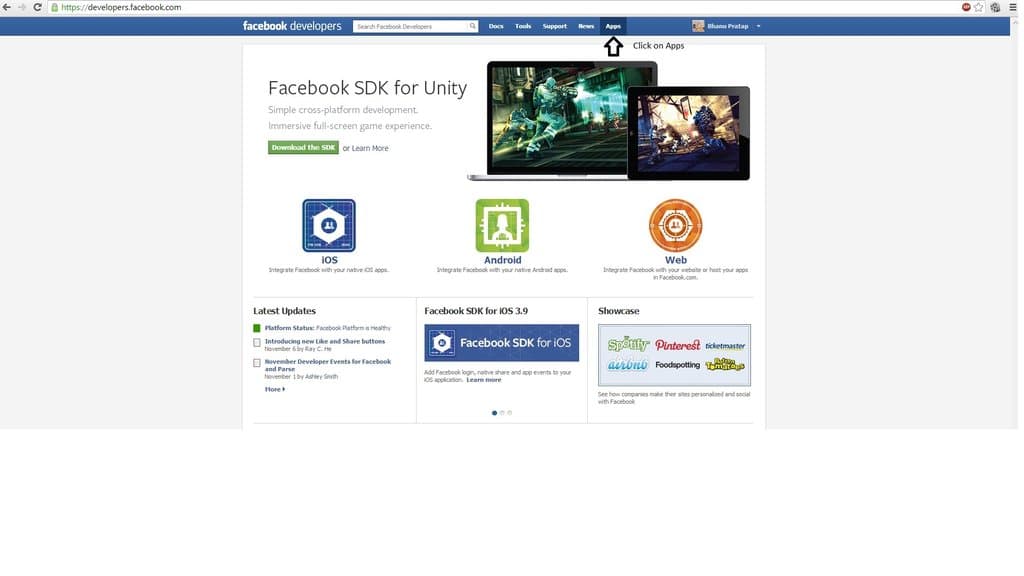
Click on Apps
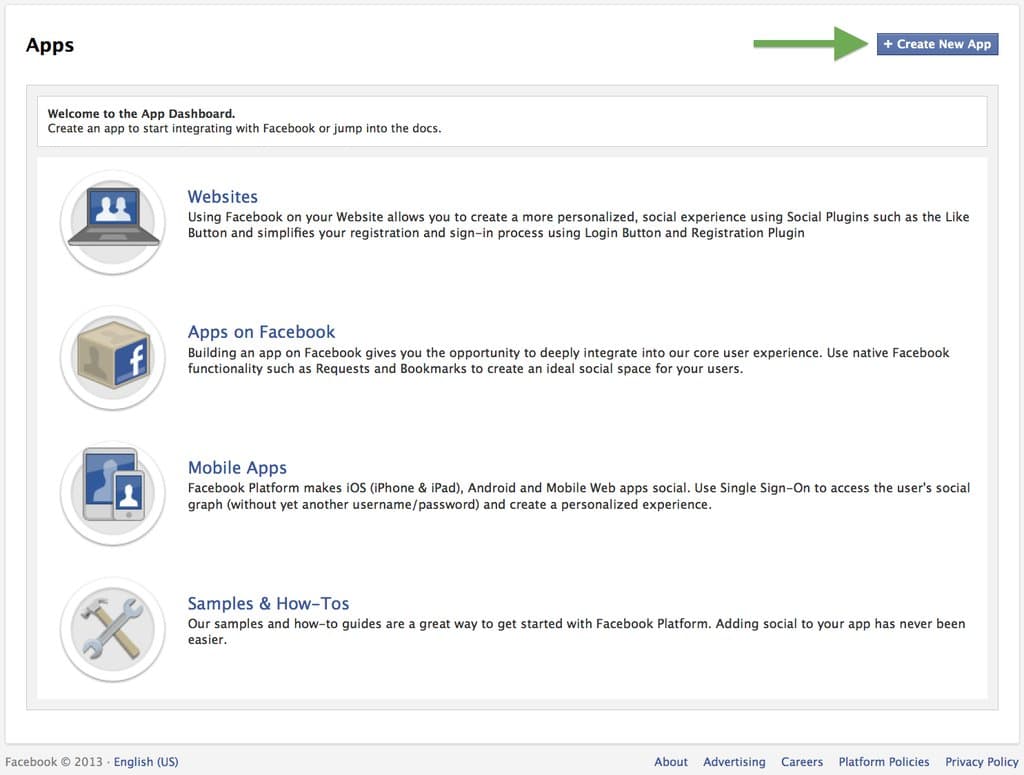
Click on Create new App (must be registered)
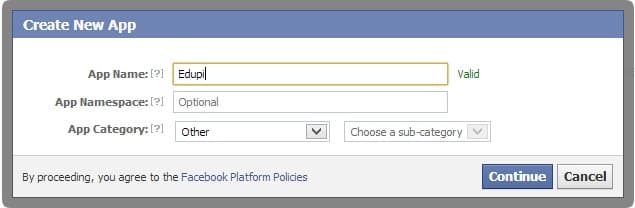
Enter the App Name and other relevant information and click on Continue.
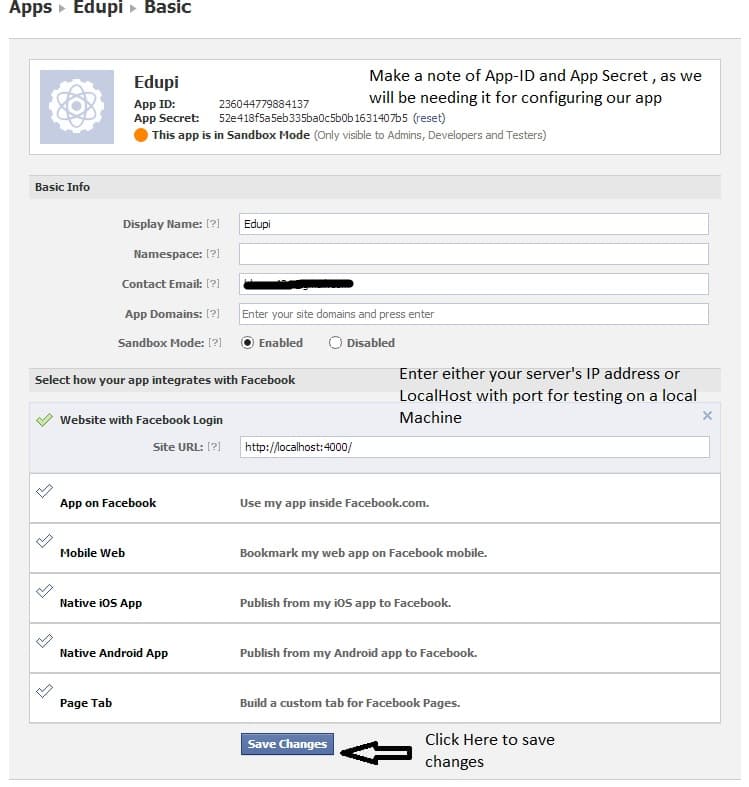
Click on Website with Facebook Login and enter the server’s url or IP. You can enter your virtual server’s IP like http://192.168.1.2:80/ or enter http://localhost:4000/ if you are testing your application on a localserver. In case you see a different Screen, Click on edit app to reach this screen.
Make a Note of the App ID and App Secret and click on save changes.
Note: You should never share your App ID and App Secret with anyone. I did it to minimize any confusion.
Now go back your server’s directory and in the Edupi Folder open config/secrets.json file.
{
	 "passport": {
"successRedirect": "/",
"failureRedirect": "/login",
"twitter": {
  "consumerKey": "XXXXXX",
  "consumerSecret": "XXXXXX"
},
"facebook": {
  "clientID": "XXXXXX",
  "clientSecret": "XXXXXX"
},
"yammer": {
  "clientID": "XXXXXX",
  "clientSecret": "XXXXXX"
}
  }
}
Here, successRedirect is the path which the User will be returned in the case of successful authorization; failure Redirect is the url where the user will be redirected if the authorization fails. Please note that you are only allowed to pass relative links. For example, setting “successRedirect”: “http://localhost:4000/login/” will return an error. You can change Both the urls in case you change the routes.
Enter AppId as clientID and App Secret as Client Secret as shown below.
{
 "passport": {
"successRedirect": "/",
"failureRedirect": "/login",
"twitter": {
  "consumerKey": "XXXXXX",
  "consumerSecret": "XXXXXX"
},
"facebook": {
  "clientID": "670657392948407",
  "clientSecret": "1beefd26e84f7e7adb4eb8a371c41af8"
},
"yammer": {
  "clientID": "XXXXXX",
  "clientSecret": "XXXXXX"
}
  }
}
You can get twitter and yammer application settings and enter as shown above to get them working. You can search them in case you have any difficulty finding them.
Now Save the File and run the server Using
geddy app
And voila , Now you have facebook integration built into you geddy application. Upon Authentication, two items get added to user’s session which are userId (mongodb ID for the user ad authtype which for this case would be facebook).
You can check against these variables in your controllers to authenticate a request before it is executed on the virtual server.
Going HTTPS in Geddy
Geddy supports HTTPS via SSL/TLS or SPDY . To enable it, just add your certificate’s details to the configuration file. Key and cert options are required whereas other options that are available for https and spdy module are optional.
To add SSL/TLS simply add the following lines to your config file:
// ...
, ssl: {
key: 'config/key.pem',
cert: 'config/cert.pem'
  }
// ...
To add support for SPDY add the follwing:
// ...
, spdy: {
key: 'config/key.pem',
cert: 'config/cert.pem'
  }
// ...
Here it is assumed that key.pem and cert.pem are placed in the config folder. And the rest is handled by geddy.
Going Into Production Mode
Create a file named app.js with the following content .
var geddy = require('geddy');

geddy.start({
environment: 'production'
});
And then use Forever to run your server that shall prevent your app from going down
TO install forever
sudo npm install forever -g
And then to start your app, go to the directory containing app.js in terminal and run
forver start app.js
And now your app will automatically start in case it crashes.
<div class=“author”>Submitted By: <a href=“https://www.google.com/+BhanuChaudharyiitk?rel=author”>Bhanu Chaudary</a></div>
Thanks for learning with the DigitalOcean Community. Check out our offerings for compute, storage, networking, and managed databases.
About the author
Still looking for an answer?
This textbox defaults to using Markdown to format your answer.
You can type !ref in this text area to quickly search our full set of tutorials, documentation & marketplace offerings and insert the link!
Awesome Intro !! Some portions here are not covered even in the official documentation of the project.
 This work is licensed under a Creative Commons Attribution-NonCommercial- ShareAlike 4.0 International License.
Become a contributor for community
Get paid to write technical tutorials and select a tech-focused charity to receive a matching donation.

DigitalOcean Documentation
Full documentation for every DigitalOcean product.

Resources for startups and AI-native businesses
The Wave has everything you need to know about building a business, from raising funding to marketing your product.
The developer cloud
Scale up as you grow — whether you're running one virtual machine or ten thousand.

Start building today
From GPU-powered inference and Kubernetes to managed databases and storage, get everything you need to build, scale, and deploy intelligent applications.
