AI Technical Writer

Introduction
AI is progressing at a lightning fast speed from simple chatbots that can answer questions or hold a basic conversation to AI chatbots that goes one step further and answer complex queries to solve a problem. This is possible with Agentic AI. Agentic AI can reason, take multi-step actions, and work more autonomously, almost like a digital assistant that doesn’t just talk, but actually gets things done. The challenge is that traditional large language model (LLM) applications fall short. They usually lack memory, can’t adapt well to new situations, and struggle to manage complex tasks that require multiple steps or tools working together.
That’s where LangGraph comes in. It’s a framework that helps developers design structured, reliable workflows for agentic systems, making AI not just smarter, but more useful in real-world scenarios.
In this article, we’ll introduce the concept of Agentic AI, explore how LangGraph makes it easier to build, and walk through the steps to help you get started on your own projects. We’ve created several tutorials on Agentic AI, all of which are available in our resources section.
Key Takeaways
- Agentic AI is the already a development of AI, moving beyond static chatbots to autonomous, reasoning-based systems that can complete multi-step tasks.
- Traditional LLM apps fall short because they lack memory, adaptability, and orchestration.
- LangGraph provides a structured framework to design agentic workflows using nodes, edges, and graphs, making agents more reliable and scalable.
- Developers can start small by building simple agents that call tools and then expand to complex, memory-driven systems.
- Deployment on platforms like DigitalOcean GPU Droplets makes scaling practical, giving agents the compute power they need for real-world use.
- Practical applications span industries, from customer support to research assistants and automated workflows.
- Getting started is easy, with Python, an API key, and LangGraph, anyone can begin building their own agentic AI.
Prerequisites
To follow along, readers should have:
-
Basic Programming Knowledge: Familiarity with Python. Understanding of LLMs: Some exposure to tools like OpenAI’s GPT or Hugging Face models.
-
Environment Setup:
-
Optional but Recommended:
- Experience with LangChain (since LangGraph builds on similar ideas).
- A DigitalOcean account (for deploying the agent).
Good to Know Concepts
- Graph: A graph is a way of representing relationships between things.
- Nodes (or vertices): These represent the “things” (e.g., cities, people, airports).
- Edges (or links): These represent the connections or relationships between those things (e.g., a flight route, friendship, or road). So a graph is basically dots (nodes) connected by lines (edges). Imagine airports and flight routes where each airport is a node (e.g., New York, London, Dubai). Each flight route is an edge connecting two nodes (e.g., New York → London).
- Graph-based Workflow: LangGraph structures agent workflows as graphs, where each node represents a step or decision point, and edges represent the flow of control or data. This makes agent behavior transparent, debuggable, and easier to extend.
Memory in Agents: Memory allows agents to maintain context across interactions. LangGraph supports different memory patterns, such as short-term (conversation-level) and long-term (persistent) memory.
Tools and Actions: Agents can be connected to external tools (APIs, databases, code execution) to expand their capabilities. LangGraph defines how and when these tools are invoked.
What is Agentic AI?
Imagine a scenario where we are asking an AI agent: “Plan me a weekend trip to Goa.”
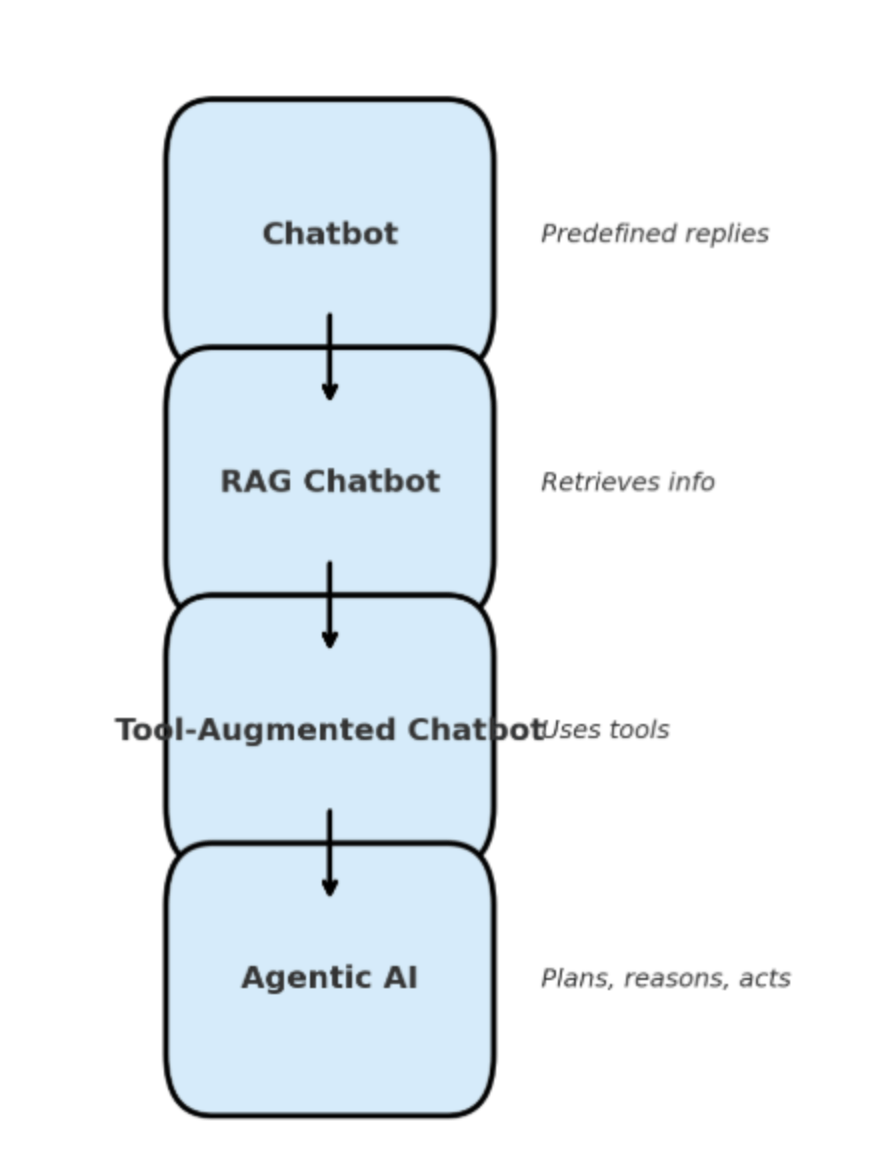
A regular chatbot might just hand you a list of popular attractions. A RAG-powered chatbot could do a bit better by pulling in fresh data and drafting a basic itinerary. But Agentic AI takes it a step further. Think of it as a problem-solving junior assistant. It doesn’t just answer questions; it can actually reason, plan, and carry out a series of steps to help you reach your goal.
In simple terms, Agentic AI can think through problems, make decisions, and take action or multiple actions rather than just giving static responses. It’s the difference between an assistant who suggests options and one who can actually help you get things done.
It starts with goal-oriented planning. The agentic AI will break this task down into smaller objectives, such as finding flights, checking hotels, checking the weather, and recommending activities.
Next comes multi-step reasoning. Suppose you add, “Make sure it’s budget-friendly and vegetarian-friendly.” Instead of giving a one-size-fits-all answer, the agentic AI can reason across steps, hence filtering hotels by price, checking restaurant options, and combining results into a personalized itinerary.
Aigentic AI can also perform autonomous decision-making between every step. If it discovers that one of the hotels is sold out, it won’t stop and wait for you to intervene. Instead, it will adjust its plan and choose the next best option automatically. It has access to external tools and knowledge bases. For example, it could query a real-time flight API, pull restaurant reviews from Google Maps, or check the weather forecast before finalizing the plan. This makes it far more dynamic than a system limited to its training data.
To understand it better, let us take an example of a traditional chatbot, which is like a hotel receptionist who can only recite memorized answers: “Breakfast is at 8 AM” or “Here’s our address.” A RAG (retrieval-augmented generation) chatbot is like a librarian: it can look up information in books or documents and summarize it for you, but it won’t act on it.
A tool-augmented chatbot is more like a calculator: it can use a specific tool to give you an answer, such as solving “What’s 378 × 56?”, but it won’t plan beyond that.
By contrast, agentic AI is like a skilled travel planner and a problem solver who listens to your request, reasons through the steps, uses external resources, adapts when things change, and delivers a complete, actionable outcome.
Now, you may ask what the difference is between an AI agent and an agentic AI system. An AI agent might be a single-purpose bot that says, one that only schedules calendar events. But an agentic AI system brings together multiple agents, memory, reasoning, and orchestration into a framework that can handle complex goals, like coordinating your calendar, booking travel, and sending reminders, all in one flow.
If you’d like to dive deeper into Agentic AI frameworks, we’ve published detailed blogs on the topic—check out the links in the resources section.
Introduction to LangGraph
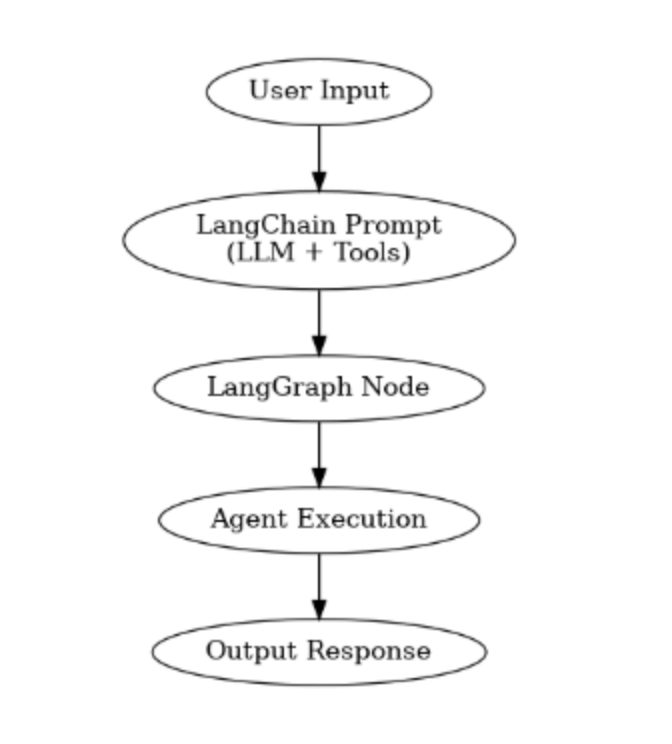
LangGraph is an open-source framework built on top of LangChain that allows developers to design AI workflows as graphs. Now, LangGraph helps developers to build agentic AI systems which are structured and develop workflows which are reliable. While most AI agents today are flexible and powerful, they often suffer from problems like unpredictability, lack of memory, or difficulty handling multi-step processes. LangGraph tackles these challenges by giving developers a way to visualize and control agent workflows as graphs—with nodes representing steps (like reasoning, tool use, or memory) and edges representing the flow of logic between them.
Instead of writing linear, step-by-step code, LangGraph lets you represent an AI system as nodes (tasks) connected by edges (decisions or transitions). This makes it easier to build agentic AI systems that can reason, adapt, and follow structured paths.
Traditional AI agents often behave unpredictably, jumping between steps without a clear structure. LangGraph solves this by:
- Supporting stateful, structured workflows where context and memory are preserved.
- Encouraging deterministic reasoning paths, making agents more reliable.
- Providing a graph-based visualization of agent flows, so developers can see exactly how the system is reasoning.
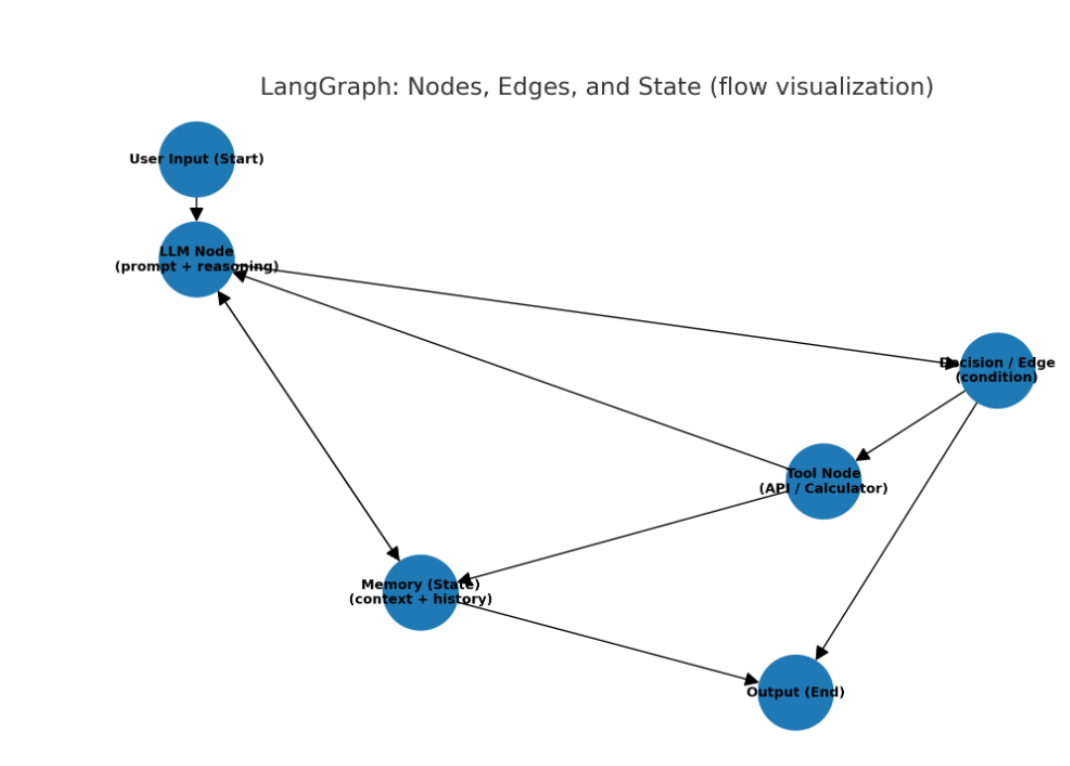
Now, the typical workflow starts with User Input, which goes to an LLM Node that performs prompt-based reasoning. A Decision/Edge node routes the flow: if the LLM decides a tool is needed, the workflow goes to a Tool Node (e.g., API or calculator) and may loop back to the LLM to continue reasoning. Throughout the process, the Memory (State) node stores context and history and is both read from and written to by the LLM and tool nodes. Finally, the workflow reaches Output (End) with the final result.
Both LangChain and LangGraph are frameworks built to help developers work with Large Language Models (LLMs), but they serve slightly different purposes.
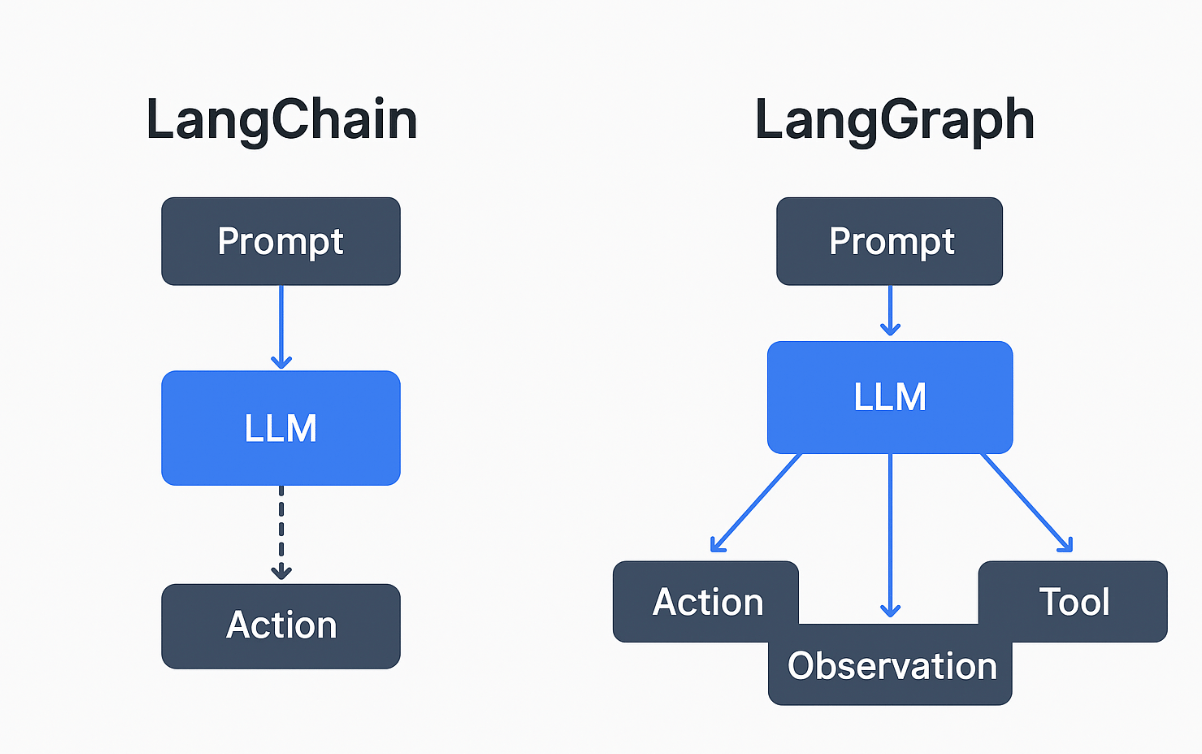
Langchain follows a linear pathway and is sometimes unreliable in multi-step agentic use cases, since it doesn’t provide a strict structure for how steps should be executed. However, LangGraph builds on top of LangChain’s concepts but is focused on structured agent workflows.
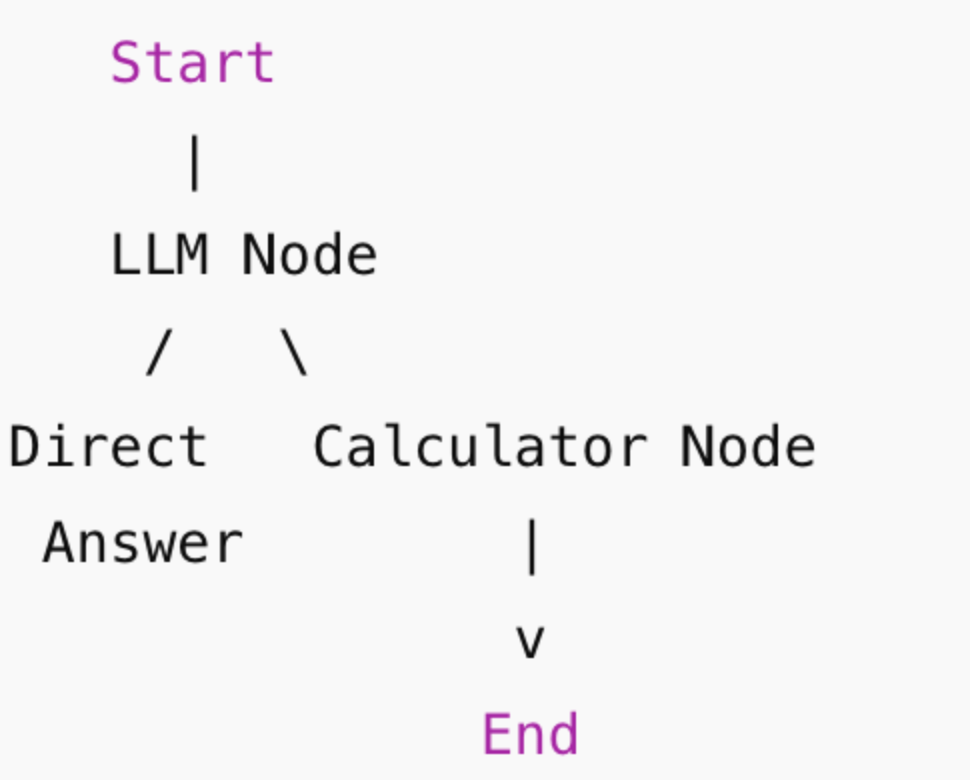
Example: Simple LangGraph Workflow
We’ll build a graph where:
- User asks a question.
- The LLM decides if it needs a tool (e.g., calculator).
- If tool needed → route to Calculator Node.
- Else → answer directly.
Finally → return result.
from langgraph.graph import StateGraph, END
from langchain_openai import ChatOpenAI
from langchain_community.tools import Calculator

# 1. Define the state
class State(dict):
    question: str
    answer: str

# 2. Initialize LLM and Tool
llm = ChatOpenAI(model="gpt-4o-mini")
calculator = Calculator()

# 3. LLM Node (decides if it needs the calculator)
def call_llm(state: State):
    q = state["question"]
    response = llm.invoke(f"Answer the question. If it's a math calculation, say 'USE_CALCULATOR: <expression>'.\n\nQuestion: {q}")

    if "USE_CALCULATOR:" in response.content:
        expression = response.content.split("USE_CALCULATOR:")[1].strip()
        return {"expression": expression}  # route to calculator node
    else:
        return {"answer": response.content}  # direct answer

# 4. Calculator Node
def use_calculator(state: State):
    result = calculator.run(state["expression"])
    return {"answer": f"Result is {result}"}

# 5. Build Graph
workflow = StateGraph(State)

# Add nodes
workflow.add_node("llm_node", call_llm)
workflow.add_node("calculator_node", use_calculator)

# Define edges
workflow.set_entry_point("llm_node")
workflow.add_conditional_edges(
    "llm_node",
    lambda state: "calculator_node" if "expression" in state else END,
    {"calculator_node": "calculator_node", END: END}
)
workflow.add_edge("calculator_node", END)

# 6. Compile Graph
app = workflow.compile()

# 7. Run with two examples
print(app.invoke({"question": "What is the capital of Japan?"})["answer"])
print(app.invoke({"question": "What is 456 * 789?"})["answer"])
- State → Holds input question, possible expression, and final answer.
- LLM Node → Answers directly, OR routes math expressions to Calculator.
- Calculator Node → Evaluates the math and returns the result.
- Graph → Uses conditional edges to decide the path dynamically.
- Run →
Input:"What is the capital of Japan?"→"Tokyo"Input:"What is 456 * 789?"→"Result is 359784"
Setting Up Your Environment for an Agentic AI Project in LangGraph
Create a DigitalOcean Account
- Sign up or log in to your DigitalOcean account.
- DigitalOcean provides GPU Droplets and other compute instances that are perfect for running agentic AI projects at scale.
Provision a Droplet
- From the DigitalOcean dashboard, create a new Droplet.
- Choose a GPU Droplet (for faster LLM inferencing) or a CPU Droplet (for lightweight workflows).
- Select your preferred OS (Ubuntu 22.04 recommended).
- Add SSH keys for secure access.
- SSH into the GPU Droplet using VS Code.
Install Python and Dependencies
Update your system and install Python 3.10+:
sudo apt update && sudo apt upgrade -y
sudo apt install python3 python3-venv python3-pip -y
Create and activate a virtual environment:
python3 -m venv langgraph-env
source langgraph-env/bin/activate
Install LangGraph and Tools
With your environment ready, install the core libraries:
pip install --upgrade pip
pip install langgraph langchain openai pygraphviz matplotlib networkx graphviz
Configure API Keys
For using OpenAI or other LLMs, set your API key:
export OPENAI_API_KEY="your_api_key_here"
Verify Installation
Run a quick test to confirm everything is working:
import langgraph
print("LangGraph version:", langgraph.__version__)
If you see the version number, your setup is complete.
Cost Optimization Tips on DigitalOcean
When experimenting with LangGraph projects, you don’t always need the largest GPU Droplet. Start with a smaller instance and scale up only when your workflows demand it. Use snapshots to save environments so you can destroy unused Droplets and recreate them later without extra setup. Also consider monitoring tools to track usage and prevent unnecessary costs.
Building Your First Agent with LangGraph
Core LangGraph concepts
- Nodes: A node is a small unit of computation: a pure Python function that reads the state and returns partial updates to the state. Nodes are the workhorses (e.g., call an LLM, call a tool, transform data).
- Edges: Edges connect nodes and determine control flow. They can be unconditional (fixed flow) or conditional (choose next node based on state). Edges let your graph branch, loop, or run nodes in parallel.
- State: The state is a schema (TypedDict / Pydantic / dataclass) representing the graph’s shared data. Nodes read state and return partial updates. Reducers control how multiple updates to the same key are merged (e.g., append messages).
- Reducers: Annotate state fields with reducer functions to control how updates combine — common for “messages” where you want to append instead of overwrite.
- Graph (Graph API): LangGraph models the workflow as a Graph (StateGraph). It exposes tooling for sequences, branches, loops, caching, retries, checkpoints, and visualization. You compile a builder into a Graph and then
invoke/streamit. - Tools & prebuilt agents: LangGraph ships prebuilt helpers (e.g.,
create_react_agent) that wire together an LLM + tool loop (ReAct-style agents). These helpers are excellent for getting started quickly. You can also assemble your own nodes + edges. - Observability & persistence: LangGraph supports checkpointers, streaming outputs, and integration with LangSmith / tracing tools for debugging long-running agents. This is what makes it production-ready for stateful, checkpointable workflows.
Let’s use LangGraph to design the agent workflows as graphs. Instead of chaining prompts linearly, LangGraph allows you to create nodes (LLMs, tools, decision logic) and edges (transitions). This makes your agent more modular, interpretable, and reliable.
Step 1: Define the State
Every agent needs memory/state so nodes can share information. For example, you may want to store:
- The user’s query
- Intermediate tool results
- Final response
# Define the state schema
from typing import TypedDict, Optional

class AgentState(TypedDict):
    query: str               # User's input
    search_results: Optional[str]   # Retrieved info from the web
    final_answer: Optional[str]     # Agent’s response
This state dictionary will be passed between nodes.
Step 2: Create Nodes
Nodes are the building blocks of the graph. Each node takes in a state and returns an updated state.
We’ll create two nodes:
- Reasoning Node (LLM): Understands the query and decides whether to search or answer directly.
- Action Node (Tool/API): Calls a search API and stores the results.
Reasoning Node (LLM)
from langchain_openai import ChatOpenAI

llm = ChatOpenAI(model="gpt-3.5-turbo", temperature=0)

def reasoning_node(state: AgentState) -> AgentState:
    query = state["query"]
    # For simplicity, if "search" keyword is in query, call tool
    if "search" in query.lower():
        print("Reasoning: Need to call search tool.")
        return {**state, "search_results": None}  # Pass to action node
    else:
        print("Reasoning: Answering directly with LLM.")
        answer = llm.invoke(query).content
        return {**state, "final_answer": answer}
Alternatively, you can utilize Ollama to access and implement various models. A tutorial demonstrating how to pull and use Ollama models is available in our resources section.
Action Node (Search API)
Here we’ll simulate a search call. In practice, you can connect to a real API (e.g., Tavily, SerpAPI).
def search_tool(query: str) -> str:
    # Dummy search tool
    return f"Results for '{query}': This is mock search output."

def action_node(state: AgentState) -> AgentState:
    query = state["query"]
    results = search_tool(query)
    print("Action: Got search results.")
    return {**state, "search_results": results}
Step 3: Connect Nodes into a Graph
We use LangGraph to wire reasoning → action → reasoning → final answer.
from langgraph.graph import StateGraph, END

# Build graph
graph = StateGraph(AgentState)

# Add nodes
graph.add_node("reasoning", reasoning_node)
graph.add_node("action", action_node)

# Define transitions
graph.set_entry_point("reasoning")              # Start here
graph.add_edge("reasoning", "action")           # If search needed → action
graph.add_edge("action", "reasoning")           # After action, return to reasoning
graph.add_edge("reasoning", END)                # End if answer ready

# Compile
agent = graph.compile()
Step 4: Run the Graph
Now let’s test with two queries:
- Without search
- With search
# Case 1: No search needed
state = {"query": "What is the capital of France?"}
result = agent.invoke(state)
print("\nFinal Answer:", result["final_answer"])

# Case 2: Search needed
state = {"query": "search latest AI news"}
result = agent.invoke(state)
print("\nSearch Results:", result["search_results"])
print("Final Answer:", result["final_answer"])
In this code example
-
Input:
"What is the capital of France?" -
Reasoning node detects no “search” → directly answers.
-
Final output:
"Paris is the capital of France." -
Input:
"search latest AI news" -
Reasoning node decides to search.
-
Action node fetches mock results.
-
Reasoning node summarizes results.
FAQ’s
1. What is Agentic AI, and how is it different from a regular chatbot?
Agentic AI refers to AI systems that can reason, plan, and make autonomous decisions rather than simply responding to prompts. Unlike a regular chatbot that only answers questions based on predefined rules or training data, an agentic AI can break down goals into smaller steps, use external tools or knowledge sources, and adjust its approach dynamically. For example, while a chatbot may only provide a static answer about a travel plan, an agentic AI can research flights, compare options, and create a full itinerary.
2. Why do I need LangGraph for building Agentic AI?
LangGraph is built on top of LangChain and provides a framework for modeling agent workflows as graphs. This structure makes your agents more reliable, predictable, and transparent. It helps solve common challenges in AI development, such as:
- Lack of memory or context retention.
- Difficulty in controlling reasoning paths.
- Debugging complex workflows.
By using nodes (actions/tools), edges (decision pathways), and state (memory), LangGraph makes it easier to build agents you can trust in production environments.
3. How is LangGraph different from LangChain?
LangChain provides powerful building blocks for LLM applications, while LangGraph adds a layer of structure on top of it. In LangChain, agents can sometimes behave unpredictably because workflows aren’t tightly controlled. LangGraph solves this by forcing workflows into a graph format with clear nodes and edges. This means developers can model deterministic reasoning paths, improving reliability and reducing unwanted behavior.
4. Do I need a lot of technical knowledge to get started with LangGraph?
Not necessarily. Basic familiarity with Python and concepts like functions or APIs will help, but LangGraph is designed to be developer-friendly. It provides clear abstractions so you don’t need to be an AI expert to begin. The framework also includes visualization tools that make it easier to understand how your agent is reasoning.
5. What are some real-world use cases of Agentic AI with LangGraph?
- Customer support agents that can resolve issues by pulling information from multiple sources.
- Research assistants that gather data, summarize findings, and present structured insights.
- Workflow automation bots that can make decisions, call APIs, and trigger different actions.
- Multi-agent systems where different specialized agents collaborate (e.g., one agent gathers financial data, another analyzes it).
6. Can I scale LangGraph agents to production environments?
Yes. Once you’ve built and tested your agent locally, you can deploy it to production using GPU-backed hosting. Platforms like DigitalOcean GPU Droplets or Paperspace provide the infrastructure needed to scale your agents for real-world applications, ensuring they can handle complex workloads efficiently.
7. How do Agentic AI systems compare with Generative AI?
Generative AI focuses on creating new content (like text, images, or audio) based on patterns in training data. Agentic AI, on the other hand, emphasizes goal-directed behavior. It uses reasoning, planning, and tools to accomplish tasks in the real world. In short, Generative AI is about “creation,” while Agentic AI is about “action.”
Conclusion
Agentic AI is a new chapter and has transformed the way we interact with AI. Instead of being limited to one-off conversations, these agents can now reason through problems, plan multi-step actions, and make autonomous decisions, making them far more useful in real-world scenarios. The capabilities such as reasoning, planning, and decision-making are turning the known large language models into true human assistants.
But building reliable, structured agents isn’t simple, and LangGraph helps us to build reliable agents.
Modeling agent workflows as graphs provides the missing structure and reliability that traditional LLM applications lack. Its nodes, edges, and state management let developers design agents that don’t just react, but can follow deterministic reasoning paths, maintain memory, and integrate with tools or external knowledge bases. In short, LangGraph helps you move from experimental prototypes to trustworthy, production-ready AI systems.
As you continue your journey, here are some practical next steps to explore:
- Experiment with different node types (tools, memory, reasoning steps) to design unique workflows.
- Push boundaries by trying multi-agent collaboration, where multiple agents interact to solve bigger challenges.
- Take your projects to scale by hosting them on GPU-backed infrastructure like DigitalOcean GPU Droplets ensuring performance and reliability in production.
Additional Resources
- LangChain Tutorials
- LangGraph Documentation
- OpenAI / Anthropic API guides
- Run LLMs with Ollama on H100 GPUs for Maximum Efficiency
- Agentic AI Frameworks for Building Autonomous AI Agents
- Building Autonomous Systems: A Guide to Agentic AI Workflows
- Setting Up the GPU Droplet Environment for AI/ML Coding - Jupyter Labs
Thanks for learning with the DigitalOcean Community. Check out our offerings for compute, storage, networking, and managed databases.
About the author
With a strong background in data science and over six years of experience, I am passionate about creating in-depth content on technologies. Currently focused on AI, machine learning, and GPU computing, working on topics ranging from deep learning frameworks to optimizing GPU-based workloads.
Still looking for an answer?
This textbox defaults to using Markdown to format your answer.
You can type !ref in this text area to quickly search our full set of tutorials, documentation & marketplace offerings and insert the link!
 This work is licensed under a Creative Commons Attribution-NonCommercial- ShareAlike 4.0 International License.
Become a contributor for community
Get paid to write technical tutorials and select a tech-focused charity to receive a matching donation.

DigitalOcean Documentation
Full documentation for every DigitalOcean product.

Resources for startups and AI-native businesses
The Wave has everything you need to know about building a business, from raising funding to marketing your product.
The developer cloud
Scale up as you grow — whether you're running one virtual machine or ten thousand.

Start building today
From GPU-powered inference and Kubernetes to managed databases and storage, get everything you need to build, scale, and deploy intelligent applications.
