By Ayoosh Kathuria and Shaoni Mukherjee

If you’re looking to get started with Reinforcement Learning, the OpenAI gym is undeniably the most popular choice for implementing environments to train your agents. A wide range of environments that are used as benchmarks for proving the efficacy of any new research methodology are implemented in OpenAI Gym, which is out of the box. Furthermore, OpenAI Gym provides an easy API to implement your environments.
In this article, I will introduce the basic building blocks of OpenAI Gym. Here is a list of things I have covered in this article.
Key takeaways:
- OpenAI Gym is a toolkit for reinforcement learning that provides a wide variety of standardized environments (from simple tasks like CartPole to complex Atari games) along with a simple interface for interacting with them, allowing researchers and developers to test and benchmark RL algorithms consistently.
- The basic usage of Gym involves creating an environment with gym.make(), resetting it (env.reset()) to get an initial state, then iteratively taking actions with env.step(action) to advance the environment and receive observations, rewards, and a done flag until the episode terminates.
- Each Gym environment defines an observation space and an action space to specify the format of inputs and outputs; for example, an environment might have a discrete action space of size N (N possible actions) and an observation space of certain dimensions, which tells your agent what kind of data it will receive and what actions it can take.
- It’s important to note that Gym by itself doesn’t provide the learning algorithm—it’s up to you (or an external library like Stable Baselines) to implement an agent that uses the observations and rewards from the environment to learn an optimal policy over time.
Prerequisites
- Python: Beginner’s Python is required to follow along
- OpenAI Gym: Access to the OpenAI Gym environment and packages
Installation
The first thing we do is to make sure we have the latest version of the gym installed.
One can either use conda or pip to install gym. In our case, we’ll use pip.
pip install -U gym
Environments
The fundamental building block of OpenAI Gym is the Env class. It is a Python class that basically implements a simulator that runs the environment you want to train your agent in. Open AI Gym comes packed with a lot of environments, such as one where you can move a car up a hill, balance a swinging pendulum, score well on Atari games, etc. Gym also provides you with the ability to create custom environments as well.
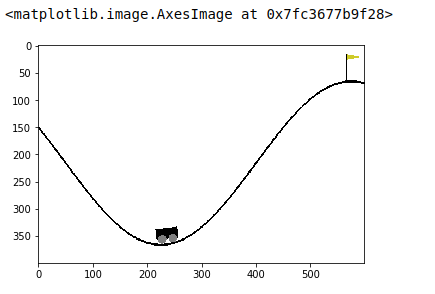
We start with an environment called MountainCar, where the objective is to drive a car up a mountain. The car is on a one-dimensional track, positioned between two “mountains”. The goal is to drive up the mountain on the right; however, the car’s engine is not strong enough to scale the mountain in a single go. Therefore, the only way to succeed is to drive back and forth to build up momentum.
The goal of the Mountain Car Environment is to gain momentum and reach the flag.
import gym
env = gym.make('MountainCar-v0')
The basic structure of the environment is described by the observation_space and the action_space attributes of the Gym Env class.
The observation_space defines the structure as well as the legitimate values for the observation of the state of the environment. The observation can be different things for different environments. The most common form is a screenshot of the game. There can be other forms of observations as well, such as certain characteristics of the environment described in vector form.
Similarly, the Env class also defines an attribute called the action_space, which describes the numerical structure of the legitimate actions that can be applied to the environment.
# Observation and action space
obs_space = env.observation_space
action_space = env.action_space
print("The observation space: {}".format(obs_space))
print("The action space: {}".format(action_space))
OUTPUT:
The observation space: Box(2,)
The action space: Discrete(3)
The observation for the mountain car environment is a vector of two numbers representing velocity and position. The middle point between the two mountains is taken to be the origin, with right being the positive direction and left being the negative direction.
We see that both the observation space as well as the action space are represented by classes called Box and Discrete, respectively. These are one of the various data structures provided by gym in order to implement observation and action spaces for different kind of scenarios (discrete action space, continuous action space, etc). We will dig further into these later in the article.
Info: DigitalOcean’s GenAI Platform offers businesses a fully-managed service to build and deploy custom AI agents. With access to leading models from Meta, Mistral AI, and Anthropic, along with essential features like RAG workflows and guardrails, the platform makes it easier than ever to integrate powerful AI capabilities into your applications.
Interacting with the Environment
In this section, we cover functions of the Env class that help the agent interact with the environment. Two such important functions are:
- reset: This function resets the environment to its initial state and returns the observation of the environment corresponding to the initial state.
- step: This function takes an action as an input and applies it to the environment, which leads to the environment transitioning to a new state. The reset function returns four things:
- observation: The observation of the state of the environment.
- reward: The reward that you can get from the environment after executing the action that was given as the input to the step function.
- done: Whether the episode has been terminated. If true, you may need to end the simulation or reset the environment to restart the episode.
- info: This provides additional information depending on the environment, such as number of lives left, or general information that may be conducive in debugging.
Let us now see an example that illustrates the concepts discussed above. We first begin by resetting the environment, then we inspect an observation. We then apply an action and inspect the new observation.
import matplotlib.pyplot as plt

# reset the environment and see the initial observation
obs = env.reset()
print("The initial observation is {}".format(obs))

# Sample a random action from the entire action space
random_action = env.action_space.sample()

# # Take the action and get the new observation space
new_obs, reward, done, info = env.step(random_action)
print("The new observation is {}".format(new_obs))
OUTPUT:
The initial observation is [-0.48235664  0.]
The new observation is [-0.48366517 -0.00130853]
In this case, our observation is not the screenshot of the task being performed. In many other environments (like Atari, as we will see), the observation is a screenshot of the game. In either of the scenarios, if you want to see how the environment looks in the current state, you can use the render method.
env.render(mode = "human")
This should display the environment in its current state in a pop-up window. You can close the window using the close function.
env.close()
If you want to see a screenshot of the game as an image, rather than as a pop-up window, you should set the mode argument of the render function to rgb_array.
env_screen = env.render(mode = 'rgb_array')
env.close()

import matplotlib.pyplot as plt
plt.imshow(env_screen)
Collecting all the little blocks of code we have covered so far, the typical code for running your agent inside the MountainCar environment would look like the following. In our case, we just take random actions, but you can have an agent that does something more intelligent based on the observations you get.
import time

# Number of steps you run the agent for
num_steps = 1500

obs = env.reset()

for step in range(num_steps):
    # take random action, but you can also do something more intelligent
    # action = my_intelligent_agent_fn(obs)
    action = env.action_space.sample()

    # apply the action
    obs, reward, done, info = env.step(action)

    # Render the env
    env.render()

    # Wait a bit before the next frame unless you want to see a crazy fast video
    time.sleep(0.001)

    # If the epsiode is up, then start another one
    if done:
        env.reset()

# Close the env
env.close()
Spaces
The observation_space for our environment was Box(2,), and the action_space was Discrete(2). These are both types of data structures called Spaces, provided by the Gym library, which describe the valid values for observations and actions in reinforcement learning environments. All of these structures inherit from the gym.Space base class.
type(env.observation_space)
# OUTPUT -> gym.spaces.box.Box
The Box(n,) space represents an n-dimensional continuous space. In our case, n = 2, so the observation space is a 2-dimensional continuous space. This space is bounded, meaning it has specified upper and lower limits for each dimension. These bounds define the range of legitimate values that observations can take and can be accessed using the high and low attributes of the Box space. These typically correspond to the maximum and minimum values of features such as positions or velocities in the environment.
print("Upper Bound for Env Observation", env.observation_space.high)
print("Lower Bound for Env Observation", env.observation_space.low)
OUTPUT:
Upper Bound for Env Observation [0.6  0.07]
Lower Bound for Env Observation [-1.2  -0.07]
You can set these upper/lower limits while defining your space, as well as when you are creating an environment.
The Discrete(n) box describes a discrete space with [0…n-1] possible values. In our case, n = 3, meaning our actions can take values of either 0, 1, or 2. Unlike Box, Discrete does not have a high and low method, since, by the very definition, it is clear what type of values are allowed.
If you try to input invalid values in the step function of our environment (in our case, say, 4), it will lead to an error.
# Works
env.step(2)
print("It works!")

# Doesn't work.
env.step(4)
print("It works!")
There are multiple other spaces available for various use cases, such as MultiDiscrete, which allow you to use more than one discrete variable for your observation and action space.
Wrappers
The Wrapper class in OpenAI Gym provides you with the functionality to modify various parts of an environment to suit your needs. Why might such a need arise? Maybe you want to normalize your pixel input, or maybe you want to clip your rewards. While typically you could accomplish the same by making another class that subclasses your environment Env class, the Wrapper class allows us to do it more systematically.
But before we begin, let’s switch to a more complex environment that will help us appreciate the utility that Wrapper brings to the table. This complex environment is going to be the the Atari game Breakout.
Before we begin, we will install the Atari components for the gym.
!pip install --upgrade pip setuptools wheel
!pip install opencv-python
!pip install gym[atari]
If you have an error to the tune of AttributeError: module ‘enum’ has no attribute ‘IntFlag’, you might need to uninstall the enum package, and then re-attempt the install.
pip uninstall -y enum34
 Gameplay of Atari Breakout
Let’s now run the environment with random actions.
env = gym.make("BreakoutNoFrameskip-v4")

print("Observation Space: ", env.observation_space)
print("Action Space       ", env.action_space)


obs = env.reset()

for i in range(1000):
    action = env.action_space.sample()
    obs, reward, done, info = env.step(action)
    env.render()
    time.sleep(0.01)
env.close()
OUTPUT:
Observation Space:  Box(210, 160, 3)
Action Space        Discrete(4)
Our observation space is a continuous space of dimensions (210, 160, 3) corresponding to an RGB pixel observation of the same size. Our action space contains 4 discrete actions (Left, Right, Do Nothing, Fire)
Now that we have our environment loaded, let us suppose we have to make certain changes to the Atari Environment. It’s a common practice in Deep RL that we construct our observation by concatenating the past k frames together. We have to modify the Breakout Environment such that both our reset and step functions return concatenated observations.
For this, we define a class of type gym. Wrapper to override the reset and return functions of the Breakout Env. The Wrapper class, as the name suggests, is a wrapper on top of an Env class that modifies some of its attributes and functions.
The __init__ function is defined with the Env class for which the wrapper is written, and the number of past frames to be concatenated. Note that we also need to redefine the observation space since we are now using concatenated frames as our observations. (We modify the observation space from (210, 160, 3) to (210, 160, 3 * num_past_frames.)
In the reset function, while we are initializing the environment, since we don’t have any previous observations to concatenate, we concatenate just the initial observations repeatedly.
from collections import deque
from gym import spaces
import numpy as np

class ConcatObs(gym.Wrapper):
    def __init__(self, env, k):
        gym.Wrapper.__init__(self, env)
        self.k = k
        self.frames = deque([], maxlen=k)
        shp = env.observation_space.shape
        self.observation_space = \
            spaces.Box(low=0, high=255, shape=((k,) + shp), dtype=env.observation_space.dtype)


def reset(self):
    ob = self.env.reset()
    for _ in range(self.k):
        self.frames.append(ob)
    return self._get_ob()

def step(self, action):
    ob, reward, done, info = self.env.step(action)
    self.frames.append(ob)
    return self._get_ob(), reward, done, info

def _get_ob(self):
    return np.array(self.frames)
Now, to effectively get our modified environment, we wrap our environment Env in the wrapper we just created.
env = gym.make("BreakoutNoFrameskip-v4")
wrapped_env = ConcatObs(env, 4)
print("The new observation space is", wrapped_env.observation_space)
OUTPUT:
The new observation space is Box(4, 210, 160, 3)
Let us now verify whether the observations are indeed concatenated or not.
# Reset the Env
obs = wrapped_env.reset()
print("Intial obs is of the shape", obs.shape)

# Take one step
obs, _, _, _  = wrapped_env.step(2)
print("Obs after taking a step is", obs.shape)
OUTPUT:

Intial obs is of the shape (4, 210, 160, 3)
Obs after taking a step is (4, 210, 160, 3)
There is more to Wrappers than the vanilla Wrapper class. Gym also provides you with specific wrappers that target specific elements of the environment, such as observations, rewards, and actions. Their use is demonstrated in the following section.
- ObservationWrapper: This helps us make changes to the observation using the observation method of the wrapper class.
- RewardWrapper: This helps us make changes to the reward using the reward function of the wrapper class.
- ActionWrapper: This helps us make changes to the action using the action function of the wrapper class.
Let us suppose that we have to make the following changes to our environment:
- We have to normalize the pixel observations by 255.
- We have to clip the rewards between 0 and 1.
- We have to prevent the slider from moving to the left (action 3).
import random

class ObservationWrapper(gym.ObservationWrapper):
    def __init__(self, env):
        super().__init__(env)

    def observation(self, obs):
        # Normalise observation by 255
        return obs / 255.0

class RewardWrapper(gym.RewardWrapper):
    def __init__(self, env):
        super().__init__(env)

    def reward(self, reward):
        # Clip reward between 0 to 1
        return np.clip(reward, 0, 1)

class ActionWrapper(gym.ActionWrapper):
    def __init__(self, env):
        super().__init__(env)

    def action(self, action):
        if action == 3:
            return random.choice([0,1,2])
        else:
            return action
Now we apply all of these wrappers to our environment in a single line of code to get a modified environment. Then, we verify that all of our intended changes have been applied to the environment.
env = gym.make("BreakoutNoFrameskip-v4")
wrapped_env = ObservationWrapper(RewardWrapper(ActionWrapper(env)))

obs = wrapped_env.reset()

for step in range(500):
    action = wrapped_env.action_space.sample()
    obs, reward, done, info = wrapped_env.step(action)

    # Raise a flag if values have not been vectorised properly
    if (obs > 1.0).any() or (obs < 0.0).any():
        print("Max and min value of observations out of range")

    # Raise a flag if reward has not been clipped.
    if reward < 0.0 or reward > 1.0:
        assert False, "Reward out of bounds"

    # Check the rendering if the slider moves to the left.
    wrapped_env.render()

    time.sleep(0.001)

wrapped_env.close()

print("All checks passed")
OUTPUT: All checks passed
In case you want to recover the original Env after applying wrappers to it, you can use the unwrapped attribute of an Env class. While the Wrapper class may look like just any other class that subclasses from Env, it does maintain a list of wrappers applied to the base Env.
print("Wrapped Env:", wrapped_env)
print("Unwrapped Env", wrapped_env.unwrapped)
print("Getting the meaning of actions", wrapped_env.unwrapped.get_action_meanings())
OUTPUT:
Wrapped Env :<ObservationWrapper<RewardWrapper<ActionWrapper<TimeLimit<AtariEnv<BreakoutNoFrameskip-v4>>>>>>
Unwrapped Env <AtariEnv<BreakoutNoFrameskip-v4>>
Getting the mean of actions ['NOOP', 'FIRE', 'RIGHT', 'LEFT']
Vectorized Environments
A lot of Deep RL algorithms (like Asynchronous Actor Critic Methods) use parallel threads, where each thread runs an instance of the environment to both speed up the training process and improve efficiency.
Now we will use another library, also called Baselines, by OpenAI. This library provides us with performant implementations of many standard Deep RL algorithms to compare any novel algorithm with. In addition to these implementations, baselines also provide us with many other features that enable us to prepare our environments in accordance with the way they were used in OpenAI experiments.
One of these features includes wrappers, which allow you to run multiple environments in parallel using a single function call. Before we begin, we first proceed with the installation of baselines by running the following commands in a terminal.
!git clone https://github.com/openai/baselines
!cd baselines
!pip install .
You may need to restart your Jupyter notebook before the installed package becomes available.
The wrapper of interest here is SubProcEnv, which will run all the environments asynchronously. We first create a list of function calls that return the environment we are running in. I have used a lambda function in code to create an anonymous function that returns the gym environment.
# get the neccasary stuff
import gym
from baselines.common.vec_env.subproc_vec_env import SubprocVecEnv

# list of envs
num_envs = 3
envs = [lambda: gym.make("BreakoutNoFrameskip-v4") for i in range(num_envs)]

# Vec Env
envs = SubprocVecEnv(envs)
This envs now acts as a single environment where we can call the reset and step functions. However, these functions now return an array of observations/actions rather than a single observation/action.
# Get initial state
init_obs = envs.reset()


# We get a list of observations corresponding to parallel environments
print("Number of Envs:", len(init_obs))

# Check out of the obs
one_obs = init_obs[0]
print("Shape of one Env:", one_obs.shape)

# prepare a list of actions and apply them to environment
actions = [0, 1, 2]
obs = envs.step(actions)
OUTPUT:
Number of Envs: 3
Shape of one Env: (210, 160, 3)
Calling the render function on the vectorized envs displays screenshots of the games in a tiled fashion.
# render the envs
import time

# list of envs
num_envs = 3
envs = [lambda: gym.make("BreakoutNoFrameskip-v4") for i in range(num_envs)]

# Vec Env
envs = SubprocVecEnv(envs)

init_obs = envs.reset()

for i in range(1000):
    actions = [envs.action_space.sample() for i in range(num_envs)]
    envs.step(actions)
    envs.render()
    time.sleep(0.001)

envs.close()
The following screen plays out.
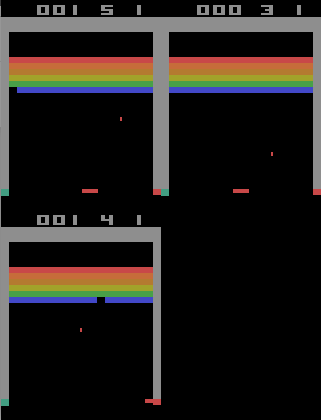
render for the SubProcEnv environment. Learn more about vectorized environments in Gym by exploring the vectorized environments documentation.
FAQ’s
Q: OpenAI Gym vs Gymnasium: which RL environment to use in 2025?
Gymnasium is the actively maintained successor to OpenAI Gym and is recommended for 2025 projects. Gymnasium provides better API design, improved documentation, enhanced environment compatibility, and regular updates. It maintains backward compatibility with most Gym code while fixing long-standing issues. OpenAI Gym is in maintenance mode with limited updates. Choose Gymnasium for new projects and consider migrating existing Gym-based projects for better long-term support and feature access.
Q: What are the best reinforcement learning algorithms for beginners in 2025?
For RL beginners in 2025, start with these algorithms: Proximal Policy Optimization (PPO) for its stability and versatility across environments. Deep Q-Networks (DQN) for discrete action spaces and conceptual simplicity. Soft Actor-Critic (SAC) for continuous control tasks with sample efficiency. Advantage Actor-Critic (A2C) for understanding policy gradient methods. Use Stable-Baselines3 for implementations - it provides well-tested, documented algorithms. Start with simple environments like CartPole or LunarLander before progressing to complex tasks. Focus on understanding the fundamental concepts (value functions, policy gradients, exploration) rather than jumping to advanced algorithms. Practice hyperparameter tuning and experiment tracking with tools like Weights & Biases.
Q: How to benchmark and evaluate reinforcement learning agents effectively?
Effective RL evaluation requires systematic approaches:
- Multiple random seeds (10-30 runs) to account for training variance and ensure statistical significance.
- Learning curves tracking cumulative reward, episode length, and success rate over training steps.
- Evaluation episodes separate from training with deterministic policies to measure true performance. Statistical testing using confidence intervals and significance tests for algorithm comparisons.
- Standardized benchmarks like Atari, MuJoCo, or domain-specific suites for reproducible results.
- Hyperparameter sensitivity analysis to understand robustness.
- Use tools like Weights & Biases or TensorBoard for experiment tracking.
- Report both sample efficiency and final performance.
- Consider human-interpretable metrics beyond reward scores for real-world applications.
Conclusion
Given what we’ve covered so far, you should now be able to start training your reinforcement learning agents using environments from OpenAI Gym. But what if the environment you need isn’t readily available? You’re in luck for a couple of reasons! First, OpenAI Gym allows you to create custom reinforcement learning environments. Second, that’s exactly what we have covered in Part 2 of this series. Until then, enjoy exploring the world of reinforcement learning with OpenAI Gym environments!
Thanks for learning with the DigitalOcean Community. Check out our offerings for compute, storage, networking, and managed databases.
About the author(s)
With a strong background in data science and over six years of experience, I am passionate about creating in-depth content on technologies. Currently focused on AI, machine learning, and GPU computing, working on topics ranging from deep learning frameworks to optimizing GPU-based workloads.
Still looking for an answer?
This textbox defaults to using Markdown to format your answer.
You can type !ref in this text area to quickly search our full set of tutorials, documentation & marketplace offerings and insert the link!
 This work is licensed under a Creative Commons Attribution-NonCommercial- ShareAlike 4.0 International License.
Become a contributor for community
Get paid to write technical tutorials and select a tech-focused charity to receive a matching donation.

DigitalOcean Documentation
Full documentation for every DigitalOcean product.

Resources for startups and AI-native businesses
The Wave has everything you need to know about building a business, from raising funding to marketing your product.
The developer cloud
Scale up as you grow — whether you're running one virtual machine or ten thousand.

Start building today
From GPU-powered inference and Kubernetes to managed databases and storage, get everything you need to build, scale, and deploy intelligent applications.
