By Saleh Salem

Introduction
ngx_pagespeed is simply a module that is added to nginx web server to speed up websites by reducing the time an internet browser takes to load web pages – <a href=“https://developers.google.com/speed/pagespeed/module"target="_blank”>click here</a> for more technical information.
Building a custom nginx package
Nginx does not support what is called “Dynamic Loading of Modules”, which basically gives you the freedom of adding plug-ins or modules to a software after it’s been installed. By the way, this is in no way a bug in nginx or shortcoming from its developers; however, its advantages which are outside the scope of this tutorial. So the only way to add modules to nginx is by adding them during compile-time. In this tutorial, you are going to add ngx_pagespeed module to nginx by building it from Debian wheezy backport source, because Debian backports repository has a more recent nginx version than the stable repository, which is at the time of writing this tutorial version 1.4.4. For more information about Debian Backports, just visit its official page at backports.debian.org.
First: Add Debian wheezy backports repository
By default, Debian wheezy doesn’t include backports repository in the system, so we must add it ourselves by following these steps:
- Open “sources.list” file in your favorite text editor in your system:
<pre>sudo vim /etc/apt/sources.list</pre>
- Append the following two lines, which point to Debian backports repository, to the end file at its end (making sure each one is inserted into a separate line):
<pre>[…] deb http://ftp.uk.debian.org/debian wheezy-backports main deb-src http://ftp.uk.debian.org/debian wheezy-backports main</pre>
- Update Debian repositories package lists:
<pre>sudo apt-get update</pre>
Tip
You can replace the uk mirror with the mirror closest to you; for a list of all Debian mirrors, <a href=“http://www.debian.org/mirror/list"target="_blank”>click here</a>.
Second: Download nginx backport source package & build dependencies
Now that you have added the backports repository to your system, it’s time to download nginx backport source package. Before you do that, though, you must download and install a few prerequisite packages to help you build the custom nginx package:
- Install Debian essential building packages which is, as the name indicates, essential to build any Debian package on the system:
<pre>sudo apt-get install dpkg-dev build-essential zlib1g-dev libpcre3 libpcre3-dev unzip</pre>
- Install nginx build dependencies from the backports repository; and since backports repository is deactivated by default, you must specify that explicitly to apt:
<pre>sudo apt-get -t wheezy-backports build-dep nginx</pre>
Now that you have fulfilled the prerequisites, you can start downloading the nginx source package from the backports repository:
- First of all, let’s create a folder in our home directory to download the nginx source package into:
<pre> cd ~ mkdir custom-nginx-1.4.4 # or choose whatever folder name you like cd custom-nginx-1.4.4</pre>
- Download the nginx package source:
<pre>sudo apt-get -t wheezy-backports source nginx</pre>
Third: Prepare & modify nginx source package
Let’s list the content of the folder that you’ve downloaded the source package into:
<pre>ls -la</pre>
You should see three files and one folder which is the folder that the files were extracted to:
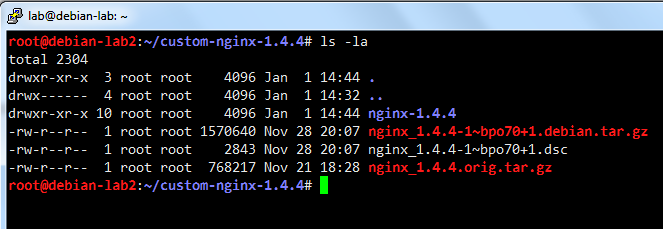
As you can in the picture, the version of nginx backport source package is 1.4.4 at the time of writing this tutorial. To start adding ngx_pagespeed module, you need first to go to the module folder within the extracted folder “nginx-1.4.4”:
<pre>cd nginx-1.4.4/debian/modules</pre>
Once you are in the module folder, execute the following command lines (which is quoted from ngx <a href=“https://github.com/pagespeed/ngx_pagespeed"target="_blank”>official page</a>; so make sure to check if a new version is released before proceeding):
<pre> wget https://github.com/pagespeed/ngx_pagespeed/archive/v1.7.30.1-beta.zip unzip v1.7.30.1-beta.zip cd ngx_pagespeed-1.7.30.1-beta/ wget https://dl.google.com/dl/page-speed/psol/1.7.30.1.tar.gz tar -xzvf 1.7.30.1.tar.gz</pre>
Now, you have added ngx_pagespeed module successfully to the module folder of the nginx source package ready to be build with the other nginx modules. But before you can do that, there are two more crucial steps you have to finish:
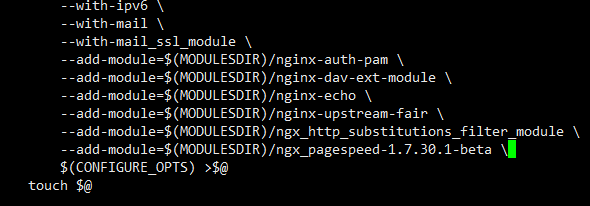
- Edit the rules file, located in the debian folder:
<pre>sudo vim ~/custom-nginx-1.4.4/nginx-1.4.4/debian/rules</pre>
In this file, you will find four config.status blocks (config.status.full, config.status.light, config.status.extras, config.status.naxsi); with each block of them ending with (CONFIGURE_OPTS) >@. All you have to do is add --add-module=$(MODULESDIR)/ngx_pagespeed-1.7.30.1-beta \ to each of the four blocks, right before the (CONFIGURE_OPTS) >@ line, then save the changes:
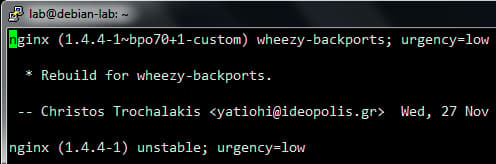
- Increase the source package version, since this will help you pin the package later. To achieve this, open the changelog file with a text editor:
<pre>sudo vim ~/custom-nginx-1.4.4/nginx-1.4.4/debian/changelog</pre>
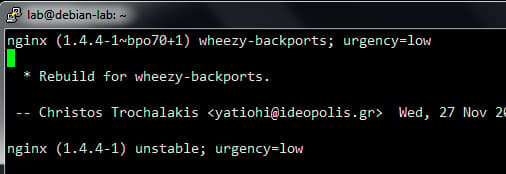
The first line of the changelog file represents the current package version (1.4.4-1~bpro70+1) and distribution (wheezy-backports), just add your nickname or whatever you like at the end of the version number preceded by a hyphen:
Fourth: Build the custom nginx package
Now, it’s time to build your custom package that includes ngx_pagespeed module. But since building this package is going to take at least 10 minutes (depending on the speed of your machine), we’ll use an application called Screen, which is simply a terminal inside your regular terminal window. But unlike regular terminal, screen keeps the processes running under your current shell session alive after losing the connection to it. This means if you lose connection to your shell session during building a package (specially those that take time), you won’t have to start all over again. For more information on how to use screen, read this nice tutorial <a href=“https://www.digitalocean.com/community/articles/how-to-install-and-use-screen-on-an-ubuntu-cloud-server"target="_blank”>here</a>.
After creating a “screen session”, let’s start building the package:
<pre> cd ~/custom-nginx-1.4.4/nginx-1.4.4 sudo dpkg-buildpackage -b</pre>
You can now let the package building tools do their job while you stretch.
Once the command prompt appears again, you know that the building process is finished. Now the generated packages are located right outside the source package folder:
<pre> cd ~/custom-nginx-1.4.4 ls -la</pre>
You should see something similar to the following:
<pre>root@debian-lab2::~/custom-nginx-1.4.4# ls -la total 72052 drwxr-xr-x 3 root root 4096 Dec 28 13:35 . drwxr-xr-x 4 root root 4096 Dec 27 03:51 … drwxr-xr-x 10 root root 4096 Dec 28 13:34 nginx-1.4.4 -rw-r–r-- 1 root root 78168 Dec 28 13:34 nginx-common_1.4.4-1~bpo70+1-custom_all.deb -rw-r–r-- 1 root root 79988 Dec 28 13:34 nginx-doc_1.4.4-1~bpo70+1-custom_all.deb -rw-r–r-- 1 root root 26144390 Dec 28 13:35 nginx-extras-dbg_1.4.4-1~bpo70+1_amd64.deb -rw-r–r-- 1 root root 3481982 Dec 28 13:35 nginx-extras_1.4.4-1~bpo70+1-custom_amd64.deb -rw-r–r-- 1 root root 24335692 Dec 28 13:35 nginx-full-dbg_1.4.4-1~bpo70+1-custom_amd64.deb -rw-r–r-- 1 root root 3286600 Dec 28 13:35 nginx-full_1.4.4-1~bpo70+1-custom_amd64.deb -rw-r–r-- 1 root root 3618406 Dec 28 13:35 nginx-light-dbg_1.4.4-1~bpo70+1-custom_amd64.deb -rw-r–r-- 1 root root 3049594 Dec 28 13:35 nginx-light_1.4.4-1~bpo70+1-custom_amd64.deb -rw-r–r-- 1 root root 3796392 Dec 28 13:35 nginx-naxsi-dbg_1.4.4-1~bpo70+1-custom_amd64.deb -rw-r–r-- 1 root root 356138 Dec 28 13:34 nginx-naxsi-ui_1.4.4-1~bpo70+1-custom_all.deb -rw-r–r-- 1 root root 3092638 Dec 28 13:35 nginx-naxsi_1.4.4-1~bpo70+1-custom_amd64.deb -rw-r–r-- 1 root root 1570640 Nov 28 12:07 nginx_1.4.4-1~bpo70+1.debian.tar.gz -rw-r–r-- 1 root root 2843 Nov 28 12:07 nginx_1.4.4-1~bpo70+1.dsc -rw-r–r-- 1 root root 66716 Dec 28 13:34 nginx_1.4.4-1~bpo70+1-custom_all.deb -rw-r–r-- 1 root root 4922 Dec 28 13:35 nginx_1.4.4-1~bpo70+1-custom_amd64.changes -rw-r–r-- 1 root root 768217 Nov 21 10:28 nginx_1.4.4.orig.tar.gz</pre> <br>
Fifth: Install the custom nginx package
Now all you have to do is select which nginx package you’d like to install. There are four of them that differ only in the number of modules packed into each one; you can find <a href=“https://wiki.debian.org/Nginx"target="_blank”>here</a> more information regarding the differences. I’m going to choose the full version and install it as follows:
<pre>sudo dpkg -i nginx-full_1.4.4-1~bpo70+1-custom_amd64.deb nginx-common_1.4.4-1~bpo70+1-custom_all.deb nginx_1.4.4-1~bpo70+1-custom_all.deb</pre>
As you might have noticed, you are going to install two more .deb packages beside ‘nginx-full_1.4.4-1~bpo70+1-custom_amd64.deb’. Those two are package dependencies that you must install along any of the four nginx packages (full, light, extras, naxsi).
In case you encounter the following error message:
<pre>dpkg: dependency problems prevent configuration of nginx-common: nginx-common depends on init-system-helpers (>= 1.11~); however: Package init-system-helpers is not installed. […]</pre>
or any error message regarding dependency problems after executing the previous command, then just execute the following command:
<pre>sudo apt-get -f install</pre>
which will fix any dependency problems you might be having plus resuming the previous interrupted installation.
Finally, it’s time to check if ngx_pagespeed module was installed successfully with the nginx package:
<pre>sudo nginx -V</pre>
If the installation was successful, you should see the ngx_pagespeed module listed among the other modules:
<pre>root@debian-lab2:~/shared# nginx -V nginx version: nginx/1.4.4 TLS SNI support enabled configure arguments: --prefix=/usr/share/nginx --conf-path=/etc/nginx/nginx.conf –error-log-path=/var/log/nginx/error.log --http-client-body-temp-path=/var/lib/nginx/body –http-fastcgi-temp-path=/var/lib/nginx/fastcgi --http-log-path=/var/log/nginx/access.log –http-proxy-temp-path=/var/lib/nginx/proxy --http-scgi-temp-path=/var/lib/nginx/scgi –http-uwsgi-temp-path=/var/lib/nginx/uwsgi --lock-path=/var/lock/nginx.lock --pid-path=/run/nginx.pid –with-pcre-jit –with-debug --with-http_addition_module --with-http_dav_module --with-http_geoip_module –with-http_gzip_static_module --with-http_image_filter_module –with-http_realip_module –with-http_stub_status_module --with-http_ssl_module –with-http_sub_module --with-http_xslt_module –with-ipv6 --with-mail --with-mail_ssl_module –add-module=/root/custom-nginx-1.4.4/nginx-1.4.4/debian/modules/nginx-upload-progress –add-module=/root/custom-nginx-1.4.4/nginx-1.4.4/debian/modules/nginx-auth-pam –add-module=/root/custom-nginx-1.4.4/nginx-1.4.4/debian/modules/nginx-dav-ext-module –add-module=/root/custom-nginx-1.4.4/nginx-1.4.4/debian/modules/nginx-echo –add-module=/root/custom-nginx-1.4.4/nginx-1.4.4/debian/modules/nginx-upstream-fair –add-module=/root/custom-nginx-1.4.4/nginx-1.4.4/debian/modules/ngx_http_substitutions_filter_module –add-module=/root/custom-nginx-1.4.4/nginx-1.4.4/debian/modules/ngx_pagespeed-1.7.30.1-beta</pre>
Sixth: Enable ngx_pagespeed module
Before enabling the module, we have to create a folder, where it will cache your websites’ files into:
<pre> sudo mkdir -p /var/ngx_pagespeed_cache
sudo chown -R www-data:www-data /var/ngx_pagespeed_cache</pre>
Then open “nginx.conf” file in your favorite text editor
<pre>sudo vim /etc/nginx/nginx.conf</pre>
And add the following lines in the http block and save the changes:
<pre>## #ngx_pagespeed module settings
pagespeed on; pagespeed FileCachePath /var/ngx_pagespeed_cache;</pre>
That’s how “nginx.conf” file should look like:

Now, restart nginx server for the changes to take effect:
<pre>sudo service nginx restart</pre>
To confirm that ngx_pagespeed module has been enabled successfully, execute the following commands:
<pre> sudo apt-get install curl curl -I -p http://localhost|grep X-Page-Speed</pre>
you should then see X-Page-Speed header in the output:

Finally, add the following lines to every server block in your website’s virtual host file located in /etc/nginx/sites-available :
<pre># Ensure requests for pagespeed optimized resources go to the pagespeed
handler and no extraneous headers get set.
location ~ “.pagespeed.([a-z].)?[a-z]{2}.[^.]{10}.[^.]+” { add_header “” “”; } location ~ “^/ngx_pagespeed_static/” { } location ~ “^/ngx_pagespeed_beacon” { } location /ngx_pagespeed_statistics { allow 127.0.0.1; deny all; } location /ngx_pagespeed_global_statistics { allow 127.0.0.1; deny all; } location /ngx_pagespeed_message { allow 127.0.0.1; deny all; } location /pagespeed_console { allow 127.0.0.1; deny all; }</pre>
Finally: Pin your custom nginx package
To prevent your custom nginx package from being replaced in the future by ‘apt’ with a more recent release of nginx, you should pin (hold) your package from being upgraded by the following steps:
- Create a new file in /etc/apt/preferences.d:
<pre>sudo vim /etc/apt/preferences.d/nginx</pre>
- Then paste the following lines in it and save [make sure to replace the Pin version with the custom version, you have set earlier]:
<pre>Package: nginx Pin: version 1.4.4-1~bpo70+1-custom Pin-Priority: 1001</pre>
DISCLAIMER
Having your own custom package comes with one disadvantage which is being solely responsible for updating it whenever a security vulnerability is patched. This means that simply running “apt-get upgrade” won’t do anything to your package since you have already pinned it. So, make sure to check regularly if a new security update is released.
<div class=“author”>Submitted by: Saleh Salem</div>
Thanks for learning with the DigitalOcean Community. Check out our offerings for compute, storage, networking, and managed databases.
About the author
Still looking for an answer?
This textbox defaults to using Markdown to format your answer.
You can type !ref in this text area to quickly search our full set of tutorials, documentation & marketplace offerings and insert the link!
Thanks for this guide! You might want to check the screenshots though, it seems they got mixed up a little.
@me: The screenshots seem to be in the correct order to me. Which screenshot are you talking about?
Instead of compiling nginx with pagespeed Debian/Ubuntu users can install <strong>nginx-extras</strong> from the <a href=“http://dotdeb.org”>dotdeb</a> repositories. This package <a href=“https://docs.google.com/a/jesin.tk/spreadsheet/ccc?key=0AjuNPnOoex7SdG5fUkhfc3BCSjJQbVVrQTg4UGU2YVE#gid=0”>contains</a> the ngx_pagespeed module.
Thanks for the tut.
one quick question, wouldn’t the compression feature in this case be useless if ngx_speed is used?? I think it is either to enable it and get rid of contents compression or disable it and have all contents compressed when sent over http…
somebody correct me if I’m wrong!!
Thanks
@Kamal thanks for the tut.
after I run sudo dpkg-buildpackage -b
I get this error
/bin/sh: 33: Syntax error: “(” unexpected make: *** [config.status.full] Error 2 dpkg-buildpackage: error: debian/rules build gave error exit status 2
could you help me?
thanks
I found the solution. It was a typo
CONFIGURE_OPTS) >@. All you have to do is add "–add-module=(MODULESDIR)/ngx_pagespeed-1.7.30.1-beta "
After the character --add-module= comes the character $
Does this setup work with Ubuntu 14.04 ? I want to run Nginx, WordPress on t but with Google Pagespeed.
@sameermanas: This will work on Ubuntu 14.04, but you are going to notice some slight differences. You can skip the part about enabling backports. Also the version of nginx in 14.04 is 1.4.6, so the paths will be different.
Hi, I need some help, when trying to install: sudo apt-get -t wheezy-backports build-dep nginx ==> Reading package lists… Done Building dependency tree Reading state information… Done Selected version ‘1.6.1-1~bpo70+1’ (wheezy-backports) for nginx Note, selecting ‘libexpat1-dev’ instead of ‘libexpat-dev’ Note, selecting ‘libgd-dev’ instead of ‘libgd2-dev’ Note, selecting ‘liblua5.1-0-dev’ instead of ‘liblua5.1-dev’ The following packages have unmet dependencies: libgeoip-dev : Depends: libgeoip1 (= 1.5.0-3~bpo70+1) but 1.6.0-1 is to be installed E: Build-dependencies for nginx could not be satisfied.
thanks
 This work is licensed under a Creative Commons Attribution-NonCommercial- ShareAlike 4.0 International License.
Become a contributor for community
Get paid to write technical tutorials and select a tech-focused charity to receive a matching donation.

DigitalOcean Documentation
Full documentation for every DigitalOcean product.

Resources for startups and AI-native businesses
The Wave has everything you need to know about building a business, from raising funding to marketing your product.
The developer cloud
Scale up as you grow — whether you're running one virtual machine or ten thousand.

Start building today
From GPU-powered inference and Kubernetes to managed databases and storage, get everything you need to build, scale, and deploy intelligent applications.
