By Brian Hogan

Hugo is a static site generator and framework for building websites. With Hugo, you define your themes using HTML and build your content using Markdown or other text processors. Hugo generates HTML that you can host anywhere.
In this tutorial, you’ll use Hugo to build a small static website and deploy the site to DigitalOcean’s App Platform by using GitHub. Then you’ll make changes to your site and see those changes deployed automatically.
Prerequisites
To complete this tutorial, you’ll need:
- A DigitalOcean account.
- A GitHub account.
- Git installed on your local machine. You can follow the tutorial Contributing to Open Source: Getting Started with Git to install and set up Git on your computer.
- A text editor. You can use Visual Studio Code or your favorite text editor.
Step 1 — Installing Hugo
To build your Hugo site, you’ll install the hugo command-line tool on your local machine. You’ll use this tool to generate your site, create content pages, and launch a small server you’ll use to test your site before you deploy it.
Hugo is available as a single binary, so the installation process involves downloading the file to your machine and placing it on your path.
Download Hugo from the releases page on GitHub. Hugo comes in two versions: the regular version and the extended version. Download the extended version so you have support for asset management and support for CSS preprocessing. Save the file to your Downloads directory.
Once you’ve downloaded the file, you’ll need to uncompress the file and place it somewhere on your system PATH so you can run the file from any directory.
On Windows, create the directory C:\Hugo, unzip the file you’ve downloaded, and place it in C:\hugo. Then add that folder to your PATH environment variable. To do this, use Windows Search and type “environment”. Select Edit Environment Variables for My Account. On the screen that appears, press the Environment Variables button, locate PATH in the System Variables section, and press the Edit button. Add c:\hugo\bin in the text area and press OK to save the settings. Press OK on the rest of the dialogs to close them.
On macOS or Linux, copy the executable to /usr/local/bin, as this is already included in your PATH environment variable by default.
First, switch to the Downloads directory:
- cd ~/Downloads
Uncompress the file:
- tar zxvf hugo_extended_0.75.1*.gz
Then move the file to /usr/local/bin:
- mv hugo /usr/local/bin
Ensure that Hugo is configured by switching to your home directory and typing the hugo command:
- cd
- hugo version
You’ll see the version number printed to the screen:
OutputHugo Static Site Generator v0.75.1-A4A7BAB7/extended darwin/amd64 BuildDate: 2020-09-15T06:54:33Z
Now that Hugo is installed, you can create your site.
Step 2 — Creating the Hugo Project
Let’s create a small site about sharks. We’ll call it “Sharkopedia”, and it will have pages about different kinds of sharks.
To create a site, use the hugo new site command. From your home directory, execute the following command:
- hugo new site sharkopedia
This creates the directory sharkopedia and displays a welcome message that tells you how to install a theme for your site:
OutputCongratulations! Your new Hugo site is created in /Users/your_username/sharkopedia.

Just a few more steps and you're ready to go:

1. Download a theme into the same-named folder.
   Choose a theme from https://themes.gohugo.io/ or
   create your own with the "hugo new theme <THEMENAME>" command.
2. Perhaps you want to add some content. You can add single files
   with "hugo new <SECTIONNAME>/<FILENAME>.<FORMAT>".
3. Start the built-in live server via "hugo server".

Visit https://gohugo.io/ for quickstart guide and full documentation.
Instead of installing an existing theme, you’ll add a small amount of HTML and CSS to your site to define how it looks. Existing themes can often require a lot of configuration, and that’s outside of the scope of this tutorial.
Switch to the sharkopedia directory:
- cd sharkopedia
Your Hugo site has the following structure:
Output├── archetypes
├── config.toml
├── content
├── data
├── layouts
├── resources
├── static
└── themes
archetypesare your content templates. You can use thehugocommand to create new Markdown pages, and it’ll use the files in thearchetypesdirectory as the template for those pages.config.tomlis the configuration file for the site, where you specify the site’s domain, title, and the theme you want to use.contentis the directory that holds your site’s content.datais where you can store JSON files you can use when generating your site.layoutsis where you place the HTML files that define your site’s look and feel, or override the templates from a theme.resourcesis where Hugo places files it generates, like optimized images.staticholds static assets, like files, stylesheets, scripts, or other assets that you don’t need Hugo to manage for you.themescontains themes you create or download.
You won’t use a theme in this tutorial; you’ll define HTML files in the layouts directory to define the way your site looks.
Before moving on, open the file config.toml in your editor. Change the baseURL field to an empty string, and modify the title so it says “Sharkopedia”:
baseURL = ""
languageCode = "en-us"
title = "Sharkopedia"
Save the file.
Next, you’ll create the layout and content for the site. The site will have a home page and a section called “Sharks”. To display your content, Hugo needs three types of template files:
- A template for the home page.
- A template for a page of content, like a page about a single shark.
- A template that shows a list of pages, such as a page that lists all the sharks, or all of the tags or categories on the site.
Let’s start by creating the home page template. Create the file layouts/index.html and open it in your editor. Add the following code to the file to define the site:
<!DOCTYPE html>
<html lang="en-US">
  <head>
    <meta charset="utf-8">
    <meta name="viewport" content="width=device-width, initial-scale=1">
    <title><^>{{ .Site.Title }}</title>
    <link rel="stylesheet" href="/style.css">
  </head>
  <body>

    <header>
      <h1>{{ .Site.Title }}</h1>
    </header>

    <main>
      <h2>{{ .Title }}</h2>
      {{ .Content }}
    </main>

    <footer>
      <small>Made with love and Hugo</small>
    </footer>
  </body>
</html>
The {{ .Site.Title }} lines grab the title from the config.toml file. The {{ .Title }} line and {{ .Content }} line grab the title and content from the document associated with the home page, which you’ll create next.
Save your file.
By default, Hugo creates all new pages in draft mode. Open the file archetypes/default.md in your editor and modify it so that draft is false. This way all new pages you create won’t be in draft mode.
---
title: "{{ replace .Name "-" " " | title }}"
date: {{ .Date }}
draft: false
---
The replace line in the title field tells Hugo to generate the page’s title based on the filename.
Save the file.
Now use Hugo to generate a content file for your home page. From the terminal, in the directory of your project, type this command:
- hugo new _index.md
This generates the file content/index.md:
Output/Users/your_username/sharkopedia/content/_index.md created
The underscore in the filename tells Hugo that this is the content page for either a listing page or the home page, as opposed to a regular piece of content.
Open the content/_index.md file in your editor and add some text and change the title:
---
title: "Welcome"
date: 2020-10-07T14:07:35-05:00
draft: false
---
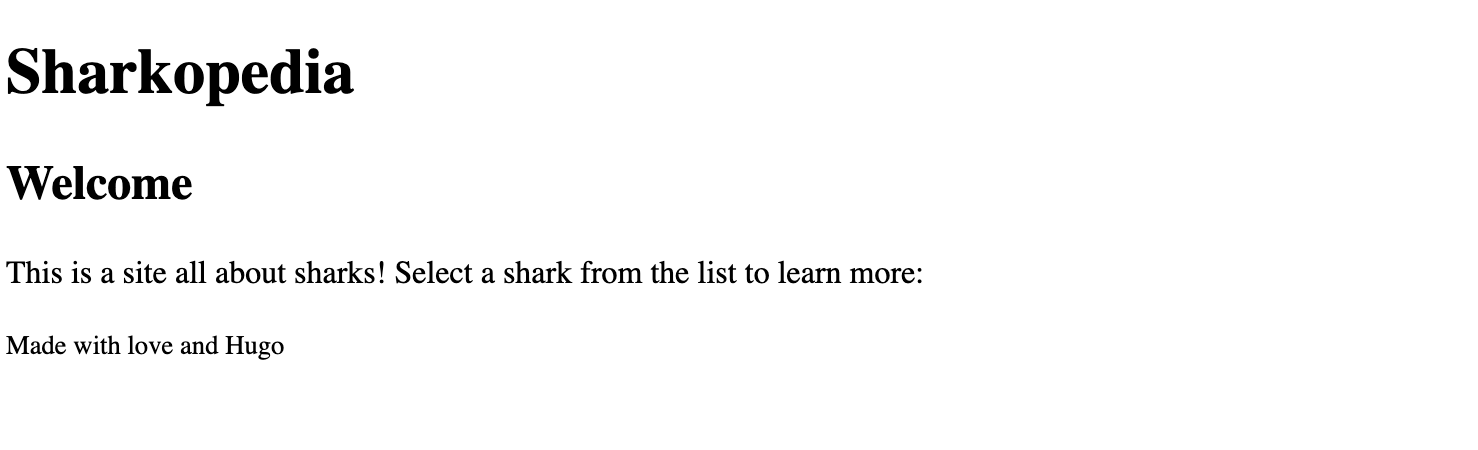
This is a site all about sharks! Select a shark from the list to learn more:
The content in this file will be placed on the home page. Let’s test it out.
From the terminal, launch Hugo’s development server with the following command:
- hugo serve
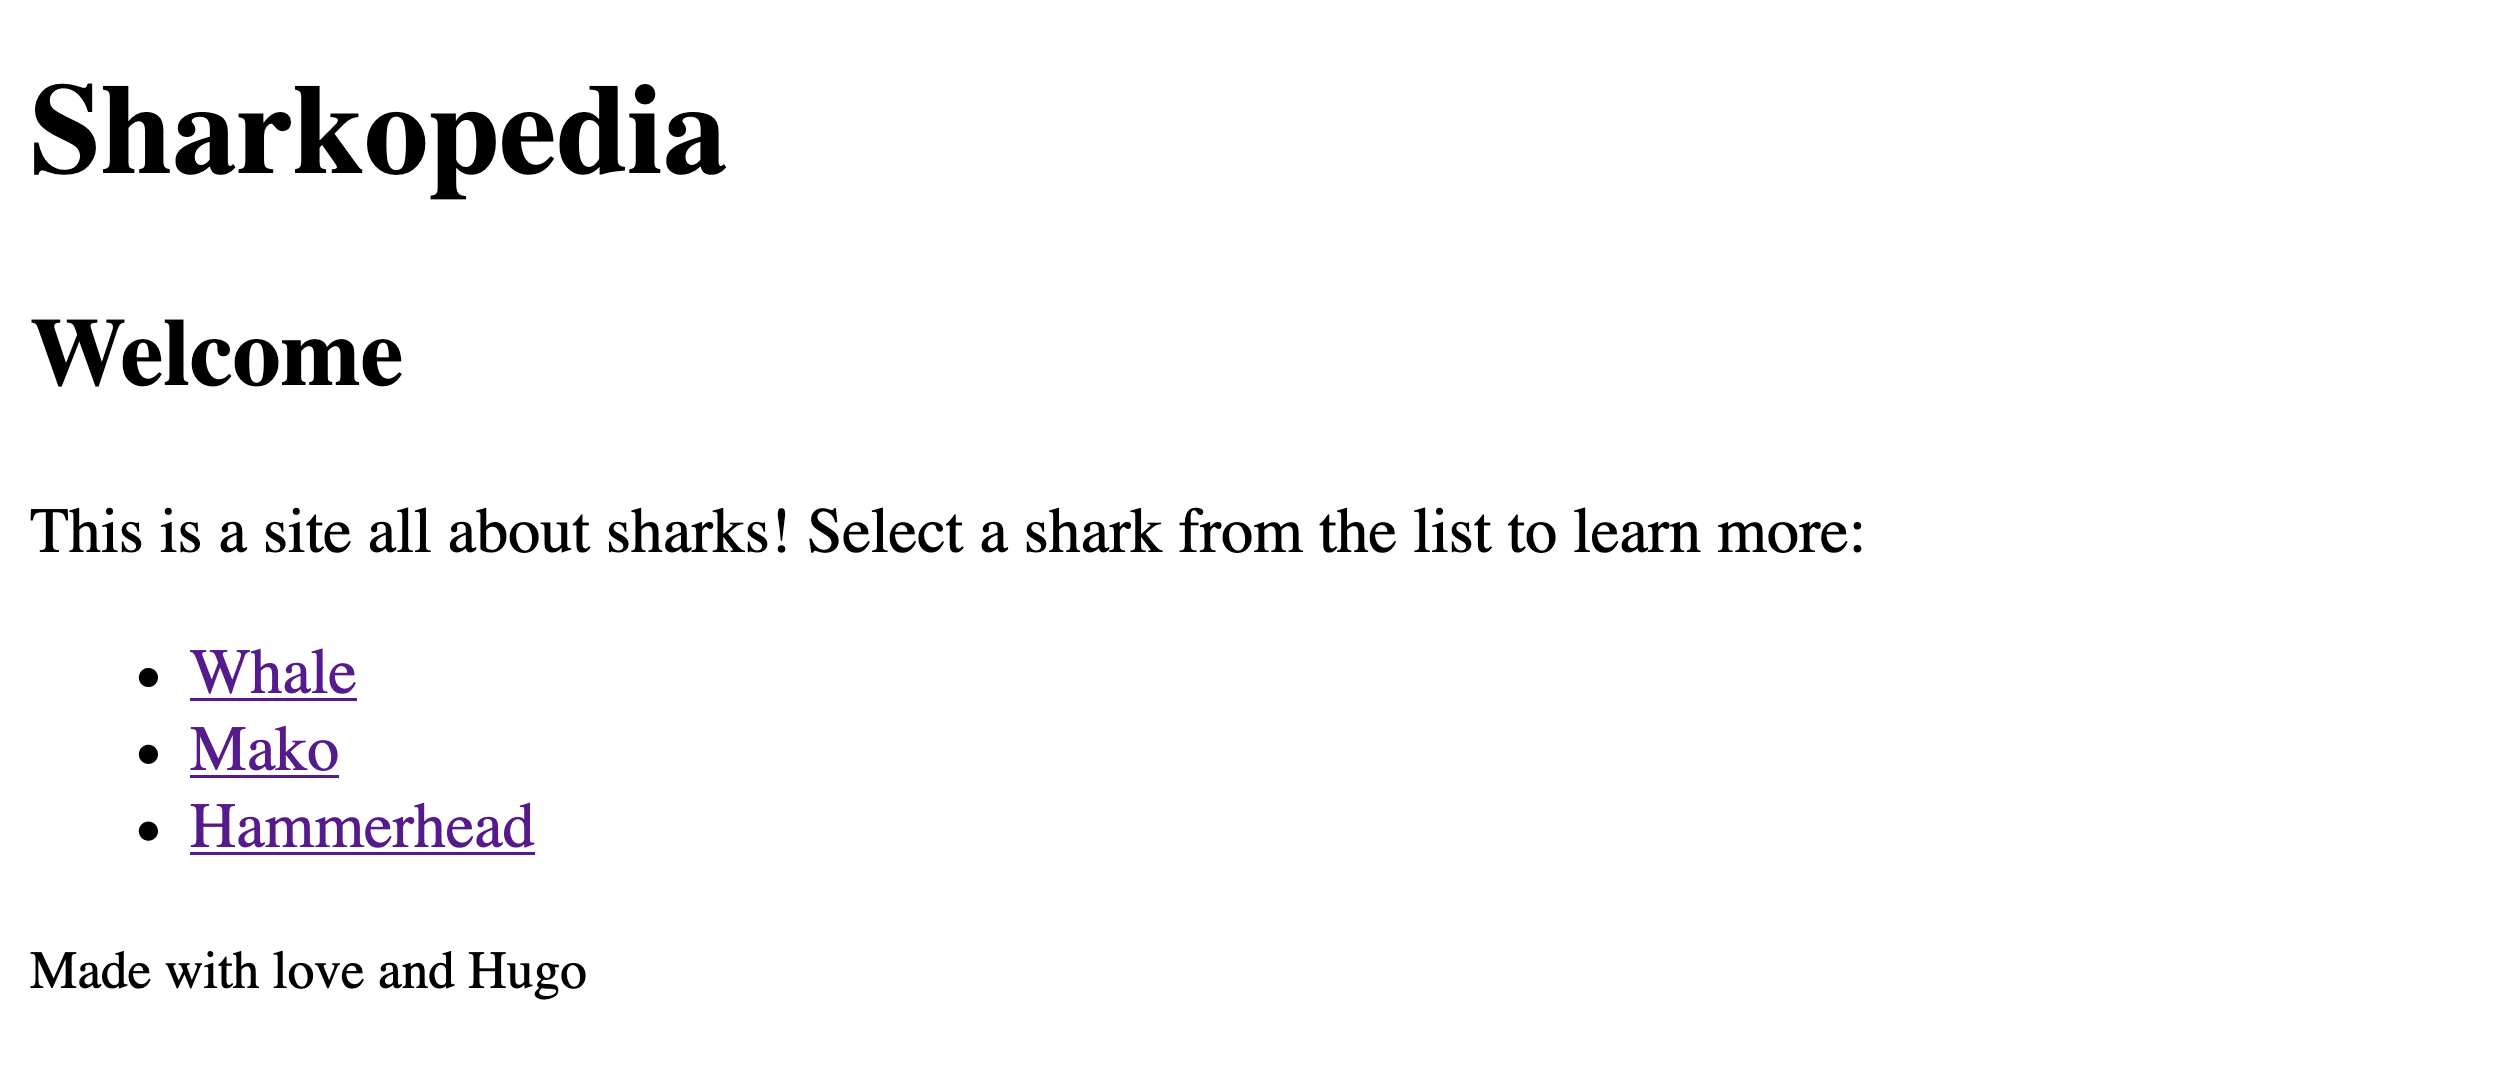
Visit http://localhost:1313 in your web browser and you’ll see your home page:
Once you’ve verified that the site is working, press CTRL+C to stop the server.
Next you’ll need a template for single pieces of content, and for this project, you can duplicate the home page, although you’ll have to place it in a specific directory.
Create the directory layouts/_default:
- mkdir layouts/_default
Then create the file layouts/_default/single.html and copy the contents of your layouts/index.html file into the new file. You can do this from the command line with this command:
- cp layouts/index.html layouts/_default/single.html
Next, you’ll create a sharks content section of the site. To do so, you’ll use the hugo command to create new Markdown files in the content directory under a sharks subdirectory. Execute this command to create a content page for Hammerhead sharks:
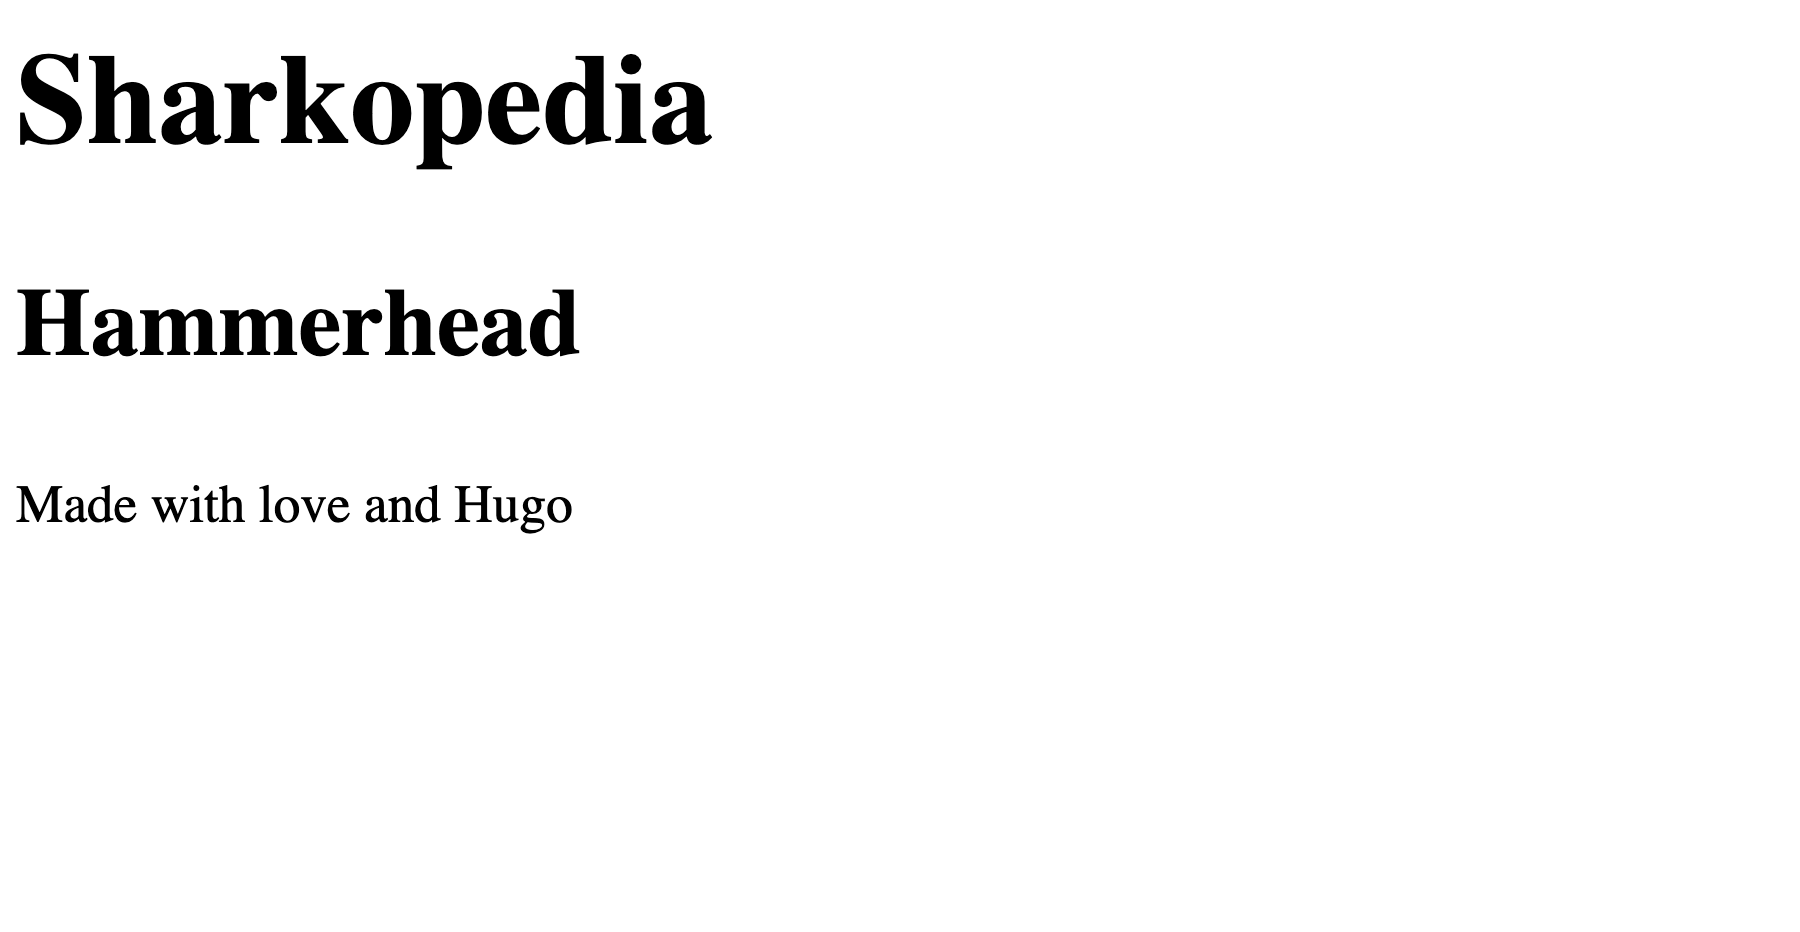
- hugo new sharks/hammerhead.md
Note that you don’t specify the content directory when using the hugo new command.
Now launch Hugo’s development server:
- hugo serve
Visit http://localhost:1313/sharks/hammerhead.md to see your page for Hammerhead sharks:
If you visit http://localhost:1313/sharks, you won’t see anything because you haven’t defined the final template you need: the template that Hugo uses to display lists of content. Let’s do that now.
Stop the server by pressing CTRL+C.
Create the file layouts/_default/list.html and open it in your editor. Inside the file, place the same content as your other templates:
<!DOCTYPE html>
<html lang="en-US">
  <head>
    <meta charset="utf-8">
    <meta name="viewport" content="width=device-width, initial-scale=1">
    <title><^>{{ .Site.Title }}</title>
    <link rel="stylesheet" href="/style.css">
  </head>
  <body>

    <header>
      <h1>{{ .Site.Title }}</h1>
    </header>

    <main>
      <h2>{{ .Title }}</h2>
      {{ .Content }}
    </main>

    <footer>
      <small>Made with love and Hugo</small>
    </footer>
  </body>
</html>
Inside the <main> tag, after the title and content, place the following code which generates a bulleted list of pages to display:
    <main>
      <h2>{{ .Title }}</h2>
      {{ .Content }}

      <ul>
      {{ range .Pages }}
        <li><a href="{{ .RelPermalink }}">{{ .Title }}</a></li>
      {{ end }}
      </ul>
    </main>
The range function iterates over all of the pages for the section of the site. The actual value of .Pages is determined when Hugo generates your site. This list template you created will be used as the default template for any lists, including tag pages, category pages, and your “sharks” section. You can make more specific templates for your sections, but this gives you a default layout that works everywhere. Save the file.
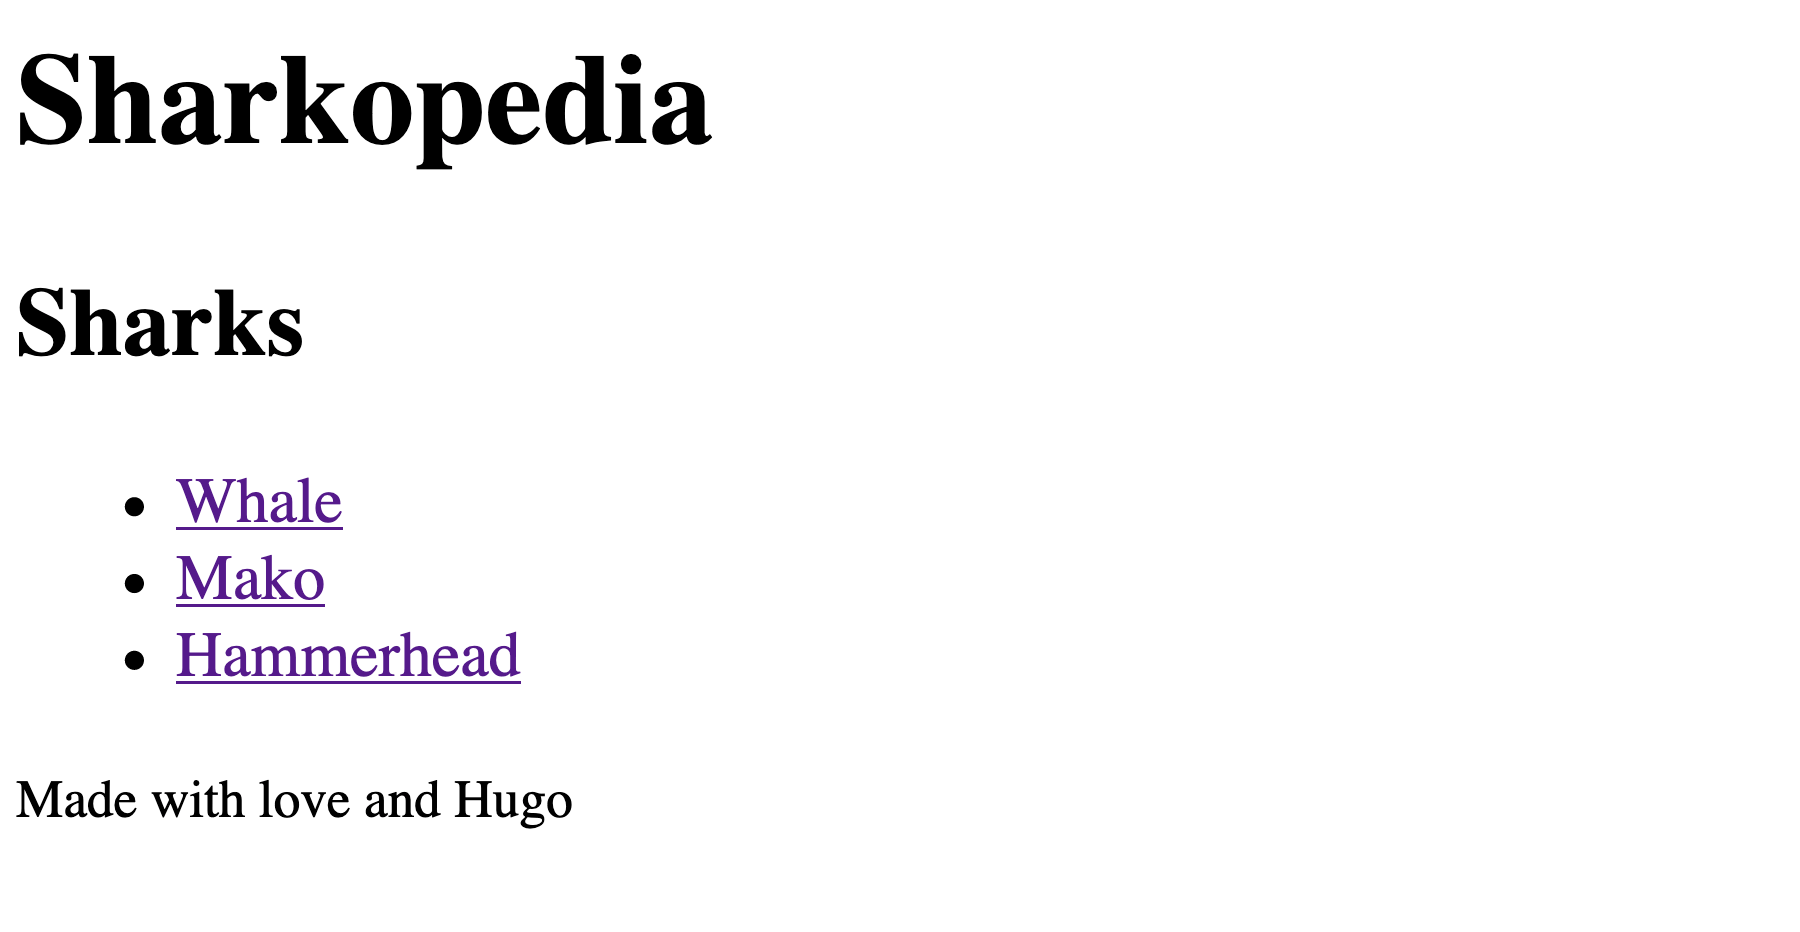
Finally, create pages for Mako sharks and whale sharks so there’s more content to display:
- hugo new sharks/mako.md
- hugo new sharks/whale.md
Start the server again with hugo serve and visit http://localhost:1313/sharks and you’ll see the three Shark pages listed:
Stop the server with CTRL+C.
Your site is ready. Next you’ll push your code to GitHub so you can deploy it.
Step 3 — Pushing the Site to GitHub
DigitalOcean App Platform deploys your code from GitHub repositories, so the first thing you’ll need to do is get your site in a Git repository and push that repository to GitHub.
First, initialize your Sharkopedia project as a Git repository:
- git init
When you generate your site, Hugo will place files in a directory called public. Let’s exclude that directory by adding it to Git’s ignore list. Create a new file called .gitignore and add the following code to the file:
public
Save the file.
Now execute the following command to add files to your repository:
- git add archetypes/ config.toml content/ .gitignore layouts/
You’ll notice that the data, themes, resources, static, and themes aren’t included in this command; those directories are empty and Git only stores files, not directories. If you add your own data, themes, or static content later, you’ll add those directories later.
Make your initial commit:
- git commit -m "Initial version of the site"
Your files will commit:
Output[master (root-commit) b045f24] First version of the site
 10 files changed, 114 insertions(+)
 create mode 100644 .gitignore
 create mode 100644 archetypes/default.md
 create mode 100644 config.toml
 create mode 100644 content/_index.md
 create mode 100644 content/sharks/hammerhead.md
 create mode 100644 content/sharks/mako.md
 create mode 100644 content/sharks/whale.md
 create mode 100644 layouts/_default/list.html
 create mode 100644 layouts/_default/single.html
 create mode 100644 layouts/index.html
Open your browser and navigate to GitHub, log in with your profile, and create a new repository called sharkopedia. Create an empty repository without a README or license file.
Once you’ve created the repository, return to the command line to push your local files to GitHub.
First, add GitHub as a remote repository:
- git remote add origin https://github.com/your_username/sharkopedia
Next, rename the default branch main, to match what GitHub expects:
- git branch -M main
Finally, push your main branch to GitHub’s main branch:
- git push -u origin main
Your files will transfer:
OutputEnumerating objects: 16, done.
Counting objects: 100% (16/16), done.
Delta compression using up to 6 threads
Compressing objects: 100% (14/14), done.
Writing objects: 100% (16/16), 1.58 KiB | 1.58 MiB/s, done.
Total 16 (delta 1), reused 0 (delta 0), pack-reused 0
remote: Resolving deltas: 100% (1/1), done.
To https://github.com/your_username/sharkopedia
 * [new branch]      main -> main
Branch 'main' set up to track remote branch 'main' from 'origin'.
Enter your GitHub credentials when prompted to push your code.
You’re ready to deploy your site to DigitalOcean’s App Platform.
Step 4 — Deploying to DigitalOcean with App Platform
Once the code is pushed, visit https://cloud.digitalocean.com/apps and click Launch Your App. You’ll be prompted to connect your GitHub account:
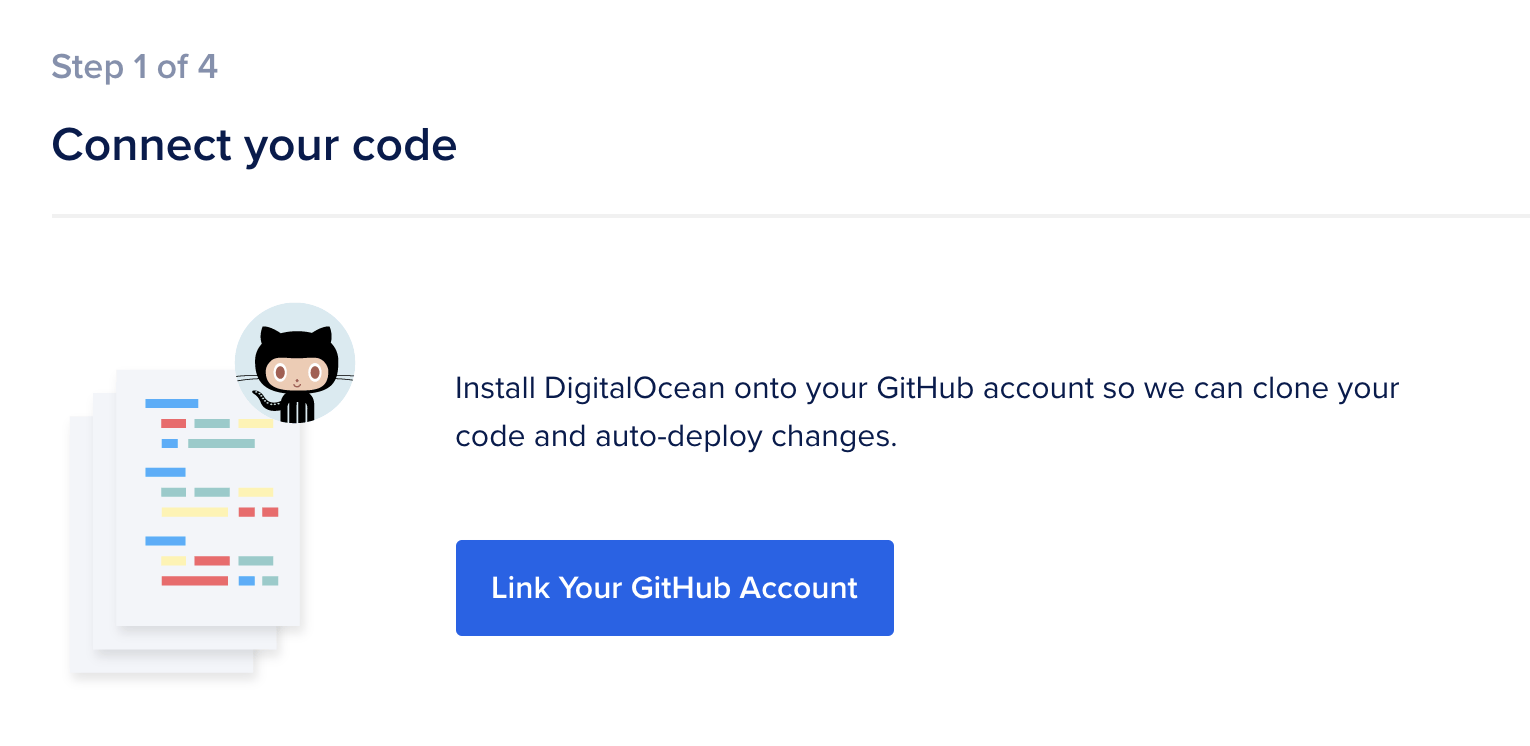
Connect your account and allow DigitalOcean to access your repositories. You can choose to let DigitalOcean have access to all of your repositories, or just to the ones you wish to deploy.
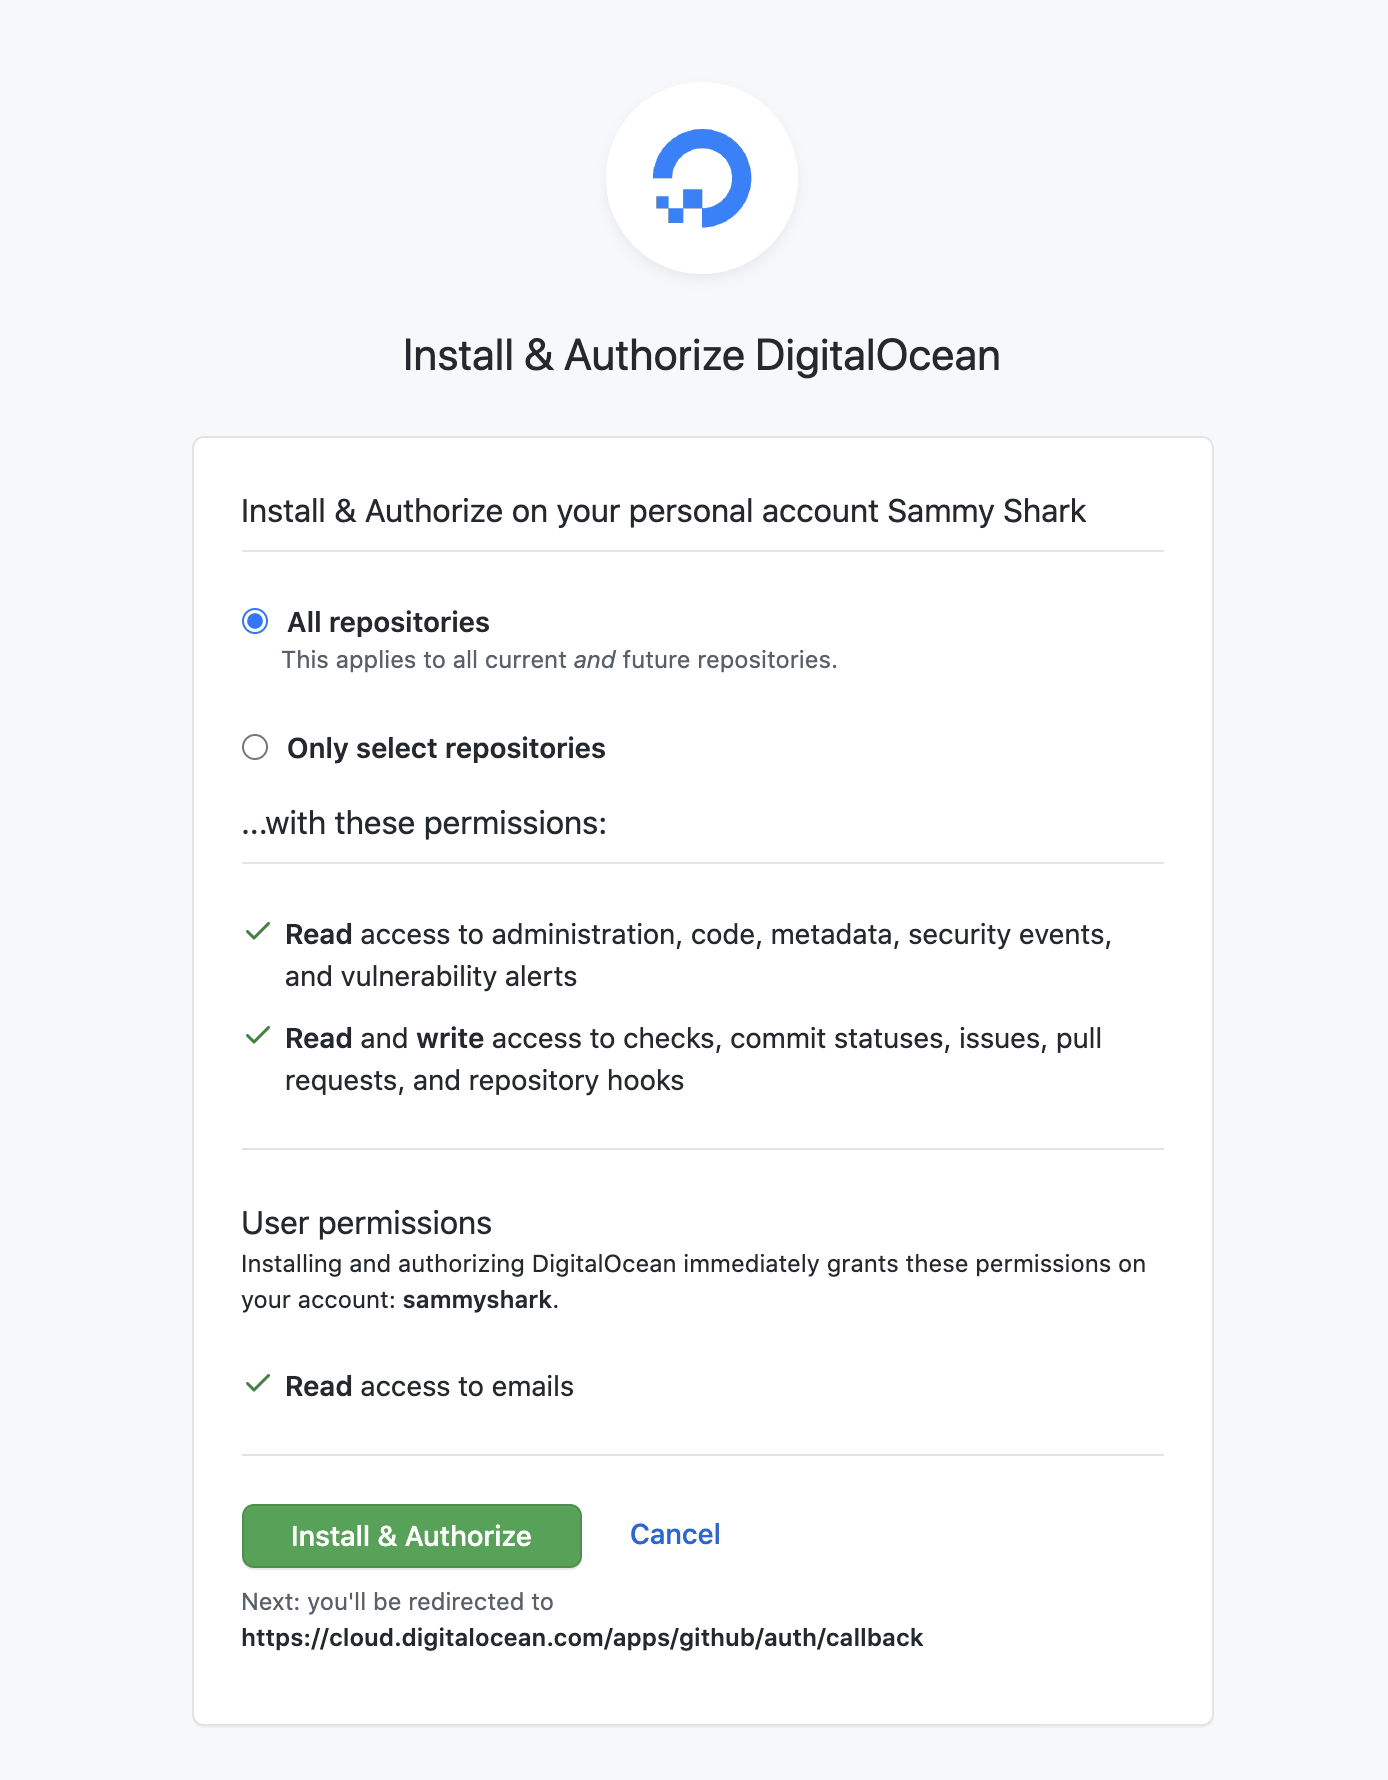
Press Install and Authorize. You’ll be returned to your DigitalOcean dashboard to continue creating your app.
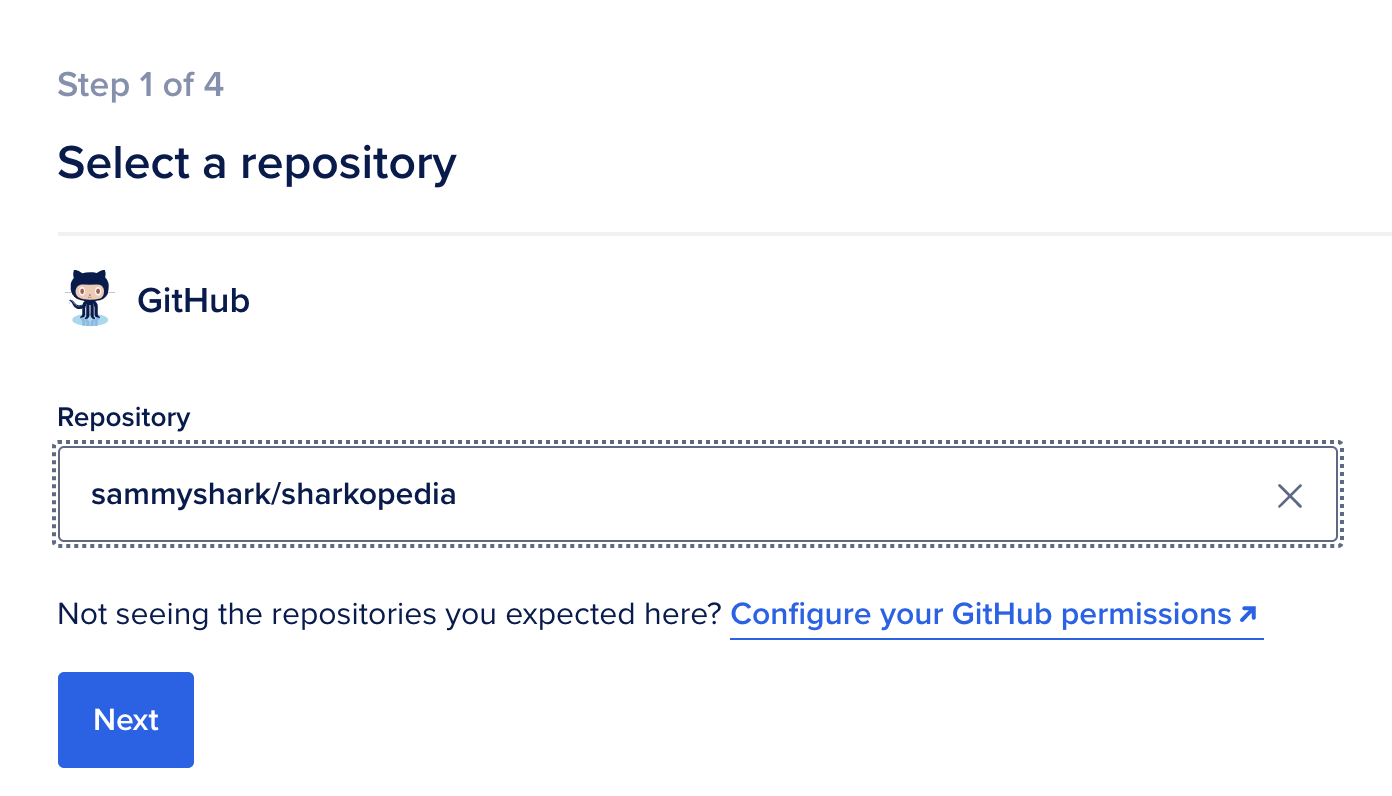
Once your GitHub account is connected, select the your_account/sharkopedia repository and click Next.
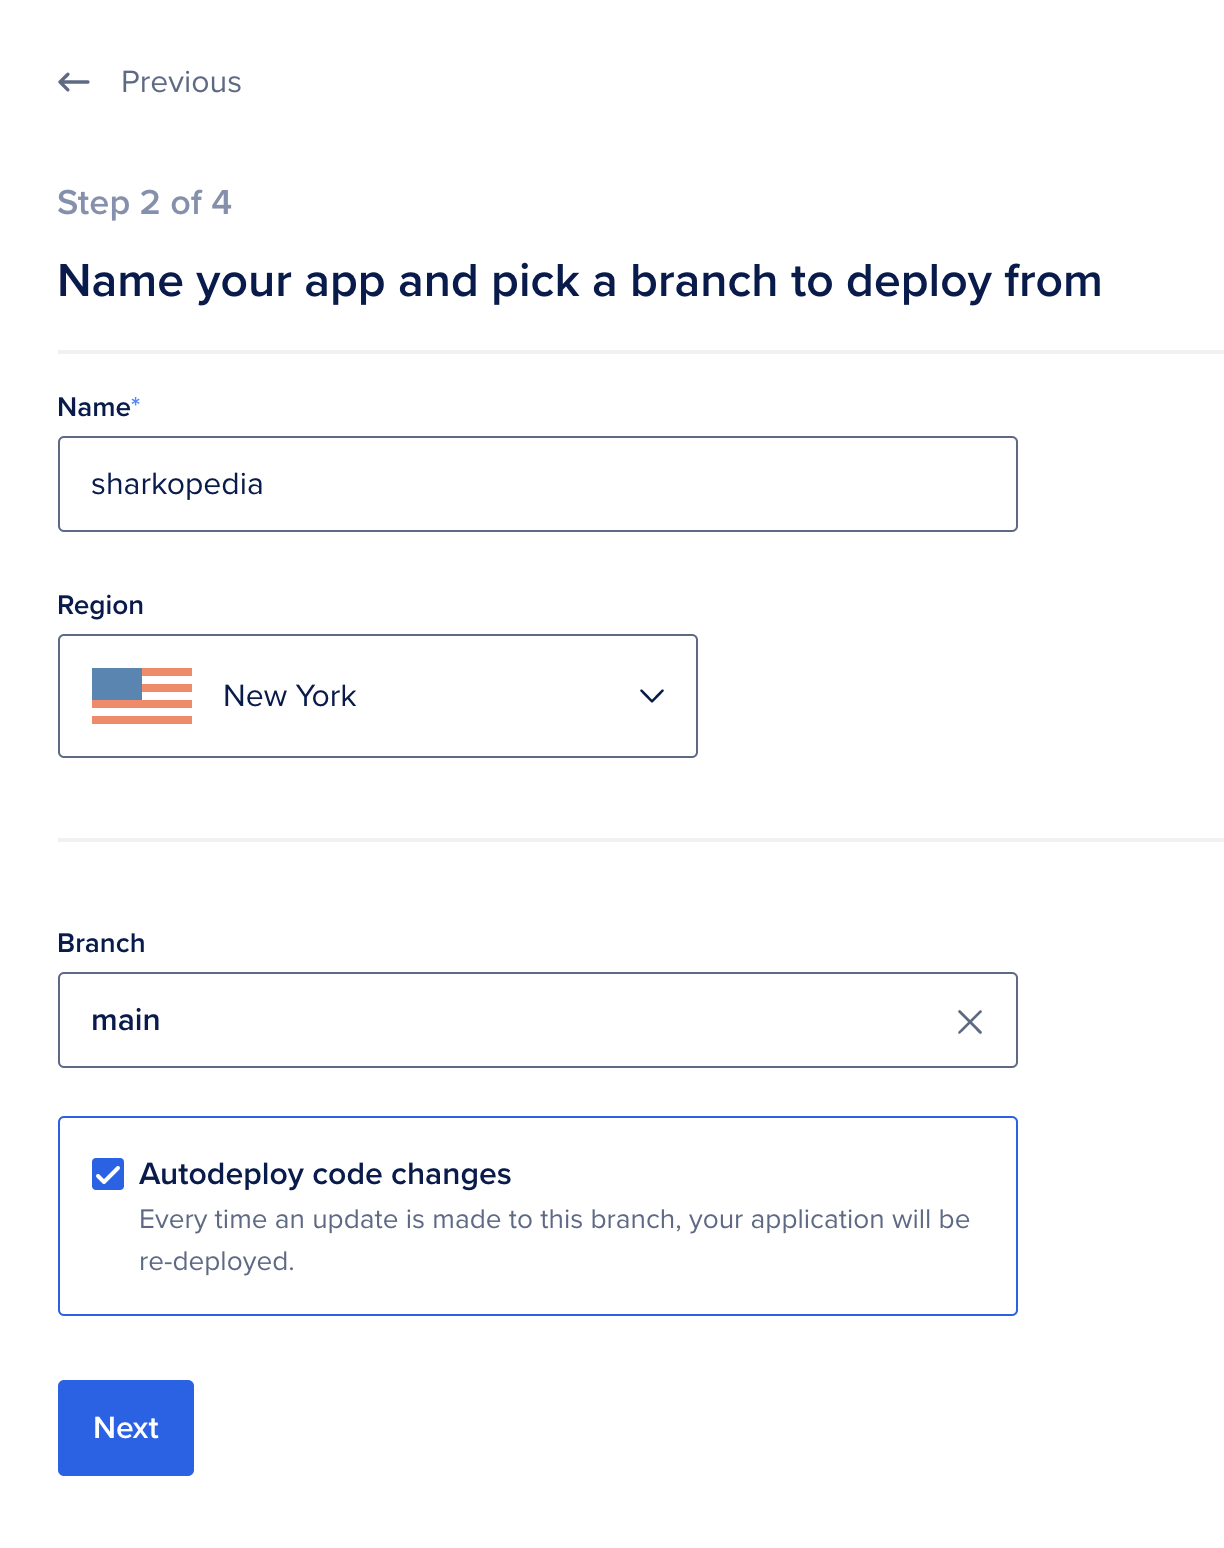
Next, provide your app’s name, choose a region, and ensure the main branch is selected. Then ensure that Autodeploy code changes is checked. Press Next to continue.
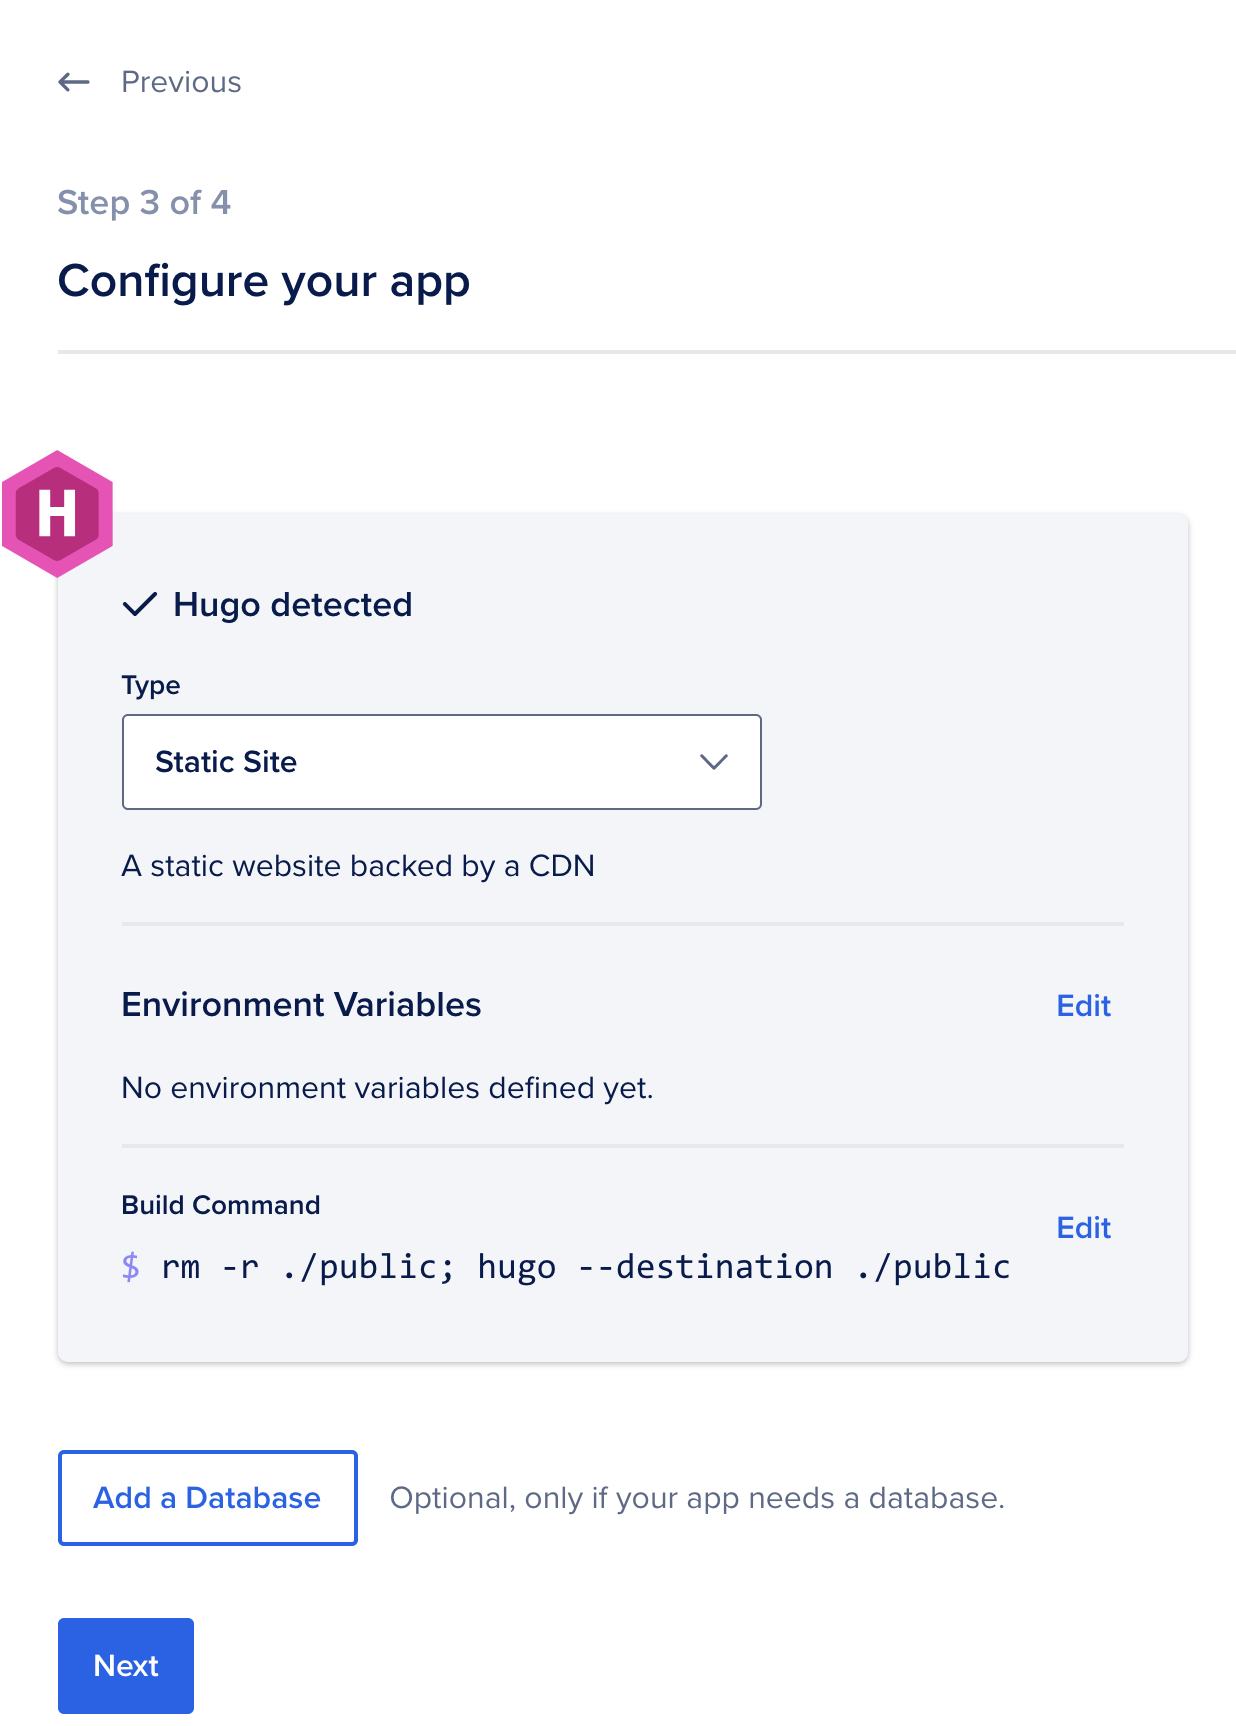
DigitalOcean will detect that your project is a Hugo site and will automatically populate the command to build your site.
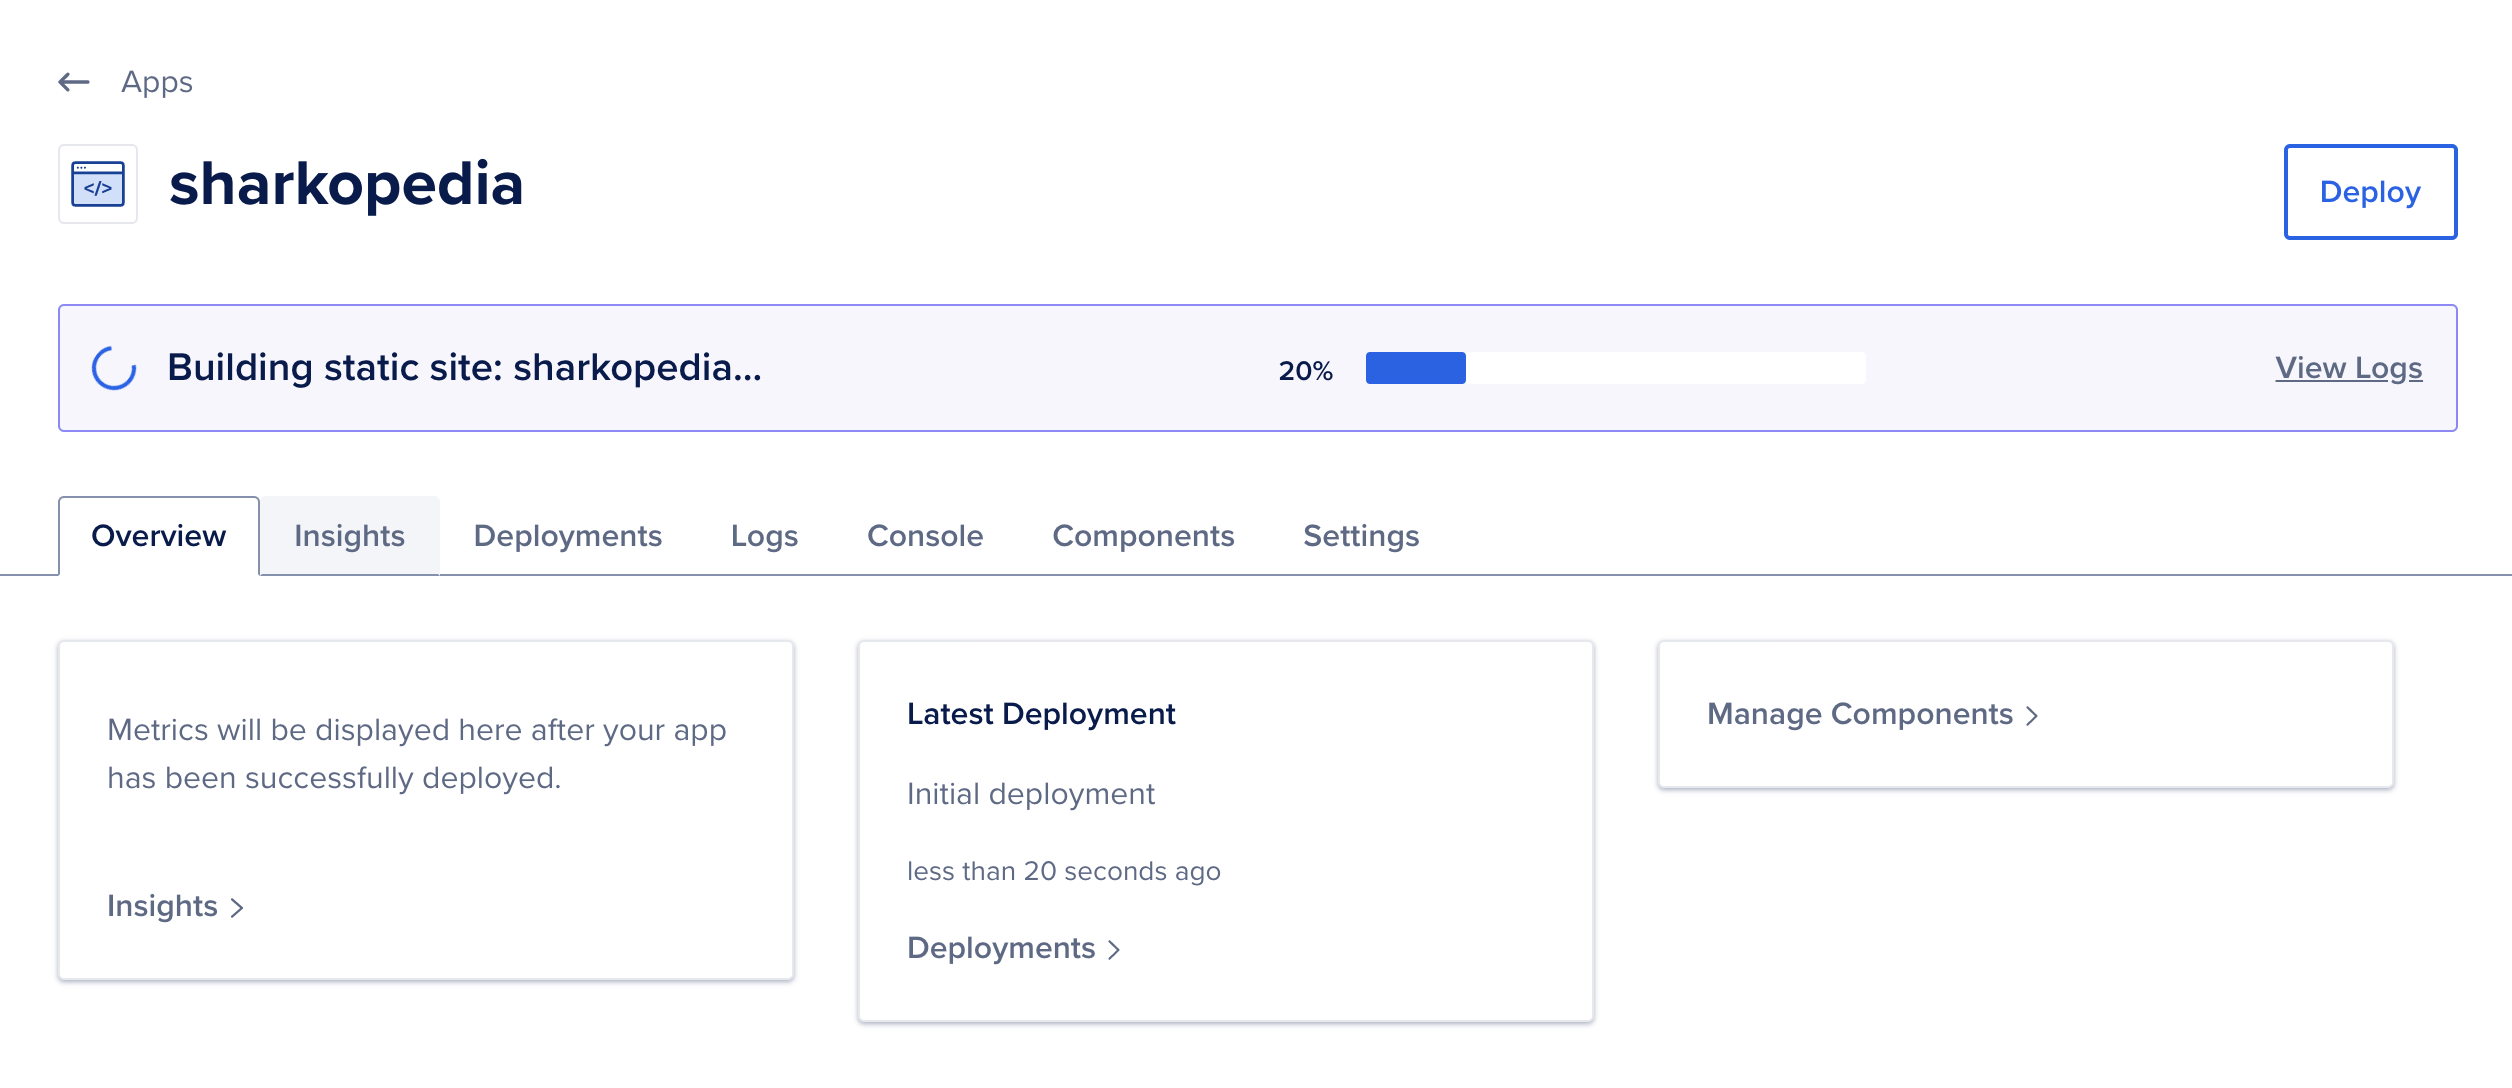
Press Next and you’ll be directed to the Finalize and Launch screen where you’ll choose your plan. Static sites are free, so choose Starter App and press Launch Starter App at the bottom. Your site will build:
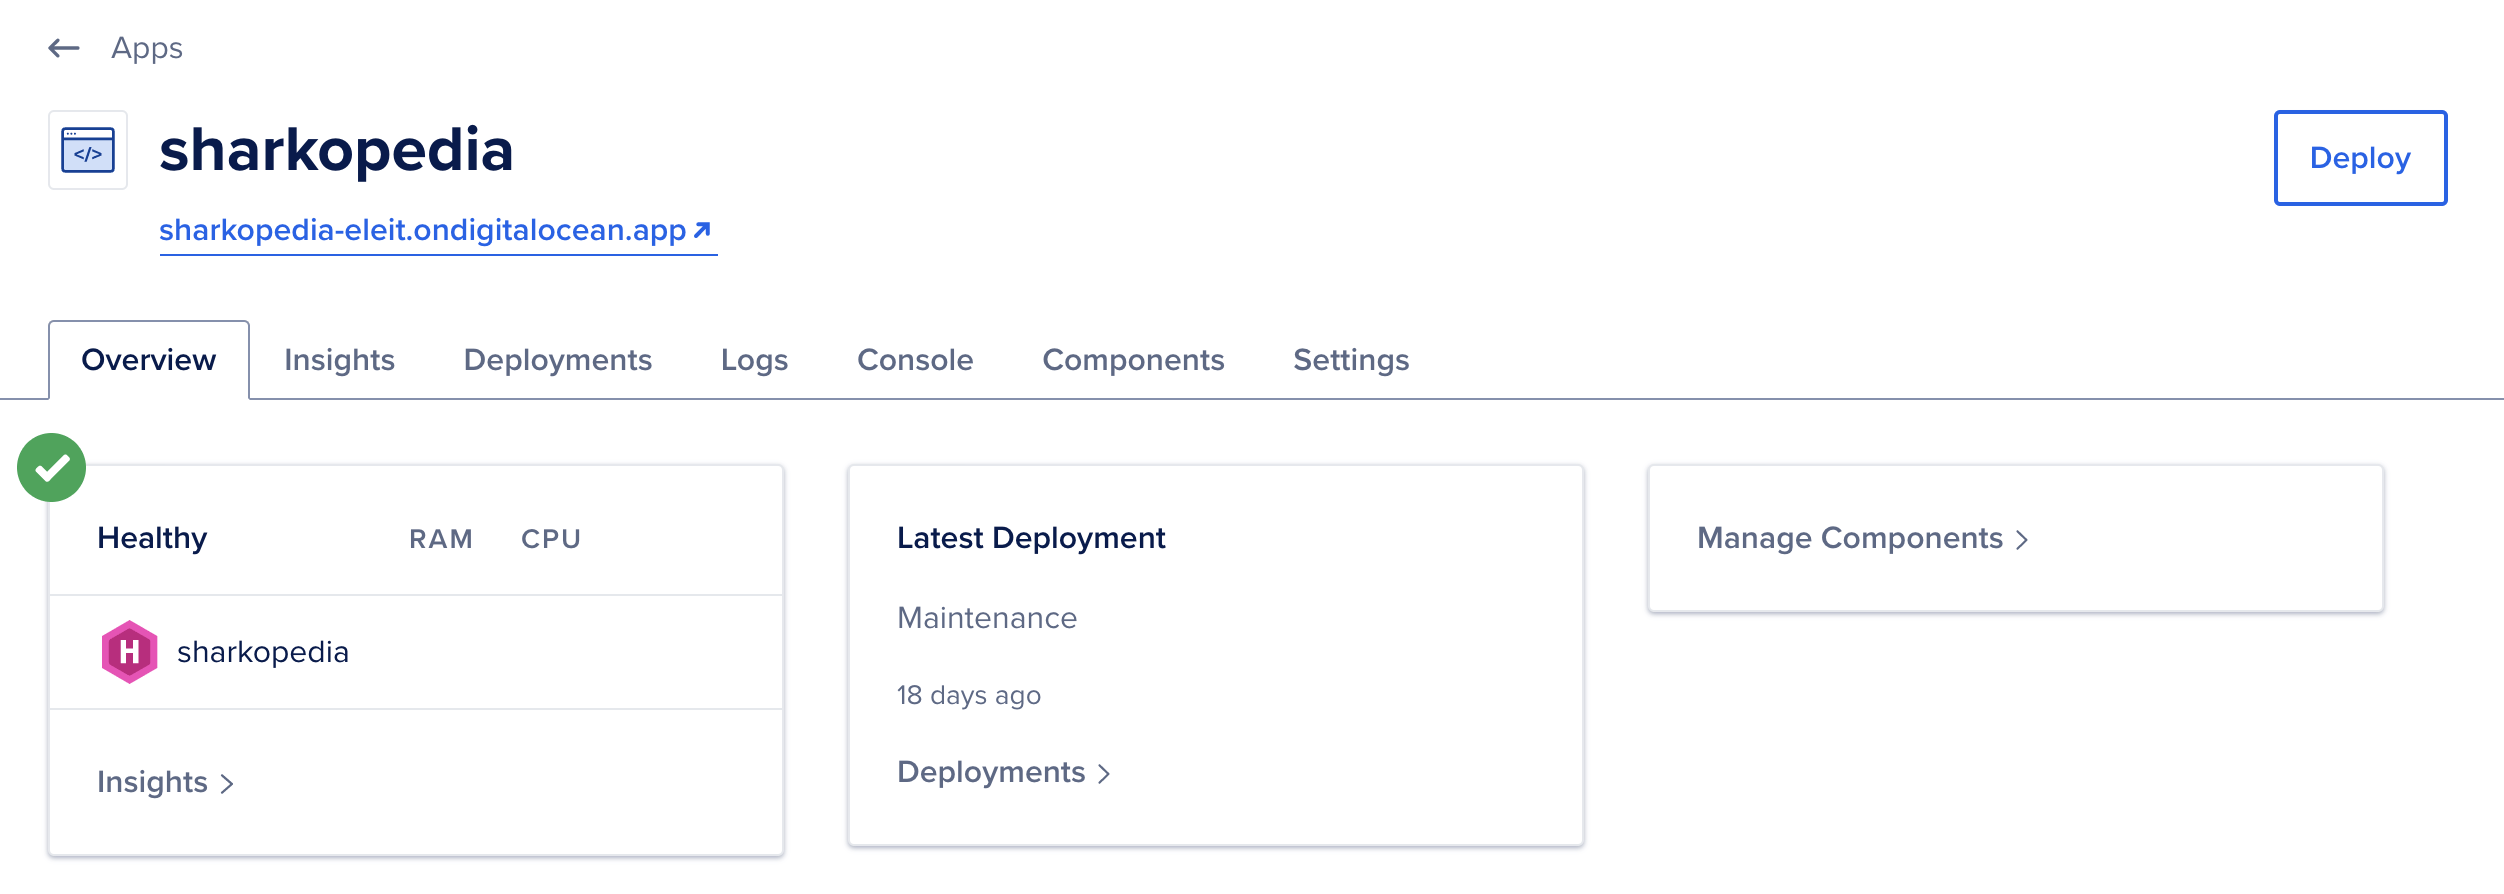
Once the build process completes, the interface will show you a healthy site and provide a link for you to visit the site:
Now that your site is deployed, you can make changes by pushing your code to GitHub.
Step 5 — Deploying Changes
To ensure that changes get deployed, let’s add the list of sharks to the home page of the site. When you commit the changes to your repository and push them to GitHub, they’ll deploy automatically.
Open the file layouts/index.html in your editor and add the following code to iterate over all the pages of your site that are sharks and display them:
...
    <main>
      <h2>{{ .Title }}</h2>
      {{ .Content }}

      <ul>
      {{ range (where site.RegularPages "Type" "in" "sharks") }}
        <li><a href="{{ .RelPermalink }}">{{ .Title }}</a></li>
      {{ end }}
      </ul>
    </main>
This version uses (where site.RegularPages "Type" "in" "sharks") to find only the content pages for sharks. Unlike your default list template, your home page needs more direction about what kind of content to display.
Save the file. Run the server with hugo serve and visit http://localhost:1313 to see your sharks listed:
Press CTRL+C to stop the server.
Now add the updated file to your repository:
- git add layouts/index.html
Make a commit:
- git commit -m "Add sharks to home page"
Finally, push your code to GitHub:
- git push origin main
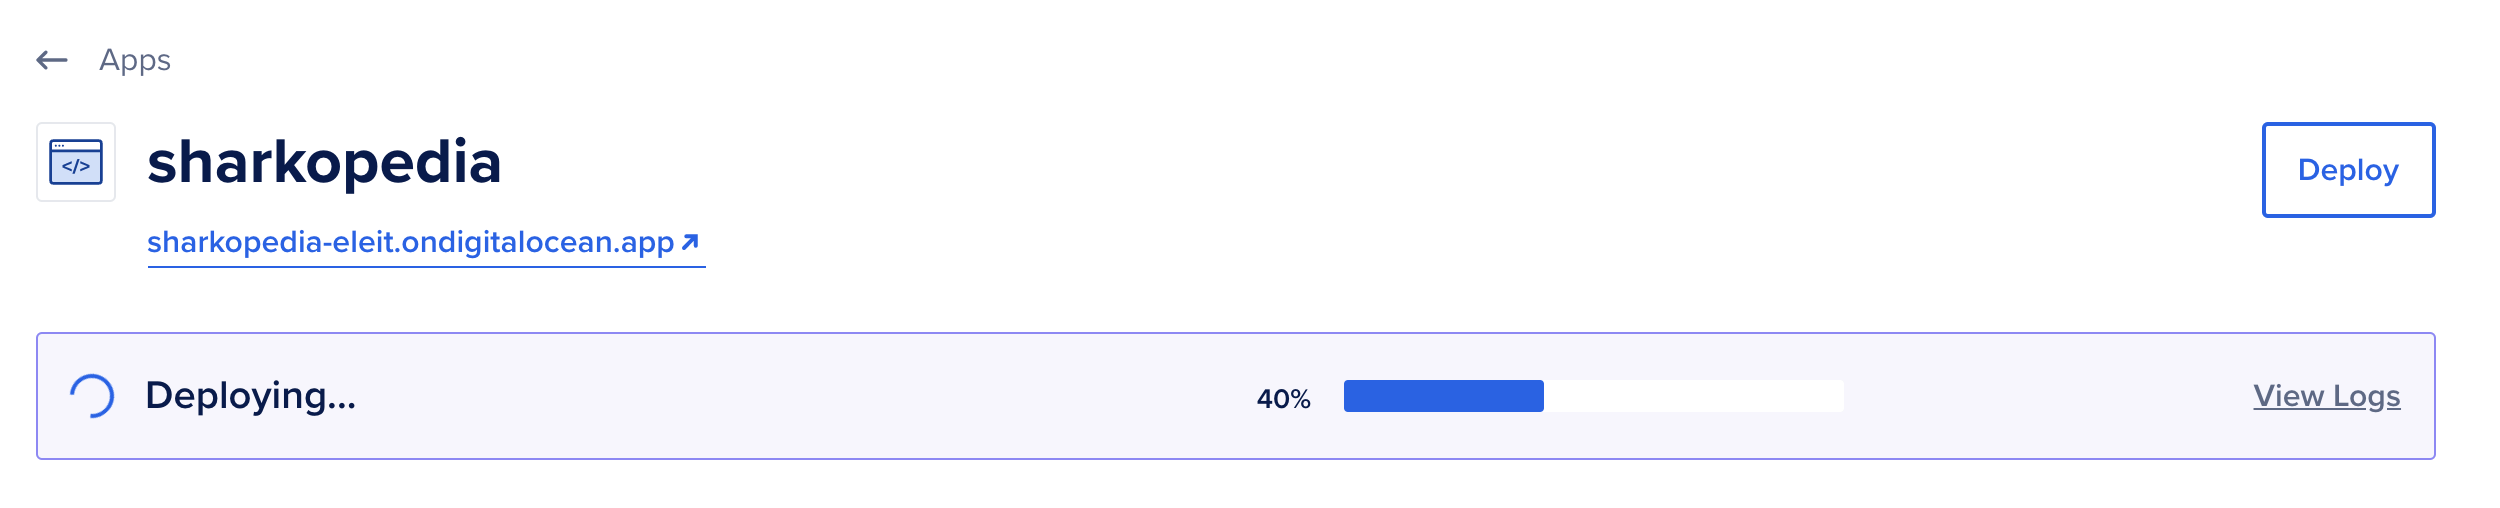
Within a few moments, your changes will be deployed. If you switch back to your DigitalOcean App status page, you’ll see the progress bar deploying your app again:
Once it finishes, visit your site to see your changes live.
Conclusion
In this tutorial you built a basic Hugo website and deployed using DigitalOcean’s App Platform. Any changes you commit and push to your repository will be redeployed, so you can now expand your site. You can find the example code for this tutorial in the DigitalOcean Community Repository
The example in this tutorial is a minimal Hugo site. Your own site may have more complex themes and features, but the deployment process will be the same.
Thanks for learning with the DigitalOcean Community. Check out our offerings for compute, storage, networking, and managed databases.
About the author
Managed the Write for DOnations program, wrote and edited community articles, and makes things on the Internet. Expertise in DevOps areas including Linux, Ubuntu, Debian, and more.
Still looking for an answer?
This textbox defaults to using Markdown to format your answer.
You can type !ref in this text area to quickly search our full set of tutorials, documentation & marketplace offerings and insert the link!
Great new feature! Is there way to do this with a separate VPS that hosts a bare git server instead? I know I can build a script locally but would be nice to have this on your end.
Cool tutorial. It would be nice if it would cover using a Hugo theme as well, most of us will use a theme.
Btw, how are 301 redirects made for websites on the DO Apps platform?
I would like to redirect certain pages such as:
domain.com/my-old-page/ redirects to domain.com/my-new-page/
I believe that Netlify has an easy way with a .toml file placed in the root. Is there such feature with DO App?
This was very helpful.
git remote add https://github.com/your_username/sharkopedia
Should that actually be (?):
git remote add origin https://github.com/your_username/sharkopedia
Thank you for the great tutorial!
What would be really great if this whole process worked not only with GitHub and GitLab repositories, but also with privately hosted git servers (eg. Gitea)
I noticed the instructions do not cover how to make the site available on the owner’s custom domain.
Is that information going to be added later? Or will there be a part 2 to these instructions?
I came here since I have an existing github repository for my blog that I would like to deploy to an existing DO droplet.
Thanks!
 This work is licensed under a Creative Commons Attribution-NonCommercial- ShareAlike 4.0 International License.
Become a contributor for community
Get paid to write technical tutorials and select a tech-focused charity to receive a matching donation.

DigitalOcean Documentation
Full documentation for every DigitalOcean product.

Resources for startups and AI-native businesses
The Wave has everything you need to know about building a business, from raising funding to marketing your product.
The developer cloud
Scale up as you grow — whether you're running one virtual machine or ten thousand.

Start building today
From GPU-powered inference and Kubernetes to managed databases and storage, get everything you need to build, scale, and deploy intelligent applications.
