By Glad Chinda and Bradley Kouchi

Introduction
We often get involved in building web applications where we need to fetch large sets of data records from a remote server, API, or a database. If you are building a payment system, for example, it could be fetching thousands of transactions. If it is a social media app, it could be fetching many user comments, profiles, or activities. Whatever the case may be, there are several solutions for presenting the data in a manner that does not overwhelm the end-user interacting with the app.
One method for handling large datasets is using pagination. Pagination works effectively when you already know the size of the dataset (the total number of records in the dataset) upfront. Secondly, you only load the required chunk of data from the total dataset based on the end-users interaction with the pagination control. This is the technique used in displaying search results in Google Search.
In this tutorial, you will learn how to build a custom pagination component with React for paginating large datasets. You will build a paginated view of the countries in the world - a dataset with a known size.
Here is a demo of what you will be building in this tutorial:
Prerequisites
To complete this tutorial, you will need:
- Node installed on your machine. Steps can be found at How to Install Node.js and Create a Local Development Environment.
- The
create-react-appcommand-line package to create the boilerplate code for your React app. If you are usingnpm < 5.2, then you may need to installcreate-react-appas a global dependency. - Finally, this tutorial assumes that you are already familiar with React. If that is not the case, you can check out the How To Code in React.js series to learn more about React.
This tutorial was verified with Node v14.2.0, npm v6.14.4, react v16.13.1, and react-scripts v3.4.1.
Step 1 — Setting Up the Project
Start a new React application using the create-react-app command. You can name the application whatever you’d like, but this tutorial will name it react-pagination:
- npx create-react-app react-pagination
Next, you will install the dependencies needed for your application. First, use the terminal window to navigate to the project directory:
- cd react-pagination
Run the following command to install the required dependencies:
- npm install bootstrap@4.1.0 prop-types@15.6.1 react-flags@0.1.13 countries-api@2.0.1 node-sass@4.14.1
This will install bootstrap, prop-types, react-flags, countries-api, and node-sass.
You installed the bootstrap package as a dependency for your application since you will need some default styling. You will also use styles from the Bootstrap pagination component.
To include Bootstrap in the application, edit the src/index.js file:
- nano src/index.js
And add the following line before the other import statements:
import "bootstrap/dist/css/bootstrap.min.css";
Now, Bootstrap styling will be available throughout your application.
You also installed react-flags as a dependency for your application. In order to get access to the flag icons from your application, you will need to copy the icon images to the public directory of your application.
Create an img directory in your public directory:
- mkdir public/img
Copy the image files in flags to img:
- cp -R node_modules/react-flags/vendor/flags public/img
This provides a copy of all the react-flag images to your application.
Now that you’ve included some dependencies, start the application by running the following command with npm from the react-pagination project directory:
- npm start
Now that you’ve started the application, development can begin. Notice that a browser tab has been opened for you with live reloading functionality to keep in sync with the application as you develop.
At this point, the application view should look like the following screenshot:

You’re now ready to start creating components.
Step 2 — Creating the CountryCard Component
CountryCard ComponentIn this step, you will create the CountryCard component. The CountryCard component renders the name, region, and flag of a given country.
First, let’s create a components directory in the src directory:
- mkdir src/components
Then, create a new CountryCard.js file in the src/components directory:
- nano src/components/CountryCard.js
And add the following code snippet to it:
import React from 'react';
import PropTypes from 'prop-types';
import Flag from 'react-flags';

const CountryCard = props => {
  const {
    cca2: code2 = '', region = null, name = {}
  } = props.country || {};

  return (
    <div className="col-sm-6 col-md-4 country-card">
      <div className="country-card-container border-gray rounded border mx-2 my-3 d-flex flex-row align-items-center p-0 bg-light">
        <div className="h-100 position-relative border-gray border-right px-2 bg-white rounded-left">
          <Flag country={code2} format="png" pngSize={64} basePath="./img/flags" className="d-block h-100" />
        </div>
        <div className="px-3">
          <span className="country-name text-dark d-block font-weight-bold">{ name.common }</span>
          <span className="country-region text-secondary text-uppercase">{ region }</span>
        </div>
      </div>
    </div>
  )
}

CountryCard.propTypes = {
  country: PropTypes.shape({
    cca2: PropTypes.string.isRequired,
    region: PropTypes.string.isRequired,
    name: PropTypes.shape({
      common: PropTypes.string.isRequired
    }).isRequired
  }).isRequired
};

export default CountryCard;
The CountryCard component requires a country prop that contains the data about the country to be rendered. As seen in the propTypes for the CountryCard component, the country prop object must contain the following data:
cca2- 2-digit country coderegion- the country region (e.g., “Africa”)name.common- the common name of the country (e.g., “Nigeria”)
Here is a sample country object:
{
  cca2: "NG",
  region: "Africa",
  name: {
    common: "Nigeria"
  }
}
Also, notice how you render the country flag using the react-flags package. You can check the react-flags documentation to learn more about the required props and how to use the package.
You now have a completed an individual CountryCard component. Ultimately, you will be using CountryCards multiple times to display different flags and country information in your application.
Step 3 — Creating the Pagination Component
Pagination ComponentIn this step, you will create the Pagination component. The Pagination component contains the logic for building, rendering, and switching pages on the pagination control.
Create a new Pagination.js file in the src/components directory:
- nano src/components/Pagination.js
And add the following code snippet to it:
import React, { Component, Fragment } from 'react';
import PropTypes from 'prop-types';

class Pagination extends Component {
  constructor(props) {
    super(props);
    const { totalRecords = null, pageLimit = 30, pageNeighbours = 0 } = props;

    this.pageLimit = typeof pageLimit === 'number' ? pageLimit : 30;
    this.totalRecords = typeof totalRecords === 'number' ? totalRecords : 0;

    // pageNeighbours can be: 0, 1 or 2
    this.pageNeighbours = typeof pageNeighbours === 'number'
      ? Math.max(0, Math.min(pageNeighbours, 2))
      : 0;

    this.totalPages = Math.ceil(this.totalRecords / this.pageLimit);

    this.state = { currentPage: 1 };
  }
}

Pagination.propTypes = {
  totalRecords: PropTypes.number.isRequired,
  pageLimit: PropTypes.number,
  pageNeighbours: PropTypes.number,
  onPageChanged: PropTypes.func
};

export default Pagination;
The Pagination component can take four special props as specified in the propTypes object.
onPageChangedis a function called with data of the current pagination state only when the current page changes.totalRecordsindicates the total number of records to be paginated. It is required.pageLimitindicates the number of records to be shown per page. If not specified, it defaults to30as defined in theconstructor().pageNeighboursindicates the number of additional page numbers to show on each side of the current page. The minimum value is0, and the maximum value is2. If not specified, it defaults to0as defined in theconstructor().
The following image illustrates the effect of different values of the pageNeighbours prop:

In the constructor() function, you compute the total pages as follows:
this.totalPages = Math.ceil(this.totalRecords / this.pageLimit);
Notice that you use Math.ceil() here to ensure that you get an integer value for the total number of pages. This also ensures that the excess records are captured in the last page, especially in cases where the number of excess records is less than the number of records to be shown per page.
Finally, you initialized the state with the currentPage property set to 1. You need this state property to keep track of the currently active page internally.
Next, you will create the method for generating the page numbers.
After the imports but before the Pagination class, add the following constants and range function:
// ...

const LEFT_PAGE = 'LEFT';
const RIGHT_PAGE = 'RIGHT';

/**
 * Helper method for creating a range of numbers
 * range(1, 5) => [1, 2, 3, 4, 5]
 */
const range = (from, to, step = 1) => {
  let i = from;
  const range = [];

  while (i <= to) {
    range.push(i);
    i += step;
  }

  return range;
}
In the Pagination class, after the constructor, add the following fetchPageNumbers method:
class Pagination extends Component {
  // ...

  /**
   * Let's say we have 10 pages and we set pageNeighbours to 2
   * Given that the current page is 6
   * The pagination control will look like the following:
   *
   * (1) < {4 5} [6] {7 8} > (10)
   *
   * (x) => terminal pages: first and last page(always visible)
   * [x] => represents current page
   * {...x} => represents page neighbours
   */
  fetchPageNumbers = () => {
    const totalPages = this.totalPages;
    const currentPage = this.state.currentPage;
    const pageNeighbours = this.pageNeighbours;

    /**
     * totalNumbers: the total page numbers to show on the control
     * totalBlocks: totalNumbers + 2 to cover for the left(<) and right(>) controls
     */
    const totalNumbers = (this.pageNeighbours * 2) + 3;
    const totalBlocks = totalNumbers + 2;

    if (totalPages > totalBlocks) {
      const startPage = Math.max(2, currentPage - pageNeighbours);
      const endPage = Math.min(totalPages - 1, currentPage + pageNeighbours);
      let pages = range(startPage, endPage);

      /**
       * hasLeftSpill: has hidden pages to the left
       * hasRightSpill: has hidden pages to the right
       * spillOffset: number of hidden pages either to the left or to the right
       */
      const hasLeftSpill = startPage > 2;
      const hasRightSpill = (totalPages - endPage) > 1;
      const spillOffset = totalNumbers - (pages.length + 1);

      switch (true) {
        // handle: (1) < {5 6} [7] {8 9} (10)
        case (hasLeftSpill && !hasRightSpill): {
          const extraPages = range(startPage - spillOffset, startPage - 1);
          pages = [LEFT_PAGE, ...extraPages, ...pages];
          break;
        }

        // handle: (1) {2 3} [4] {5 6} > (10)
        case (!hasLeftSpill && hasRightSpill): {
          const extraPages = range(endPage + 1, endPage + spillOffset);
          pages = [...pages, ...extraPages, RIGHT_PAGE];
          break;
        }

        // handle: (1) < {4 5} [6] {7 8} > (10)
        case (hasLeftSpill && hasRightSpill):
        default: {
          pages = [LEFT_PAGE, ...pages, RIGHT_PAGE];
          break;
        }
      }

      return [1, ...pages, totalPages];
    }

    return range(1, totalPages);
  }
}
Here, you first define two constants: LEFT_PAGE and RIGHT_PAGE. These constants will be used to indicate points where you have page controls for moving left and right, respectively.
You also defined a helper range() function that can help you generate ranges of numbers.
Note: If you use a utility library like Lodash in your project, then you can use the _.range() function provided by Lodash instead. The following code snippet shows the difference between the range() function you just defined and the one from Lodash:
range(1, 5); // returns [1, 2, 3, 4, 5]
_.range(1, 5); // returns [1, 2, 3, 4]
Next, you defined the fetchPageNumbers() method in the Pagination class. This method handles the core logic for generating the page numbers to be shown on the pagination control. You want the first page and the last page to always be visible.
First, you defined a couple of variables. totalNumbers represents the total page numbers that will be shown on the control. totalBlocks represents the total page numbers to be shown plus two additional blocks for the left and right page indicators.
If totalPages is not greater than totalBlocks, you return a range of numbers from 1 to totalPages. Otherwise, you return the array of page numbers, with LEFT_PAGE and RIGHT_PAGE at points where you have pages spilling to the left and right, respectively.
However, notice that your pagination control ensures that the first page and last page are always visible. The left and right page controls appear inwards.
Now, you will add the render() method to enable you to render the pagination control.
In the Pagination class, after the constructor and fetchPageNumbers method, add the following render method:
class Pagination extends Component {
// ...
render() {
if (!this.totalRecords || this.totalPages === 1) return null;
const { currentPage } = this.state;
const pages = this.fetchPageNumbers();
return (
<Fragment>
<nav aria-label="Countries Pagination">
<ul className="pagination">
{ pages.map((page, index) => {
if (page === LEFT_PAGE) return (
<li key={index} className="page-item">
<a className="page-link" href="#" aria-label="Previous" onClick={this.handleMoveLeft}>
<span aria-hidden="true">«</span>
<span className="sr-only">Previous</span>
</a>
</li>
);
if (page === RIGHT_PAGE) return (
<li key={index} className="page-item">
<a className="page-link" href="#" aria-label="Next" onClick={this.handleMoveRight}>
<span aria-hidden="true">»</span>
<span className="sr-only">Next</span>
</a>
</li>
);
return (
<li key={index} className={`page-item${ currentPage === page ? ' active' : ''}`}>
<a className="page-link" href="#" onClick={ this.handleClick(page) }>{ page }</a>
</li>
);
}) }
</ul>
</nav>
</Fragment>
);
}
}
Here, you generate the page numbers array by calling the fetchPageNumbers() method you created earlier. You then render each page number using Array.prototype.map(). Notice that you register click event handlers on each rendered page number to handle clicks.
Also, notice that the pagination control will not be rendered if the totalRecords prop was not correctly passed to the Pagination component or in cases where there is only 1 page.
Finally, you will define the event handler methods.
In the Pagination class, after the constructor and fetchPageNumbers method and render method, add the following:
class Pagination extends Component {
  // ...

  componentDidMount() {
    this.gotoPage(1);
  }

  gotoPage = page => {
    const { onPageChanged = f => f } = this.props;
    const currentPage = Math.max(0, Math.min(page, this.totalPages));
    const paginationData = {
      currentPage,
      totalPages: this.totalPages,
      pageLimit: this.pageLimit,
      totalRecords: this.totalRecords
    };

    this.setState({ currentPage }, () => onPageChanged(paginationData));
  }

  handleClick = page => evt => {
    evt.preventDefault();
    this.gotoPage(page);
  }

  handleMoveLeft = evt => {
    evt.preventDefault();
    this.gotoPage(this.state.currentPage - (this.pageNeighbours * 2) - 1);
  }

  handleMoveRight = evt => {
    evt.preventDefault();
    this.gotoPage(this.state.currentPage + (this.pageNeighbours * 2) + 1);
  }
}
You define the gotoPage() method that modifies the state and sets the currentPage to the specified page. It ensures that the page argument has a minimum value of 1 and a maximum value of the total number of pages. It finally calls the onPageChanged() function that was passed in as a prop, with data indicating the new pagination state.
When the component mounts, you go to the first page by calling this.gotoPage(1) as shown in the componentDidMount() lifecycle method.
Notice how you use (this.pageNeighbours * 2) in handleMoveLeft() and handleMoveRight() to slide the page numbers to the left and to the right respectively based on the current page number.
Here is a demo of the interaction of the left to right movement.

You now have completed Pagination component. Users will be able to interact with the navigation controls in this component to display different pages of flags.
Step 4 — Building the App Component
App ComponentNow that you have a CountryCard and Pagination component, you can use them in your App component.
Modify the App.js file in the src directory:
- nano src/App.js
Replace the contents of App.js with the following lines of code:
import React, { Component } from 'react';
import Countries from 'countries-api';
import './App.css';
import Pagination from './components/Pagination';
import CountryCard from './components/CountryCard';

class App extends Component {
  state = { allCountries: [], currentCountries: [], currentPage: null, totalPages: null }

  componentDidMount() {
    const { data: allCountries = [] } = Countries.findAll();
    this.setState({ allCountries });
  }

  onPageChanged = data => {
    const { allCountries } = this.state;
    const { currentPage, totalPages, pageLimit } = data;
    const offset = (currentPage - 1) * pageLimit;
    const currentCountries = allCountries.slice(offset, offset + pageLimit);

    this.setState({ currentPage, currentCountries, totalPages });
  }
}

export default App;
Here you initialize the App component’s state with the following attributes:
allCountries- This an array of all the countries in your app. Initialized to an empty array ([]).currentCountries- This an array of all the countries to be shown on the currently active page. Initialized to an empty array ([]).currentPage- The page number of the currently active page. Initialized tonull.totalPages- The total number of pages for all the country records. Initialized tonull.
Next, in the componentDidMount() lifecycle method, you fetch all the world countries using the countries-api package by invoking Countries.findAll(). You then update the app state, setting allCountries to contain all the world countries. You can see the countries-api documentation to learn more about the package.
Finally, you defined the onPageChanged() method, which will be called each time you navigate to a new page from the pagination control. This method will be passed to the onPageChanged prop of the Pagination component.
There are two lines that are worth paying attention to in this method. The first is this line:
const offset = (currentPage - 1) * pageLimit;
The offset value indicates the starting index for fetching the records for the current page. Using (currentPage - 1) ensures that the offset is zero-based. Let’s say, for example, that you are displaying 25 records per page, and you are currently viewing page 5. Then the offset will be ((5 - 1) * 25 = 100).
For example, if you are fetching records on demand from a database, this is a sample SQL query to show you how offset can be used:
SELECT * FROM `countries` LIMIT 100, 25
Since you are not fetching records from a database or any external source, you need a way to extract the required chunk of records to be shown for the current page.
The second is this line:
const currentCountries = allCountries.slice(offset, offset + pageLimit);
Here you use the Array.prototype.slice() method to extract the required chunk of records from allCountries by passing the offset as the starting index for the slice and (offset + pageLimit) as the index before which to end the slice.
Note: In this tutorial, you did not fetch records from any external source. In a real application, you will probably be fetching records from a database or an API. The logic for fetching the records can go into the onPageChanged() method of the App component.
Let’s say you have a fictitious API endpoint /api/countries?page={current_page}&limit={page_limit}. The following snippet shows how you can fetch countries on demand from the API using the axios HTTP package:
onPageChanged = data => {
  const { currentPage, totalPages, pageLimit } = data;

  axios.get(`/api/countries?page=${currentPage}&limit=${pageLimit}`)
    .then(response => {
      const currentCountries = response.data.countries;
      this.setState({ currentPage, currentCountries, totalPages });
    });
}
Now, you can finish up the App component by adding the render() method.
In the App class, but after componentDidMount and onPageChanged, add the following render method:
class App extends Component {
// ... other methods here ...
render() {
const { allCountries, currentCountries, currentPage, totalPages } = this.state;
const totalCountries = allCountries.length;
if (totalCountries === 0) return null;
const headerClass = ['text-dark py-2 pr-4 m-0', currentPage ? 'border-gray border-right' : ''].join(' ').trim();
return (
<div className="container mb-5">
<div className="row d-flex flex-row py-5">
<div className="w-100 px-4 py-5 d-flex flex-row flex-wrap align-items-center justify-content-between">
<div className="d-flex flex-row align-items-center">
<h2 className={headerClass}>
<strong className="text-secondary">{totalCountries}</strong> Countries
</h2>
{ currentPage && (
<span className="current-page d-inline-block h-100 pl-4 text-secondary">
Page <span className="font-weight-bold">{ currentPage }</span> / <span className="font-weight-bold">{ totalPages }</span>
</span>
) }
</div>
<div className="d-flex flex-row py-4 align-items-center">
<Pagination totalRecords={totalCountries} pageLimit={18} pageNeighbours={1} onPageChanged={this.onPageChanged} />
</div>
</div>
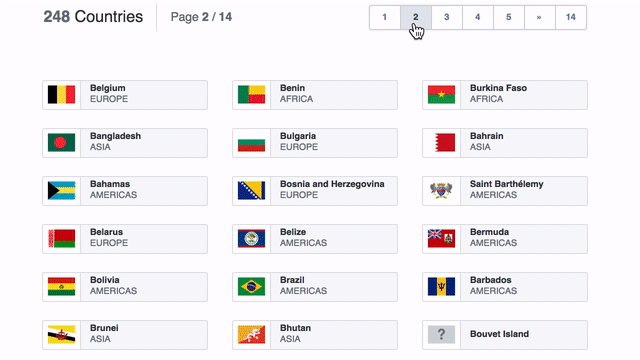
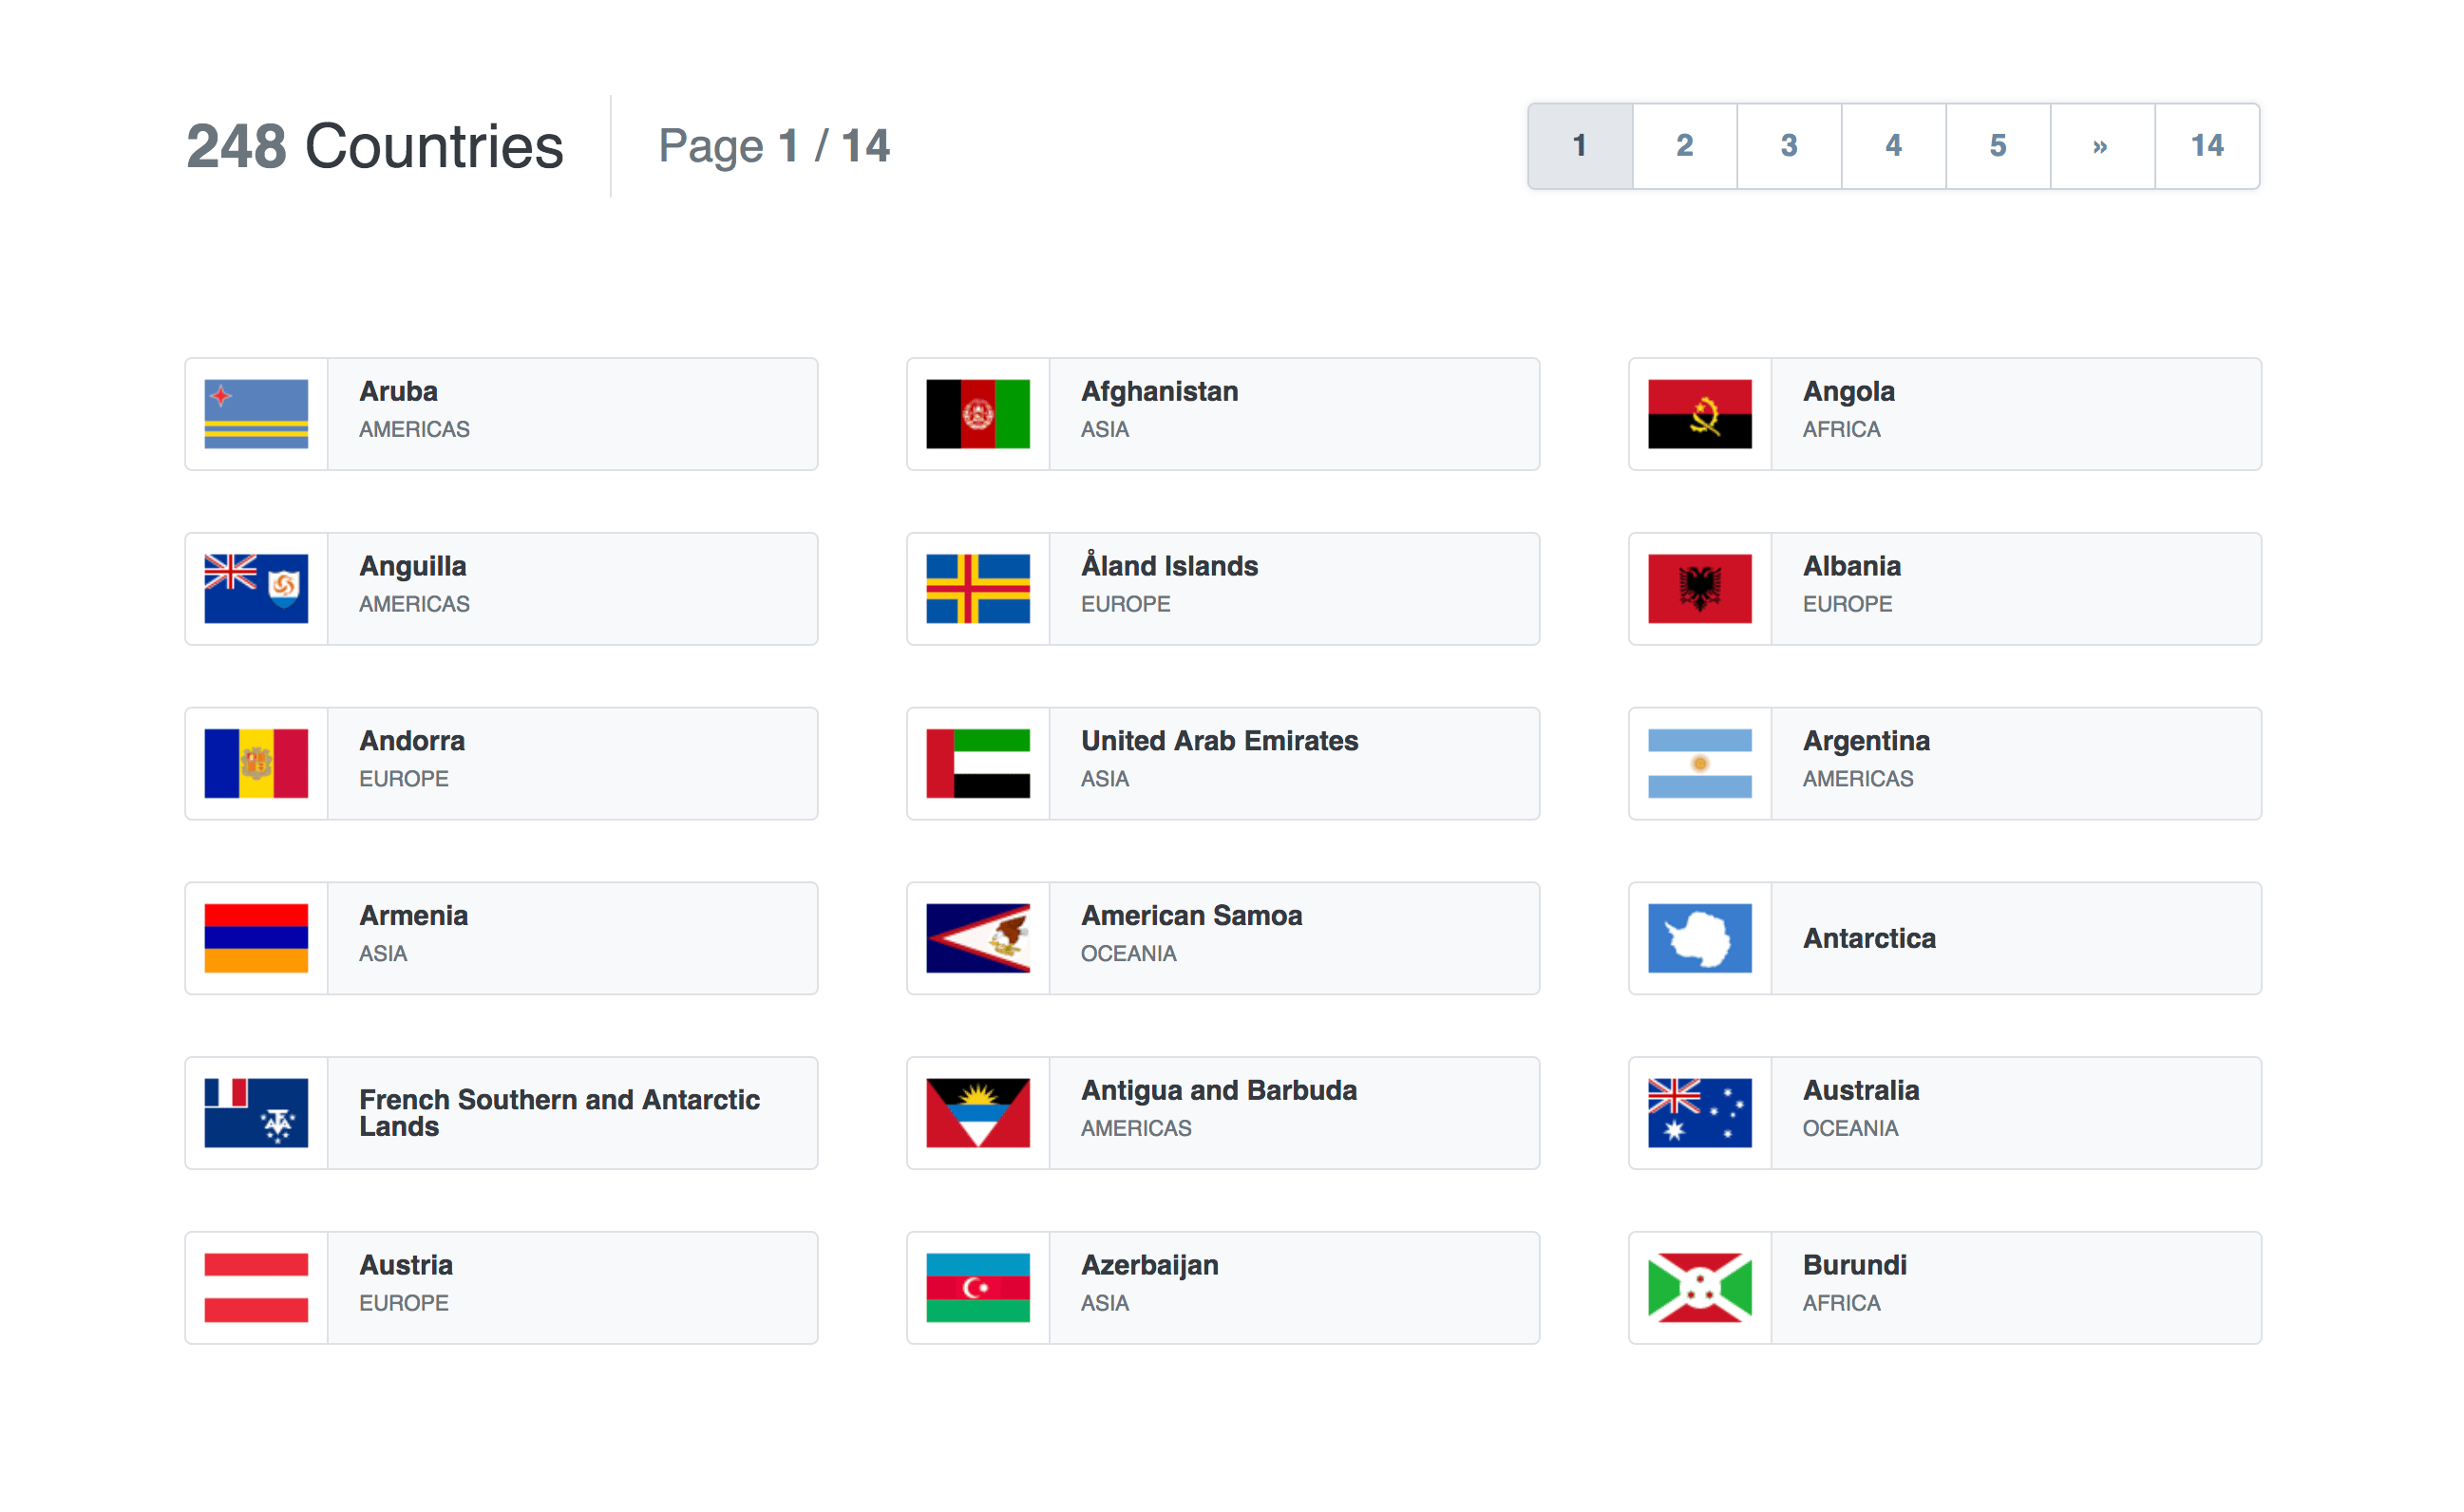
{ currentCountries.map(country => <CountryCard key={country.cca3} country={country} />) }
</div>
</div>
);
}
}
In the render() method, you render the total number of countries, the current page, the total number of pages, the <Pagination> control, and then the <CountryCard> for each country in the current page.
Notice that you passed the onPageChanged() method you defined earlier to the onPageChanged prop of the <Pagination> control. This is very important for capturing page changes from the Pagination component. You are also displaying 18 countries per page.
At this point, the app will look like the following screenshot:

You now have an App component that displays multiple CountryCard components and a Pagination component that breaks up the content into separate pages. Next you will explore styling your application.
Step 5 — Adding Custom Styles
You may have noticed that you have been adding some custom classes to the components you created earlier. Let’s define some style rules for those classes in the src/App.scss file.
- nano src/App.scss
The App.scss file will look like the following snippet:
/* Declare some variables */
$base-color: #ced4da;
$light-background: lighten(desaturate($base-color, 50%), 12.5%);

.current-page {
  font-size: 1.5rem;
  vertical-align: middle;
}

.country-card-container {
  height: 60px;
  cursor: pointer;
  position: relative;
  overflow: hidden;
}

.country-name {
  font-size: 0.9rem;
}

.country-region {
  font-size: 0.7rem;
}

.current-page,
.country-name,
.country-region {
  line-height: 1;
}

// Override some Bootstrap pagination styles
ul.pagination {
  margin-top: 0;
  margin-bottom: 0;
  box-shadow: 0 0 5px rgba(0, 0, 0, 0.1);

  li.page-item.active {
    a.page-link {
      color: saturate(darken($base-color, 50%), 5%) !important;
      background-color: saturate(lighten($base-color, 7.5%), 2.5%) !important;
      border-color: $base-color !important;
    }
  }

  a.page-link {
    padding: 0.75rem 1rem;
    min-width: 3.5rem;
    text-align: center;
    box-shadow: none !important;
    border-color: $base-color !important;
    color: saturate(darken($base-color, 30%), 10%);
    font-weight: 900;
    font-size: 1rem;

    &:hover {
      background-color: $light-background;
    }
  }
}
Modify your App.js file to reference App.scss instead of App.css.
Note: For more information about this, see the Create React App documentation.
- nano src/App.js
import React, { Component } from 'react';
import Countries from 'countries-api';
import './App.scss';
import Pagination from './components/Pagination';
import CountryCard from './components/CountryCard';
After adding the styles, the app will now look like the following screenshot:
You now have a complete application with additional custom styling. You can use custom styles to modify and enhance any default stylings provided by libraries like Bootstrap.
Conclusion
In this tutorial, you created a custom pagination widget in your React application. Although you didn’t make calls to any API or interact with any database backend in this tutorial, your application may demand such interactions. You are not in any way limited to the approach used in this tutorial - you can extend it as you wish to suit the requirements of your application.
For this tutorial’s complete source code, check out the build-react-pagination-demo repository on GitHub. You can also get a live demo of this tutorial on Code Sandbox.
If you’d like to learn more about React, take a look at our How To Code in React.js series, or check out our React topic page for exercises and programming projects.
Thanks for learning with the DigitalOcean Community. Check out our offerings for compute, storage, networking, and managed databases.
About the author(s)
Former Technical Editor at DigitalOcean. Expertise in areas including Vue.js, CSS, React, and more.
Still looking for an answer?
This textbox defaults to using Markdown to format your answer.
You can type !ref in this text area to quickly search our full set of tutorials, documentation & marketplace offerings and insert the link!
This comment has been deleted
Hi Glad, many thanks for your job, it’s very helpful.
Could you show, please, how to lead to the situation that after reloading the page (or e.g. after removing an element from the page) the current page is displayed, not the first.
Kind regards, Radek
Hi Glad,
Great tutorial. I am new to React can you please explain the code : const { data: allCountries = [] } = Countries.findAll(); this.setState({ allCountries });
and
const { currentPage, totalPages, pageLimit } = data;
Regards,
Mandeep Gill
The author who wrote this tutorial is a fucking moron, some of the source files are missing, and the way he wrote the code is totally not user friendly to new people learning react, by far the worst rect tutorial I seen.
WHERE IS 'import Countries from “countries-api/lib/data/Countries.json”;???
you fucking cretin,
also what is tht half assed ‘ajax’ tutorial??
if you cant fucking write a tutorial, dont write it! fucking retard
const startPage = Math.max(2, currentPage - pageNeighbours);
      const endPage = Math.min(totalPages - 1, currentPage + pageNeighbours);
      let pages = range(startPage, endPage);
This was the most confusing part. For those who didn’t get it: pages variable represents NOT all pages of a pagination controller but rather everything between the first and last page numbers hence skimming through the return [1, ...pages, totalPages] statement makes sense. That’s why author didn’t use just startPage=currentPage - pageNeighbours but rather Math.max(2, currentPage - pageNeighbours) same thing for endPage. I hope the comment is somewhat useful.
 This work is licensed under a Creative Commons Attribution-NonCommercial- ShareAlike 4.0 International License.
Become a contributor for community
Get paid to write technical tutorials and select a tech-focused charity to receive a matching donation.

DigitalOcean Documentation
Full documentation for every DigitalOcean product.

Resources for startups and AI-native businesses
The Wave has everything you need to know about building a business, from raising funding to marketing your product.
The developer cloud
Scale up as you grow — whether you're running one virtual machine or ten thousand.

Start building today
From GPU-powered inference and Kubernetes to managed databases and storage, get everything you need to build, scale, and deploy intelligent applications.
