By Cristian Marius Tiutiu, Bikram Gupta and Easha Abid

Introduction
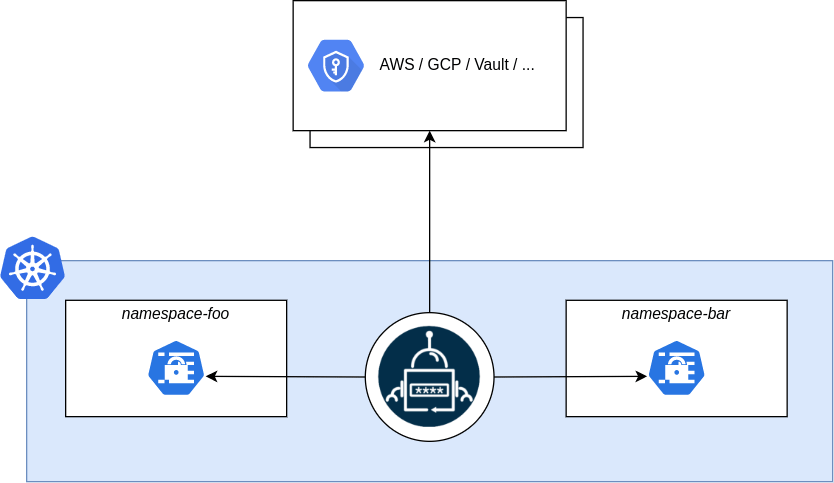
In this tutorial, you will learn how to configure and use the External Secrets Operator. External Secrets Operator is a Kubernetes operator that integrates external secret management systems like AWS Secrets Manager, HashiCorp Vault, Google Secrets Manager, Azure Key Vault and many more. The operator reads information from external APIs and automatically injects the values into a Kubernetes Secret.
You will be installing and configuring Vault server on an external DO Droplet.
Prerequisites
To complete this tutorial, you will need:
- A Git client for cloning the Starter Kit repository.
- Helm for installing the Loki stack chart.
- Kubectl for Kubernetes interaction.
- A text editor with YAML lint support for example: Visual Studio Code.
- Vault sever installed on a DO Droplet as explained in this article. Please install the Vault server on the same VPC Network as the Kubernetes droplet for easier access via private address.
Please make sure that you replace the vault version in the packer template.json from 1.8.4 to 1.11.3. That is specified in the provisioner block on line 16.
Change it from:
"curl -L https://releases.hashicorp.com/vault/1.8.4/vault_1.8.4_linux_amd64.zip -o vault.zip"
to
"curl -L https://releases.hashicorp.com/vault/1.11.3/vault_1.11.3_linux_amd64.zip -o vault.zip"
Step 1 - Understanding External Secrets Operator
The External Secrets Operator extends Kubernetes with Custom Resources, which defines where secrets live and how to synchronize them. The controller fetches secrets from an external API and creates Kubernetes secrets. If the secret from the external API changes, the controller will reconcile the state in the cluster and update the secrets accordingly.
The External Secrets Operator uses the following CRDs:
- Secret Store - the idea behind the SecretStore resource is to separate concerns of authentication/access and the actual Secret and configuration needed for workloads. The ExternalSecret specifies what to fetch, the SecretStore specifies how to access it. This resource is namespaced.
- Cluster Secret Store - The ClusterSecretStore is a global, cluster-wide SecretStore that can be referenced from all namespaces. You can use it to provide a central gateway to your secret provider.
- External Secret - An ExternalSecret declares what data to fetch. It has a reference to a SecretStore which knows how to access that data. The controller uses ExternalSecret as a blueprint to create secrets.
Throughout this guide, you will be using Hashicorp Vault as a provider for secrets management. Vault itself implements lots of different secret engines. ESO only supports the KV Secrets Engine.
Step 2 - Configuring the Vault Server
The vault server in this chapter is for development/demonstration purposes only.
HashiCorp Vault is an identity-based secrets and encryption management system. It provides encryption services that are gated by authentication and authorization methods. Using Vault’s UI, CLI, or HTTP API, access to secrets and other sensitive data can be securely stored and managed, tightly controlled (restricted), and auditable.
Please follow the next steps to configure the vault:
SSH into your droplet and create a file called config.hcl. Add the following content to it:
listener "tcp" {
address = "0.0.0.0:8200"
tls_disable = "true"
}

storage "raft" {
path = "./vault/data"
node_id = "node1"
}
cluster_addr = "http://127.0.0.1:8201"
api_addr = "http://127.0.0.1:8200"
Explanations for the above configuration:
listener- Configures how Vault is listening for API requests. It’s currently set to listen on all interfaces so your Kubernetes Cluster can communicate with it.storage- Configures the storage backend where Vault data is stored.Raftis the integrated storage backend used by Vault.
When using the Integrated Storage backend, it is required to provide cluster_addr and api_addr to indicate the address and port to be used for communication between Vault servers in the cluster for client redirection.
Create the vault directory which will be used as storage from the current working directory:
mkdir -p vault/data
Start the Vault server using the config file created in the above step:
vault server -config=config.hcl
Open a new terminal instance and SSH into the droplet. Export the VAULT_ADDR environment variable to the following:
export VAULT_ADDR=http://127.0.0.1:8200
Initialize the vault server with the following command:
vault operator init
IMPORTANT
After the initialize command the output will show 5 Unseal Keys and an initial Root Token. These are very important. Vault is sealed by default so you will use three keys to unseal it. The Root Token value will be used in the SecretStore CRD to connect to the Vault server from the Kubernetes Cluster. You should save these values and keep them stored in a secure place like a Password Manager with limited access.
Export the VAULT_TOKEN environment variable to the value of the Root Token from the previous step:
export VAULT_TOKEN=<ROOT_TOKEN_VALUE>
Unseal the vault server with the Unseal Keys outputted above:
vault operator unseal
You should see something similar to the following:
root@vault:~# vault operator unseal
Unseal Key (will be hidden):
Key                Value
---                -----
Seal Type          shamir
Initialized        true
Sealed             true
Total Shares       5
Threshold          3
Unseal Progress    1/3
Unseal Nonce       5f5492b4-b89a-cbf1-9e02-1f95c890710b
Version            1.11.3
Build Date         2022-08-26T10:27:10Z
Storage Type       raft
HA Enabled         true
Please note that you will need to repeat this step three times with different keys as shown in the Unseal Progress line.
Enable the KV secrets engine:
vault secrets enable -path=secret/ kv
Check the status of the Vault server:
vault status
You should see something similar to the following:
root@vault:~# vault status
Key                     Value
---                     -----
Seal Type               shamir
Initialized             true
Sealed                  false
Total Shares            5
Threshold               3
Version                 1.11.3
Build Date              2022-08-26T10:27:10Z
Storage Type            raft
Cluster Name            vault-cluster-5641086a
Cluster ID              9ea65968-d2fc-cca1-d396-75de70e1289b
HA Enabled              true
HA Cluster              https://127.0.0.1:8201
HA Mode                 active
Active Since            2022-09-09T12:21:20.509152959Z
Raft Committed Index    36
Raft Applied Index      36
Take note of the Initialized and Sealed lines. They should show true and false respectively.
As a precaution, you should also restrict incoming connections to the Vault Server Droplet to just the Kubernetes cluster. This is necessary for the time being as TLS is disabled in the vault config file. To achieve this please follow the next steps:
- Log into your DO account and go to the Networking --> Firewalls menu.
- Click on the Create Firewall button.
- Add a name to the firewall and from the Inbound rules, configure the following rule: Custom rule type, TCP protocol, 8200 port, and the Source should be set as Kubernetes Cluster which will consume secrets from the Vault server.
- After the rule is created make sure you add this rule to the droplet from the Droplets menu.
At this point, the Vault Server should be initialized and ready for use. In the next section, you will create a ClusterSecretStore and ExternalSecret CRD.
Step 3 - Installing and Configuring the External Secrets Operator
In this step, you will learn how to deploy External Secrets Operator to your DOKS cluster, using Helm. Take a look at the chart of external secrets.
First, clone the Starter Kit repository, and then change the directory to your local copy:
git clone https://github.com/digitalocean/Kubernetes-Starter-Kit-Developers.git

cd Kubernetes-Starter-Kit-Developers
Next, add the External Secrets Helm repository and list the available charts:
helm repo add external-secrets https://charts.external-secrets.io

helm repo update external-secrets

helm search repo external-secrets
The output looks similar to the following:
NAME                                    CHART VERSION   APP VERSION     DESCRIPTION
external-secrets/external-secrets       0.5.9           v0.5.9          External secret management for Kubernetes
It’s a good practice to use a specific version for the Helm chart. This way, you can version it using Git and target it for a specific release. In this tutorial, the Helm chart version 0.5.9 is picked for external-secrets, which maps to application version 0.5.9.
Next, install the stack using helm. The following command installs version 0.5.9 of external-secrets/external-secrets in your cluster, and also creates the external-secrets namespace, if it doesn’t exist (it also installs CRDs):
HELM_CHART_VERSION="0.5.9"

helm install external-secrets external-secrets/external-secrets --version "${HELM_CHART_VERSION}" \
  --namespace=external-secrets \
  --create-namespace \
  --set installCRDs=true
Finally, check Helm release status:
helm ls -n external-secrets
The output looks similar to the following. STATUS column should display deployed.
NAME                    NAMESPACE               REVISION        UPDATED                                 STATUS          CHART                   APP VERSION
external-secrets        external-secrets        1               2022-09-10 10:33:50.324582 +0300 EEST   deployed        external-secrets-0.5.9  v0.5.9
Next, inspect all the Kubernetes resources created for External Secrets:
kubectl get all -n external-secrets
The output looks similar to:
NAME                                                    READY   STATUS    RESTARTS   AGE
pod/external-secrets-66457766c4-95mvm                   1/1     Running   0          48s
pod/external-secrets-cert-controller-6bd49df95b-8bw6x   1/1     Running   0          48s
pod/external-secrets-webhook-579c46bf-g4z6p             1/1     Running   0          48s

NAME                               TYPE        CLUSTER-IP     EXTERNAL-IP   PORT(S)   AGE
service/external-secrets-webhook   ClusterIP   10.245.78.48   <none>        443/TCP   49s

NAME                                               READY   UP-TO-DATE   AVAILABLE   AGE
deployment.apps/external-secrets                   1/1     1            1           50s
deployment.apps/external-secrets-cert-controller   1/1     1            1           50s
deployment.apps/external-secrets-webhook           1/1     1            1           50s

NAME                                                          DESIRED   CURRENT   READY   AGE
replicaset.apps/external-secrets-66457766c4                   1         1         1       50s
replicaset.apps/external-secrets-cert-controller-6bd49df95b   1         1         1       50s
replicaset.apps/external-secrets-webhook-579c46bf             1         1         1       50s
Next, you will create ClusterSecretStore, which is what the External Secrets Operator uses to store information about how to communicate with the given secrets provider. But before you work with the External Secrets Operator, you’ll need to add your Vault token inside a Kubernetes secret so that the External Secrets Operator can communicate with the secrets provider. This token was created when you first initialized the operator in Step 2.
To create the Kubernetes secret containing the token follow the next steps:
kubectl create secret generic vault-token --from-literal=token=<YOUR_VAULT_TOKEN>
The output should look similar to:
secret/vault-token created
The ClusterSecretStore is a cluster scoped SecretStore that can be referenced by all ExternalSecrets from all namespaces whereas SecretStore is namespaced. Use it to offer a central gateway to your secret backend.
A typical ClusterSecretStore configuration looks like below:
apiVersion: external-secrets.io/v1beta1
kind: ClusterSecretStore
metadata:
  name: vault-backend
spec:
  provider:
    vault:
      server: '<YOUR_DROPLET_ADDRESS>:<PORT>'
      path: secret
      version: v1
      auth:
        tokenSecretRef:
          name: <YOUR_SECRET_NAME>
          key: <YOUR_SECRET_KEY>
Explanations for the above configuration:
spec.provider.vault.server: Internal IP address of the Vault server droplet. Runs on port 8200.spec.provider.vault.path: Path where secrets are located.spec.provider.vault.version: Version of the Vault KV engine.auth.tokenSecretRef.name: Name of the previously created secret holding the Root Token of the Vault server.auth.tokenSecretRef.key: Key name in the secret since the secret was created with a key-value pair.
Then, open and inspect the 06-kubernetes-secrets/assets/manifests/cluster-secret-store.yaml file provided in the Starter Kit repository, using an editor of your choice (preferably with YAML lint support). Please make sure to replace the <> placeholders accordingly:
code 06-kubernetes-secrets/assets/manifests/cluster-secret-store.yaml
Next, create the ClusterSecretStore resource:
kubectl apply -f 06-kubernetes-secrets/assets/manifests/cluster-secret-store.yaml
This command applies the ClusterSecretStore CRD to your cluster and creates the object. You can see the object by running the following command, which will show you all of the information about the object inside of Kubernetes:
kubectl get ClusterSecretStore vault-backend
You should see something similar to:
NAME            AGE   STATUS   READY
vault-backend   97s   Valid    True
If you created the SecretStore successfully, you should see the STATUS column with a Valid value. If not, a very common issue is message: unable to validate store. This generally means that the authentication method for your client has failed as the ClusterSecretStore will try and create a client for your provider to verify everything is working. Recheck the secret containing the token and the status of the vault server.
Step 4 - Fetching an Example Secret
In this section, you will create ExternalSecret, which is the main resource in the External Secrets Operator. The ExternalSecret resource tells ESO to fetch a specific secret from a specific SecretStore and where to put the information. This resource is very important because it defines what secret you’d like to get from the external secret provider, where to put it, which secret store to use, and how often to sync the secret, among several other options.
Before creating the ExternalSecret, you need to have a secret available in the VaultServer. If you do not have one, follow the next steps:
SSH into the Vault Server droplet (if you closed the server you will need to restart the server and unseal it. Steps highlighted in Step 2) and create a secret using the following command:
vault kv put -mount=secret secret key=secret-value
You should see the following output:
Success! Data written to: secret/secret
A typical ExternalSecret configuration looks like below:
apiVersion: external-secrets.io/v1beta1
kind: ExternalSecret
metadata:
  name: <EXTERNAL_SECRET_NAME>
spec:
  refreshInterval: 15s
  secretStoreRef:
    name: vault-backend
    kind: ClusterSecretStore
  target:
    name: <KUBERNETES_SECRET_NAME>
    creationPolicy: Owner
  data:
    - secretKey: <SECRET_KEY>
      remoteRef:
        key: <VAULT_SECRET_KEY>
        property: <VAULT_SECRET_PROPERTY>
Explanations for the above configuration:
spec.refreshInterval: How often this secret is synchronized. If the secret’s value changes in Vault it will be updated to its Kubernetes counterpart.spec.secretStoreRef: Reference to theClusterSecretStoreresource created earlier.spec.target.name: Secret to be created in Kubernetes. If not present, then thesecretKeyfield underdatawill be usedspec.target.creationPolicy: This will create the secret if it doesn’t existdata.[].secretKey: This is the key inside of the Kubernetes secret that you would like to populate.data.[].remoteRef.key: This is the remote key in the secret provider. (As an example the previously created secret would be:secret/secret)data.[].remoteRef.property: This is the property inside of the secret at the path specified in indata.[].remoteRef.key. (As an example the previously created secret would be:key)
Then, open and inspect the 06-kubernetes-secrets/assets/manifests/external-secret.yaml file provided in the Starter Kit repository using an editor of your choice (preferably with YAML lint support). Please make sure to replace the <> placeholders accordingly:
code 06-kubernetes-secrets/assets/manifests/cluster-secret-store.yaml
Next, create the ExternalSecret resource:
kubectl apply -f 06-kubernetes-secrets/assets/manifests/external-secret.yaml
This command applies the ExternalSecret CRD to your cluster and creates the object. You can see the object by running the following command, which will show you all of the information about the object inside of Kubernetes:
kubectl get ExternalSecret example-sync
You should see something similar to:
NAME           STORE           REFRESH INTERVAL   STATUS         READY
example-sync   vault-backend   15s                SecretSynced   True
If the previous output has a Sync Error under STATUS, make sure your SecretStore is set up correctly. You can view the actual error by running the following command:
kubectl get ExternalSecret example-sync -o yaml
Conclusion
In this tutorial, you learned how to set up Vault on an external server and how to set up and configure the External Secrets Operator. You enabled communication between your DOKS cluster and the Vault Server making use of the External Secrets Operator CRDs. You also created a secret in your DOKS cluster by syncing an existing secret in Vault Server. For more advanced functionalities make sure you read their documentation here:
For more information on secrets in a Kubernetes cluster, refer to these guides:
- Access Vault Secrets Inside of Kubernetes Using ESO
- Securely Manage Secrets with HashiCorp Vault on Ubuntu
- Managing Kubernetes Secrets
The next step is to Scale Application Workloads.
Thanks for learning with the DigitalOcean Community. Check out our offerings for compute, storage, networking, and managed databases.
About the author(s)
Still looking for an answer?
This textbox defaults to using Markdown to format your answer.
You can type !ref in this text area to quickly search our full set of tutorials, documentation & marketplace offerings and insert the link!
 This work is licensed under a Creative Commons Attribution-NonCommercial- ShareAlike 4.0 International License.
Become a contributor for community
Get paid to write technical tutorials and select a tech-focused charity to receive a matching donation.

DigitalOcean Documentation
Full documentation for every DigitalOcean product.

Resources for startups and AI-native businesses
The Wave has everything you need to know about building a business, from raising funding to marketing your product.
The developer cloud
Scale up as you grow — whether you're running one virtual machine or ten thousand.

Start building today
From GPU-powered inference and Kubernetes to managed databases and storage, get everything you need to build, scale, and deploy intelligent applications.
