By Liang Zan Wong and Elliot Cooper

The author selected the Free and Open Source Fund to receive a donation as part of the Write for DOnations program.
Introduction
WebDAV is an extension of the HTTP protocol that allows users to manage files on remote servers. There are many ways to use a WebDAV server, you can, for example, share Word or Excel documents with your colleagues by uploading them to your WebDAV server. You can also share your music collection with your family and friends by simply giving them a URL. All of this can be achieved without them installing any additional software as everything is built right into their operating system.
In this article, you’ll configure an Apache web server to enable WebDAV access from Windows, Mac, and Linux with SSL and password authentication.
Prerequisites
Before you begin this guide, you will need the following:
- An Ubuntu 20.04 server. Follow the Initial Server Setup with Ubuntu 20.04 to create a sudo enabled, non-root user.
- A domain name that resolves to the public IP address of your server. The Domains and DNS explains how to set this up.
- An Apache web server configured to serve your domain, you can complete the How To Install the Apache Web Server on Ubuntu 20.04 tutorial to set this up—make sure to follow Step 5 — Setting Up Virtual Hosts as part of this prerequisite.
- An SSL Certificate for your domain name. Follow the How To Secure Apache with Let’s Encrypt on Ubuntu 20.04 guide for instructions on how to do this.
WebDAV requires very few server resources, so any sized virtual machine will be enough to get your WebDAV server up and running.
Log in to your server as the sudo-enabled, non-root user to start the first step.
Step 1 — Enabling the WebDAV Apache Modules
The Apache web server provides a lot of functionality as optional modules. You can enable and disable these modules to add and remove their functionality from Apache. Its WebDAV functionality is included in a module that you installed along with Apache, but is not enabled by default. You enable the WebDAV module for Apache using the a2enmod utility. The following two commands will enable the WebDAV modules:
- sudo a2enmod dav
- sudo a2enmod dav_fs
Now, restart Apache to load the new modules:
- sudo systemctl restart apache2.service
The WebDAV module is now loaded and running. In the next step, you will configure Apache to serve your files via WebDAV.
Step 2 — Configuring Apache
In this step, you will create all the configurations that Apache needs to implement a WebDAV server.
First, create the WebDAV root folder at /var/www/webdav that will hold the files you want to make available over WebDAV:
- sudo mkdir /var/www/webdav
Then, set Apache’s user, www-data, to be the owner of the WebDAV directory:
- sudo chown www-data:www-data /var/www/webdav
Next, you need to create a location for the database file that Apache uses to manage and lock the files that WebDAV users are accessing. This file needs to be readable and writable by Apache, but must not be available from the website as this can leak sensitive information.
Create a new directory with the mkdir utility for the database file at /usr/local/apache/var/:
- sudo mkdir -p /usr/local/apache/var/
The -p option tells the mkdir utility to create all the directories in the path you specified if they don’t exist.
Next, set the owner and group of the new directory to Apache’s user and group with the chown utility:
- sudo chown www-data:www-data /usr/local/apache/var
Now, you need to edit the VirtualHost file that holds the Apache configuration about your domain name. This file is located in /etc/apache2/sites-enabled/ and ends in le-ssl.conf if you used Certbot to register the SSL certificate.
Open the VirtualHost file with a text editor:
- sudo nano /etc/apache2/sites-enabled/your_domain-le-ssl.conf
On the first line, add the DavLockDB directive:
DavLockDB /usr/local/apache/var/DavLock
. . .
Next, add the following Alias and Directory directives inside the <VirtualHost> tags following all the other directives:
. . .
Alias /webdav /var/www/webdav

<Directory /var/www/webdav>
    DAV On
</Directory>
The Alias directive maps requests to http://your.server/webdav to the /var/www/webdav folder.
The Directory directive tells Apache to enable WebDAV for the /var/www/webdav folder. You can find out more about mod_dav from the Apache docs.
Your final VirtualHost file will be as follows, which includes the DavLockDB, Alias, and Directory directives in the correct locations:
DavLockDB /usr/local/apache/var/DavLock
<IfModule mod_ssl.c>
<VirtualHost *:443>
        ServerAdmin admin@your_domain
        ServerName your_domain
        ServerAlias your_domain
        DocumentRoot /var/www/your_domain
        ErrorLog ${APACHE_LOG_DIR}/error.log
        CustomLog ${APACHE_LOG_DIR}/access.log combined

        SSLCertificateFile /etc/letsencrypt/live/your_domain/fullchain.pem
        SSLCertificateKeyFile /etc/letsencrypt/live/your_domain/privkey.pem
        Include /etc/letsencrypt/options-ssl-apache.conf

        Alias /webdav /var/www/webdav

        <Directory /var/www/webdav>
            DAV On
        </Directory>

</VirtualHost>
</IfModule>
If you make any syntax errors while you are editing Apache’s configuration it will refuse to start. It’s a good practice to check your Apache configuration before restarting Apache.
Use the apachectl utility to check the configuration:
- sudo apachectl configtest
If your configuration is error free, apachectl will print Syntax OK. When you receive this, it is safe to restart Apache to load the new configuration:
- sudo systemctl restart apache2.service
You’ve now configured Apache as a WebDAV server to serve files from /var/www/webdav. However, you don’t yet have authentication configured or enabled so anyone that can access your server will be able to read, write, and edit your files. In the next section, you will enable and configure WebDAV authentication.
Step 3 — Adding Authentication to WebDAV
The authentication method that you will use is called digest authentication. Digest authentication is the more secure method of WebDAV authentication, especially when coupled with HTTPS.
Digest authentication works with a file that stores the usernames and passwords of users that are allowed to access the WebDAV server. Just as with the DavLockDB the digest file needs to be stored in a location that Apache can read and write to and that cannot be served from your website.
As you already created /usr/local/apache/var/ for this purpose, you will place the digest file there as well.
First, create an empty file called users.password at /usr/local/apache/var/ with the touch utility:
- sudo touch /usr/local/apache/var/users.password
Then change the owner and group to www-data so Apache can read and write to it:
- sudo chown www-data:www-data /usr/local/apache/var/users.password
New users are added to WebDAV using the htdigest utility. The following command adds the user sammy:
- sudo htdigest /usr/local/apache/var/users.password webdav sammy
The webdav in this command is the realm and should be thought of as the group you are adding the new user to. It is also the text displayed to users as they enter their username and password when they access your WebDAV server. You can choose whatever realm best describes your use case.
htdigest will prompt you to enter a password and confirm it when you run it:
OutputAdding user sammy in realm webdav
New password:
Re-type new password:
Next, you’ll tell Apache to require authentication for WebDAV access and to use the users.password file.
Open your VirtualHost file:
- sudo nano /etc/apache2/sites-enabled/your_domain-le-ssl.conf
Then, add the following lines inside the Directory directive block:
AuthType Digest
AuthName "webdav"
AuthUserFile /usr/local/apache/var/users.password
Require valid-user
These directives do the following:
AuthType Digest: Use the digest authentication method.AuthName "webdav": Only allow users from thewebdavrealm.AuthUserFile /usr/local/apache/var/users.password: Use the usernames and passwords contained in/usr/local/apache/var/users.password.Require valid-user: Allow access to any user listed in theusers.passwordfile that supplied the correct password.
Your <Directory> directive will be as follows:
<Directory /var/www/webdav>
  DAV On
  AuthType Digest
  AuthName "webdav"
  AuthUserFile /usr/local/apache/var/users.password
  Require valid-user
</Directory>
Next, enable the auth_digest Apache module so that Apache knows how to use the digest authentication method:
- sudo a2enmod auth_digest
Finally, restart Apache to load all the new configuration:
- sudo systemctl restart apache2.service
You’ve now configured your WebDAV server to use HTTPS and digest authentication. It is ready to start serving files to your users. In the next section, you’ll access a WebDAV server from either Windows, Linux, or macOS.
Step 4 — Accessing WebDAV
In this step, you’ll access a WebDAV server with the native file browsers of macOS, Windows, and Linux (KDE and GNOME).
Before you get started accessing your WebDAV server you should put a file into the WebDAV folder, so you have a file to test.
Open a new file with a text editor:
- sudo nano /var/www/webdav/webdav-testfile.txt
Add some text then save and exit. Now, set the owner and group of this file to www-data:
- sudo chown www-data:www-data /var/www/webdav/webdav-testfile.txt
You are now ready to start accessing and testing your WebDAV server.
Linux KDE
First, open the KDE Dolphin file manager. Then edit the address bar with a URL that has the following form:
webdavs://your_domain/webdav
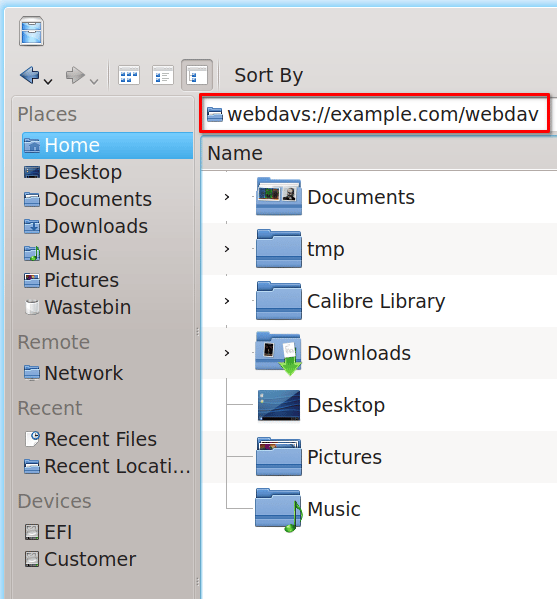
When you hit ENTER you will be prompted to enter a username and password.
Check the Remember password option if you want Dolphin to retain your password. Then click OK to continue. It will now present you with the contents of the /var/www/webdav/ directory, which you can manipulate as if they were on your local system.
Bookmark your WebDAV server by grabbing the folder icon in the address bar and dragging it under the Remote section in the left-hand navigation panel.
Linux GNOME
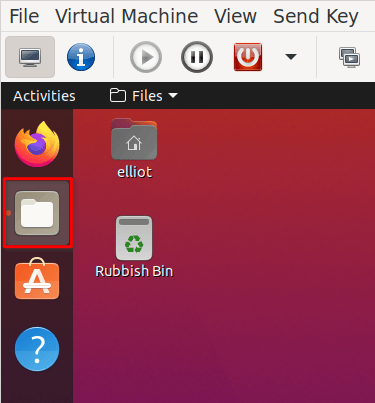
First, open the Files application by clicking on its icon on the right-hand side of the desktop.
When Files opens do the following:
- Click on + Other Locations.
- Enter the URL of your WebDAV instance with the following form:
davs://your_domain/webdav
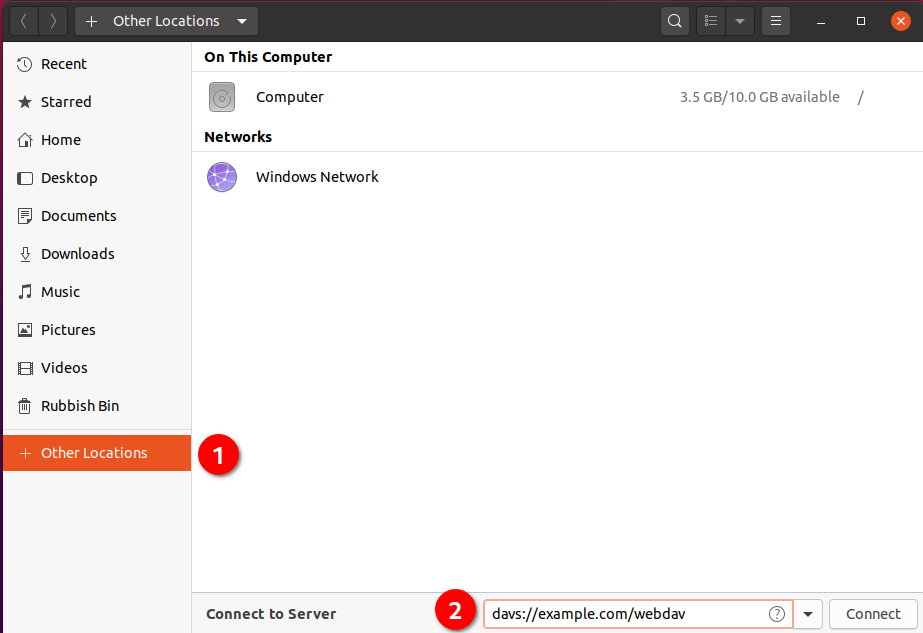
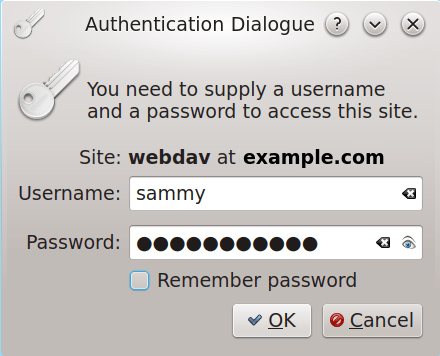
Then, click on Connect. It will then prompt you with a username and password dialog box.
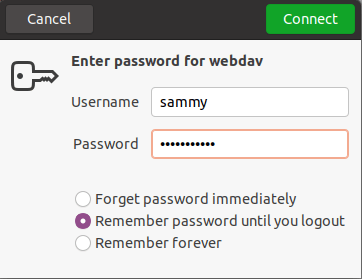
Enter your username and password then click Connect to log in to your WebDAV server. Check the Remember forever option if you do not want to enter your password every time you access your files.
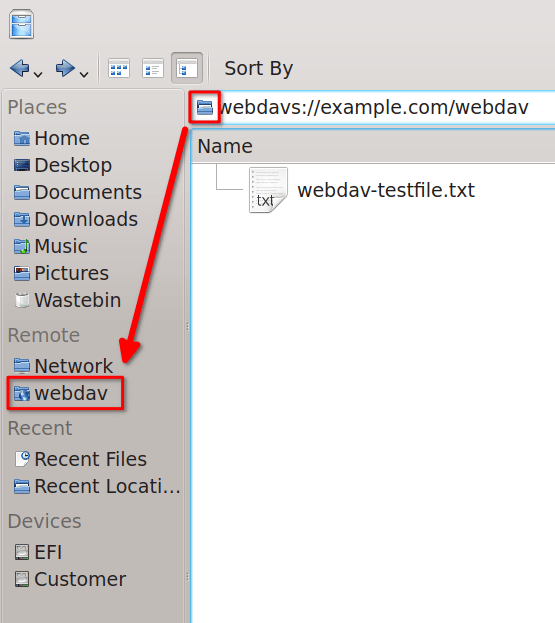
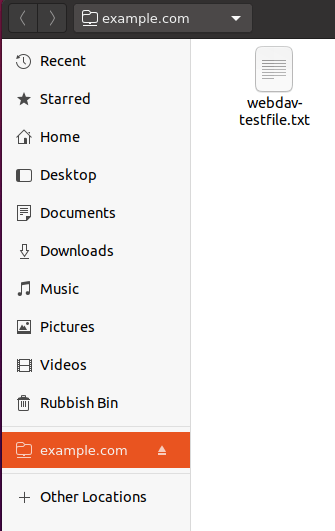
Your WebDAV folder will now be available in Files where you can manage your files:
macOS
First, open the Finder application. Next, click on the Go menu and then on Connect to server.
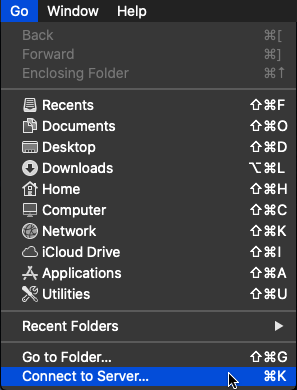
You will now find a new dialog box where you enter the URL of the WebDAV server. This URL must have the following form:
https://your_domain/webdav
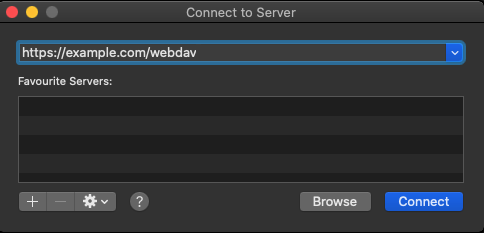
Click on the Connect button to continue. It will prompt you to enter a username and password.
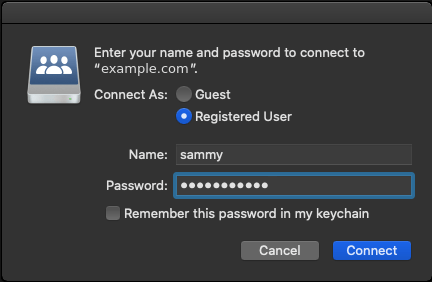
Click on Connect to complete adding your WebDAV server to your system.
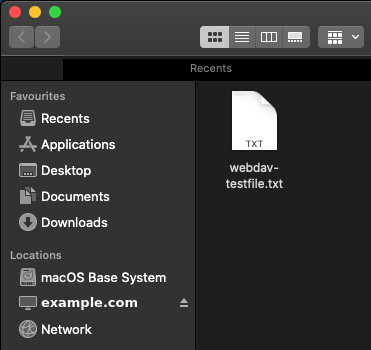
You will now find your WebDAV server in Finder under the Locations section.
Windows
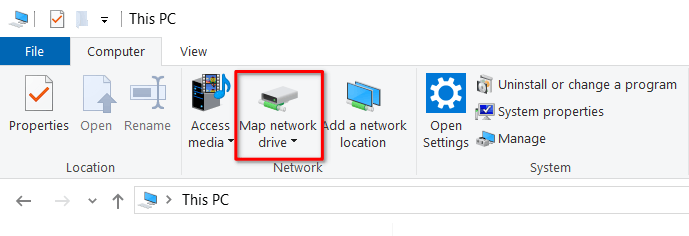
First, from the Start Menu, open the File Explorer application. When this opens select This PC from the left-hand navigation panel.
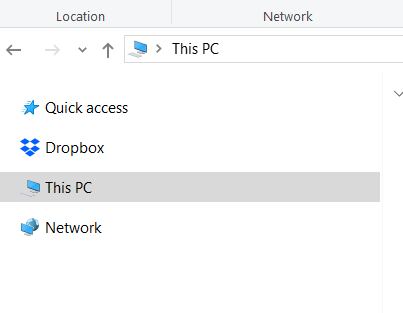
Next, click on the Map network drive icon in the top navigation bar.
Enter the URL of your WebDAV server with a URL of the following form:
https://your_domain/webdav
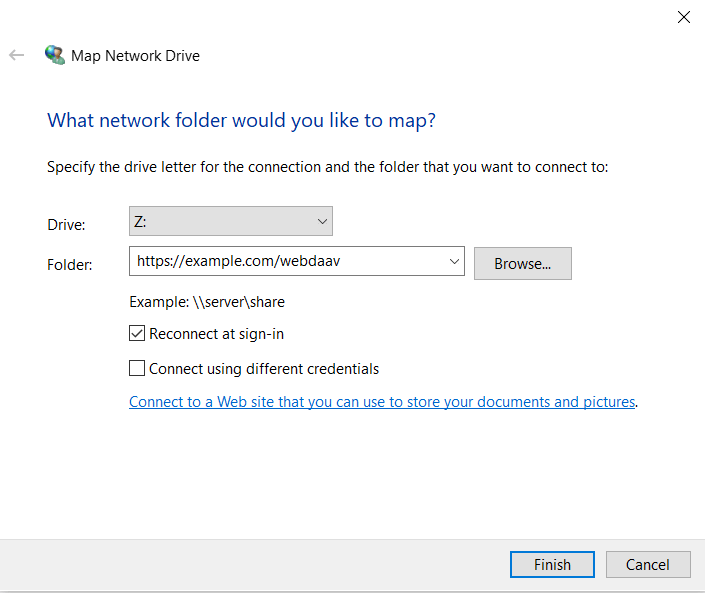
Click Finish to connect to your WebDAV server. It will prompt you to enter a username and password.
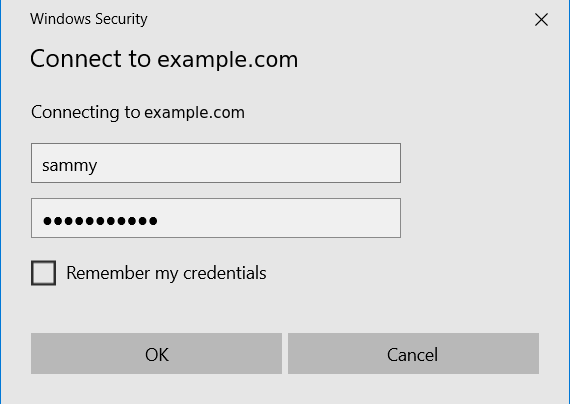
Enter your username and password and click OK to log in to your server. Check the Remember my credentials option if you do not want to enter your password every time you access your files.
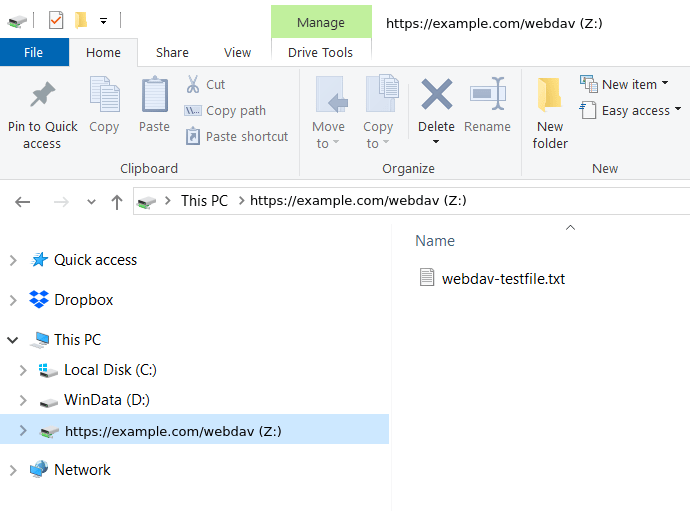
Your WebDAV will now appear as a location under the This PC section of the File Explorer left-hand navigation panel.
Conclusion
You have now set up and configured a secure WebDAV server to serve your files to your users. No matter what operating system your users have on their local system they will be able to access and manage the files in your WebDAV server.
Thanks for learning with the DigitalOcean Community. Check out our offerings for compute, storage, networking, and managed databases.
About the author(s)
I have been a Linux Systems Administrator and technical content creator for more than 20 years. I am passionate about using and promoting OSS.
Still looking for an answer?
This textbox defaults to using Markdown to format your answer.
You can type !ref in this text area to quickly search our full set of tutorials, documentation & marketplace offerings and insert the link!
I constantly get /usr/bin/mount.davfs: mounting failed; the server does not support WebDAV.
sudo chown www-data:www-data /var/www/webdav
May that without “-R”? Do it’s working?
But NAS isn’t working for tranfser because insufficient authorization. If with “-R” is working. What’s wrong?
Hello, how to allow apache using webdav in a multi-user environment in order to have each user access its own home directory? This requires using local authentication (PAM) and having apache behave with the authenticated user/group instead of www-data.
 This work is licensed under a Creative Commons Attribution-NonCommercial- ShareAlike 4.0 International License.
Become a contributor for community
Get paid to write technical tutorials and select a tech-focused charity to receive a matching donation.

DigitalOcean Documentation
Full documentation for every DigitalOcean product.

Resources for startups and AI-native businesses
The Wave has everything you need to know about building a business, from raising funding to marketing your product.
The developer cloud
Scale up as you grow — whether you're running one virtual machine or ten thousand.

Start building today
From GPU-powered inference and Kubernetes to managed databases and storage, get everything you need to build, scale, and deploy intelligent applications.
