By Kris Stadler and Brian Hogan

Introduction
Intranets are private networks created by organizations to ease communication and data transfers. An intranet is constructed by connecting multiple networks all over the world to create a new virtual network. Users connected to the intranet can access certain internal websites or gain access to other network services and content on the intranet. For example, if an off-site employee wants to access sensitive information located on the main network of their employer, the employee would connect to a VPN server located on the main network at the office. This VPN connection would create a secure tunnel between the employee and the office. On the network, the employee’s connection would appear as if they were locally connected to the main network and not using an off-site connection.
In this tutorial you’ll configure services that are only available to clients who are connected to the VPN, including file shares and a web site, and you’ll learn how to manage access to those resources. When you’re done, you’ll have a basic intranet you can easily expand to meet your needs.
Prerequisites
To complete this tutorial, you’ll need the following:
- A new Ubuntu 16.04 server.
- A standard user account with
sudoprivileges. You can set up a standard account by following Steps 2 and 3 of the Initial Server Setup with Ubuntu 16.04 tutorial.
- OpenVPN installed and configured on your server. Complete the How to Set Up an OpenVPN Server on Ubuntu 16.04 tutorial before proceeding. We will assume that the VPN server is located at the IP address
10.8.0.1on the VPN, which is the address used in the OpenVPN tutorial, and that you can connect to the VPN from your local machine. - A registered domain name and access to add DNS entries. We’ll use
example.comthroughout this tutorial, and we’ll use DigitalOcean’s DNS service. To use DigitalOcean’s DNS service with your domain, follow steps 1 and 2 of our How To Set Up a Host Name with DigitalOcean tutorial to point your domain name at DigitalOcean’s name servers. - Apache installed with two virtual hosts configured for your domain. Follow the tutorial How to Set Up Apache Virtual Hosts on Ubuntu 16.04 to set up two virtual hosts called
example.comandintranet.example.com, each with a default HTML page.
Step 1 — Installing and Configuring a Samba File Server
Let’s start by setting up Samba so people on our intranet can share files. Samba differs from other file sharing applications like Dropbox in that it does not have a web interface or any storage limit. Instead, Samba shares directories and files on the server itself so you do not have to upload your data to any outside servers that you do not control.
We will create two share directories. The first directory will be accessible by all users on our private network. The second directory will only be accessible by users we specify. We’ll name these shares Allusers and Restricted, respectively.
First, install Samba and its prerequisites with the following command:
- sudo apt-get install samba samba-common python-glade2 system-config-samba
Next, make a backup of the Samba configuration file just in case we make a mistake when we modify it later.
- sudo cp /etc/samba/smb.conf /etc/samba/smb.conf.backup
Samba also needs access through the firewall, so add a rule for Samba traffic:
- sudo ufw allow samba
Now create the directories we’ll share. First, create the allusers directory:
- sudo mkdir -p /samba/allusers
Then create the restricted directory:
- sudo mkdir -p /samba/restricted
Now, let’s edit the Samba configuration file to set up the service and define the shares. Open the Samba configuration file:
- sudo nano /etc/samba/smb.conf
Then delete all the content as we will be writing our own configuration from scratch piece by piece.
First, we specify some global settings for the Samba server. Add the following lines to the configuration file:
[global]
        workgroup = WORKGROUP
        server string = Samba Server %v
        netbios name = ubuntu
        security = user
        map to guest = bad user
        dns proxy = no
        interfaces = 10.8.0.1/8
        bind interfaces only = yes
Let’s break down each setting:
The workgroup setting specifies the workgroup the server will appear on when queried by clients. The default group is WORKGROUPfor Windows, but you can change it if you already have a workgroup name you’re using.
The server string and netbios lines specify the name of the Samba server and its platform respectively.
The security setting specifies that this will be a stand-alone file server with its own user accounts. The map to guest setting treats all logins with an invalid username or password as guest users, and the dns proxy setting tells Samba not to try to resolve domain names since we’re not running our own DNS for this intranet.
With the interfaces setting, we specify that we’re only listening for connections using the VPN server’s IP, not a publicly-accessible IP. The bind interface tells Samba to only listen to requests originating from our VPN.
Next, we need to specify the logging settings for Samba. Add this configuration block to the file, in the [global] section:
[global]
        ...

        ## Logging
        log level = 2
        log file = /var/log/samba.log.%m
        max log size = 50
        debug timestamp = yes
The log level setting determines the level of detail you want in your log files. These levels range from 1 to 10, but we will stick with level 2 as it is a relatively light debugging level. The log file setting specifies the file path and name of the log file, with the max log size limiting the size of the log file. The debug timestamp setting includes timestamps in the log.
That takes care of the global settings for our server. Now let’s create the actual share definitions. These settings specify the files we want to share, and who is allowed to access those files.
We want two shares; one called Allusers, and another called Restricted. Let’s define the Allusers share first. For this share, users can browse, write, and read files in the /samba/allusers directory. Add this configuration to the file:
#============ Share Defenitions ==================
[Allusers]
        path = /samba/allusers
        browsable = yes
        writable = yes
        guest ok = yes
        read only = no
        force user = nobody
The [Allusers] block indicates that the settings that follow are only applicable to the Allusers share. It also defines the name of the share that users will see. The path setting specifies the file directory of the folder we want to share on our intranet. Setting browsable and writable to yes gives users the permission to browse within that folder as well as read and write files.
We want all users to access this share, even if they do not have a user account on the server. Remember that in the global section we specified the map to guest setting, meaning that users that do not have an account or valid login credentials can still access files shared as a guest. We allow those guests to access this share by setting guest ok to yes and then we force that user to assume the identity of nobody with force user = nobody.
The nobody user group is a known default user group on any Linux system. We can set the desired permissions on the /samba/allusers folder to the nobody user. Then, with Samba, we allow multiple guests to use that identity. This way we can easily manage guest user access to our system.
For more information on the nobody user, visit the Ubuntu wiki and this answer on StackExchange.
Now let’s create the Restricted file share, which should only be accessible by members of the smbrestricted group:
[Restricted]
        path = /samba/restricted
        valid users = @smbrestricted
        guest ok = no
        writable = yes
        browsable = yes
Once again we start by specifying the directory we want to share and grant browsing and writing permissions, just like we did with the allusers share. Then we set valid users = @smbrestricted, which tells Samba to only allow members of the group smbrestricted to access the share. We’ll create this group shortly.
That does it for the smb.conf file. Your file should look like the following example:
[global]
        workgroup = WORKGROUP
        server string = Samba Server %v
        netbios name = ubuntu
        security = user
        map to guest = bad user
        dns proxy = no
        interfaces = 10.8.0.1/8
        bind interfaces only = yes

        ## Logging
        log level = 2
        log file = /var/log/samba.log.%m
        max log size = 50
        debug timestamp = yes

#============ Share Defenitions ==================

[Allusers]
        path = /samba/allusers
        browsable = yes
        writable = yes
        guest ok = yes
        read only = no
        force user = nobody

[Restricted]
        path = /samba/restricted
        valid users = @smbrestricted
        guest ok = no
        writable = yes
        browsable = yes
With the Samba configuration in place, we can create the smbrestricted group and create our first user.
Step 2 — Configuring Access to Samba Shares
To allow access to our shares, we have to create a user account and apply appropriate permissions to the folders we’re planning to share.
First, create the smbrestricted group with the following command:
- sudo addgroup smbrestricted
Now create a user account on the server and add it to the smbrestricted group. We’ll create an account for client1, which matches the name of the VPN connection created in the prerequisite tutorial:
- sudo useradd client1 -G smbrestricted
Finally, we need to assign a Samba password for client1. With the configuration we’ve set up, Samba uses its own credential verification system that’s separate from the normal Linux system’s verification system. This is nice because we can create users that can access file shares with Samba without giving them access to log into the machine itself.
Create the Samba password for the client1 user with the following command:
- sudo smbpasswd -a client1
Note: If you have users on your system that you’d like to also be able to access Samba shares, you’ll need to create a Samba password for those users as well, since the login systems are separate with this configuration.
Next, we set the permissions for the directories we want to share. First, we’ll set the permissions for the allusers directory:
- sudo chmod -R 766 /samba/allusers
- sudo chown -R nobody:nogroup /samba/allusers
This grants the owner of the directory full permissions, and only grants read and write permissions for the group and everyone else, We then change the owner and group of the share directory to nobody:nogroup with the chown command.
There is, however, a small problem with changing the owner and group to nobody:nogroup. The chmod -R 766 command only grants read and write permissions to current and new files/directories within the /samba/allusers directory, regardless of who created those files or directories. This means that as soon as you try and create a new file inside a folder located within the /samba/allusers directory you would get an insufficient permissions error. Remember that when you are working within the Allusers share you are assuming the identity of nobody, and nobody has very limited permissions.
To overcome this problem we make use of Access Control Lists, or ACLs. ACL rules let us automatically assign permissions for a user and/or group to newly created files and directories.
Set the ACL rules for the /samba/allusers folder with the following commands:
- sudo setfacl -dm g:nogroup:rw /samba/allusers/
- sudo setfacl -dm u:nobody:rw /samba/allusers/
The command setfacl -dm indicates that we are defining new permission rules for a directory or file, and that in the future these permissions should be applied to newly created objects as well. g:nogroup:rw and u:nobody:rw are the new ACL rules granting read and write permissions to the nobody user and members of the group nogroup.
You can learn more about ACLs from the Ubuntu Wiki.
That takes care of the guest share. Now we can set permissions for the restricted directory:
- sudo chmod -R 770 /samba/restricted
- sudo chown root:smbrestricted /samba/restricted
This time we completely block access to this directory except for the owner and members of the smbrestricted group with chmod 770. We don’t need to set ACL rules because the permissions function normally within this shared folder since we’re using authenticated user accounts.
Now that we have the shares configured, restart the Samba server so that it uses the new configuration file:
- sudo service smbd restart
We can now connect to the Samba server to upload or download files.
Step 3 — Connecting to the Samba Server From a Client
The goal of our intranet is to access and share files in a secure environment as if we were connected to the main network. When a client connects to Samba, it mounts the share directories in the file explorer of that client. Let’s test this out.
Connecting from Windows
To connect from Windows, open Windows Explorer. In the navigation bar, type in the Samba server address, \\10.8.0.1 and press the Enter key.

It might take a few moments for Windows to connect. When the connection is successful you’ll see the shared folders hosted on the intranet:

Notice that a new network mount point is created under the Network tab in the Quick access toolbar. The name of the mount point is 10.8.0.1, the same as the VPN’s IP.
You access the Allusers share just like any other folder, as no credentials are needed. Just double-click on the folder to view its contents:

To access the Restricted share, double-click on the folder named Restricted. A Windows Security pop-up will appear stating that network credentials are required to gain access.

Type in the username and password for the user you created, and optionally check the box to remember your credentials. Then click Ok to connect.

Once connected, you can create new files or folders, or even drag folders over to your server to upload them.
Connecting from Ubuntu
To connect from Ubuntu, open the file explorer and select the Connect to Server option in the sidebar on the left. This opens a new screen where we can input a server address.

Enter smb://10.8.0.1/ and click on the Connect button in the bottom right corner. It may take a few seconds for you PC to connect to the server depending on your connection speed. When you have connected, a screen showing all the shared directories on the server will appear:

To access the Allusers share, just double click on the folder. A login screen will appear asking for a username and password. The Allusers share does not require any username and password, so you should select Anonymous for the Connect As option. Click on Connect and it will open the share directory for you.

Notice how these share directories are mounted in your file system after you have accessed them. The Allusers share is mounted as a network drive alongside the other local drives.

The drive will stay mounted until the system is restarted or the drive is unmounted.
To access the Restricted share, you need a valid username and password for login. Double click on the Restricted share
and the login screen will appear again. For the Connect As option select Registered User and fill in the username and password
in the appropriate fields, leaving the Domain option as it is. Then click on Connect, and you will be able to access the shared files.

Connecting from a Mac
To connect from your Mac, open Finder, select the Go menu, and choose Connect to Server…. Then use smb://10.8.0.1/ for the Server Address:
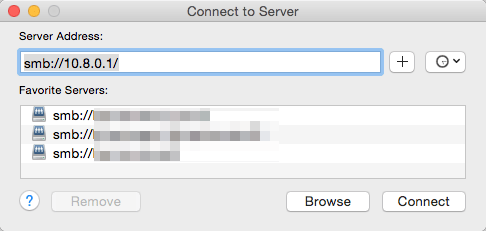
The rest of the connection process is identical to the process for connecting from Linux or Windows. You’ll be prompted for a username and password and will be able to view and connect to the available shares.
That takes care of our file server. Now let’s look at how to configure Apache to host websites internally and externally on the same server.
Step 4 — Configuring Access to Apache Virtual Hosts
Prior to this tutorial, you created two virtual hosts, which we’ll configure for use on our server. The first host, example.com, will be accessible by the general public. This might be the main public web site for your domain. The second host, intranet.example.com, will only be accessible by clients connected to the intranet.
To restrict access to intranet.example.com, we’ll edit the configuration file for that virtual host. Open the file /etc/apache2/sites-available/intranet.example.com.conf:
- sudo nano /etc/apache2/sites-available/intranet.example.com.conf
Then change the VirtualHost declaration from this:
<VirtualHost *:80>
to this:
<VirtualHost 10.8.0.1:80>
Before the change, Apache would serve requests for internal.example.com on all network interfaces. After this change, it only serves requests on our intranet interface. This is similar to the configuration we used for Samba.
Save the file and restart the Apache service:
- sudo systemctl restart apache2
We also need to allow connections through UFW for Apache to work properly. If you haven’t already done so, execute this command to allow traffic through the firewall for Apache:
- sudo ufw allow http
And if you plan to allow HTTPS traffic, allow that as well now, or configure it later with:
- sudo ufw allow https
Now let’s configure domain names so we can more easily access our resources.
Step 5 — Configuring Domain Names
In this step, we will configure our domain name to redirect traffic for the intranet while also serving the publicly accessible website. Before starting this article, you should have pointed your domain name to DigitalOcean’s name servers.
Note: If you have your own name servers, you’ll want to make these settings in your DNS provider’s control panel instead.
Log into your DigitalOcean account and click on the Networking tab in the top bar. You’ll then see a screen like the following:

To add a domain to your DigitalOcean account, type in your domain name in the first box under the Add a domain heading. In the second box type in the public IP of your intranet server, and click on the Create record button.

Your new domain name will then appear under the Domains subheading as in the second picture. Now click on More next to the domain you want to use, and then select View domain.

This will open up the settings page for that specific domain.

We need to add three records for this domain. One for the Intranet, and two more to ensure that requests for our public website is resolved correctly.
First, create a record for the intranet.
- Click on the orange ‘A’ box under Select record type.
- Enter
intranetinto the Enter Name field. - For the IP address, enter the private IP address for your server, which should be
10.8.0.1.

Next, we need a a record that directs non-intranet traffic to the right place. Create another ‘A’ record, set the name to @ and set the IP to your server’s public IP.

Finally, create a CNAME record for www. Click on the CNAME tab in the top corner, set the name to www and enter your domain name (example.com as the Hostname:

When you are done, your domain records should look like the following image:

The intranet A-record directs requests to intranet.example.com only if it originates from the VPN server. This means that only clients connected to the VPN would be able to access web content hosted on intranet.example.com. The second ‘A’ record and CNAME record direct traffic that does not have access to the intranet to the publicly available web site.
Note: It may take up to 72 hours for these DNS changes to propagate.
Go to your browser and visit http://intranet.example.com without being connected to the VPN. You should see your browser trying to load the web page only to return an error. Now connect to your VPN and reload the web page. You can now access the web page, as the DNS entry will resolve.

Now that we have thoroughly configured and tested our intranet, let’s look at how we manage access to this newly created network.
Step 6 — Managing Access to the Intranet
The final step in this tutorial will deal with managing access to our intranet and its shared files. First, we will look at how to revoke client certificates for VPN access. Then we’ll look at how to remove users from the smbrestricted group. Finally, we’ll review adding additional users and getting them the access they need.
Revoking VPN Access
To revoke access to the VPN, we would revoke a client’s certificate. This lets us deny access to our intranet without generating new certificates for any other clients or the server.
First, we need to add an additional line to our VPN server’s configuration file to enable us to revoke any client certificate without changing the original CA certificate or server certificate. This makes access control much easier as you can now easily revoke a single certificate on-the-fly without disrupting any other client connections.
Open the VPN configuration file:
- sudo nano /etc/openvpn/server.conf
Add the following line of code at the end of the file:
crl-verify crl.pem
This tells the VPN server to look for the file crl.pem, which is a Certificate Revocation List. It will contain a list of all the certificates that are no longer allowed to access our VPN.
Save and close the configuration file, but don’t restart the server yet; we need to create the crl.pem file our configuration is looking for.
To create this file, change to the ~/openvpn-ca/ directory on your server:
- cd ~/openvpn-ca/
Let’s pretend that we need to revoke the certificates of client1 because they no longer work for our organization. To do this, run the following commands:
- source vars
- ./revoke-full client1
You’ll see the following output:
OutputUsing configuration from /home/intranetexapmle/openvpn-ca/openssl-1.0.0.cnf
Revoking Certificate 02.
Data Base Updated
Using configuration from /home/intranetexample/openvpn-ca/openssl-1.0.0.cnf
client1.crt: C = US, ST = NY, L = New-York City,
error 23 at 0 depth lookup:certificate revoked
The last line of the output should always indicate a error 23. This error only confirms that the certificates have been revoked.
This also creates crl.pem in the ~/openvpn-ca/keys/ directory. To confirm that the certificates are revoked, open the keys/index.txt file with any text editor, or display its contents with cat:
- cat keys/index.txt
There will be an “R” next to the client whose certificates we revoked:
OutputV       260904153313Z           01      unknown /C=US/ST=NY/L=New York/O=DigitalOcean/OU=Community/CN=server/name=server/emailAddress=me@example.com
R       260904172539Z   160915150543Z   02      unknown /C=US/ST=NY/L=New York/O=DigitalOcean/OU=Community/CN=client1/name=server/emailAddress=me@example.com
Now copy the crl.pem file to the /etc/openvpn/ directory, which is where we told our OpenVPN server to look for the file:
- sudo cp keys/crl.pem /etc/openvpn/
Then restart the OpenVPN server for the certificate revoking option to take effect.
- sudo systemctl restart openvpn@server
The OpenVPN server consults the crl.pem file every time a new connection is made to the server. Each time you revoke a client’s certificates you replace the old crl.pem file with the new one. You do not need to restart the server.
It is important to note that once a VPN certificate has been revoked, it can not be re-used in the future. A client whose VPN certificate has been revoked would require a new certificate if we want them to be able to connect to the network again.
Blocking a user’s access to the Restricted share.
We created a shared directory that is only accessible by users in the smbrestricted group. To deny access for a user already in that group we remove the user from that group. For example, to remove client1, use the following command:
- sudo deluser client1 -G smbrestricted
You’ll see the following output:
OutputRemoving user `client1' from group `smbrestricted' ...
Done.
If you are unsure if a user is already included in the group, or you want to double-check if a user has been removed, you can use the members command:
- sudo apt-get install members
- members smbrestricted
Any users in the group will be displayed on the screen.
Adding a new user to the intranet
Each new user of the intranet will require their own VPN certificate, so you’d follow the steps in the How to Set Up an OpenVPN Server on Ubuntu 16.04 tutorial from the prerequisites for each user. For example, to create a user called client2, you’d do the following:
First, build the key:
cd ~/openvpn-ca
./build-key client2
Then generate the client configuration:
- cd ~/client-configs
- ./make_config.sh client2
Then, on your local machine, download the client configuration:
- sftp sammy@openvpn_server_ip:client-configs/files/client2.ovpn ~/
To grant the new user access to the restricted files, follow the same steps you used for client1 in the Samba section of this tutorial:
- Create the user and add them to the
smbrestrictedgroup. - Create the Samba password for the user with
smbpassword. - Test the connection.
Then repeat this process for each user you need to add.
Conclusion
You’ve successfully created and secured your own private intranet using OpenVPN, Samba, and Apache. You have an internal web site and two file shares.
Where you go next depends on what you’ll use your intranet for. As most server applications make use of a web page to display information, you could restrict access to that page with the use of a virtual host configuration just like the one we did in this tutorial. You can expand your network by hosting multiple services from an internal social network, a Wiki or an E-mail service to name a few. And for even more efficient management of shared files, you can download and install the Samba Web Administration Tool. Using what you learned here, you should be able to configure any number of services for use with your new intranet.
Thanks for learning with the DigitalOcean Community. Check out our offerings for compute, storage, networking, and managed databases.
About the author(s)
Managed the Write for DOnations program, wrote and edited community articles, and makes things on the Internet. Expertise in DevOps areas including Linux, Ubuntu, Debian, and more.
Still looking for an answer?
This textbox defaults to using Markdown to format your answer.
You can type !ref in this text area to quickly search our full set of tutorials, documentation & marketplace offerings and insert the link!
Thank you (again - your tutorial is awesome!). Small typo when creating group:
sudo addgroup smbrestriced
should be restricted.
Hello,
Your topic “create intranet with OpenVPN” is a little bit misleading. It is more focused on samba etc.
Thanks for this tutorial, it is really good. I have a problem though. After following your steps all is ok until I reboot the server. After this I cannot access the Samba shares via openvpn from a client computer. OpenVPN connects but the shares are not accessible. The samba server works as I can connect to it using SSH. Any suggestions?
Cool tutorial, however, adding 10.8.0.1 to the 000-default.conf doesn’t work for me :/ I can access the site from the outside world.
Hi. I do have challenge to set samba server up properly. Whenever I try to use ‘interfaces’ under smb.conf I get following error while starting nmbd deamon:
STATUS=daemon failed to start: NMBD failed when creating subnet lists, error code 13.
When ‘hosts allowed’, ‘interfaces’ and ‘bind to interfaces only’ are commented out I can access my shared folders via Samba server IP. But this is not what I need.
It worked fine for a moment with settings:
hosts allowed = 10.8.0.1/8
interfaces = 10.8.0.1/8 eth0
bind to interfaces only = yes
Unfortunately I played with syslog settings, restarted smbd and nmbd and all the problems appeared. And now I can’t force samba to work with above host and interface again. My OpenVPN and Samba are located on the same machine… Thanks for suggestions.
 This work is licensed under a Creative Commons Attribution-NonCommercial- ShareAlike 4.0 International License.
Become a contributor for community
Get paid to write technical tutorials and select a tech-focused charity to receive a matching donation.

DigitalOcean Documentation
Full documentation for every DigitalOcean product.

Resources for startups and AI-native businesses
The Wave has everything you need to know about building a business, from raising funding to marketing your product.
The developer cloud
Scale up as you grow — whether you're running one virtual machine or ten thousand.

Start building today
From GPU-powered inference and Kubernetes to managed databases and storage, get everything you need to build, scale, and deploy intelligent applications.
