By Matthew Pontes and Brian Hogan

Introduction
Packer, by Hashicorp, is a command-line tool for quickly creating identical machine images for multiple platforms and environments. With Packer, you use a configuration file, called a template, to create a machine image containing a preconfigured operating system and software. You can then use this image to create new machines. You can even use a single template to orchestrate the simultaneous creation of your production, staging, and development environments.
In this tutorial, you’ll use Packer to configure an Nginx web server on CentOS 7. You’ll then use Packer to create a snapshot of this Droplet and make it immediately available in your DigitalOcean dashboard so you can use it to create new Droplets.
Prerequisites
Before you can get up and running with Packer you will need a few things.
- A CentOS 7 server, configured with a non-root user with sudo privileges, You can set this up up by following How to Add and Delete Users on a CentOS 7 Server.
- A DigitalOcean API token with read and write privileges. Review How to Use the DigitalOcean API v2 to get a token.
Step 1 — Downloading and Installing Packer
After logging in to your server, you will download the Packer binary package, install Packer for the current user, and check that your installation was successful.
The easiest way to get Packer running on your system is to download the latest binary package from the official Hashicorp releases website. At the time of writing, the latest version is 0.12.2.
Use the curl utility to download the binary package from the Hashicorp website.
- curl -O https://releases.hashicorp.com/packer/0.12.2/packer_0.12.2_linux_amd64.zip
Once downloaded, install the unzip utility and use it to unzip the package contents into the /usr/local directory, the recommended location to make Packer available to all users.
- sudo yum install -y unzip
- sudo unzip -d /usr/local packer_0.12.2_linux_amd64.zip
CentOS already includes a program called packer, and while you could simply type out the full path each time you run a command, a more efficient method to work around this issue is to create a symlink that maps packer.io to /usr/local/packer. Make the symlink in the /usr/local/bin folder with the following command:
- sudo ln -s /usr/local/packer /usr/local/bin/packer.io
Verify that the installation was successful by checking that packer.io is available on the command line:
- packer.io
A successful installation will output the following:
Outputusage: packer [--version] [--help] <command> [<args>]

Available commands are:
    build       build image(s) from template
    fix         fixes templates from old versions of packer
    inspect     see components of a template
    push        push a template and supporting files to a Packer build service
    validate    check that a template is valid
    version     Prints the Packer version
Packer is now installed and working on your machine. In the next step you will set up a project directory and configure the template to produce a basic CentOS snapshot.
Step 2 — Configuring the DigitalOcean Builder
We want Packer to create a Droplet, install some software and configuration files, and then turn that Droplet into an image we can use to create new machines. Packer uses a configuration file called a template that contains all the details that tell Packer how to build an image. We write this configuration using JSON, a common format for configuration files.
In Packer-speak, a builder is a JSON object that contains the blueprint for the image you want Packer to create. Using the digitalocean builder, you are going to instruct Packer to create a 512 MB CentOS 7.3 Droplet that will be launched in the NYC1 region.
Create and change to a new directory which will hold the template and configuration files we’ll create in this tutorial:
- mkdir ~/packerProject
- cd ~/packerProject
Now that you have a project directory, open a new file called template.json, in your text editor:
- vi ~/packerProject/template.json
Each builder needs to go into the builders section of template.json. Add this section now and include the digitalocean builder by placing this code into the file:
{
  "builders": [
    {
      "type": "digitalocean"
    }]
}
The type key defines which builder Packer uses to create your image. The digitalocean builder creates DigitalOcean Droplets from which Packer creates snapshots.
Packer now knows that you want to create an image for DigitalOcean, but it still needs a few more key-value pairs to be able to complete the build.
Finish configuring your Droplet by adding these keys and values to produce a snapshot from a 512 MB CentOS 7 Droplet that is launched in the NYC1 region. Modify your file so it looks like this:
{
  "builders": [
    {
      "type": "digitalocean",
      "ssh_username": "root",
      "api_token": "YOUR_DIGITALOCEAN_API_TOKEN",
      "image": "centos-7-x64",
      "region": "nyc1",
      "size": "512mb"
    }]
}
Packer connects to Droplets using the ssh_username value. This value needs to be set to “root” in order for Packer to work properly.
Save template.json and exit your text editor.
The preceding block of code contains the minimum amount of configuration needed to create a DigitalOcean Droplet but there are additional configuration options available, as shown in the following table:
| Key | Value | Required | Description |
|---|---|---|---|
api_token |
String | Yes | The API token to use to access your account. It can also be specified via environment variable DIGITALOCEAN_API_TOKEN, if set. |
image |
String | Yes | The name (or slug) of the base image to use. This is the image that will be used to launch a new Droplet and provision it. See https://developers.digitalocean.com/documentation/v2/#list-all-images for details on how to get a list of the the accepted image names/slugs. |
region |
String | Yes | The name (or slug) of the region to launch the Droplet in. Consequently, this is the region where the snapshot will be available. See https://developers.digitalocean.com/documentation/v2/#list-all-regions for the accepted region names/slugs. |
size |
String | Yes | The name (or slug) of the Droplet size to use. See https://developers.digitalocean.com/documentation/v2/#list-all-sizes for the accepted size names/slugs. |
api_url |
String | No | The URL of a non-standard API endpoint. Set this if you are using a DigitalOcean API-compatible service. |
droplet_name |
String | No | The name assigned to the Droplet. DigitalOcean sets the hostname of the machine to this value. |
private_networking |
Boolean | No | Set to true to enable private networking for the Droplet being created. This defaults to false, or not enabled. |
snapshot_name |
String | No | The name of the resulting snapshot that will appear in your account. This must be unique. |
state_timeout |
String | No | The time to wait, as a duration string, for a Droplet to enter a desired state (such as “active”) before timing out. The default state timeout is “6m”. |
user_data |
String | No | User data to launch with the Droplet. See An Introduction to Droplet Metadata for more information. |
You now have a valid template, but your API token is hard-coded in your template. This is a bad practice and a potential security risk. In the next step you will create a variable for this token and move it out of template.json.
Step 3 — Creating and Storing User Variables
Packer lets you create and store the values of variables in a separate file. This file can then be passed to Packer via the command line when you are ready to build your image.
Storing variables in a separate file is an ideal way to keep sensitive information or environment-specific data out of your template. This is crucial if you intend to share it with team members or store it in a public facing repository such as GitHub.
Even if you will only be saving a local copy, it’s a Packer best practice to store variables outside of a template.
Create and open a new JSON file in the packerProject directory to store this information:
- vi ~/packerProject/variables.json
Now, add a my_token variable and set its value to your DigitalOcean API token:
{
  "my_token": "YOUR_DIGITALOCEAN_API_TOKEN"
}
Save variables.json and exit your editor.
Now let’s configure our template to use variables. Before you use the my_token variable, or any other variable, you first need to tell Packer the variable exists by defining it in a variables section at the beginning of the template.json file.
Open template.json in your editor:
- vi template.json
Add a new variables section above the builders section you previously defined. Within this new section, declare the my_token variable and set its default value to an empty string:
{
  "variables": {
    "my_token":""
  },
  "builders": [
  ...

}
Variables defined in the variables section are available globally.
Next, replace your API token in the builders section with a call to my_token:
{
  ...
  "builders": [
    {
      "type": "digitalocean",
      "api_token": "{{ user `my_token` }}",
      ...
    }]
}
As you can see, calls to user variables must use a specific format: "{{ user `variable_name` }}. The quotes and the backticks are required, as are the double curly braces.
Save the file and exit the editor.
You now have a working template that produces a basic snapshot and a separate variables file to store your API key. Before you validate and build your image, let’s add a provisioners section to our template which will configure Packer to install and set up the Nginx web server on the machine before creating the image.
Step 4 — Configuring Provisioners
The provisioners section is where Packer installs and configures software on the running Droplet before turning it into a machine image. Like builders, there are different types of provisioners you can use to configure a Droplet.
In order to configure Nginx, you are going to use Packer’s file provisioner to upload configuration files to the server, and then use the shell provisioner to execute an installation script that uses those files. The file provisioner lets you move files and directories to and from a running machine before it is turned into an image. With the shell provisioner, you can remotely execute shell scripts on that machine.
Provisioners execute in the same order in which they appear within the template. This means putting the file provisioner first since your shell scripts need the uploaded files.
Add a provisioners section immediately following the builders section in template.json and set the two provisioners you will use:
{
  ...
  "builders": [
    {
      ...
  }],
  "provisioners": [
    {
      "type": "file"
    },
    {
      "type": "shell"
    }]
}
The file provisioner requires a source, which points to a local file path, and a destination, which points to an existing file path on the running machine. Packer can only move files to destinations that already exist. For this reason, we generally upload files to the /tmp directory.
Configure the file provisioner by adding the highlighted lines to template.json:
{
  ...
  "provisioners": [
    {
      "type": "file",
      "source": "configs/",
      "destination": "/tmp"
    },
    ...
}
We’ll create the configs folder on our local machine in the next step. Before we do, let’s finish editing the configuration file by setting up the shell provisioner.
The shell provisioner takes a scripts key which contains array of scripts that should be passed to the running machine. Each script is uploaded and executed in the order specified in your template.
Now, configure the shell provisioner by providing the full path to your script:
{
  ...
  "provisioners": [
    {
      "type": "file",
      "source": "configs/",
      "destination": "/tmp"
    },
    {
      "type": "shell",
      "scripts": [
        "scripts/configureNginx.sh"
      ]
    }]
}
Scripts must be listed individually, which allows you to control the execution order of the scripts.
The provisioners section of your template is complete. Save the file and exit Vim.
Now let’s create the shell scripts and configuration files that Packer will use to create your image.
Step 5 — Adding Configuration Files and Installation Scripts
We want our image to ship with a fully-configured Nginx installation, with the proper configuration files and a default web page. In this section, you’ll create these files from some predefined configuration based on the tutorial How To Set Up Nginx Server Blocks (Virtual Hosts) on Ubuntu 16.04, as Nginx configuration is beyond the scope of this tutorial.
We’ll provision the server with Nginx by creating and uploading three separate configuration files that are handled by a single installation script.
First, create a new directory within the project folder to store the configuration files.
- mkdir ~/packerProject/configs
Change to /configs to create your Nginx configuration files:
- cd ~/packerProject/configs
First, you need a default web page to serve from your new domain. Create the file index.html.new:
- vi index.html.new
In this new file, insert the following:
HELLO FROM YOUR TEST PAGE
Next, you need an Nginx configuration file that defines the server block for your domain that defines the listening port and the location of your web pages for the domain. Create a file called newDomain.conf:
- vi newDomain.conf
Place the following configuration in this file:
server {
        listen 80;
        listen [::]:80;

        server_name example.com;

        location / {
                root /var/www/html/newDomain;
                index index.html index.htm;
        }
}
In this example, we’re using example.com as a placeholder value. When you create a new machine from your image, you’ll have to log in to the new machine and change this file to reflect the actual domain or IP address that points to the machine.
Finally, you want Nginx to load your domain’s configuration from a new directory, /etc/nginx/vhost.d/. This means editing the main Nginx configuration file.
Create nginx.conf.new:
- vi nginx.conf.new
We’ll use a default Nginx config file, but we’ll modify it to include our specific site configuration. Put the following contents into this file:
user nginx;
worker_processes auto;
error_log /var/log/nginx/error.log;
pid /run/nginx.pid;

include /usr/share/nginx/modules/*.conf;

events {
    worker_connections 1024;
}

http {
    log_format  main  '$remote_addr - $remote_user [$time_local] "$request" '
                      '$status $body_bytes_sent "$http_referer" '
                      '"$http_user_agent" "$http_x_forwarded_for"';

    access_log  /var/log/nginx/access.log  main;

    sendfile            on;
    tcp_nopush          on;
    tcp_nodelay         on;
    keepalive_timeout   65;
    types_hash_max_size 2048;

    include             /etc/nginx/mime.types;
    default_type        application/octet-stream;

    include /etc/nginx/conf.d/*.conf;
    include /etc/nginx/vhost.d/*.conf;

    server {
        listen       80 default_server;
        listen       [::]:80 default_server;
        server_name  _;
        root         /usr/share/nginx/html;

        include /etc/nginx/default.d/*.conf;

        location / {
        }

        error_page 404 /404.html;
            location = /40x.html {
        }

        error_page 500 502 503 504 /50x.html;
            location = /50x.html {
        }
    }

}
Save and exit the file.
With the configuration files in place, let’s define the scripts that Packer will use to install the software we need. Create a new folder to store your scripts:
- mkdir ~/packerProject/scripts
Now change to this new directory and create the installation script, configureNginx.sh, which installs, configures, enables, and starts the Nginx web server:
- cd ~/packerProject/scripts
- vi configureNginx.sh
Paste the following into the file, which installs, configures, and starts Nginx, using the configuration files you just created:
#!/bin/bash
# Script to install Nginx and enable on boot.

# Update your system:
yum update -y

# Install EPEL Repository, update EPEL, and install Nginx:
yum install -y epel-release
yum update -y
yum install -y nginx

#Start Nginx service and enable to start on boot:
systemctl enable nginx
systemctl start nginx

# Create new 'vhost' directory for domain configuration:
mkdir /etc/nginx/vhost.d

# Create a new directory to serve new content.
mkdir -p /var/www/html/newDomain

# Create a copy of original configuration files and import configuration:
cp /etc/nginx/nginx.conf /etc/nginx/nginx.conf.original
cp /tmp/nginx.conf.new /etc/nginx/nginx.conf

# Copy over the server block configuration:
cp /tmp/newDomain.conf /etc/nginx/vhost.d/newDomain.conf

# Copy over the html test page:
cp /tmp/index.html.new /var/www/html/newDomain/index.html

# Restart Nginx:
systemctl restart nginx
Your template is finished and you’re now ready to validate and build your snapshot.
Step 6 - Validating and Building the Droplet
It’s time to test your template using Packer’s validate subcommand. Once your template validates successfully you will build your Droplet and create the snapshot.
Change to the root of your project:
- cd ~/packerProject
The validate subcommand will check your template for valid syntax and configuration options:
- packer.io validate -var-file=variables.json template.json
The -var-file flag reads variables.json and sets the value for my_token within template.json.
You’ll see the following output:
OutputTemplate validated successfully.
If there is something wrong with template.json you will get an error message. This message will vary depending on the error but most can be fixed by double checking syntax and correcting any typos.
The build subcommand runs the build that you defined in the builders section of your template. In other words, it tells Packer to build your Droplet and then create a snapshot of that Droplet in your DigitalOcean dashboard.
Call packer.io build to build the Droplet and create the snapshot:
- packer.io build -var-file=variables.json template.json
Note that the -var-file flag operates in the exact same manner for both the build and validate subcommands.
The output of a successful build will look similar to the following:
Outputdigitalocean output will be in this color.

==> digitalocean: Creating temporary ssh key for Droplet...
==> digitalocean: Creating Droplet...
==> digitalocean: Waiting for Droplet to become active...
==> digitalocean: Waiting for SSH to become available...
==> digitalocean: Connected to SSH!
==> digitalocean: Gracefully shutting down Droplet...
==> digitalocean: Creating snapshot: packer-1467580504
==> digitalocean: Waiting for snapshot to complete...
==> digitalocean: Destroying Droplet...
==> digitalocean: Deleting temporary ssh key...
Build 'digitalocean' finished.

==> Builds finished. The artifacts of successful builds are:
--> digitalocean: A snapshot was created: 'packer-1487878703' (ID: 18252043) in region 'nyc1'
After a successful build you will find a new snapshot in your DigitalOcean snapshots repository. You can find the name of the snapshot in the output. In this example, it’s packer-1487878703.
From here, visit your DigitalOcean dashboard, select Images, and the new Snapshot will appear in your list:
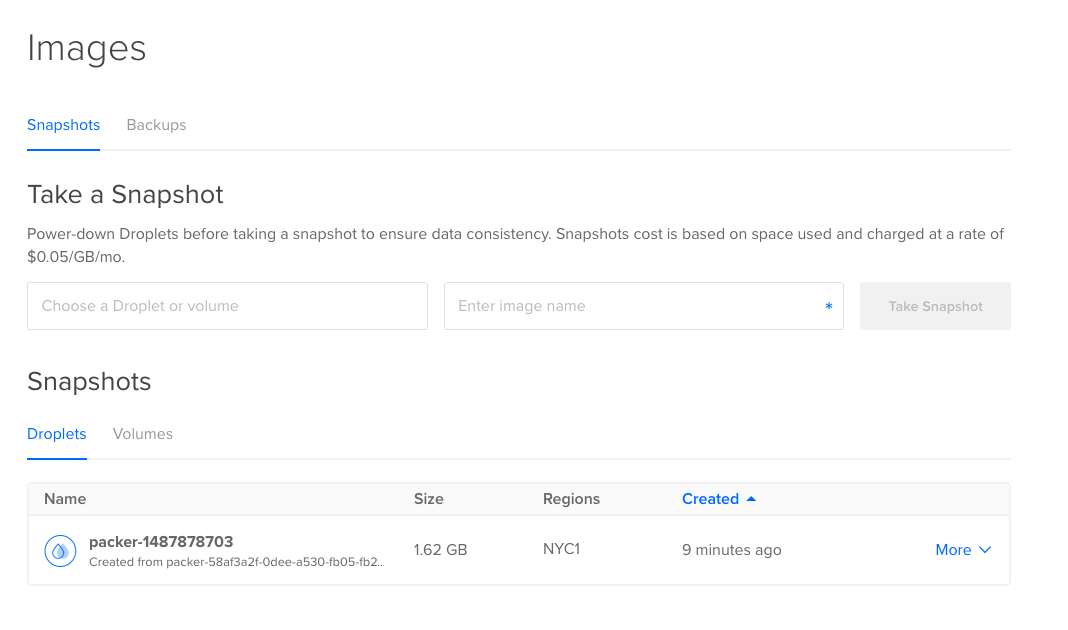
You can now use this new snapshot to create new Droplets. Select More and choose Create Droplet. Then complete the form to create your new machine.
Once the machine is online, determine its IP address from your dashboard and log in to your new machine:
- ssh root@your_new_server_ip_address
Then edit the Nginx server configuration file:
- vi /etc/nginx/vhost.d/newDomain.conf
And replace example.com with either the IP address of the machine or the domain name you’ll use:
server {
        listen 80;
        listen [::]:80;

        server_name your_new_server_ip_address;

        location / {
                root /var/www/html/newDomain;
                index index.html index.htm;
        }
}
Alternatively, you can use the sed command to replace the value in the file, like this:
- sudo sed -i 's/^.*server_name example.com/server_name your_new_server_ip_address/' /etc/nginx/vhost.d/newDomain.conf
You can learn more about sed in this tutorial.
Troubleshooting
Occasionally, you may run into an issue that isn’t adequately explained by the error message. In these scenarios, you can extract more detail about your build by enabling debug mode, inspecting the Packer logs, or both.
Debug mode provides builder-specific debugging information for each step in a remote build. Enabling debug mode for a DigitalOcean build will also produce a temporary private key in your project folder which you can use to connect to and inspect a running Droplet before it is turned into a snapshot.
You can enter debug mode by passing the -debug flag to packer.io build on the command line:
- packer.io build -debug --var-file=variables.json template.json
If you are unable to diagnose the issue in debug mode you can try enabling the Packer logs. These logs are primarily used to debug local builders, but they may provide helpful information on remote builds as well.
To enable the Packer logs, set the PACKER_LOG environmental variable to any value except “0” or an empty string:
- PACKER_LOG=1 packer build --var-file=variables.json template.json
Logs will print to the console unless you also set the PACKER_LOG_PATH environmental variable.
If you are still having problems, you may want to try reaching out to someone in the Packer community.
Conclusion
Now that you are comfortable with the basics of Packer, you may be interested in building on this foundation.
Try adding a second builder to your template to create a local testing environment alongside your DigitalOcean snapshot. The virtualbox-iso builder, for example, produces images for VirtualBox, a free, open-source virtualization product used by both enterprises and hobbyists. You can define a post-processor to the VirtualBox image and create Vagrant environments that mirror your DigitalOcean snapshots. This will allow you to test website changes locally before pushing them to a live Droplet. You can learn more in the Vagrant post-processor documentation.
Or you may want to connect your web server to a database. Add a second digitalocean builder and use the only key in your provisioners section to apply different provisioning to each build.
If you’re more comfortable using a configuration management tools, Packer comes with out of the box support for Ansible, Puppet, Chef, and more. Try using one of these provisioners to further configure your Droplet to match your use case. If you’ve never tried configuration management before, take a look at How To Create Ansible Playbooks to Automate System Configuration on Ubuntu.
Thanks for learning with the DigitalOcean Community. Check out our offerings for compute, storage, networking, and managed databases.
About the author(s)
Managed the Write for DOnations program, wrote and edited community articles, and makes things on the Internet. Expertise in DevOps areas including Linux, Ubuntu, Debian, and more.
Still looking for an answer?
This textbox defaults to using Markdown to format your answer.
You can type !ref in this text area to quickly search our full set of tutorials, documentation & marketplace offerings and insert the link!
 This work is licensed under a Creative Commons Attribution-NonCommercial- ShareAlike 4.0 International License.
Become a contributor for community
Get paid to write technical tutorials and select a tech-focused charity to receive a matching donation.

DigitalOcean Documentation
Full documentation for every DigitalOcean product.

Resources for startups and AI-native businesses
The Wave has everything you need to know about building a business, from raising funding to marketing your product.
The developer cloud
Scale up as you grow — whether you're running one virtual machine or ten thousand.

Start building today
From GPU-powered inference and Kubernetes to managed databases and storage, get everything you need to build, scale, and deploy intelligent applications.
