By Felipe Arenales and Sharon Campbell

###An Article from azk
Introduction
azk is a lightweight open-source tool you can use to orchestrate application environments.
Have you ever gotten an application running on your local workstation, only to find the setup is completely different when you deploy it to a production server?
This article introduces an orchestration tool called azk, currently implemented for these applications, but applicable to many more. When you deploy an azk-ready application, you can run it locally and in production with minimal fuss.
azk makes it quick and easy to run not just the application but all of its dependencies, including the required OS, languages, frameworks, databases and other dependencies (an otherwise labor-intensive, repetitive, long, and thus error-prone task), whether you’re on your local environment or a server.
The purpose of this article is to show how azk works as an orchestration tool, using a simple Rails app called Stringer as an example.
azk takes care of many steps behind the scenes to make orchestration easier. So, this tutorial contains a few optional steps which are not strictly necessary to set up the sample app, but explain what azk is doing.
We’ll run the app from source code on our local computer, deploy it to a server, make some local changes, deploy the changes, and demonstrate a rollback.
After completing this article, you should have a good idea of how azk works as an orchestration tool for your development/deployment workflow.
How It Works
First, azk orchestrates the application’s environment on your local computer. Once you have the application running locally, azk also automates its deployment to your Droplet.
Since azk always runs applications from source code, you can also tinker with the application locally (if you want to), and then deploy or roll back, again with no special extra steps.
azk isolates the environments using containers, so it’s safe to run applications on your local computer. It works with both new projects started from scratch and previously existing code.
Using azk with Custom Applications
Using the current list of applications preconfigured to work with azk as examples, with some extra work you can configure any project to work with azk.
To do this, add an Azkfile to the project.
That’s a simple manifest file that lists the elements necessary to run the application and summarizes their relationships (OS, languages, databases etc.).
The benefits of adding an Azkfile to your project include:
- Use azk to automate the environment setup for your project both locally and in deployment
- Other people who want to deploy your app can do it with azk
Composing an Azkfile is beyond the scope of this tutorial, but you can check azk’s documentation to learn how to compose an Azkfile and how to add the Run Project GitHub button to your code.
Prerequisites
To follow along with this guide, you’ll need a local computer running any of these operating systems (64-bit) for your local environment:
- Mac OS X 10.6 (Snow Leopard) or later
- Ubuntu 12.04, 14.04 or 15.10
- Fedora 21 or 22
You’ll also need to be able to make git commits.
- Your local computer needs to have Git installed. See this series on using Git for Linux instructions, or visit the Git download page
- Make sure you’ve run the suggested commands
git config --global user.email "you@example.com"andgit config --global user.name "Your Name"before starting the tutorial; see the previous links for details about Git
Notice that having an active Droplet isn’t a requirement for this tutorial. azk will create one for you using DigitalOcean’s API.
Deploying a Droplet costs money! This tutorial deploys a single 1 GB Droplet by default.
Linux Users: Installing Docker
If you’re using Linux (Ubuntu or Fedora), you’ll need to install Docker 1.8.1 or later as your container software.
One way to install Docker is to run Docker’s installation script. (In general, make sure you understand what a script does before running it):
If you want to learn more about installing Docker on Linux, check the instructions available on the official documentation, or DigitalOcean’s Docker installation article.
Mac OS X Users: Installing VirtualBox
You’ll need VirtualBox 4.3.6 or later as your container software.
To install VirtualBox, download the appropriate Virtualbox installation package from the official download page.
Step 1 — Installing azk Locally
We will install azk using the project’s installation script. Make sure you understand what any script does before executing it on your system.
If you already have an older version of azk installed, you can use that installation script to update azk.
Alternately, check out the package installation instructions for supported operating systems.
Installing azk on Linux
If you’re using Linux (Ubuntu or Fedora), run this command in a terminal to install azk using the project’s script. We recommend vetting any script before running it on your system:
After the installation is complete, log out and then log in again to make all alterations effective.
The reason you need to log out is because, during the installation process, your user will be added to the docker group. This is a required step so that we can use Docker without being the root user. You have to exit the current session for this to take effect.
If you want to learn more about the Docker group, you can check Docker’s official documentation.
Installing azk on Mac OS X
Run this command in a terminal to install azk using the project’s script. We recommend vetting any script before running it on your system:
Step 2 — Checking azk Installation
Once the azk installation is complete, run the command below to check if the installation process was successful:
This command verifies the azk version installed. If it returns a version number (e.g. azk 0.17.0 or later), we’re good to go and you can move on to the next step.
Congratulations on installing azk for your local environment!
If not, read one of the troubleshooting sections below for help.
Troubleshooting azk installation for Linux
Let’s check the Docker version installed by running:
You’ll need version 1.8.1 or later.
However, if you get an error message, it means you don’t have Docker installed yet. In that case, follow the specific installation instructions for your OS from Docker’s documentation.
After you have confirmed you have a proper version of Docker installed, run this command as your sudo user to make sure your user is in the docker group:
If your list of groups includes docker, it means it is correctly configured. Otherwise, if you don’t get the word docker among them, run this command to add your user to the group:
Then log out and log in again.
Check the id -Gn command once more to make sure it returns the list of groups with docker among them.
If these instructions weren’t enough for you to get Docker running properly (e.g. you’re still not able to successfully run the docker version command), please refer to Docker’s installation instructions.
Troubleshooting azk installation for Mac OS X
Make sure you have VirtualBox installed:
If this returns a file path (such as /usr/local/bin/VBoxManage), we’re good to proceed. Otherwise, if it returns a “not found” message, it means you don’t have VirtualBox installed.
In this case, download and install the VirtualBox installation package from their official website.
(Optional) Step 3 — Learning About the Demo Application, Stringer
We chose Stringer as a demo application for this guide because it’s a simple application that’s already configured to work with azk.
It’s a Rails app with a well-defined use case: a bare-bones RSS reader.
More about Stringer:
Some news sites also offer their content in the format of an RSS feed. This is a standard XML file format that enables publishers to syndicate data automatically. An RSS reader is a program used to subscribe and present RSS content. Subscribing to a website RSS feed removes the need for users to manually check the website for new content. Users can create a list of subscribed feeds and consume their contents on the RSS reader (usually in the format of a cronologically ordered list).
(Optional) Step 4 — Configuring a Custom Application to Use azk
While the primary focus of this guide is to show how azk works for an application that already has its environment details spelled out for azk, in the long run the tool is most useful when you can use it to deploy any application.
So, take a look at how this forked version of Stringer compares to the primary Stringer repository.
The azk version has only two additions to Stringer’s original version:
- An
Azkfile, which provides the environment information for azk - An azk Run Project button
You can learn more about making azk work with other applications from azk’s documentation on the Azkfile and the Run Project button.
Next we’ll see how an azk-friendly application looks on GitHub.
(Optional) Step 5 — Using azk’s Run Project Button on GitHub
Part of azk’s best practices for GitHub projects is to make it very obvious how to run that project with azk. So, instead of just showing the azk command in the middle of the project readme, projects that use azk can use the Run Project button to visually isolate the azk command.
Stringer uses this button.
Visit the Running Locally section of azk’s forked version of Stringer.
Click the Run Project button.

The first time you click the Run Project button, you’ll see a short explanation of what’s going on. When you’re ready to move on, just click OK, DISMISS at the bottom of the explanation.

Then you’ll be taken to a page with the azk command for the Stringer project:

You can always click the What is this? link on the upper right corner to see the explanation again.
In the center of the screen, there’s a command box with three tabs: curl, wget and azk. Since we already have azk installed, we can use the azk one.
This is the command we’ll use in the next step to actually run Stringer.
Step 6 — Running Stringer Locally
In this section we’ll use azk to run Stringer on our local workstation.
On our local computer, let’s make sure we’re in our home directory (if you choose a different installation folder, just remember to adapt later commands to your chosen directory):
Go ahead and run that command on your local workstation to run Stringer:
Since this is your first time starting azk, you’ll be asked to accept its terms of service. A message like the following should be prompted:
? =========================================================================
  Thank you for using azk! Welcome!
  Before we start, we need to ask: do you accept our Terms of Use?
  http://docs.azk.io/en/terms-of-use
 =========================================================================
 (Y/n)
Press either Y if you agree or N otherwise. Then press ENTER to inform your answer. In the case you disagree, you won’t be able to use azk.
Finally, azk will automatically download Stringer’s source code as well as the attached Azkfile to run this code in a completely safe and isolated environment on your local computer.
Next, you’ll be asked if you want to start the azk agent:
? The agent is not running, would you like to start it? (Y/n)
The agent is an azk component that configures Docker (on Linux) or a VirtualBox VM (on Mac OS X).
Press ENTER to answer “Yes” (default option).
The first time you run the agent, azk will run its setup.
The setup does a lot of things behind the scenes, including creating the file /etc/resolver/dev.azk.io, which contains a DNS configuration to resolve addresses ending with the dev.azk.io suffix.
azk uses this suffix when running applications to apply human-readable addresses to them instead of requiring us to manually configure http://localhost:PORT_NUMBER addresses. This also avoids port conflict across different applications.
(It’s basically doing the same thing as editing your /etc/hosts file to redirect a domain name locally.)
If you get a message like the following:
? Enter the vm ip: (192.168.50.4)
You can enter any local IP address that you would like to run the app on. The default should be fine for most cases. To accept it, just press ENTER.
To complete the azk agent setup, you’ll be asked for your sudo password (for Mac OS X users, this is your admin password).
Now azk will start. You’ll see azk downloading the elements listed in the Azkfile (in the form of Docker images).
These images may take a few minutes to download the first time (around 10 minutes or less).
As soon as azk completes the setup, your default browser will automatically load Stringer’s initial screen running on your local computer.
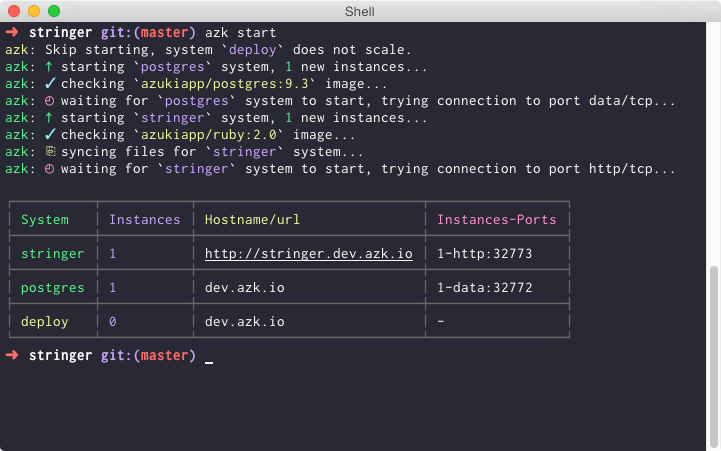
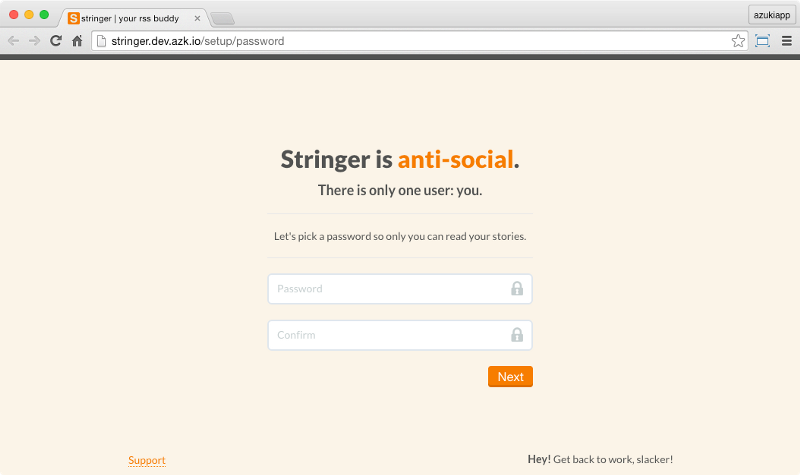
As you can see, it’s using local DNS, so the app is visible at http://stringer.dev.azk.io. You can also access the application manually by going to http://stringer.dev.azk.io.
If you want to set a password and start using the application you can, but it’s not necessary for this tutorial. We just wanted to see that azk could run Stringer locally.
Now that we have Stringer running on our local computer, we can deploy it from the computer to a Droplet.
Step 7 — Obtaining a DigitalOcean API Token
Before we can deploy a Droplet from azk, we need an API token. The token gives azk permission to deploy a new DigitalOcean server on your account.
The first time you run azk from this environment with this token, it will deploy a new 1 GB Ubuntu 14.04 Droplet. Subsequent deployments from the same local environment will use that same single Droplet.
Follow the instructions from the How To Generate a Personal Access Token section of the linked tutorial. The generated token must have read and write permissions.
Copy the 64 hexadecimal characters of your token, similar to the example below:
a17d6a72566200ad1a8f4e090209fe1841d77d7c85223f769e8c5de47475a726
You’ll see the token string only once, so note it down in a safe place. (Remember, if this token gets compromised, it could be used to access your account, so keep it private.)
For the instructions below, remember to replace the example token with your real one.
Go to Stringer’s folder:
Save your Personal Access Token in a file you’ll call .env. To do this, run this command to create the file (don’t forget to replace the token):
The .env file contents should look like this:
DEPLOY_API_TOKEN=a17d6a72566200ad1a8f4e090209fe1841d77d7c85223f769e8c5de47475a726
(Optional) Step 8 — Learning about SSH Keys
You don’t have to do anything to set up an SSH key for azk, but it’s useful to know how azk uses one.
azk uses an SSH key to access the Droplet. If you already have an SSH key, azk will use that one.
To find out if you have an SSH key on you computer, run:
If it returns a “not found” message, you don’t have any SSH keys on your computer.
In that case, azk will automatically create a new SSH key to use exclusively for deploying each new application from your computer.
azk will create its key in reserved storage of its own and won’t make any modifications to your ~/.ssh directory.
If you want to check the generated public key, you can run the following command after the first application deployment:
To learn more about SSH keys in general, read this tutorial about SSH keys.
Step 9 — Deploying with azk
By default, azk will create a 1 GB DigitalOcean Droplet running Ubuntu 14.04 to deploy your application.
If you’d like to deploy a Droplet with different specs, you can change the settings in the envs property of the deploy system in the Azkfile.js file. Refer to azk deployment documentation for additional instructions.
First, go to Stringer’s (or your application’s) directory:
Then, to start the deployment, just run:
The command azk deploy is the command you’ll run the most often when using azk to orchestrate your application.
The first deployment may take a while (around 10 minutes) as azk does all the work.
In specific, azk has to:
- Download support elements (Docker image for deployment)
- Create and configure the Droplet
- Upload the application’s source code to the Droplet
- Run the application
Every new deployment of this application from your computer will be a lot faster (around 30 seconds or less) since the longer steps will already be completed.
If your SSH key is password protected, it will be required a few times during the deployment process. Just type your SSH key password and press ENTER every time a message as the one below appears:
Enter passphrase for ~/.ssh/id_rsa:
The terminal output will show quite a few actions being taken on the remote system, ending with the successful deployment message App successfully deployed at http://your_server_ip.

Visit http://your_server_ip to view the application hosted on your server.

From now on, you can alter the code of the application on your computer, test it locally, and deploy the changes to your Droplet with the azk deploy command.
Step 10 — Modifying Stringer
To show how easy is to use azk for application development, for customization, or for version control, let’s make a simple change to the Stringer signup page, and redeploy the application.
Be sure you’re in Stringer’s directory:
Let’s edit the file app/views/first_run/password.erb, which is the page that contains the text for that first signup page.
Use nano or your favorite text editor:
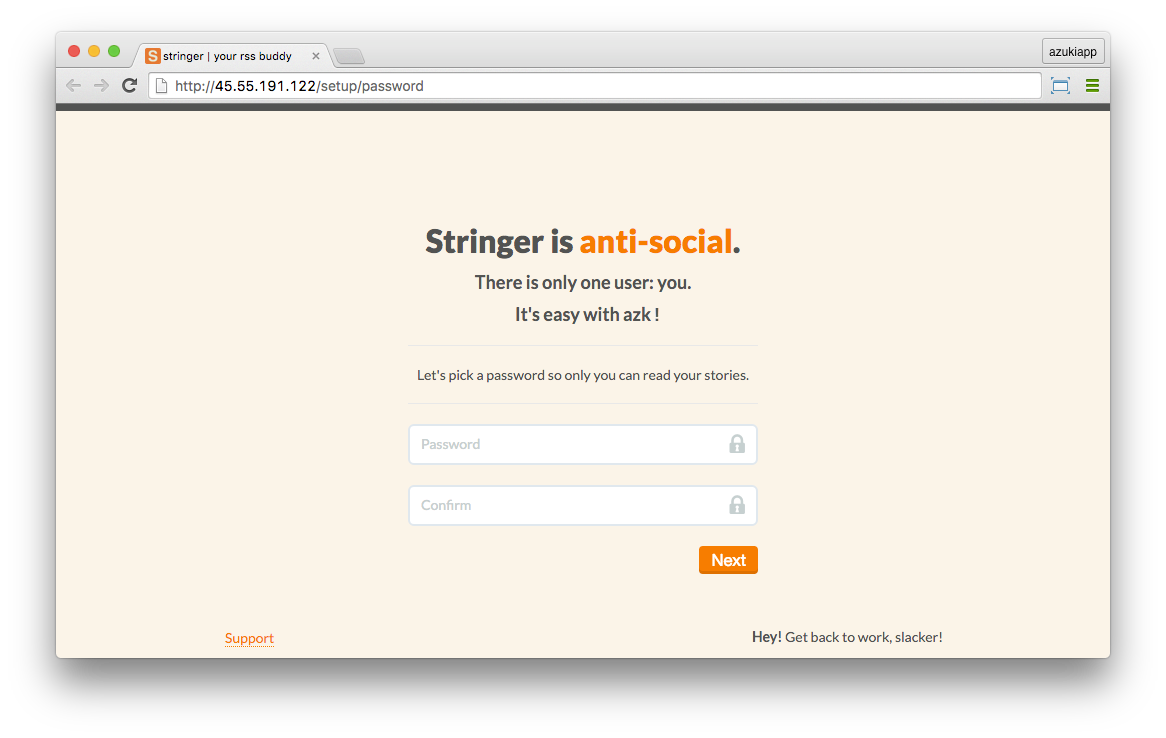
Here we’re adding an extra line that says “It’s easy with azk!”:
<div class="setup" id="password-setup">
  <h1><%= t('first_run.password.title') %> <span class="orange"><%= t('first_run.password.anti_social') %></span>.</h1>
  <h2><%= t('first_run.password.subtitle') %></h2>
  <h2>It's easy with azk!</h2>
  <hr />
  . . .
</div>
Save and exit the text editor. If you’re using nano, press CTRL+O to save and CTRL+X to exit.
Since Stringer is set to run in production mode by default, refreshing your browser isn’t enough to make your change goes live. Restart the application from azk:
A new browser tab should open with the new version of Stringer. Right below the default text There is only one user: you., it should now say It’s easy with azk! as well.
Step 11 — Redeploying Stringer
Now, let’s commit the changes into our version control system so we can deploy them.
You’ll be shown a text editor (most likely nano or vim).
Enter a commit message, like It is easy with azk.
This commit message will be used to label versions of your application within azk, so choose one that will jog your memory if you need to roll back later.
Save and close the commit message.
If you get the fatal: empty ident name (for <sammy@azk.(none)>) not allowed error, please run the suggested setup commands for Git to set an email address and name (more details in the Prerequisites section).
To deploy your change and update the application running on your Droplet, run:
Once it’s done, access your Droplet’s IP address from your browser (e.g. http://your_server_ip). You should see the new line It’s easy with azk! here, too.
This new deployment will create a new version of the application on the Droplet. All versions of the application are stored, so you can roll back to a previous one and then forward again.
Step 12 — Rolling Back to a Previous Version
To list all available versions of our application on the Droplet, run this command locally:
This should result in a list like:
⇲ Retrieving deployed versions...

  ➜ v2              It is easy with azk
    v1              Merge branch 'master' of https://github.com/swanson/stringer
To roll back the application to an older version, just run:
The argument v1 is a version number shown by the output of the azk deploy versions command. If you run the command without an argument (e.g. azk deploy rollback), the application will be rolled back to the version right before the current one.
To check that the rollback completed, just refresh the browser tab that’s showing the server version.
Now you should see the application without our custom text, the way it was in the original deployment.
If you’d like to roll forward again, you can choose the newest version:
The labels for these versions come from the git commit messages in the previous step.
Conclusion
In this guide, we used a simple Rails app to demonstrate how azk automates our application environment setup tasks. This makes it easy to deploy the same application in multiple environments.
If you like azk’s deployment process, consider using it for your own project or adding an Azkfile to a fork of another open-source project. Learn about creating an Azkfile here and how to add the Run Project GitHub button here.
Or, you can check out this demonstration gallery of other applications that already have the legwork done to run with azk.
Besides rollback and versions, azk supports other auxiliary subcommands that allow us to perform some additional actions (e.g., access the Droplet’s shell via SSH).
Thanks for learning with the DigitalOcean Community. Check out our offerings for compute, storage, networking, and managed databases.
About the author(s)
Software Engineer at Azuki
Current fan and former Editorial Manager at DigitalOcean. Hi! Expertise in areas including Ubuntu, Docker, Rails, and more.
Still looking for an answer?
This textbox defaults to using Markdown to format your answer.
You can type !ref in this text area to quickly search our full set of tutorials, documentation & marketplace offerings and insert the link!
That’s pretty cool. I hope I get to try Azk on DigitalOcean soon. :)
How about an Elixir + Phoenix tutorial too?
Awesome! I’ve been using DO and azk for some time and this tutorial is the missing key for the rails administration panel app we’re working on. :)
Great tool!
We already use azk in all of our local development environments. Next step is using it for deployment too (since we’ve recently moved our product to DigitalOcean).
I’d like too see an azk tutorial using Laravel 5.
azk has proven itself quite useful to me. I´ve been using it in my personal projects and it has been a breeze.
In a few steps I´m able to create development environments that would otherwise cost me hours (or even days) to configure manually.
The ‘Run Project’ button is also a great way to get other people to quickly run my application with no help or advanced technical skills.
I haven´t trying to deploy to DigitalOcean with azk yet, but that´s my next step with it.
I’ve been using azk for the past 6 months and now I have to use docker-compose in a client project, I can say that azk is much simpler then docker-compose, but powerful as well.
Would be nice to have a way to easily use azk + DO for my project, that will be a huge improvement in my developer life!
WOW! That’s pretty nice.
I used AZK for our Internet Of Cows API.
We held a hackathon at MassChallenge last December and the hackers got to make the exemple code of our API work monster fast!
It’s pretty cool to know that it’s also easy to deploy to Digital Ocean with AZK.
Go Azuki!!!
 This work is licensed under a Creative Commons Attribution-NonCommercial- ShareAlike 4.0 International License.
Become a contributor for community
Get paid to write technical tutorials and select a tech-focused charity to receive a matching donation.

DigitalOcean Documentation
Full documentation for every DigitalOcean product.

Resources for startups and SMBs
The Wave has everything you need to know about building a business, from raising funding to marketing your product.
The developer cloud
Scale up as you grow — whether you're running one virtual machine or ten thousand.

Get started for free
Sign up and get $200 in credit for your first 60 days with DigitalOcean.*

*This promotional offer applies to new accounts only.