By Jamie Scaife and Kathryn Hancox
Not using Ubuntu 18.04?
Choose a different version or distribution.
The author selected the Electronic Frontier Foundation to receive a donation as part of the Write for DOnations program.
Introduction
OctoDNS is an infrastructure-as-code tool that allows you to deploy and manage your DNS zones using standard software development principles, including version control, testing, and automated deployment. OctoDNS was created by GitHub and is written in Python.
Using OctoDNS eliminates many of the pitfalls of manual DNS management, as zone files are stored in a structured format (YAML). This allows you to deploy zones to multiple DNS providers simultaneously, identify syntax errors, and push out your DNS configuration automatically, reducing the risk of human error. Another common usage of OctoDNS is to synchronize your DNS configuration between different providers, such as a testing and production system, or between live and failover environments.
OctoDNS is similar to DNSControl, which is an equivalent tool created by Stack Exchange and written in Go. Unlike OctoDNS, DNSControl uses a JavaScript-based configuration language for defining DNS zones, which allows you to use advanced programmatic features such as loops to specify multiple similar records within the same zone. The article How to Deploy and Manage Your DNS Using DNSControl on Ubuntu 18.04 covers the basic setup and configuration of DNSControl.
In this tutorial, you’ll install and configure OctoDNS, create a basic DNS configuration, and begin deploying DNS records to a live provider. As part of this tutorial, we will use DigitalOcean as the example DNS provider. If you wish to use a different provider, the setup is very similar. When you’re finished, you’ll be able to manage and test your DNS configuration in a safe, offline environment, and then automatically deploy it to production.
Prerequisites
Before you begin this guide you’ll need the following:
- One Ubuntu 18.04 server set up by following the Initial Server Setup with Ubuntu 18.04, including a sudo non-root user and enabled firewall to block non-essential ports.
your-server-ipv4-addressandyour-server-ipv6-addressrefer to the IP addresses of the server where you’re hosting your website or domain. - A fully registered domain name with DNS hosted by a supported provider. This tutorial will use
your-domainthroughout and DigitalOcean as the service provider. - A DigitalOcean API key (Personal Access Token) with read and write permissions. To create one, visit How to Create a Personal Access Token.
Once you have these ready, log in to your server as your non-root user to begin.
Step 1 — Installing OctoDNS
OctoDNS is distributed as a Python pip package, and runs in a Python Virtual Environment (virtualenv), so you’ll start this step by installing the packages required for this. A virtualenv is an isolated Python environment that can have its own libraries and configuration, separate from the main system-wide Python installation. Python and virtualenv are available within Ubuntu’s default software repositories, making it possible to install using conventional package management tools.
Begin by updating the local package index to reflect any new upstream changes:
- sudo apt update
Then, install the python and virtualenv packages:
- sudo apt install python virtualenv
After confirming the installation, apt will download and install Python, virtualenv, and all of their required dependencies.
Next, you’ll create the required directories for OctoDNS, where your DNS and program configuration will be stored. Start by creating the ~/octodns and ~/octodns/config directories:
- mkdir ~/octodns ~/octodns/config
Now move into ~/octodns:
- cd ~/octodns
Next, you need to create the Python Virtual Environment—an isolated Python environment with its own libraries and configuration to run OctoDNS in:
- virtualenv env
Activate your environment with the following command:
- source env/bin/activate
This will output something similar to the following:
OutputRunning virtualenv with interpreter /usr/bin/python2
New python executable in /home/user/octodns/env/bin/python2
Also creating executable in /home/user/octodns/env/bin/python
Installing setuptools, pkg_resources, pip, wheel...done.
Your Bash shell prompt will now also be prefixed with the name of the virtual environment. This shows that you are currently operating within the virtualenv:
(env) user@digitalocean:~/octodns$
If you wish to exit the virtualenv, you can use the deactivate command at any time. However, you should stay in your virtualenv to continue with this tutorial.
Now that you’ve installed and configured Python and virtualenv, you can install OctoDNS. OctoDNS is distributed as a Python pip package, which is the standard package-management tool for Python packages and libraries.
You can install the OctoDNS pip package using the following command within your virtualenv:
- pip install octodns
Once this is complete, you can check the installed version to make sure that everything is working:
- octodns-sync --version
Your output will look similar to the following:
OutputoctoDNS 0.9.6
If you see a octodns-sync: command not found error, double-check that you’re still inside your virtualenv.
Now that you’ve installed OctoDNS, you can create the required configuration files to connect OctoDNS to your DNS provider to allow it to make changes to your DNS records.
Step 2 — Configuring OctoDNS
In this step, you’ll create the required configuration files for OctoDNS, and connect it to your DNS provider so that it can begin to make live changes to your DNS records.
Note: This tutorial will focus on the initial setup of OctoDNS; however for production use it is recommended to store your OctoDNS configuration in a version control system (VCS) such as Git. The advantages of this include full version control, integration with CI/CD for testing, seamlessly rolling-back deployments, and so on.
Firstly, you need to configure the config.yaml file, which defines the DNS zones for OctoDNS to manage, and allows it to authenticate to your DNS provider and make changes.
The format of config.yaml differs slightly depending on the DNS provider that you are using. Please see the Supported Providers list in the official OctoDNS documentation to find the configuration for your own provider. When viewing this hyperlink, the configuration details are presented as a code comment in the actual Python code for your provider, which is linked in the ‘Provider’ column of the table. Once you have found the Python code for your provider, such as cloudflare.py or route53.py, the relevant code comment can be found directly under the class ProviderNameProvider. For example:
class Route53Provider(BaseProvider):
    '''
    AWS Route53 Provider
    route53:
        class: octodns.provider.route53.Route53Provider
        # The AWS access key id
        access_key_id:
        # The AWS secret access key
        secret_access_key:
        # The AWS session token (optional)
        # Only needed if using temporary security credentials
        session_token:
Move into the ~/octodns/config directory:
- cd ~/octodns/config
Then create and open config.yaml for editing:
- nano config.yaml
Add the sample config.yaml configuration for your DNS provider to the file. If you’re using DigitalOcean as your DNS provider, you can use the following:
---
providers:
  config:
    class: octodns.provider.yaml.YamlProvider
    directory: ./config
    default_ttl: 300
    enforce_order: True
  digitalocean:
    class: octodns.provider.digitalocean.DigitalOceanProvider
    token: your-digitalocean-oauth-token

zones:
  your-domain.:
    sources:
      - config
    targets:
      - digitalocean
This file tells OctoDNS which DNS providers you want it to connect to, and which DNS zones it should manage for those providers.
You’ll need to provide some form of authentication for your DNS provider. This is usually an API key or OAuth token.
If you do not wish to store your access token in plain text in the configuration file, you can instead pass it as an environment variable when the program runs. To do this, you should use the following token: line instead in config.yaml:
token: env/DIGITALOCEAN\_OAUTH\_TOKEN
Then, before running OctoDNS, set the relevant environment variable to your access token, and OctoDNS will read it from there when run:
- export DIGITALOCEAN\_OAUTH\_TOKEN=your-digitalocean-oauth-token
Warning: This token will grant access to your DNS provider account, so you should protect it as you would a password. Also, ensure that if you’re using a version control system, either the file containing the token is excluded (e.g. using .gitignore), or is securely encrypted in some way.
If you’re using DigitalOcean as your DNS provider, you can use the required OAuth token in your DigitalOcean account settings that you generated as part of the prerequisites.
If you have multiple different DNS providers—for example, for multiple domain names, or delegated DNS zones—you can define these all in the same config.yaml file.
You’ve set up the initial OctoDNS configuration file to allow the program to authenticate to your DNS provider and make changes. Next you’ll create the configuration for your DNS zones.
Step 3 — Creating a DNS Configuration File
In this step, you’ll create an initial DNS configuration file, which will contain the DNS records for your domain name or delegated DNS zone.
Each DNS zone that you want to manage using OctoDNS has its own file, for example your-domain.yaml. In this file, the DNS records for the zone are defined using YAML.
To begin, move into the ~/octodns/config directory:
- cd ~/octodns/config
Then create and open your-domain.yaml for editing:
- nano your-domain.yaml
Add the following sample configuration to the file:
---
'':
  - type: A
    value: your-server-ipv4-address

www:
  - type: A
    value: your-server-ipv4-address
This sample file defines a DNS zone for your-domain with two A records, pointing to the IPv4 address that you’re hosting your domain or website on. One A record is for the root domain (e.g. your-domain), and the other is for the www subdomain (e.g. www.your-domain).
Once complete, save and close the file.
You’ve set up a basic DNS zone configuration file for OctoDNS, with two basic A records pointing to the IPv4 address of your domain or website. Next, you’ll expand the file with some useful DNS records.
Step 4 — Populating Your DNS Configuration File
Next, you can populate the DNS configuration file with a practical set of DNS records for your website or service, using the YAML structured configuration language.
Unlike traditional BIND zone files, where DNS records are written in a raw, line-by-line format, DNS records within OctoDNS are defined as YAML keys and subkeys with a number of associated values, as shown briefly in Step 3.
The top-level key is usually the 'name', which is essentially the record identifier. www, subdomain1, and mail are all examples of DNS 'name'. In OctoDNS, there are two special-use names, which are '', for the root record (usually referred to as @), and '*', for wildcard records. A required value of each key (DNS record) is type. This defines which type of DNS record you are defining within that YAML top-level key. A type exists for each of the standard DNS record types, including A, AAAA, MX, TXT, NS, CNAME, and so on. A full list of available record types is available in the Records section of the OctoDNS documentation.
The values for your DNS records are defined either directly as values to the top-level keys (if you only have one value), or as a list (if you have multiple values, e.g. multiple IP addresses or MX addresses).
For example, to define a single value, you could use the following configuration:
'www':
  type: A
  value: 203.0.113.1
Alternatively, to define multiple values for a single record:
'www':
  type: A
  values:
  - 203.0.113.1
  - 203.0.113.2
The syntax for setting DNS records varies slightly for each record type. Following are some examples for the most common record types:
A records:
Purpose: To point to an IPv4 address.
Syntax:
'name':
  type: A
  value: ipv4-address
Example:
'www':
  type: A
  value: your-server-ipv4-address
AAAA records:
Purpose: To point to an IPv6 address.
Syntax:
'name':
  type: AAAA
  value: ipv6-address
Example:
'www':
  type: AAAA
  value: your-server-ipv6-address
CNAME records:
Purpose: To make your domain/subdomain an alias of another.
Syntax:
'name':
  type: CNAME
  value: fully-qualified-domain-name
Example:
'www':
  type: CNAME
  value: www.example.org
MX records:
Purpose: To direct email to specific servers/addresses.
Syntax:
'name':
  type: MX
  value:
    exchange: mail-server
    preference: priority-value
Note that a trailing . must be included if there are any dots in the MX value.
Example:
'':
  type: MX
  value:
    exchange: mail.your-domain.
    preference: 10
TXT records:
Purpose: To add arbitrary plain text, often used for configurations without their own dedicated record type.
Syntax:
'name':
  type: TXT
  value: content
Example:
'':
  type: TXT
  value: This is a TXT record.
In order to begin adding DNS records for your domain or delegated DNS zone, edit your DNS configuration file:
- cd ~/octodns/config
- nano your-domain.yaml
Next, you can begin populating your DNS zone using the syntax described in the previous list, as well as the Records section of the official OctoDNS documentation.
For reference, the code block here contains a full sample configuration for an initial DNS setup:
---
'':
  - type: A
    value: your-server-ipv4-address

  - type: AAAA
    value: your-server-ipv6-address

  - type: MX
    value:
      exchange: mail.your-domain.
      preference: 10

  - type: TXT
    value: v=spf1 -all

_dmarc:
  type: TXT
  value: v=DMARC1\; p=reject\; rua=mailto:abuse@your-domain\; aspf=s\; adkim=s\;

mail:
  - type: A
    value: your-server-ipv4-address

  - type: AAAA
    value: your-server-ipv6-address

www:
  - type: A
    value: your-server-ipv4-address

  - type: AAAA
    value: your-server-ipv6-address
Once you have completed your initial DNS configuration, save and close the file.
In this step, you set up the initial DNS configuration file, containing your DNS records. Next, you will test the configuration and deploy it.
Step 5 — Testing and Deploying Your DNS Configuration
In this step, you will run a local syntax check on your DNS configuration, and then deploy the changes to the live DNS server/provider.
Firstly, move into your octodns directory:
- cd ~/octodns
Double check that you’re still operating within your Python virtualenv by looking for the name of it before your Bash prompt:
(env) user@digitalocean:~/octodns$
Next, use the octodns-validate command to check the syntax of your configuration file(s). You’ll need to specify the path to your configuration file:
- octodns-validate --config=./config/config.yaml
If the YAML syntax of your DNS configuration file is correct, OctoDNS will return with no output.
If you see an error or warning in your output, OctoDNS will provide details on what and where the error is located within your YAML file.
Next, you can perform a dry-run push of the DNS configuration, which will output which changes will be made, without actually making them:
- octodns-sync --config=./config/config.yaml
This should produce an output similar to the following:
Output********************************************************************************
* your-domain.
********************************************************************************
* digitalocean (DigitalOceanProvider)
*   Create <ARecord A 300, mail.your-domain., ['your-server-ipv4-address']> (config)
*   Create <AaaaRecord AAAA 300, mail.your-domain., ['your-server-ipv6-address']> (config)
*   Create <TxtRecord TXT 300, your-domain., ['v=spf1 -all']> (config)
*   Create <AaaaRecord AAAA 300, your-domain., ['your-server-ipv6-address']> (config)
*   Create <ARecord A 300, your-domain., ['your-server-ipv4-address']> (config)
*   Create <ARecord A 300, www.your-domain., ['your-server-ipv4-address']> (config)
*   Create <MxRecord MX 300, your-domain., [''10 mail.your-domain.'']> (config)
*   Create <TxtRecord TXT 300, _dmarc.your-domain., ['v=DMARC1\; p=reject\; rua=mailto:abuse@your-domain\; aspf=s\; adkim=s\;']> (config)
*   Create <AaaaRecord AAAA 300, www.your-domain., ['your-server-ipv6-address']> (config)
*   Summary: Creates=9, Updates=0, Deletes=0, Existing Records=2
********************************************************************************
Warning: The next command will make live changes to your DNS records and possibly other settings. Please ensure that you are prepared for this, including taking a backup of your existing DNS configuration, as well as ensuring that you have the means to roll back if needed.
Finally, you can push out the changes to your live DNS provider:
- octodns-sync --config=./config/config.yaml --doit
Note: In some cases, OctoDNS will refuse to push changes if it is making a significant number of adjustments. This is an automatic protection feature to prevent accidental misconfigurations. If you encounter this refusal, you can re-run octodns-sync using the --force option, but please ensure you are ready to do so.
You’ll see an output like the dry-run earlier in this step, but with the addition of something similar to the following:
Output2019-07-07T23:17:27 INFO  DigitalOceanProvider[digitalocean] apply: making changes
2019-07-07T23:17:30 INFO  Manager sync:   9 total changes
Now, if you check the DNS settings for your domain in the DigitalOcean control panel, you’ll see the changes.
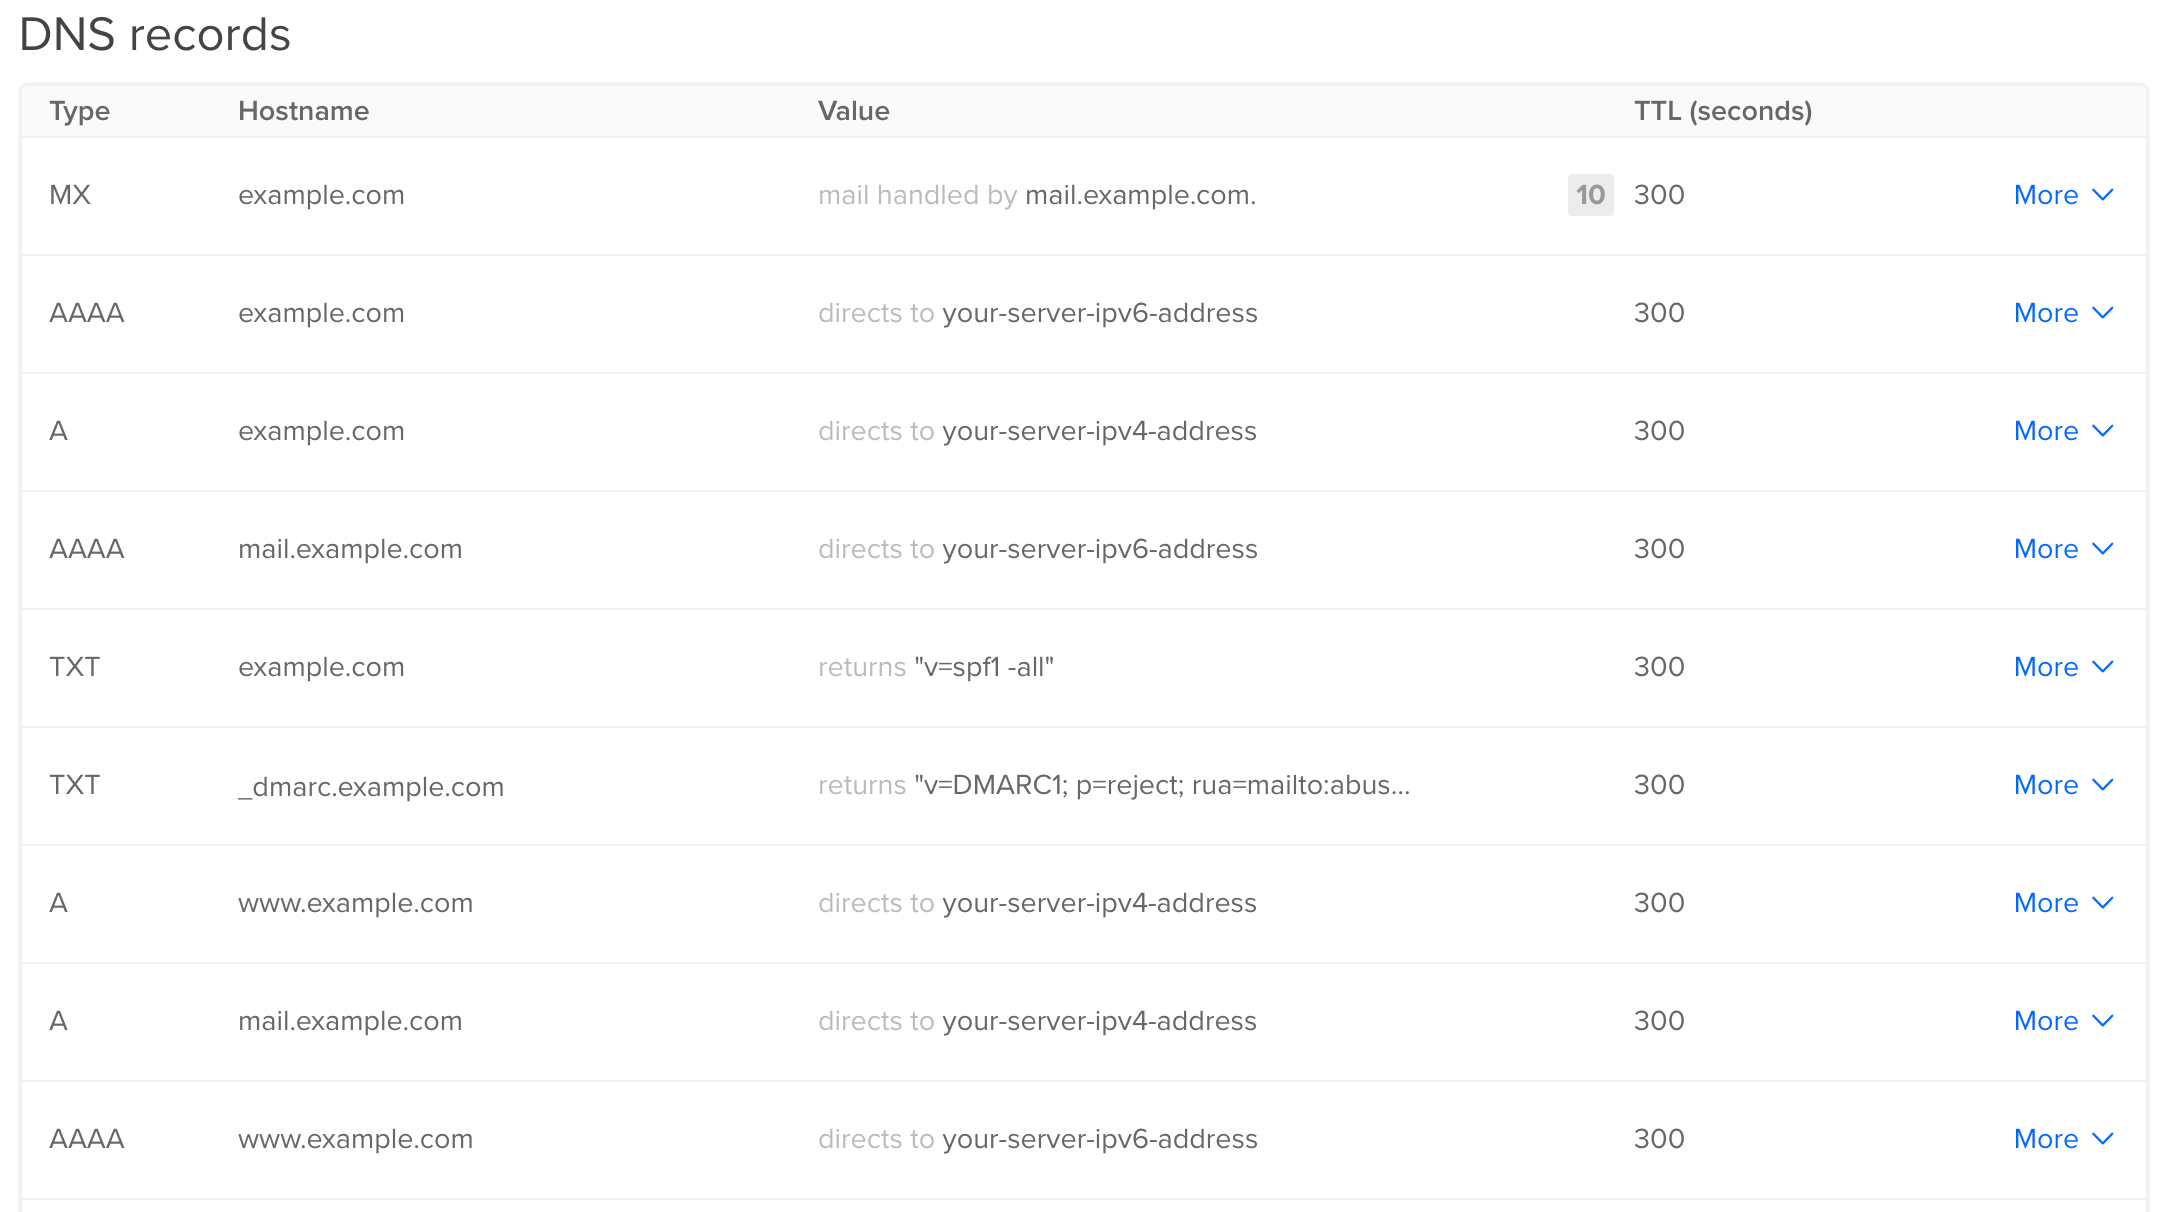
You can also check the record creation by running a DNS query for your domain/delegated zone. You’ll see that the records have been updated accordingly:
- dig +short your-domain
You’ll see output showing the IP address and relevant DNS record from your zone that was deployed using OctoDNS. DNS records can take some time to propagate, so you may need to wait and run this command again.
In this final step, you ran a local syntax check of the DNS configuration file, then deployed it to your live DNS provider, and tested that the changes were made successfully.
Conclusion
In this article you set up OctoDNS and deployed a DNS configuration to a live provider. Now you can manage and test your DNS configuration changes in a safe, offline environment before deploying them to production.
If you wish to explore this subject further, OctoDNS is designed to be integrated into your CI/CD pipeline, allowing you to run in-depth tests and have more control over your deployment to production. You could also look into integrating OctoDNS into your infrastructure build/deployment processes, allowing you to deploy servers and add them to DNS completely automatically.
If you wish to go further with OctoDNS, the following DigitalOcean articles provide some interesting next steps to help integrate OctoDNS into your change management and infrastructure deployment workflows:
Thanks for learning with the DigitalOcean Community. Check out our offerings for compute, storage, networking, and managed databases.
About the author(s)
IT Security Engineer, technical writer and occasional blogger from the United Kingdom, with an interest in security defence and blue team activities.
Former Senior Technical Editor at DigitalOcean, with a strong focus on DevOps and System Administration content. Areas of expertise include Terraform, PyTorch, Python, and Django.
Still looking for an answer?
This textbox defaults to using Markdown to format your answer.
You can type !ref in this text area to quickly search our full set of tutorials, documentation & marketplace offerings and insert the link!
 This work is licensed under a Creative Commons Attribution-NonCommercial- ShareAlike 4.0 International License.
Become a contributor for community
Get paid to write technical tutorials and select a tech-focused charity to receive a matching donation.

DigitalOcean Documentation
Full documentation for every DigitalOcean product.

Resources for startups and AI-native businesses
The Wave has everything you need to know about building a business, from raising funding to marketing your product.
The developer cloud
Scale up as you grow — whether you're running one virtual machine or ten thousand.

Start building today
From GPU-powered inference and Kubernetes to managed databases and storage, get everything you need to build, scale, and deploy intelligent applications.
