By Daniel Li and Caitlin Postal

The author selected the Wikimedia Foundation to receive a donation as part of the Write for DOnations program.
Introduction
Infrastructure as Code (IaC) is a practice of automating infrastructure deployment and modifications by defining the resource states and their relationships in code. Executing that code then creates or modifies the actual resources in the cloud. IaC allows engineers to use an IaC tool like Terraform (by HashiCorp) for provisioning infrastructure.
With IaC, changes to your infrastructure can go through the same code review process as your application code. You can store the code in version control (like Git) to keep a history of the state of your infrastructure, and you can automate the deployment process further with higher-level tools such as a self-service internal developer platform (IDP).
Terraform is a popular platform-agnostic IaC tool due to its broad support for many platforms, including GitHub, Cloudflare, and DigitalOcean. Most Terraform configurations are written using a declarative language called the HashiCorp Configuration Language (HCL).
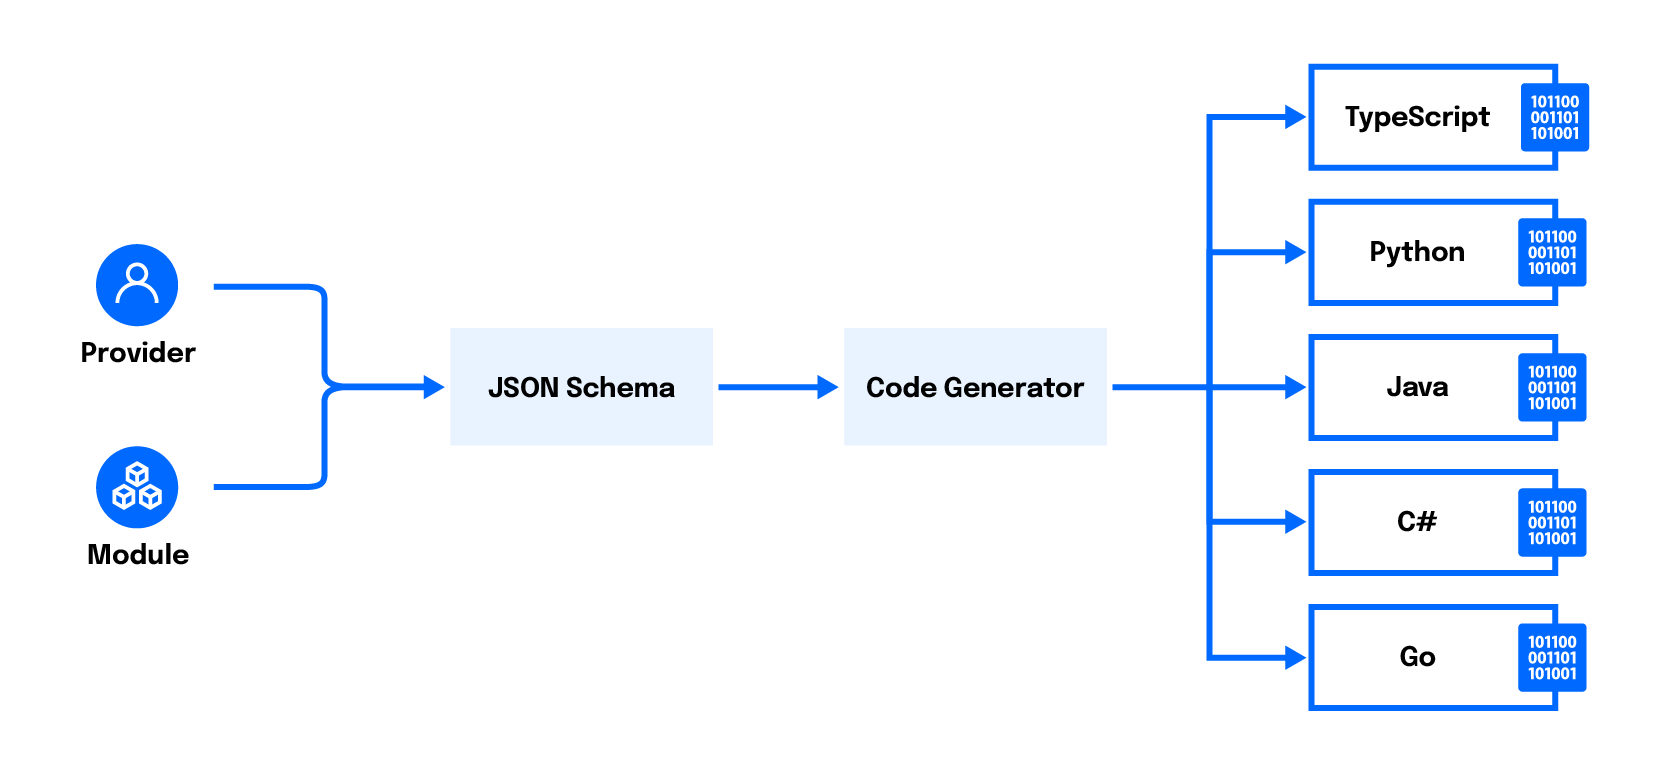
The Cloud Development Kit for Terraform (CDKTF) is a tool built on top of Terraform that allows you to define infrastructure using a familiar programming language (such as TypeScript, Python, or Go) instead of HCL. This tool can provide a shallower learning curve for developers unfamiliar with HCL, while allowing developers to use native programming features like loops, variables, and functions.
In this tutorial, you will start by installing the cdktf command-line interface (CLI) tool. Then, you will author a CDKTF project in TypeScript and define the project with two NGINX servers that are load-balanced by a load balancer. You will then use cdktf to deploy the infrastructure. At the end of this tutorial, you will have a CDKTF project from which you can build to expand your infrastructure.
Note: This tutorial has been tested with CDKTF 0.11.2 and Terraform 1.2.2.
Prerequisites
To complete this tutorial, you will need:
- A good understanding of Infrastructure-as-Code (IaC). You can learn about IaC in Infrastructure as Code Explained.
- A DigitalOcean account. If you do not have one, sign up for a new account.
- A DigitalOcean Personal Access Token, which you can create via the DigitalOcean console. Instructions on how to do that can be found at How to Generate a Personal Access Token.
- A password-less SSH key added to your DigitalOcean account. You can add that by following How To Use SSH Keys with DigitalOcean Droplets. When you add the key to your account, remember the name you give it, as you will need it in this tutorial. For CDKTF to accept the name of your key, it must start with a letter or underscore and may contain only letters, digits, underscores, and dashes.
- Terraform installed on your local machine, which you can set up with “Step 1 - Installing Terraform” in How To Use Terraform with DigitalOcean.
- Node.js installed on your local machine. You can find instructions for this in the How to Install Node.js and Create a Local Development Environment series.
- To be comfortable programming with JavaScript. To build your skills, check out the How To Code in JavaScript series.
- To be comfortable using the basic features of TypeScript. If you are not comfortable with TypeScript, the How To Code in TypeScript tutorial series is a good resource to get you up to speed.
- A code editor or integrated development environment (IDE) that supports TypeScript. If you are not currently using one, try Visual Studio Code. You can also read up on How To Work With TypeScript in Visual Studio Code.
Step 1 — Installing the cdktf CLI
cdktf CLITo begin, you will install the cdktf command-line tool.
The cdktf CLI is available as an NPM package. If you search for cdktf on npmjs.com, you will find two similarly-named packages: cdktf and cdktf-cli.
Conceptually, CDKTF is an abstraction layer on top of Terraform. It consists of two parts:
-
a library containing a set of language-native constructs (such as functions and classes) for defining infrastructure. This part is encapsulated within the
cdktfnpm package. For example, you can see the use of theAppandTerraformStackclasses from thecdktfpackage in the following sample CDKTF project:import { App, TerraformStack } from "cdktf"; class APIStack extends TerraformStack {} const app = new App(); new APIStack(app, "feature-x"); app.synth(); -
an adapter that parses the constructs within the CDKTF project and reduces them to a set of JSON documents, which are then ingested into Terraform in the same way HCL is ingested. This adaptor is encapsulated into a CLI tool called
cdktf, provided by thecdktf-clipackage.
To install the cdktf CLI tool, you need the cdktf-cli package. You can install this package globally using npm, yarn, or a package manager of your choosing.
To install cdktf-cli with npm, run the following:
- npm install --global cdktf-cli@0.11.2
Note: There will likely be a newer version of the cdktf-cli package after the publication of this article. You can try following the tutorial with the latest version by running npm install --global cdktf-cli@latest instead, but be aware that some outputs may differ slightly.
Alternatively, you can use Homebrew on macOS or Linux to install the cdktf CLI as the cdktf formula:
- brew install cdktf
To verify the installation is successful, run the cdktf command with no arguments:
- cdktf
You will see output similar to the following:
OutputPlease pass a command to cdktf, here are all available ones:
cdktf

Commands:
  cdktf init                Create a new cdktf project from a template.
  cdktf get                 Generate CDK Constructs for Terraform providers and modules.
  cdktf convert             Converts a single file of HCL configuration to CDK for Terraform.
  cdktf deploy [stacks...]  Deploy the given stacks
  cdktf destroy [stacks..]  Destroy the given stacks
  cdktf diff [stack]        Perform a diff (terraform plan) for the given stack
  cdktf list                List stacks in app.
  cdktf login               Retrieves an API token to connect to Terraform Cloud.
  cdktf synth               Synthesizes Terraform code for the given app in a directory.
  cdktf watch [stacks..]    [experimental] Watch for file changes and automatically trigger a deploy
  cdktf output [stacks..]   Prints the output of stacks
  cdktf debug               Get debug information about the current project and environment
  cdktf completion          generate completion script

Options:
      --version                   Show version number
      --disable-logging           Dont write log files. Supported using the env CDKTF_DISABLE_LOGGING.
      --disable-plugin-cache-env  Dont set TF_PLUGIN_CACHE_DIR automatically.
      --log-level                 Which log level should be written.
  -h, --help                      Show help

Options can be specified via environment variables with the "CDKTF_" prefix (e.g. "CDKTF_OUTPUT")
The output shows you the available commands. In the rest of this tutorial, you will gain experience using cdktf init, cdktf get, cdktf deploy, and cdktf destroy.
Now that you have installed the cdktf CLI, you can define infrastructure by writing some TypeScript code.
Step 2 — Creating a New CDKTF Project
In this step, you will use the cdktf CLI you just installed to create a boilerplate CDKTF project, which you will build on in subsequent steps.
Create a directory that will house the CDKTF project by running the following command:
- mkdir infra
Then, navigate into the newly-created directory:
- cd infra/
Use the cdktf init command to create a CDKTF project scaffold that you will build on:
- cdktf init --template=typescript --project-name=base --project-description="Base architecture" --local
CDKTF allows developers to define infrastructure using TypeScript, Python, Java, C#, or Go. The --template=typescript option tells cdktf to scaffold this CDKTF project using TypeScript.
Terraform (and thus CDKTF) keeps track of the resources it is managing by recording their definitions and states in files called Terraform state files. The --local option tells CDKTF to keep these state files locally on the machine running cdktf (each file follows the naming structure terraform.<stack>.tfstate).
After running the command, the CLI may ask you for permission to send crash reports to the CDKTF team to help them improve the product:
Output? Do you want to send crash reports to the CDKTF team? See https://www.terraform.io/cdktf/create-and-deploy/configuration-file for
 more information (Y/n)
Type Y if you’d like to consent or N if you disagree, then press ENTER.
cdktf will then create the project scaffold and install the packages. When the project is scaffolded, you will see an output similar to the following:
Output  Your cdktf typescript project is ready!

  cat help                Print this message

  Compile:
    npm run get           Import/update Terraform providers and modules (you should check-in this directory)
    npm run compile       Compile typescript code to javascript (or "npm run watch")
    npm run watch         Watch for changes and compile typescript in the background
    npm run build         Compile typescript

  Synthesize:
    cdktf synth [stack]   Synthesize Terraform resources from stacks to cdktf.out/ (ready for 'terraform apply')

  Diff:
    cdktf diff [stack]    Perform a diff (terraform plan) for the given stack

  Deploy:
    cdktf deploy [stack]  Deploy the given stack

  Destroy:
    cdktf destroy [stack] Destroy the stack

  Test:
    npm run test        Runs unit tests (edit __tests__/main-test.ts to add your own tests)
    npm run test:watch  Watches the tests and reruns them on change

  Upgrades:
    npm run upgrade        Upgrade cdktf modules to latest version
    npm run upgrade:next   Upgrade cdktf modules to latest "@next" version (last commit)
You will also see some new files added to the infra directory. The most important files are cdktf.json and main.ts.
cdktf.json is the configuration file for the CDKTF project. If you open the file, it will display something like the following:
{
  "language": "typescript",
  "app": "npx ts-node main.ts",
  "projectId": "28c87598-4343-47a9-bb5d-8fb0e031c41b",
  "terraformProviders": [],
  "terraformModules": [],
  "context": {
    "excludeStackIdFromLogicalIds": "true",
    "allowSepCharsInLogicalIds": "true"
  }
}
The app property defines the command that will be run to synthesize the TypeScript code to Terraform-compatible JSON. This property indicates that main.ts is the entry point to the CDKTF project.
If you open the main.ts file, you will see something similar to the following:
import { Construct } from "constructs";
import { App, TerraformStack } from "cdktf";

class MyStack extends TerraformStack {
  constructor(scope: Construct, name: string) {
    super(scope, name);

    // define resources here
  }
}

const app = new App();
new MyStack(app, "infra");
app.synth();
In the language of CDKTF, a collection of related infrastructure resources can be grouped into a stack. For example, the resources making up an API application, such as Droplets, load balancers, and DNS records, can be grouped into a single stack named APIStack. Each stack keeps its own state and can be deployed, modified, or destroyed independently from other stacks. A common use of stacks is to have one stack for production and a separate stack for development.
An application is a container for multiple stacks. For example, an application can group the stacks of various microservices.
The CDKTF project scaffold generated in main.ts contains a single stack class called MyStack, currently defining no resources. An instance of MyStack is created with the name infra, contained within an application called app. In subsequent steps, you will define infrastructure resources within the MyStack constructor.
After creating the project, the next step is configuring the CDKTF project with providers.
Step 3 — Installing the DigitalOcean Provider
In this step, you will install the DigitalOcean Provider into the CDKTF project.
Providers are libraries that provide instructions to Terraform (which is used by cdktf under the hood) on how to create, update, and delete resources on cloud providers, SaaS providers, and other platforms exposing application programming interfaces (APIs). Providers encapsulate the logic of calling these upstream APIs into standard functions that Terraform can call.
For example, if you were to create a new DigitalOcean Droplet without Terraform, you’d have to send a POST request to the /v2/droplets endpoint of the DigitalOcean API. With Terraform, you would instead install the DigitalOcean provider and define a digitalocean_droplet resource, similar to the following sample snippet:
new Droplet(this, 'web', {
  image: 'ubuntu-20-04-x64',
  name,
  region: 'lon1',
  size: 's-1vcpu-1gb',
}
You can then use the cdktf CLI tool to translate this TypeScript code into Terraform-compatible JSON and pass it to the provider, who will make the appropriate API calls to create the Droplet on your behalf.
Now that you understand what a provider is, you can set up the DigitalOcean provider for your CDKTF project.
Open the cdktf.json file and add the string digitalocean/digitalocean to the terraformProviders array:
{
  "language": "typescript",
  "app": "npx ts-node main.ts",
  "projectId": "28c87598-4343-47a9-bb5d-8fb0e031c41b",
  "terraformProviders": ["digitalocean/digitalocean"],
  "terraformModules": [],
  "context": {
    "excludeStackIdFromLogicalIds": "true",
    "allowSepCharsInLogicalIds": "true"
  }
}
digitalocean/digitalocean is the identifier for the DigitalOcean provider on the Terraform Registry.
Save and close the file.
Next, run cdktf get to download and install the provider.
- cdktf get
cdktf get will download the provider, extract the schema, generate the corresponding TypeScript classes, and add it as a TypeScript module under .gen/providers/. This auto-code generation enables you to use any Terraform providers and HCL modules with CDKTF, and it is how CDKTF can provide code completion in editors that support it.
Once cdktf get finishes running, you will see output similar to the following:
OutputGenerated typescript constructs in the output directory: .gen
You will also see a new directory called .gen containing the generated code of the provider.
In this step, you installed the digitalocean/digitalocean provider into the project. In the next step, you will configure the DigitalOcean provider with the credentials required to authenticate the provider with the DigitalOcean API.
Step 4 — Configuring the DigitalOcean Provider
In this step, you will configure the DigitalOcean provider with your DigitalOcean Personal Access Token, which allows the provider to call the DigitalOcean API on your behalf.
Different providers require and support different credentials for authenticating with the upstream API. For the DigitalOcean provider, you need to provide your DigitalOcean Personal Access Token. You can specify the token to the provider by setting it as the DIGITALOCEAN_TOKEN or DIGITALOCEAN_ACCESS_TOKEN environment variables.
Run the following command in your terminal to set the environment variable for that terminal session.
- export DIGITALOCEAN_ACCESS_TOKEN="your_personal_access_token"
Note: By calling export, you are setting the environment variable only for that terminal session. If you close and re-open the terminal or run the cdktf commands in a different terminal, you will need to run the export command again for the environment variable to take effect.
Next, you will specify the provider within the MyStack class, which will allow you to define resources provided by the provider within your stack. Update the main.ts file to the following:
import { Construct } from "constructs";
import { App, TerraformStack } from "cdktf";
import { DigitaloceanProvider } from "./.gen/providers/digitalocean"

class MyStack extends TerraformStack {
  constructor(scope: Construct, name: string) {
    super(scope, name);

    new DigitaloceanProvider(this, 'provider')

  }
}

const app = new App();
new MyStack(app, "infra");
app.synth();
The module for the provider is located at ./.gen/providers/digitalocean, which was automatically generated when you ran cdktf get.
You configured the digitalocean/digitalocean provider with credentials in this step. Next, you will start defining the infrastructure that forms part of the goal of this tutorial.
Step 5 — Defining Web Applications on Droplets
In this step, you will define two NGINX servers, each serving different files, deployed on two identical Ubuntu 20.04 Droplets.
You start with the definition of the two Droplets. Modify main.ts with the highlighted changes:
...
import { DigitaloceanProvider, Droplet } from "./.gen/providers/digitalocean"

class MyStack extends TerraformStack {
  constructor(scope: Construct, name: string) {
    ...
    const dropletNames = ['foo', 'bar']
    const droplets = dropletNames.map(name => new Droplet(this, name, {
        image: 'ubuntu-20-04-x64',
        name,
        region: 'lon1',
        size: 's-1vcpu-1gb',
      })
    )
  }
}
You use a JavaScript-native loop (Array.prototype.map()) to avoid duplication in the code.
Just as if you were creating the Droplet through the console, there are several parameters to specify:
image- the Linux distribution and version your Droplet will run.region- the data center the Droplet will run in.size- the amount of CPU and memory resources to reserve to the Droplet.name- a unique name used to refer to the Droplet.
The values for image, region, and size must be things that DigitalOcean supports. You can find the valid values (called slugs) for all supported Linux distribution images, Droplet sizes, and regions on the DigitalOcean API Slugs page. You can find a complete list of required and optional attributes on the digitalocean_droplet documentation page.
Adding an SSH Key
As part of the prerequisites, you uploaded a password-less SSH public key to your DigitalOcean account and noted its name. You will now use that name to retrieve the SSH key’s ID and pass it into the definition of your Droplet.
Since the SSH key was manually added to your DigitalOcean account, it is not a resource managed by your current Terraform configuration. If you tried to define a new digitalocean_ssh_key resource, it will create a new SSH key instead of using the existing one.
Instead, you will define a new digitalocean_ssh_key data source. In Terraform, data sources are used to retrieve information about infrastructure that are not managed by the current Terraform configuration. In other words, they provide a read-only view into the state of pre-existing, external infrastructure. Once a data source is defined, you can use the data elsewhere in your Terraform configuration.
Still in main.ts and within the constructor of MyStack, define a new DataDigitaloceanSshKey data source, and pass in the name you assigned to your SSH key (here, the name is do_cdktf):
...
import { DataDigitaloceanSshKey, DigitaloceanProvider, Droplet } from "./.gen/providers/digitalocean"

class MyStack extends TerraformStack {
  constructor(scope: Construct, name: string) {
    ...
    const dropletNames = ['foo', 'bar']
    const sshKey = new DataDigitaloceanSshKey(this, 'sshKey', {
      name: 'do_cdktf',
    })
    const droplets = dropletNames.map(name => new Droplet(this, name, {
    ...
  }
}
...
Then, update the Droplet’s definition to include the SSH key:
...
const droplets = dropletNames.map(name => new Droplet(this, name, {
  image: 'ubuntu-20-04-x64',
  name,
  region: 'lon1',
  size: 's-1vcpu-1gb',
  sshKeys: [sshKey.id.toString()]
}))
...
When provisioned, you can access the Droplet using a private SSH key instead of a password.
Specifying User Data Script to Install NGINX
You have now defined two identical Droplets running Ubuntu, configured with SSH access. The next task is to install NGINX on each Droplet.
When a Droplet is being created, a tool called CloudInit will bootstrap the server. CloudInit can accept a file called user data, which can modify how the server is bootstrapped. The user data can be any cloud-config files or scripts the server can interpret, such as Bash scripts.
In the remainder of this step, you will create a Bash script and specify it as the Droplet’s user data. The script will install NGINX as part of the bootstrapping process. In addition, the script will also replace the contents of the /var/www/html/index.html file (the default file served by NGINX) with the hostname and IP address of the Droplet, which will cause the two NGINX servers to serve different files. In the next step, you will put both of these NGINX servers behind a load balancer; by serving different files, it will make it apparent whether the load balancer is distributing requests correctly or not.
Still in main.ts, add a new userData property to the Droplet’s configuration object:
...
class MyStack extends TerraformStack {
  constructor(scope: Construct, name: string) {
    ...
    const droplets = dropletNames.map(name => new Droplet(this, name, {
      image: 'ubuntu-20-04-x64',
      name,
      region: 'lon1',
      size: 's-1vcpu-1gb',
      sshKeys: [sshKey.id.toString()],
      userData: `#!/bin/bash

apt-get -y update
apt-get -y install nginx
export HOSTNAME=$(curl -s http://169.254.169.254/metadata/v1/hostname)
export PUBLIC_IPV4=$(curl -s http://169.254.169.254/metadata/v1/interfaces/public/0/ipv4/address)
echo Droplet: $HOSTNAME, IP Address: $PUBLIC_IPV4 > /var/www/html/index.html
`
    }))
  }
}
Warning: Make sure there are no new lines before the shebang (#!); otherwise, the script may not get executed.
When the Droplet is first provisioned, the script will be run as the root user. It will use Ubuntu’s package manager, APT, to install the nginx package. It will then use DigitalOcean’s Metadata Service to retrieve information about itself, and write the hostname and IP address into index.html, which is served by NGINX.
In this step, you defined the two Droplets running Ubuntu, configured each one with SSH access, and installed NGINX using the user data feature. In the next step, you will define a load balancer that will sit in front of these NGINX servers and configure it to load balance in a round-robin fashion.
Step 6 — Defining a Load Balancer
In this step, you will define a DigitalOcean Load Balancer by defining an instance of the digitalocean_loadbalancer resource.
Still in main.ts, add the following definition for a load balancer at the end of the MyStack constructor:
...
import { App, Fn, TerraformStack } from "cdktf";
import { DataDigitaloceanSshKey, DigitaloceanProvider, Droplet, Loadbalancer } from "./.gen/providers/digitalocean"

class MyStack extends TerraformStack {
  constructor(scope: Construct, name: string) {
    ...
    new Loadbalancer(this, 'lb', {
      name: 'default',
      region: 'lon1',
      algorithm: 'round_robin',
      forwardingRule: [{
        entryProtocol: 'http',
        entryPort: 80,
        targetProtocol: 'http',
        targetPort: 80,
      }],
      dropletIds: droplets.map((droplet) => Fn.tonumber(droplet.id))
    })
  }
}
...
The forwardingRule argument tells the load balancer to listen for HTTP requests on port 80 and forward them to each of the Droplets on port 80.
The dropletIds specify the Droplets to which the load balancer will pass requests. It takes a number, but the value of droplet.id is a string. Therefore, you have used the Fn.tonumber Terraform function to convert the string Droplet ID value to a number.
Note: You used the Fn.tonumber Terraform function here instead of the JavaScript-native parseInt because the value of droplet.id is unknown until the Droplet is provisioned. Terraform functions are designed to operate on unknown runtime values before Terraform applies a configuration.
Save and close the file.
You have now defined two Droplets and a load balancer that sits in front of them. Your main.ts should look similar to this:
import { Construct } from "constructs";
import { App, Fn, TerraformStack } from "cdktf";
import { DataDigitaloceanSshKey, DigitaloceanProvider, Droplet, Loadbalancer } from "./.gen/providers/digitalocean"

class MyStack extends TerraformStack {
  constructor(scope: Construct, name: string) {
    super(scope, name);

    new DigitaloceanProvider(this, 'provider')

    const dropletNames = ['foo', 'bar']
    const sshKey = new DataDigitaloceanSshKey(this, 'sshKey', {
      name: 'do_cdktf',
    })
    const droplets = dropletNames.map(name => new Droplet(this, name, {
        image: 'ubuntu-20-04-x64',
        name,
        region: 'lon1',
        size: 's-1vcpu-1gb',
        sshKeys: [sshKey.id.toString()],
        userData: `#!/bin/bash

apt-get -y update
apt-get -y install nginx
export HOSTNAME=$(curl -s http://169.254.169.254/metadata/v1/hostname)
export PUBLIC_IPV4=$(curl -s http://169.254.169.254/metadata/v1/interfaces/public/0/ipv4/address)
echo Droplet: $HOSTNAME, IP Address: $PUBLIC_IPV4 > /var/www/html/index.html
`
      })
    )

    new Loadbalancer(this, 'lb', {
      name: 'default',
      region: 'lon1',
      algorithm: 'round_robin',
      forwardingRule: [{
        entryProtocol: 'http',
        entryPort: 80,
        targetProtocol: 'http',
        targetPort: 80,
      }],
      dropletIds: droplets.map((droplet) => Fn.tonumber(droplet.id))
    })
  }
}

const app = new App();
new MyStack(app, "infra");
app.synth();
In the next step, you will use the cdktf CLI tool to actualize your entire CDKTF project.
Step 7 — Provisioning Your Infrastructure
In this step, you will use the cdktf CLI tool to provision the Droplets and load balancers you defined in the previous steps.
Make sure that you are in the infra/ directory and have set the DIGITALOCEAN_ACCESS_TOKEN environment variable for your terminal session, then run the cdktf deploy command:
- cdktf deploy
You should see output similar to the following:
Outputinfra  Initializing the backend...
infra  Initializing provider plugins...
infra  - Reusing previous version of digitalocean/digitalocean from the dependency lock file
infra  - Using previously-installed digitalocean/digitalocean v2.19.0
infra  Terraform has been successfully initialized!
infra  Terraform used the selected providers to generate the following execution
       plan. Resource actions are indicated with the following symbols:
       + create

       Terraform will perform the following actions:
infra    # digitalocean_droplet.bar (bar) will be created
         + resource "digitalocean_droplet" "bar" {
       + backups              = false
       + created_at           = (known after apply)
       + disk                 = (known after apply)
       + graceful_shutdown    = false
       + id                   = (known after apply)
       + image                = "ubuntu-20-04-x64"
       + ipv4_address         = (known after apply)
       + ipv4_address_private = (known after apply)
       + ipv6                 = false
       + ipv6_address         = (known after apply)
       + locked               = (known after apply)
       + memory               = (known after apply)
       + monitoring           = false
       + name                 = "bar"
       + price_hourly         = (known after apply)
       + price_monthly        = (known after apply)
       + private_networking   = (known after apply)
       + region               = "lon1"
       + resize_disk          = true
       + size                 = "s-1vcpu-1gb"
       + ssh_keys             = [
       + "34377800",
       ]
       + status               = (known after apply)
       + urn                  = (known after apply)
       + user_data            = "f9b1d9796d069fe504ce0d89439b6b664b14b1a1"
       + vcpus                = (known after apply)
       + volume_ids           = (known after apply)
       + vpc_uuid             = (known after apply)
       }

         # digitalocean_droplet.foo (foo) will be created
         + resource "digitalocean_droplet" "foo" {
       + backups              = false
       + created_at           = (known after apply)
       + disk                 = (known after apply)
       + graceful_shutdown    = false
       + id                   = (known after apply)
       + image                = "ubuntu-20-04-x64"
       + ipv4_address         = (known after apply)
       + ipv4_address_private = (known after apply)
       + ipv6                 = false
       + ipv6_address         = (known after apply)
       + locked               = (known after apply)
       + memory               = (known after apply)
       + monitoring           = false
       + name                 = "foo"
       + price_hourly         = (known after apply)
       + price_monthly        = (known after apply)
       + private_networking   = (known after apply)
       + region               = "lon1"
       + resize_disk          = true
       + size                 = "s-1vcpu-1gb"
       + ssh_keys             = [
       + "34377800",
       ]
       + status               = (known after apply)
       + urn                  = (known after apply)
       + user_data            = "f9b1d9796d069fe504ce0d89439b6b664b14b1a1"
       + vcpus                = (known after apply)
       + volume_ids           = (known after apply)
       + vpc_uuid             = (known after apply)
       }

         # digitalocean_loadbalancer.lb (lb) will be created
         + resource "digitalocean_loadbalancer" "lb" {
       + algorithm                        = "round_robin"
       + disable_lets_encrypt_dns_records = false
       + droplet_ids                      = (known after apply)
       + enable_backend_keepalive         = false
       + enable_proxy_protocol            = false
       + id                               = (known after apply)
       + ip                               = (known after apply)
       + name                             = "default"
       + redirect_http_to_https           = false
       + region                           = "lon1"
       + size_unit                        = (known after apply)
       + status                           = (known after apply)
       + urn                              = (known after apply)
       + vpc_uuid                         = (known after apply)

       + forwarding_rule {
       + certificate_id   = (known after apply)
       + certificate_name = (known after apply)
       + entry_port       = 80
       + entry_protocol   = "http"
       + target_port      = 80
       + target_protocol  = "http"
       + tls_passthrough  = false
       }

       + healthcheck {
       + check_interval_seconds   = (known after apply)
       + healthy_threshold        = (known after apply)
       + path                     = (known after apply)
       + port                     = (known after apply)
       + protocol                 = (known after apply)
       + response_timeout_seconds = (known after apply)
       + unhealthy_threshold      = (known after apply)
       }

       + sticky_sessions {
       + cookie_name        = (known after apply)
       + cookie_ttl_seconds = (known after apply)
       + type               = (known after apply)
       }
       }

       Plan: 3 to add, 0 to change, 0 to destroy.

       ─────────────────────────────────────────────────────────────────────────────

       Saved the plan to: plan

       To perform exactly these actions, run the following command to apply:
       terraform apply "plan"

Please review the diff output above for infra
❯ Approve  Applies the changes outlined in the plan.
  Dismiss
  Stop
Note: CDKTF is still being developed, and the output may differ from that shown above.
This display lists all the resources and properties that cdktf plans to create, update, and destroy. Some values, such as a Droplet’s ID, are only known after the resource is provisioned. For those, you will see (known after apply) as the property value in the output.
Review the list of resources to make sure it is what you expect. Then, use the arrow keys to select the Approve option and press ENTER.
You will see an output similar to the following:
Outputinfra  digitalocean_droplet.foo (foo): Creating...
       digitalocean_droplet.bar (bar): Creating...
infra  digitalocean_droplet.bar (bar): Still creating... [10s elapsed]
infra  digitalocean_droplet.foo (foo): Still creating... [10s elapsed]


1 Stack deploying     0 Stacks done     0 Stacks waiting
This output tells you that cdktf is communicating with the DigitalOcean API to create the Droplet. cdktf is creating the Droplets first because the load balancer depends on the Droplet’s ID, which is unknown until the Droplets are provisioned.
Droplet creation usually takes less than a minute. Once the Droplets are provisioned, cdktf moves on to creating the load balancer.
Outputinfra  digitalocean_droplet.bar (bar): Creation complete after 54s [id=298041598]
infra  digitalocean_droplet.foo (foo): Creation complete after 55s [id=298041600]
infra  digitalocean_loadbalancer.lb (lb): Creating...
infra  digitalocean_loadbalancer.lb (lb): Still creating... [10s elapsed]
The load balancer may take longer. After the load balancer is created, you will see a summary that shows the stack has been deployed successfully.
Outputinfra  digitalocean_loadbalancer.lb (lb): Still creating... [1m30s elapsed]
infra  digitalocean_loadbalancer.lb (lb): Creation complete after 1m32s [id=4f9ae2b7-b649-4fb4-beed-96b95bb72dd1]
infra
       Apply complete! Resources: 3 added, 0 changed, 0 destroyed.


No outputs found.
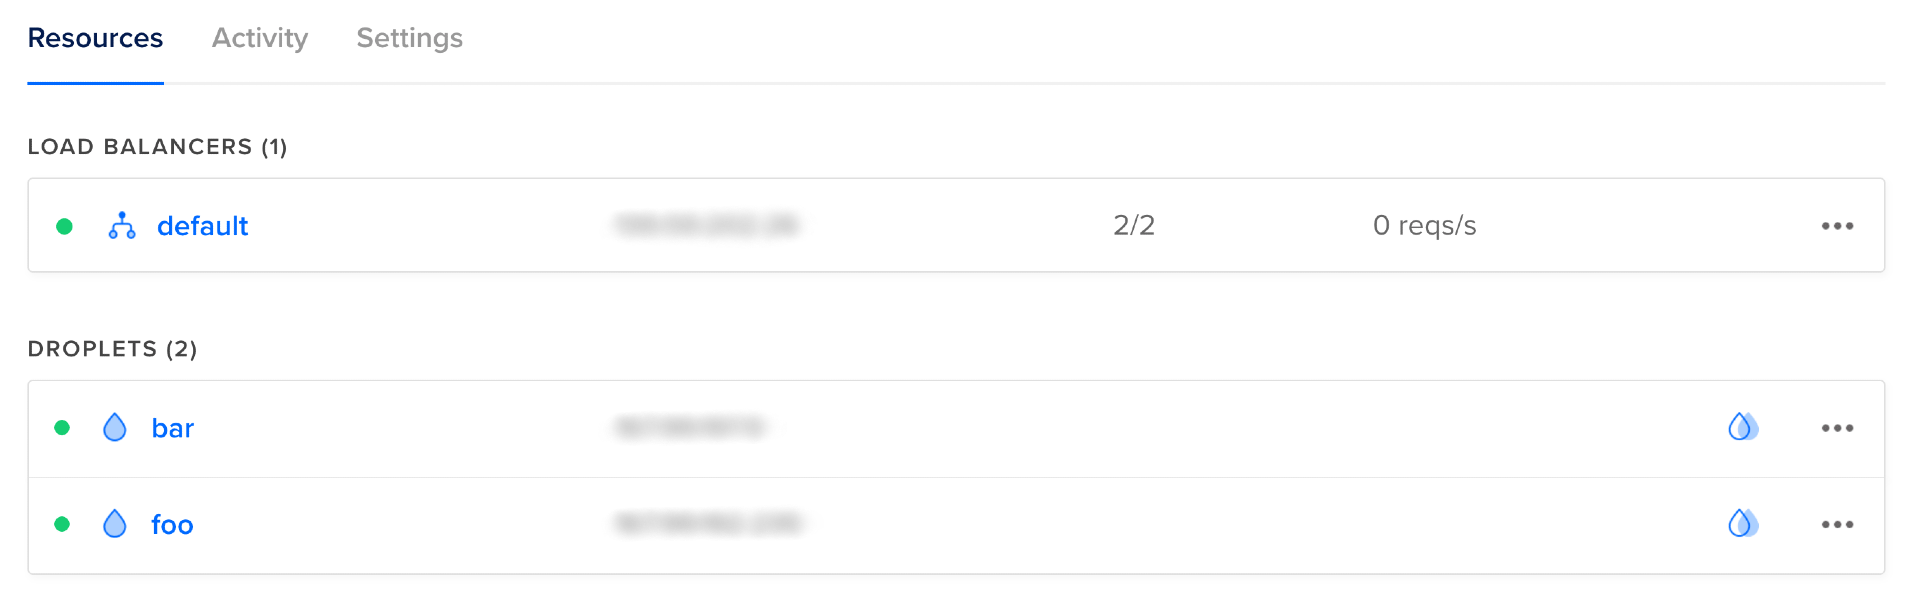
You can now visit the DigitalOcean console, where you can see one load balancer named default and two healthy Droplets named foo and bar, each serving as a target for the load balancer.
You can test that NGINX is running and serving content correctly by visiting the IP address of each Droplet. You should see text similar to the following:
Droplet: bar, IP Address: droplet_ip
If you don’t see that string of text or the server is not responding, check that the user data you specified is correct and that no characters (including new lines) preceed the shebang (#!). You can also SSH into the Droplet using your SSH private key and review the output logs generated by CloudInit at /var/log/cloud-init-output.log:
- ssh -i path_to_ssh_private_key root@droplet_ip
Once you have confirmed the Droplets are up and serving content, you can begin testing the load balancer. You do this by sending a few requests.
Run the following command from your terminal to send ten requests to the load balancer:
- for run in {1..10}; do curl http://load_balancer_ip/; done
You should see output similar to the following, although the IP addresses shown will be different:
OutputDroplet: foo, IP Address: droplet_foo_ip
Droplet: bar, IP Address: droplet_bar_ip
Droplet: foo, IP Address: droplet_foo_ip
Droplet: bar, IP Address: droplet_bar_ip
Droplet: bar, IP Address: droplet_bar_ip
Droplet: foo, IP Address: droplet_foo_ip
Droplet: bar, IP Address: droplet_bar_ip
Droplet: foo, IP Address: droplet_foo_ip
Droplet: bar, IP Address: droplet_bar_ip
Droplet: foo, IP Address: droplet_foo_ip
It shows that requests to the load balancer were forwarded to each Droplet five times, indicating that the load balancer is working.
Note: The load balancer may not always balance between the two Droplets perfectly; you may find that four requests were sent to one Droplet and six to the other. This behavior is normal.
In this step, you used cdktf to provision your resources, and then you used the DigitalOcean console to discover the IP addresses of your Droplets and load balancer. You then sent requests to each Droplet and load balancer to confirm they work.
In the next step, you will obtain the IP addresses of the Droplets and load balancer without logging into the DigitalOcean console.
Step 8 — Outputting Information
In the previous step, you had to log in to the DigitalOcean Console to obtain the IP addresses of your Droplet and load balancer. In this step, you will modify your code slightly so that this information is printed in the output of the cdktf deploy command, saving you a trip to the console.
Terraform records the configuration and state of its managed resources in state files. For your infra stack, the state file can be found at infra/terraform.infra.tfstate. You will be able to find the IP addresses of the Droplets and load balancer inside this state file.
However, sorting through a large file can be inconvenient. CDKTF provides the TerraformOutput construct, which you can use to output variables and make them available outside of the stack. Any outputs are printed in stdout after cdktf deploy is run. Running cdktf output can also print outputs at any time.
Note: Although you only use outputs to print information to the console in this tutorial, its real power comes from stacks using outputs from other stacks as input, a feature known as cross-stack references.
Update the main.ts file to include outputs of the IP addresses of the load balancer and Droplets:
import { Construct } from "constructs";
import { App, Fn, TerraformOutput, TerraformStack } from "cdktf";
import { DataDigitaloceanSshKey, DigitaloceanProvider, Droplet, Loadbalancer } from "./.gen/providers/digitalocean"

class MyStack extends TerraformStack {
  constructor(scope: Construct, name: string) {
    ...
    const lb = new Loadbalancer(this, 'lb', {
      ...
    })

    new TerraformOutput(this, "loadBalancerIP", {
      value: lb.ip,
    });

    droplets.forEach((droplet, index) => new TerraformOutput(this, `droplet${index}IP`, {
      value: droplet.ipv4Address
    }))
  }
}
...
Save and close the file.
Run cdktf deploy to actualize the change:
- cdktf deploy
Within the output, you should see something similar to the following:
Output─────────────────────────────────────────────────────────────────────────────

Changes to Outputs:
+ droplet0IP     = "droplet_foo_ip"
+ droplet1IP     = "droplet_bar_ip"
+ loadBalancerIP = "load_balancer_ip"

You can apply this plan to save these new output values to the Terraform
state, without changing any real infrastructure.

─────────────────────────────────────────────────────────────────────────────
This output tells you that no infrastructure changes will be made, only what is output from the stack.
Use the arrow keys to select Approve, and then press ENTER. At the end of the terminal output, you should see something similar to:
Outputinfra
droplet0IP = droplet_foo_ip
droplet1IP = droplet_bar_ip
loadBalancerIP = load_balancer_ip
Now, each time you run cdktf deploy or cdktf output, the IP address of the Droplets and the load balancers are printed in the terminal output, removing the need to access that information from the DigitalOcean console.
You have now provisioned two Droplets and a load balancer and confirmed they are working. You can use the CDKTF project you have developed as a base to define more sophisticated infrastructure (you can find a reference implementation at do-community / digitalocean-cdktf-typescript).
The resources provisioned in this tutorial will incur a charge. If you do not intend to use the infrastructure created, you should destroy it. In the next and final step, you will clean up the project by destroying the resources created in this tutorial.
Step 9 — Destroying Your Infrastructure
In this step, you will remove all the resources created in this tutorial.
Still within the infra/ directory, run cdktf destroy:
- cdktf destroy
You should see output similar to the following:
Outputinfra  Initializing the backend...
infra  Initializing provider plugins...
infra  - Reusing previous version of digitalocean/digitalocean from the dependency lock file
infra  - Using previously-installed digitalocean/digitalocean v2.19.0
infra  Terraform has been successfully initialized!
infra  digitalocean_droplet.bar (bar): Refreshing state... [id=298041598]
       digitalocean_droplet.foo (foo): Refreshing state... [id=298041600]
infra  digitalocean_loadbalancer.lb (lb): Refreshing state... [id=4f9ae2b7-b649-4fb4-beed-96b95bb72dd1]
infra  Terraform used the selected providers to generate the following execution
       plan. Resource actions are indicated with the following symbols:
       - destroy

       Terraform will perform the following actions:
infra    # digitalocean_droplet.bar (bar) will be destroyed
         - resource "digitalocean_droplet" "bar" {
       - backups              = false -> null
       - created_at           = "2022-05-02T10:04:16Z" -> null
       - disk                 = 25 -> null
       - graceful_shutdown    = false -> null
       - id                   = "298041598" -> null
       - image                = "ubuntu-20-04-x64" -> null
       - ipv4_address         = "droplet_bar_public_ip" -> null
       - ipv4_address_private = "droplet_bar_private_ip" -> null
       - ipv6                 = false -> null
       - locked               = false -> null
       - memory               = 1024 -> null
       - monitoring           = false -> null
       - name                 = "bar" -> null
       - price_hourly         = 0.00744 -> null
       - price_monthly        = 5 -> null
       - private_networking   = true -> null
       - region               = "lon1" -> null
       - resize_disk          = true -> null
       - size                 = "s-1vcpu-1gb" -> null
       - ssh_keys             = [
       - "34377800",
       ] -> null
       - status               = "active" -> null
       - tags                 = [] -> null
       - urn                  = "do:droplet:298041598" -> null
       - user_data            = "f9b1d9796d069fe504ce0d89439b6b664b14b1a1" -> null
       - vcpus                = 1 -> null
       - volume_ids           = [] -> null
       - vpc_uuid             = "bed80b32-dc82-11e8-83ec-3cfdfea9f3f0" -> null
       }

         # digitalocean_droplet.foo (foo) will be destroyed
         - resource "digitalocean_droplet" "foo" {
       - backups              = false -> null
       - created_at           = "2022-05-02T10:04:16Z" -> null
       - disk                 = 25 -> null
       - graceful_shutdown    = false -> null
       - id                   = "298041600" -> null
       - image                = "ubuntu-20-04-x64" -> null
       - ipv4_address         = "droplet_foo_public_ip" -> null
       - ipv4_address_private = "droplet_foo_private_ip" -> null
       - ipv6                 = false -> null
       - locked               = false -> null
       - memory               = 1024 -> null
       - monitoring           = false -> null
       - name                 = "foo" -> null
       - price_hourly         = 0.00744 -> null
       - price_monthly        = 5 -> null
       - private_networking   = true -> null
       - region               = "lon1" -> null
       - resize_disk          = true -> null
       - size                 = "s-1vcpu-1gb" -> null
       - ssh_keys             = [
       - "34377800",
       ] -> null
       - status               = "active" -> null
       - tags                 = [] -> null
       - urn                  = "do:droplet:298041600" -> null
       - user_data            = "f9b1d9796d069fe504ce0d89439b6b664b14b1a1" -> null
       - vcpus                = 1 -> null
       - volume_ids           = [] -> null
       - vpc_uuid             = "bed80b32-dc82-11e8-83ec-3cfdfea9f3f0" -> null
       }

         # digitalocean_loadbalancer.lb (lb) will be destroyed
         - resource "digitalocean_loadbalancer" "lb" {
       - algorithm                        = "round_robin" -> null
       - disable_lets_encrypt_dns_records = false -> null
       - droplet_ids                      = [
       - 298041598,
       - 298041600,
       ] -> null
       - enable_backend_keepalive         = false -> null
       - enable_proxy_protocol            = false -> null
       - id                               = "4f9ae2b7-b649-4fb4-beed-96b95bb72dd1" -> null
       - ip                               = "load_balancer_ip" -> null
       - name                             = "default" -> null
       - redirect_http_to_https           = false -> null
       - region                           = "lon1" -> null
       - size_unit                        = 1 -> null
       - status                           = "active" -> null
       - urn                              = "do:loadbalancer:4f9ae2b7-b649-4fb4-beed-96b95bb72dd1" -> null
       - vpc_uuid                         = "bed80b32-dc82-11e8-83ec-3cfdfea9f3f0" -> null

       - forwarding_rule {
       - entry_port      = 80 -> null
       - entry_protocol  = "http" -> nul
infra  l
       - target_port     = 80 -> null
       - target_protocol = "http" -> null
       - tls_passthrough = false -> null
       }

       - healthcheck {
       - check_interval_seconds   = 10 -> null
       - healthy_threshold        = 5 -> null
       - path                     = "/" -> null
       - port                     = 80 -> null
       - protocol                 = "http" -> null
       - response_timeout_seconds = 5 -> null
       - unhealthy_threshold      = 3 -> null
       }

       - sticky_sessions {
       - cookie_ttl_seconds = 0 -> null
       - type               = "none" -> null
       }
       }

       Plan: 0 to add, 0 to change, 3 to destroy.

       ─────────────────────────────────────────────────────────────────────────────

       Saved the plan to: plan

       To perform exactly these actions, run the following command to apply:
       terraform apply "plan"

Please review the diff output above for infra
❯ Approve  Applies the changes outlined in the plan.
  Dismiss
  Stop
This time, instead of showing + next to each resource, it shows -, indicating CDKTF plans to destroy the resource. Review the changes proposed, then use the arrow keys to select Approve and press ENTER. The DigitalOcean provider will now communicate with the DigitalOcean API to destroy the resources.
Outputinfra  digitalocean_loadbalancer.lb (lb): Destroying... [id=4f9ae2b7-b649-4fb4-beed-96b95bb72dd1]
infra  digitalocean_loadbalancer.lb (lb): Destruction complete after 1s
infra  digitalocean_droplet.bar (bar): Destroying... [id=298041598]
       digitalocean_droplet.foo (foo): Destroying... [id=298041600]
The load balancer was deleted first because it has no dependencies (no other resources reference the load balancer in their inputs). Because the load balancer references the Droplets, they can only be destroyed after the load balancer is destroyed.
After the resources have been destroyed, you will see the following line printed in the output:
OutputDestroy complete! Resources: 3 destroyed.
Conclusion
In this tutorial, you used CDKTF to provision and destroy a load-balanced web page, consisting of two DigitalOcean Droplets running NGINX servers, served behind a load balancer. You also output information about the resources on the terminal.
CDKTF is an abstraction layer above Terraform. A good understanding of Terraform is helpful in understanding CDKTF. If you’d like to learn more about Terraform, you can read the How To Manage Infrastructure with Terraform series, which covers Terraform in depth.
You can also check out the official CDK for Terraform documentation and tutorials to learn more about CDKTF.
Thanks for learning with the DigitalOcean Community. Check out our offerings for compute, storage, networking, and managed databases.
About the author(s)
Author of Building Enterprise JavaScript Applications (https://packtpub.com/web-development/building-enterprise-javascript-applications) and Internal Developer Platform on AWS (https://www.manning.com/liveprojectseries/internal-developer-platform-ser)
Still looking for an answer?
This textbox defaults to using Markdown to format your answer.
You can type !ref in this text area to quickly search our full set of tutorials, documentation & marketplace offerings and insert the link!
 This work is licensed under a Creative Commons Attribution-NonCommercial- ShareAlike 4.0 International License.
Become a contributor for community
Get paid to write technical tutorials and select a tech-focused charity to receive a matching donation.

DigitalOcean Documentation
Full documentation for every DigitalOcean product.

Resources for startups and AI-native businesses
The Wave has everything you need to know about building a business, from raising funding to marketing your product.
The developer cloud
Scale up as you grow — whether you're running one virtual machine or ten thousand.

Start building today
From GPU-powered inference and Kubernetes to managed databases and storage, get everything you need to build, scale, and deploy intelligent applications.
