By Jeff Fan and Anish Singh Walia
Introduction
This comprehensive tutorial guides you through the deployment of NVIDIA Dynamo for high-performance Large Language Model (LLM) inference on DigitalOcean GPU Droplets. As artificial intelligence advances, the demand for efficient and scalable LLM inference solutions has grown significantly. NVIDIA Dynamo, a state-of-the-art inference service framework, provides a robust set of tools to address these demands. This tutorial aims to assist developers and teams, regardless of their AI or cloud background, in rapidly deploying and validating NVIDIA Dynamo on DigitalOcean GPU Droplets for distributed LLM inference capabilities.
In this tutorial, we will focus on single-node deployment, providing a solid foundation for understanding the basics of NVIDIA Dynamo and its integration with DigitalOcean GPU Droplets. It’s essential to note that NVIDIA Dynamo also supports more advanced deployment scenarios, including multi-node configurations and Kubernetes integration, which will be explored in subsequent tutorials. This tutorial is designed to help developers and teams, regardless of their AI or cloud background, to quickly get started with deploying and validating NVIDIA Dynamo on DigitalOcean GPU Droplets for distributed LLM inference.
Key Takeaways
- Learn how to deploy NVIDIA Dynamo on DigitalOcean GPU Droplets for high-throughput LLM inference.
- Understand the importance of distributed LLM inference services, intelligent resource scheduling, and high-performance validation.
- Explore the capabilities of vLLM and how NVIDIA Dynamo addresses its limitations in distributed scenarios and intelligent request routing.
- Discover the benefits of KV Cache in LLM inference, including dramatic speedup, memory-compute trade-off, and better scalability.
What is NVIDIA Dynamo?
NVIDIA Dynamo is a cutting-edge, high-performance inference service framework specifically designed to accelerate and optimize large-scale generative AI and inference models. By leveraging DigitalOcean’s GPU Droplets, you can deploy Dynamo to unlock a range of benefits, including:
-
Distributed LLM Inference Services
Dynamo enables the deployment of distributed LLM inference services, allowing you to allocate prefill and decode stages to different GPUs. This disaggregated service architecture ensures maximum resource utilization, leading to improved performance and efficiency. -
Intelligent Resource Scheduling
The framework incorporates intelligent resource scheduling capabilities, which dynamically allocate GPU resources based on workload demands. This is achieved through the integration of KV Cache, a key-value caching system that optimizes request routing and reduces latency. As a result, you can expect significant improvements in throughput and latency reduction. -
High-Performance Validation
To validate the performance of your LLM inference services, Dynamo provides practical examples and testing tools. These resources enable you to observe and compare performance differences in parallel inference scenarios, ensuring that your deployment is optimized for high-performance and low-latency operations.
You can read more about NVIDIA Dynamo in the officla documentation on What is NVIDIA Dynamo?.
What is vLLM and Why Do We Need Dynamo?
vLLM is a fast and easy-to-use library for LLM inference and serving, originally developed at UC Berkeley’s Sky Computing Lab. vLLM excels at:
- PagedAttention: Efficient management of attention key and value memory
- Continuous Batching: Dynamic batching of incoming requests for higher throughput
- Optimized CUDA Kernels: Integration with FlashAttention and FlashInfer for fast model execution
- OpenAI-Compatible API: Seamless integration with existing applications
However, vLLM alone has limitations in distributed scenarios and intelligent request routing, which is where NVIDIA Dynamo provides orchestration and scaling capabilities.
Understanding KV Cache: The Foundation of Efficient LLM Inference
KV Cache (Key-Value Cache) is a crucial optimization technique that fundamentally transforms how Large Language Models process sequential text generation. At its core, KV Cache stores pre-computed key-value pairs from previous tokens in the attention mechanism, eliminating redundant calculations during text generation and dramatically improving inference performance.
How KV Cache Works?
The attention mechanism in transformers computes three key components for each token: Query (Q), Key (K), and Value (V). When generating text sequentially, the model processes each new token by attending to all previous tokens. Without caching, this requires recalculating K and V for every previous token at each step, leading to O(n²) computational complexity.
KV Cache solves this by storing the computed K and V tensors for each token position. When generating the next token, the model only needs to:
- Compute Q, K, V for the new token
- Retrieve cached K, V values from previous tokens
- Perform attention calculations using the combined K, V tensors
This reduces computational complexity from O(n²) to O(n), making it possible to handle much longer sequences efficiently.
Key Benefits of KV Cache?
- Dramatic Speedup: Reduces computation from O(n²) to O(n) complexity, enabling real-time text generation even for long sequences
- Memory-Compute Trade-off: Strategically uses GPU memory to cache values, trading memory space for significant computation savings
- Better Scalability: Maintains consistent performance as sequence length grows, unlike traditional approaches that degrade exponentially
- Reduced Latency: Eliminates redundant calculations, resulting in faster response times for interactive applications
- Improved Throughput: Enables processing of multiple requests simultaneously with better resource utilization
Real-World Impact of KV Cache?
- Benchmark Results: 5.2x faster inference (61s → 11.7s) for longer sequences, with some models showing up to 10x improvement
- Production Use: Essential for chatbots, code generation, long-form content creation, and any application requiring sequential text generation
- Cost Efficiency: Reduces GPU usage and operational costs significantly by minimizing redundant computations
- User Experience: Enables real-time interactions in applications like ChatGPT, GitHub Copilot, and other AI-powered tools
- Scalability: Allows serving larger models and handling more concurrent users with the same hardware resources
Memory Considerations and Trade-offs of KV Cache?
While KV Cache provides substantial performance benefits, it comes with memory overhead. Each cached token requires storing K and V tensors, which can grow significantly for long sequences. For example, a model with 4096 hidden dimensions might require approximately 8MB of GPU memory per cached token. This trade-off is particularly important when:
- Managing Long Conversations: Chat applications need to balance cache size with memory constraints
- Multi-User Environments: Each user session requires separate cache storage
- Resource Optimization: Dynamo’s intelligent cache management helps optimize this trade-off across distributed systems
Integration with NVIDIA Dynamo
NVIDIA Dynamo enhances KV Cache functionality through intelligent routing and distributed management:
- Cache-Aware Routing: Directs requests to workers with the highest cache hit rates
- Distributed Cache Management: Supports multi-tier memory systems (GPU, CPU, NVMe, remote storage)
- Dynamic Cache Eviction: Implements smart policies to manage memory usage across multiple users and sessions
For technical details, see the official KV caching guide.
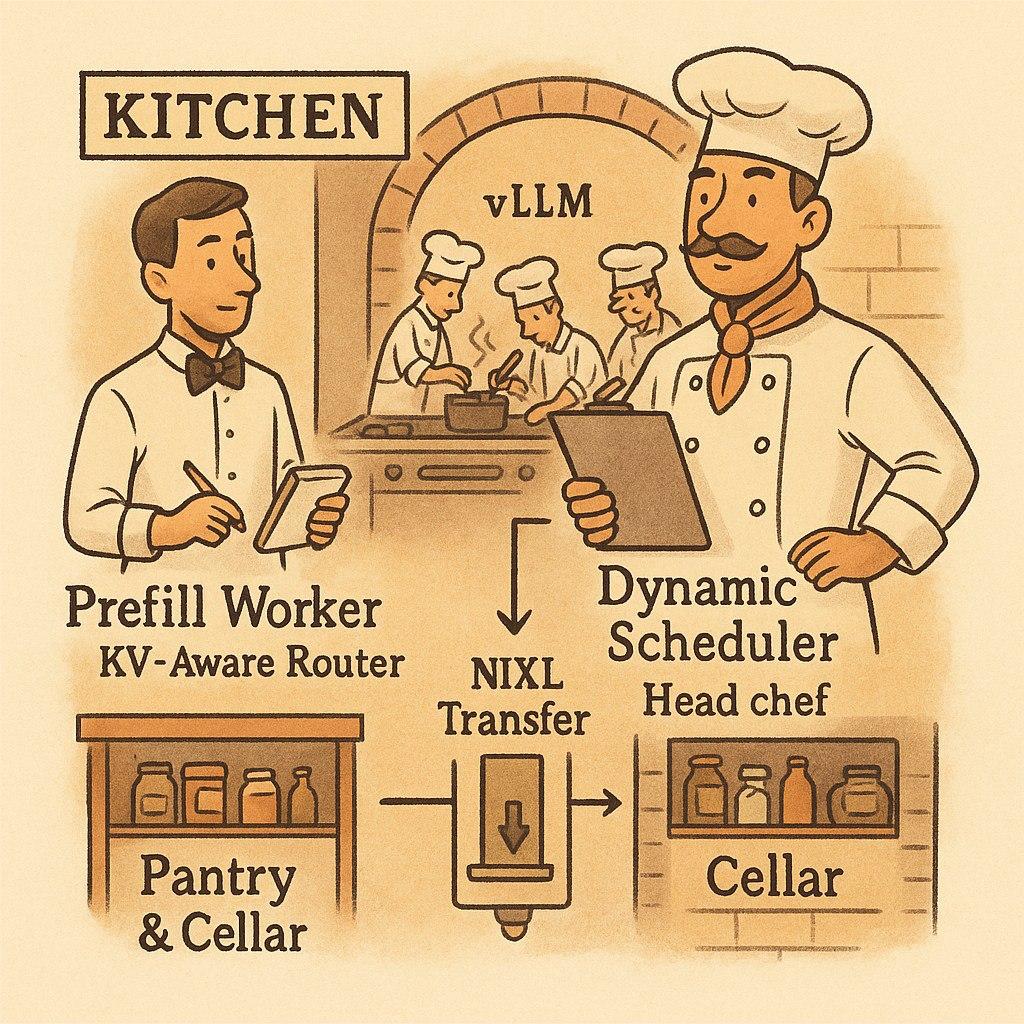
Understanding LLM Inference Frameworks with a Michelin Restaurant Analogy
Imagine walking into a Michelin-starred restaurant. It’s not just about having top-tier chefs (like vLLM, a high-performance inference engine), but also having a complete professional service system, ordering system, customized menu design, and even the ability to coordinate the optimal serving sequence and experience based on each customer’s taste preferences, allergies, and dining timing.

- vLLM is like the top-tier kitchen engine in the restaurant, capable of quickly and efficiently preparing various dishes, ensuring each dish is delicious.
- NVIDIA Dynamo is like the entire Michelin restaurant’s operational system. It not only includes kitchens like vLLM, but also front-desk ordering, customer preference management, dish routing, and serving coordination functions. Dynamo can arrange the most suitable chef based on each customer’s needs, adjust menu details, and ensure multiple dishes can be served simultaneously and on time.
In the world of LLM inference, what does this mean?
- Pre-fill (context understanding) is like the restaurant preparing suitable ingredients and seasonings based on customers’ past dining records and taste preferences.
- Decode (generating responses) is like the head chef cooking dishes exclusively for you based on this information.
- Dynamo coordinates the entire process, allowing each GPU (chef) to perform at maximum efficiency and automatically allocate resources based on different requests, ensuring each customer can enjoy their meal at the optimal time.
Summary:
Dynamo is not meant to replace vLLM, but to incorporate efficient kitchens like vLLM into a smarter, more flexible operational system. This allows AI services to simultaneously handle more users, support larger models, and provide higher quality experiences.
Positioning and Comparison of Nvidia Dynamo with Other Inference Frameworks
NVIDIA Dynamo is the successor to Nvidia Triton for LLM workloads, bringing several innovations:
- Disaggregated Serving: Allocates prefill (context) and decode (generation) stages to different GPUs, maximizing resource utilization and throughput.
- KV Cache Intelligent Routing: Intelligent router directs requests to workers with the highest KV cache hit rates, reducing recomputation.
- Dynamic GPU Scheduling: Real-time resource allocation, avoiding bottlenecks and idle time.
- Distributed KV Cache Management: Supports multi-tier memory (GPU, CPU, NVMe, remote), capable of serving large models beyond single-card capacity.
- NIXL Communication Library: Accelerates data transfer between heterogeneous hardware.
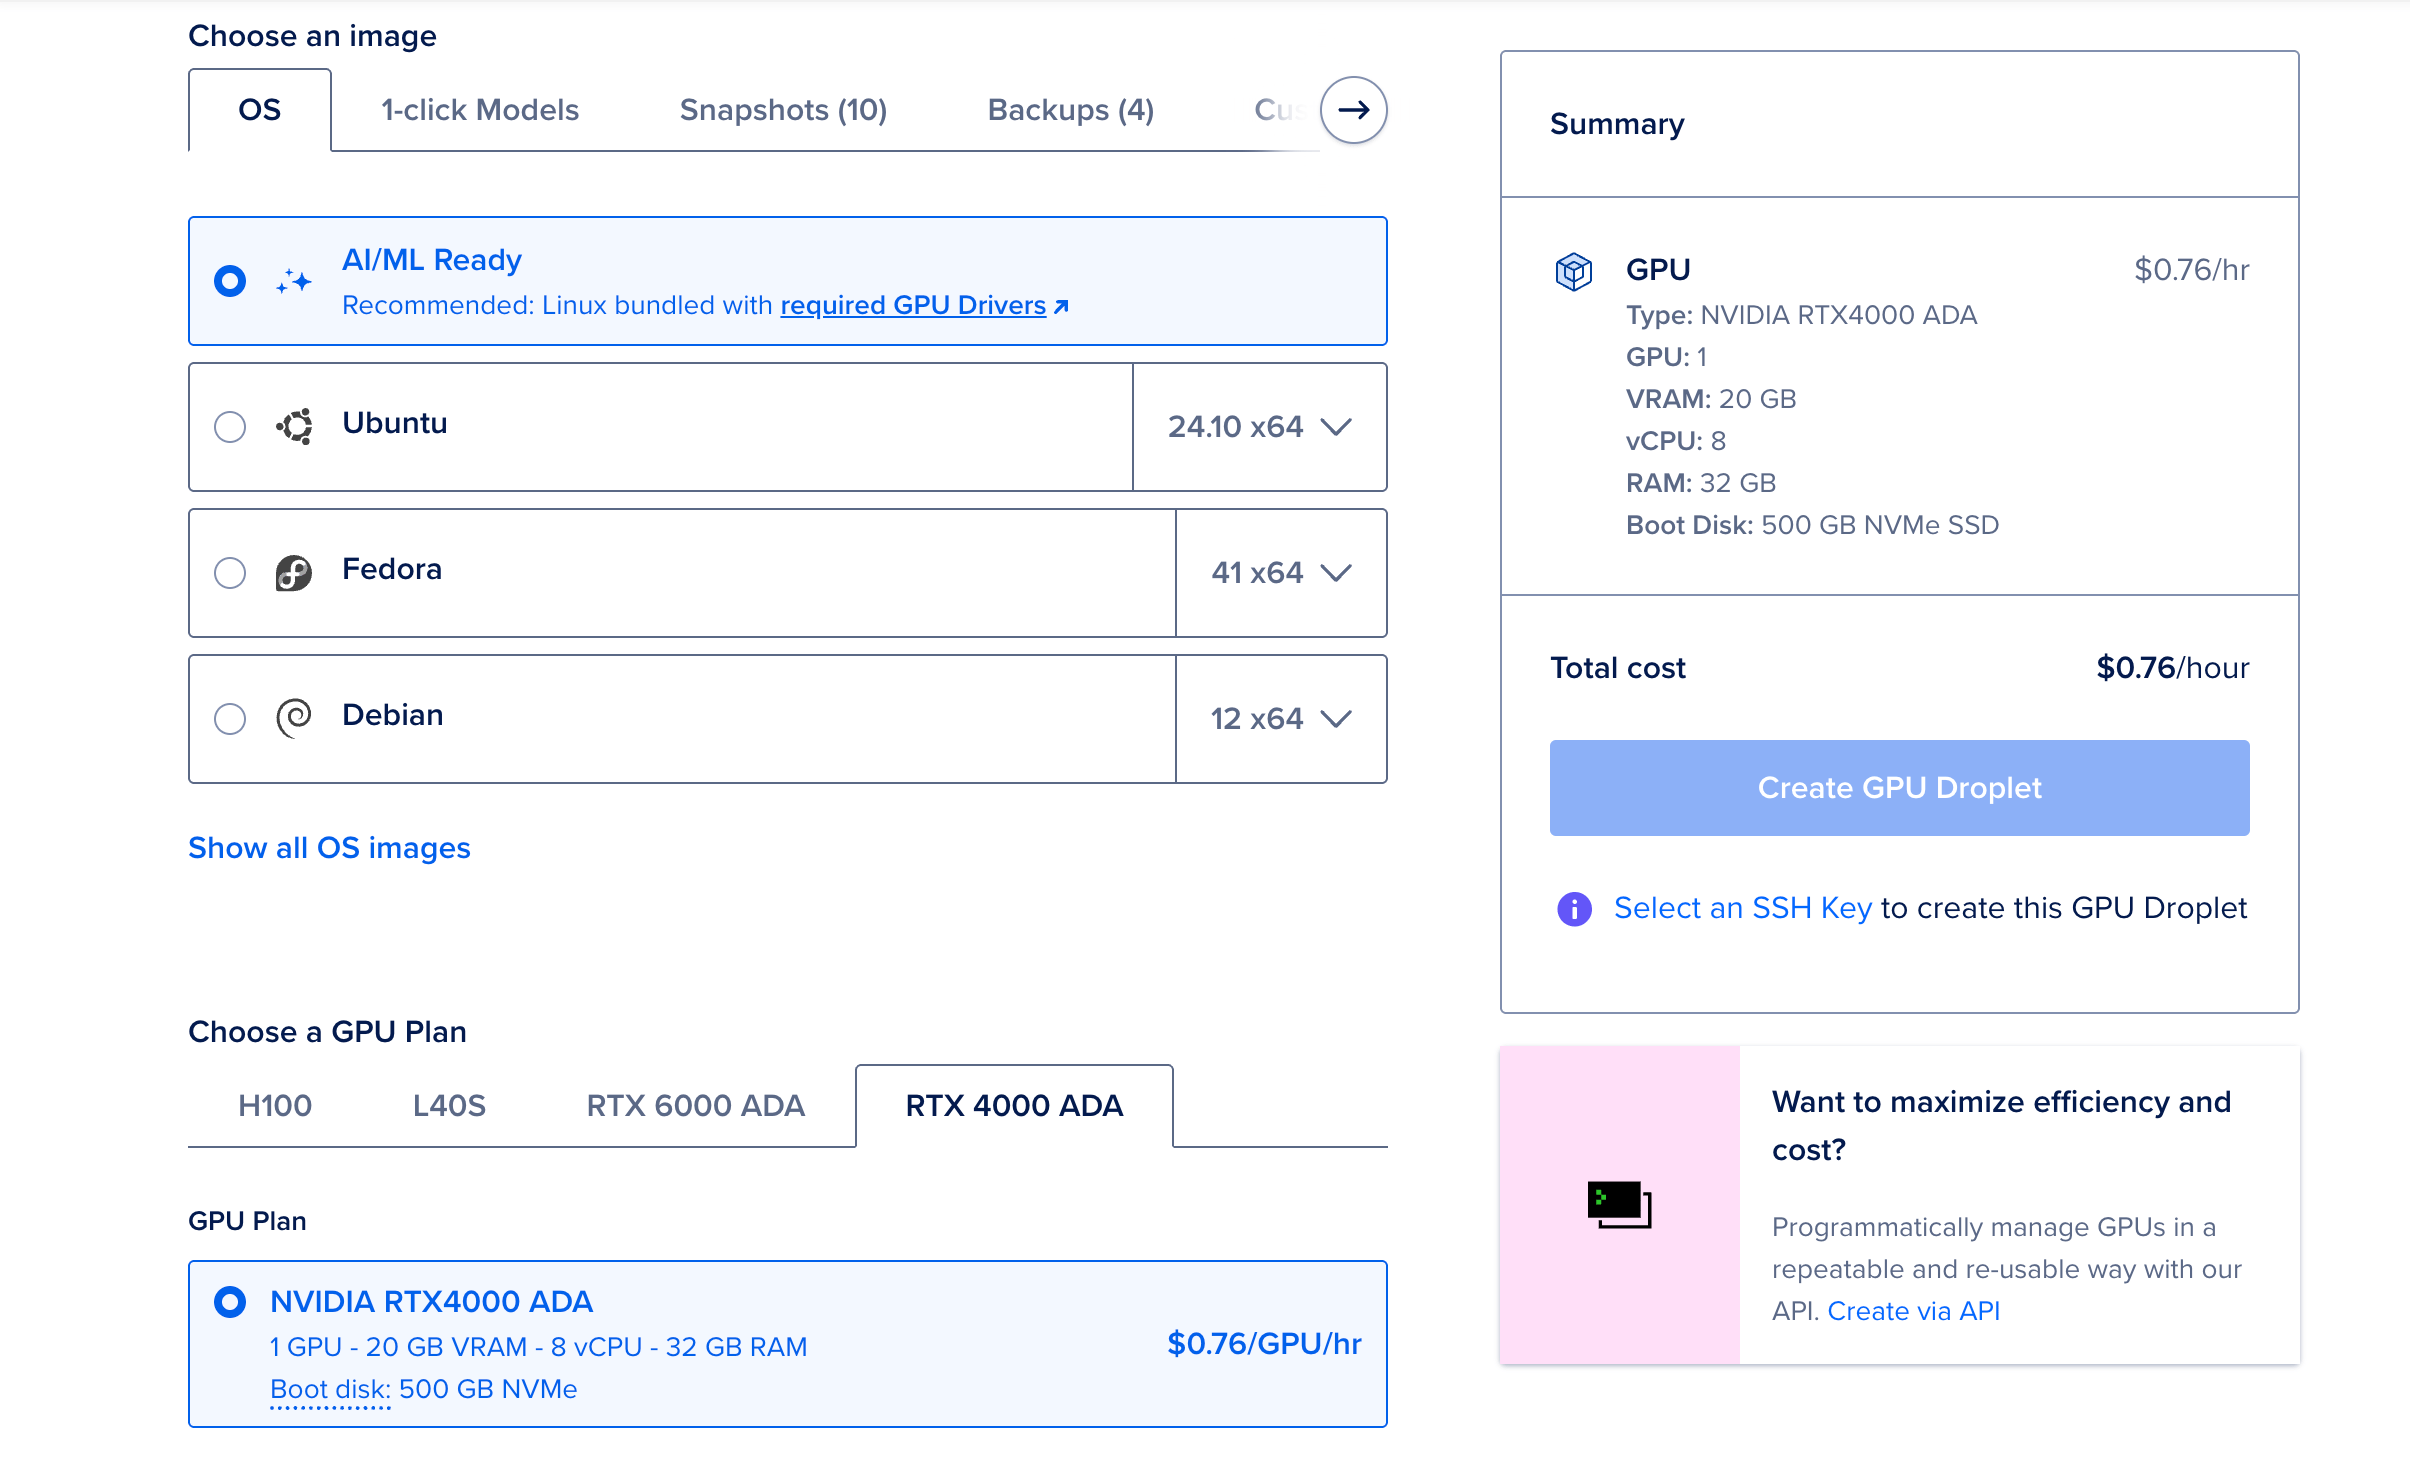
Step 1: Choose Droplet Specifications and Initialize Environment
Choose the Right GPU Specifications
Foundation for Success: Choosing the right GPU specifications is critical for NVIDIA Dynamo’s performance. Unlike traditional CPU-based applications, LLM inference requires:
- GPU Memory Requirements: Modern LLMs like
DeepSeek-R1-Distill-Llama-8Brequire 8-16GB GPU memory for efficient inference - Compute Capability: NVIDIA L40s, RTX 6000 Ada, and RTX 4000 Ada provide the CUDA cores needed for parallel matrix operations
- Memory Bandwidth: High-bandwidth memory ensures fast data transfer between GPU cores and memory
- AI/ML Ready Images: Pre-configured with NVIDIA drivers, CUDA toolkit, and essential libraries, saving 30-45 minutes of setup time
Cost Optimization: Selecting appropriate specifications prevents over-provisioning (wasting money) or under-provisioning (poor performance). The recommended 32GB+ system RAM ensures smooth container operations and model loading.
Scalability Foundation: Starting with the right base configuration makes future scaling decisions easier and more predictable.
- Recommended Image: AI/ML Ready Image
- GPU models: NVIDIA L40s, RTX 6000 Ada, and RTX 4000 Ada
- Memory recommended: 32GB or more
Step 2: Environment Setup and Prerequisites
Complete Infrastructure Foundation
This step establishes the entire software stack required for NVIDIA Dynamo deployment:
-
System Updates: Ensures security patches and compatibility with latest NVIDIA drivers
-
Essential Packages:
python3-dev,libucx0, and other dependencies are required for Dynamo’s Rust and Python components -
Docker with GPU Support: Critical for containerized deployment - without proper GPU passthrough, containers cannot access NVIDIA hardware
-
NVIDIA Container Toolkit: Bridges Docker and NVIDIA drivers, enabling
--gpusflag functionality -
System Reboot: Ensures kernel modules and driver changes take effect properly
-
Why Reboot is Essential: The NVIDIA Container Toolkit modifies system-level configurations. Without reboot, you may encounter “device driver not found” errors or GPU access failures in containers.
-
DigitalOcean CLI Integration:
doctlenables seamless integration with DigitalOcean Container Registry (DOCR), essential for storing and deploying custom Dynamo images in production environments.
This 5-6 minute setup prevents hours of troubleshooting later and ensures a stable foundation for all subsequent steps.
System Update and Essential Packages
SSH or Login in to your GPU Droplet and run the following commands to update your system and install essential packages:
sudo apt-get update && sudo apt-get upgrade -y
sudo apt-get install -y python3-dev python3-pip python3-venv libucx0 git ca-certificates curl snapd jq
Install Docker with GPU Support
# Install Docker
curl -fsSL https://get.docker.com | sh
sudo usermod -aG docker $USER

# Install NVIDIA Container Toolkit
distribution=$(. /etc/os-release;echo $ID$VERSION_ID)
curl -s -L https://nvidia.github.io/libnvidia-container/gpgkey | sudo apt-key add -
curl -s -L https://nvidia.github.io/libnvidia-container/$distribution/libnvidia-container.list | sudo tee /etc/apt/sources.list.d/nvidia-container-toolkit.list
sudo apt-get update && sudo apt-get install -y nvidia-docker2
sudo systemctl restart docker

# Reboot system to ensure all changes take effect
sudo reboot
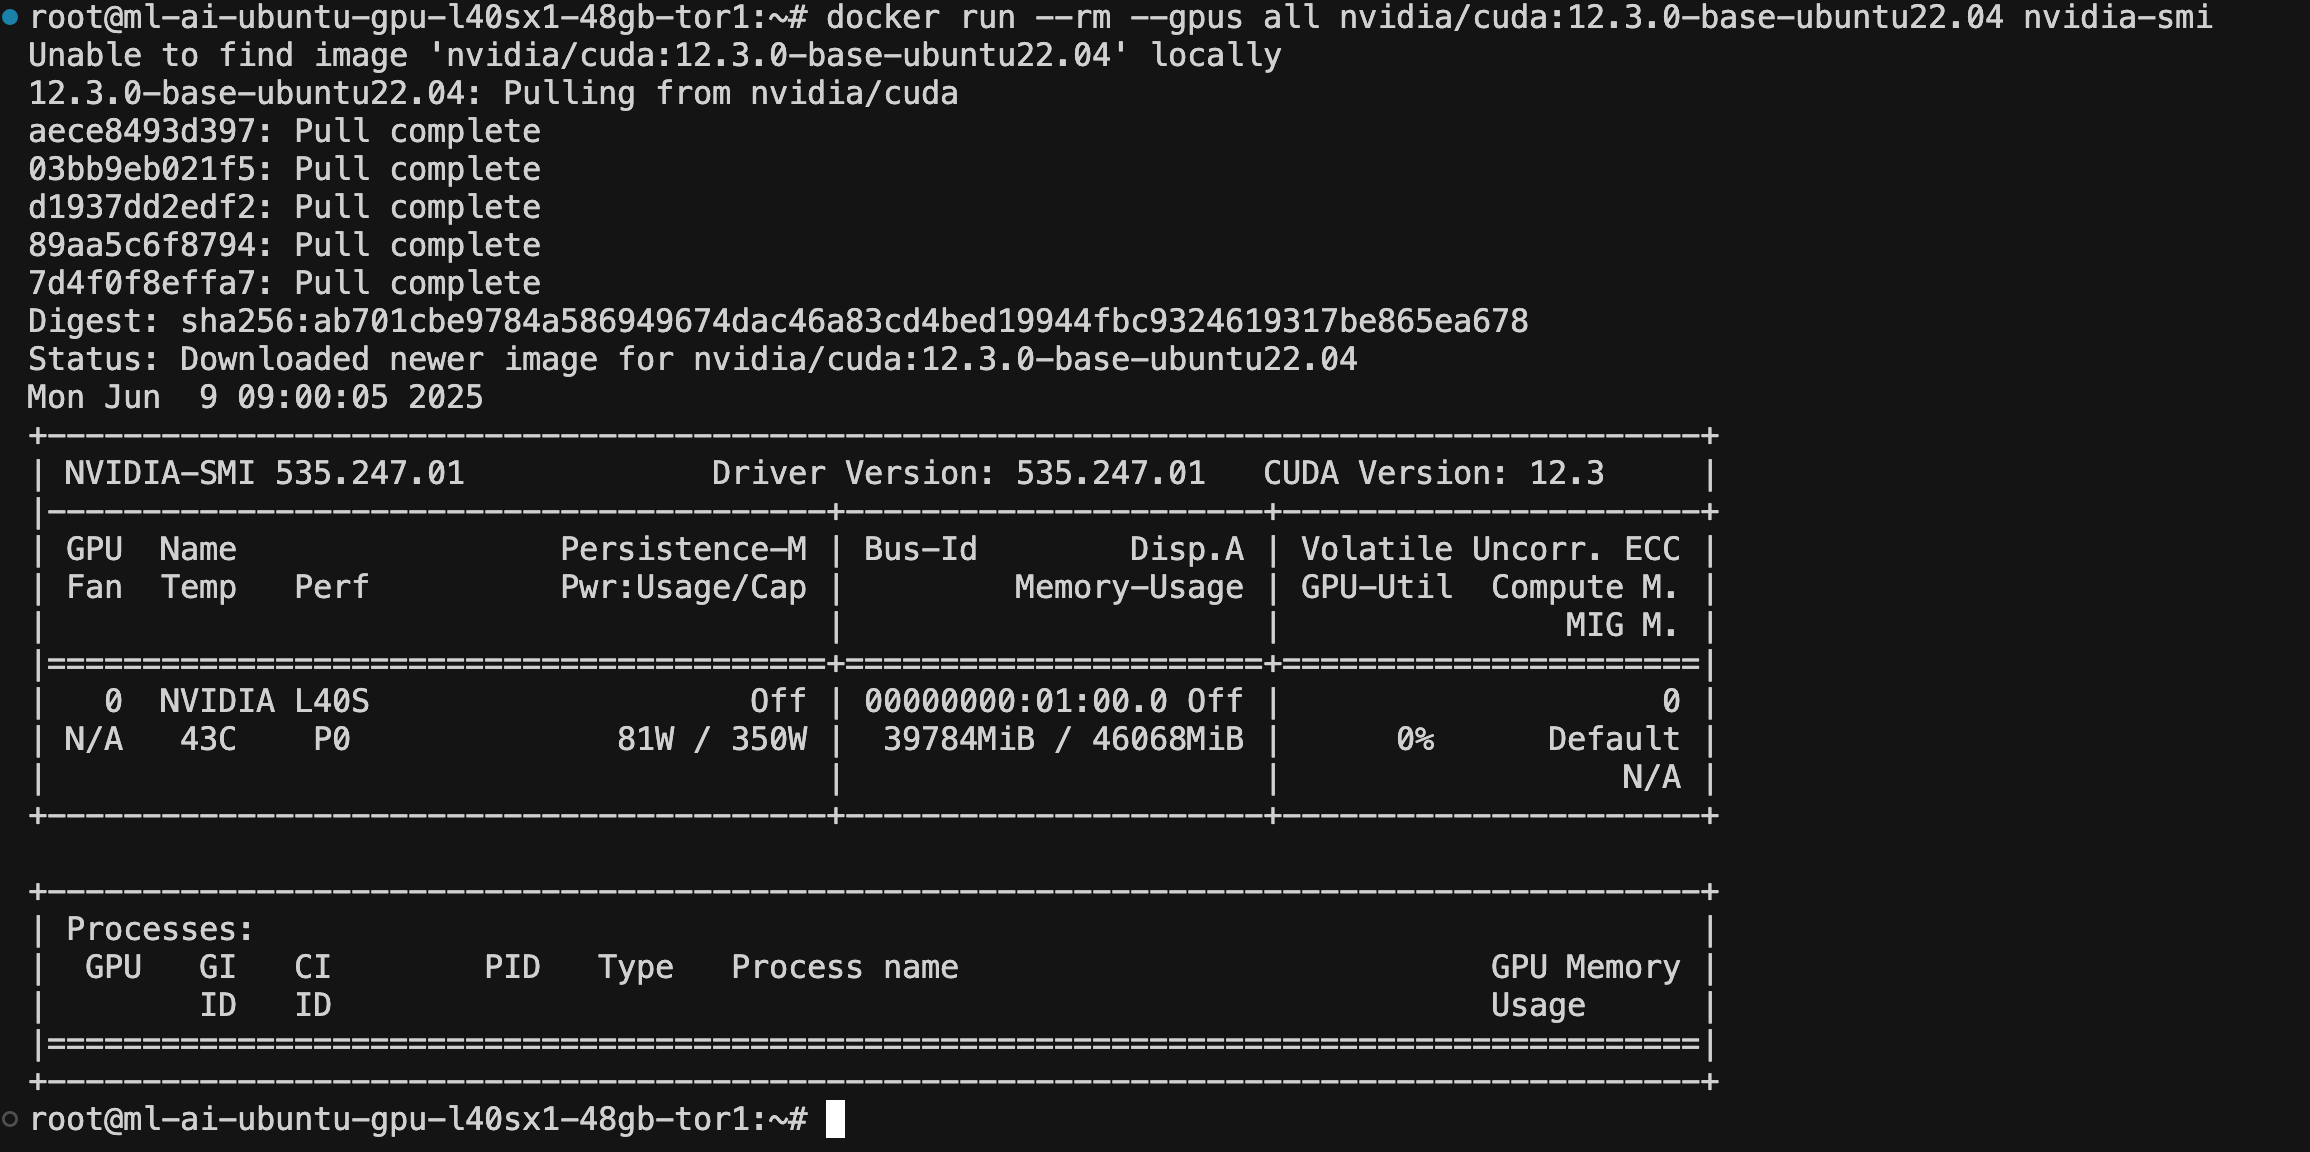
After reboot, reconnect to your Droplet and verify GPU access:
# Test GPU access in containers
docker run --rm --gpus all nvidia/cuda:12.3.0-base-ubuntu22.04 nvidia-smi
Install Docker Compose and DigitalOcean CLI
# Install Docker Compose
sudo apt-get install docker-ce docker-ce-cli containerd.io docker-buildx-plugin docker-compose-plugin -y
# Install doctl for DOCR access
sudo snap install doctl
doctl auth init  # Enter your DO API token
doctl registry login
Step 3: Set Up Python Virtual Environment and Install Dynamo
Run the following commands to create a virtual environment and install NVIDIA Dynamo:
apt-get update
DEBIAN_FRONTEND=noninteractive apt-get install -yq python3-dev python3-pip python3-venv libucx0
python3 -m venv venv
source venv/bin/activate

pip install "ai-dynamo[all]"
Dependency Isolation: Python virtual environments prevent conflicts between different projects and system packages:
- Version Control: Dynamo requires specific versions of PyTorch, transformers, and other ML libraries
- Clean Installation: Avoids conflicts with system Python packages that might break other applications
- Reproducible Environments: Ensures consistent behavior across different deployments and team members
- Easy Cleanup: Virtual environments can be deleted and recreated without affecting the system
Why ai-dynamo[all]: The [all] extra installs optional dependencies including:
- Monitoring Tools: Prometheus metrics and observability components
- Additional Backends: Support for different model formats and optimization libraries
- Development Tools: Debugging and profiling utilities
Production Best Practice: Virtual environments are essential for production deployments, making dependency management predictable and maintainable.
Step 4: Download Dynamo Source Code
Run the following commands to download the source code and checkout the v0.3.0 tag:
git clone https://github.com/ai-dynamo/dynamo.git
cd dynamo
git fetch --tags
git checkout v0.3.0
Why This Step Matters
Version Stability: Using the official source code and checking out a specific tag (v0.3.0) ensures:
- Reproducible Builds: Everyone following this tutorial gets identical results
- Tested Compatibility: v0.3.0 is a stable release with known compatibility with DigitalOcean GPU Droplets
- Bug Fixes: Avoids issues present in development branches or newer unstable versions
- Documentation Alignment: Tutorial instructions match the specific version’s API and configuration
Source Code Access: Having the full source code enables:
- Custom Modifications: Ability to modify configurations, add custom metrics, or debug issues
- Container Building: Required for creating custom Docker images with your specific requirements
- Understanding Architecture: Access to examples, configurations, and documentation
Git Tag Strategy: Using git fetch --tags and git checkout v0.3.0 ensures you get the exact version tested with this tutorial, preventing version-related deployment issues.
Step 5: Build and Push Dynamo Base Image to DOCR
Run the following commands to build the Dynamo base image and push it to your DigitalOcean Container Registry (DOCR):
./container/build.sh
# Wait 20-30 minutes

export DOCKER_REGISTRY=<your-registry>
docker tag dynamo:v0.3.0-vllm $DOCKER_REGISTRY/dynamo-base:v0.3.0-vllm
docker login $DOCKER_REGISTRY
docker push $DOCKER_REGISTRY/dynamo-base:v0.3.0-vllm
# Wait 20-30 minutes
Custom Image Benefits: Building your own Dynamo image provides several advantages:
- Environment Consistency: Your image contains exactly the dependencies and configurations you need
- Security Control: You know exactly what’s in your container, reducing security risks
- Customization: Ability to add custom libraries, configurations, or monitoring tools
- Version Control: Tag and version your images for different environments (dev, staging, prod)
DigitalOcean Container Registry (DOCR) Advantages:
- Geographic Proximity: Faster image pulls from DigitalOcean data centers
- Integrated Billing: Consolidated with your Droplet costs
- Private Registry: Secure storage for proprietary configurations
- Team Collaboration: Share images across team members and CI/CD pipelines
Build Time Investment: The 20-30 minute build time includes:
- Rust Compilation: Dynamo’s high-performance components are written in Rust
- Python Dependencies: Installing and optimizing ML libraries like PyTorch
- CUDA Integration: Ensuring proper GPU support in the container
Production Readiness: This step transforms the development code into a production-ready container that can be deployed consistently across environments.
Performance Optimization Tip: For optimal performance, consider setting up your DigitalOcean Container Registry in the NYC region (same as your GPU Droplet location). This reduces image transfer time significantly during deployment and updates.
Registry Setup Guide: If you haven’t set up DOCR yet, follow the comprehensive DigitalOcean Private Docker Registry Tutorial to create your registry in the NYC region.
Step 6: Start Dynamo Distributed Runtime Services
Run the following commands to start the Dynamo distributed runtime services:
docker compose -f deploy/metrics/docker-compose.yml up -d
Infrastructure Services: The metrics Docker Compose stack provides essential infrastructure:
- Prometheus: Collects and stores time-series metrics from Dynamo services
- Grafana: Provides dashboards for visualizing performance metrics
- Service Discovery: Enables automatic discovery of Dynamo service instances
- Health Monitoring: Tracks service health and availability
Distributed Architecture Foundation: These services enable:
- Multi-Service Coordination: Required for Dynamo’s disaggregated serving architecture
- Performance Monitoring: Real-time visibility into throughput, latency, and resource usage
- Debugging Support: Metrics help identify bottlenecks and performance issues
- Production Readiness: Essential for operating Dynamo in production environments
Why Start Early: Starting these services before Dynamo ensures:
- Service Registration: Dynamo services can register themselves upon startup
- Immediate Monitoring: Metrics collection begins as soon as Dynamo starts
- Dependency Resolution: Avoids startup failures due to missing infrastructure services
Step 7: Enter Container and Mount Workspace
Run the following commands to enter the container and mount the workspace:
./container/run.sh -it --mount-workspace --image dynamo:v0.3.0-vllm
Development Environment Isolation: Working inside containers provides several benefits:
- Consistent Environment: Same runtime environment as production deployment
- Dependency Isolation: Avoids conflicts with host system packages and libraries
- GPU Access: Container has proper NVIDIA driver and CUDA toolkit access
- Reproducible Development: Team members get identical development environments
Workspace Mounting Benefits:
- Code Persistence: Changes made inside container persist on the host filesystem
- Development Workflow: Edit code with host tools, run inside container
- Build Artifacts: Compiled binaries and build outputs are accessible from host
- Debugging: Access to logs and debug information from both host and container
Why dynamo:v0.3.0-vllm Image: This specific image includes:
- vLLM Integration: Pre-configured with vLLM for high-performance inference
- CUDA Support: Proper GPU drivers and CUDA toolkit
- Development Tools: Rust compiler, Python environment, and debugging utilities
Container vs Host Development: Container development ensures your local changes will work identically in production, eliminating “works on my machine” issues.
Step 8: Build Rust Components and Prepare Python Environment
Run the following commands to build the Rust components:
# Build Rust components
cargo build --release
Wait 10-15 minutes for build completion
mkdir -p /workspace/deploy/dynamo/sdk/src/dynamo/sdk/cli/bin
cp /workspace/target/release/http /workspace/deploy/dynamo/sdk/src/dynamo/sdk/cli/bin
cp /workspace/target/release/llmctl /workspace/deploy/dynamo/sdk/src/dynamo/sdk/cli/bin
cp /workspace/target/release/dynamo-run /workspace/deploy/dynamo/sdk/src/dynamo/sdk/cli/bin
Now, we need to install the Python packages:
uv pip install -e .
export PYTHONPATH=$PYTHONPATH:/workspace/deploy/sdk/src:/workspace/components/planner/src
Rust Components Performance: Dynamo’s core components are written in Rust for maximum performance:
- Memory Safety: Rust prevents memory leaks and buffer overflows common in C/C++
- Zero-Cost Abstractions: High-level code compiles to efficient machine code
- Concurrency: Rust’s ownership model enables safe parallel processing
- Performance: Rust performance rivals C/C++ while being safer and more maintainable
Critical Binaries Built:
http: High-performance HTTP server for API endpointsllmctl: Command-line tool for managing LLM servicesdynamo-run: Main service orchestrator and runtime
Build Time Investment: The 10-15 minute build time includes:
- Dependency Compilation: Building all Rust dependencies from source
- Optimization: Release builds include aggressive optimizations for performance
- Cross-Platform Compatibility: Ensures binaries work with your specific GPU architecture
Python Environment Setup: Installing Dynamo in editable mode (-e .) enables:
- Development Workflow: Changes to Python code take effect immediately
- Custom Modifications: Ability to modify and test Dynamo’s Python components
- PYTHONPATH Configuration: Ensures all modules can find each other correctly
Why This Step is Critical: Without properly built Rust components, Dynamo cannot start or will have severely degraded performance.
Step 9: Start Dynamo Test Service
Run the following commands to start the Dynamo test service:
cd examples/llm
dynamo serve graphs.agg_router:Frontend -f configs/agg_router.yaml

Service Validation: Starting the Dynamo service validates your entire deployment:
- Configuration Verification: Ensures all configuration files are correct and compatible
- GPU Access: Confirms containers can access GPU hardware properly
- Model Loading: Tests ability to download and load the specified LLM model
- API Endpoint: Establishes the HTTP API for receiving inference requests
Aggregated Router Architecture: The agg_router configuration demonstrates:
- Request Routing: Intelligent distribution of requests across available workers
- Load Balancing: Automatic scaling based on request volume and GPU availability
- KV Cache Management: Efficient memory usage through intelligent caching strategies
- Performance Optimization: Disaggregated serving for maximum throughput
Model Download Process: The DeepSeek-R1-Distill-Llama-8B model:
- Size: Approximately 8GB download, requiring stable internet connection
- Caching: Model is cached locally for subsequent runs
- Rate Limiting: Hugging Face may rate-limit downloads (hence the 429 error handling)
Service Health Indicators: A successful start shows:
- Port Binding: Service listening on port 8000
- Model Loading: Successful model initialization
- GPU Utilization: GPU memory allocation for model weights
- API Readiness: Ready to accept inference requests
Note: If you are encountering HTTP error 429 (Too many requests) during model download, please wait five minutes and retry.
Step 10: Send Test Request
Use the following command to send a test request to the Dynamo service using curl and jq:
curl localhost:8000/v1/chat/completions \
  -H "Content-Type: application/json" \
  -d '{
    "model": "deepseek-ai/DeepSeek-R1-Distill-Llama-8B",
    "messages": [
      {"role": "user", "content": "How to travel from Munich to Berlin?"}
    ],
    "stream": false,
    "max_tokens": 300
  }' | jq
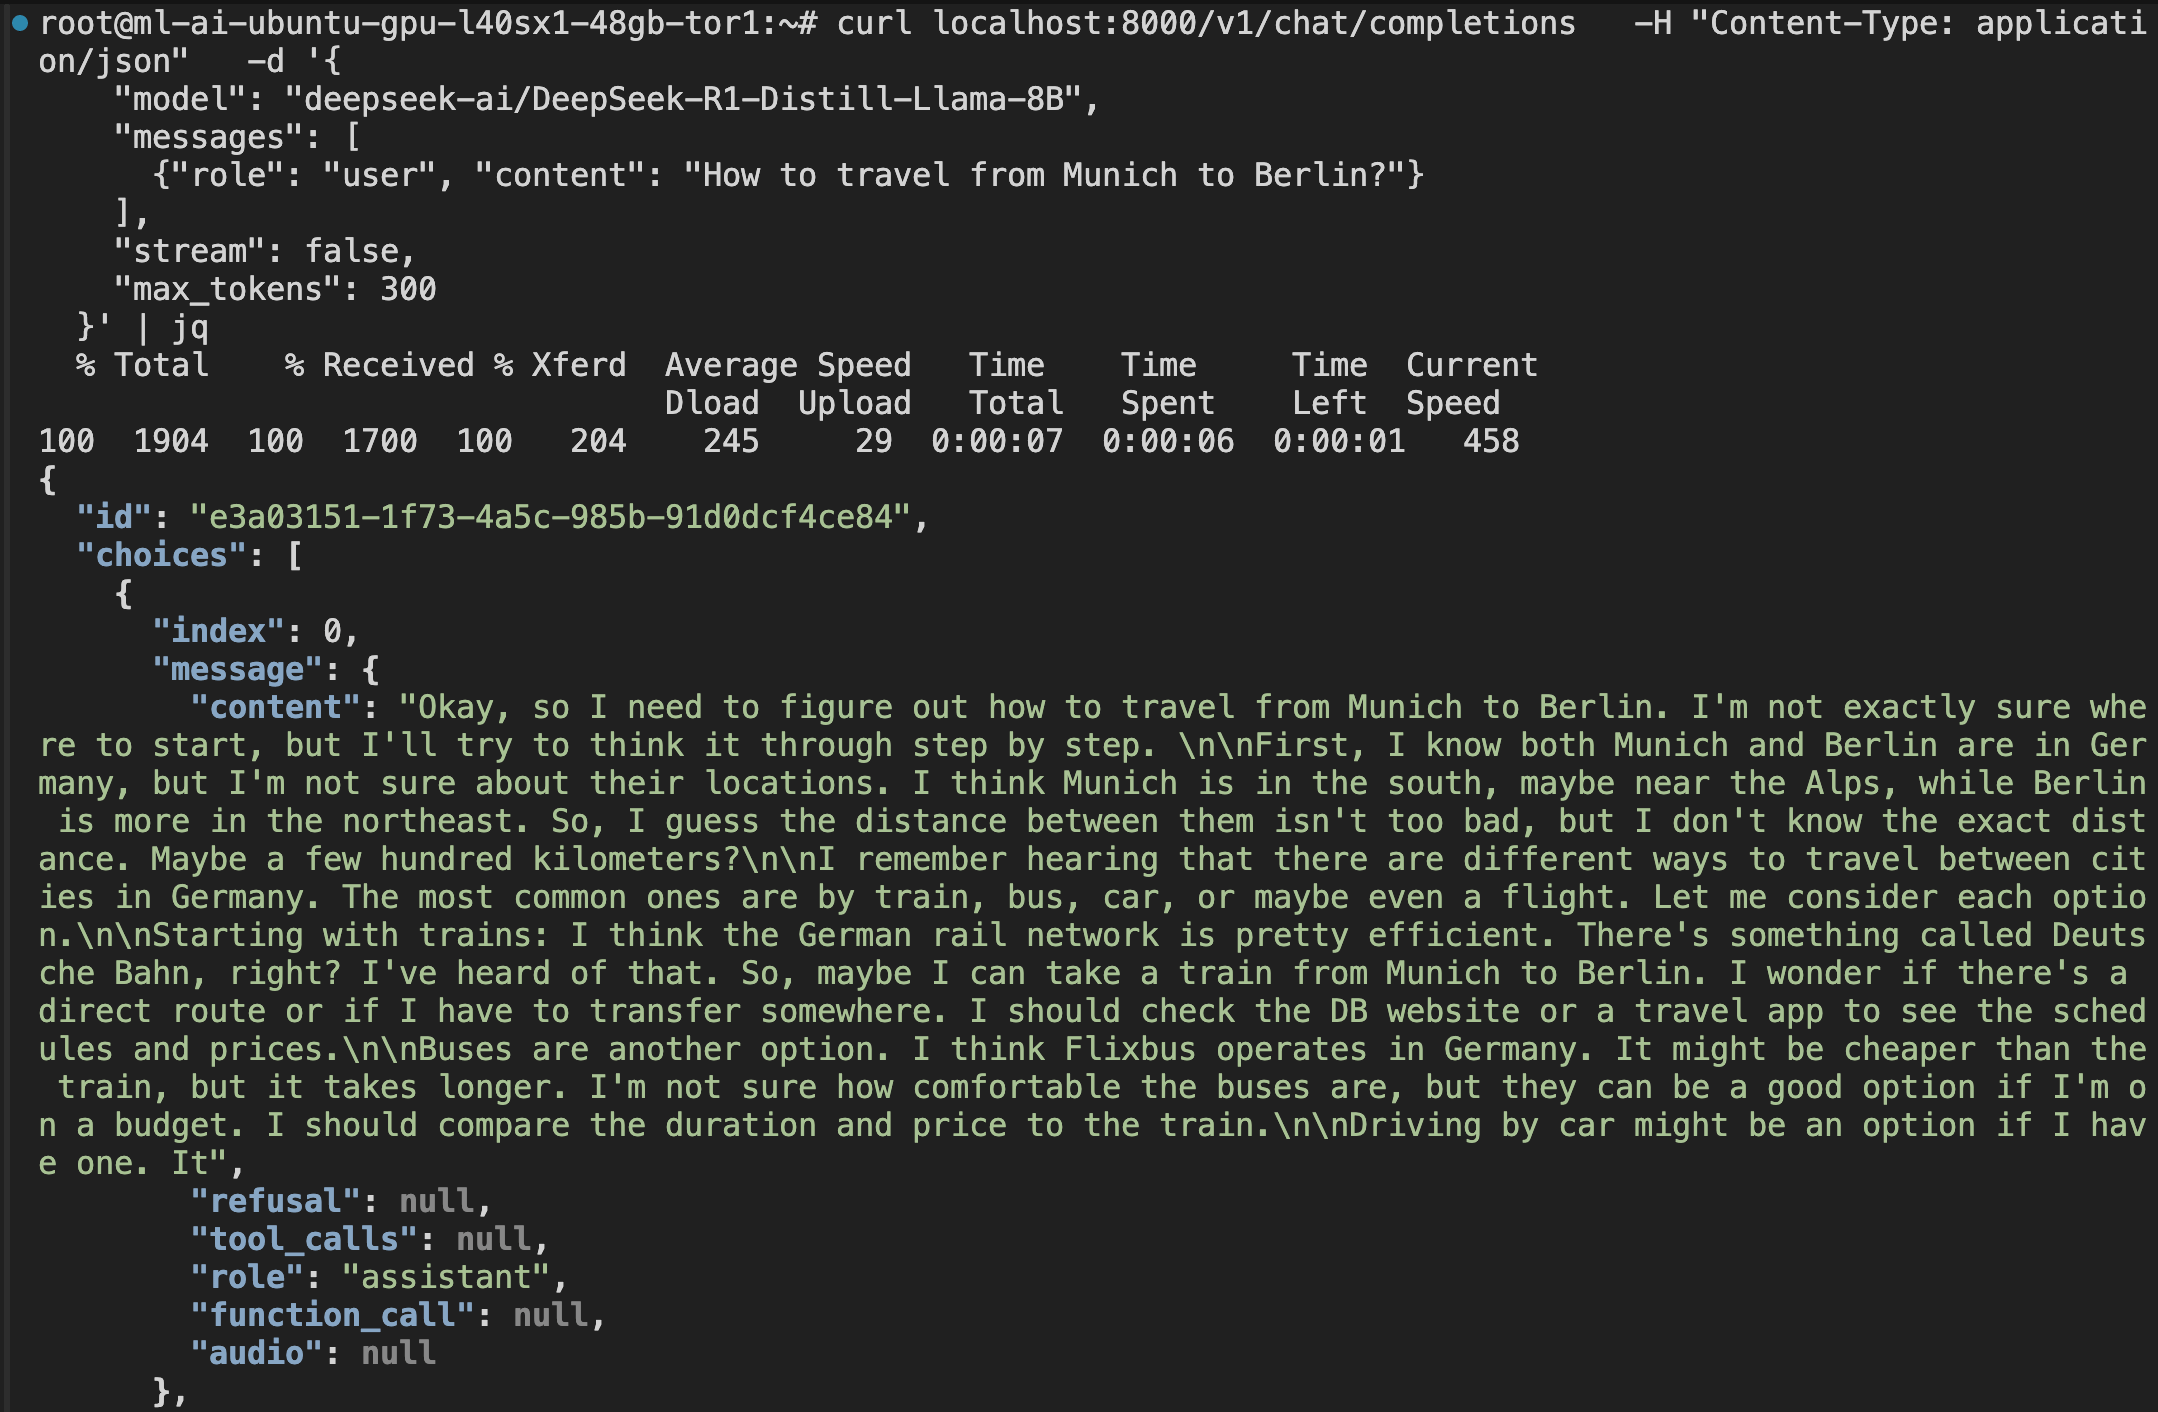
End-to-End Validation: This final test confirms your entire deployment works correctly:
- API Functionality: Verifies the HTTP API accepts and processes requests
- Model Inference: Confirms the LLM can generate coherent responses
- GPU Utilization: Validates GPU is being used for inference computations
- Response Quality: Ensures the model produces expected output format
Request Structure Analysis:
- OpenAI Compatibility: Uses OpenAI-compatible API format for easy integration
- Model Specification: Explicitly specifies the loaded model
- Message Format: Standard chat completion format with user/assistant roles
- Parameters:
max_tokenslimits response length,stream: falsegets complete response
Performance Indicators: A successful response demonstrates:
- Latency: Time from request to response (typically 2-5 seconds for first request)
- Throughput: System’s ability to process requests
- Quality: Coherent, relevant response to the travel question
- Stability: Service remains responsive after processing requests
Production Readiness: This test confirms your deployment is ready for:
- Application Integration: Can be integrated into web applications or services
- Load Testing: Ready for performance benchmarking and optimization
- Scaling: Foundation for multi-GPU or multi-node deployments
Troubleshooting Value: If this test fails, it helps identify issues in:
- Network Configuration: Port access and firewall settings
- Service Health: Whether Dynamo is running correctly
- Model Loading: Whether the LLM model loaded successfully
- GPU Access: Whether inference is using GPU acceleration
Congratulations! You’ve successfully deployed NVIDIA Dynamo and received your first LLM response. Your high-performance inference service is now running on DigitalOcean GPU Droplets.
DigitalOcean Practical Supplements
- Open port
8000(or your configured API port) in Droplet firewall - Recommend regularly checking disk space and GPU status
- For container startup, permission, port issues, refer to the below section of “Common Issues and Troubleshooting” section of this tutorial.
Common Issues and Troubleshooting with NVIDIA Dynamo
When deploying NVIDIA Dynamo to DigitalOcean GPU Droplets, you may encounter the following common issues to help you quickly locate and resolve problems.
| Issue Type | Symptoms/Error Messages | Solution Suggestions |
|---|---|---|
| NVIDIA Driver/CUDA Issues | nvidia-smi cannot display GPU, or CUDA version mismatch |
Recommend using DigitalOcean default drivers, upgrade not recommended unless specifically needed. If upgrading, refer to official tutorials and restart Droplet. |
| Docker/nvidia-docker Issues | docker: Error response from daemon: could not select device driver |
Confirm nvidia-docker2 is installed, test with docker run --gpus all nvidia/cuda:12.3.0-base-ubuntu22.04 nvidia-smi. |
| Dynamo Installation/Startup Errors | ModuleNotFoundError, ImportError, dynamo: command not found |
Confirm ai-dynamo[all] is installed in venv, and checked out to v0.3.0 tag. |
| API Connection/Port Issues | curl no response, Connection refused, port errors |
Confirm port when Dynamo starts (e.g., 8000), firewall is open, and test command port matches. |
| GPU Resource Insufficient/Cannot Allocate | CUDA out of memory, No GPU found |
Check Droplet GPU specifications, gpu parameter in config.yaml should not exceed physical GPU count. |
| Version/Dependency Incompatibility | No matching distribution found for ai-dynamo-runtime==X.X.X |
Recommend checkout v0.3.0 tag, ensure pip/venv is clean. |
FAQs
1. What are the minimum system requirements for running NVIDIA Dynamo on DigitalOcean GPU Droplets?
The minimum requirements include:
- GPU: At least 1 NVIDIA GPU (T4, V100, A100, or newer)
- RAM: Minimum 16GB RAM (32GB+ recommended for larger models)
- Storage: At least 50GB available disk space
- OS: Ubuntu 22.04 LTS (recommended)
- Docker: Latest version with nvidia-docker2 support
- CUDA: Version 12.3 or compatible (handled by DigitalOcean’s default drivers)
2. How do I scale NVIDIA Dynamo to handle multiple concurrent requests?
To scale Dynamo for multiple requests:
- Use Auto-scale GPU Droplets: You can make use of Autoscale Workloads Using Droplet Autoscale Pools to scale your Dynamo deployment automatically.
- Load Balancing: Use a reverse proxy (nginx/haproxy) to distribute requests.
- Resource Allocation: Adjust
max_concurrent_requestsin config.yaml - GPU Memory: Ensure sufficient VRAM for your model size
- Monitoring: Implement request queuing and monitoring for optimal performance
3. What should I do if my model fails to load or shows “CUDA out of memory” errors?
Common solutions include:
- Check GPU Memory: Verify your model fits in available VRAM using
nvidia-smi - Reduce Batch Size: Lower
max_batch_sizein config.yaml - Model Quantization: Use quantized models (INT8/FP16) to reduce memory usage
- GPU Selection: Ensure
gpuparameter matches available GPUs - Memory Cleanup: Restart the service to clear GPU memory cache
4. How can I monitor and optimize the performance of my Dynamo deployment?
Performance monitoring strategies:
- Built-in Metrics: Use Dynamo’s
/metricsendpoint for real-time statistics - GPU Monitoring: Track GPU utilization with
nvidia-smi -l 1 - Response Times: Monitor API latency and throughput
- Resource Usage: Check CPU, memory, and disk I/O
- Log Analysis: Review Dynamo logs for errors and performance patterns
5. Is it possible to run multiple different models simultaneously on the same GPU Droplet?
Yes, with considerations:
- Memory Constraints: Ensure total model memory fits in GPU VRAM
- Multiple Instances: Run separate Dynamo containers on different ports
- Resource Allocation: Configure
gpu_memory_fractionper instance - Load Balancing: Route requests to appropriate model instances
- Performance Impact: Monitor for resource contention between models
6. What backup and disaster recovery strategies should I implement for production Dynamo deployments?
Essential backup strategies include:
- Configuration Backup: Version control your
config.yamland startup scripts - Model Storage: Store models in persistent volumes or cloud storage
- Snapshot Backups: Regular DigitalOcean Droplet snapshots
- Multi-Region: Deploy across multiple regions for redundancy
- Monitoring Alerts: Set up health checks and automated recovery procedures
Conclusion
You have learned how to deploy and validate NVIDIA Dynamo on DigitalOcean GPU Droplets, completing the full process of high-performance LLM inference services. This will help you quickly build scalable AI applications, and you can expand to multi-node, frontend integration, and other advanced applications as needed.
Next Step
Now that you have successfully deployed NVIDIA Dynamo on a single GPU Droplet, the next essential step is to understand and optimize its performance:
Performance Benchmarking & Monitoring
In our next tutorial, you’ll learn how to build a comprehensive monitoring dashboard and conduct systematic performance testing to optimize your NVIDIA Dynamo deployment. This includes understanding key metrics, identifying bottlenecks, and making data-driven scaling decisions.
Stay tuned for the upcoming guide on Building Performance Monitoring Dashboards for NVIDIA Dynamo!
Related Resources
- Check GPU Droplet Pricing for cost planning.
- Explore DigitalOcean Community for more tutorials on Droplet management, Docker usage, or other advanced pipelines.
- Refer to NVIDIA Dynamo Official Documentation for more advanced features.
Happy deploying and efficient inference!
Thanks for learning with the DigitalOcean Community. Check out our offerings for compute, storage, networking, and managed databases.
About the author(s)
I’m a Senior Solutions Architect in Munich with a background in DevOps, Cloud, Kubernetes and GenAI. I help bridge the gap for those new to the cloud and build lasting relationships. Curious about cloud or SaaS? Let’s connect over a virtual coffee! ☕
I help Businesses scale with AI x SEO x (authentic) Content that revives traffic and keeps leads flowing | 3,000,000+ Average monthly readers on Medium | Sr Technical Writer(Team Lead) @ DigitalOcean | Ex-Cloud Consultant @ AMEX | Ex-Site Reliability Engineer(DevOps)@Nutanix
Still looking for an answer?
This textbox defaults to using Markdown to format your answer.
You can type !ref in this text area to quickly search our full set of tutorials, documentation & marketplace offerings and insert the link!
How long does it take for the command “dynamo serve graphs.agg_router:Frontend -f configs/agg_router.yaml” to run?
The following are the errors I encountered. RuntimeWarning: invalid value encountered in scalar divide ret = ret.dtype.type(ret / rcount)
 This work is licensed under a Creative Commons Attribution-NonCommercial- ShareAlike 4.0 International License.
Become a contributor for community
Get paid to write technical tutorials and select a tech-focused charity to receive a matching donation.

DigitalOcean Documentation
Full documentation for every DigitalOcean product.

Resources for startups and AI-native businesses
The Wave has everything you need to know about building a business, from raising funding to marketing your product.
The developer cloud
Scale up as you grow — whether you're running one virtual machine or ten thousand.

Start building today
From GPU-powered inference and Kubernetes to managed databases and storage, get everything you need to build, scale, and deploy intelligent applications.
