By Bikram Gupta, Cristian Marius Tiutiu and Easha Abid

Introduction
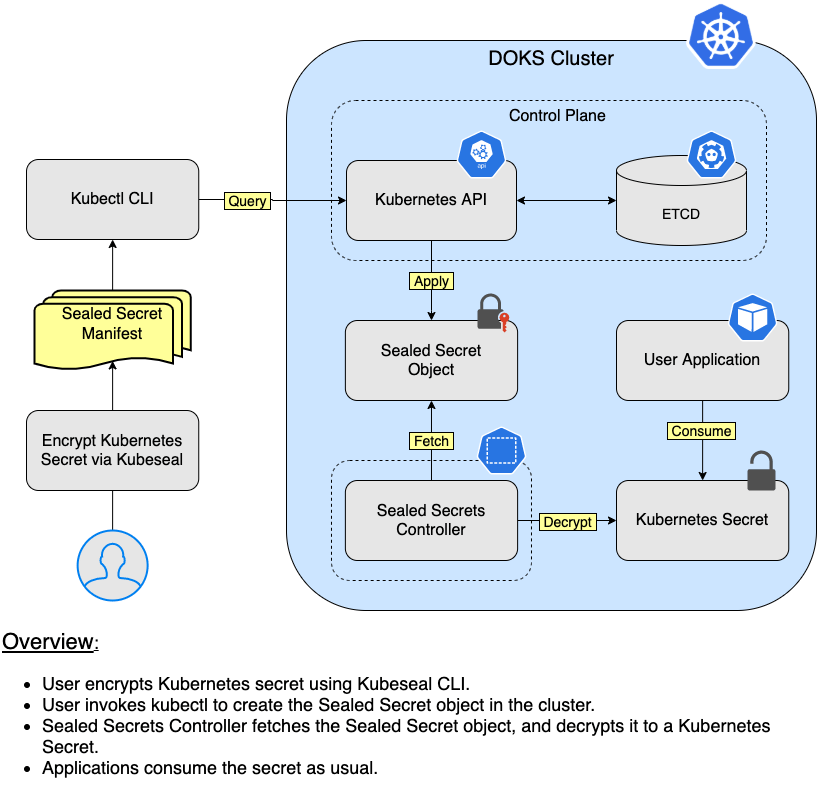
To safeguard sensitive data from unauthorized access, you can enable encryption in your Kubernetes cluster. In this tutorial, you will learn how to deploy and encrypt generic Kubernetes Secrets using the Sealed Secrets Controller. Sealed Secrets allows you to:
- Store encrypted secrets in a Git repository
- Apply GitOps principles for Kubernetes Secrets as well
Prerequisites
To complete this tutorial, you will need:
Step 1 - Installing the Sealed Secrets Controller
In this step, you will learn how to deploy the Sealed Secrets Controller using Helm. The chart of interest is called sealed-secrets and it’s provided by the bitnami-labs repository.
First, clone the Starter Kit Git repository, and change the directory to your local copy:
git clone https://github.com/digitalocean/Kubernetes-Starter-Kit-Developers.git

cd Kubernetes-Starter-Kit-Developers
Then, add the sealed secrets bitnami-labs repository for Helm:
helm repo add sealed-secrets https://bitnami-labs.github.io/sealed-secrets
Next, update the sealed-secrets chart repository:
helm repo update sealed-secrets
Next, search the sealed-secrets repository for available charts to install:
helm search repo sealed-secrets
The output looks similar to:
NAME                            CHART VERSION   APP VERSION     DESCRIPTION
sealed-secrets/sealed-secrets   2.4.0           v0.18.1         Helm chart for the sealed-secrets controller.
Now, open and inspect the 06-kubernetes-secrets/assets/manifests/sealed-secrets-values-v2.4.0.yaml file provided in the Starter kit repository using an editor of your choice (preferably with YAML lint support).
code 06-kubernetes-secrets/assets/manifests/sealed-secrets-values-v2.4.0.yaml
Next, install the sealed-secrets/sealed-secrets chart using Helm. Notice that a dedicated sealed-secrets namespace is created as well.
HELM_CHART_VERSION="2.4.0"

helm install sealed-secrets-controller sealed-secrets/sealed-secrets --version "${HELM_CHART_VERSION}" \
  --namespace sealed-secrets \
  --create-namespace \
  -f "06-kubernetes-secrets/assets/manifests/sealed-secrets-values-v${HELM_CHART_VERSION}.yaml"
- A specific version of the Helm chart is used. In this case
2.4.0is picked which maps to the0.18.1version of the application. It’s a good practice to lock on a specific version. This helps to have predictable results and allows versioning control via Git. - You will want to restrict access to the sealed-secrets namespace for other users that have access to your DOKS cluster to prevent unauthorized access to the private key (e.g. use RBAC policies).
Next, list the deployment status for Sealed Secrets controller. The STATUS column value should be deployed.
helm ls -n sealed-secrets
The output looks similar to:
NAME                            NAMESPACE       REVISION        UPDATED                                 STATUS          CHART                  APP VERSION
sealed-secrets-controller       sealed-secrets  1               2021-10-04 18:25:03.594564 +0300 EEST   deployed        sealed-secrets-2.4.0   v0.18.1
Finally, inspect the Kubernetes resources created by the Sealed Secrets Helm deployment:
kubectl get all -n sealed-secrets
The output looks similar to the following snippet. The status of the sealed-secrets-controller pod and service must be Running.
NAME                                             READY   STATUS    RESTARTS   AGE
pod/sealed-secrets-controller-7b649d967c-mrpqq   1/1     Running   0          2m19s

NAME                                TYPE        CLUSTER-IP       EXTERNAL-IP   PORT(S)    AGE
service/sealed-secrets-controller   ClusterIP   10.245.105.164   <none>        8080/TCP   2m20s

NAME                                        READY   UP-TO-DATE   AVAILABLE   AGE
deployment.apps/sealed-secrets-controller   1/1     1            1           2m20s

NAME                                                   DESIRED   CURRENT   READY   AGE
replicaset.apps/sealed-secrets-controller-7b649d967c   1         1         1       2m20s
In the next step, you will learn how to seal your secrets. Only your DOKS cluster can decrypt the sealed secrets because it’s the only one having the private key.
Step 2 - Encrypting a Kubernetes Secret
In this step, you will learn how to encrypt your generic Kubernetes secret using kubeseal CLI. Then, you will deploy it to your DOKS cluster and see how the Sealed Secrets controller decrypts it for your applications to use.
Suppose that you need to seal a generic secret for your application saved in the following file: your-app-secret.yaml. Notice the your-data field which is base64 encoded (it’s vulnerable to attacks because it can be very easily decoded using free tools):
apiVersion: v1
data:
  your-data: ZXh0cmFFbnZWYXJzOgogICAgRElHSVRBTE9DRUFOX1RPS0VOOg== # base64 encoded application data
kind: Secret
metadata:
  name: your-app
First, you need to fetch the public key from the Sealed Secrets Controller (performed only once per cluster and on every fresh install):
kubeseal --fetch-cert --controller-namespace=sealed-secrets > pub-sealed-secrets.pem
- If you deploy the Sealed Secrets controller to another namespace (defaults to
kube-system), you need to specify to thekubesealCLI the namespace via the--controller-namespaceflag. - The public key can be safely stored in a Git repository, for example, or even given to the world. The encryption mechanism used by the Sealed Secrets controller cannot be reversed without the private key that’s only stored in your DOKS cluster.
Next, create a sealed file from the Kubernetes secret, using the pub-sealed-secrets.pem key:
kubeseal --format=yaml \
  --cert=pub-sealed-secrets.pem \
  --secret-file your-app-secret.yaml \
  --sealed-secret-file your-app-sealed.yaml
The file content looks similar to the following snippet. Notice your-data field which is encrypted now using a Bitnami SealedSecret object.
apiVersion: bitnami.com/v1alpha1
kind: SealedSecret
metadata:
  creationTimestamp: null
  name: your-app
  namespace: default
spec:
  encryptedData:
    your-data: AgCFNTLd+KD2IGZo3YWbRgPsK1dEhxT3NwSCU2Inl8A6phhTwMxKSu82fu0LGf/AoYCB35xrdPl0sCwwB4HSXRZMl2WbL6HrA0DQNB1ov8DnnAVM+6TZFCKePkf9yqVIekr4VojhPYAvkXq8TEAxYslQ0ppNg6AlduUZbcfZgSDkMUBfaczjwb69BV8kBf5YXMRmfGtL3mh5CZA6AAK0Q9cFwT/gWEZQU7M1BOoMXUJrHG9p6hboqzyEIWg535j+14tNy1srAx6oaQeEKOW9fr7C6IZr8VOe2wRtHFWZGjCL3ulzFeNu5GG0FmFm/bdB7rFYUnUIrb2RShi1xvyNpaNDF+1BDuZgpyDPVO8crCc+r2ozDnkTo/sJhNdLDuYgIzoQU7g1yP4U6gYDTE+1zUK/b1Q+X2eTFwHQoli/IRSv5eP/EAVTU60QJklwza8qfHE9UjpsxgcrZnaxdXZz90NahoGPtdJkweoPd0/CIoaugx4QxbxaZ67nBgsVYAnikqc9pVs9VmX/Si24aA6oZbtmGzkc4b80yi+9ln7x/7/B0XmyLNLS2Sz0lnqVUN8sfvjmehpEBDjdErekSlQJ4xWEQQ9agdxz7WCSCgPJVnwA6B3GsnL5dleMObk7eGUj9DNMv4ETrvx/ZaS4bpjwS2TL9S5n9a6vx6my3VC3tLA5QAW+GBIfRD7/CwyGZnTJHtW5f6jlDWYS62LbFJKfI9hb8foR/XLvBhgxuiwfj7SjjAzpyAgq
  template:
    data: null
    metadata:
      creationTimestamp: null
      name: your-app
      namespace: default
If you don’t specify a namespace, the default one is assumed. You can use kubeseal --namespace flag to change the targeted namespace. The default scope used by kubeseal is strict. Refer to scopes in Security Best Practices for more details.
Next, you can delete the Kubernetes secret file because it’s not needed anymore:
rm -f your-app-secret.yaml
Finally, deploy the sealed secret to your cluster:
kubectl apply -f your-app-sealed.yaml
Check that the Sealed Secrets Controller decrypted your Kubernetes secret in the default namespace:
kubectl get secrets
The output looks similar to:
NAME                  TYPE                                  DATA   AGE
your-app              Opaque                                1      31s
Inspect the secret:
kubectl get secret your-app -o yaml
The output looks similar to the following. your-data key value should be decrypted to the original base64 encoded value.
apiVersion: v1
data:
  your-data: ZXh0cmFFbnZWYXJzOgogICAgRElHSVRBTE9DRUFOX1RPS0VOOg==
kind: Secret
metadata:
  creationTimestamp: '2021-10-05T08:34:07Z'
  name: your-app
  namespace: default
  ownerReferences:
    - apiVersion: bitnami.com/v1alpha1
      controller: true
      kind: SealedSecret
      name: your-app
      uid: f6475e74-78eb-4c6a-9f19-9d9ceee231d0
  resourceVersion: '235947'
  uid: 7b7d2fee-c48a-4b4c-8f16-2e58d25da804
type: Opaque
Step 3 - Managing Sealed Secrets
Managing Existing Secrets
If you want SealedSecret controller to take management of an existing Secret (i.e. overwrite it when unsealing a SealedSecret with the same name and namespace), then you have to annotate that Secret with the annotation sealedsecrets.bitnami.com/managed: "true" while Encrypting a Kubernetes Secret.
Updating Existing Secrets
If you want to add or update existing sealed secrets without having the cleartext for the other items, you can just copy & paste the new encrypted data items and merge them into an existing sealed secret.
Make sure to update items with a compatible name and namespace.
You can use the --merge-into command to update existing sealed secrets if you don’t want to copy & paste:
echo -n bar | kubectl create secret generic mysecret --dry-run=client --from-file=foo=/dev/stdin -o json \
  | kubeseal --controller-namespace=sealed-secrets > mysealedsecret.json

echo -n baz | kubectl create secret generic mysecret --dry-run=client --from-file=bar=/dev/stdin -o json \
  | kubeseal --controller-namespace=sealed-secrets --merge-into mysealedsecret.json
If you are using VS Code, then there’s an extension that allows you to use the GUI mode to perform the above operations - Kubeseal for vscode.
Step 4 - Sealed Secrets Controller Private Key Backup
If you want to perform a manual backup of the private and public keys, you can do the following:
kubectl get secret -n sealed-secrets -l sealedsecrets.bitnami.com/sealed-secrets-key -o yaml > master.key
Then, store the master.key file somewhere safe. To restore from a backup after some disaster, just put that secret back before starting the controller - or if the controller was already started, replace the newly created secrets and restart the controller:
kubectl apply -f master.key

kubectl delete pod -n sealed-secrets -l name=sealed-secrets-controller
Velero or Trilio helps you to restore the Sealed Secrets controller state in case of a disaster without the need to fetch the master key and then insert it back into the cluster.
Security Best Practices
In terms of security, Sealed Secrets allows you to restrict other users from decrypting your sealed secrets inside the cluster. There are three scopes that you can use with kubeseal CLI --scope flag:
strict(default): the secret must be sealed with the same name and namespace. These attributes become part of the encrypted data and thus changing name and/or namespace would lead to decryption error.namespace-wide: you can freely rename the sealed secret within a given namespace.cluster-wide: the secret can be unsealed in any namespace and can be given any name.
Next, you can apply some of the best practices highlighted below:
- Make sure to change both secrets periodically (like passwords, tokens, etc.), and the private key used for encryption. This way, if the encryption key is ever leaked, sensitive data doesn’t get exposed. And even if it is, the secrets are not valid anymore. You can read more on the topic by referring to the Secret Rotation chapter from the official documentation.
- You can leverage the power of RBAC for your Kubernetes cluster to restrict access to namespaces. So, if you store all your Kubernetes secrets in a specific namespace, then you can restrict access to unwanted users and applications for that specific namespace. This is important because plain Kubernetes Secrets are
base64encoded and can be decoded easily by anyone. Sealed Secrets provide an encryption layer on top of encoding, but in your DOKS cluster sealed secrets are transformed back to generic Kubernetes secrets. - To avoid private key leaks, please ensure that the namespace where you deployed the Sealed Secrets controller is also protected through corresponding RBAC rules.
Conclusion
In this tutorial, you learned how to use generic Kubernetes secrets securely. Then, you discovered how to use kubeseal CLI to generate SealedSecret manifests that hold sensitive content encrypted. After applying the sealed secrets manifest file to your DOKS cluster, the Sealed Secrets Controller will recognize it as a new sealed secret resource, and decrypt it to a generic Kubernetes Secret resource.
Learn More
- Steps to Secure a DOKS Cluster
- Secure Site in Kubernetes with cert-manager, Traefik, and Let’s Encrypt
- Secure Kubernetes Ingress With Let’s Encrypt
Next, you will learn how to automatically scale your application workloads based on external load (or traffic).
Thanks for learning with the DigitalOcean Community. Check out our offerings for compute, storage, networking, and managed databases.
About the author(s)
Still looking for an answer?
This textbox defaults to using Markdown to format your answer.
You can type !ref in this text area to quickly search our full set of tutorials, documentation & marketplace offerings and insert the link!
 This work is licensed under a Creative Commons Attribution-NonCommercial- ShareAlike 4.0 International License.
Become a contributor for community
Get paid to write technical tutorials and select a tech-focused charity to receive a matching donation.

DigitalOcean Documentation
Full documentation for every DigitalOcean product.

Resources for startups and AI-native businesses
The Wave has everything you need to know about building a business, from raising funding to marketing your product.
The developer cloud
Scale up as you grow — whether you're running one virtual machine or ten thousand.

Start building today
From GPU-powered inference and Kubernetes to managed databases and storage, get everything you need to build, scale, and deploy intelligent applications.
