By Ivan and Kathryn Hancox

The author selected the Free and Open Source Fund to receive a donation as part of the Write for DOnations program.
Introduction
Terraform is an infrastructure-as-code tool created by HashiCorp that helps developers with deploying, updating, and removing different assets of their infrastructure in an efficient and more scalable way.
Developers can use Terraform to organize different environments, track changes through version control, and automate repetitive work to limit human error. It also provides a way for teams to collaborate on improving their infrastructure through shared configurations.
In this tutorial, you’ll import existing DigitalOcean infrastructure into Terraform. By the end of this tutorial you’ll be able to use Terraform for all of your existing infrastructure in addition to creating new assets.
Prerequisites
- A DigitalOcean Personal Access Token, which you can create via the DigitalOcean control panel. You can find instructions in the DigitalOcean product documents, How To Create a Personal Access Token.
- A DigitalOcean Droplet with a tag. You can use the following guide on How To Create a Droplet from the DigitalOcean Control Panel. The tag
terraform-testingis used in this tutorial. - A DigitalOcean Cloud Firewall applied to your Droplet. You can use the guide How To Create Firewalls. The firewall name
testing-terraform-firewallis used for purposes of this tutorial. - The DigitalOcean Command Line Client installed on your local machine, which you can do by following the install instructions on the
doctlGitHub page. For additional guidance, you can read the tutorial, How To Use Doctl, the Official DigitalOcean Command-Line Client.
This tutorial was tested using Terraform 1.0.10.
Step 1 — Installing Terraform Locally
In this first step, you’ll install Terraform on your local machine. This step details the installation of Terraform on the Linux distribution. If you use Windows or MacOS, you can check the Download Terraform page on the Terraform website.
Installation steps are described on HashiCorp website.
Note: It’s usually bad practice to pipe/run objects/executables downloaded from the internet directly in the same command, but as HashiCorp is trusted source, we are going to make an exception here. If you don’t feel comfortable doing this, download the object first, inspect it, and then move forward if everything looks good.
Installing on Ubuntu 20.04
HashiCorp digitally signs their repository, so you will need to add their GNU Privacy Guard (GPG) key. This provides a reasonable guarantee that the repository is actually owned and maintained by HashiCorp:
- curl -fsSL https://apt.releases.hashicorp.com/gpg | sudo apt-key add -
Add the official HashiCorp repository to the system:
- sudo apt-add-repository "deb [arch=$(dpkg --print-architecture)] https://apt.releases.hashicorp.com $(lsb_release -cs) main"
Install Terraform:
- sudo apt update; sudo apt install terraform=1.0.10
Installing on Fedora 34
In order to add the HashiCorp repository, you need to add it to your repository list. The core DNF plugin config-manager is used for this purpose, and is provided by the dnf-plugins-core package. Install the needed dnf plugin:
- sudo dnf install -y dnf-plugins-core
Add the official HashiCorp repository to the system:
- sudo dnf config-manager --add-repo https://rpm.releases.hashicorp.com/fedora/hashicorp.repo
Install Terraform:
- sudo dnf install terraform-1.0.10-1
After following the installation directions for your OS, check if Terraform is installed properly by checking the version:
- terraform version
The output will look similar to this:
OutputTerraform v1.0.10
on linux_amd64
You’ve installed Terraform to your local machine. Next, you’ll prepare the configuration files.
Step 2 — Preparing Terraform Configuration Files
In this step, you’ll import your existing assets into Terraform by creating a project directory and writing configuration files. Since Terraform doesn’t support generating configs from the import command at this time, you need to create those configurations manually.
Run the following command to create your project directory:
- mkdir -p do_terraform_import
Then move into that directory:
- cd do_terraform_import
Initialize a new Terraform workspace:
- terraform workspace new do_terraform_import
Check if you’re using newly created workspace:
- terraform workspace list
The output will be similar to this:
Output  default
* do_terraform_import
Within this step you’ll create three additional files that will contain the required configurations. Your directory structure for this project will look like the following:
├── digitalocean_droplet.tf
├── digitalocean_firewall.tf
├── provider.tf
├── .terraform
└── terraform.tfstate.d
To begin, you’ll create the file provider.tf to define your DigitalOcean Access Token as an environment variable instead of hardcoding it into your configuration.
Warning: Your access token gives access to your complete infrastructure with unrestricted access, so treat it as such. Be sure that you’re the only one who has access to the machine where that token is stored.
In addition to your access token, you’ll also specify which provider you want to use. In this tutorial, that’s digitalocean. For a full list of available Data Sources and Resources for DigitalOcean with Terraform, visit the Providers page on their website.
Create and edit provider.tf with the following command:
- nano provider.tf
Add the following content into the provider.tf file:
terraform {
  required_providers {
    digitalocean = {
      source = "digitalocean/digitalocean"
      version = "2.15.0"
    }
  }
}

variable "do_token" {}

provider "digitalocean" {
  token = var.do_token
}
In this file, you add your DigitalOcean Access Token as a variable, which Terraform will use as identification for the DigitalOcean API. You also specify the version of the DigitalOcean provider plugin. Terraform recommends that you specify which version of the provider you’re using so that future updates don’t potentially break your current setup.
Save and close the file.
Now you’ll create the digitalocean_droplet.tf file. Here you’ll specify the resource that you’re going to use, in this case: droplet.
This file should replicate existing resources in order to successfully import it in Terraform state in later steps.
Create the file with the following command:
- nano digitalocean_droplet.tf
Add the following configuration, updating where necessary to match your pre-existing resources:
resource "digitalocean_droplet" "do_droplet" {
    name   = "testing-terraform"
    region = "fra1"
    tags   = ["terraform-testing"]
    count  = "1"
}
Here, you specify four parameters that should match your pre-existing resources:
-
name: The Droplet name. -
region: The region that the Droplet is located in. -
tags: A list of the tags that are applied to this Droplet. -
count: The number of resources needed for this configuration.
Save and close the file.
Next, you’ll create a configuration file for your firewall. Create the file digitalocean_firewall.tf with the following command:
- nano digitalocean_firewall.tf
Add the following content to the file:
resource "digitalocean_firewall" "do_firewall" {
  name  = "testing-terraform-firewall"
  tags  = ["terraform-testing"]
}
Here you specify the name of the firewall you wish to import and the tags of the Droplets to which the firewall rules apply.
Save and close the file.
Note: You can include firewall resources in the digitalocean_droplet.tf file as well; however, if you have multiple environments where multiple Droplets share the same firewall, it’s a good idea to separate them in case you only want to remove a single Droplet. This will then leave the firewall unaffected.
Now it’s time to initialize those changes so Terraform can download the required dependencies. You will use the terraform init command for this, which will allow you to initialize a working directory containing Terraform configuration files.
Run this command from your project directory:
- terraform init
You’ll see the following output:
OutputTerraform has been successfully initialized!
Terraform has successfully prepared the working directory by downloading plugins, searching for modules, and so on. Next you’ll begin importing your assets to Terraform.
Step 3 — Importing Your Assets to Terraform
In this step, you’ll import your DigitalOcean assets to Terraform. You’ll use doctl to find the ID numbers of your Droplets before importing your assets. You’ll then check the import configuration with the terraform show and terraform plan commands.
To begin, you’ll export your DigitalOcean Access Token as an environment variable, which you’ll then inject into Terraform during runtime.
Export it as an environment variable into your current shell session with the following command:
- export DO_TOKEN="YOUR_TOKEN"
In order to import your existing Droplet and firewall, you’ll need their ID numbers. You can use doctl, the command line interface for the DigitalOcean API.
Run the following command to list your Droplets and access their IDs:
- doctl compute droplet list
You’ll see output similar to the following:
OutputID             Name                  Public IPv4
DROPLET-ID    DROPLET-NAME         DROPLET-IPv4
DROPLET-ID    DROPLET-NAME         DROPLET-IPv4
DROPLET-ID    DROPLET-NAME         DROPLET-IPv4
Make note of the Droplet ID for the resource you want to import, as you’ll need this in a later command.
Next, run the following command to list your firewalls and access their IDs:
- doctl compute firewall list
You’ll see output similar to the following:
OutputID              Name          Status
FIREWALL-ID    FIREWALL-NAME  succeeded
Make note of the firewall ID for the resource you want to import, as you’ll need this in a later command.
Import your existing Droplet into Terraform, replacing DROPLET-ID with the ID of your Droplet:
- terraform import -var "do_token=${DO_TOKEN}" digitalocean_droplet.do_droplet DROPLET-ID
You use the -var flag to specify your DigitalOcean Access Token value that you previously exported to your shell session. This is needed so the DigitalOcean API can verify who you are and apply changes to your infrastructure.
Now run the same command for your firewall, replacing FIREWALL ID with the ID of your firewall:
- terraform import -var "do_token=${DO_TOKEN}" digitalocean_firewall.do_firewall FIREWALL-ID
You’ll check that the import was successful by using the terraform show command. This command provides human-readable output of your infrastructure state. It can be used to inspect a plan to ensure that wanted changes are going to be executed, or to inspect the current state as Terraform sees it.
In this context, state refers to the mapping of your DigitalOcean assets to the Terraform configuration that you’ve written and the tracking of metadata. This allows you to confirm that there’s no difference between existing DigitalOcean assets that you want to import and assets that Terraform is keeping track of:
- terraform show
The output will look similar to this:
Output. . .
# digitalocean_droplet.do_droplet:
resource "digitalocean_droplet" "do_droplet" {
    backups            = false
    created_at         = "2020-02-03T16:12:02Z"
    disk               = 25
    id                 = "DROPLET-ID"
    image              = "DROPLET-IMAGE"
    ipv4_address       = "DROPLET-IP"
    ipv6               = false
    locked             = false
    memory             = 1024
    monitoring         = false
    name               = "testing-terraform-0"
    price_hourly       = 0.00744
    price_monthly      = 5
    private_networking = false
    region             = "fra1"
    resize_disk        = true
    size               = "s-1vcpu-1gb"
    status             = "active"
    tags               = [
        "terraform-testing",
    ]
    urn                = "DROPLET-URN"
    vcpus              = 1
    volume_ids         = []
. . .
}
You’ll see two resources in the output along with their attributes.
After you import your Droplet and firewall into Terraform state, you need to make sure that configurations represent the current state of the imported assets. To do this, you’ll specify your Droplet’s image and its size. You can find these two values in the output of terraform show for digitalocean_droplet.do_droplet resource.
Open the digitalocean_droplet.tf file:
- nano digitalocean_droplet.tf
In this tutorial:
- The operating system image used for the existing Droplet is
ubuntu-20-04-x64. - The region where the Droplet is located is
fra1. - The Droplet tag for the existing Droplet is
terraform-testing.
Note: Your operating system, region, size of the droplet, and other resources might differ, be sure to update file to reflect your values.
To make sure the configuration in digitalocean_droplet.tf matches the current state of the imported Droplet, it will need to be updated to look like this:
resource "digitalocean_droplet" "do_droplet" {
    image   = "ubuntu-20-04-x64"
    name    = "testing-terraform"
    region  = "fra1"
    size    = "s-1vcpu-1gb"
    tags    = ["terraform-testing"]
}
Where relevant, update the configuration to match your imported Droplet.
Next, you’ll add in the firewall rules. In our example, open ports for inbound traffic are 22, 80, and 443. All ports are opened for outbound traffic. You can adjust this configuration accordingly to your open ports.
Open digitalocean_firewall.tf:
- nano digitalocean_firewall.tf
Add the following configuration:
resource "digitalocean_firewall" "do_firewall" {
  name  = "testing-terraform-firewall"
  tags  = ["terraform-testing"]

  inbound_rule {
      protocol                = "tcp"
      port_range              = "22"
      source_addresses        = ["0.0.0.0/0", "::/0"]
    }
  inbound_rule {
      protocol                = "tcp"
      port_range              = "80"
      source_addresses        = ["0.0.0.0/0", "::/0"]
    }
  inbound_rule {
      protocol                = "tcp"
      port_range              = "443"
      source_addresses        = ["0.0.0.0/0", "::/0"]
    }

  outbound_rule {
      protocol                = "tcp"
      port_range              = "all"
      destination_addresses   = ["0.0.0.0/0", "::/0"]
    }
  outbound_rule {
      protocol                = "udp"
      port_range              = "all"
      destination_addresses   = ["0.0.0.0/0", "::/0"]
    }
  outbound_rule {
      protocol                = "icmp"
      destination_addresses   = ["0.0.0.0/0", "::/0"]
    }
}
These rules replicate the state of the existing example firewall. If you’d like to limit traffic to different IP addresses, different ports, or different protocol, you can adjust the file to replicate your existing firewall.
Save and close the file.
After you’ve updated your Terraform files, you’ll use the plan command to see if changes you made replicate the state of existing assets on DigitalOcean.
The terraform plan command is used as a dry run. With this command, you can check whether the changes Terraform is going to make are the changes you want to make. It is a good idea to always run this command for confirmation before applying changes.
Run terraform plan with the following:
- terraform plan -var "do_token=$DO_TOKEN"
If no changes are detected, the output will look similar to this:
OutputNo changes. Infrastructure is up-to-date.
If changes are detected, the Terraform output will display them for you to review and adjust accordingly.
You’ve successfully imported existing DigitalOcean assets in Terraform, and now you can make changes to your infrastructure through Terraform without the risk of accidentally deleting or modifying existing assets.
Step 4 — Creating New Assets via Terraform
In this step, you’ll add two additional Droplets to your existing infrastructure. Adding assets this way to your existing infrastructure can be useful, for example, if you have a live website and don’t want to make any potentially breaking changes to that website while working on it. Instead you can add a Droplet to use as a development environment and work on your project in the same environment as the production Droplet, without any of the potential risk.
Open digitalocean_droplet.tf to add the rules for your new Droplets:
- nano digitalocean_droplet.tf
Add the highlighted lines to your file:
resource "digitalocean_droplet" "do_droplet" {
    image   = "ubuntu-20-04-x64"
    name    = "testing-terraform"
    region  = "fra1"
    size    = "s-1vcpu-1gb"
    tags    = ["terraform-testing"]
    count   = "1"
}

resource "digitalocean_droplet" "do_droplet_new" {
    image   = "ubuntu-20-04-x64"
    name    = "testing-terraform-${count.index}"
    region  = "fra1"
    size    = "s-1vcpu-1gb"
    tags    = ["terraform-testing"]
    count   = "2"
}
You can use the count meta-argument to tell Terraform how many Droplets with the same specifications you want. These new Droplets will also be added to your existing firewall as you specify the same tag as per your firewall.
Apply these rules to check the changes you’re specifying in digitalocean_droplet.tf:
- terraform plan -var "do_token=$DO_TOKEN"
Verify that the changes you want to make are replicated in the output of this command.
You’ll see output similar to the following:
. . .
[secondary_label Output]
# digitalocean_droplet.do_droplet_new[1] will be created
  + resource "digitalocean_droplet" "do_droplet_new" {
      + backups              = false
      + created_at           = (known after apply)
      + disk                 = (known after apply)
      + id                   = (known after apply)
      + image                = "ubuntu-20-04-x64"
      + ipv4_address         = (known after apply)
      + ipv4_address_private = (known after apply)
      + ipv6                 = false
      + ipv6_address         = (known after apply)
      + ipv6_address_private = (known after apply)
      + locked               = (known after apply)
      + memory               = (known after apply)
      + monitoring           = false
      + name                 = "testing-terraform-1"
      + price_hourly         = (known after apply)
      + price_monthly        = (known after apply)
      + private_networking   = true
      + region               = "fra1"
      + resize_disk          = true
      + size                 = "s-1vcpu-1gb"
      + status               = (known after apply)
      + tags                 = [
          + "terraform-testing",
        ]
      + urn                  = (known after apply)
      + vcpus                = (known after apply)
      + volume_ids           = (known after apply)
    }

Plan: 2 to add, 1 to change, 0 to destroy.
Once you’re satisfied with the output, use the terraform apply command to apply the changes you’ve specified to the state of the configuration:
- terraform apply -var "do_token=$DO_TOKEN"
Confirm the changes by entering yes on the command line. After successful execution, you’ll see output similar to the following:
Output. . .
digitalocean_droplet.do_droplet_new[1]: Creating...
digitalocean_droplet.do_droplet_new[0]: Creating...
digitalocean_firewall.do_firewall[0]: Modifying... [id=FIREWALL-ID]
digitalocean_firewall.do_firewall[0]: Modifications complete after 1s [id=FIREWALL-ID]
digitalocean_droplet.do_droplet_new[0]: Still creating... [10s elapsed]
digitalocean_droplet.do_droplet_new[1]: Still creating... [10s elapsed]
digitalocean_droplet.do_droplet_new[0]: Creation complete after 16s [id=DROPLET-ID]
digitalocean_droplet.do_droplet_new[1]: Still creating... [20s elapsed]
digitalocean_droplet.do_droplet_new[1]: Creation complete after 22s [id=DROPLET-ID]
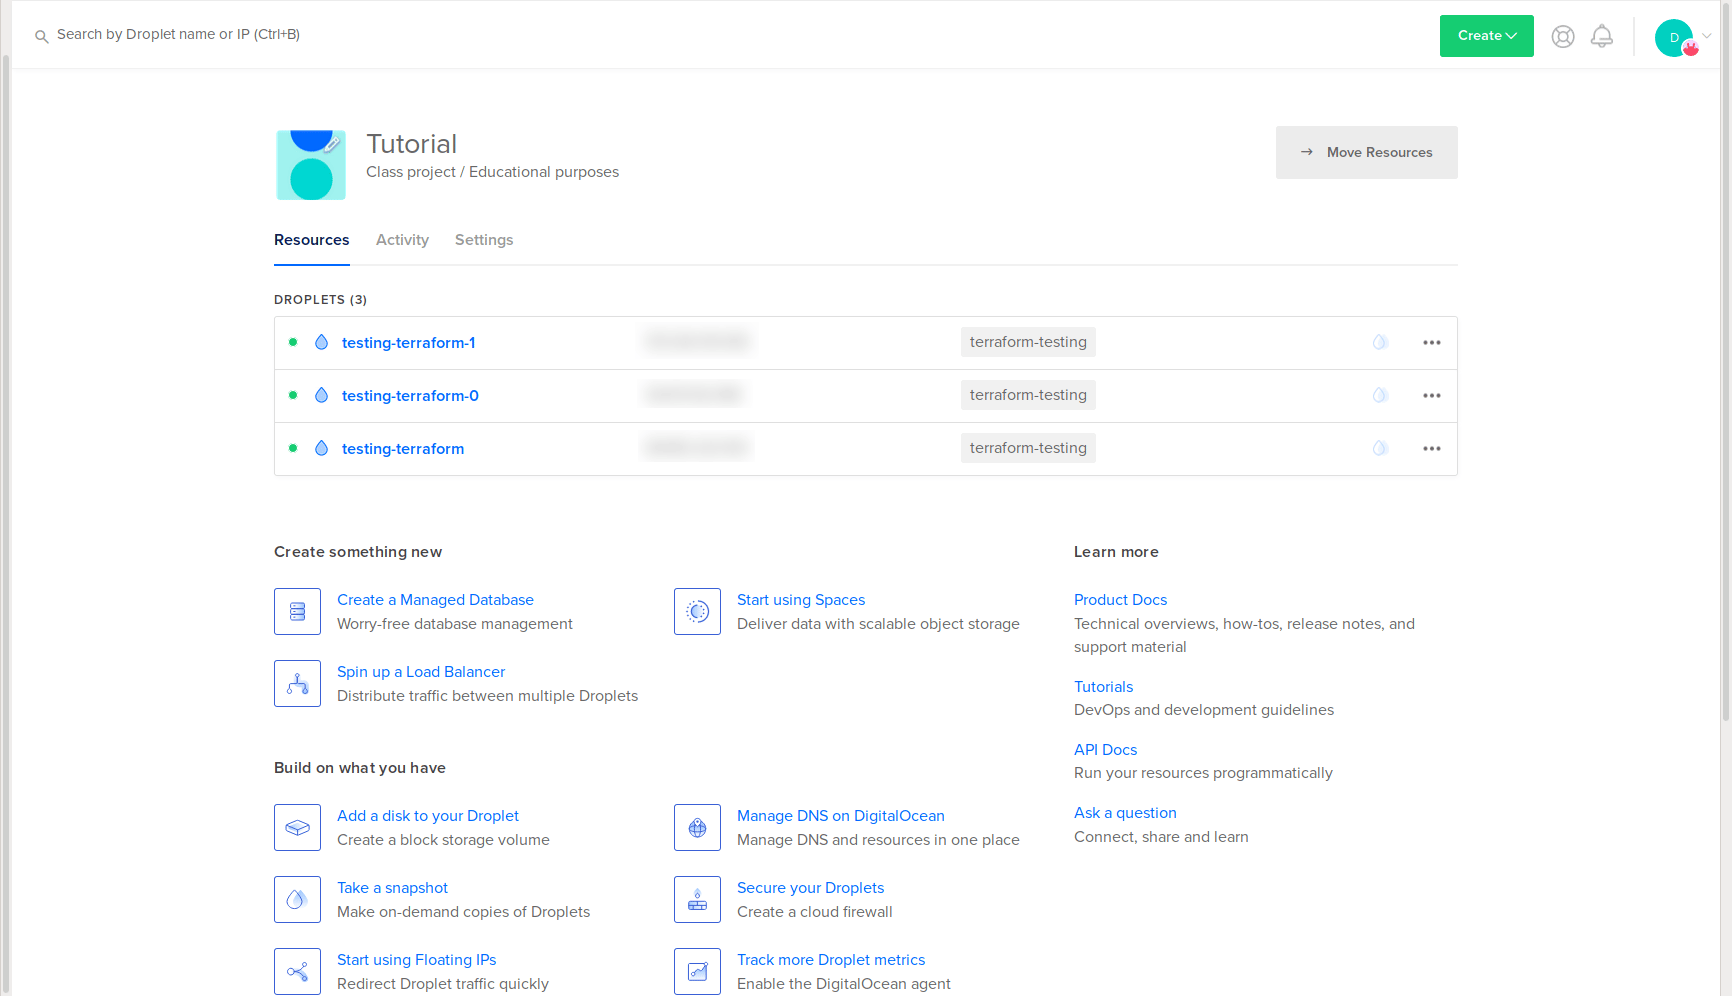
Apply complete! Resources: 2 added, 1 changed, 0 destroyed.
You’ll see two new Droplets in your DigitalOcean web panel:
You’ll also see them attached to your existing firewall:
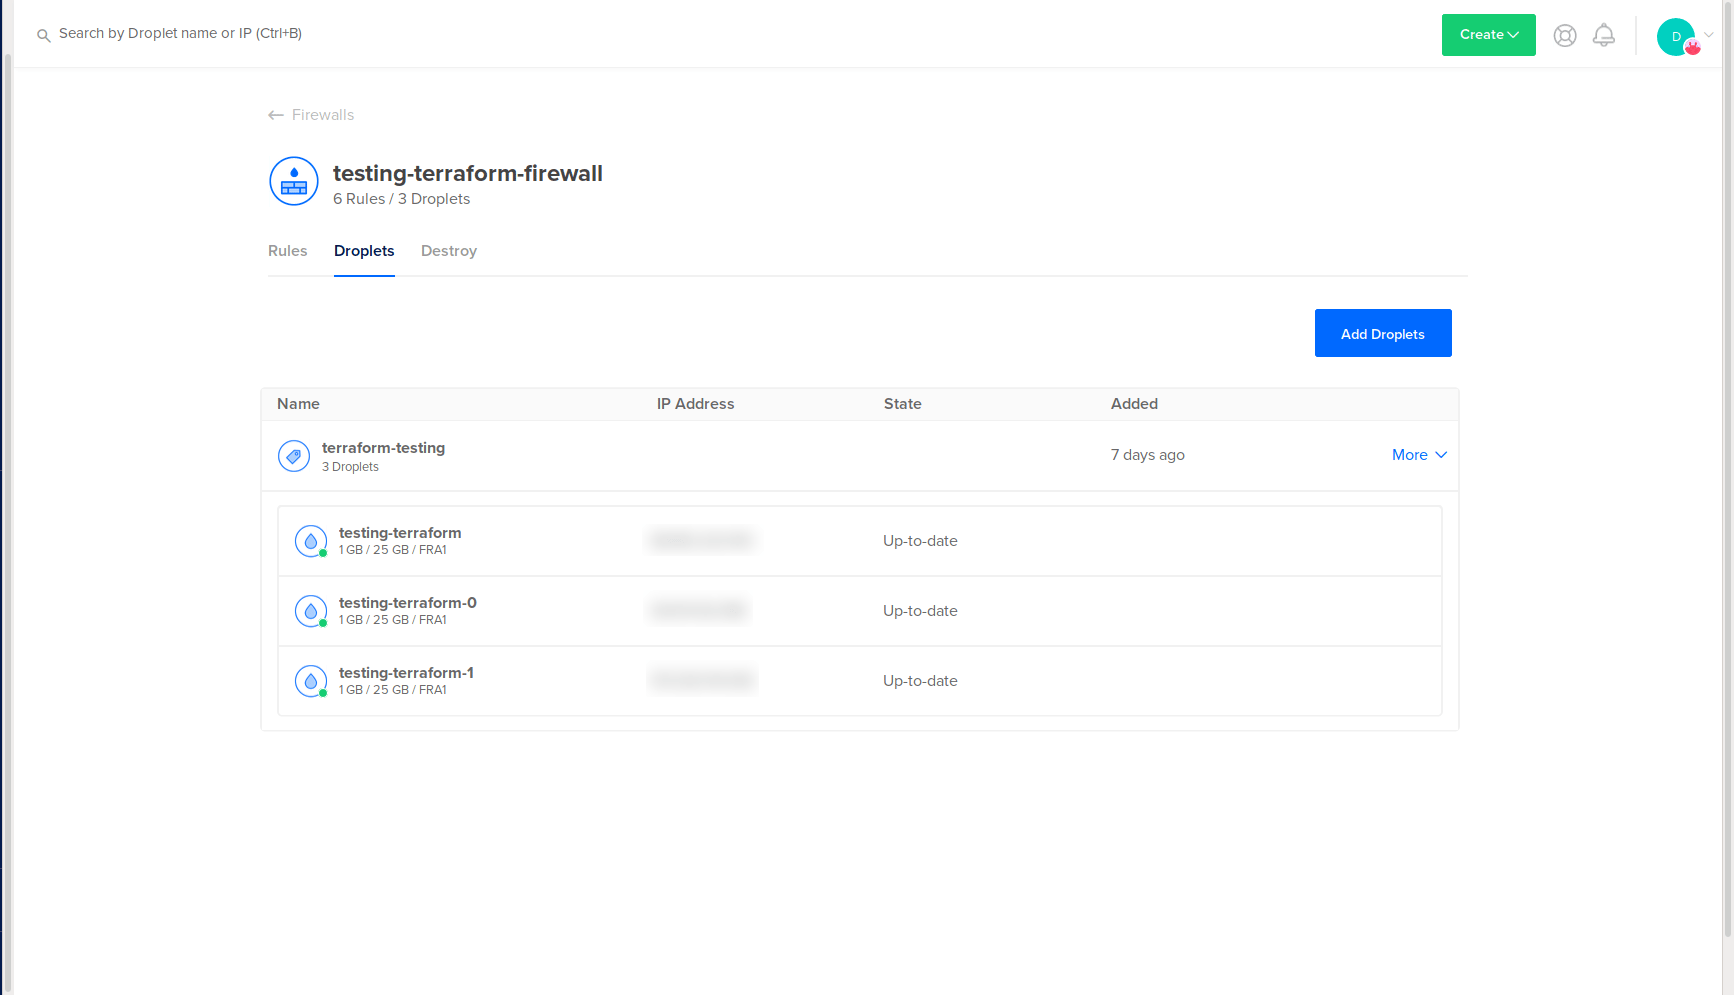
You’ve created new assets with Terraform using your existing assets. To learn how to destroy these assets, you can optionally complete the next step.
Step 5 — Destroying Imported and Created Assets (Optional)
In this step, you’ll destroy the assets that you’ve imported and created by using Terraform’s destroy option.
To destroy assets that are handled by Terraform, execute the following command:
- terraform destroy -var "do_token=${DO_TOKEN}"
Terraform will ask you to confirm if you wish to destroy the Droplets and firewall. This will destroy all assets you imported and created via Terraform, so be sure that you wish to proceed before typing yes.
The output will look similar to this:
Output. . .
digitalocean_droplet.do_droplet[0]: Destroying... [id=YOUR-DROPLET-ID]]
digitalocean_droplet.do_droplet_new[0]: Destroying... [id=YOUR-DROPLET-ID]
digitalocean_droplet.do_droplet_new[1]: Destroying... [id=YOUR-DROPLET-ID]
digitalocean_firewall.do_firewall[0]: Destroying... [id=YOUR-FIREWALL-ID]
digitalocean_firewall.do_firewall[0]: Destruction complete after 1s
digitalocean_droplet.do_droplet_new[1]: Still destroying... [id=YOUR-DROPLET-ID, 10s elapsed]
digitalocean_droplet.do_droplet[0]: Still destroying... [id=YOUR-DROPLET-ID, 10s elapsed]
digitalocean_droplet.do_droplet_new[0]: Still destroying... [id=YOUR-DROPLET-ID, 10s elapsed]
digitalocean_droplet.do_droplet_new[1]: Still destroying... [id=YOUR-DROPLET-ID, 20s elapsed]
digitalocean_droplet.do_droplet_new[0]: Still destroying... [id=YOUR-DROPLET-ID, 20s elapsed]
digitalocean_droplet.do_droplet[0]: Still destroying... [id=YOUR-DROPLET-ID, 20s elapsed]
digitalocean_droplet.do_droplet_new[1]: Destruction complete after 22s
digitalocean_droplet.do_droplet[0]: Destruction complete after 22s
digitalocean_droplet.do_droplet_new[0]: Destruction complete after 22s

Apply complete! Resources: 0 added, 0 changed, 4 destroyed.
You’ve successfully deleted all assets managed by Terraform.
Conclusion
In this tutorial, you installed Terraform, imported existing assets, created new assets, and optionally destroyed those assets. You can scale this workflow to a larger project, such as deploying a production-ready Kubernetes cluster. Using Terraform you could manage all of the nodes, DNS entries, firewalls, storage, and other assets, as well as use version control to track changes and collaborate with a team.
To explore additional Terraform features, read their documentation. You can also read DigitalOcean’s Terraform content for further tutorials and Q&A.
Thanks for learning with the DigitalOcean Community. Check out our offerings for compute, storage, networking, and managed databases.
About the author(s)
Former Senior Technical Editor at DigitalOcean, with a strong focus on DevOps and System Administration content. Areas of expertise include Terraform, PyTorch, Python, and Django.
Still looking for an answer?
This textbox defaults to using Markdown to format your answer.
You can type !ref in this text area to quickly search our full set of tutorials, documentation & marketplace offerings and insert the link!
Hello,
Thanks for the tutorial. However, I am stuck at importing my droplets. Always receive:
Error: Error importing droplet: GET https://api.digitalocean.com/v2/droplets/DROPLET_ID: 401 Unable to authenticate you
I have double checked and the Application token is correct. Any ideas?
Thanks!
This comment has been deleted
terraform {
  required_providers {
    digitalocean = {
      source  = "digitalocean/digitalocean"
      version = "~> 2.0"
    }
  }
}

provider "digitalocean" {
  token = var.token
}

data "digitalocean_droplets" "all_droplets" {}

output "fetched_droplets" {
  value =  [
    for droplet in data.digitalocean_droplets.all_droplets.droplets : {
        name = droplet.name
        id = droplet.id
        ip = droplet.ipv4_address
        region = droplet.region
        size = droplet.size
        image = droplet.image
    }
  ]
}
Use data block to get the details of all the droplets. You don’t need to install doctl tool to find what all instances availabe.
 This work is licensed under a Creative Commons Attribution-NonCommercial- ShareAlike 4.0 International License.
Become a contributor for community
Get paid to write technical tutorials and select a tech-focused charity to receive a matching donation.

DigitalOcean Documentation
Full documentation for every DigitalOcean product.

Resources for startups and AI-native businesses
The Wave has everything you need to know about building a business, from raising funding to marketing your product.
The developer cloud
Scale up as you grow — whether you're running one virtual machine or ten thousand.

Start building today
From GPU-powered inference and Kubernetes to managed databases and storage, get everything you need to build, scale, and deploy intelligent applications.
