By Paddy Sherry and Brian Hogan

Introduction
Nginx excels when processing requests for web pages, but even though a web page can seem fast, the default Nginx configuration will cause Google’s PageSpeed Insights tool to flag inefficiencies in your site and grade it poorly. Google uses the speed of your site as a key factor in determining your site’s search position.
In this tutorial you’ll make quick edits to the configuration file for your domain that instantly boost your site’s response speed and its PageSpeed metric. The aim is to achieve a score above 80/100 as this is the threshold above which Google will apply a green marker to your score, signaling a fast site.
First, you’ll enable Gzip compression for specific types of files. Then you’ll configure browser caching for an extra boost. These methods will improve the speed of any site running on Nginx, regardless of the software or CMS it is built with. For example, a slow and underperforming Wordpress install would see instant gains without having to touch a line of the core or pay for expensive performance plugins. This approach works even if the site is running on low-powered shared hosting, as long as the server is Nginx and you can edit the configuration file.
Prerequisites
To complete this tutorial, you will need:
- One Ubuntu 16.04 server set up with this initial server setup tutorial, including a sudo non-root user and a firewall.
- Nginx installed on your server by following the How To Install Nginx on Ubuntu 16.04 tutorial.
Step 1 — Get the Initial PageSpeed Score
Before we make any changes, let’s capture the existing PageSpeed score so we have a performance baseline to compare against once the tutorial is complete. Do this by pasting the site URL into Google’s PageSpeed Insights service and clicking Run Insights.
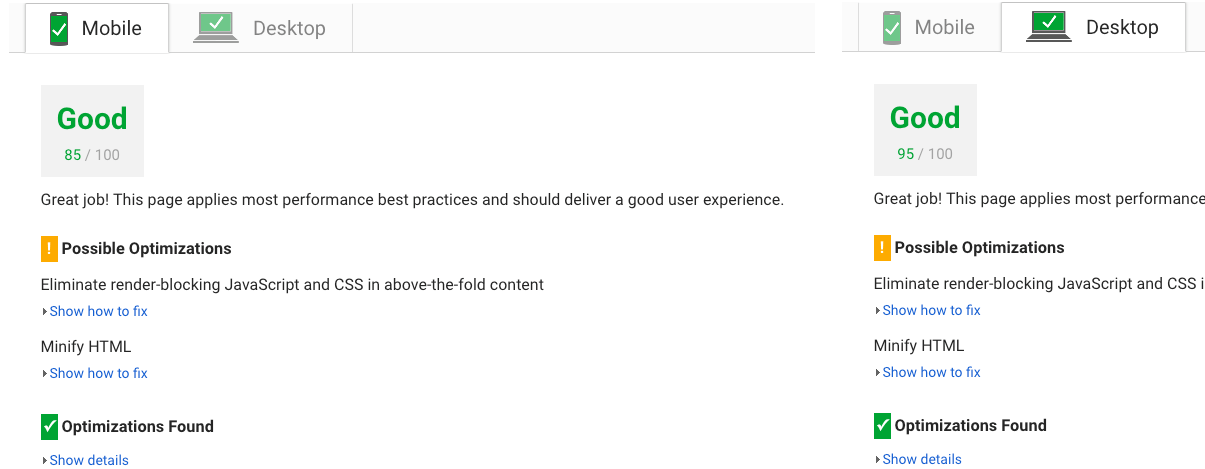
You’ll see results like the following:

In this example, we see a low score of 63 on Mobile and 74 on Desktop because compression and browser caching are not configured correctly on the server. By the end of this tutorial, these two items will be resolved on all device types via Nginx configuration changes.
Note: In some cases, the default Nginx configuration may already have Gzip compression and caching enabled in the global configuration file, resulting in what looks like a perfect PageSpeed score. If that’s the case, keep reading, as the defaults aren’t quite good enough for a real-world setup.
Let’s start by configuring Nginx to compress some responses.
Step 2 — Enabling Compression
CSS, JavaScript and image files can be large, increasing the amount of data that users have to download. Compression means that these assets are reduced in size to a more compact version that is smaller but still contains all of the required data. Gzip is one option for performing this compression on Nginx. It is available in all major Linux distributions and just needs to be enabled and configured correctly. With Gzip compression enabled, browsers can download static assets quicker, which is why the PageSpeed tool flags it as something that needs to be addressed.
To enable compression, open the Nginx configuration file for your site in nano or your favorite text editor. We’ll use the default file in this example:
- sudo nano /etc/nginx/sites-available/default
Locate the server configuration block, which will look like this:
server {
    listen 80 default_server;
    listen [::]:80 default_server;
    . . .
}
Let’s add a series of snippets to configure compression.
First, enable Gzip compression and set the compression level:
server {
    listen 80 default_server;
    listen [::]:80 default_server;

    gzip on;
    gzip_comp_level    5;
You can choose a number between 1 and 9 for this value. 5 is a perfect compromise between size and CPU usage, offering about a 75% reduction for most ASCII files (almost identical to level 9).
Next, tell Nginx not to compress anything that’s already small and unlikely to shrink much further. The default is 20 bytes, which is bad as it usually leads to larger files after compression. Set it to 256 instead:
...
    gzip_comp_level    5;
    gzip_min_length    256;
Next, tell Nginx to compress data even for clients that are connecting to us via proxies like CloudFront:
...
    gzip_min_length    256;
    gzip_proxied       any;
Then tell these proxies to cache both the compressed and regular version of a resource whenever the client’s Accept-Encoding capabilities header varies. This avoids the issue where a non-Gzip capable client, which is extremely rare today, would display gibberish if their proxy gave them the compressed version.
...
    gzip_proxied       any;
    gzip_vary          on;
Lastly, specify the MIME-types for the output you want to compress. We’ll compress images, JSON data, fonts, and other common file types:
...
    gzip_vary          on;

    gzip_types
    application/atom+xml
    application/javascript
    application/json
    application/ld+json
    application/manifest+json
    application/rss+xml
    application/vnd.geo+json
    application/vnd.ms-fontobject
    application/x-font-ttf
    application/x-web-app-manifest+json
    application/xhtml+xml
    application/xml
    font/opentype
    image/bmp
    image/svg+xml
    image/x-icon
    text/cache-manifest
    text/css
    text/plain
    text/vcard
    text/vnd.rim.location.xloc
    text/vtt
    text/x-component
    text/x-cross-domain-policy;
    # text/html is always compressed by gzip module
When you’re done, the entire section should look like the following example:
server {
    listen 80 default_server;
    listen [::]:80 default_server;

    gzip on;
    gzip_comp_level    5;
    gzip_min_length    256;
    gzip_proxied       any;
    gzip_vary          on;

    gzip_types
    application/atom+xml
    application/javascript
    application/json
    application/ld+json
    application/manifest+json
    application/rss+xml
    application/vnd.geo+json
    application/vnd.ms-fontobject
    application/x-font-ttf
    application/x-web-app-manifest+json
    application/xhtml+xml
    application/xml
    font/opentype
    image/bmp
    image/svg+xml
    image/x-icon
    text/cache-manifest
    text/css
    text/plain
    text/vcard
    text/vnd.rim.location.xloc
    text/vtt
    text/x-component
    text/x-cross-domain-policy;
    # text/html is always compressed by gzip module
}
Save and close the file.
You’ve added many lines to the configuration file, and there is always the chance that there’s a missing character or semicolon that could break things. To make sure your file has no errors at this point, test the Nginx configuration:
- sudo nginx -t
If you’ve made the changes exactly as stated in this tutorial, you’ll see no error messages.
This change will provide the biggest acceleration in your site speed, but you can also configure Nginx to leverage browser caching, which will squeeze additional performance out of the server.
Step 3 — Configuring Browser Caching
The first time you visit a domain, these files are downloaded and stored in the browser’s cache. On subsequent visits, the browser can serve the local versions instead of downloading the files again. This enables the web page to load much faster as it only needs to retrieve the data that has changed since the last visit. It offers a much better experience for users and is the reason Google’s PageSpeed Insights recommends that it be implemented.
Once again, open the default Nginx configuration file in your editor:
- sudo nano /etc/nginx/sites-available/default
You will add a small piece of code that will tell browsers to store CSS, JavaScript, images, and PDF files in their cache for a period of seven days.
Insert the following snippet inside the server block directly after the previous code for Gzip compression:
...
# text/html is always compressed by gzip module

location ~*  \.(jpg|jpeg|png|gif|ico|css|js|pdf)$ {
    expires 7d;
}
Note: This is a configuration for content that change frequently. If you are running a simple blog for which the there is minimal development activity, there is no point in forcing new downloads every week. Instead, you can tell browsers to cache assets for a longer period of time, like 30 days or more.
The final Nginx configuration file should look like this:
server {
    listen 80 default_server;
    listen [::]:80 default_server;

    gzip on;
    gzip_comp_level    5;
    gzip_min_length    256;
    gzip_proxied       any;
    gzip_vary          on;

    gzip_types
    application/atom+xml
    application/javascript
    application/json
    application/ld+json
    application/manifest+json
    application/rss+xml
    application/vnd.geo+json
    application/vnd.ms-fontobject
    application/x-font-ttf
    application/x-web-app-manifest+json
    application/xhtml+xml
    application/xml
    font/opentype
    image/bmp
    image/svg+xml
    image/x-icon
    text/cache-manifest
    text/css
    text/plain
    text/vcard
    text/vnd.rim.location.xloc
    text/vtt
    text/x-component
    text/x-cross-domain-policy;
    # text/html is always compressed by gzip module

    location ~*  \.(jpg|jpeg|png|gif|ico|css|js|pdf)$ {
        expires 7d;
    }
}
Save and close the file to exit. Ensure the configuration has no errors:
- sudo nginx -t
Then restart Nginx to apply these new directives for incoming requests.
- sudo systemctl restart nginx
You’ve tailored Nginx to deliver better PageSpeed scores. Let’s see how these changes affect our PageSpeed.
Step 4 — Measure the Results
To check how many points these configuration changes have elevated your PageSpeed score by, run your site through the PageSpeed Insights tools once more by pasting the URL and clicking Run Insights. You will see that compression and browser caching warnings are gone:
Compare the new score against your initial baseline metric. Upon completing this tutorial, you should have a grade that is at least 10 points higher than before.
Our goal was to have a score that is above 80. If your site is still below this threshold, there are other things you need to pay attention to. PageSpeed Insights will detail exactly what these are and show you how to fix them if you click on the Show how to fix link for each issue . The exact steps vary for each site and are outside the scope of this tutorial.
Conclusion
You’ve accelerated your website by making simple changes to the Nginx configuration. Your PageSpeed score is now much better and the site is loading a lot quicker. This will make users happier and increase the quality of your site in the eyes of Google. PageSpeed is a very important ranking signal, and you are now demonstrating that your domain is offering a pleasant experience to visitors.
Changing your Nginx configuration is only one method of improving PageSpeed and may not be enough on its own. You still need to write performant code, cache things appropriately, serve assets via a Content Delivery Network (CDN), and use minification where possible to keep things fast.
Thanks for learning with the DigitalOcean Community. Check out our offerings for compute, storage, networking, and managed databases.
About the author(s)
Director of LeaderInternet.com. Blazing fast Laravel and October CMS development.
Managed the Write for DOnations program, wrote and edited community articles, and makes things on the Internet. Expertise in DevOps areas including Linux, Ubuntu, Debian, and more.
Still looking for an answer?
This textbox defaults to using Markdown to format your answer.
You can type !ref in this text area to quickly search our full set of tutorials, documentation & marketplace offerings and insert the link!
Hello Team,
This is nice tutorial but we are using Ubuntu 14.04.5 so is this possible for my ubuntu? And if this is possible can u explain how can I achieve this?
I have the same on StackOverflow , but google page speed insights says me, that for some files expiration not specified, help plesae
Hello,
This works fine until I add location ~* \.(jpg|jpeg|png|gif|ico|css|js|pdf)$ { expires 7d; }
When I add this, my site no longer shows images and css, … Any idea what might be wrong?
With kind regards, Nathalie
 This work is licensed under a Creative Commons Attribution-NonCommercial- ShareAlike 4.0 International License.
Become a contributor for community
Get paid to write technical tutorials and select a tech-focused charity to receive a matching donation.

DigitalOcean Documentation
Full documentation for every DigitalOcean product.

Resources for startups and AI-native businesses
The Wave has everything you need to know about building a business, from raising funding to marketing your product.
The developer cloud
Scale up as you grow — whether you're running one virtual machine or ten thousand.

Start building today
From GPU-powered inference and Kubernetes to managed databases and storage, get everything you need to build, scale, and deploy intelligent applications.
