By Alex Wafula and Brian Hogan
Not using Ubuntu 16.04?
Choose a different version or distribution.
Introduction
SimpleSAMLphp is an open-source PHP authentication application that provides support for SAML 2.0 as a Service Provider (SP) or Identity Provider (IdP).
SAML (Security Assertion Markup Language) is a secure XML-based communication mechanism for exchanging authentication and authorization data between organizations and applications. It’s often used to implement Web SSO (Single Sign On). This eliminates the need to maintain multiple authentication credentials across multiple organizations. Simply put, you can use one identity, like a username and password, to access multiple applications.
An instance of SimpleSAMLphp connects to an authentication source, which is an identity provider like LDAP or a database of users. It authenticates users against this authentication source before granting access to resources made available from linked Service Providers.
In this tutorial you’ll install SimpleSamplPHP and configure it to use a MySQL database as an authentication source. You’ll store users and encrypted passwords in the MySQL database and test that you can use those users to log in.
Prerequisites
- One Ubuntu 16.04 server set up by following the Ubuntu 16.04 initial server setup guide, including a sudo non-root user and a firewall.
- Apache, MySQL, and PHP installed on the server by following How To Install Linux, Apache, MySQL, PHP (LAMP stack) on Ubuntu 16.04 .
- A domain name configured to point to your server. You can learn how to point domains to DigitalOcean Droplets by following the How To Set Up a Host Name with DigitalOcean tutorial.
- A Virtual Host configured for the domain using the
ServerNamedirective. Follow How To Set Up Apache Virtual Hosts on Ubuntu 16.04 to set one up for your domain name. - A Let’s Encrypt certificate set up for the domain you’ve configured by following the How To Secure Apache with Let’s Encrypt on Ubuntu 16.04 guide.
Step 1 — Downloading and Installing SimpleSAMLphp
Installing SimpleSAMLphp involves a couple of steps. We have to download the software itself as well as a few additional components and prerequisites. We’ll also need to make some changes to our Virtual Host configuration.
Log in to your server if you’re not logged in already.
Download SimpleSAMLphp from the project’s website. SimpleSAMLphp always links the latest stable version of their software to the same URL. This means we can get the latest version by typing this:
- wget https://simplesamlphp.org/download?latest
This will download a compressed file called download?latest which contains SimpleSAMLphp. Extract the contents with the tar command:
- tar zxf download?latest
The files will be extracted to a new directory labeled simplesamlphp-1.x.y, where x.y is the current version number. Use the ls command to identify the file:
- ls
You’ll see the filename displayed:
Ouptutsimplesamlphp-1.14.14
Now, copy the contents of the directory to /var/simplesamlphp using the cp command. Be sure to replace the version number with the version you have:
- sudo cp -a simplesamlphp-1.x.y/. /var/simplesamlphp/
The -a switch ensures that the file permissions are copied along with the files and folders. The dot at the end of the source file ensures everything in the source directory including hidden files gets copied to the destination directory.
Note: If you need to install the files in a different location, you’ll need to update several files. Refer to SimpleSAMLphp’s official installation documentation for specifics.
There are a few additional software packages SimpleSAMLphp needs, including PHP extensions to work with XML, multi-byte strings, curl, and LDAP. It also requires memcached. Install these using your package manager.
First, update your package list:
- sudo apt-get update
Then install the packages:
- sudo apt-get install php-xml php-mbstring php-curl php-memcache php-ldap memcached
Once the installation completes, restart Apache to activate the new PHP extensions:
- sudo systemctl restart apache2
Now that SimpleSAMLphp is installed, let’s configure Apache to serve the files.
Step 2 — Configuring Apache to Serve SimpleSAMLphp
You’ve already configured a domain and pointed at this server, and you’ve set up a Virtual Host to work with HTTPS by securing Apache with Let’s Encrypt. Let’s use that to serve SimpleSAMLphp.
The only SimpleSAMLphp directory that needs to be visible to the web is /var/simplesamlphp/www. To expose it to the Web, edit the Virtual Host SSL Apache configuration file for your domain.
If your Virtual Host config file is named your_domain.conf, Let’s Encrypt created a new config file called your_domain-le-ssl.conf that handles HTTPS requests for your domain. Open the SSL config file with the following command to edit the file. Be sure to replace your_domain with the actual name of the file:
- sudo nano /etc/apache2/sites-available/your_domain-le-ssl.conf
The file should look like the following, although the actual file may have more descriptive comments:
<IfModule mod_ssl.c>
<VirtualHost *:443>
        ServerName your_domain

        ServerAdmin webmaster@localhost
        DocumentRoot /var/www/html

        ErrorLog ${APACHE_LOG_DIR}/error.log
        CustomLog ${APACHE_LOG_DIR}/access.log combined

SSLCertificateFile /etc/letsencrypt/live/your_domain/fullchain.pem
SSLCertificateKeyFile /etc/letsencrypt/live/your_domain/privkey.pem
Include /etc/letsencrypt/options-ssl-apache.conf
</VirtualHost>
</IfModule>
The ServerName directive here defines the base domain that should match for this virtual host definition. This should be the domain name you set up an SSL certificate for in the Prerequisites section. Let’s add an Alias directive that gives control to SimpleSAMLphp for all URLs matching https://your_domain/simplesaml/* Do that by adding the following line to the config file:
...
[label /etc/apache2/sites-available/your_domain-le-ssl.conf]
  ServerAdmin webmaster@localhost
  DocumentRoot /var/www/html

  Alias /simplesaml /var/simplesamlphp/www

...
This means all URLs matching domain_name/simplesaml/* will be directed to the /var/simplesamlphp/www directory giving SimpleSAMLphp control.
Next, we’ll grant access to the /var/simplesamlphp/www directory by specifying a Require all granted access control for it. This will make the SimpleSAMLphp service accessible over the Web. Do that by adding the following to the config file:
...
  Alias /simplesaml /var/simplesamlphp/www
  <Directory /var/simplesamlphp/www/>
      Require all granted
  </Directory>
...
Save and close the file. Restart Apache for the changes to take effect:
- sudo systemctl restart apache2
Now that Apache is configured to serve the application files, let’s configure SimpleSAMLphp.
Step 3 — Configuring SimpleSAMLphp
Next, we need to make several changes to the core SimpleSAMLphp configuration located at /var/simplesamlphp/config/config.php. Open the file in your editor:
- nano /var/simplesamlphp/config/config.php
Set the administrator password by locating the 'auth.adminpassword' line and replacing the default value of 123 with a more secure password. This password lets you access some of the pages in your SimpleSAMLphp installation web interface:
. . .
'auth.adminpassword'        => 'your_admin_password',
. . .
Next, set a secret salt, which should be a randomly-generated string of characters. Some parts of SimpleSAMLphp use this salt to create cryptographically secure hashes. You’ll get errors if the salt isn’t changed from the default value.
You can use the OpenSSL rand function to generate a random string to use as your secret salt string. Open a new terminal, connect to your server again, and run the following command to generate this string:
- openssl rand -base64 32
The -base64 32 option ensures a Base64 encoded string that is 32 characters long.
Then, in the configuration file, locate the 'secretsalt' entry and replace defaultsecretsalt with the string you generated:
. . .
'secretsalt' => 'your_generated_salt',
. . .
Then set the technical contact information. This information will be available in the generated metadata, and SimpleSAMLphp will send automatically-generated error reports to the email address you specify. Locate the following section:
. . .
'technicalcontact_name'     => 'Administrator',
'technicalcontact_email'    => 'na@example.org',
. . .
Replace Administrator and na@example.org with appropriate values.
Then set the timezone you would like to use. Locate this section:
. . .
'timezone' => null,
. . .
Replace null with a preferred time zone from this list of timezones for PHP. Be sure to enclose the value in quotes:
. . .
'timezone' => 'America/New_York',
. . .
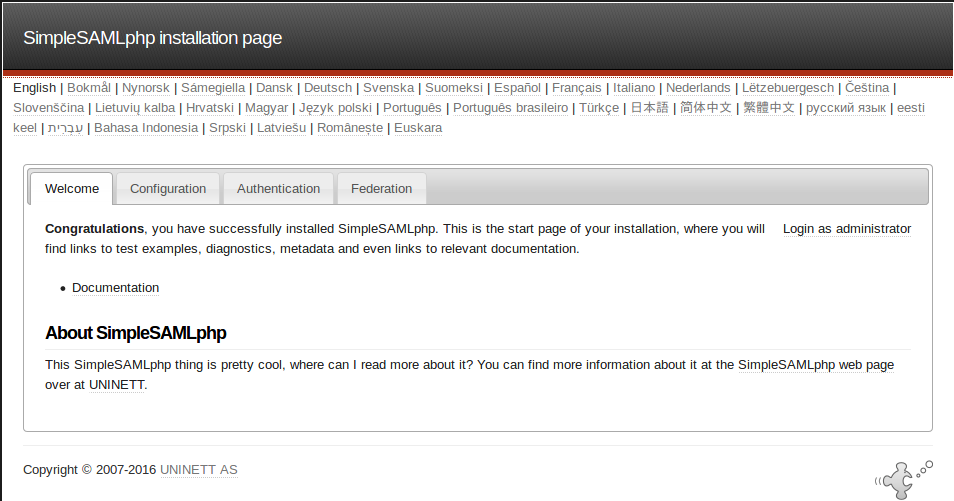
Save and close the file. You should now be able to access the site in your browser by visiting https://your_domain/simplesaml. You’ll see the following screen in your browser:
To make sure your PHP installation meets all requirements for SimpleSAMLphp to run smoothly, select the Configuration tab and click on the Login as administrator link. Then use the administrator password you set in the configuration file in Step 3.
Once logged in, you’ll see a list of required and optional PHP extensions used by SimpleSAMLphp and which of those are already installed on your system. If your setup has all PHP extensions installed, your screen will look like this:
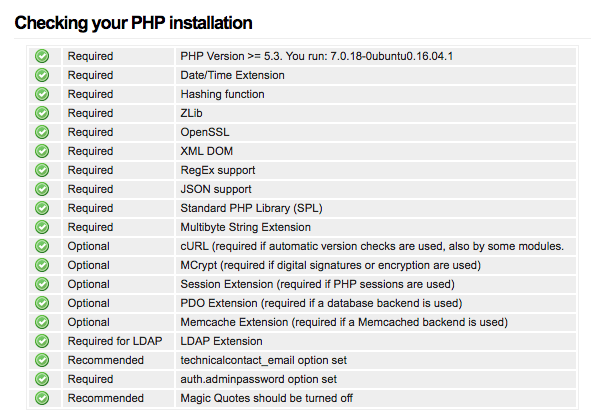
If there are components missing, review this tutorial and install the missing components before you move on.
You’ll also see a link that says Sanity check of your SimpleSAMLphp setup. Click this link to get a list of checks applied to your setup to see whether they are successful.
Let’s move on to configure an authentication source for for SimpleSAMLphp.
Step 4 — Configuring the Authentication Source
Now that we have SimpleSAMLphp installed and set up, let’s configure an authentication source so we can authenticate users. We will use a MySQL database to store a list of usernames and passwords to authenticate against.
To get started, log in to the MySQL root account:
- mysql -u root -p
You will be prompted for the MySQL root account password. Provide it to proceed.
Next, create a database that will act as the authentication source. We’ll call it auth. Feel free to name yours differently:
- CREATE DATABASE auth DEFAULT CHARACTER SET utf8 COLLATE utf8_unicode_ci;
Now let’s create a separate MySQL user to exclusively operate on our auth database. From a management and security standpoint, it is a good practice to create one-function databases and accounts. We will name our user authuser. Execute the following command to create the user, set a password, and grant it access to our auth database. Remember to provide a strong password here for your new database user.
- GRANT ALL ON auth.* TO 'authuser'@'localhost' IDENTIFIED BY 'your_mysql_auth_user_password';
Now create a users table, which will be made up of two fields: username and password. For some additional security, we are going to use the MySQL AES_ENCRYPT() function to encrypt the password string so we don’t store the passwords in plain text. This function encrypts a string and returns a binary string.
- CREATE TABLE auth.users(username VARCHAR(30), password VARBINARY(30));
Then insert three users into the newly created table. This is where we’ll use the AES_ENCRYPT() function to encrypt the values for the password field. You need to provide a string that’s used as an encryption key. Make sure to replace this with your own string, which can be any string you’d like, as long as it’s complex.
- INSERT INTO auth.users(username, password) VALUES
- ('user1', AES_ENCRYPT('user1pass','your_secret_key')),
- ('user2', AES_ENCRYPT('user2pass','your_secret_key')),
- ('user3', AES_ENCRYPT('user3pass','your_secret_key'));
Use the same key for each user, and be sure to remember the key so you can use it again to create additional users in the future. You’ll also use this secret key in the SimpleSAMLphp configuration so you can decrypt the passwords to compare them with the ones people enter.
We need to flush the privileges so that the current instance of MySQL knows about the recent privilege changes we’ve made:
- FLUSH PRIVILEGES;
Exit out of the MySQL prompt by typing:
- exit
To enable the identity provider functionality in SimpleSAMLphp, we need to edit the /var/simplesamlphp/config/config.php file. There are several options available but since this guide focuses on SAML 2.0 support, we want to enable the enable.saml20-idp option. To do that, open the /var/simplesamlphp/config/config.phpand enable SAML 2.0 support:
- nano /var/simplesamlphp/config/config.php
Locate this section of the file:
...
'enable.saml20-idp' => false,
...
Replace false with true. Then save the file and exit the editor.
Now that we have the identity provider functionality enabled, we need to indicate the authentication module to be used. Since we have a users table on a MySQL database, we are going to use the SQL Authentication Module. Open the authsources configuration file:
- nano /var/simplesamlphp/config/authsources.php
Locate the following block, which is commented out:
...
    /*
    'example-sql' => array(
        'sqlauth:SQL',
        'dsn' => 'pgsql:host=sql.example.org;port=5432;dbname=simplesaml',
        'username' => 'simplesaml',
        'password' => 'secretpassword',
        'query' => 'SELECT uid, givenName, email, eduPersonPrincipalName FROM users WHERE uid = :username AND password = SHA2(CONCAT((SELECT salt FROM users WHERE uid = :username), :password),256);',
    ),
    */
...
This code defines a database connection and a query that SimpleSAMLphp can use to look up a user in a database table called users. We need to uncomment it and change the query to look up a user from our table using MySQL’s AES_DECRYPT() function. We’ll need to provide the AES_DECRYPT() function the same key we used to encrypt the passwords in the query.
Modify the section of the file to specify the database connection details and the query:
...
    'example-sql' => array(
        'sqlauth:SQL',
        'dsn' => 'mysql:host=localhost;port=5432;dbname=auth',
        'username' => 'authuser',
        'password' => 'your_mysql_auth_user_password',
        'query' => 'SELECT username FROM users WHERE username = :username AND AES_DECRYPT(password,"your_secret_key") = :password',
    ),
...
Be sure to place the secret key you specified in place of your_secret_key.
Save and close the file. Let’s test our identity provider.
Step 5 — Testing the Identity Provider with the SAML 2.0 SP Demo
You can test the MySQL authentication source you just set up by navigating to the Authentication tab and clicking on the Test configured authentication sources link. You will be presented with a list of authentication sources already configured.

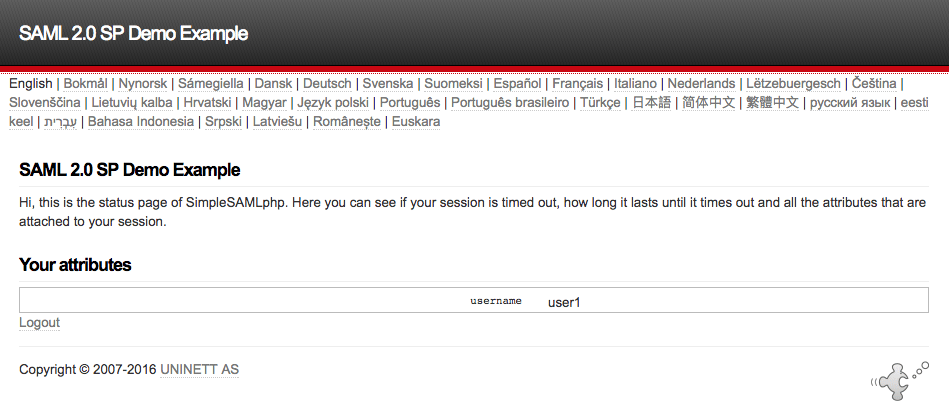
Click example-sql, as this is the provider you configured in the previous step. A prompt to enter a username and password will appear. Enter any of the three test user and password combinations you inserted in the MySQL users table. Try user1 with the password user1pass.
With a successful attempt, you will be presented with the SAML 2.0 SP Demo Example page:
If you’re unable to log in and you know the password is correct, ensure that you used the same key with both the AES_ENCRYPT() function when you created the user, and the AES_DECRYPT() function when you looked up the user.
You can now integrate SimpleSAMLphp with your own applications by following the SimpleSAMLphp API documentation.
Conclusion
You now have the SimpleSAMLphp application appropriately installed and configured on your Ubuntu 16.04 VPS. You can explore more avenues in adding other identity and service providers. SimpleSAMLphp also allows for extensive user interface customization through theming. You can refer to their theming docs for more on that.
Thanks for learning with the DigitalOcean Community. Check out our offerings for compute, storage, networking, and managed databases.
About the author(s)
Managed the Write for DOnations program, wrote and edited community articles, and makes things on the Internet. Expertise in DevOps areas including Linux, Ubuntu, Debian, and more.
Still looking for an answer?
This textbox defaults to using Markdown to format your answer.
You can type !ref in this text area to quickly search our full set of tutorials, documentation & marketplace offerings and insert the link!
Minor typo: ls simplesamplphp-1* Should be: ls simplesamlphp-1* Or better: ls -d simplesamlphp-1*
Thank you so much - this is a really great tutorial. I tried this in December 2018 on an Ubuntu 18.04 machine with SimpleSAMLphp 1.16.2 and have two minor corrections - in case someone else wonders, why it doesn’t work right away:
- In Step 4 when editing /var/simplesamlphp/config/authsources.php make sure the mysql port matches the one currently in use in your system. In my case that’s
'dsn' => 'mysql:host=localhost;port=3306;dbname=auth',instead of port 5432. - Also my installation according to this tutorial threw an exception, in which SimpleSAMLphp couldn’t make a call to the ```‘sqlauth:SQL’,`` module. I found this thread helpful Google Group … apparently the module is disabled by default in newer versions. All I had to add in the /var/simplesamlphp/config/config.php was this:
                'sqlauth' => TRUE,
        ),
Great tutorial - thanks. Two minor updates (after installing it on an Ubuntu 18.04 machine with SimpleSAMLphp 1.16.2):
- Make sure the mysql port matches the one used on your machine, in my case 3306 instead of 5432 in the dns-section.
- Apparently the sqlauth:SQL module is disabled by default in newer versions. I changed this by going into the config.php and adding the following lines of code in the MODULES section:
        'module.enable' => array(
                'sqlauth' => TRUE,
        ),
 This work is licensed under a Creative Commons Attribution-NonCommercial- ShareAlike 4.0 International License.
Become a contributor for community
Get paid to write technical tutorials and select a tech-focused charity to receive a matching donation.

DigitalOcean Documentation
Full documentation for every DigitalOcean product.

Resources for startups and AI-native businesses
The Wave has everything you need to know about building a business, from raising funding to marketing your product.
The developer cloud
Scale up as you grow — whether you're running one virtual machine or ten thousand.

Start building today
From GPU-powered inference and Kubernetes to managed databases and storage, get everything you need to build, scale, and deploy intelligent applications.
