By finid, Mark Drake and Manikandan Kurup
Not using Ubuntu 20.04?
Choose a different version or distribution.
Introduction
Virtual Network Computing, or VNC, is a connection system that allows you to use your keyboard and mouse to interact with a graphical desktop environment on a remote server. This method provides a user-friendly way to manage files, software, and settings on a remote machine, which is useful for users who are not yet comfortable with the command line.
In this guide, you’ll set up a VNC server with TightVNC on an Ubuntu server and connect to it securely through an SSH tunnel. Then, you’ll use a VNC client program on your local machine to interact with your server through a graphical desktop environment.
Key Takeaways:
- Virtual Network Computing (VNC) enables remote control of a server’s graphical desktop environment using your own keyboard and mouse.
- For optimal performance, especially over slower connections, it is best to use a lightweight VNC server and desktop environment.
- Most servers are command-line only, so a graphical desktop environment must be installed before a VNC server can be used.
- Proper VNC setup involves creating a dedicated system user and setting a secure password for remote access.
- A critical security measure is to configure the VNC server to only accept connections from the server itself, preventing direct exposure to the internet.
- To ensure the VNC server runs reliably and starts automatically on boot, it should be configured as a systemd service.
- Since the VNC protocol itself is not encrypted, an SSH tunnel is essential for creating a secure, encrypted connection.
- A VNC client connects to a local port on your machine, which is then securely forwarded to the remote server through the SSH tunnel.
Deploy your applications from GitHub using DigitalOcean App Platform. Let DigitalOcean focus on scaling your app.
Prerequisites
To complete this tutorial, you’ll need:
- One Ubuntu server with a non-root administrative user and a firewall configured with UFW. To set this up, follow our initial server setup guide for Ubuntu.
- A local computer with a VNC client installed. The VNC client you use must support connections over SSH tunnels:
Step 1 — Installing the Desktop Environment and VNC Server
By default, an Ubuntu server does not come with a graphical desktop environment or a VNC server installed, so you’ll begin by installing those.
You have many options when it comes to which VNC server and desktop environment you choose. In this tutorial, you will install packages for the latest Xfce desktop environment and the TightVNC package available from the official Ubuntu repository. Both Xfce and TightVNC are known for being lightweight and fast, which will help ensure that the VNC connection will be smooth and stable even on slower internet connections.
After connecting to your server with SSH, update your list of packages:
- sudo apt update
Now install Xfce along with the xfce4-goodies package, which contains a few enhancements for the desktop environment:
- sudo apt install xfce4 xfce4-goodies
During installation, you may be prompted to choose a default display manager for Xfce. A display manager is a program that allows you to select and log in to a desktop environment through a graphical interface. You’ll only be using Xfce when you connect with a VNC client, and in these Xfce sessions you’ll already be logged in as your non-root Ubuntu user. So for the purposes of this tutorial, your choice of display manager isn’t pertinent. Select either one and press ENTER.
Once that installation completes, install the TightVNC server:
- sudo apt install tightvncserver
Next, run the vncserver command to set a VNC access password, create the initial configuration files, and start a VNC server instance:
- vncserver
You’ll be prompted to enter and verify a password to access your machine remotely:
OutputYou will require a password to access your desktops.

Password:
Verify:
The password must be between six and eight characters long. Passwords more than 8 characters will be truncated automatically.
Once you verify the password, you’ll have the option to create a view-only password. Users who log in with the view-only password will not be able to control the VNC instance with their mouse or keyboard. This is a helpful option if you want to demonstrate something to other people using your VNC server, but this isn’t required.
The process then creates the necessary default configuration files and connection information for the server. Additionally, it launches a default server instance on port 5901. This port is called a display port, and is referred to by VNC as :1. VNC can launch multiple instances on other display ports, with :2 referring to port 5902, :3 referring to 5903, and so on:
OutputWould you like to enter a view-only password (y/n)? n
xauth:  file /home/sammy/.Xauthority does not exist

New 'X' desktop is your_hostname:1

Creating default startup script /home/sammy/.vnc/xstartup
Starting applications specified in /home/sammy/.vnc/xstartup
Log file is /home/sammy/.vnc/your_hostname:1.log
Note that if you ever want to change your password or add a view-only password, you can do so with the vncpasswd command:
- vncpasswd
At this point, the VNC server is installed and running. Now let’s configure it to launch Xfce and give us access to the server through a graphical interface.
Step 2 — Configuring the VNC Server
The VNC server needs to know which commands to execute when it starts up. Specifically, VNC needs to know which graphical desktop environment it should connect to.
The commands that the VNC server runs at startup are located in a configuration file called xstartup in the .vnc folder under your home directory. The startup script was created when you ran the vncserver command in the previous step, but you’ll create your own to launch the Xfce desktop.
Because you are going to be changing how the VNC server is configured, first stop the VNC server instance that is running on port 5901 with the following command:
- vncserver -kill :1
The output will look like this, although you’ll see a different PID:
OutputKilling Xtightvnc process ID 17648
Before you modify the xstartup file, back up the original:
- mv ~/.vnc/xstartup ~/.vnc/xstartup.bak
Now create a new xstartup file and open it in a text editor, such as nano:
- nano ~/.vnc/xstartup
Then add the following lines to the file:
#!/bin/bash
xrdb $HOME/.Xresources
startxfce4 &
The first line is a shebang. In executable plain-text files on *nix platforms, a shebang tells the system what interpreter to pass that file to for execution. In this case, you’re passing the file to the Bash interpreter. This will allow each successive line to be executed as commands, in order.
The first command in the file, xrdb $HOME/.Xresources, tells VNC’s GUI framework to read the server user’s .Xresources file. .Xresources is where a user can make changes to certain settings of the graphical desktop, like terminal colors, cursor themes, and font rendering. The second command tells the server to launch Xfce. Whenever you start or restart the VNC server, these commands will execute automatically.
Save and close the file after adding these lines. If you used nano, do so by pressing CTRL + X, Y, then ENTER.
To ensure that the VNC server will be able to use this new startup file properly, you’ll need to make it executable:
- chmod +x ~/.vnc/xstartup
Then restart the VNC server:
- vncserver -localhost
Notice that this time the command includes the -localhost option, which binds the VNC server to your server’s loopback interface. This will cause VNC to only allow connections that originate from the server on which it’s installed.
In the next step, you’ll establish an SSH tunnel between your local machine and your server, essentially tricking VNC into thinking that the connection from your local machine originated on your server. This strategy will add an extra layer of security around VNC, as the only users who will be able to access it are those that already have SSH access to your server.
You’ll see output similar to this:
OutputNew 'X' desktop is your_hostname:1

Starting applications specified in /home/sammy/.vnc/xstartup
Log file is /home/sammy/.vnc/your_hostname:1.log
With the configuration in place, you’re ready to connect to the VNC server from your local machine.
Step 3 — Connecting to the VNC Desktop Securely
VNC itself doesn’t use secure protocols when connecting. To securely connect to your server, you’ll establish an SSH tunnel and then tell your VNC client to connect using that tunnel rather than making a direct connection.
Create an SSH connection on your local computer that securely forwards to the localhost connection for VNC. You can do this via the terminal on Linux or macOS with the following ssh command:
- ssh -L 59000:localhost:5901 -C -N -l sammy your_server_ip
Here’s what this ssh command’s options mean:
-L 59000:localhost:5901: The-Lswitch specifies that the given port on the local computer (59000) is to be forwarded to the given host and port on the destination server (localhost:5901, meaning port5901on the destination server, defined asyour_server_ip). Note that the local port you specify is somewhat arbitrary; as long as the port isn’t already bound to another service, you can use it as the forwarding port for your tunnel.-C: This flag enables compression which can help minimize resource consumption and speed things up.-N: This option tellssshthat you don’t want to execute any remote commands. This setting is useful when you just want to forward ports.-l sammy your_server_ip: The-lswitch lets you specify the user you want to log in as once you connect to the server. Make sure to replacesammyandyour_server_ipwith the name of your non-root user and your server’s IP address.
Note: This command establishes an SSH tunnel that forwards information from port 5901 on your VNC server to port 59000 on your local machine via port 22 on each machine, the default port for SSH. Assuming you followed the prerequisite Initial Server Setup guide for Ubuntu, you will have added a UFW rule to allow connections to your server over OpenSSH.
This is more secure than simply opening up your server’s firewall to allow connections to port 5901, as that would allow anyone to access your server over VNC. By connecting over an SSH tunnel, you’re limiting VNC access to machines that already have SSH access to the server.
If you are using PuTTY to connect to your server, you can create an SSH tunnel by right-clicking on the top bar of the terminal window, and then clicking the Change Settings… option:
![]()
Find the Connection branch in the tree menu on the left-hand side of the PuTTY Reconfiguration window. Expand the SSH branch and click on Tunnels. On the Options controlling SSH port forwarding screen, enter 59000 as the Source Port and localhost:5901 as the Destination, like this:

Then click the Add button, and then the Apply button to implement the tunnel.
Once the tunnel is running, use a VNC client to connect to localhost:59000. You’ll be prompted to authenticate using the password you set in Step 1.
Once you are connected, you’ll see the default Xfce desktop. It should look something like this:
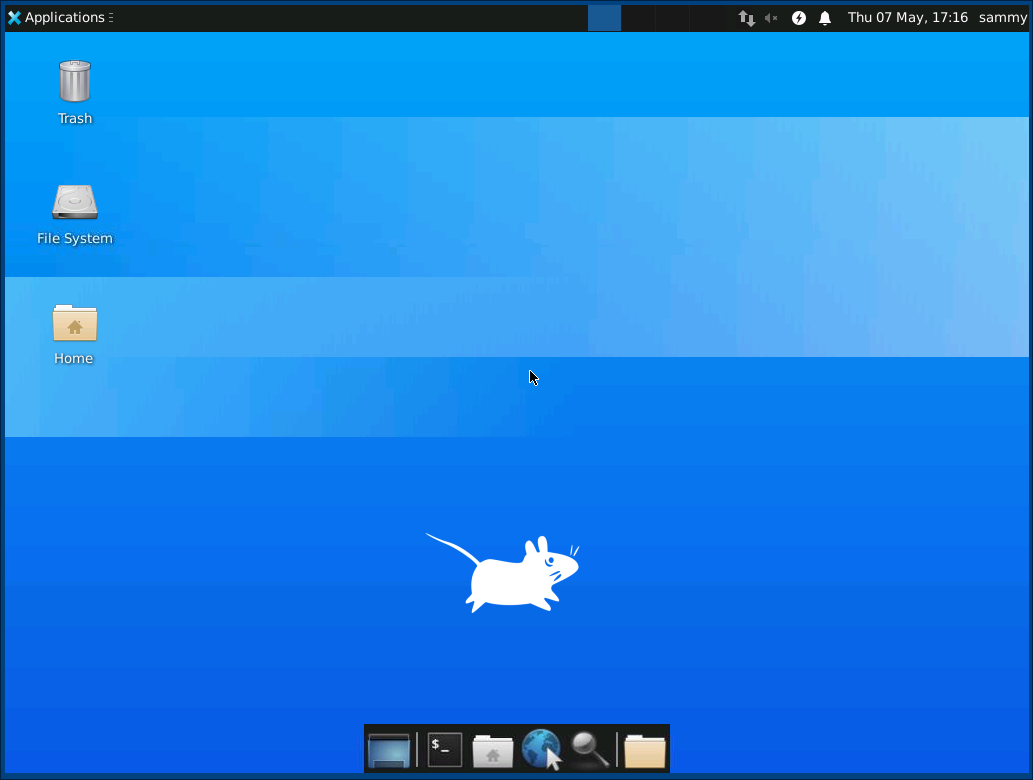
You can access files in your home directory with the file manager or from the command line, as seen here:

Press CTRL+C in your local terminal to stop the SSH tunnel and return to your prompt. This will disconnect your VNC session as well.
Now you can configure your VNC server to run as a systemd service.
Step 4 — Running VNC as a System Service
By setting up the VNC server to run as a systemd service you can start, stop, and restart it as needed, like any other service. You can also use systemd’s management commands to ensure that VNC starts when your server boots up.
First, create a new unit file called /etc/systemd/system/vncserver@.service:
- sudo nano /etc/systemd/system/vncserver@.service
The @ symbol at the end of the name will let us pass in an argument you can use in the service configuration. You’ll use this to specify the VNC display port you want to use when you manage the service.
Add the following lines to the file. Be sure to change the value of User, Group, WorkingDirectory, and the username in the value of PIDFile to match your username:
[Unit]
Description=Start TightVNC server at startup
After=syslog.target network.target

[Service]
Type=forking
User=sammy
Group=sammy
WorkingDirectory=/home/sammy

PIDFile=/home/sammy/.vnc/%H:%i.pid
ExecStartPre=-/usr/bin/vncserver -kill :%i > /dev/null 2>&1
ExecStart=/usr/bin/vncserver -depth 24 -geometry 1280x800 -localhost :%i
ExecStop=/usr/bin/vncserver -kill :%i

[Install]
WantedBy=multi-user.target
The ExecStartPre command stops VNC if it’s already running. The ExecStart command starts VNC and sets the color depth to 24-bit color with a resolution of 1280x800. You can modify these startup options as well to meet your needs. Also, note that the ExecStart command again includes the -localhost option.
Save and close the file.
Next, make the system aware of the new unit file:
- sudo systemctl daemon-reload
Enable the unit file:
- sudo systemctl enable vncserver@1.service
The 1 following the @ sign signifies which display number the service should appear over, in this case the default :1 as was discussed in Step 2.
Stop the current instance of the VNC server if it’s still running:
- vncserver -kill :1
Then start it as you would start any other systemd service:
- sudo systemctl start vncserver@1
You can verify that it started with this command:
- sudo systemctl status vncserver@1
If it started correctly, the output should look like this:
Output● vncserver@1.service - Start TightVNC server at startup
     Loaded: loaded (/etc/systemd/system/vncserver@.service; enabled; vendor preset: enabled)
     Active: active (running) since Thu 2020-05-07 17:23:50 UTC; 6s ago
    Process: 39768 ExecStartPre=/usr/bin/vncserver -kill :1 > /dev/null 2>&1 (code=exited, status=2)
    Process: 39772 ExecStart=/usr/bin/vncserver -depth 24 -geometry 1280x800 :1 (code=exited, status=0/SUCCESS)
   Main PID: 39795 (Xtightvnc)
...
Your VNC server is now ready to use whenever your server boots up, and you can manage it with systemctl commands like any other systemd service.
However, there won’t be any difference on the client side. To reconnect, start your SSH tunnel again:
- ssh -L 59000:localhost:5901 -C -N -l sammy your_server_ip
Then make a new connection using your VNC client software to localhost:59000 to connect to your server.
Comparing Remote Desktop Protocols: VNC vs. X2Go vs. xrdp
Choosing a remote desktop protocol involves evaluating trade-offs between performance, security, and platform compatibility. VNC, X2Go, and xrdp are three common solutions for accessing remote systems, each with distinct advantages and disadvantages.
The following table provides a high-level comparison of these protocols.
| Feature | VNC (Virtual Network Computing) | X2Go | xrdp (RDP) |
|---|---|---|---|
| Underlying Protocol | RFB (Remote Framebuffer) | NX (NoMachine) | RDP (Remote Desktop Protocol) |
| Primary Use Case | Simple, cross-platform screen sharing and direct control of the physical display. | Fast, secure, and feature-rich remote access to Linux desktops, especially over low-bandwidth connections. | Seamless remote access to Linux systems from Windows environments using the native Remote Desktop Client. |
| Performance | Can be slow, especially over high-latency or low-bandwidth networks, as it transmits pixel-based screen updates. | High performance and responsive, even on slow connections, due to efficient compression of the X11 protocol. | Generally performs well, offering a smooth user experience with support for features like audio and clipboard redirection. |
| Security | Not secure by default; requires manual configuration of an SSH tunnel or VPN for encryption. | Secure by default, as all traffic is tunneled over SSH. | Provides encrypted connections, offering a secure remote access solution. |
| Platform Compatibility | Server: Windows, macOS, Linux. Client: Virtually all platforms, including mobile. | Server: Linux only. Client: Windows, macOS, Linux. | Server: Linux. Client: Any RDP-compatible client (e.g., Windows Remote Desktop Connection, FreeRDP). |
| Session Management | Typically mirrors the existing desktop session. Multiple users can view and interact with the same session. | Supports both full desktop environments and single applications. Allows for session suspension and resumption. | Creates a new, isolated session for each user, enabling multiple users to work independently on the same server. |
Troubleshooting Common VNC Issues
Let’s address some of the frequent problems you might face when setting up your VNC server and the steps to resolve them.
Blank or Grey Screen After Connecting
A common issue is successfully connecting to the VNC server but seeing only a blank or grey screen instead of the Xfce desktop. This usually indicates a problem with the VNC startup script.
Cause:
- The
~/.vnc/xstartupfile does not have execute permissions. - The
xstartupscript has incorrect commands or syntax errors. - The Xfce desktop environment is not installed correctly.
Solution:
-
Check Permissions: Connect to your server via SSH and verify that the
xstartupfile is executable.- ls -l ~/.vnc/xstartup
The output should show execute permissions (
x) for the user. If it does not, add them with thechmodcommand:- chmod +x ~/.vnc/xstartup
-
Verify Script Content: Open the
~/.vnc/xstartupfile and confirm it contains the correct commands to launch Xfce.~/.vnc/xstartup#!/bin/bash xrdb $HOME/.Xresources startxfce4 & -
Restart the VNC Server: After making any changes, kill the current VNC session and restart it. If you configured the systemd service in Step 4, use
systemctl.- sudo systemctl restart vncserver@1
If you started it manually, use
vncserver -killfollowed by the start command.- vncserver -kill :1
- vncserver -localhost
-
Check Logs: The VNC server log file can provide details about what went wrong. The log is located in
~/.vnc/your_hostname:1.log. Check this file for any errors related tostartxfce4or other startup commands.- cat ~/.vnc/your_hostname:1.log
Connection Refused Error
Your VNC client might report a “Connection refused” error when you try to connect. This means the client was unable to establish a connection.
Cause:
- You are trying to connect directly to the server’s public IP address instead of
localhostthrough the SSH tunnel. - The SSH tunnel is not active.
- The VNC server process is not running on the remote server.
Solution:
-
Connect to
localhost: Confirm that your VNC client is configured to connect tolocalhost:59000(or whichever local port you specified in your SSH command), notyour_server_ip:5901. The connection must go through the SSH tunnel for security. -
Check the SSH Tunnel: Make sure the terminal window where you ran the
ssh -Lcommand is still open and the command is active. If you closed it, you must run the command again to re-establish the tunnel. -
Verify the VNC Server Status: Connect to your server with a separate SSH session and check if the VNC server process is running. If you configured the systemd service, use this command:
- sudo systemctl status vncserver@1
The output should show
Active: active (running). If it is not running, start it withsudo systemctl start vncserver@1. -
Check for Listening Port: On the server, confirm that the VNC process is listening on the correct
localhostinterface. This is important for ensuring the server only accepts secure connections via the tunnel.- ss -ltn | grep 5901
The output should show an entry for
127.0.0.1:5901. If it shows0.0.0.0:5901or*:5901, you forgot to add the-localhostoption when starting the server. Stop the server and restart it with the correct option to secure it.
systemd Service Fails to Start
When you try to start the VNC service using systemctl, it may fail immediately or enter a failed state.
Cause:
- Typos or incorrect information in the
/etc/systemd/system/vncserver@.servicefile. - Incorrect user, group, or home directory path specified in the service file.
Solution:
-
Check the Service File: Carefully review the
vncserver@.serviceunit file for errors. Pay close attention to theUser,Group,WorkingDirectory, andPIDFilepaths. Ensure they match your non-root username and home directory exactly.- sudo nano /etc/systemd/system/vncserver@.service
-
Check System Logs for Errors: Use
journalctlto get detailed error messages from systemd about why the service failed.- sudo journalctl -u vncserver@1.service
Look for lines that indicate an error, such as “code=exited, status=…” or messages about incorrect file paths or permissions. These logs are often the fastest way to diagnose the problem.
-
Reload the Daemon: After editing the service file, you must tell systemd to reload its configuration before trying to start the service again.
- sudo systemctl daemon-reload
- sudo systemctl start vncserver@1
Authentication Failure
Your VNC client connects but gives an “Authentication failure” or “Incorrect password” error.
Cause:
- You are entering the wrong password. The VNC password is separate from your Ubuntu user’s system password.
- The password was truncated.
Solution:
The VNC password must be between six and eight characters long. If you entered a longer password when you set it up, the system automatically truncated it to eight characters. Try entering only the first eight characters of the password you set.
To reset the password completely, connect to your server via SSH and run the vncpasswd command:
- vncpasswd
You will be prompted to enter and verify a new password. After resetting it, try connecting with your VNC client again using the new password.
Permission Denied Errors
Permission errors can occur if the VNC server process, which runs under your user account, cannot access the files and directories it needs to operate. These errors often appear in the VNC log file or prevent the server from starting at all.
Cause:
- Running the initial
vncservercommand as therootuser usingsudo. - Incorrect file ownership or permissions within the user’s home directory.
Solution:
-
Check Directory Ownership: The
~/.vncdirectory and all its contents should be owned by the non-root user you are setting the VNC server up for. Connect to your server via SSH and check the ownership.- ls -ld ~/.vnc
The output should show your username as the owner and group. For example, for a user named
sammy:drwxr-xr-x 2 sammy sammy 4096 Oct 26 15:20 /home/sammy/.vnc -
Correct Ownership: If the owner is
rootor another user, you must change it. The following command recursively changes the owner and group for the entire.vncdirectory. Remember to replaceyour_userwith your actual username.- sudo chown -R your_user:your_user /home/your_user/.vnc
-
Avoid Using
sudowithvncserver: Thevncserverandvncpasswdcommands are meant to be run by the user who will own the VNC session. Running them withsudois a common mistake that leads to these permission issues. The only commands in the setup process that requiresudoare those that involve system-wide changes, such as installing packages (apt), editing systemd files (nano /etc/systemd/...), or controlling the service withsystemctl. -
Verify Service User: Double-check the
UserandGroupdirectives in your/etc/systemd/system/vncserver@.servicefile. They must match the user who owns the~/.vncdirectory. If you make changes, reload the systemd daemon and restart the service.- sudo systemctl daemon-reload
- sudo systemctl restart vncserver@1
FAQs
1. What is the best VNC server for Ubuntu?
There is no single “best” VNC server, as the right choice depends on your specific needs for performance, security, and features. The most common options for Ubuntu are TigerVNC, TightVNC, and x11vnc. Each has distinct characteristics.
- TightVNC is known for its “tight” encoding, which performs well over low-bandwidth connections. It is a suitable option if you need to connect over a slow network.
- TigerVNC is a high-performance, actively maintained VNC server that is a good general-purpose choice. It focuses on performance and security extensions.
- x11vnc allows you to access the existing physical display (
:0) of the machine, rather than creating a separate virtual desktop. This is useful for remote assistance, where you need to see and interact with the same screen a local user sees.
Here is a comparison of these three servers:
| Feature | TigerVNC | TightVNC | x11vnc |
|---|---|---|---|
| Primary Use Case | General remote desktop access | Low-bandwidth connections | Accessing the physical display |
| Desktop Environment | Creates a new virtual desktop | Creates a new virtual desktop | Mirrors the active physical display |
| Performance | High, optimized for modern networks | Good, especially on slow networks | Dependent on the active desktop session |
| Security | Supports TLS encryption and advanced authentication | Basic password authentication | Supports SSL/TLS and Unix user logins |
| Installation Command | sudo apt install tigervnc-standalone-server |
sudo apt install tightvncserver |
sudo apt install x11vnc |
For most new setups where you require a dedicated virtual desktop, TigerVNC is a reliable starting point due to its active development and performance.
2. How do I set a password for VNC on Ubuntu?
You set a VNC password using the vncpasswd command-line utility. This command creates a password file in your home directory at ~/.vnc/passwd. The VNC server uses this file to authenticate connections. The password is limited to eight characters; any characters beyond the eighth are ignored.
To set your password, run the following command in your terminal:
- vncpasswd
You will be prompted to enter and then verify the password.
Password:
Verify:
Would you like to enter a view-only password (y/n)? n
You can choose to set an optional view-only password. A user connecting with the view-only password can see the screen but cannot interact with the desktop using their mouse or keyboard.
3. How do I connect to VNC from Windows or macOS?
To connect to a VNC server, you need a VNC client application and the IP address or hostname of your Ubuntu machine, along with the display number. The VNC server runs on port 5900 + N, where N is the display number. For example, display :1 runs on port 5901.
-
Connecting from Windows: Windows does not have a built-in VNC client. You can download one of several available clients. Popular options include:
- TightVNC Viewer
- RealVNC Viewer
- TigerVNC Viewer
After installing a client, open it and enter the IP address and display number of your Ubuntu machine in this format:
IP_ADDRESS:Display_Number.For example, to connect to display
:1on a server at192.168.1.10, you would enter:192.168.1.10:1 -
Connecting from macOS: macOS includes a built-in VNC client called Screen Sharing.
- Open Finder.
- Go to the Go menu and select Connect to Server (or press
Cmd+K). - In the server address field, type
vnc://followed by the IP address and port number.
For example, to connect to display
:1(port 5901) on a server at192.168.1.10, you would enter:vnc://192.168.1.10:5901You will then be prompted to enter the VNC password you set with
vncpasswd.
4. How can I make VNC start automatically on boot?
To make your VNC server start automatically on boot, you can create a systemd service file. systemd is the standard service manager on modern Linux distributions, including Ubuntu.
This example shows how to create a service for TigerVNC to start a session for a user named ubuntu_user.
-
Create a systemd service file. Use a text editor like
nanoto create the file.sudo nano /etc/systemd/system/vncserver@.service -
Add the following configuration. This template creates a VNC session on display
:1with a resolution of 1920x1080. The%iin the file is a placeholder for the display number that you will specify when enabling the service. Replaceubuntu_userwith your actual username.[Unit] Description=Start TigerVNC server at startup After=syslog.target network.target [Service] Type=forking User=ubuntu_user Group=ubuntu_user WorkingDirectory=/home/ubuntu_user PIDFile=/home/ubuntu_user/.vnc/%H:%i.pid ExecStartPre=-/usr/bin/vncserver -kill :%i > /dev/null 2>&1 ExecStart=/usr/bin/vncserver -depth 24 -geometry 1920x1080 :%i ExecStop=/usr/bin/vncserver -kill :%i [Install] WantedBy=multi-user.target -
Reload the systemd daemon. This makes
systemdaware of the new service file.sudo systemctl daemon-reload -
Enable the service. This command enables the service for display
:1. The service will now start automatically on every boot.sudo systemctl enable vncserver@1.service -
Start the service immediately. You can start the service without rebooting.
sudo systemctl start vncserver@1.service
5. How do I secure my VNC connection on Ubuntu?
The default VNC protocol does not provide strong encryption. It is highly recommended that you secure your connection to protect your data from being intercepted. The most common method is to tunnel VNC traffic through an SSH connection.
-
Use a Firewall: First, ensure that your VNC port is not exposed to the public internet. Use a firewall like UFW to block incoming connections to the VNC port (e.g.,
5901) from any source except your local machine (localhost). The SSH tunnel will connect locally to this port.# Allow SSH connections sudo ufw allow ssh # Deny all incoming traffic to the VNC port sudo ufw deny 5901 # Enable the firewall sudo ufw enable -
Tunnel VNC Over SSH: An SSH tunnel creates an encrypted channel between your client computer and the server. You then direct your VNC traffic through this secure channel. This means your VNC server only needs to listen for local connections on the server, which is much more secure.
Configure your VNC server to only accept connections from
localhost. For TigerVNC, you can do this by adding the-localhostoption to theExecStartline in yoursystemdservice file:ExecStart=/usr/bin/vncserver -depth 24 -geometry 1920x1080 -localhost :%iAfter making this change, reload the
systemddaemon and restart your VNC service.
6. What port does VNC use in Ubuntu?
VNC uses a base TCP port of 5900. Each VNC server can run multiple independent desktop sessions, referred to as “displays.” Each display is identified by a number, starting with :1.
The port number for a specific display is calculated by adding the display number to the base port 5900.
- Display
:1uses port5900+1=5901 - Display
:2uses port5900+2=5902 - Display
:3uses port5900+3=5903
When connecting with a VNC client, you typically specify the server’s IP address and the display number (e.g., 192.168.1.10:1), and the client calculates the correct port. Some clients may require you to enter the full port number instead.
7. Can I use SSH tunneling with VNC for extra security?
Yes, using an SSH tunnel is the recommended way to secure a VNC connection. An SSH tunnel forwards traffic from a port on your local machine to a port on the remote server through an encrypted SSH connection.
How it works:
- You establish an SSH connection to your server.
- The SSH client on your local machine listens on a local port (e.g.,
5901). - When your VNC client connects to this local port, the SSH client encrypts the traffic and sends it to the SSH server.
- The SSH server decrypts the traffic and forwards it to the VNC server’s port on the same machine.
You can use any free local port for the SSH tunnel (such as 59000 or 5901); just make sure to connect your VNC client to the same port you specify in the SSH command.
To create an SSH tunnel, open a terminal on your local client machine (not the server) and run the following command. This command forwards any connection to localhost:5901 on your machine to localhost:5901 on the server.
- ssh -L 5901:localhost:5901 -C -N -l username server_ip_address
In this command:
-L 5901:localhost:5901: Forwards local port5901tolocalhost:5901on the remote server.-C: Enables compression, which is useful for slower networks.-N: Tells SSH not to execute a remote command. This is used for port forwarding only.-l username: Specifies the user to log in as on the remote server.server_ip_address: The IP address or hostname of your VNC server.
Once the tunnel is active, open your VNC client and connect to localhost:1 or 127.0.0.1:1. Your connection will be securely tunneled through SSH.
Conclusion
You have now successfully installed and configured a VNC server on your Ubuntu server. By setting up the Xfce desktop environment and using TightVNC, you can access a full graphical desktop to manage your remote machine. You have also secured the connection with an SSH tunnel and configured VNC to run as a systemd service, allowing it to start automatically when the server boots. This setup provides a user-friendly graphical interface for managing your server’s files, software, and settings.
To learn more about installing and using remote virtual desktops, check out the following articles:
Thanks for learning with the DigitalOcean Community. Check out our offerings for compute, storage, networking, and managed databases.
About the author(s)
Jack of all trades, master of a few
Former Technical Writer at DigitalOcean. Focused on SysAdmin topics including Debian 11, Ubuntu 22.04, Ubuntu 20.04, Databases, SQL and PostgreSQL.
With over 6 years of experience in tech publishing, Mani has edited and published more than 75 books covering a wide range of data science topics. Known for his strong attention to detail and technical knowledge, Mani specializes in creating clear, concise, and easy-to-understand content tailored for developers.
Still looking for an answer?
This textbox defaults to using Markdown to format your answer.
You can type !ref in this text area to quickly search our full set of tutorials, documentation & marketplace offerings and insert the link!
I have noticed there’s no window decorations (borders). This is a known bug with xfwm4 and has been reported at https://bugs.launchpad.net/ubuntu/+source/xfwm4/+bug/1860921
This bug has been fixed in version 4.14.2 which can be found at https://launchpad.net/ubuntu/+source/xfwm4
If you run vncserver via the desktop X session, you will run unto problems due to the inherited environment. The solution is to run vncserver via an SSH session and/or add the following to ~/.vnc/xsession before calling startxfce4
unset SESSION_MANAGER
unset DBUS_SESSION_BUS_ADDRESS
This resets the environment such that xfce4 doesn’t think a window manager is currently running.
I received the following: SSH protocol v.1 is no longer supported
Your screen grab of the XFCE file manager window does not have max/min/close buttons. I’m having this issue too. However, I’m running my Ubuntu 20.04 server on a VPS and the console displays the button. I’m thinking there is a tightVNC server issue with 20.04.
All I get is Please set correct fontPath in the vncserver script when trying to start the service. None of the suggestions out there from installing the xfonts-base to installing xfonts with different dpi’s to checking host name to anything else so far that someone has suggested works. Nothing works. Why doesn’t this work at all?
Works perfectly! … Except we have one major application issue, our Tomcat Server Application won’t start as sudo or root without giving us this error:
“Client is not authorized to connect to ServerCannot open display: Can’t connect to X11 window server using ‘:1.0’ as the value of the DISPLAY variable.”
We need this application to run as root, so that we can make use of port 443.
Thanks for any help, suggestions, or ideas!
The service crashes every few minutes with the following message: mbrown@ubuntu:~$ sudo systemctl start vncserver@1 Job for vncserver@1.service failed because a timeout was exceeded. See “systemctl status vncserver@1.service” and “journalctl -xe” for details. mbrown@ubuntu:~$ sudo systemctl start vncserver@1 Job for vncserver@1.service failed because a timeout was exceeded. See “systemctl status vncserver@1.service” and “journalctl -xe” for details.
Any ideas?
the service crashes every few minutes with the following message: mbrown@ubuntu:~$ sudo systemctl start vncserver@1 Job for vncserver@1.service failed because a timeout was exceeded. See “systemctl status vncserver@1.service” and “journalctl -xe” for details. mbrown@ubuntu:~$ sudo systemctl start vncserver@1 Job for vncserver@1.service failed because a timeout was exceeded. See “systemctl status vncserver@1.service” and “journalctl -xe” for details.
Any ideas?
 This work is licensed under a Creative Commons Attribution-NonCommercial- ShareAlike 4.0 International License.
Become a contributor for community
Get paid to write technical tutorials and select a tech-focused charity to receive a matching donation.

DigitalOcean Documentation
Full documentation for every DigitalOcean product.

Resources for startups and AI-native businesses
The Wave has everything you need to know about building a business, from raising funding to marketing your product.
The developer cloud
Scale up as you grow — whether you're running one virtual machine or ten thousand.

Get started for free
Sign up and get $200 in credit for your first 60 days with DigitalOcean.*

*This promotional offer applies to new accounts only.