
Introduction
FreeBSD is a powerful operating system capable of functioning in a variety of roles. Part of what makes this operating system an ideal choice in many scenarios is its reputation for flexibility. A large contribution to this reputation comes from FreeBSD’s supported method for installing software from source, known as the ports system.
In this guide, we will discuss some of the benefits of the ports system and will demonstrate how to use it to acquire and manage additional software. We will cover how to install using the make command, how to customize your applications, and how to leverage some common tools to make ports maintenance easier.
Note: As of July 1, 2022, DigitalOcean no longer supports the creation of new FreeBSD Droplets through the Control Panel or API. However, you can still spin up FreeBSD Droplets using a custom image. Learn how to import a custom image to DigitalOcean by following our product documentation.
Prerequisites
In order to follow along with this guide, you should have access to a FreeBSD 10.1 server and a non-root user account with sudo privileges. This guide can assist you in logging into your FreeBSD server and setting up a reasonable working environment.
Managing Different Types of FreeBSD Software
The FreeBSD team maintains the base FreeBSD operating system as a coherent unit. Its components are updated using a tool called freebsd-update and their behavior is controlled primarily through configuration files located within the /etc directory. While you can install and use alternatives to the bundled software, you cannot easily or safely remove the ones that are included in the base system as these are considered functionally essential parts of the operating system.
In contrast, optional software is managed using different processes, tools, and locations within the filesystem. Unlike software from the base system, optional software is configured within the /usr/local/etc directory. FreeBSD provides two sanctioned methods for downloading and installing additional software onto the system.
The ports system, which we will be describing in this guide, is managed through a filesystem hierarchy located at /usr/ports that categorizes each available piece of software that FreeBSD knows how to build. Within this directory, the first level subdirectory categorizes software primarily according to function or language. Within these directories, folders exist for each individual piece of software. Software can be downloaded, configured, compiled, and installed either through simple make commands or through available helper utilities. The software in the ports collection includes all patches necessary to build and run the application on a FreeBSD system.
The other type of installation supported by the system is packages, which are software binaries compiled from the ports collection using reasonable defaults. This is a good method of quickly acquiring software, but it forfeits the level of customization provided by the ports system. You can learn more about how to manage software packages in this guide.
Prepping the Ports Tree
The ports tree is the name of the hierarchy that exists beneath the /usr/ports directory. This hierarchy contains directories that correspond to port categories, within which are other directories that correspond to individual ports.
Before we begin manipulating any ports, we should ensure that this hierarchy is up-to-date. Forgetting to refresh the ports hierarchy can result in build failures as the ports try to fetch and build files that may not be valid anymore.
We can update the ports tree using a utility called portsnap. This tool queries the FreeBSD ports servers for changes.
Making Note of Our Last Update
Before we execute the actual update command, we need to take note of the timestamp on a specific file within our ports tree called /usr/ports/UPDATING. We can use the stat tool to see the various timestamps associated with the file:
stat -x /usr/ports/UPDATING
You should see output that looks like this:
  File: "UPDATING"
  Size: 375337       FileType: Regular File
  Mode: (0644/-rw-r--r--)         Uid: (    0/    root)  Gid: (    0/   wheel)
Device: 0,81   Inode: 2011338    Links: 1
Access: Thu Dec 11 22:24:59 2014
Modify: Thu Dec 11 15:40:12 2014
Change: Thu Dec 11 22:24:59 2014
There is a chance that you will instead receive an error like this:
stat: /usr/ports/UPDATING: stat: No such file or directory
If you see this, it means that you do not have a ports tree initialized on your system. If this is the case, continue onto the next section to learn how to extract an initial ports tree onto your system using portsnap.
The values we want to pay attention to are the “Modify” and “Change” times, which are highlighted in the output above. In this instance, the “Modify” timestamp will be the most recent time that a ports maintainer modified the file with important information. The “Change” timestamp will be the last time that the file was synced to your server.
We need to remember the timestamp so that we know which updating notes we need to pay attention to after we refresh our ports tree. We can save these to a file in our home directory by typing:
stat -x /usr/ports/UPDATING > ~/last_update
Now that we have this information recorded, we can go ahead and update our ports tree.
Updating the Ports Tree with Portsnap
Once you have a good idea of when the ports tree was last updated, you can sync your ports tree with the most recent information from the FreeBSD project’s site. To do this, we will use a tool called portsnap.
If you do not have any information in the /usr/ports directory (if you encountered the error we mentioned in the last section), you can download and extract the entire ports tree to that directory with portsnap. This process can take quite a long time, but it is only necessary if your /usr/ports directory is empty, a situation that should only happen once.
sudo portsnap fetch extract
This will download and extract the entire ports tree to the /usr/ports directory.
If you already have a ports tree built in the /usr/ports directory (if you were able to record the timestamps in the last section), you can update the files to their most recent versions with this command:
sudo portsnap fetch update
This command will only extract those files which differ from the ones within the /usr/ports structure, so it will take significantly less time than the extract variant of the command. This is the format that should be used in day-to-day updates of the ports tree.
Once your ports tree is built or updated, you can begin to manage and work with ports on your system.
Searching the Ports Tree for Applications
Now that you have an updated ports tree hierarchy on your system, you can begin looking at the software available to you. There are several ways of doing this, each of which has its advantages.
Searching with whereis
The easiest way of searching for an application is by name using the whereis command. This will search for the command on your system and within the ports tree. If it finds a match, it will return the relevant path info for the application on your system.
Typically, if the application is not installed but the search was for a valid port, it will return the path to the port within the ports tree. If the application is installed, it will usually return the path to the executable, the port, and often the man page:
For example, we can search for the wget utility by typing this:
whereis wget
If the port is not installed, we would see something like this:
wget: /usr/ports/ftp/wget
Since the path begins with /usr/ports, we know that this is an installable port. We can use the path returned if we wish to install this port.
If the wget command is already installed, we may see output that looks like this:
wget: /usr/local/bin/wget /usr/local/man/man1/wget.1.gz /usr/ports/ftp/wget
This includes the path to the actual installed executable, the man page file for the application, and the location of the port within the ports tree.
Searching Using the echo Command on the Filesystem Hierarchy
In the FreeBSD Handbook, the authors also suggest a rather novel way of searching using only the echo command and the built-in structure of the ports tree.
The ports tree is set up with all of the relevant files and directories under the /usr/ports directory. In the filesystem, each port is represented by a distinct directory that contains all of the information necessary to build and install the software on the FreeBSD system.
To assist in organization, these ports are grouped by function within category directories within /usr/ports. So in the wget example above, we see that the wget command has been categorized within the ftp group. So the /usr/ports directory contains category directories which, in turn, contain directories for ports.
We can exploit this consistent structure through the use of the echo command and wildcards. Since we probably do not know the category the port will exist in, we will replace that directory level with an asterisk. We can also put these before and after our search term if we want to be more flexible in our matching. So we can search for wget related programs by typing:
echo /usr/ports/*/*wget*
This will return something similar to this:
/usr/ports/ftp/gwget /usr/ports/ftp/wget /usr/ports/www/ruby-wgettsv /usr/ports/www/wgetpaste
This can be a bit more flexible than the whereis command because it does not require an exact match.
Searching Using the Available make Targets
The most powerful way to search for ports is to use the make command.
This is also the command that is used to build and install ports onto the system, but is more generally a flexible tool that can be used to easily execute complex tasks that have been defined in a config file. The FreeBSD developers have created make “targets” (task definitions) that will perform a search of the ports tree for different criteria.
To use this functionality, you must first move to the base of the ports tree. This is where the make targets are defined:
cd /usr/ports
The general syntax for executing a search is:
make [search|quicksearch] [searchtype]=[searchquery] [modifiers]
The two make targets designed to search the ports tree are search and quicksearch. These have exactly the same functionality, differing only in their default display.
The search target will return information about the name of the port, path in the port tree, a general description and then details about the build including the maintainer email, build dependencies, run dependencies, and the upstream URL. The quicksearch target only returns the port name, path, and description.
The search types can be any of the following:
- name: Search only within the name field of the port.
- key: Search within the name, comment, and dependencies fields of the port.
- path: Search a specific path within the ports hierarchy.
- info: Search within the info (description) field of the port.
- maint: Searches by the maintainer email address.
- cat: Searches based on the category of the port.
- bdeps: Searches the build-time dependencies of each port.
- rdeps: Searches the run-time dependencies of each port.
- www: Searches the ports website.
You can also prepend an “x” before any of the above categories to remove results that satisfy a match. For instance, if your search includes xname=apache, any port that has the string “apache” in its name field will not be returned.
Let’s go over some quick examples. Below, you can see the difference in the output of the search and quicksearch targets. The search target includes full information about the matches:
make search name=htop
Port:   htop-1.0.3
Path:   /usr/ports/sysutils/htop
Info:   Better top(1) - interactive process viewer
Maint:  gaod@hychen.org
B-deps: autoconf-2.69 autoconf-wrapper-20131203 automake-1.14_1 automake-wrapper-20131203 gettext-runtime-0.19.3 indexinfo-0.2.2 libexecinfo-1.1_3 libffi-3.0.13_3 libiconv-1.14_6 m4-1.4.17_1,1 ncurses-5.9.20141213 perl5-5.18.4_11 python2-2_3 python27-2.7.9 readline-6.3.8
R-deps: libexecinfo-1.1_3 lsof-4.89.b,8 ncurses-5.9.20141213
WWW:    http://htop.sourceforge.net/
On the other hand, the quicksearch target only displays the essential information about the matches it finds:
make quicksearch name=htop
Port:   htop-1.0.3
Path:   /usr/ports/sysutils/htop
Info:   Better top(1) - interactive process viewer
It is possible to combine different search types to narrow down the results. For example, if we were to search for the ntop network monitor, we might see results that look like this:
make quicksearch name=ntop
Port:   ntopng-zmq-3.2.3_1
Path:   /usr/ports/devel/ntopng-zmq
Info:   NTOPNG specific ZMQ library

Port:   diveintopython-5.4_1
Path:   /usr/ports/lang/diveintopython
Info:   Free Python tutorial book that is "not For Dummies(tm)"

Port:   ntop-5.0.1_8
Path:   /usr/ports/net/ntop
Info:   Network monitoring tool with command line and web interfaces

Port:   ntopng-1.2.1_1
Path:   /usr/ports/net/ntopng
Info:   Network monitoring tool with command line and web interfaces

Port:   sntop-1.4.3_1
Path:   /usr/ports/net/sntop
Info:   Monitor status of network nodes using fping
Here, we can see that most of the results are related to ntop, but we also have a book about learning Python. We can further filter by adding a path specification:
make quicksearch name=ntop path=/net
Port:   ntop-5.0.1_8
Path:   /usr/ports/net/ntop
Info:   Network monitoring tool with command line and web interfaces

Port:   ntopng-1.2.1_1
Path:   /usr/ports/net/ntopng
Info:   Network monitoring tool with command line and web interfaces

Port:   sntop-1.4.3_1
Path:   /usr/ports/net/sntop
Info:   Monitor status of network nodes using fping
We can also modify the behavior of the search in a few different ways. Some valid modifiers are:
- icase: Set this to “1” to turn on case-insensitivity. This is the default. To make searches case-sensitive, set this to “0”.
- display: This contains a list of fields, separated by commas, to display in the output.
- keylim: Limit the searching (using the “key” search type) only to those fields being displayed. Turn this on by setting it to “1”.
For instance, we could search for descriptions or paths that contain the capitalized string “Paste” by typing:
make search key=Paste display=path,info keylim=1 icase=0
Path:   /usr/ports/devel/pear-SebastianBergmann_PHPCPD
Info:   Copy/Paste Detector (CPD) for PHP code

Path:   /usr/ports/devel/py-zope.copypastemove
Info:   Copy, Paste, and Move support for content components

Path:   /usr/ports/german/bsdpaste
Info:   Pastebin web application to upload and read text on a webserver

Path:   /usr/ports/www/p5-WWW-Pastebin-PastebinCom-Create
Info:   Paste to http://pastebin.com from Perl

Path:   /usr/ports/www/p5-WebService-NoPaste
Info:   Pastebin web application to upload snippets of text

Path:   /usr/ports/www/py-django-dpaste
Info:   Pastebin Django application that powers dpaste.de

Path:   /usr/ports/www/wgetpaste
Info:   Paste to several pastebin services via bash script
One further situation that you may come across in your searches is a port that has been moved or deleted. These results look like this:
make quicksearch name=wget
. . .

Port:   ftp/emacs-wget
Moved:
Date:   2011-05-02
Reason: Has expired: Upstream disappeared and distfile is no longer available

Port:   ftp/wgetpro
Moved:
Date:   2011-10-14
Reason: Vulnerable since 2004-12-14

Port:   www/wget4web
Moved:
Date:   2012-01-01
Reason: Has expired: Depends on expired www/apache13
If a port has been moved to a new location, the “Moved” field will contain the new place where the port can be found. If this field is present, but empty, the port has been deleted.
Even though these are deleted, they will still show up in your search results. If you wish to prevent moved or deleted ports from showing up, you can set the PORTSEARCH_MOVED environmental variable to “0”.
For example, to set this variable to “0” for only the command that follows, using the default tcsh, we can type:
env PORTSEARCH_MOVED=0 make quicksearch name=wget
Port:   gwget-1.0.4_9
Path:   /usr/ports/ftp/gwget
Info:   GNOME wget front-end

Port:   wget-1.16
Path:   /usr/ports/ftp/wget
Info:   Retrieve files from the Net via HTTP(S) and FTP

Port:   ruby20-ruby-wgettsv-0.95
Path:   /usr/ports/www/ruby-wgettsv
Info:   Collect WWW resources and generate TSV data

Port:   wgetpaste-2.25
Path:   /usr/ports/www/wgetpaste
Info:   Paste to several pastebin services via bash script
As you can see, all of the entries that had been moved or deleted are now filtered out of our results. If you wish to make this the default behavior, you can set PORTSEARCH_MOVED=0 in your make.conf file:
sudo sh -c 'echo "PORTSEARCH_MOVED=0" >> /etc/make.conf'
Installing Ports Using Make
Once you have found a port that you wish to install, you can easily download the required files, build the binary, and install it using the make command.
To install a port, change to the directory of the port within the port tree. You can find this location through any of the search methods given above. To demonstrate this, we will be installing a port called portmaster, which we will need later in this guide.
First, change to the port location. The portmaster port is kept in the ports-mgmt category:
cd /usr/ports/ports-mgmt/portmaster
Now, we can easily download, configure, compile, and install the port using make targets. Since these operations affect our system, we will need to use sudo. The long way to do this is through individual calls to make, like this. Do not type these commands yet, we will show you a much shorter version momentarily:
sudo make config
sudo make fetch
sudo make checksum
sudo make depends
sudo make extract
sudo make patch
sudo make configure
sudo make build
sudo make install
We could shorten this a bit by listing each target after a single make command like this:
sudo make config fetch checksum depends extract patch configure build install
However, this is almost always unnecessary. Each of the targets listed above will call any preceding targets necessary in order to complete the task. So the above could simply be condensed into:
sudo make install
Typically, we would want to expand this chain of commands slightly to make sure we configured everything correctly. We usually want to specify config-recursive, an option not in the above pipeline, before the install target in order to take care of configuration for this port and any dependencies at the beginning of the installation. Otherwise the build process may halt and wait for user input part way through building the necessary dependencies.
We also usually want to clean up a bit after the installation to reclaim disk space and keep a clean system. We can do this with the clean or distclean targets. The clean target deletes the extracted source code used to build this port and any dependency ports. The distclean target does this as well, but also deletes the compressed source archive for this package from the /usr/ports/distfiles directory.
So a typical installation command may look like this:
sudo make config-recursive install distclean
This will prompt you to configure the port and any dependencies at the beginning of the process. Afterwards it will download and verify the integrity of the source archive. It will then change contexts to fulfill any missing dependencies. When that process is complete, it will return to the port in question, extract the archive, apply any necessary patches, and configure it according to the options you selected. It will then compile the application and install it on your system. Afterwards, it will remove the expanded source code for this port and any dependencies. It will then delete the source archive for this port.
Execute the command above within the /usr/ports/ports-mgmt/portmaster directory:
sudo make config-recursive install distclean
You will be presented with a single dialog box for the application. If you are using one of the listed shells, you can choose to configure shell completion for the tool here:
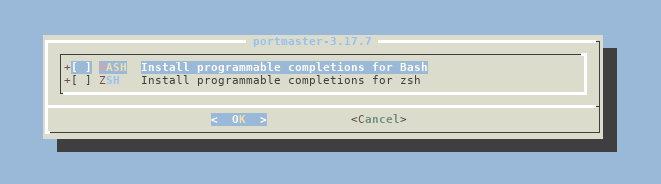
The portmaster port does not have any dependencies, but if there were any, configuration options for dependencies would be presented directly after the target port’s configuration above. The port will be downloaded, configured, and installed.
If you are using the default tcsh, you will want to rescan your PATH after every installation so that your shell environment is aware of all of the installed applications:
rehash
If the above process was successful, you have successfully installed your first port.
While the main operating system and configuration is done in the conventional locations, optional software installed through the ports system is installed within the /usr/local hierarchy.
This means that to configure optional software, you will have to look in the /usr/local/etc directory. The executables themselves are kept primarily in the /usr/local/bin and /usr/local/sbin directories. Keep this in mind when you are configuring or starting applications.
Notes Regarding Applications that Run as Services
One thing to keep in mind is that if you are installing a port that will be run as a service, the installation procedure will not start the service automatically. In fact, there are a few steps that you must take in order to start the services within FreeBSD.
If you wish to start a service a single time, you can do so by typing:
sudo service servicename onestart
For instance, to start MySQL, you could type:
sudo service mysql-server onestart
Assuming that any necessary configuration has been complete, this will start the service a single time. If you want to stop the service as a later time, you can type:
sudo service mysql-server onestop
While this works for quick tests, it is not the ideal way to manage services in FreeBSD. To configure your service to start at each boot, you must enable it. To do so, you have to add a line to the /etc/rc.conf file.
The init files that specify how optional services are started are kept in the /usr/local/etc/rc.d directory. In each of these init files, a variable called rcvar tells the init system which variable within the /etc/rc.conf file to look for to determine whether to start the service. For each optional service, you can find the appropriate line to add to the /etc/rc.conf file by typing:
grep rcvar /usr/local/etc/rc.d/*
You will receive a list that looks something like this:
/usr/local/etc/rc.d/avahi-daemon:rcvar=avahi_daemon_enable
/usr/local/etc/rc.d/avahi-dnsconfd:rcvar=avahi_dnsconfd_enable
/usr/local/etc/rc.d/dbus:rcvar=dbus_enable
/usr/local/etc/rc.d/rsyncd:rcvar=rsyncd_enable
The highlighted portion of the output shows the variable we need to set to “YES” to enable each of these services.
For example, to enable the rsync daemon service, we can add this line to /etc/rc.conf:
rsyncd_enable="YES"
The appropriate line must be in the /etc/rc.conf file before using the normal service management commands. For instance, you can add the above line to the bottom of the /etc/rc.conf file either with your text editor, or by typing:
sudo sh -c "echo 'rsyncd_enable="YES"' >> /etc/rc.conf"
This will cause the rsync daemon to be started every boot. You can now control the service using the service command without the “one” prefix. For instance, you can start the service by typing:
sudo service rsyncd start
You can stop the service again by typing:
sudo service rsyncd stop
Removing an Installed Port
If you have installed a port that you no longer need, you can remove the application from your system using a similar but more straight-forward process.
We can use the deinstall target to remove an application from our system. Again, change to the directory within the ports tree associated with the application you wish to remove:
cd /usr/ports/ports-mgmt/portmaster
You can remove the application from your system by typing:
sudo make deinstall
If you would also like to delete the options you configured for this port, you can do so by typing:
sudo make rmconfig
To delete the configuration options for this port and all of its dependencies, type:
sudo make rmconfig-recursive
If you removed portmaster using the above commands, reinstall it by typing:
sudo make reinstall distclean
Updating Applications
Now that you know how to install or remove programs, we should demonstrate how to keep your applications up-to-date.
Checking UPDATING File for Important Update Notes
At the beginning of this guide, we saved the timestamps for the /usr/ports/UPDATING file before we used portsnap to refresh our ports tree.
The /usr/ports/UPDATING file contains important notes from the ports maintainers about updates and changes that may require additional manual steps by the administrator. Failure to read this file and apply its advice prior to updating applications can leave your system in an unusable state or affect the functionality of your applications.
First, check the timestamp that we saved to the file in our home directory:
cat ~/last_update
  File: "/usr/ports/UPDATING"
  Size: 375337       FileType: Regular File
  Mode: (0644/-rw-r--r--)         Uid: (    0/    root)  Gid: (    0/   wheel)
Device: 0,81   Inode: 2011338    Links: 1
Access: Thu Dec 11 22:24:59 2014
Modify: Thu Dec 11 15:40:12 2014
Change: Thu Dec 11 22:24:59 2014
Remember, the “Modify” timestamp indicates the last time that the UPDATING file on our system was modified by a port maintainer, and the “Change” timestamp indicates the time of our last sync. The information above are the old timestamps. We can tell from this information that we need to pay attention to any entries from December 11th until the current date.
Open the refreshed UPDATING file now:
less /usr/ports/UPDATING
The file will look somewhat similar to this:
This file documents some of the problems you may encounter when upgrading
your ports.  We try our best to minimize these disruptions, but sometimes
they are unavoidable.

You should get into the habit of checking this file for changes each time
you update your ports collection, before attempting any port upgrades.

20150101:
  AFFECTS: users of net/unison and net/unison-nox11
  AUTHOR: madpilot@FreeBSD.org

  Unison has been upgraded to version 2.48, which uses a different wire
  protocol than 2.40 did.  In order to support synchronization with
  other computers where Unison is still at version 2.40, a new port
  net/unison240 has been created.  It provides unison240 and if that is
  GTK2-enabled, also unison240-text.  This unison240 port can be
  installed in parallel with the existing net/unison port.

20141230:
  AFFECTS: users of deskutils/xpad
  AUTHOR: jgh@FreeBSD.org

  deskutils/xpad has been moved to deskutils/xpad3, since 4.x has been around
  for a while.

  Should you wish to stick with legacy branch at this time;

  # portmaster -o deskutils/xpad deskutils/xpad3

. . .
This file contains every potentially breaking change for every available port going all of the way back to 2008. You only need to pay attention to the notices that:
- Have been added since the last time you updated your ports
- Involve the ports you have installed on your system
So, for this example, we would only need to pay attention to notices that have been added since December 11th involving our installed ports. If you do not know which ports are installed on your system, you can use portmaster to create a complete list:
portmaster -l
===>>> Root ports (No dependencies, not depended on)
===>>> dialog4ports-0.1.5_2
===>>> pkg-1.4.0
===>>> pkgconf-0.9.7
===>>> portmaster-3.17.7
===>>> rsync-3.1.1_3
===>>> 5 root ports

===>>> Trunk ports (No dependencies, are depended on)
===>>> ca_root_nss-3.17.3_1
===>>> expat-2.1.0_2

. . .
The output will be divided into sections according to their dependency relationships. Use this information to check against the UPDATING notes.
If any manual steps are required, complete those before continuing on with the rest of the update.
Checking for Known Vulnerabilities
One other consideration to keep in mind when updating is whether the software installed on your system has any known security vulnerabilities.
FreeBSD maintains a vulnerability database that you can check to see whether any of your ports or packages have security problems. This functionality is included in the pkg tool. Run a security audit by typing:
sudo pkg audit -F
This will download the latest version of the vulnerability database from the FreeBSD project’s servers. It will then check the versions of all of your installed ports or packages and compare them against the entries in the security database.
If any ports or packages installed on your system have known vulnerabilities in the database, you will be alerted. Typically, these will have at least an up-to-date port available that patches the issue.
Below, we will discuss how to update all of the ports on your system or just a subset. Regardless of your update strategy, it is essential that you at least update the ports that have known security vulnerabilities.
Updating Installed Ports
After you have taken care of any manual steps outlined in the UPDATING files, you can update your software.
To see which ports have updates available, you can use the portmaster command with the -L flag:
portmaster -L
===>>> Root ports (No dependencies, not depended on)
===>>> dialog4ports-0.1.5_2
===>>> pkg-1.4.0
        ===>>> New version available: pkg-1.4.3
===>>> pkgconf-0.9.7
===>>> portmaster-3.17.7
===>>> rsync-3.1.1_3
===>>> 5 root ports

===>>> Trunk ports (No dependencies, are depended on)
===>>> ca_root_nss-3.17.3_1
===>>> expat-2.1.0_2

. . .

===>>> 44 total installed ports
        ===>>> 4 have new versions available
This provides a similar output to the lowercase variant of the option that we used earlier, but it checks for available updates as well. Here, we can see that the pkg port has a new version available. We can see that there are a total of 4 ports that have new versions available.
To upgrade a single port, you can go to the port’s directory location within the port tree and reinstall the new version of the software:
sudo make deinstall reinstall
You can also accomplish the same thing with the portmaster command. You must provide the category and port name. For instance, to upgrade the wget command, we could type:
sudo portmaster ftp/wget
The above command can be used to install ports as well. Many users coming from other backgrounds find portmaster to be a more familiar software management experience than using the make targets we outlined above.
Although it is possible to upgrade ports independently, it is usually best to update all of the software at once. You can do this with portmaster using the -a flag:
sudo portmaster -a
This will update all of the ports on the system to their newest version. Any new configuration options will be presented to you at the beginning of the process. If you have any packages installed with pkg with newer versions available through the ports system, these will be updated and transitioned over to ports as well.
Conclusion
By now, you should have a fairly good grasp on how to work with ports on a FreeBSD system. Ports are extremely flexible, allowing you to easily customize the majority of the applications on your server with little effort.
Many administrators welcome the trade off between compilation time and increased control, but your needs may vary. However, learning about the ports system is a good investment regardless of your software strategy on FreeBSD. There are times when critical updates might not have a package available yet, and there are certain pieces of software that cannot be distributed in a packaged format due to licensing restrictions. These cases necessitate the use of ports regardless of your preferences.
Thanks for learning with the DigitalOcean Community. Check out our offerings for compute, storage, networking, and managed databases.
Tutorial Series: Getting Started with FreeBSD
This series will show you how to get started with a FreeBSD cloud server. The first article will explain some of the differences between Linux and FreeBSD. The tutorials that follow cover the basics of FreeBSD security, maintenance, and software installation. If you are new to FreeBSD, this series will help you get up and running quickly.
Browse Series: 7 tutorials
About the author
Former Senior Technical Writer at DigitalOcean, specializing in DevOps topics across multiple Linux distributions, including Ubuntu 18.04, 20.04, 22.04, as well as Debian 10 and 11.
Still looking for an answer?
This textbox defaults to using Markdown to format your answer.
You can type !ref in this text area to quickly search our full set of tutorials, documentation & marketplace offerings and insert the link!
 This work is licensed under a Creative Commons Attribution-NonCommercial- ShareAlike 4.0 International License.
Become a contributor for community
Get paid to write technical tutorials and select a tech-focused charity to receive a matching donation.

DigitalOcean Documentation
Full documentation for every DigitalOcean product.

Resources for startups and AI-native businesses
The Wave has everything you need to know about building a business, from raising funding to marketing your product.
The developer cloud
Scale up as you grow — whether you're running one virtual machine or ten thousand.

Start building today
From GPU-powered inference and Kubernetes to managed databases and storage, get everything you need to build, scale, and deploy intelligent applications.
