By Scarlz and Sharon Campbell

Introduction
Mumble-Django is a front-end web interface for administering Murmur server instances and the users they serve. This dashboard will let you, and other admins if you choose, run your Mumble server from a graphical web interface rather than the command line.
As the name implies, the dashboard is written with Django. It makes a variety of administrative features of your Murmur server accessible through a graphical interface, once the admin user is logged in. Features include but are not limited to:
- Live channel viewer (CVP) with responsive version for mobile devices
- Mumble user permissions
- Configuration for settings like message of the day, server password, version to recommend, and much more
- Bans
- Logs
- Extensibility through the Django framework and licensing as free software under the GPL
Also, you can administer multiple Murmur installations from the same dashboard.
Prerequisites
Please complete the following prerequisites.
-
A VPS with Debian 7 as its operating system (at the time of writing, Mumble-Django did not work well on Debian 8)
-
A user account on the VPS with sudo elevation privileges: How To Add, Delete, and Grant Sudo Privileges to Users on a Debian VPS
-
A Mumble server (Murmur) installed and running on the same VPS: How To Install and Configure Mumble Server (Murmur) on Ubuntu 14.04
The DigitalOcean article linked above, How To Install and Configure Mumble Server (Murmur) on Ubuntu 14.04, can also be followed for a Droplet running Debian 7. <$>
Configuring ICE Middleware
Before installing Mumble-Django, we have to enable the ICE (Internet Communications Engine) component of Murmur. This will allow us to use the extra functionality of programs like mumble-django and the features they provide.
ICE makes it possible to interaction with the Murmur server through means other than the default Mumble client, without compromising the security of the inner workings of Murmur, such as the databases, registered user details, and admin rights.
The alternative to ICE is D-Bus, which provides a similar service, but ICE is generally the preferred choice now, which is why we are choosing it over D-Bus in this tutorial.
Step 1 — Connect to Murmur Server
Use SSH to connect to the VPS where you installed the Murmur server from the previous tutorial. Use a user with sudo elevation privileges, and follow the steps below in order.
- ssh sammy@your_server_ip
Step 2 — Configure ICE in mumble-server.ini
All of the core configuration of the Mumble server resides in one central text file. By default, this is the mumble-server.ini file in the /etc/ directory on Debian. If you changed this directory during the earlier Murmur server installation, then you will find it in there instead.
Let’s find the file and make sure it exists in /etc/ by using grep :
- sudo ls /etc/ | grep mumble-server
If the file is present, the output will be:
Outputmumble-server.ini
We’re going to use the nano text editor to open files for writing and editing in this tutorial. Feel free to use your preferred text editor instead.
- sudo nano /etc/mumble-server.ini
Disable D-Bus by commenting out its entry line.
Do this by adding a hash symbol (#) to the beginning of the line shown here:
#dbus=system
Further down in this file, confirm that the ice line exists and is uncommented (it should be by default):
ice="tcp -h 127.0.0.1 -p 6502"
This allows ICE access on the localhost IP address of the server through TCP port 6502. Leave this line as it is.
Set the ICE Secret
Next we need to set a value for the icesecretwrite directive in the config file. If this is left blank, anyone with SSH access to your server can reconfigure or change the ICE setup.
The two lines we are looking for in the file look like this:
#icesecretread=
icesecretwrite=
The first line we can ignore, as it is already commented out and disabled, which is fine. The second line is where we need to set the ICE secret.
Append your chosen phrase to the second line (all one word); make sure you set a password different from the one shown below:
#icesecretread=
icesecretwrite=example_password
You will need this ICE secret later on, so make sure you remember it.
Save your changes in nano to the mumble-server.ini config file by pressing:
CTRL + X, then y for yes, then the ENTER key.
If using a different text editor, then perform the equivalent save/write actions.
Step 3 — Confirm ICE Is Running
Restart the Murmur server so the changes we made take effect.
- sudo service mumble-server restart
Use netstat to determine whether ICE is indeed running and listening on port 6502, just like we enabled it to:
- sudo netstat -apn | grep 6502
This previous command pipes the output we generate from netstat through grep, which selects only data matching the pattern we’ve specified for output to the terminal. In our case this pattern is the number 6502.
The output we receive from this command will look like the next code snippet if everything is running correctly:
Outputtcp 0 0 127.0.0.1:6502 0.0.0.0:* LISTEN 23629/murmurd
<$>[note] The final group of digits in the above output will differ from user to user.
If the port is not being listened on, and you receive no output like the above, check Murmur’s log file to see if you can identify any specific errors on boot, in relation to this socket (127.0.0.1:6502).
You can check the log file by using the tail command shown here:
- sudo tail -n 20 /var/log/mumble-server/mumble-server.log
It should state in the log file that it is enabling ICE on startup. The line that indicates this looks like the following:
Output"MurmurIce: Endpoint "tcp -h 127.0.0.1 -p 6502" running"
The line will likely be a few lines back in the log.
If it does not show this in your tail output, then your mumble-server.ini file probably needs to be checked for inaccuracy or errors; the log file may have more specific details on the type of error.
Go back and check your settings now if needed, or proceed to the next section if everything is working as intended.
Installing the Apache Web Server
ICE is now working and listening as we need it to.
Let’s bring Apache into the picture.
Step 1 — Update and Upgrade System Packages
This command updates the apt-get package manager’s database.
- sudo apt-get update
This next action will install any new updates gained from the previous command to the Debian system packages.
- sudo apt-get upgrade
Confirm when prompted about updating new packages by entering y for yes.
Step 2 — Install Apache Web Server
This installs the base version of Apache we need to host Mumble-Django:
- sudo apt-get install apache2
Step 3 — Set ServerName in apache2.conf
Open up the apache2.conf file with a text editor
- sudo nano /etc/apache2/apache2.conf
Scroll down to find the Global Configuration section and add the entire ServerName line, using your own IP address:
# Global configuration
#
ServerName your_server_ip
Save the apache2.conf file changes.
Restart Apache so the config file changes we made are picked up.
- sudo service apache2 restart
Installing & Configuring Postfix for Mail
Postfix provides Mumble-Django with a local email address and a system to send out registration and other emails when needed.
Here’s how to install and configure it for what we need.
Step 1 — Install Postfix
Use apt-get to install the postfix package:
- sudo apt-get install postfix
Select Internet Site from the installation menu. It should be selected by default, so just press ENTER.
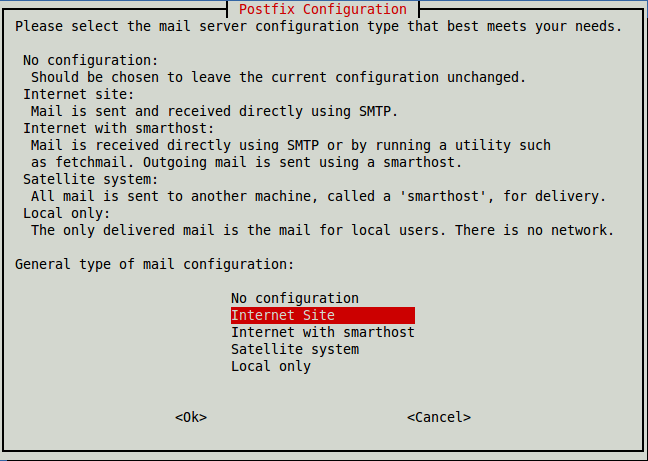
Then enter the name you gave your Droplet upon creation; you can find this listed in the DigitalOcean Control Panel.

This mail installation provides only the barest SMTP (mail sending) functionality. You’ll want to make sure your DNS settings, Postfix settings, and hostname all align in a production mail setup.
Step 2 — Configure Postfix
Edit the main configuration file of Postfix:
- sudo nano /etc/postfix/main.cf
Find the last line of the file that reads:
inet_interfaces = all
Then, change it from all to localhost so Postfix will only operate using the server’s loopback address:
inet_interfaces = localhost
Save your changes to the main.cf config file.
Reload the configuration file changes by restarting postfix .
- sudo service postfix restart
Postfix is now ready to send out emails as needed.
Installing & Configuring Mumble-Django
The vast majority of this next section is completed as part of one continual configuration process, and sets up Mumble-Django for use.
Bear in mind that the method we will use here is for an Apache setup without virtual hosts.
Step 1 — Install Mumble-Django
Install Mumble-Django itself:
- sudo apt-get install mumble-django
When prompted, press ENTER to select <Ok> during the installation.
Step 2 — Configure Mumble-Django
The interactive configuration process is started by entering this command:
- sudo mumble-django-configure
You should see this interactive prompt:
InteractiveWhat do you want to do?
 > 1) Detect a new Mumble-Server instance and make it known to Mumble-Django
   2) Create a new SuperUser for Mumble-Django's web admin interface
      Note: This will be done automatically when you run 1) for the first time.
   3) Drop to a Python shell.
   4) Drop to a Database shell.
In this case we want to select option 1 to make the running instance of Murmur known to the program.
Press 1 and then ENTER to continue.
Another prompt should now be shown that looks like this:
InteractiveIf this is the first time you run this script, you might want to probe for the
Debian default configuration instead of entering the service string yourself.
Please choose what service string to use.
 > 1) Debian default (Meta:tcp -h 127.0.0.1 -p 6502)
   2) user defined
Once again we want to select option 1, as this is what we enabled earlier in the murmur-server.ini config file.
Press 1 again and then ENTER to continue.
The next set of output will look like this:
OutputRunning as www-data: manage.py syncdb
Creating tables ...
Creating table auth_permission
Creating table auth_group_permissions
Creating table auth_group
Creating table auth_user_user_permissions
Creating table auth_user_groups
Creating table auth_user
Creating table django_admin_log
Creating table django_content_type
Creating table django_session
Creating table django_site
Creating table mumble_mumbleserver
Creating table mumble_mumble
Creating table mumble_mumbleuser
Creating table registration_registrationprofile
Followed by:
InteractiveYou just installed Django's auth system, which means you don't have any superusers defined.
Would you like to create one now? (yes/no):
This step lets us create a new administrative user for Mumble-Django. This user is for the dashboard only; it’s not a Mumble or Murmur user. However, this user will have access to act as a Mumble administrator in many ways.
Type yes and press ENTER.
Proceed by completing the information for the new Mumble-Django user.
The first one, Username, can be whatever name you choose. In this example the admin user is named sammy.
InteractiveUsername (leave blank to use 'www-data'): sammy
The Email Address is bound to the username and password you are about to create:
InteractiveE-mail address: sammy@emaildomain.com
This Password is used to log in to the Mumble-Django dashboard along with the username that we just created.
[secondary_label Interactive]
Password:
Password (again):
After the Superuser created successfully message, we are asked to enter the Ice secret.
We set this earlier in the first section within the mumble-server.ini config file.
Enter whatever exact value you decided on for the ICE secret now:
InteractivePlease enter the Ice secret (if any): example_password
We are then given the choice to restart Apache again:
InteractiveApache2
-------------------------
If you have changed any settings in settings.py, you should reload the Web server
in order for the changes to take effect. Do you want to reload Apache2 now?
   1) Yes, reload Apache2.
 > 2) No, don't do anything.
Do as recommended and restart Apache by typing 1 and then pressing ENTER for a final time. (If you accidentally hit ENTER on the second option, remember to restart Apache later with sudo service apache2 restart)
Last, we are asked for a domain where Mumble-Django can be reached.
OutputThe domain is configured as example.com, which is the default but does not make sense. Please enter the domain where Mumble-Django is reachable.
If you have a domain name set up for your server, you can enter it here. Otherwise, enter your server’s IP address and press ENTER.
Interactiveyour_server_ip
You should see these final lines of output, confirming that the configuration is successful:
Outputyour.vps.ip.address [ OK ]
Checking Murmur instances... [ OK ]
Checking if an Admin user exists... [ OK ]
Checking SECRET_KEY... [ OK ]
Goodbye.
If you’ve reached this point in the configuration process with everything working as intended, move on to the next step below.
For those who received an error message during the previous configuration process reading:
OutputMurmur does not appear to be listening on this address.
If you see this error, it is likely that the localhost or loopback address we set ICE to run through is blocked, and conflicting with a firewall on your VPS.
In the case of a basic iptables firewall, the 127.0.0.1 loopback IP address needs to be added as a rule to allow for it to transmit properly.
Add the iptables rules with these commands:
- sudo iptables -I INPUT 1 -i lo -j ACCEPT -m comment --comment "allow input on localhost"
-
- sudo iptables -I OUTPUT 1 -o lo -j ACCEPT -m comment --comment "allow output on localhost"
Once this is resolved, run the configure command again to restart the process:
- sudo mumble-django-configure
Then, go through this step again from the beginning.
For more help with iptables and how it operates, see this DigitalOcean guide: How To Set Up a Firewall Using IPTables on Ubuntu 14.04
Step 3 — Edit Settings in settings.py
settings.py is the main configuration file for Mumble-Django. Open it with nano or your preferred text editor:
- sudo nano /etc/mumble-django/settings.py
First provide an email address where Mumble-Django can send errors. Locate the line # Who will receive emails on errors?, and then enter your name and email address between the two sets of parentheses:
Notice also that the # symbol needs to be removed to enable the line.
# Who will receive emails on errors?
ADMINS = (
     ('Sammy', 'sammy@email-domain.com'),
)
Now set debug mode to False in this file by setting DEBUG to False .
# If you want to file a bug report, please enable this option.
DEBUG = False
While debug mode is disabled, this will email the address above with the full exception error information if and when errors are generated by users.
It can be helpful to leave debug mode on while you are setting things up, or if you run into errors with the dashboard. Turn it off when you go into production.
Save your changes to settings.py.
Restart Apache again so the config file changes in settings.py become active:
- sudo service apache2 restart
Using the Mumble-Django Online Dashboard
The final section of the tutorial describes using Mumble-Django’s web interface.
Step 1 — Access Mumble-Django
You can access Mumble-Django in a web browser at either of the following addresses:
-
http://your_server_ip/mumble-django -
http://your_server_ip/mumble-django/mumble/1
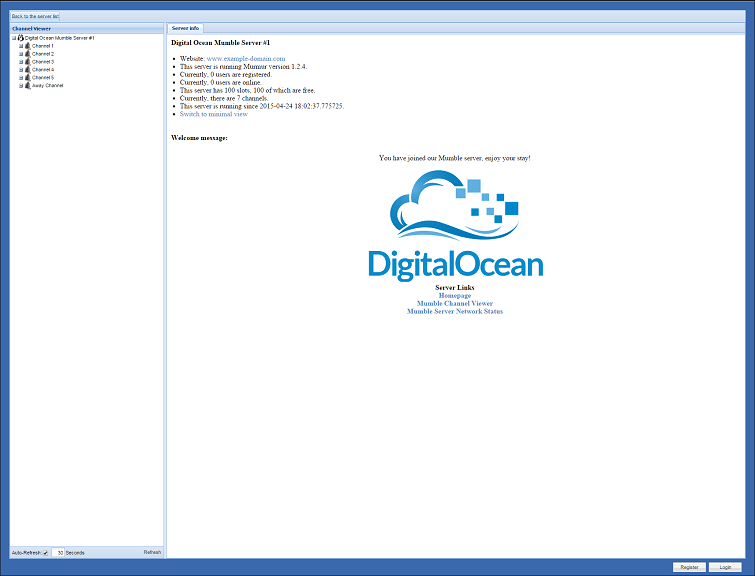
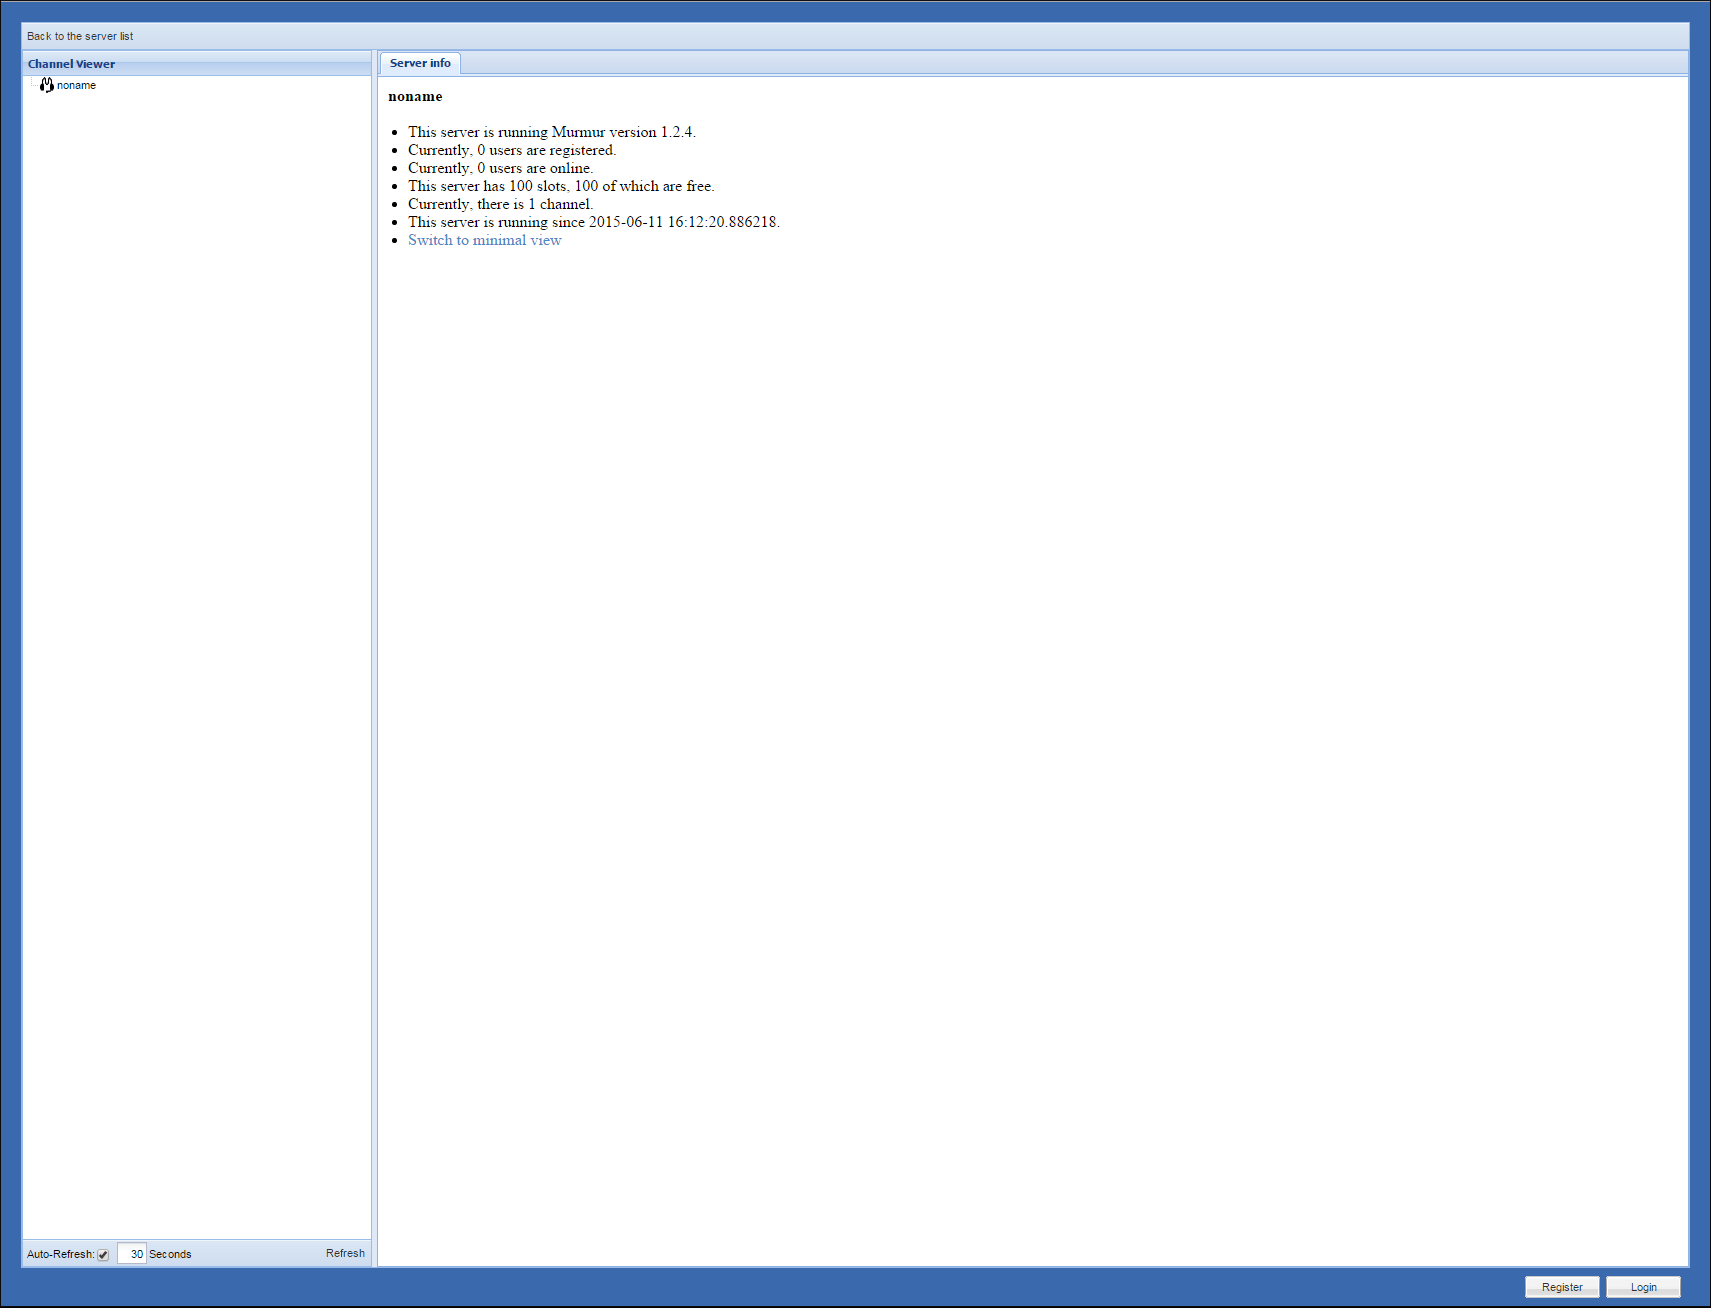
You should see the Channel Viewer window in the left column, and the Server info tab in the right column.
Step 2 — Log in as the Django Admin User
To view the rest of the interface and extra tabs, you need to log in to the dashboard with the Django administrative user you set back in Step 2 — Configure Mumble-Django. In our example, this was sammy. Remember, the dashboard user is separate from your Mumble (Murmur) user account details generated in the other tutorial.
The button to Login is located at the bottom right of the page.

After signing in, read the next few sections to take a look at all the different things you can do via the dashboard!
Live Channel Viewer
This window is static; it will always be visible, regardless of what you choose to view or change.
The Channel Viewer shows you which users are presently connected to the Mumble server instance in question.
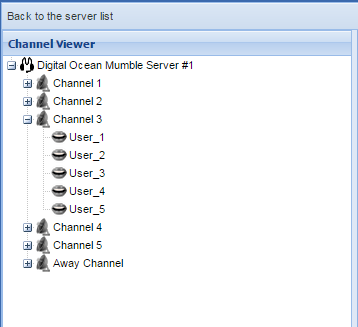
The viewer even tracks when a user is actively transmitting to the server (that is, the user is talking). The interval for updating this can be increased or lowered at the bottom of the screen, where you can enable/disable Auto-Refresh and set the refresh interval in seconds.

Everything here you would normally see on a Mumble client works here, too. So, you can use the channel names, descriptions, images, messages, etc.
Server info
The Server info tab shows general statistics and settings for the current Mumble server instance you are viewing. Other details you add and amend in the Administration can be added to this tab as well.
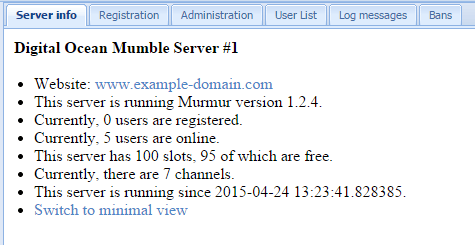
You can click links on this screen for more information.

Registration
With this Registration form, you can add Mumble users to the Murmur database for connection from the client. (These are not dashboard users; these are chat users.) Mumble accounts that belong to you and already exist can be linked to your Mumble-Django account name, and are marked with you as the owner. (Feel free to sync up the SuperUser Mumble account with your Mumble-Django user now.)

Bear in mind that the default method of authentication in Murmur is now SSL certificates, and not text-based passwords, for user accounts.
We’ll go over how to add more dashboard users in a later section.
Administration
You might recognize the settings in the Administration tab from the mumble-server.ini file. Setting and adding these here overwrites anything you have defined in said file, and applies it to the Mumble server instance you’re administering.
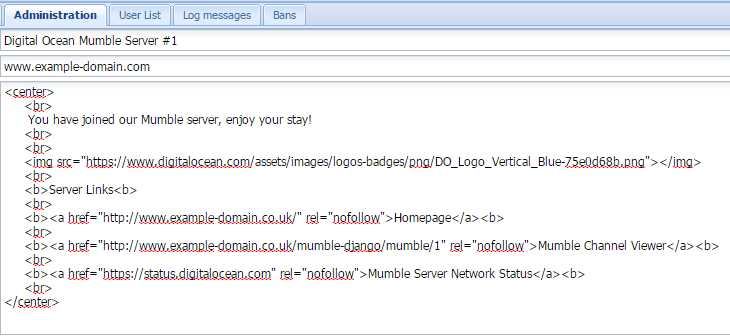
Like the Log messages tab, this is a more accessible method of changing and adding to the server’s configuration. Many of the fields update without a reboot and are instantly applied.
User texture
Here you can add images for users. See the Mumble wiki for details.
User List
The User List shows any user accounts you have registered through the Mumble client or this dashboard. You can delete users, give admin rights, and change passwords if applicable. Note that Mumble now uses SSL certificates by default for authentication, and not text-based passwords, so you shouldn’t need to alter any passwords here.

Use the Resync with Murmur button frequently when simultaneously changing user properties through the Mumble client and Mumble-Django.
Log messages
Note: IP Addresses have been redacted where necessary in the upcoming screenshots.
Murmur’s log file includes both internal and external (incoming/outgoing) server and database events. It’s possible to locate this file in /var/log/ on the command line to view its contents, but you can also skip doing this and view it here instead, if you want to see the last few recent entries.
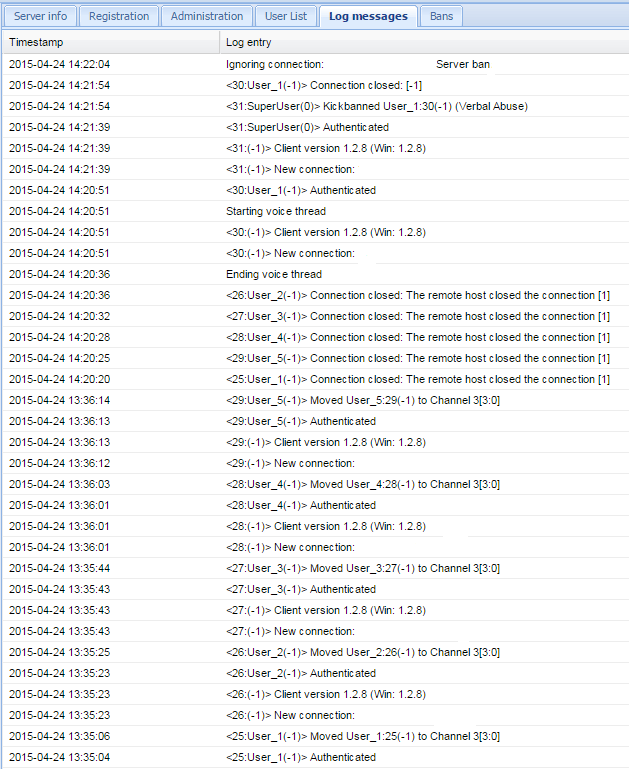
You can’t manipulate the data here like on the command line, but it’s still presentable and a lot more accessible to users who don’t have command line access. It’s also filterable through the input field at the bottom left of the window.
Bans
Bans on user appear here with all the details laid out into columns.

A Duration value of 0 indicates a permanent ban.
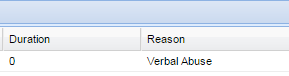
Select a ban to lift it via the Delete button at the bottom left.
Step 3 — Access the Django Administration Page
The previous section let us administer Mumble. In this section, we’ll show you how to administer the dashboard itself.
To access even more of the capabilities of Mumble-Django, click the Administration button at the bottom right of the screen (only visible when logged in).

In this new window, there are some extra server instance details you can configure if required.
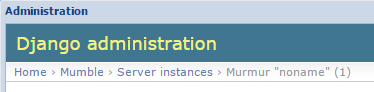
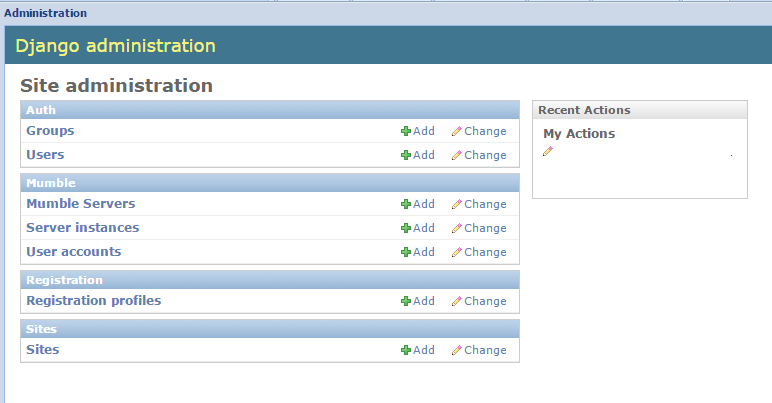
Click the Home link at the top left of the new panel. This takes you to the root Django administration page, providing access to otherwise hidden settings and further aspects of Mumble-Django.
-
Groups lets you assign dashboard users their permissions by allocating them to a group you create that has specific rights (if they aren’t dashboard Superusers)
-
Users provides another manual means of registering or approving new Mumble-Django admin accounts, and is the most basic but reliable way of adding new dashboard users. These are dashboard users, not chat users
-
Mumble Servers lists separate connections that are detected through middleware such as ICE or D-Bus. There should be only one when following this tutorial
-
Server instances shows all registered Murmur server instances. You can start, stop, and restart each one individually or together, and well as enable or disable their automatic boot
-
Registration profiles contains options such as re-sending verification emails and manually activating user accounts
-
Sites lets you change the dashboard domain name. Only change this if your new domain points to the server
Step 4 — Registering Additional Dashboard User Accounts
The Register button is located back on the initial home page (visible while signed out) and is where new users go to sign up for an account to use the dashboard.

Have new users register through the form on this button, and then click on the activation link in the email sent to their supplied email address.
New users should check their account’s spam folder for the activation email if needed. It will be from webmaster and have the subject Account verification.
New users must be approved and given Staff status (and Superuser status if desired), before they can log in and access most of the administration features in the dashboard.
Access the Django Administration Window described in the previous section (Django Administration Page) and follow these steps to approve a new user:
- Click the Home link as shown in the previous section
- Click the Users link on the root Django administration page
- Click on the relevant new username in the next window

- Check the Staff status box, and potentially the Superuser status box, and provide any other details you see fit for the new user
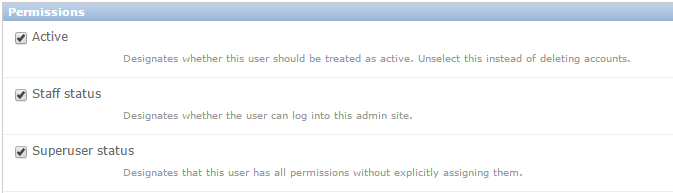
- Click the blue Save button at the bottom right
This gives the new user the same Mumble-Django rights as the first Superuser account created initially in the configuration process (the sammy account in our example).
The new user can now log in to the dashboard with full administration rights and help run your chat server from the dashboard.
Conclusion
In this guide we configured ICE middleware to interface with a Murmur instance, installed and configured Mumble-Django and its subsidiary packages, and made it accessible online with the Apache web server. Finally we learned about some of the capabilities of the Mumble-Django dashboard.
Other areas covered in the tutorial:
- Confirm or troubleshoot if ICE is working through the use of
netstat,grep, andtail - Allow input on the
127.0.0.1localhost address viaiptablesif required - Install
postfixand configure it to locally send out emails
Future steps could be to acquire and apply a domain name to the web server, set up Mumble-Django with a virtual hosts configuration, or add additional Murmur servers to the dashboard.
Thanks for learning with the DigitalOcean Community. Check out our offerings for compute, storage, networking, and managed databases.
About the author(s)
Current fan and former Editorial Manager at DigitalOcean. Hi! Expertise in areas including Ubuntu, Docker, Rails, and more.
Still looking for an answer?
 This work is licensed under a Creative Commons Attribution-NonCommercial- ShareAlike 4.0 International License.
Become a contributor for community
Get paid to write technical tutorials and select a tech-focused charity to receive a matching donation.

DigitalOcean Documentation
Full documentation for every DigitalOcean product.

Resources for startups and AI-native businesses
The Wave has everything you need to know about building a business, from raising funding to marketing your product.
The developer cloud
Scale up as you grow — whether you're running one virtual machine or ten thousand.

Start building today
From GPU-powered inference and Kubernetes to managed databases and storage, get everything you need to build, scale, and deploy intelligent applications.
