
The author selected the Open Internet/Free Speech Fund to receive a donation as part of the Write for DOnations program.
Introduction
Buildbot is a job scheduling system commonly used for the purpose of continuous integration (CI). CI is a software development practice that typically comprises automatically building and testing your software on a regular basis and for every change. While it’s commonly used as a CI platform, Buildbot can also be used for any automated task that runs on a computer. Buildbot’s task execution configuration includes four components:
- Change sources: these detect changes – such as those in a Git repository – and notify schedulers about them
- Schedulers: schedulers trigger builders according to incoming changes
- Builders: these contain the actual build steps, such as compilation of a software project
- Reporters: reporters use the build results to send failure emails or other notifications
Buildbot functions through at least one Buildbot master which runs and checks all build configuration and other settings, and distributes the actual builds to its workers. Additionally, the master offers a browser-based user interface subcomponent which, if enabled, is used to trigger or view builds and check status reports and other settings. There are also one or more Buildbot workers which connect to the master and receive commands, namely to run builds.
In this guide, you will use FreeBSD jails to install and run each Buildbot component in a separate, isolated environment. You’ll then serve Buildbot using the Nginx web server and access its web interface using a web browser on your local machine. After completing this guide, you will have a working setup with a sample project build, ready to extend for your own CI or other use cases.
Note: As of July 1, 2022, DigitalOcean no longer supports the creation of new FreeBSD Droplets through the Control Panel or API. However, you can still spin up FreeBSD Droplets using a custom image. Learn how to import a custom image to DigitalOcean by following our product documentation.
Prerequisites
Before you begin this guide, you will need:
- A server running FreeBSD 11.2, although newer and older supported versions of FreeBSD should work as well. If you’re new to working with FreeBSD, you may find it helpful to customize this server by following our guide on How to Get Started with FreeBSD.
- Nginx installed on your server. Read how to set this up by following our guide on How to Install Nginx on FreeBSD 11.2.
If you want to host the Buildbot web interface using secure HTTPS, you’ll also need the following:
- A registered domain name that you own and control. If you do not already have a registered domain name, you may register one with one of the many domain name registrars out there (e.g. Namecheap, GoDaddy, etc.).
- A DNS A Record that points your domain to the public IP address of your server. This is required because of how Let’s Encrypt validates that you own the domain it’s issuing a certificate for. For example, if you want to obtain a certificate for
example.com, that domain must resolve to your server for the validation process to work. You can follow this DNS Quickstart guide for details on how to add this. Throughout this tutorial, we will useexample.comas an example domain name. - An SSL/TLS certificate for your domain. Follow How To Secure Nginx with Let’s Encrypt on FreeBSD to set this up.
Step 1 – Setting up Jails for the Buildbot Master and Worker
Because Buildbot allows external contributers to run code on your system, it’s recommended that you isolate its various components to prevent arbitrary or malicious code from taking up your server’s resources. In this tutorial, you will do this using FreeBSD jails.
Similar to LXC, Docker, and other container mechanisms, FreeBSD jails offer lightweight isolation from the host system. Processes running inside a jail can only access the resources to which the jail was already granted access; otherwise, they behave like any other FreeBSD environment. Jails share the same kernel but typically run on a filesystem that has a copy of the FreeBSD base system, which may be any version of FreeBSD compatible with the host kernel. For most workloads, performance differences between running a task on the host versus in a jail are not noticeable.
Several external software packages exist to help with the creation and management of FreeBSD jails. Since none of them are the de facto standard, we will use the operating system’s built-in jail configuration mechanism.
First, we want to create a separate network interface for the system’s jails. In jails, the kernel rewrites network connections to the first IPv4/IPv6 address assigned to the jail. For example, if the first assigned IP address is public and a service in the jail listens on 127.0.0.1:1234, port 1234 will be publicly accessible. The recommended practice is to have a separate network interface for jails. We will follow this recommendation of cloning the primary loopback interface (lo0) into a separate interface (lo1). We’ll use the network 10.0.0.0/24, but any other non-overlapping network will work as well.
Begin by configuring a cloned interface to be created on boot. This sysrc command writes a rule to the /etc/rc.conf file but doesn’t create the interface itself:
- sudo sysrc cloned_interfaces+=lo1
Next, create the network interface with the following command:
- sudo service netif cloneup
You can check the interface state and IP with:
- ifconfig lo1
Outputlo1: flags=8008<LOOPBACK,MULTICAST> metric 0 mtu 16384
    options=600003<RXCSUM,TXCSUM,RXCSUM_IPV6,TXCSUM_IPV6>
    nd6 options=21<PERFORMNUD,AUTO_LINKLOCAL>
    groups: lo
The output shows that the interface exists, but has no IP addresses listed and attached to it yet. Its flag LOOPBACK means that this interface is only available locally and does not represent an actual hardware device.
Next, open up a new configuration file for the master jail using your preferred editor. Here, we will use ee:
- sudo ee /etc/jail.buildbot-master.conf
Then add the following content to the file, which will configure a master jail named buildbot-master:
buildbot-master {
    host.hostname = buildbot-master.localdomain;
    ip4.addr = "lo1|10.0.0.2/24";
    path = "/usr/jails/buildbot-master";
    exec.start = "/bin/sh /etc/rc";
    exec.stop = "/bin/sh /etc/rc.shutdown";
    mount.devfs; # need /dev/*random for Python
    persist;
}
This code assigns a fixed hostname and IP address on the jail network interface, 10.0.0.2, and specifies the root filesystem, /usr/jails/buildbot-master. The exec.start and exec.stop values used here declare that the jail’s start and stop services will behave like boot processes and use the startup and shutdown scripts found in the /etc/ directory. The persist option lets the jail keep running even if all of its processes are finished.
To learn more about possible master jail settings, check out the jail(8) manpage.
After adding this content, save and exit the editor. If you’re using ee, do this by pressing CTRL+C, typing exit, and pressing ENTER.
The configuration file for the master jail is separate from the global jail configuration file, /etc/jail.conf. Because of this, you will need to add the name of the master jail to the list of known jails:
- sudo sysrc "jail_list+=buildbot-master"
Then enable any jails listed in jail_list to start automatically on boot:
- sudo sysrc jail_enable=YES
If you already have jails on your system configured with the /etc/jail.conf global file but you haven’t used jail_list before, enabling this setting will mean that only the jails in jail_list will auto-start and you may want to add your existing jails to the list.
Note:
If you use the ZFS filesystem, it’s recommended that you create a separate dataset for the jail’s files in order to easily back up, clone, or destroy it later. The following commands assume your zpool to have the standard name zroot. If you aren’t sure of the name of your zpool, you can find it with the following command:
- zpool list
First, create the parent dataset for all jails:
- sudo zfs create zroot/usr/jails
Next, create the master jail’s dataset:
- sudo zfs create zroot/usr/jails/buildbot-master
Next, we will create the master jail’s root directory and extract the FreeBSD system.
Ensure the jail’s root filesystem directory exists. If you ran the ZFS commands in the previous note, then this has already been done and you can skip this command:
- sudo mkdir -p /usr/jails/buildbot-master
Then download a FreeBSD 11.2 base system archive. We first install root certificates to trust the download server:
- sudo pkg install ca_root_nss
This command will prompt you to approve installation of the ca_root_nss package. Do so by pressing y and then ENTER.
Next, download the archive:
- fetch -o /tmp/base.txz "https://download.freebsd.org/ftp/releases/amd64/11.2-RELEASE/base.txz"
Extract the contents of this file as the jail’s root filesystem:
- sudo tar -x -f /tmp/base.txz -C /usr/jails/buildbot-master
This guide describes the process of installing exactly one worker – also contained in a jail – and you will configure it in the same way as you did the master, reusing the base system that you just downloaded. Open up another new configuration file for the worker jail using the ee command:
- sudo ee /etc/jail.buildbot-worker0.conf
Add the following content to this file:
buildbot-worker0 {
    host.hostname = buildbot-worker0.localdomain;
    ip4.addr = "lo1|10.0.0.3/24";
    path = "/usr/jails/buildbot-worker0";
    exec.start = "/bin/sh /etc/rc";
    exec.stop = "/bin/sh /etc/rc.shutdown";
    mount.devfs; # need /dev/*random for Python
    persist;
}
Looking at these lines, notice how the worker jail has a different hostname, IP, and root filesystem directory from the master. Save and close this file.
Again, because we are using a separate jail configuration file instead of the global /etc/jail.conf, add the name to the list of known jails:
- sudo sysrc "jail_list+=buildbot-worker0"
Note: As with the master jail, if you use the ZFS filesystem it’s recommended that you create a separate dataset for the worker jail’s files. Again, the following command creates the worker jail’s dataset and assumes your zpool to have the standard name zroot:
- sudo zfs create zroot/usr/jails/buildbot-worker0
Extract the already-downloaded FreeBSD 11.2 base system as you did for the master:
- sudo mkdir /usr/jails/buildbot-worker0
- sudo tar -x -f /tmp/base.txz -C /usr/jails/buildbot-worker0
At this point, both jails are configured and contain a FreeBSD base system with no extra packages installed. Let’s start the jails:
- sudo service jail start
Check whether the startup was successful by listing all the running jails on the system with the following command:
- jls
This will return an output similar to the following that shows the jails currently running on your server:
Output   JID  IP Address      Hostname                      Path
     1  10.0.0.2        buildbot-master.localdomain   /usr/jails/buildbot-master
     2  10.0.0.3        buildbot-worker0.localdomain  /usr/jails/buildbot-worker0
This confirms that the jails are running as expected. At this point, however, they have no access to the internet, which means you won’t be able to install the Buildbot packages within them. Continue reading to resolve this.
Step 2 – Setting up Internet Access for the Jails
Although the master and worker jails are running, both of them are closed off from the internet. Opening them up to the internet is necessary, as they must be able to install packages as well as communicate with one another.
To resolve this, copy the host’s DNS resolver configuration to both of the jails:
- sudo cp /etc/resolv.conf /usr/jails/buildbot-master/etc/resolv.conf
- sudo cp /etc/resolv.conf /usr/jails/buildbot-worker0/etc/resolv.conf
Next, route the outgoing internet traffic from the jail. To do this, use IPFW – FreeBSD’s built-in firewall – to set up NAT (network address translation) networking rules. When you complete this step, traffic going out of the jail network will be translated to the public IP address of your host.
If you followed the Let’s Encrypt tutorial from the prerequisites, you will already have the firewall configured to allow access to your web server. In that case, some of the below steps will be redundant but there’s no harm in running through them again.
Warning: Performing erroneous changes to your firewall configuration can render the remote host inaccessible over SSH, so it’s important to ensure that you have an alternative method you can use to log into the machine.
To enable access through this feature, set a root password with the following command:
- sudo passwd
Alternatively, you can set a password for your current user with by typing:
- passwd
Include the predefined workstation firewall rules in your rc.conf file with the following command. The workstation rules protect the server but still allow basic services through, such as pinging the host or Dynamic Host Configuration Protocol:
- sudo sysrc firewall_type="workstation"
Next, allow access to the web server ports from the outside world. The following command allows traffic over port 22, for SSH; port 80, allowing Buildbot to be served over HTTP; and port 443, allowing Buildbot to be served over HTTPS. If you’ve secured your server with Let’s Encrypt, then all three of these ports are necessary, but if you haven’t and don’t plan to do so, then you can exclude port 443:
- sudo sysrc firewall_myservices="22/tcp 80/tcp 443/tcp"
Allow access from any IP address to the ports specified in the firewall_myservices directive:
- sudo sysrc firewall_allowservices="any"
Configure the firewall to start at boot:
- sudo sysrc firewall_enable=YES
Then start the firewall with basic rules. The following nohup command avoids interruption of the firewall start, and also redirects both stderr and stdout to a temporary log file. This is important so as not to leave firewall rules in an inconsistent state, which can potentially leave your remote host inaccessible over SSH:
- sudo nohup service ipfw start >/tmp/ipfw.log 2>&1
If you’re using either the csh or tcsh shells, this redirect will cause Ambiguous output redirect. to appear in your output. If you’re using either of these shells, run sudo nohup service ipfw start >&/tmp/ipfw.log the following instead to start ipfw:
At this point, the firewall service will start and begin protecting the host from connections to unsecured ports.
Note: If something went wrong or you used a different firewall type, the firewall may not yet know the state of your SSH connection, causing your connection to the server to stall. You can find out by typing something into the shell. During a stalled connection, the characters won’t be printed on the remote side. If this is the case, you can either wait until SSH notices the timeout, or drop out of the hanging terminal by pressing these keys one after another: ENTER, ~, .
After your SSH connection is closed, reconnect to your server from your local machine:
- ssh freebsd@your_server_ip
If the SSH connection can’t be reestablished, you will need to connect to it using an alternative method.
Once you’ve regained access deactivate the firewall:
- sudo service ipfw stop
With the firewall stopped, you’ll be free to debug the problem.
Next, you need to determine the network interface of the host which connects to the internet. Find this by running:
- ifconfig
This command may output a couple different interfaces. The one used by the host to connect to the internet is the one that includes your server’s public IP address. To illustrate, the following example output shows that vtnet0 is the network interface used by the host:
Outputvtnet0: flags=8843<UP,BROADCAST,RUNNING,SIMPLEX,MULTICAST> metric 0 mtu 1500
    options=6c07bb<RXCSUM,TXCSUM,VLAN_MTU,VLAN_HWTAGGING,JUMBO_MTU,VLAN_HWCSUM,TSO4,TSO6,LRO,VLAN_HWTSO,LINKSTATE,RXCSUM_IPV6,TXCSUM_IPV6>
    ether 9a:3e:fa:2a:5f:56
    hwaddr 9a:3e:fa:2a:5f:56
    inet6 fe80::983e:faff:fe2a:5f56%vtnet0 prefixlen 64 scopeid 0x1
    inet public_server_ip netmask 0xffffffc0 broadcast broadcast_ip
    inet 10.10.0.23 netmask 0xffff0000 broadcast 10.10.255.255
    nd6 options=21<PERFORMNUD,AUTO_LINKLOCAL>
    media: Ethernet 10Gbase-T <full-duplex>
    status: active
lo0: flags=8049<UP,LOOPBACK,RUNNING,MULTICAST> metric 0 mtu 16384
    options=600003<RXCSUM,TXCSUM,RXCSUM_IPV6,TXCSUM_IPV6>
    inet6 ::1 prefixlen 128
    inet6 fe80::1%lo0 prefixlen 64 scopeid 0x2
    inet 127.0.0.1 netmask 0xff000000
    nd6 options=21<PERFORMNUD,AUTO_LINKLOCAL>
    groups: lo
lo1: flags=8049<UP,LOOPBACK,RUNNING,MULTICAST> metric 0 mtu 16384
    options=600003<RXCSUM,TXCSUM,RXCSUM_IPV6,TXCSUM_IPV6>
    inet 10.0.0.2 netmask 0xffffff00
    inet 10.0.0.3 netmask 0xffffff00
    inet6 fe80::1%lo1 prefixlen 64 scopeid 0x3
    nd6 options=21<PERFORMNUD,AUTO_LINKLOCAL>
    groups: lo
Make a note of this interface, then configure its name globally:
- sudo sysrc firewall_nat_interface=vtnet0
Open up the new firewall configuration script file:
- sudo ee /usr/local/etc/ipfw.rules
Then add the following content to the file, defining the firewall rules for IPFW:
#!/bin/sh
set -e

# Add basic rules as defined by firewall_type, firewall_myservices, etc.
. /etc/rc.firewall

# External network interface
ext_if="$firewall_nat_interface"

# The interface we chose for communication between jails
jail_if="lo1"

for interface in "$ext_if" "$jail_if"; do
    if [ -z "$interface" ]; then
        >&2 echo "Missing network interface"
        exit 1
    fi
    if ! ifconfig $interface >/dev/null 2>&1; then
        >2 echo "No such network interface: $interface"
        exit 1
    fi
done

ipfw nat 123 config if $ext_if
ipfw add 1 allow all from any to any via $jail_if
ipfw add 2 nat 123 ip4 from any to any in via $ext_if
ipfw add 501 skipto 20000 udp from any to any 53 out via $ext_if keep-state
ipfw add 502 skipto 20000 udp from any to any 67 out via $ext_if keep-state
ipfw add 503 skipto 20000 tcp from any to any out via $ext_if setup keep-state
ipfw add 504 skipto 20000 icmp from any to any out via $ext_if keep-state
ipfw add 19999 deny all from any to any
ipfw add 20000 nat 123 ip4 from any to any out via $ext_if
ipfw add 20001 allow ip from any to any
Here’s what each part of the script does:
. /etc/rc.firewallincludes the system’s predefined IPFW rules script, which adds basic rules according to your configuration of thefirewall_*variables in/etc/rc.conf.- The next block checks whether all configured interfaces exist. This is for your safety and quits the script early if there’s a misconfiguration.
- The directives starting with
ipfwadd the actual firewall configuration and rules. Each rule – added in the lines starting withipfw add– has a number. The firewall uses these numbers to evaluate the rules in sequential order.ipfw nat 123 config if $ext_ifcreates an in-kernel NAT facility with the ID “123” to translate traffic using the public-facing network interface.ipfw add 1 allow all from any to any via $jail_ifallows all traffic between the jails. Note that if anallowrule matches, rule processing stops and the packet is allowed to pass.ipfw add 2 nat 123 ip4 from any to any in via $ext_iftranslates all incoming IPv4 packets on the external interface. This is needed as a counterpart to the translation of outgoing packets, as described in the explanation ofipfw add 20000....ipfw add 501 skipto 20000 udp from any to any 53 out via $ext_if keep-stateand the followingskiptorules define which outbound traffic to allow and to consider for network address translation. If there is a match, processing continues by jumping to rule20000, which performs NAT. The rule number501intentionally comes after the default loopback rules which deny traffic from local-only networks (127.0.0.0/8and::1), such as00300 deny ip from 127.0.0.0/8 to any. Runsudo ipfw listto see the currently active firewall rules (but mind that we did not apply the above changes yet).- Except for the
skiptorules, there is an intentional gap between rules2and19999where the/etc/rc.firewallscript inserts certain basic rules. If none of the aboveskiptorules match, the basic rules will take care of allowing different types of traffic including loopback, incoming ICMP ping messages, and the ports specified byfirewall_myservices. ipfw add 19999 deny all from any to anycomes after all the basic rules and ensures the end of non-NAT rule processing, essentially disallowing all traffic that was not matched by a previousallowrule.ipfw add 20000 nat 123 ip4 from any to any out via $ext_iftranslates the address of all outbound IPv4 packets leaving on the external interface. You only need IPv4 here because, in this tutorial, jails are assigned IPv4 addresses exclusively.ipfw add 20001 allow ip from any to anyis only required if you have turned off one-pass mode fornatrules, in which case processing will continue after going through the rule20000, requiring you to explicitly allow those packets through with a separate rule. For the default one-pass mode, the firewall will stop processing at thenatrule and therefore ignore rule20001.
Save the file and exit the editor.
Since we want to amend the predefined, basic firewall rules with the rules defined in the ipfw.rules script, we must point to this script in the rc.conf file. The following command will configure the script to execute whenever the firewall starts:
- sudo sysrc firewall_script="/usr/local/etc/ipfw.rules"
This setup uses the in-kernel NAT support of IPFW, so you must tell the system to load the respective kernel module at boot. Additionally, load the module immediately without requiring a reboot:
- sudo sysrc -f /boot/loader.conf ipfw_nat_load=YES
- sudo kldload ipfw_nat
Restart the firewall to put the extended firewall rules script in effect:
- sudo nohup service ipfw restart >/tmp/ipfw.log 2>&1
Again, if you’re using the csh shell or one of its derivatives (like tcsh), run sudo nohup service ipfw restart >&/tmp/ipfw.lo instead of the previous command to restart the firewall:
Check that the firewall rules have been loaded correctly:
- cat /tmp/ipfw.log
This lists the firewall rules, followed by a success message:
OutputFlushed all rules.
00100 allow ip from any to any via lo0
[...]
65500 deny ip from any to any
Firewall rules loaded.
You can also view installed firewall rules at any time using:
- sudo ipfw list
Output00001 allow ip from any to any via lo1
00002 nat 123 ip from any to any in via em0
[...]
65535 deny ip from any to any
With all firewall rules in place, your jails are now able to access the internet. You can check by trying to download a web page from within a jail:
- sudo jexec buildbot-master fetch -q -o- http://example.com/
Output<!doctype html>
<html>
<head>
    <title>Example Domain</title>
[...]
With that, you’ve successfully prepared both jails to run like a regular operating system, set up internet access for each jail, and started both of them. The next two steps in this tutorial will walk you through installing both the master and worker components and then running them as services.
Step 3 – Installing and Running the Buildbot Master
Buildbot’s components are split into several packages. You only need to install the py36-buildbot package to run the master component, but in this guide we will also go over how to install the web interface package, py36-buildbot-www.
Since we are using jails to segment the various components, start by opening a root shell in the master jail:
- sudo jexec buildbot-master csh
Please note that, in this guide, shell command blocks are marked with a different color if they must be executed within a jail shell. Additionally, the command prompt will reflect which of the jail’s user profiles – either the root or unprivileged buildbot-master user – that commands must be run under.
Install the packages:
- pkg install py36-buildbot py36-buildbot-www
If you haven’t yet installed or used the pkg package manager in this jail, it will prompt you to confirm that you allow it to bootstrap itself. To do this, press y and then ENTER. Then, approve installation of the Buildbot packages by again entering y.
Next, create a regular, unprivileged user to run the master service. The following command will assign a random password to this user, but you do not need to remember it since the root user of the host (outside the jail) can change it or become any user within the jail without a password:
- pw useradd -n buildbot-master -m -w random
Following this, create the master directory where you will store the configuration:
- mkdir /var/buildbot-master
And give ownership to the service user:
- chown buildbot-master:buildbot-master /var/buildbot-master
From this point on, all master-related setup and changes should be executed as the unprivileged user, as this will help to keep ownership and permissions consistent.
Switch over to the the unprivileged user:
- su -l buildbot-master
Then use the built-in buildbot utility to create a directory and configuration structure in the specified directory:
- buildbot-3.6 create-master /var/buildbot-master
Unlike other CI software like Jenkins, Buildbot’s behavior is defined directly in its configuration file, which is interpreted with Python. This allows for streamlined versioning of your configuration, while the use of a scripting language allows for the freedom to write custom build configurations and extend existing Buildbot functionalities.
The Buildbot package comes with a sample master configuration file which you can use as a template for your own configuration. Copy over the sample configuration and name it master.cfg:
- cp /var/buildbot-master/master.cfg.sample /var/buildbot-master/master.cfg
Then open the base configuration file with your preferred text editor. Here, we’ll use ee:
- ee /var/buildbot-master/master.cfg
The configuration file contains a password required for workers to connect to the master. Replace the default pass with a secure password of your choosing. Also, our worker’s name will be worker0, so also replace example-worker with worker0 in both the WORKERS and BUILDERS sections.
When finished, the parts of the file you need to edit will look like this:
####### WORKERS

# ...
c['workers'] = [worker.Worker("worker0", "your_secure_password")]
# ...

####### BUILDERS

# ...
c['builders'] = []
c['builders'].append(
    util.BuilderConfig(name="runtests",
      workernames=["worker0"],
      factory=factory))
# ...
Save and close this file, then run the exit command to switch back to the root user within the jail:
- exit
Because the sample configuration watches the Git repository git://github.com/buildbot/hello-world.git as its change source, you also need to install Git:
- pkg install git-lite
With that, you’ve created the master directory structure and configuration, but the service isn’t running yet. To run Buildbot manually, one could run the command buildbot start from the master directory, /var/buildbot-master. However, this does not take care of boot-time startup or other system-wide configuration. Instead, we will use rc scripts, FreeBSD’s standard method for running services. Specifically, we’ll do so using the service utility.
For the purposes of this tutorial, we want to enable the service to run at every boot. In the case of jails, this means the start event of the jail. Use the following command to define the location of the master directory:
- sysrc buildbot_basedir=/var/buildbot-master
Then specify that the service should run under the buildbot-master user:
- sysrc buildbot_user=buildbot-master
Next, enable the service to run at jail startup:
- sysrc buildbot_enable=YES
At the time of writing, the py36-buildbot package has a bug which prevents the service from starting (see this bug report). Until this is fixed, you will need to manually patch the start script by running the following command from your buildbot-master jail:
- sed -i '' 's|command="/usr/local/bin/buildbot"|command="/usr/local/bin/buildbot-3.6"|' /usr/local/etc/rc.d/buildbot
Then, start the service:
- service buildbot start
The service should start with no errors. You can verify success by viewing the contents of the log file:
- tail /var/buildbot-master/twistd.log
Output2018-06-08 15:14:52+0000 [-] Starting BuildMaster -- buildbot.version: 0.9.11
2018-06-08 15:14:52+0000 [-] Loading configuration from '/var/buildbot-master/master.cfg'
[...]
2018-06-08 15:14:52+0000 [-] BuildMaster is running
To return to the host shell, run exit from the jail shell:
- exit
You have successfully configured and started the Buildbot master service. The second component, the worker, is required to actually run builds. You will install one worker in the next section inside a second jail and then configure its connection to the master service.
Step 4 – Installing and Running the Buildbot Worker
Although the Buildbot master is running, no builds can occur since you need at least one worker running. This step is similar to the previous one in that we will set up a separate jail first and then install the service. This time, however, the Buildbot worker component will connect to the master to listen for commands and report results back.
The instructions in this step are almost identical to the master setup, except that the worker component is part of another package and the only configuration changes you’ll make involve adding details about connecting it to the master and some display information about the worker itself.
Ensure you are in the host shell, not inside a jail. Then open a root shell in the worker jail:
- sudo jexec buildbot-worker0 csh
Remember that, in this guide, command blocks are marked with a different color if they must be executed within a jail shell and the command prompts will reflect which user profile the commands should be run under.
Install the Buildbot worker package with the following command:
- pkg install py36-buildbot-worker
As this command runs, it will prompt you to confirm whether you want to bootstrap the pkg package management utility. Do so by entering y. It will also ask you to confirm that you approve the installation of the packages, so enter y again when prompted.
Next, create a regular, unprivileged user to run the worker service:
- pw useradd -n buildbot-worker -m -w random
Then create the worker directory. This is the location where the worker’s configuration, display information, and build directories will be stored:
- mkdir /var/buildbot-worker
Give ownership to the service user:
- chown buildbot-worker:buildbot-worker /var/buildbot-worker
From this point on, all worker-related setup and changes should be executed as the unprivileged user. To that end, switch over to the buildbot-worker user:
- su -l buildbot-worker
Use the built-in buildbot-worker utility to create a directory and configuration structure in the /var/buildbot-worker directory. Specify the master jail’s IP address — 10.0.0.2, which we chose in the previous step — so the worker can connect to it and replace pass with the password you defined in the master configuration file:
- buildbot-worker-3.6 create-worker /var/buildbot-worker 10.0.0.2 worker0 'pass'
To finish the setup, fill in a few details about the system administrator and the worker’s purpose:
- echo 'Your Name <your.email.address@example.com>' >/var/buildbot-worker/info/admin
- echo 'Description of this worker' >/var/buildbot-worker/info/host
Following this, run the exit command to switch back to the root user within the jail:
- exit
Because the sample configuration clones the Git repository git://github.com/buildbot/hello-world.git to build the sample project, you also need to install Git within this jail. Note how the Buildbot master also required Git because change sources run on the master. Additionally, the builder uses a test runner called trial which is part of the py27-twisted package, so install this along with git-lite:
- pkg install git-lite py27-twisted
The built-in mechanism for running a worker is buildbot-worker start, which should be run from the worker directory, /var/buildbot-worker. However, this does not take care of boot-time startup and does not ensure that it will run under the correct user. As you did with the master, leverage the packaged rc script by using the service utility, to manage the service.
Use the following commands to define the worker directory as well as the user and group under which the service should run:
- sysrc buildbot_worker_basedir=/var/buildbot-worker
- sysrc buildbot_worker_uid=buildbot-worker
- sysrc buildbot_worker_gid=buildbot-worker
Next, enable the service to run at jail startup:
- sysrc buildbot_worker_enable=YES
At the time of writing, the py36-buildbot-worker package has a bug which prevents the service from starting (see this bug report). Until this is fixed, you will need to manually patch the start script by running the following command from your buildbot-worker0 jail:
- sed -i '' 's|command="/usr/local/bin/twistd"|command="/usr/local/bin/twistd-3.6"|' /usr/local/etc/rc.d/buildbot-worker
Finally, start the worker component:
- service buildbot-worker start
The service should start with no errors. You can verify that it was successful by viewing the most recent entries to the log file:
- tail /var/buildbot-worker/twistd.log
If the service started successfully, a message like Connected to 10.0.0.2:9989; worker is ready will appear in the log file. If you forgot to specify a new password earlier in this step, the service will fail to connect to the master. In this case, edit the file /var/buildbot-worker/buildbot.tac and then run service buildbot-worker restart to rectify this issue.
Once the service starts correctly, drop out to the host shell by running the exit command from the jail shell:
- exit
With that, the second jail has been configured and you have all the basic components needed for operating Buildbot. To be readily usable for your users, it’s recommended that you also set up the web-based user interface. Doing so will allow you to control Buildbot and see build results with greater convenience.
Step 5 – Setting Up the Buildbot Web Interface
Buildbot features a web-based user interface that shows build overviews and results, and allows you to trigger builds manually if a “force” scheduler is configured, as is the case in the sample configuration.
Your master configuration already sets up the www component to serve HTTP over port 8010. In a production setting, you would not serve unencrypted HTTP or open up the non-standard port 8010 to the outside, as this would open your system up to security vulnerabilities. Also, the web interface can be served from any URL path, which means that it does not need to be the only application on your domain. For example, you could serve build outputs or logs to your users. Hence, we will serve the UI to users with a separate web server – Nginx – in order to support HTTPS, protect internal ports, and gain the ability to serve other content alongside the Buildbot web interface.
Open up the Nginx configuration file for editing:
- sudo ee /usr/local/etc/nginx/nginx.conf
Add the following highlighted location blocks within the file’s existing server block:
 . . .
http {
 . . .
    server {

 . . .
        location / {
            root /usr/local/www/nginx;
            index index.html index.htm;
        }

        location /buildbot/ {
            proxy_pass http://10.0.0.2:8010/;
        }
        location /buildbot/sse/ {
            # proxy buffering will prevent sse to work
            proxy_buffering off;
            proxy_pass http://10.0.0.2:8010/sse/;
        }
        # required for websocket
        location /buildbot/ws {
            proxy_http_version 1.1;
            proxy_set_header Upgrade $http_upgrade;
            proxy_set_header Connection "upgrade";
            proxy_pass http://10.0.0.2:8010/ws;
            # raise the proxy timeout for the websocket
            proxy_read_timeout 6000s;
        }

        error_page 500 502 503 504 /50x.html;
        location = /50x.html {
            root /usr/local/www/nginx-dist;
        }

                . . .

    }
}
This configuration forwards all requests below the URL path /buildbot/ to the web interface and enables WebSocket support, which is used by the interface to receive updates that it will display such as the log output of a running build.
Save and close the Nginx configuration file. Then, reload the Nginx service:
- sudo service nginx reload
Open up your preferred web browser on your local machine and access the Buildbot web interface by going to the following URL:
https://example.com/buildbot/
Alternatively, if you did not set up a domain name for your server, you’ll instead need to enter your server’s public IP address, http://your_server_ip/buildbot/.
When you arrive at the interface, you will see an overview similar to the following:
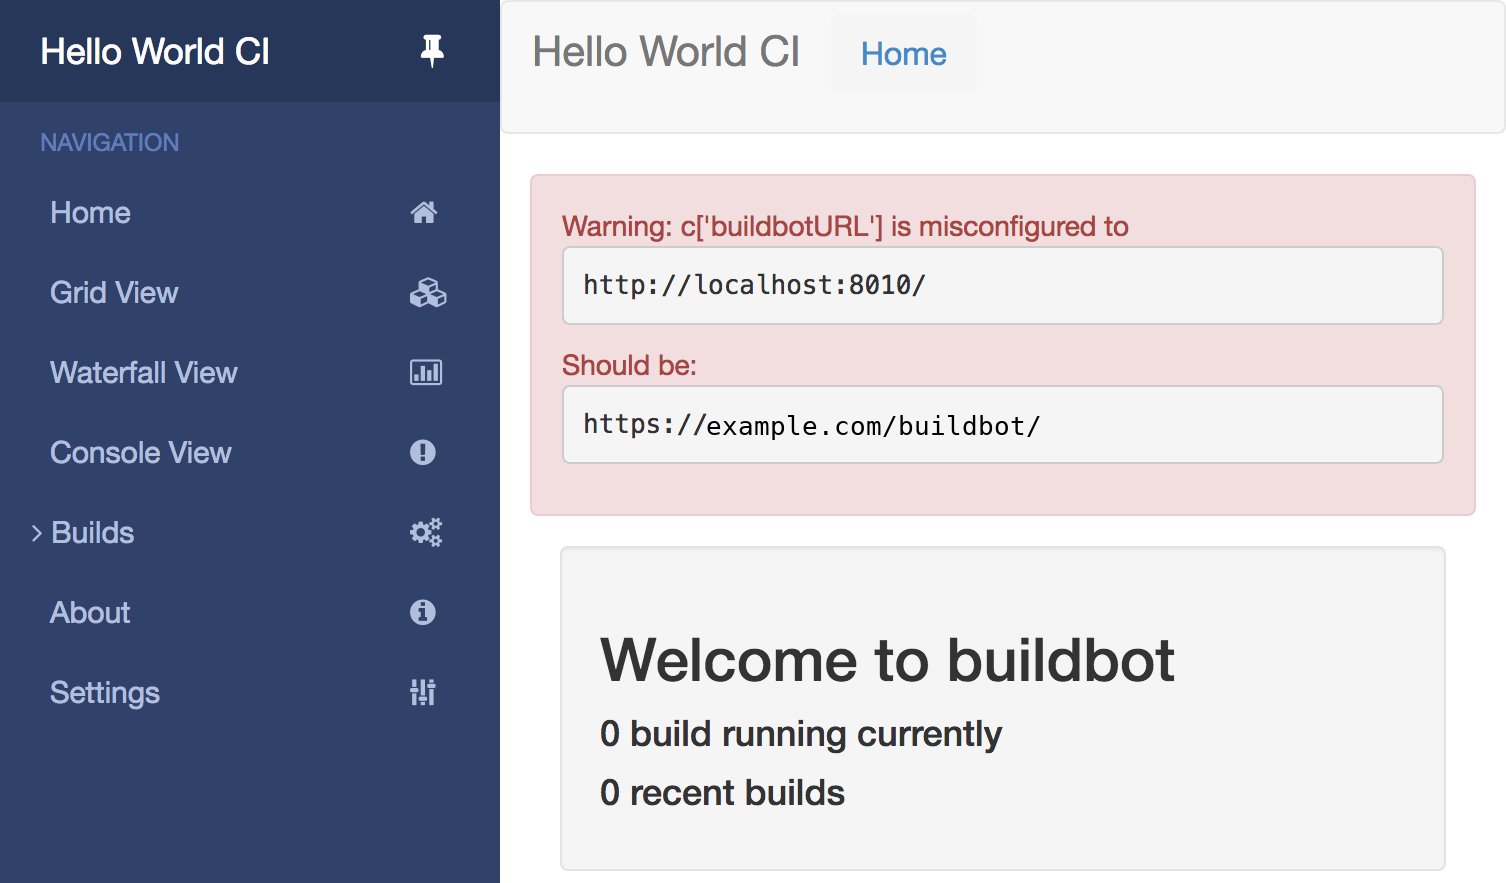
The main page may show a warning that the Buildbot URL is misconfigured. This occurs if the hostname provided in the nginx.conf file mismatches what’s listed in master Buildbot configuration. Since build result emails contain links to the Buildbot web interface by default, the master must know the correct URL where it can be reached.
Note that, in our example configurations, we have not set up this email service. If you’re interested in configuring this, see Buildbot’s documentation about reporters for more information:
With that said, to resolve the warning and send emails that contain the correct content, edit the Buildbot master configuration to point to your domain.
- sudo ee /usr/jails/buildbot-master/var/buildbot-master/master.cfg
Find the line that begins with c['buildbotURL'] and replace the default option with your domain name, followed by /buildbot/:
####### PROJECT IDENTITY
# ...
c['buildbotURL'] = 'https://example.com/buildbot/'
# ...
Save and close the file. Then, to apply the new configuration, reload the buildbot service:
- sudo jexec buildbot-master service buildbot reload
Refresh the Buildbot web interface in your browser, and the warning will disappear.
Continuous Integration servers often serve other purposes besides CI. For example, a CI server might serve build outputs for FreeBSD packages or logs over HTTPS. It’s therefore recommended that you reserve the URL path /buildbot/ for the web interface. This allows you to host more applications under different paths. For the moment, we will create a simple home page that redirects to the web interface. You can add more links once you implement more use cases for the web server.
Run the following command to open an index file in your web root – replacing example.com with your own domain – to create an automatic redirect to the Buildbot web interface:
- sudo ee /usr/local/www/example.com/html/index.html
Note: If you did not follow the prerequisite Nginx tutorial and create a new web root for your Nginx configuration, you will instead need to create an index file under the default Nginx web root by running sudo ee /usr/local/www/nginx/index.html.
Replace any existing file content with the following lines:
<html>
<body>
<a href="/buildbot/">buildbot</a>
<script>
    // Auto-redirect while only the web interface should be served
    window.location.href = "/buildbot/";
</script>
</body>
</html>
Save and close this file, then enter your domain name or IP address in the URL bar of your browser. It should automatically redirect you to the Buildbot interface.
You’ve finished the installation of all the Buildbot components, including its web-based control and viewing interface. With all of this in place, let’s run an actual build as specified in the sample configuration which we have set up for the master.
The builder has a “force” scheduler configured by default, which allows you to trigger your first build. In the web interface, click Builds > Builders > runtests > force > Start Build and see how the build runs. If you see any errors, check the server’s internet connection and whether all the dependent packages were installed as described previously.
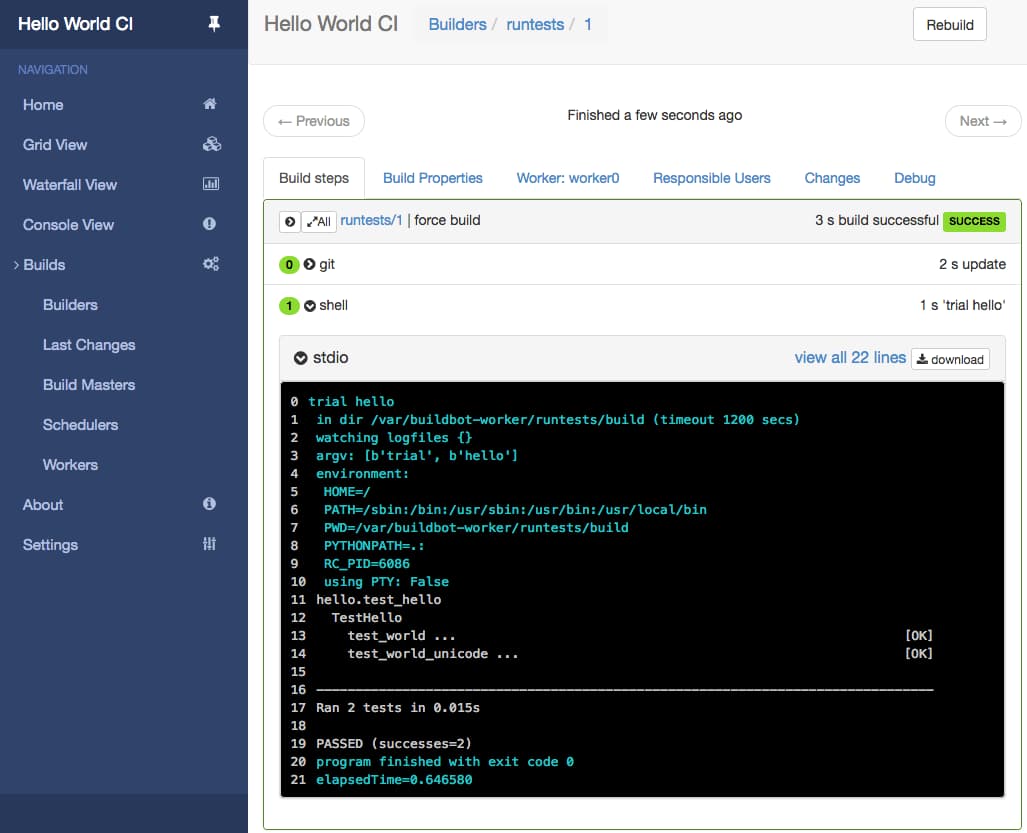
You can find the artifacts from this build (and others) by looking at the contents of the build directory:
- ls /usr/jails/buildbot-worker0/var/buildbot-worker/runtests
Outputbuild
You have successfully configured a permanently running and versatile CI system and can now begin implementing your own builds.
Conclusion
By completing this tutorial, you practiced creating FreeBSD jails and learned some of the basics of the Buildbot automation framework, resulting in a ready-to-use installation. To learn more about Buildbot and its configuration, we encourage you to read through the official Buildbot documentation.
From here, you’re free to implement your own Continuous Integration and automation practices. In order to have a secure, stable and performant setup for production use, you may want to take these optional configuration steps:
- Use HTTPS only (as explained in this tutorial)
- In the tutorial, you used a separate, host-internal network
lo1for your jails. In this guide, we usedipfwfor NAT purposes, but other firewalls have this feature as well. Check out the FreeBSD documentation about available firewalls. Unless your use case requires otherwise, it is recommended to keep the jail network inaccessible from the outside through the use of NAT or other mechanisms. - Buildbot’s web interface does not require a login or check user permissions by default. To implement these, you will have to enable user authentication.
Thanks for learning with the DigitalOcean Community. Check out our offerings for compute, storage, networking, and managed databases.
About the author(s)
Former Technical Writer at DigitalOcean. Focused on SysAdmin topics including Debian 11, Ubuntu 22.04, Ubuntu 20.04, Databases, SQL and PostgreSQL.
Still looking for an answer?
This textbox defaults to using Markdown to format your answer.
You can type !ref in this text area to quickly search our full set of tutorials, documentation & marketplace offerings and insert the link!
 This work is licensed under a Creative Commons Attribution-NonCommercial- ShareAlike 4.0 International License.
Become a contributor for community
Get paid to write technical tutorials and select a tech-focused charity to receive a matching donation.

DigitalOcean Documentation
Full documentation for every DigitalOcean product.

Resources for startups and AI-native businesses
The Wave has everything you need to know about building a business, from raising funding to marketing your product.
The developer cloud
Scale up as you grow — whether you're running one virtual machine or ten thousand.

Start building today
From GPU-powered inference and Kubernetes to managed databases and storage, get everything you need to build, scale, and deploy intelligent applications.
