By Henrik

Status: Deprecated
This article covers a version of CentOS that is no longer supported. If you are currently operating a server running CentOS 6, we highly recommend upgrading or migrating to a supported version of CentOS.
Reason: CentOS 6 reached end of life (EOL) on November 30th, 2020 and no longer receives security patches or updates. For this reason, this guide is no longer maintained.
See Instead: This guide might still be useful as a reference, but may not work on other CentOS releases. If available, we strongly recommend using a guide written for the version of CentOS you are using.
About ejabberd
Ejabberd is a very simple, stable, and powerful XMPP server written in Erlang. This tutorial will guide you through the installation process and basic setup on a CentOS VPS.
Installing ejabberd
First we need to enable EPEL-Repository (EPEL = Extra Packages for Enterprise Linux) on your VPS. This is OS dependent:
On a CentOS 5.x VPS
wget http://dl.fedoraproject.org/pub/epel/5/x86_64/epel-release-5-4.noarch.rpm
sudo rpm -Uvh epel-release-5*.rpm
On a CentOS 6.x VPS
wget http://dl.fedoraproject.org/pub/epel/6/x86_64/epel-release-6-8.noarch.rpm
sudo rpm -Uvh epel-release-6*.rpm
For more information on EPEL, click here.
After enabling EPEL, we are ready to install ejabberd from the repositories. Do the following as root.
sudo yum install ejabberd
Set Hostname
The host name of your ejabberd service is set in the ejabberd config. Edit this with your preferred editor of your choice. In this example, I will be using vim.
sudo vim /etc/ejabberd/ejabberd.cfg
Find the hostname section (Line #91. It should look something like:
%%%.   ================
%%%'   SERVED HOSTNAMES
%% hosts: Domains served by ejabberd.
%% You can define one or several, for example:
%% {hosts, ["example.net", "example.com", "example.org"]}.
%%
{hosts, ["localhost"]}.
We want to add a new hostname. This is done by editing the last line in the snippet. If we would like to add example.com, it would look like this:
{hosts, ["localhost","example.com"]}.
Now that we have added your domain, save the file.
Start the Service
In order to make a new user, we first have to start the service.
sudo service ejabberd start
Make a User
To add a new user, run the following command:
ejabberdctl register username host password
Replace username, host and password with your own data. For example:
ejabberdctl register admin example.com superman
Admin privileges
Now have a user called admin with the password superman, we would like to give this user admin privileges.
We do this by editing the ejabberd configuration file like before. Find the admin user section (Line #369) in the config, which should look something like this:
%%%.   ====================
%%%'   ACCESS CONTROL LISTS

%%
%% The 'admin' ACL grants administrative privileges to XMPP accounts.
%% You can put here as many accounts as you want.
%%
%%{acl, admin, {user, "aleksey", "localhost"}}.
%%{acl, admin, {user, "ermine", "example.org"}}.
Now, add the following line. This will give our user admin rights.
{acl, admin, {user, "admin", "example.com"}}.
Remember to restart the ejabberd service every time we change something in the configuration file:
sudo service ejabberd restart
Web Interface
Ejabberd ships with a very nice and simple web-interface for statistics, configuration, etc.
You should spend some time browsing the web-interface to get familiar with it, it’s quite simple and shouldn’t take too long.
To open the web-interface, start a browser and go to:
http://example.com:5280/admin
You will need to authenticate with an admin user.
Adding New Users from Web Interface
When you first load up the admin interface, it should look like the following:
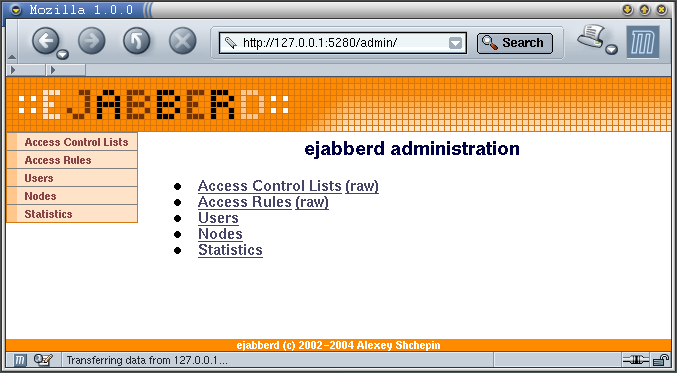
Click Virtual hosts -> example.com -> Users.
Here you will be able to add new users, as shown below:
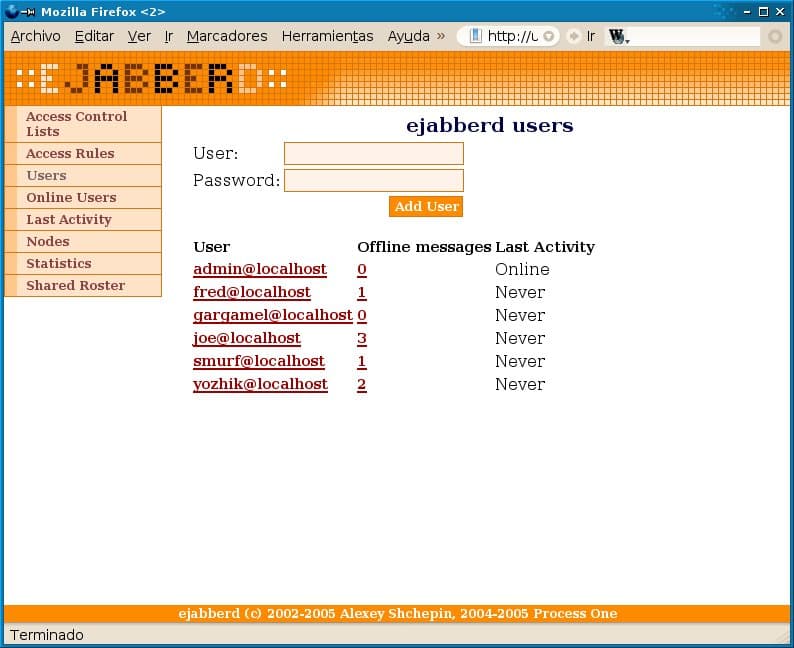
Just click the “Add user” button and it will be created!
Setting Up a Client
In this section, I will be using Gajim. While there are many clients, the steps will be similar to the following with Gajim.
First, download Gajim, install it, and start the client.
We now have to add the newly created user. To do this, go to Edit->Accounts.
Click on the “Add” button, choose “I already have an account i want to use”, and press “Forward”.
Now enter the account information.
Tick the “Connect when I press Finish” box and click “Finish”. You have now connected to your own XMPP server.
<div class=“author”>Article Submitted by: Denhart</a></div>
Thanks for learning with the DigitalOcean Community. Check out our offerings for compute, storage, networking, and managed databases.
About the author
Still looking for an answer?
This textbox defaults to using Markdown to format your answer.
You can type !ref in this text area to quickly search our full set of tutorials, documentation & marketplace offerings and insert the link!
Thank you so much for this tutorial !
P.S Anyone here knows a tutorial about a register page for jabberd ??
Sorry for my bad english
Can anyone extend this article and explain the working of mysql database with ejabberd
@rajeev0507: See if this helps: <a href=“http://www.ejabberd.im/Using ejabberd with MySQL native driver”>http://www.ejabberd.im/Using ejabberd with MySQL native driver</a>
This is the best instructions I have found for installing ejabberd. Everything worked like a charm :-) Thanks, Denhart
Hi, thanks for the tutorial, but I am not getting the Web interface. Can ou help me on this ? Thanks in advance. Jaime
@jaime.f.pinto: Is ejabberd running? <pre>sudo service ejabberd status</pre>
This tutorial is great! Any clue how to add this module after installing using this tutorial? https://github.com/jadahl/mod_restful
I can´t get it compile. thx
Leave a comment… i had cobfigured ejabberd on my centos server successfully & pidgin as messenger for my ubuntu & windows client, but the problem is i have to add each buddies manually by typing there names, is there any option by which i get list of buddies who are using my ejabberd server for messaging by pidgin.
Hi I installed ejabberd server on CentOS 6, but I cannot login to it from internet.
- I have a physical server. I installed on it Windows server 2008.
- On windows server I installed VMWare, and install CentOS minimum 6 on VMWare.
- I installed ejabberd on CentOS.
- On my mac, I use Jitsi to connect to ejabberd server. It can connect to my server, but it cannot login.
Here is my log:
=INFO REPORT==== 2014-10-01 17:33:32 ===
I(<0.459.0>:ejabberd_listener:281) : (#Port<0.3881>) Accepted connection {{58,186,59,160},23889} -> {{192,168,232,128},5222}

=INFO REPORT==== 2014-10-01 17:33:32 ===
D(<0.720.0>:ejabberd_receiver:320) : Received XML on stream = "<stream:stream to=\"my_global_ip_address\" xmlns=\"jabber:client\" xmlns:stream=\"http://etherx.jabber.org/streams\" version=\"1.0\">"

=INFO REPORT==== 2014-10-01 17:33:32 ===
D(<0.721.0>:ejabberd_c2s:1564) : Send XML on stream = [60,63,120,109,108,32,
                                                       118,101,114,115,105,
                                                       111,110,61,39,49,46,48,
                                                       39,63,62,60,115,116,
                                                       114,101,97,109,58,115,
                                                       116,114,101,97,109,32,
                                                       120,109,108,110,115,61,
                                                       39,106,97,98,98,101,
                                                       114,58,99,108,105,101,
                                                       110,116,39,32,120,109,
                                                       108,110,115,58,115,116,
                                                       114,101,97,109,61,39,
                                                       104,116,116,112,58,47,
                                                       47,101,116,104,101,114,
                                                       120,46,106,97,98,98,
                                                       101,114,46,111,114,103,
                                                       47,115,116,114,101,97,
                                                       109,115,39,32,105,100,
                                                       61,39,"1847792406",39,
                                                       32,102,114,111,109,61,
                                                       39,"14.0.18.51",39,
                                                       [" version='","1.0",
                                                        "'"],
                                                       [" xml:lang='","en",
                                                        "'"],
                                                       62]

=INFO REPORT==== 2014-10-01 17:33:32 ===
D(<0.721.0>:ejabberd_c2s:1564) : Send XML on stream = <<"<stream:features><mechanisms xmlns='urn:ietf:params:xml:ns:xmpp-sasl'><mechanism>SCRAM-SHA-1</mechanism><mechanism>DIGEST-MD5</mechanism><mechanism>PLAIN</mechanism></mechanisms><c xmlns='http://jabber.org/protocol/caps' hash='sha-1' node='http://www.process-one.net/en/ejabberd/' ver='yy7di5kE0syuCXOQTXNBTclpNTo='/><register xmlns='http://jabber.org/features/iq-register'/></stream:features>">>

=INFO REPORT==== 2014-10-01 17:33:32 ===
D(<0.720.0>:ejabberd_receiver:320) : Received XML on stream = "<presence id=\"ghyei-11\" type=\"unavailable\"></presence>"

=INFO REPORT==== 2014-10-01 17:33:32 ===
D(<0.720.0>:shaper:61) : State: {maxrate,1000,0,1412199212954191}, Size=54
M=27.0, I=25.425


=INFO REPORT==== 2014-10-01 17:33:32 ===
D(<0.720.0>:ejabberd_receiver:320) : Received XML on stream = "</stream:stream>"

=INFO REPORT==== 2014-10-01 17:33:32 ===
D(<0.720.0>:shaper:61) : State: {maxrate,1000,984.1084706225397,
                                    1412199212981627}, Size=16
M=15.74971297359357, I=0.63


=INFO REPORT==== 2014-10-01 17:33:32 ===
D(<0.721.0>:ejabberd_c2s:1564) : Send XML on stream = "</stream:stream>"
 This work is licensed under a Creative Commons Attribution-NonCommercial- ShareAlike 4.0 International License.
Become a contributor for community
Get paid to write technical tutorials and select a tech-focused charity to receive a matching donation.

DigitalOcean Documentation
Full documentation for every DigitalOcean product.

Resources for startups and AI-native businesses
The Wave has everything you need to know about building a business, from raising funding to marketing your product.
The developer cloud
Scale up as you grow — whether you're running one virtual machine or ten thousand.

Start building today
From GPU-powered inference and Kubernetes to managed databases and storage, get everything you need to build, scale, and deploy intelligent applications.
