By Vlad Roman and Hazel Virdó

Introduction
ionCube is a PHP module extension that loads encrypted PHP files and speeds up webpages. It is often required for PHP-based applications. In this tutorial, we will install ionCube on a Ubuntu 16.04 server.
Prerequisites
To follow this tutorial, you will need:
- One Ubuntu 16.04 server with a sudo non-root user and firewall, which you can set up by following this initial server setup tutorial.
- A web server with PHP installed, like Apache or Nginx. Follow the steps for installing the web server itself, updating the firewall, and installing PHP.
Step 1 — Choosing the Right ionCube Version
It is important that the version of ionCube you choose matches your PHP version, so first, you need to know:
- The version of PHP our web server is running, and
- If it is 32-bit or 64-bit.
If you have a 64-bit Ubuntu server, you are probably running 64-bit PHP, but let’s make sure. To do so, we’ll use a small PHP script to retrieve information about our server’s current PHP configuration.
Create a file called info.php file in the root directory of your web server (likely /var/www/html, unless you’ve changed it) using nano or your favorite text editor.
- sudo nano /var/www/html/info.php
Paste the following inside the file, then save and close it.
<?php
phpinfo();
After saving the changes to the file, visit http://your_server_ip/info.php in your favorite browser. The web page you’ve opened should look something like this:
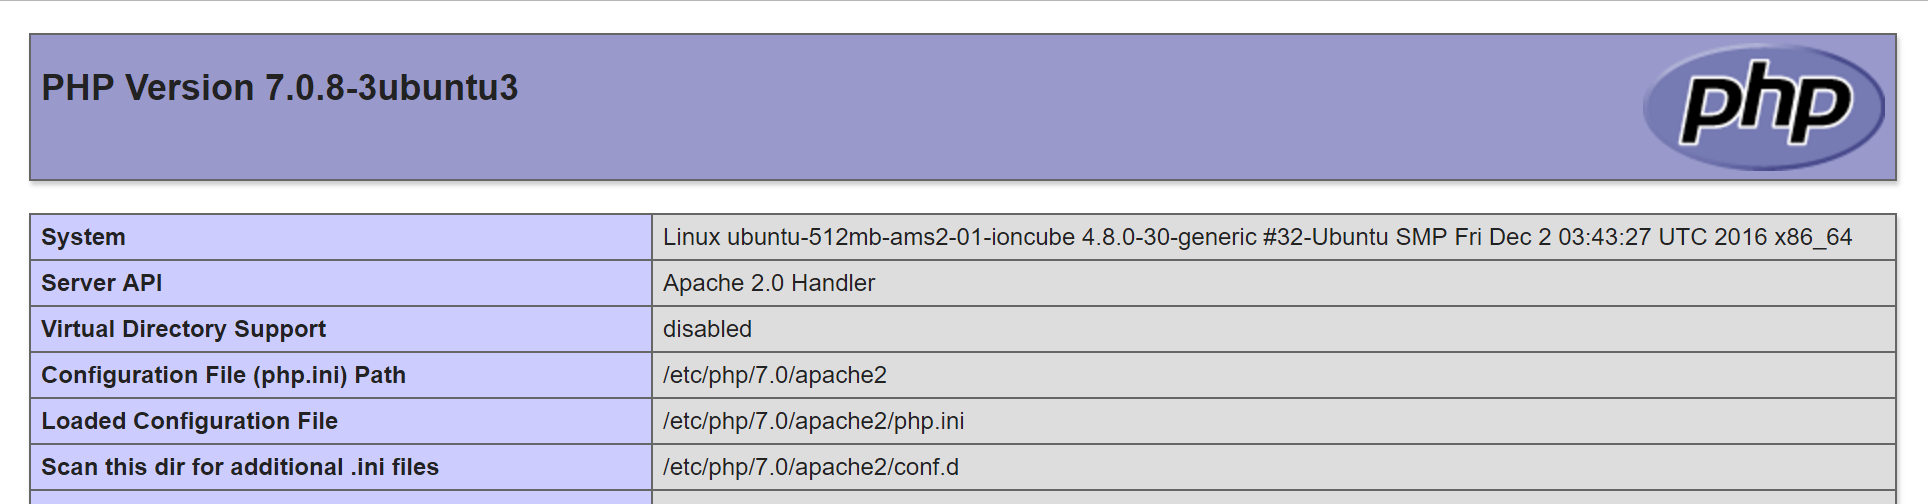
From that page, look at the header at the top where it says PHP Version. In this case, we’re running 7.0.8. Then, look at the System line. If it ends with x86_64, you’re running 64-bit PHP; if it ends with i686, it’s 32-bit.
With this information, you can proceed with the download and installation.
Step 2 — Setting Up ionCube
Visit the ionCube download page and find the appropriate download link based on your OS. In our example, we need the this 64-bit Linux version. Copy the tar.gz link on the site and download the file.
- wget http://downloads3.ioncube.com/loader_downloads/ioncube_loaders_lin_x86-64.tar.gz
Next, extract the archive.
- tar xvfz ioncube_loaders_lin_x86-64.tar.gz
This creates a directory named ioncube which contains various files for various PHP versions. Choose the right folder for your PHP version. In our example, we need the file PHP version 7.0, which is ioncube_loader_lin_7.0.so. We will copy this file to the PHP extensions folder.
To find out the path of the extensions folder, check the http://your_server_ip/info.php page again and search for extension_dir.

In this example, it’s /usr/lib/php/20151012, so copy the file there:
- sudo cp ioncube/ioncube_loader_lin_7.0.so /usr/lib/php/20151012/
For PHP to load the extension, we need to add it to the PHP configuration. We can do it in the main php.ini PHP configuration file, but it’s cleaner to create a separate file. We can set this separate file to load before other extensions to avoid possible conflicts.
To find out where we should create the custom configuration file, look at http://your_server_ip/info.php again and search for Scan this dir for additional .ini files.

So, we’ll create a file named 00-ioncube.ini inside the /etc/php/7.0/apache2/conf.d directory. The 00 at the beginning of the filename ensures this file will be loaded before other PHP configuration files.
- sudo nano /etc/php/7.0/apache2/conf.d/00-ioncube.ini
Paste the following loading directive, then save and close the file.
zend_extension = "/usr/lib/php/20151012/ioncube_loader_lin_7.0.so"
For the above change to take effect, we will need to restart the web server.
If you are using Apache, run:
- sudo systemctl restart apache2.service
If you are using Nginx, run:
- sudo systemctl restart nginx
You may also need to restart php-fpm, if you’re using it.
- sudo systemctl restart php7.0-fpm.service
Finally, let’s make sure that the PHP extension is installed and enabled.
Step 3 — Verifying the ionCube Installation
Back on the http://your_server_ip/info.php page, refresh the page and search for the “ionCube” keyword. You should now see with the ionCube PHP Loader (enabled):

That confirms that the PHP ionCube extension is loaded on your server.
It can be a bit of a security risk to keep the info.php script, as it allows potential attackers to see information about your server, so remove it now.
- sudo rm /var/www/html/info.php
You can also safely remove the extra downloaded ionCube files which are no longer necessary.
- sudo rm ioncube_loaders_lin_x86-64.tar.gz
- sudo rm -rf ioncube_loaders_lin_x86-64
ionCube is now fully set up and functional.
Conclusion
Now that the ionCube PHP extension has been installed, you can proceed with any PHP application which requires it.
Thanks for learning with the DigitalOcean Community. Check out our offerings for compute, storage, networking, and managed databases.
About the author(s)
Web developer at FileRun.com
former DO tech editor publishing articles here with the community, then founded the DO product docs team (https://do.co/docs). to all of my authors: you are incredible. working with you was a gift. love is what makes us great.
Still looking for an answer?
This textbox defaults to using Markdown to format your answer.
You can type !ref in this text area to quickly search our full set of tutorials, documentation & marketplace offerings and insert the link!
For servers using ServerPilot, be sure to follow the ServerPilot instructions for installing ionCube.
got http error 500 after following this instruction. what might cause the problem ?
The system line isn’t always a good way to determin if you’re running 32 or 64 bit PHP. For example’
Linux nas02 4.4.38-v7+ #938 SMP Thu Dec 15 15:22:21 GMT 2016 armv7l
One way that does work is adding the following to your info.php script:
echo (PHP _ INT _ SIZE * 8) . ‘-bit’; (remove the extra spaces around the underscores)
I know this a fairly old article at this point, but it’s worth noting that part of the second step is wrong for Nginx users. You need to add the INI here:
/etc/php/7.2/fpm/conf.d/00-ioncube.ini
Since Nginx is using FastCGI.
i have a litespeed wordpress droplet, i did all the steps but without luck, any advice?
 This work is licensed under a Creative Commons Attribution-NonCommercial- ShareAlike 4.0 International License.
Become a contributor for community
Get paid to write technical tutorials and select a tech-focused charity to receive a matching donation.

DigitalOcean Documentation
Full documentation for every DigitalOcean product.

Resources for startups and AI-native businesses
The Wave has everything you need to know about building a business, from raising funding to marketing your product.
The developer cloud
Scale up as you grow — whether you're running one virtual machine or ten thousand.

Start building today
From GPU-powered inference and Kubernetes to managed databases and storage, get everything you need to build, scale, and deploy intelligent applications.
