Tutorial
How To Install Linux, Apache, MySQL, PHP (LAMP) stack on Debian
 stack on Debian")
About LAMP
LAMP stack is a group of open source software used to get web servers up and running. The acronym stands for Linux, Apache, MySQL, and PHP. Since the virtual private server is already running Debian, the linux part is taken care of. Here is how to install the rest.
Set Up
Before running through the steps of this tutorial, make sure that all of your repositories are up to date:
apt-get update
With that completed, go ahead and start installing the LAMP server.
Step One—Install Apache
Apache is a free open source software which runs over 50% of the world’s web servers.
To install apache, open terminal and type in these commands:
apt-get install apache2
That’s it. To check if Apache is installed on your VPS, direct your browser to your server’s IP address (eg. http://12.34.56.789). The page should display the words “It works!" like this.
How to Find your Server’s IP address
You can run the following command to reveal your VPS's IP address.
ifconfig eth0 | grep inet | awk '{ print $2 }'
Step Two—Install MySQL
MySQL is a widely-deployed database management system used for organizing and retrieving data.
To install MySQL, open terminal and type in these commands:
apt-get install mysql-server
During the installation, MySQL will ask you to set a root password. If you miss the chance to set the password while the program is installing, it is very easy to set the password later from within the MySQL shell.
Finish up by running the MySQL set up script:
mysql_secure_installation
The prompt will ask you for your current root password.
Type it in.
Enter current password for root (enter for none):
OK, successfully used password, moving on...
Then the prompt will ask you if you want to change the root password. Go ahead and choose N and move on to the next steps.
It’s easiest just to say Yes to all the options. At the end, MySQL will reload and implement the new changes.
By default, a MySQL installation has an anonymous user, allowing anyone
to log into MySQL without having to have a user account created for
them.  This is intended only for testing, and to make the installation
go a bit smoother.  You should remove them before moving into a
production environment.

Remove anonymous users? [Y/n] y
 ... Success!

Normally, root should only be allowed to connect from 'localhost'.  This
ensures that someone cannot guess at the root password from the network.

Disallow root login remotely? [Y/n] y
... Success!

By default, MySQL comes with a database named 'test' that anyone can
access.  This is also intended only for testing, and should be removed
before moving into a production environment.

Remove test database and access to it? [Y/n] y
 - Dropping test database...
 ... Success!
 - Removing privileges on test database...
 ... Success!

Reloading the privilege tables will ensure that all changes made so far
will take effect immediately.

Reload privilege tables now? [Y/n] y
 ... Success!

Cleaning up...
Once you're done with that you can finish up by installing PHP on your virtual server.
Step Three—Install PHP
PHP is an open source web scripting language that is widely use to build dynamic webpages.
To install PHP, open terminal and type in this command. Note: If you are on a version earlier than Debian 7, include php5-suhosin as well.
apt-get install php5 php-pear php5-mysql
After you answer yes to the prompt twice, PHP will install itself.
Finish up by restarting apache:
service apache2 restart
Congratulations! You now have LAMP stack on your droplet!
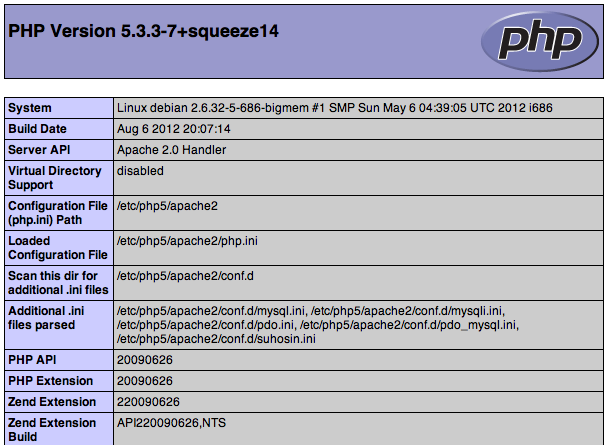
Step Four—RESULTS: See PHP on your Server
Although LAMP is installed, we can still take a look and see the components online by creating a quick php info page
To set this up, first create a new file:
nano /var/www/info.php
Add in the following line:
<?php
phpinfo();
?>
Then Save and Exit.
Finish up by visiting your php info page (make sure you replace the example ip address with your correct one): http://12.34.56.789/info.php
It should look something like this:
Thanks for learning with the DigitalOcean Community. Check out our offerings for compute, storage, networking, and managed databases.
About the author(s)
This textbox defaults to using Markdown to format your answer.
You can type !ref in this text area to quickly search our full set of tutorials, documentation & marketplace offerings and insert the link!

Become a contributor for community
Get paid to write technical tutorials and select a tech-focused charity to receive a matching donation.

DigitalOcean Documentation
Full documentation for every DigitalOcean product.

Resources for startups and SMBs
The Wave has everything you need to know about building a business, from raising funding to marketing your product.
Get our newsletter
Stay up to date by signing up for DigitalOcean’s Infrastructure as a Newsletter.
New accounts only. By submitting your email you agree to our Privacy Policy
The developer cloud
Scale up as you grow — whether you're running one virtual machine or ten thousand.

Get started for free
Sign up and get $200 in credit for your first 60 days with DigitalOcean.*

*This promotional offer applies to new accounts only.
I did the exact same steps, but when I try to load up info.php page the browser just downloads the info.php file to my computer.
Did you restart the Apache server?
try
nano /var/www/html/info.phpand then add
This worked for me. The info.php file needs to be in the html directory to load, and the tutorial just puts it in the www directory, not the html directory.
It’s because this tutorial uses older version of Apache server. In newer versions of Apache server, the correct directory is html
As long as php is installed, this should not happen. Where you able to download all of php packages in this command?
<pre> apt-get install php5 php-pear php5-suhosin php5-mysql</pre>
Did you try to turn it off and on?
Sounds like a joke but I’m talking about apache service, if you don’t restart the apache2 service instance the php interpreter won’t work…
how to install lamp-server using sudo apt-get install lamp-server^
in debian one command line to complete LAMP installation
apt-get install apache2 php5 mysql-server phpmyadmin
Hi, php5-suhosin dosen’t appear to work. It says it cannot find it! Everything else worked, and I was able to display the PHP info page, so I’m not entirely sure what it does, but I’d like to get it all set up! Thanks!
alex.vados, php5-suhosin was removed in Debian 7. Use Ubuntu 12 LTS or Debian 6.3 instead.
I’ve updated the article, thanks!
You may need to run
‘’’ apt-get install libapache2-mod-php5
as well if you are running ubuntu
If you are using Ubuntu you may need to add the libapache2-mod-php5 package. If you dont you may end up seeing php printed in plain text as alextoma has pointed out.
@kevin: The ‘php5’ package includes ‘libapache2-mod-php5’ if I recall correctly, so there is no need to install the package separately.
Thanks I did all steps on my Debian 7 and it works like charm!
You saved my time.
Regards, Sharif
No much information to install a complete functional website in Devian…All info is for Ubuntu.
Debian uses the same apt-get tool. All of the steps worked fine for me. Running debain on my droplet
@emilio_b2002: Most of the Ubuntu articles should work fine in Debian, since Ubuntu is based on Debian. Give it a shot – let me know how it goes :]
easy peasy!
cool man , I’ve did just what you said and everything works like a charm !!! thanks
great idea
“I did the exact same steps, but when I try to load up info.php page the browser just downloads the info.php file to my computer.”
This is because php.ini contains short_open_tag = Off
use full tag <?php … ?>
Hi Etel, This will be great if you please update the same in your simple and very helpful guide.
When I entered my droplet’s IP address on the browser - I get this message: “Welcome to nginx!”
When I entered “my-IP-address/index.html” on the browser - I get apache2 greeting message: "It works!
This is the default web page for this server.
The web server software is running but no content has been added, yet."
Restarting apache2 with the command: “service apache2 restart” – give the message below: […] Restarting web server: apache2apache2: Could not reliably determine the server’s fully qualified domain name, using 127.0.0.1 for ServerName … waiting apache2: Could not reliably determine the server’s fully qualified domain name, using 127.0.0.1 for ServerName . ok
I had created a previous droplet with LEMP, saved an image, then destroyed it. Both droplet have the same name. Is this a problem?
What did I do wrong?
@arabia: Try clearing your browser’s cache. Make sure nginx is stopped and is completely removed: <pre>sudo apt-get remove nginx sudo apt-get autoremove sudo service nginx stop sudo service apache2 start</pre>
The tut is straight forward, but it seems that there is something wrong… or possibly I missed something…
I tried this tut over 5 times, but nothing worked for me… All the times I have issue with php code being displayed instead of being executed !! as if the php lib is not working!!!
any idea how to get around this issue??
ok, I found a small mistaken in my conf file. sorted and works good…
by the way, which one is better Apache MPM prefork or worker, and why??
I heard a lot about prefork efficiency as it is always recommended by hosting companies and web developers over worker module…
@FMCB: See <a href=“http://stackoverflow.com/questions/13883646/apache-prefork-vs-worker-mpm”>http://stackoverflow.com/questions/13883646/apache-prefork-vs-worker-mpm</a>
Run the command:
apt-get install php5 php-pear php5-suhosin php5-mysql
without… php5-suhosin …like so:
apt-get install php5 php-pear php5-mysql
I followed the same steps however its not able to find my info.php file I get this error
Not Found
The requested URL /test.php was not found on this server.
Apache/2.4.7 (Ubuntu) Server at 162.243.131.133 Port 80
Any suggestions? Thanks!
When installing php this way, how can we install it with following options?
.configure --with-apxs2=/usr/local/apache2/bin/apxs --with-mysql --with-zlib
@wishwa: You can install these extensions by running:
after following the tutorial.
Thanks for such great manual!
Thanks for the nice tutorial. Very helpful :)
As a related tutorial I would love to know how to host many websites on the same host (droplet).
Check out How To Set Up Apache Virtual Hosts on Debian 7 | DigitalOcean
Thank you so much!!
Fast installation!!
Thanks
Thank you for making this Tutorial I did make this script to make it even more easier
https://github.com/Darksleep/LampMe
helpfully tutorial, tnks :D
To the guy with problems using Apache 2.4.7, the default page to this version has changed… Try copying your ‘info/teste/file.php’ to < /var/www/html > :D
If you’re getting a 404 error when trying to access info.php try moving the file to /var/www/html as this is the default directory.
great work
I’ve followed the same steps on Ubuntu servers without fail. Thanks for the great information! I look forward to installing a Debian server today or tomorrow using these instructions. :-)
on ubuntu following line gives ip addrees through with extra bit of text being multiple match
ifconfig eth0 | grep inet | awk ‘{ print $2 }’
can we safely change it to
ifconfig eth0 | grep inet | awk ‘NR==1{ print $2 }’
Thanks Etel for this tutorial.
I just move the phpinfo.php too /var/www/html/phpinfo.php and work great.
I use debian 8.1
hi how can i save info.php file on putty?