By Koen Vlaswinkel and Hazel Virdó
Not using CentOS 7?
Choose a different version or distribution.
Introduction
MediaWiki is a free and open-source wiki application written in PHP. It was originally created for WikiPedia, but it now allows everyone to create their own wiki sites. Currently thousands of websites are running MediaWiki, including Wikipedia, Wiktionary and Wikimedia Commons. MediaWiki’s homepage is located at https://www.mediawiki.org.
This tutorial goes through how to set up MediaWiki on a CentOS 7 Droplet.
Prerequisites
- A CentOS 7 server with SSH access. For more information, visit this tutorial.
- A LAMP stack, which you can install by following this tutorial.
Step 1 — Setting Up Your Server
After you have installed the LAMP stack, we will first need to install a few additional PHP 5 modules. All of them are optional except for the first one (the XML extension).
The first one we will be installing is the XML extension, and it is required for MediaWiki to run:
sudo yum install php-xml
The second one we will be installing is the Intl extension, for internationalization support:
sudo yum install php-intl
Secondly, we will install GD for image thumbnailing:
sudo yum install php-gd
These last two modules are really optional. These are not necessary for most wikis, unless you have a high performance or math-heavy wiki. The first one is Tex Live for in-line display of mathematical formulae:
sudo yum install texlive
For added performance, you can install XCache. For this, however, you also need to install an extra repository, as XCache is not available in the CentOS repository by default:
sudo yum install epel-release
Now, you can install XCache:
sudo yum install php-xcache
To finish these installations, restart Apache HTTPD.
sudo systemctl restart httpd.service
Step 2 — Downloading MediaWiki
In this section we will download MediaWiki from source. MediaWiki can be downloaded from its official website. At time of writing, the latest version is 1.24.1, but you can double check via the download link on this page.
Download MediaWiki.
curl -O http://releases.wikimedia.org/mediawiki/1.24/mediawiki-1.24.1.tar.gz
Untar the package:
tar xvzf mediawiki-*.tar.gz
Move to the /var/www directory:
sudo mv mediawiki-1.24.1/* /var/www/html
Step 3 — Creating a Database
In this section we will set up a MySQL database. This is not strictly required to successfully install MediaWiki, as you can use a SQLite database as well. Despite this, it is definitely a recommended measure.
We will first log in to the MySQL shell:
mysql -u root -p
This will change your prompt to MariaDB [(none)]>.
Now, we will create the database. The database name does not matter for MediaWiki, but we will use my_wiki in this tutorial. You can choose another name if you prefer.
CREATE DATABASE my_wiki;
The output should be:
Query OK, 1 row affected (0.00 sec)
We don’t want to use the root user for MediaWiki, so we will create a new database user:
GRANT INDEX, CREATE, SELECT, INSERT, UPDATE, DELETE, ALTER, LOCK TABLES ON my_wiki.* TO 'sammy'@'localhost' IDENTIFIED BY 'password';
Change my_wiki to your chosen database name, sammy to your username, and password to a secure password. The output should be:
Query OK, 0 rows affected (0.01 sec)
Next, we need to flush the MySQL privileges:
FLUSH PRIVILEGES;
The output should be:
Query OK, 0 rows affected (0.00 sec)
Last, we will need to exit the MySQL shell:
exit;
The output should be:
Bye
Step 4 - Setting Up MediaWiki
In this section, we will set up MediaWiki so it is ready to use. Visit the homepage of your Droplet in your browser by pointing your browser to http://your_server_ip. On this page, select set up the wiki.
On the first page, select a language and click Continue. The next page should show your environment and it should say in green: The environment has been checked. You can install MediaWiki. Click Continue.
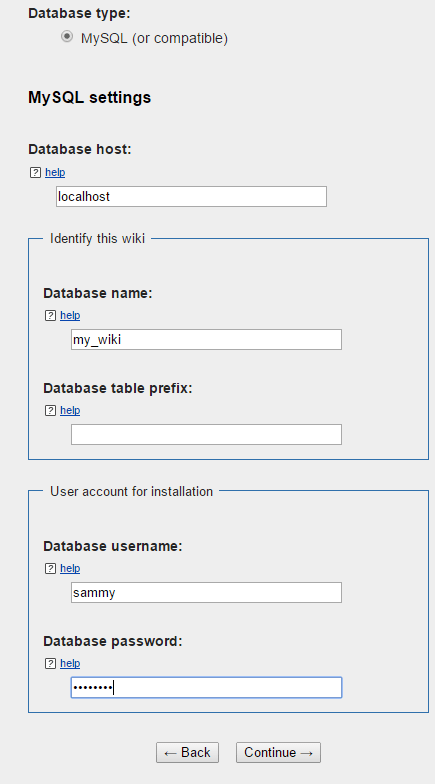
You will now get to the page with MySQL settings. For the Database type select MySQL (or compatible). For the database host, type localhost. The database name, username, and password will be the values you chose before. We used my_wiki for the database name, sammy for the username, and badpassword for the password. The table prefix can be left empty. It will look like this:
In the screen after the MySQL settings, the values can be left at their defaults. In the next screen, you will need to fill in the details of your wiki, like its name. You can also create the admin user for the wiki on this page.
In all the other screens, most, if not all, of the settings can be left untouched. If you want a specific setting enabled for your wiki, you might need to change something on one of these screens. Particularly if you have installed XCache before, you will need to check that to enable it.
When you have completed all steps, you should arrive at this page:
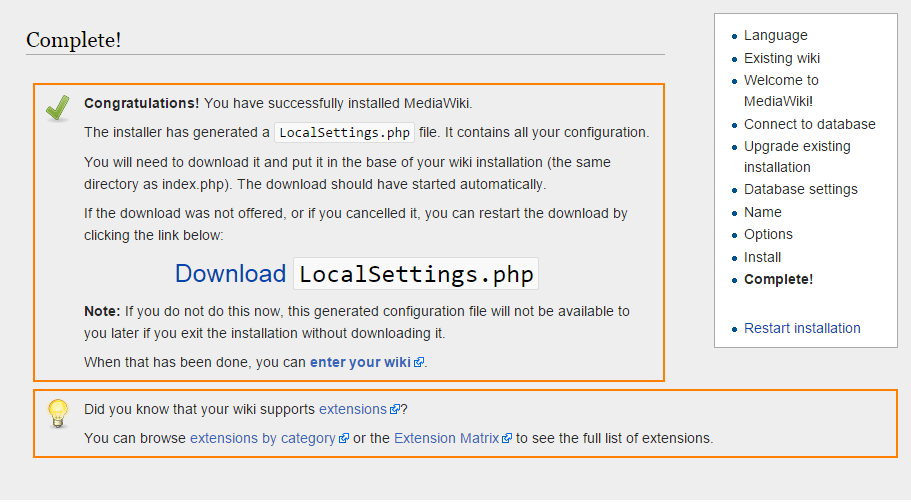
To successfully complete the installation, you will need to move a file called LocalSettings.php to your server, which should have started downloading automatically. You should download this file before closing the page.
Now, you will need to upload the file to /var/www/html. You could use an external program, but it is easiest to open the file on your local computer, copy the contents and paste them into your SSH session. To do this, first open the file on the server:
sudo nano /var/www/html/LocalSettings.php
Now, open the file on your computer in your text editor of choice and copy the contents into your SSH window. After you have saved the file, you can click enter your wiki and your wiki should be ready to use.
Conclusion
You will now see your own MediaWiki installation, ready for use. To further customize the page, visit the System administration page on the MediaWiki homepage. You can also start adding pages directly.
Thanks for learning with the DigitalOcean Community. Check out our offerings for compute, storage, networking, and managed databases.
About the author(s)
Tutorial writer
former DO tech editor publishing articles here with the community, then founded the DO product docs team (https://do.co/docs). to all of my authors: you are incredible. working with you was a gift. love is what makes us great.
Still looking for an answer?
This textbox defaults to using Markdown to format your answer.
You can type !ref in this text area to quickly search our full set of tutorials, documentation & marketplace offerings and insert the link!
Nice post, I did a script to install it quickly, its open on: https://github.com/hflautert/lotus7/blob/master/wiki/install_wiki.sh There are some comments in PT-BR, but commands and logic are universal.
Do you have a tutorial for installing PHPWiki by any chance?
Edit: Actually, nevermind. I found this good article and I can compare the performances of PhPWiki and MediaWiki now.
Thank you for the tutorial. Just one comment: you might want to mention SELinux permissions of the LocalSettings.php somewhere in case the file wasn’t directly downloaded to the server.
I get an error on this command: GRANT INDEX, CREATE, SELECT, INSERT, UPDATE, DELETE, ALTER, LOCK TABLES ON my_wiki.* TO ‘sammy’@‘localhost’ IDENTIFIED BY ‘password’;
Is the syntax correct? I have changed the values to my own.
I run into trouble at Step 4. PHP 5 is working and all of the necessary modules are installed, and MariaDB is running. But when I move MediaWiki to var/www/html/, I get nothing. It’s a blank white page on Firefox and a 500 server error in Chrome. I have no idea what went wrong :(
Hello, i am french, sorry for my language Engish. I followed to the letter your setup but I left with a page ‘403 Forbidden’ to access the interface of my wiki.
I have a rights issue apparently.
What is strange, I have no problem to open the info.php page!
Can you help me?
Please update this guide to be compatible with the latest stable version of Mediawiki (1.27.1). I’ve been running into problem after problem, trying to follow this guide and update php to the compatible version as well. The LAMP for CentOS 7 guide installs the wrong version of php.
Hello, I am not able to get the MediaWiki version that goes with the php version that is available in the tutorial referred to in this tutorial. It wants to get an older version of php which is not compatible with the latest version of mediawiki due to the latest php not being in the repository via your article: https://www.digitalocean.com/community/tutorials/how-to-install-linux-apache-mysql-php-lamp-stack-on-centos-7. When I get to Step 2 — Downloading MediaWiki it refers to MediaWiki v1.24.1 and then states that a newer version of MediaWiki can be found in the download section of https://www.mediawiki.org/wiki/Download, however the latest version of MediaWiki requires “PHP 5.5.9+ and either MySQL 5.0.2+, MariaDB” but your tutorial for LAMP for CentOS doesn’t install these versions. They are considered experimental versions for CentOS 7. MediaWiki v1.24.1 is no longer available unless using Git and this is a bit advanced for me. Can Digital Ocean provide a permanent link to the version listed in this tutorial? I have installed it once and everything worked like a charm. Thanks in advance. Edit: I have found the version that goes with this tutorial MediaWiki v1.24.1 located here:
https://releases.wikimedia.org/mediawiki/1.24/mediawiki-core-1.24.1.tar.gz for your curl command it can look like this instead: curl -O https://releases.wikimedia.org/mediawiki/1.24/mediawiki-core-1.24.1.tar.gz as opposed to: curl -O http://releases.wikimedia.org/mediawiki/1.24/mediawiki-1.24.1.tar.gz this worked!! We shall see if it installs now. I will update my post as I test.
Page needs updating at section:
Download MediaWiki.
to the following
curl -O https://releases.wikimedia.org/mediawiki/1.29/mediawiki-1.29.1.tar.gz
And also at
Move to the /var/www directory: to
sudo mv mediawiki-1.29.1/* /var/www/html
Is it possible to install a mediawiki on a virtual host?
So I got virtual hosts working for plain HTML hosting as testing. So now I’m trying something a bit more detailed, to put a MediaWiki install up on it.
I followed the instructions on installing MediaWiki on CentOS7 on Digital Ocean here: https://www.digitalocean.com/community/tutorials/how-to-install-mediawiki-on-centos-7. I set up the MariaDB and everything from the tutorial without issue. Everything was extracted to the virtual host directory. I made it so that my test HTML file wasn’t readable. When I do so, I get the ‘default Apache server’ message instead of the wiki setup. When I try to go to the /mw-config/index.php I get a
Forbidden You don’t have permission to access /mw-config/index.php on this server. error.
I am not sure where to step out from here.
 This work is licensed under a Creative Commons Attribution-NonCommercial- ShareAlike 4.0 International License.
Become a contributor for community
Get paid to write technical tutorials and select a tech-focused charity to receive a matching donation.

DigitalOcean Documentation
Full documentation for every DigitalOcean product.

Resources for startups and AI-native businesses
The Wave has everything you need to know about building a business, from raising funding to marketing your product.
The developer cloud
Scale up as you grow — whether you're running one virtual machine or ten thousand.

Start building today
From GPU-powered inference and Kubernetes to managed databases and storage, get everything you need to build, scale, and deploy intelligent applications.
