By Ian Hansen and Hazel Virdó

Written in collaboration with MemSQL
Introduction
MemSQL is a type of in-memory database that can serve faster reads and writes than a traditional database. Even though it is a new technology, it speaks the MySQL protocol, so it feels very familiar to work with.
MemSQL has embraced the newest capabilities of MySQL with modern features, like JSON support and the ability to upsert data. One of the greatest advantages of MemSQL over MySQL is its ability to split a single query across multiple nodes, known as massively parallel processing, which results in much faster read queries.
In this tutorial, we will install MemSQL on a single Ubuntu 14.04 server, run performance benchmarks, and play with inserting JSON data through a command line MySQL client.
Prerequisites
To follow this tutorial, you will need:
-
One Ubuntu 14.04 x64 Droplet with at least 8 GB RAM
-
A non-root user with sudo privileges, which you can set up by following the Initial Server Setup with Ubuntu 14.04 tutorial
Step 1 — Installing MemSQL
In this section, we will prepare our working environment for the MemSQL installation.
The latest version of MemSQL is listed on their download page. We’ll be downloading and installing MemSQL Ops, which is a program that manages downloading and preparing your server for correctly running MemSQL. The most recent version of MemSQL Ops at the time of writing is 4.0.35.
First, download MemSQL’s installation package file from their website.
- wget http://download.memsql.com/memsql-ops-4.0.35/memsql-ops-4.0.35.tar.gz
Next, extract the package.
- tar -xzf memsql-ops-4.0.35.tar.gz
Extracting the package has created a folder called memsql-ops-4.0.35. Note that the folder name has the version number, so if you download a newer version than what this tutorial specifies, you will have a folder with the version you downloaded.
Change directories into this folder.
- cd memsql-ops-4.0.35
Then, run the installation script, which is part of the installation package we just extracted.
- sudo ./install.sh
You will see some output from the script. After a moment, it will ask you if you’d like to install MemSQL on this host only. We’ll look at installing MemSQL across multiple machines in a future tutorial. So, for the purposes of this tutorial, let’s say yes by entering y.
. . .
Do you want to install MemSQL on this host only? [y/N] y

2015-09-04 14:30:38: Jd0af3b [INFO] Deploying MemSQL to 45.55.146.81:3306
2015-09-04 14:30:38: J4e047f [INFO] Deploying MemSQL to 45.55.146.81:3307
2015-09-04 14:30:48: J4e047f [INFO] Downloading MemSQL: 100.00%
2015-09-04 14:30:48: J4e047f [INFO] Installing MemSQL
2015-09-04 14:30:49: Jd0af3b [INFO] Downloading MemSQL: 100.00%
2015-09-04 14:30:49: Jd0af3b [INFO] Installing MemSQL
2015-09-04 14:31:01: J4e047f [INFO] Finishing MemSQL Install
2015-09-04 14:31:03: Jd0af3b [INFO] Finishing MemSQL Install
Waiting for MemSQL to start...
Now you have a MemSQL cluster deployed to your Ubuntu server! However, from the logs above, you’ll notice that MemSQL was installed twice.
MemSQL can run as two different roles: an aggregator node and a leaf node. The reason why MemSQL was installed twice is because it needs at least one aggregator node and at least one leaf node for a cluster to operate.
The aggregator node is your interface to MemSQL. To the outside world, it looks a lot like MySQL: it listens on the same port, and you can connect tools that expect to talk to MySQL and standard MySQL libraries to it. The aggregator’s job is to know about all of the MemSQL leaf nodes, handle MySQL clients, and translate their queries to MemSQL.
A leaf node actually stores data. When the leaf node receives a request from the aggregator node to read or write data, it executes that query and returns the results to the aggregator node. MemSQL allows you to share your data across multiple hosts, and each leaf node has a portion of that data. (Even with a single leaf node, your data is split within that leaf node.)
When you have multiple leaf nodes, the aggregator is responsible for translating MySQL queries to all the leaf nodes that should be involved in that query. It then takes the responses from all the leaf nodes and aggregates the result into one query that returns to your MySQL client. This is how parallel queries are managed.
Our single-host setup has the aggregator and leaf node running on the same machine, but you can add many more leaf nodes across many other machines.
Step 2 — Running a Benchmark
Let’s see how quickly MemSQL can operate by using the MemSQL Ops tool, which was installed as part of MemSQL’s installation script.
In your web browser, go to http://your_server_ip:9000
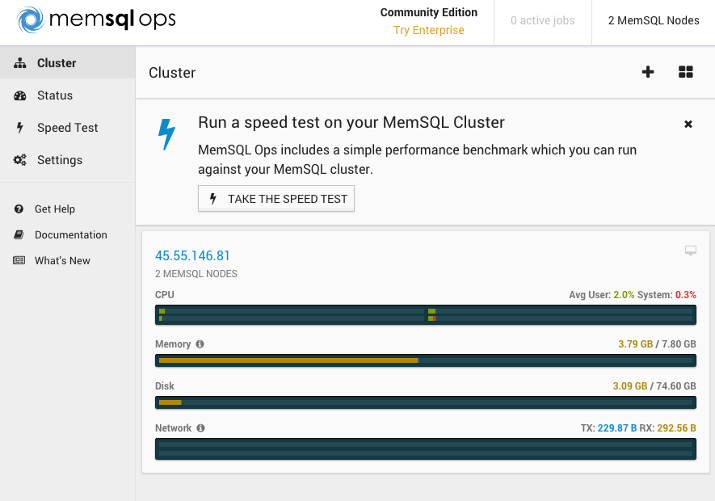
The MemSQL Ops tool gives you an overview of your cluster. We have 2 MemSQL nodes: the master aggregator and the leaf node.
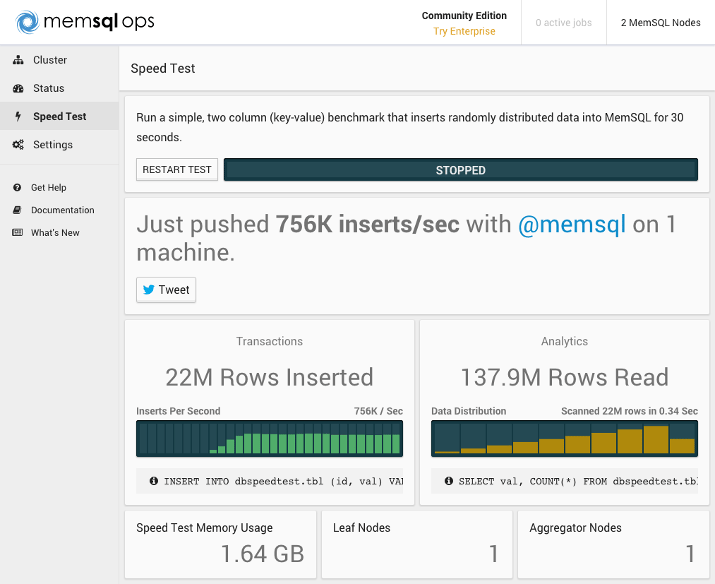
Let’s take the speed test on our single-machine MemSQL node. Click Speed Test from the menu on the left, then click START TEST. Here’s an example of the results you might see:
We won’t cover how to install MemSQL across multiple servers in this tutorial, but for comparison, here’s a benchmark from a MemSQL cluster with three 8GB Ubuntu 14.04 nodes (one aggregator node and two leaf nodes):
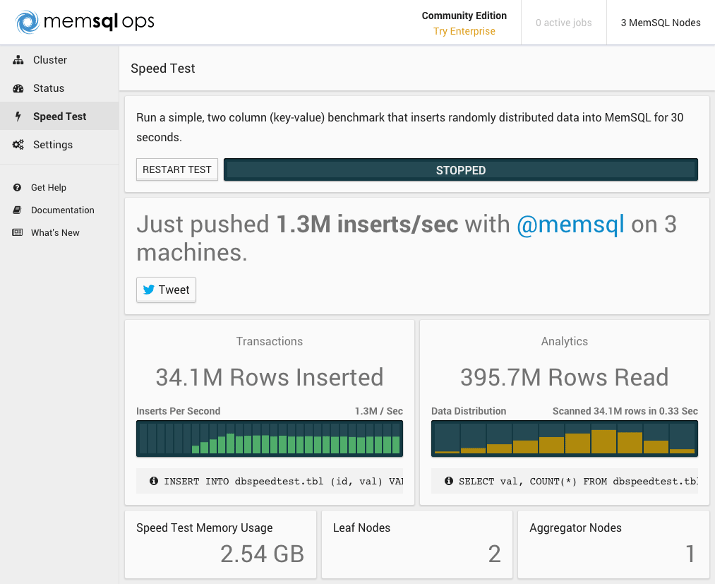
By doubling the number of leaf nodes, we were able to almost double our insert rate. By looking at the Rows Read sections, we can see that our three-node cluster was able to simultaneously read 12M more rows than the single-node cluster in the same amount of time.
Step 3 — Interacting with MemSQL via mysql-client
To clients, MemSQL looks like MySQL; they both speak the same protocol. To start talking to our MemSQL cluster, let’s install a mysql-client.
First, update apt so that we install the latest client in the next step.
- sudo apt-get update
Now, install a MySQL client. This will give us a mysql command to execute.
- sudo apt-get install mysql-client-core-5.6
We’re now ready to connect to MemSQL using a MySQL client. We’re going to connect as the root user to the host 127.0.0.1 (which is our localhost IP address) on port 3306. We’ll also customize the prompt message to memsql> .
- mysql -u root -h 127.0.0.1 -P 3306 --prompt="memsql> "
You’ll see a few lines of output followed by the memsql> prompt.
Let’s list the databases.
- show databases;
You’ll see this output.
+--------------------+
| Database           |
+--------------------+
| information_schema |
| memsql             |
| sharding           |
+--------------------+
3 rows in set (0.01 sec)
Create a new database called tutorial.
- create database tutorial;
Then switch to using the new database with the use command.
- use tutorial;
Next, we’ll create a users table which will have the id an an email fields. We have to specify a type for these two fields. Let’s make id a bigint and email a varchar with a length of 255. We’ll also tell the database that the id field is a primary key and the email field can’t be null.
- create table users (id bigint auto_increment primary key, email varchar(255) not null);
You may notice poor execution time on that last command (15 - 20 seconds). There is one main reason why MemSQL is slow to create this new table: code generation.
Under the hood, MemSQL uses code generation to execute queries. This means that any time a new type of query is encountered, MemSQL needs to generate and compile code that represents the query. This code is then shipped to the cluster for execution. This speeds up processing the actual data, but there is a cost to preparation. MemSQL does what it can to re-use pre-generated queries, but new queries whose structure has never yet been seen will have a slowdown.
Back to our users table, take a look at the table definition.
- describe users;
+-------+--------------+------+------+---------+----------------+
| Field | Type         | Null | Key  | Default | Extra          |
+-------+--------------+------+------+---------+----------------+
| id    | bigint(20)   | NO   | PRI  | NULL    | auto_increment |
| email | varchar(255) | NO   |      | NULL    |                |
+-------+--------------+------+------+---------+----------------+
2 rows in set (0.00 sec)
Now, let’s insert some example emails into the users table. This syntax is the same that we might use for a MySQL database.
- insert into users (email) values ('one@example.com'), ('two@example.com'), ('three@example.com');
Query OK, 3 rows affected (1.57 sec)
Records: 3  Duplicates: 0  Warnings: 0
Now query the users table.
- select * from users;
You can see the data we just entered:
+----+-------------------+
| id | email             |
+----+-------------------+
|  2 | two@example.com   |
|  1 | one@example.com   |
|  3 | three@example.com |
+----+-------------------+
3 rows in set (0.07 sec)
Step 4 — Inserting and Querying JSON
MemSQL provides a JSON type, so in this step, we’ll create an events table to make use of incoming events. This table will have an id field (like we did for users) and an event field, which will be a JSON type.
- create table events (id bigint auto_increment primary key, event json not null);
Let’s insert a couple of events. Within the JSON, we’ll reference an email field that, in turn, references back to the IDs of the users we inserted in step 3.
- insert into events (event) values ('{"name": "sent email", "email": "one@example.com"}'), ('{"name": "received email", "email": "two@example.com"}');
Now we can take a look at the events we just inserted.
- select * from events;
+----+-----------------------------------------------------+
| id | event                                               |
+----+-----------------------------------------------------+
|  2 | {"email":"two@example.com","name":"received email"} |
|  1 | {"email":"one@example.com","name":"sent email"}     |
+----+-----------------------------------------------------+
2 rows in set (3.46 sec)
Next, we can query all the events whose JSON name property is the text “received email”.
- select * from events where event::$name = 'received email';
+----+-----------------------------------------------------+
| id | event                                               |
+----+-----------------------------------------------------+
|  2 | {"email":"two@example.com","name":"received email"} |
+----+-----------------------------------------------------+
1 row in set (5.84 sec)
Try changing that query to finding those whose name property is the text “sent email”.
- select * from events where event::$name = 'sent email';
+----+-------------------------------------------------+
| id | event                                           |
+----+-------------------------------------------------+
|  1 | {"email":"one@example.com","name":"sent email"} |
+----+-------------------------------------------------+
1 row in set (0.00 sec)
This latest query ran much much faster than the previous one. This is because we only changed a parameter in the query, so MemSQL was able to skip the code generation.
Let’s do something advanced for a distributed SQL database: let’s join two tables on non-primary keys where one value of the join is nested within a JSON value but filters on a different JSON value.
First, we’ll ask for all fields of the user table with the events table joined on by matching email where the event name is “received email”.
- select * from users left join events on users.email = events.event::$email where events.event::$name = 'received email';
+----+-----------------+------+-----------------------------------------------------+
| id | email           | id   | event                                               |
+----+-----------------+------+-----------------------------------------------------+
|  2 | two@example.com |    2 | {"email":"two@example.com","name":"received email"} |
+----+-----------------+------+-----------------------------------------------------+
1 row in set (14.19 sec)
Next, try that same query, but filter to only “sent email” events.
- select * from users left join events on users.email = events.event::$email where events.event::$name = 'sent email';
+----+-----------------+------+-------------------------------------------------+
| id | email           | id   | event                                           |
+----+-----------------+------+-------------------------------------------------+
|  1 | one@example.com |    1 | {"email":"one@example.com","name":"sent email"} |
+----+-----------------+------+-------------------------------------------------+
1 row in set (0.01 sec)
Like before, the second query was much faster than the first. The benefits of code generation pay off when executing over millions of rows, as we saw in the benchmark. The flexibility to use a scale-out SQL database that understands JSON and how to arbitrarily join across tables is a powerful user feature.
Conclusion
You’ve installed MemSQL, run a benchmark of your node’s performance, interacted with your node via a standard MySQL client, and played with some advanced features not found in MySQL. This should be a good taste of what an in-memory SQL database can do for you.
There’s still plenty left to learn about how MemSQL actually distributes your data, how to structure tables for maximum performance, how to expand MemSQL across multiple nodes, how to replicate your data for high availability, and how to secure MemSQL.
Thanks for learning with the DigitalOcean Community. Check out our offerings for compute, storage, networking, and managed databases.
About the author(s)
Engineering Manager at DigitalOcean. I like long hikes uphill both ways.
former DO tech editor publishing articles here with the community, then founded the DO product docs team (https://do.co/docs). to all of my authors: you are incredible. working with you was a gift. love is what makes us great.
Still looking for an answer?
This textbox defaults to using Markdown to format your answer.
You can type !ref in this text area to quickly search our full set of tutorials, documentation & marketplace offerings and insert the link!
to try this tutorial and setup an environment using memsql do I need to create a droplet worth $80/month? (8GB memory)
Yes, though with Digital Ocean, you pay by the hour instead of by the month. By the day, that particular droplet would be around $2.67 per day.
 This work is licensed under a Creative Commons Attribution-NonCommercial- ShareAlike 4.0 International License.
Become a contributor for community
Get paid to write technical tutorials and select a tech-focused charity to receive a matching donation.

DigitalOcean Documentation
Full documentation for every DigitalOcean product.

Resources for startups and AI-native businesses
The Wave has everything you need to know about building a business, from raising funding to marketing your product.
The developer cloud
Scale up as you grow — whether you're running one virtual machine or ten thousand.

Start building today
From GPU-powered inference and Kubernetes to managed databases and storage, get everything you need to build, scale, and deploy intelligent applications.
