By Erin Glass
Senior Manager, DevEd
")
Introduction
OpenEMR is an open source electronic health records and medical practice management tool. It is used by physicians and healthcare facilities to manage electronic medical records, prescriptions, patient demographic tracking, scheduling, reports, and electronic billing. At the time of this publication, OpenEMR supports more than 30 languages.
In this tutorial, you will install OpenEMR on an Ubuntu 20.04 server running a LAMP environment (Linux, Apache, MySQL, PHP).
Prerequisites
- An Ubuntu 20.04 server with a non-root
sudo-enabled user account and a basic firewall. This can be configured using our initial server setup guide for Ubuntu 20.04. - A fully installed LAMP stack, including Apache, MySQL, and PHP, with firewall settings adjusted to allow HTTP traffic. Instructions for installing a LAMP stack can be found in Steps 1 through 3 in our guide How To Install Linux, Apache, MySQL, PHP (LAMP) stack on Ubuntu 20.04. Note that Steps 4 through 6 of the LAMP guide are optional as they are for testing purposes and unnecessary for this tutorial.
Step 1 — Installing Additional PHP Extensions
When setting up our LAMP stack, a minimal set of extensions were required to get PHP to communicate with MySQL. OpenEMR requires two additional PHP extensions that you will need to install for it to work correctly. Use apt to update your server’s package list and install the php-xml and php-mbstring extensions:
- sudo apt update
- sudo apt install php-xml php-mbstring
After both extensions have been installed, you’ll need to reload the Apache web server for changes to take effect:
- sudo systemctl reload apache2
When your webserver has reloaded, you should be ready to proceed to the next step.
Step 2 — Create a MySQL Database for OpenEMR
You will now create a database in MySQL for OpenEMR. First, log in to MySQL as the database root user:
- sudo mysql
Once you are logged into MySQL as the database root user, create a database named openemr with the following command:
- CREATE DATABASE openemr;
Next, create a new user and assign them a password by replacing PASSWORD below with a strong password of your choosing:
- CREATE USER 'openemr_user'@'localhost' IDENTIFIED BY 'PASSWORD';
Next, grant the new user permission to the openemr database:
- GRANT ALL PRIVILEGES ON openemr.* TO 'openemr_user'@'localhost';
To enable these changes, enter the following command:
- FLUSH PRIVILEGES;
Once you have flushed the privileges, you can now exit MySQL:
- exit
You are now ready to proceed to the next step.
Step 3 — Configuring PHP for OpenEMR
In this step, you’ll make some changes to the php.ini file as recommended by OpenEMR documentation. If you followed all prerequisites within a fresh Ubuntu 20.04 server, the php.ini that applies to your Apache web server should be located at /etc/php/7.4/apache2/php.ini. In case you have a different PHP version, this path may be slightly different. Adjust as necessary and open the file with a text editor of your choice. Here, we’ll use nano:
- sudo nano /etc/php/7.4/apache2/php.ini
Once you are in the php.ini file, you will change the values of several options as recommended by OpenEMR. If you are using nano, you can search for these options using CTRL + W. If there is a semicolon ; in front of the option you are adjusting, make sure to delete it as a semicolon is used to comment out an option.
Values for the following options should be changed:
max_ input_vars
This option limits the number of variables your server can use in a single function. OpenEMR requires this option to have the value 3000:
max_input_vars = 3000
max_execution_time
This option limits the amount of time (in seconds) a script is allowed to run before being terminated. OpenEMR requires this option to have the value 60:
max_execution_time = 60
max_input_time
This option limits the time in seconds a script is allowed to parse input data. OpenEMR requires this option to have the value -1, which means that the max_execution_time is used instead:
max_input_time = -1
post_max_size
This option limits the size of a post, including uploaded files. OpenEMR requires this option to have a value of 30M:
post_max_size = 30M
memory_limit
This option limits the amount of memory a script is allowed to allocate. OpenEMR requires this option to have a value of 256M:
memory_limit = 256M
mysqli.allow_local infile
This option enables access to local files with LOAD DATA statements. OpenEMR requires this option to be turned on:
mysqli.allow_local_infile = On
When you are done adjusting the options, save and exit the file. If you are using nano, you can do that by pressing CTRL+X, then Y and ENTER to confirm.
Next, you’ll need to reload the Apache web server for changes to take effect:
- sudo systemctl reload apache2
When your webserver has reloaded, you should be ready to proceed to the next step.
Step 4 — Downloading OpenEMR
In this step, you will download OpenEMR and prepare its files for installation. To start, download OpenEMR using the command wget, which retrieves files from the internet:
- wget https://downloads.sourceforge.net/project/openemr/OpenEMR%20Current/5.0.2.1/openemr-5.0.2.tar.gz
Next, extract the files using the tar command. The xvzf argument is used to tell the shell to extract the files (x), name the files extracted (v), uncompress the files with gzip (z), and use the file named in the command (f).
- tar xvzf openemr*.tar.gz
When the files are done being extracted, you should have a directory named openemr-5.0.2. Change the directory name to openemr using the mv command:
- mv openemr-5.0.2 openemr
Next, move the directory to your HTML directory:
- sudo mv openemr /var/www/html/
You now need to change the ownership of the directory. Use the chown command and R flag to set the owner of all files and the group associated with openemr to www-data:
- sudo chown -R www-data:www-data /var/www/html/openemr
For the installation process, OpenEMR also requires you to change the permissions of the sqlconf.php file so that all users can read and write the file but cannot execute it. After the installation is finished, we’ll change these permissions once again to secure your setup. These permissions can be granted with the chmod command using 666 as argument:
- sudo chmod 666 /var/www/html/openemr/sites/default/sqlconf.php
After you change the permissions for the sqlconf.php file, you are ready to proceed to the next step.
Step 4 — Installing OpenEMR
In this step, you will install OpenEMR through a web browser and configure the Apache web server. Open a web browser and navigate to http://server_ip/openemr, replacing server_ip with the IP address of your server.
If everything is working correctly, the browser should display the OpenEMR Setup page:
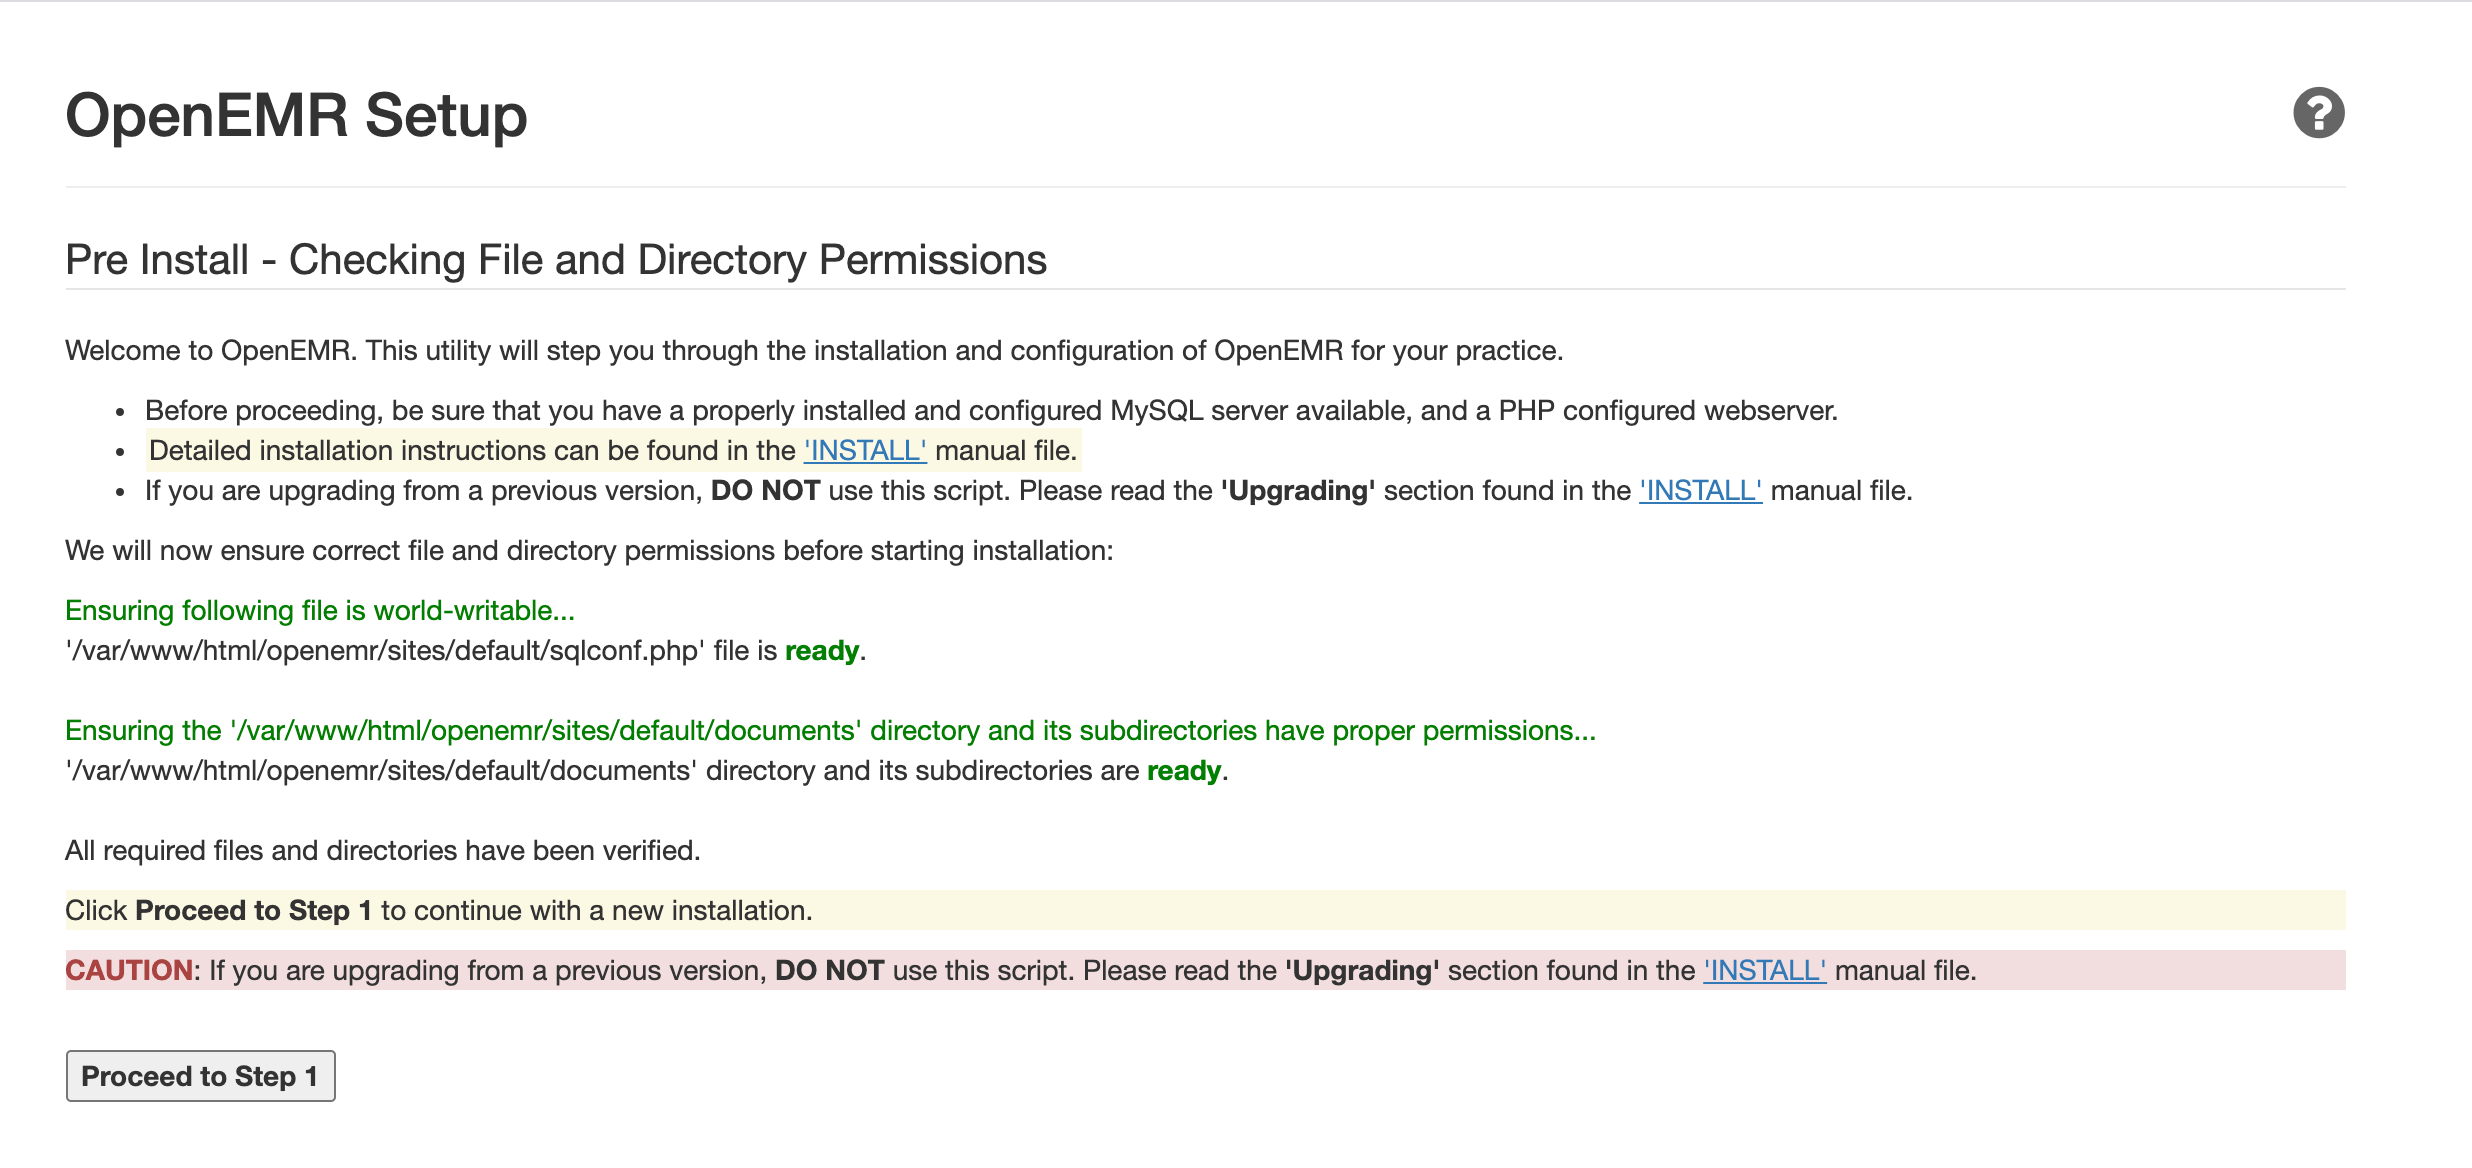
Click Proceed to Step 1. You should now be directed to a new OpenEMR Setup page for Step 1 of the installation process:
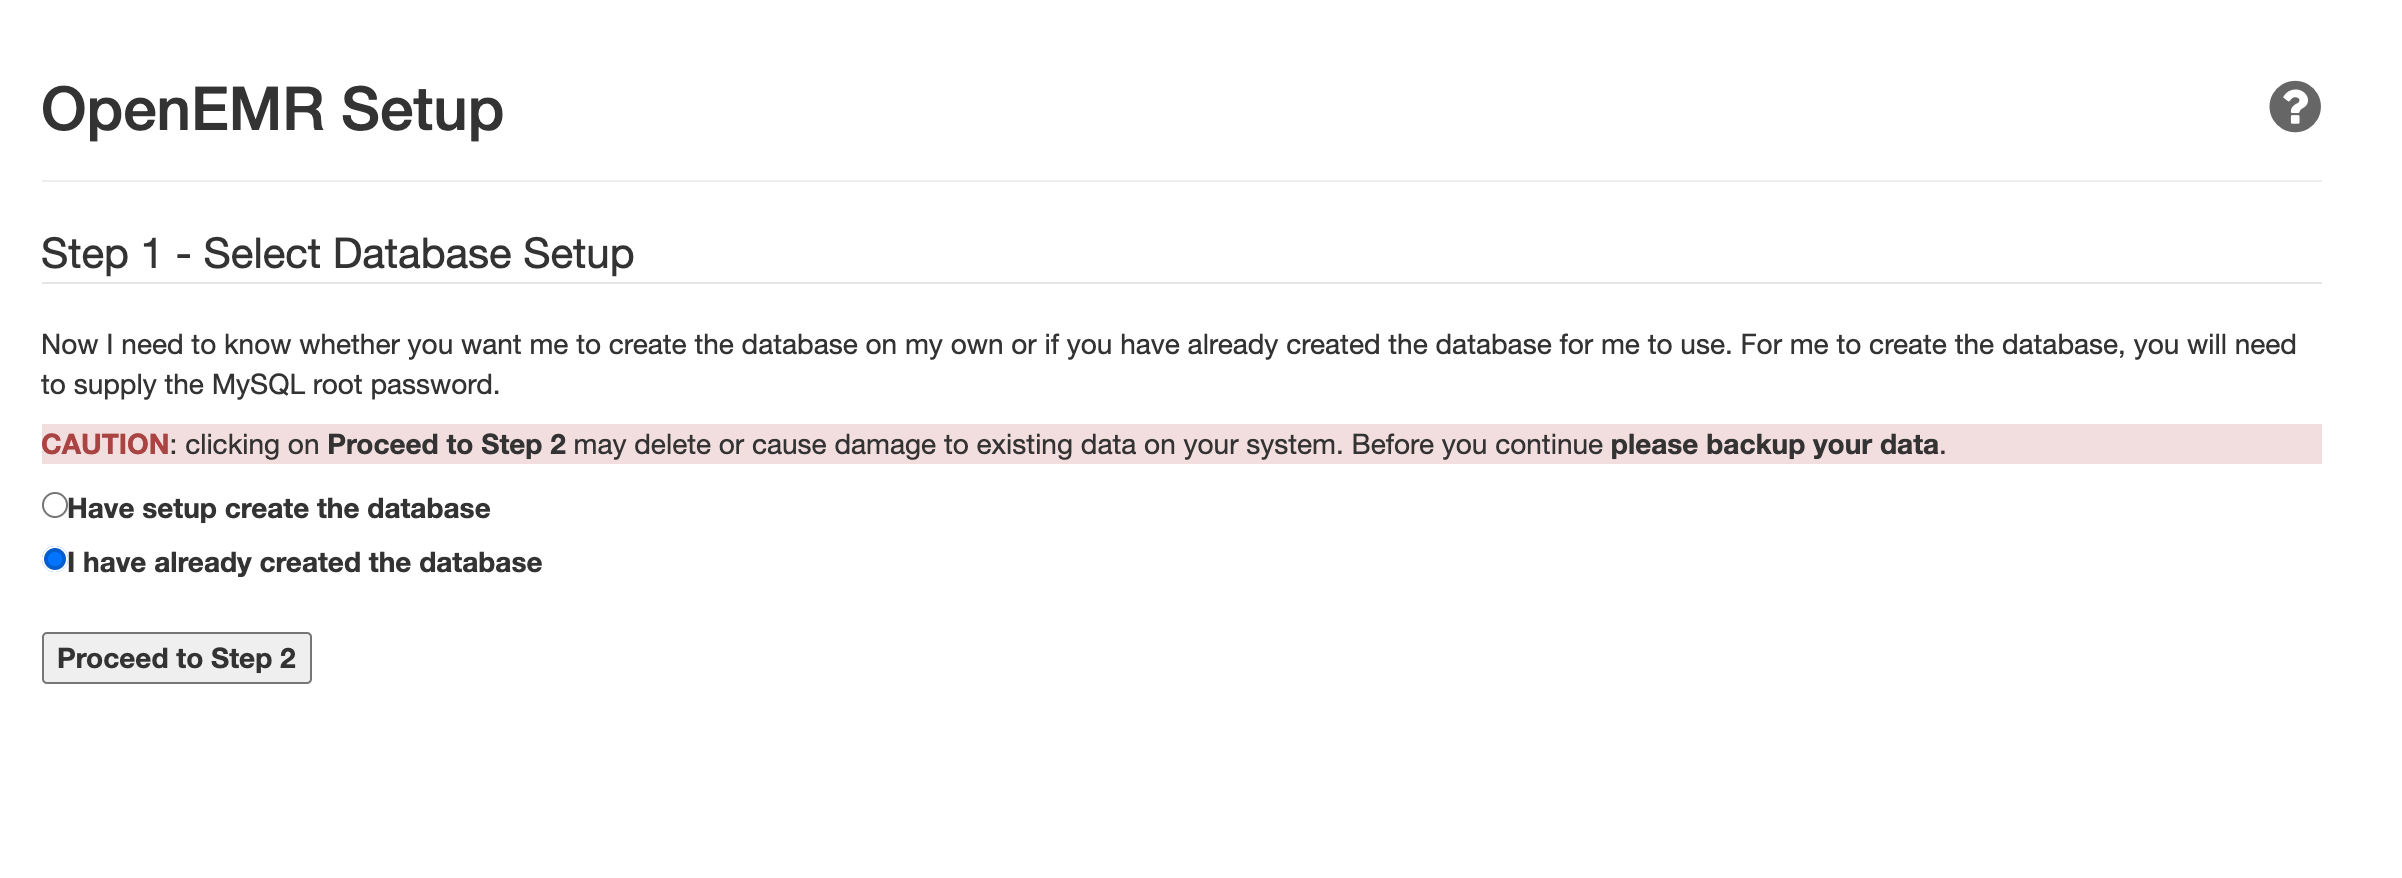
On the new page, select I have already created a database as you already created an OpenEMR database in Step 3 of this tutorial. Then click Proceed to Step 2.
Your browser should now display Step 2 of the OpenEMR Setup:
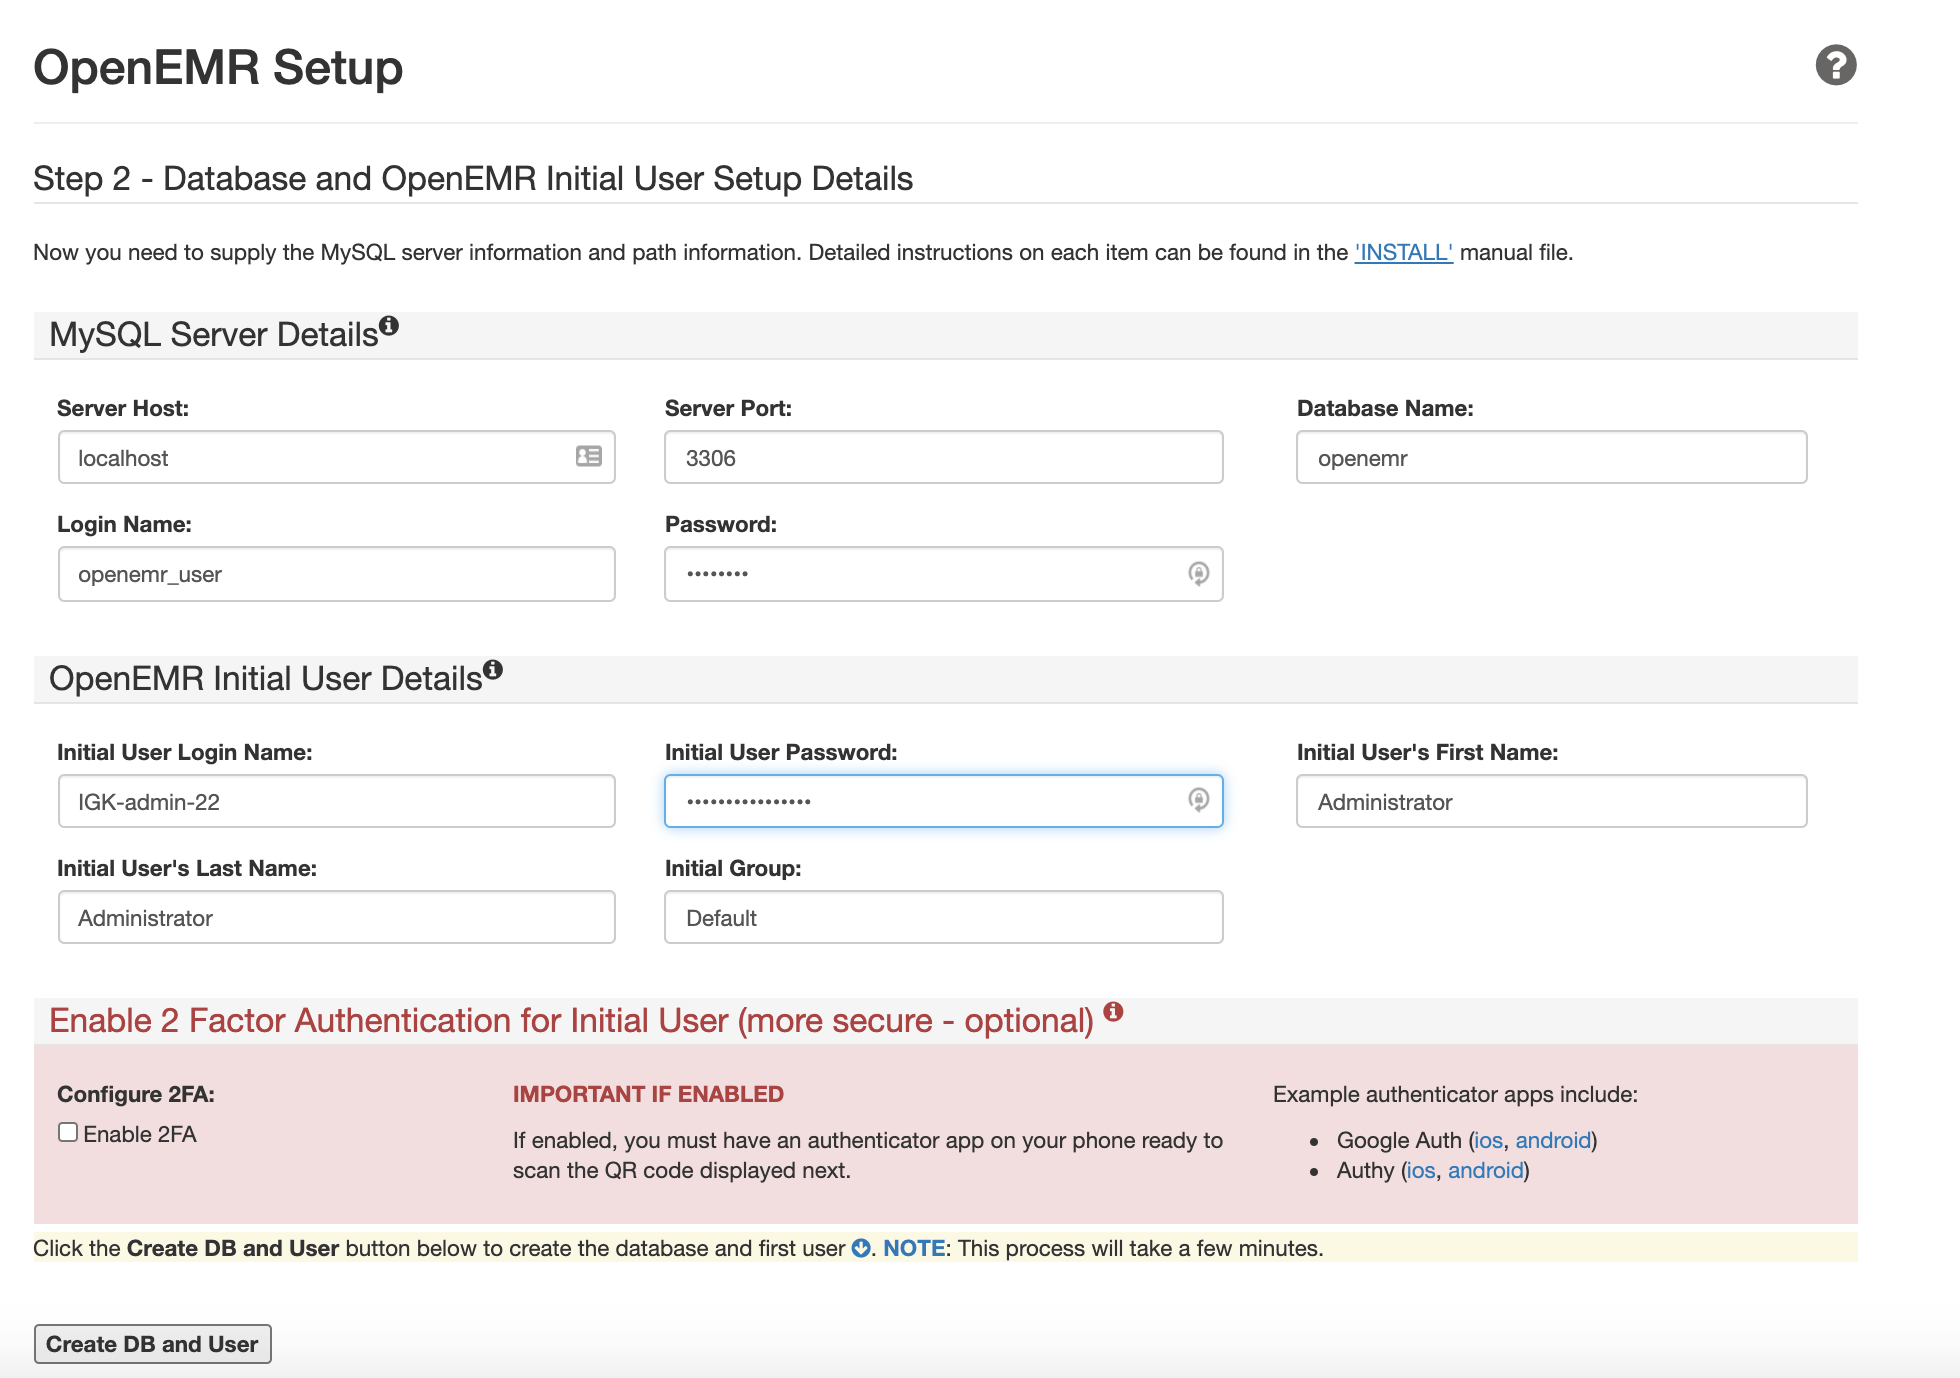 In the Login and Password fields in the MySQL Server Details section, enter the username and password you picked in Step 3.
In the OpenEMR Initial User Details section, create an Initial User Login Name and password.
If you’d like to enable 2 Factor Authentication for the initial user, click the option Enable 2FA.
Then click Create DB and User. It may take a few minutes for the next page to load. This page will verify the successful creation of the user and database:
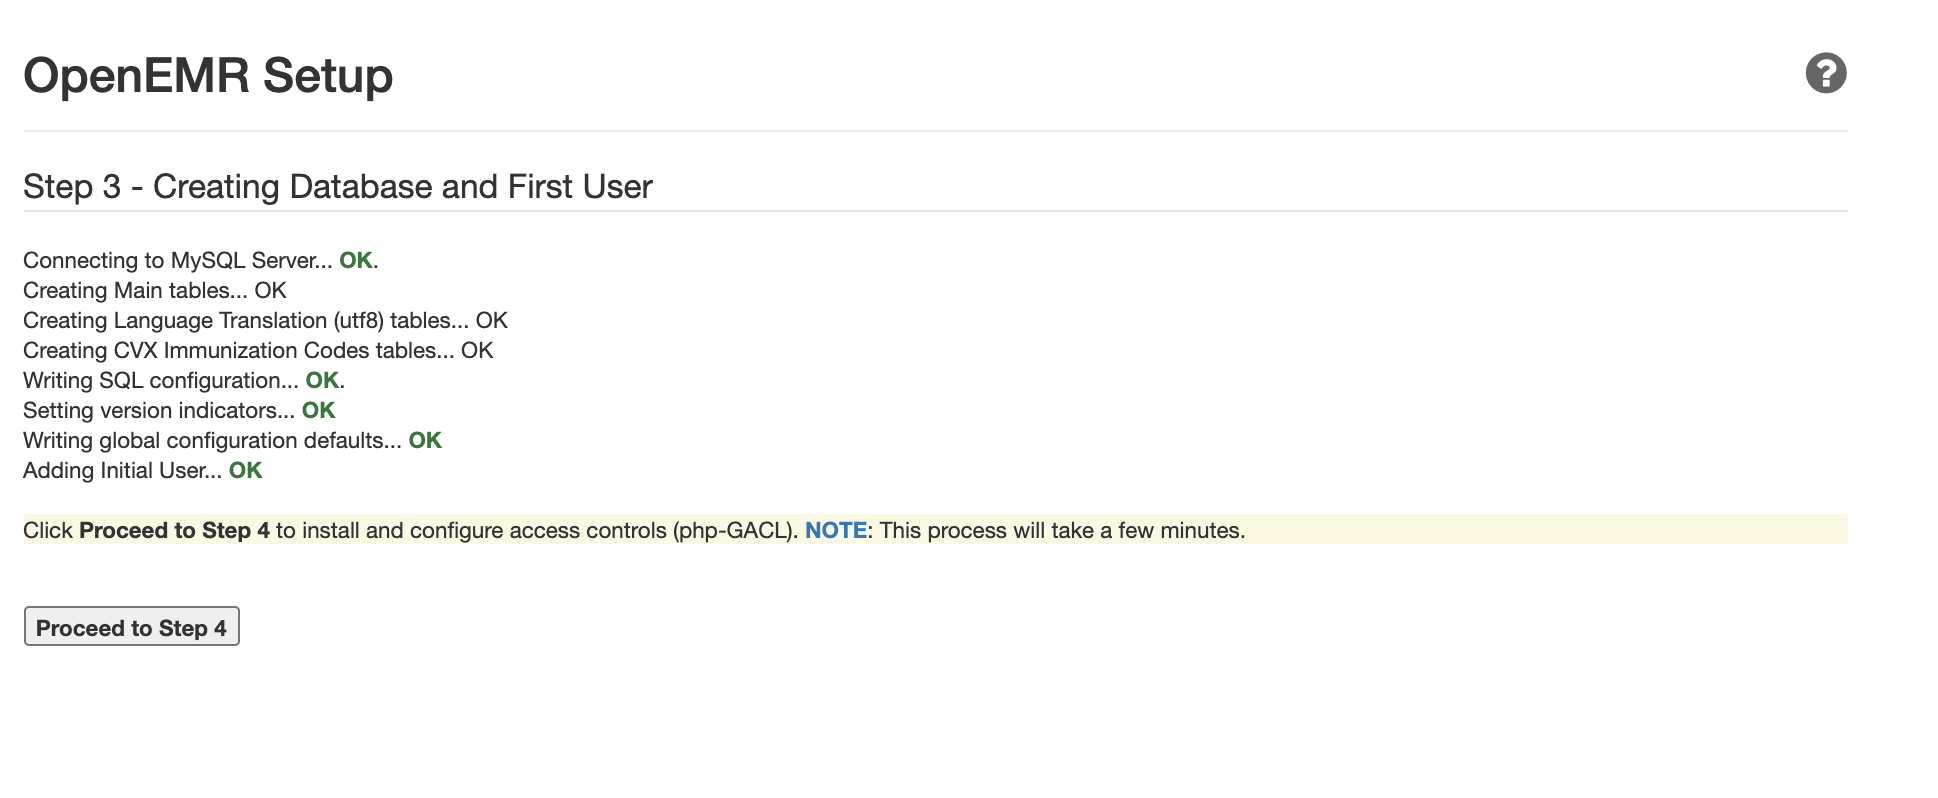
Click Proceed to Step 4 to continue. The next page will confirm the creation and configuration of the Access Control List:
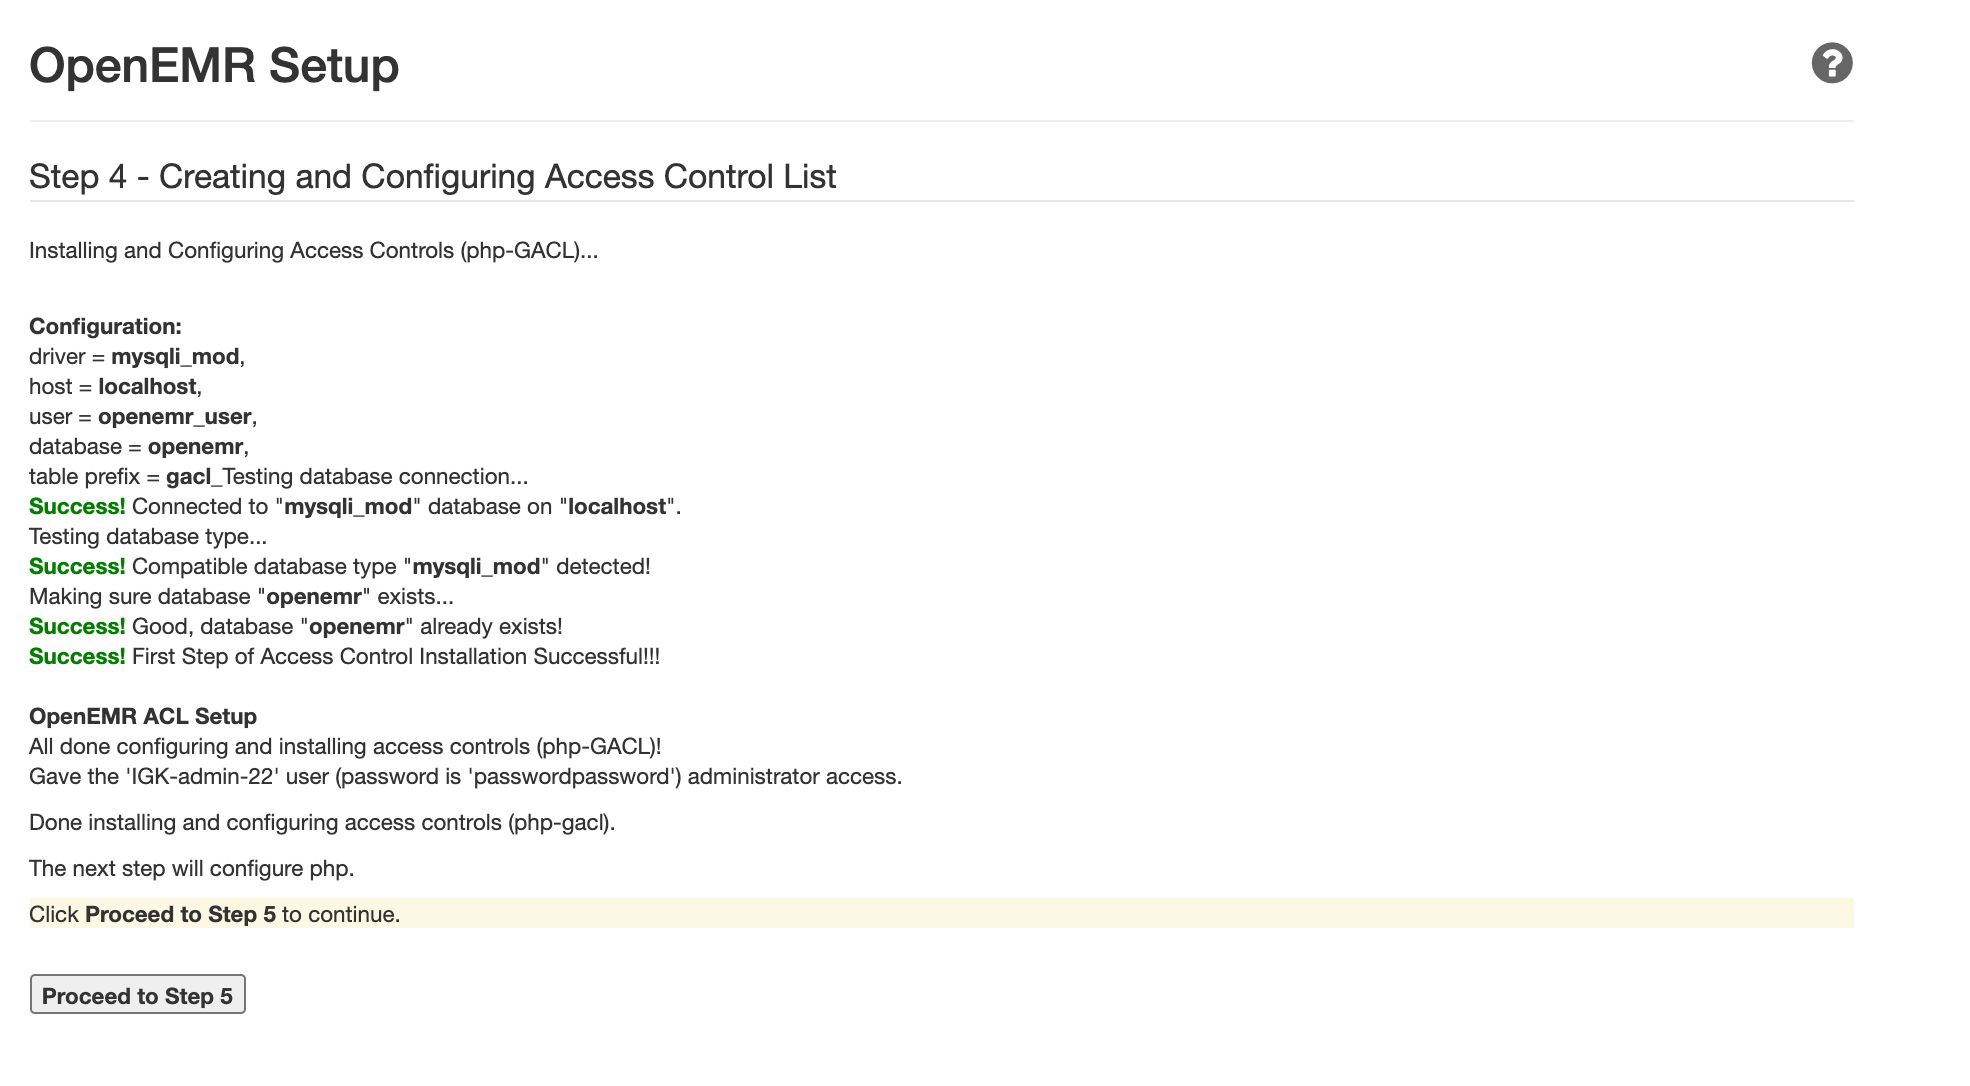
Click Proceed to Step 5 to continue. The next page will show you the required PHP configurations for OpenEMR. Your current configuration should match their requirements as you already adjusted them in Step 4.
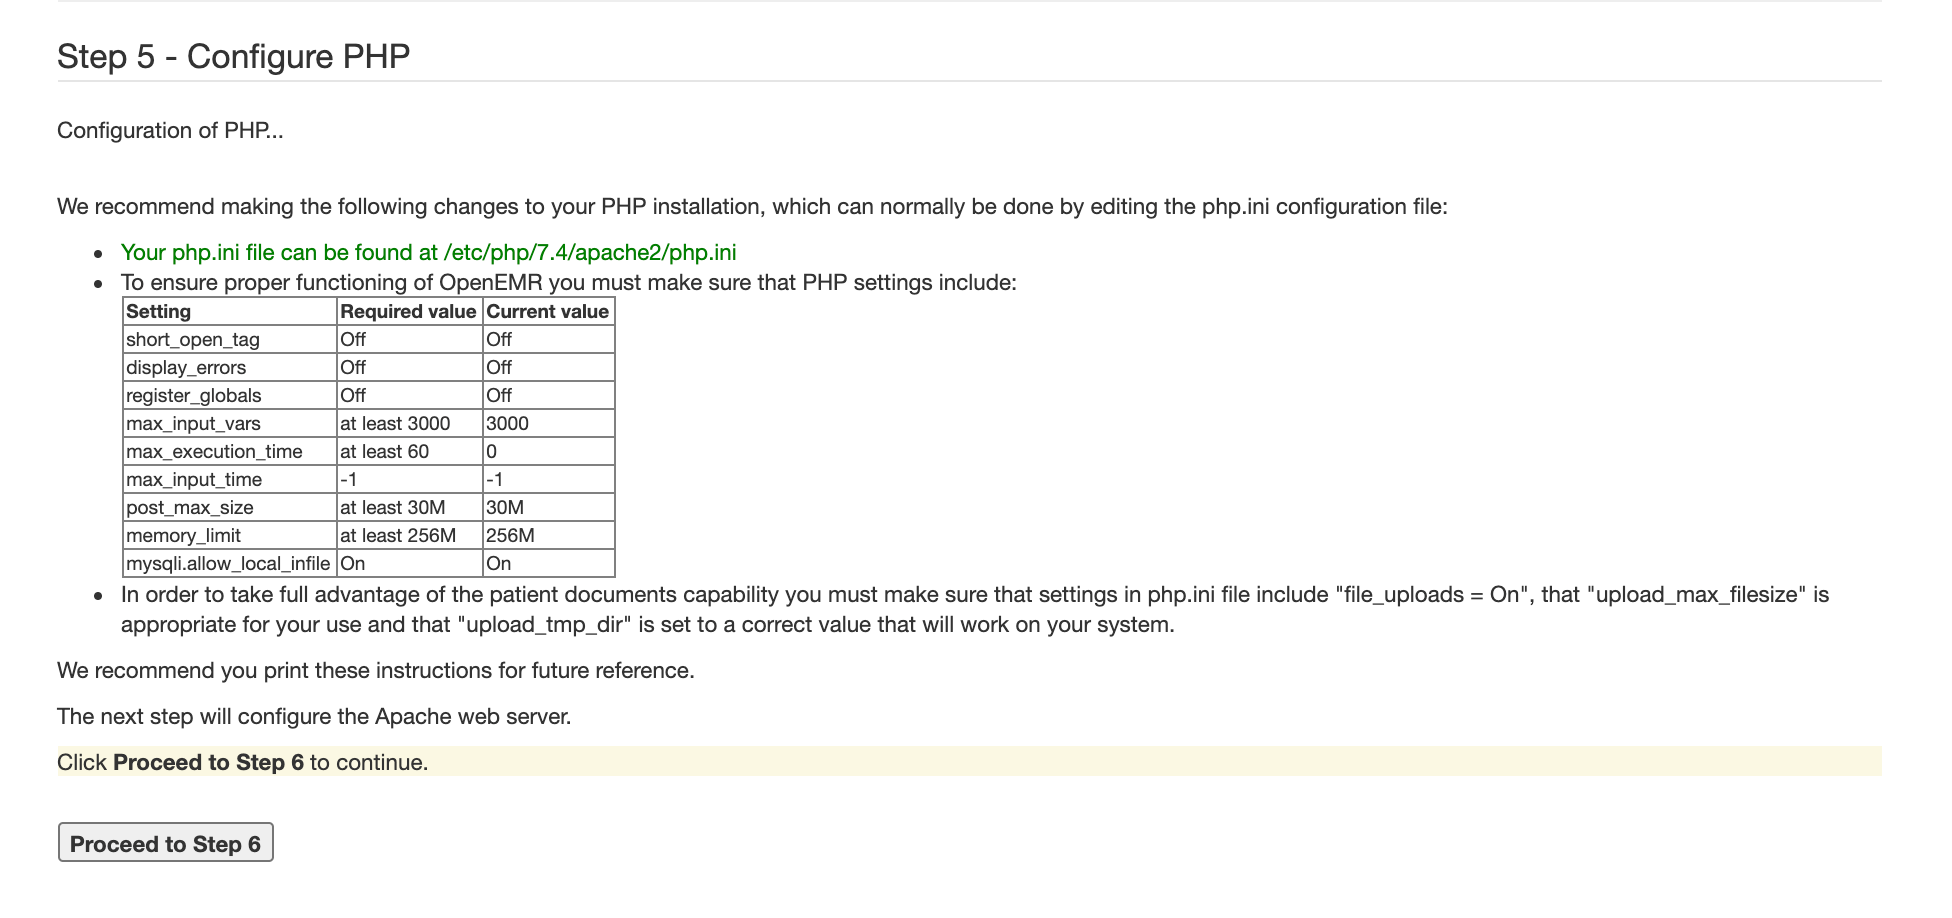
Click Proceed to Step 6 to continue. The next page will show you how to configure your Apache Web Server for OpenEMR:
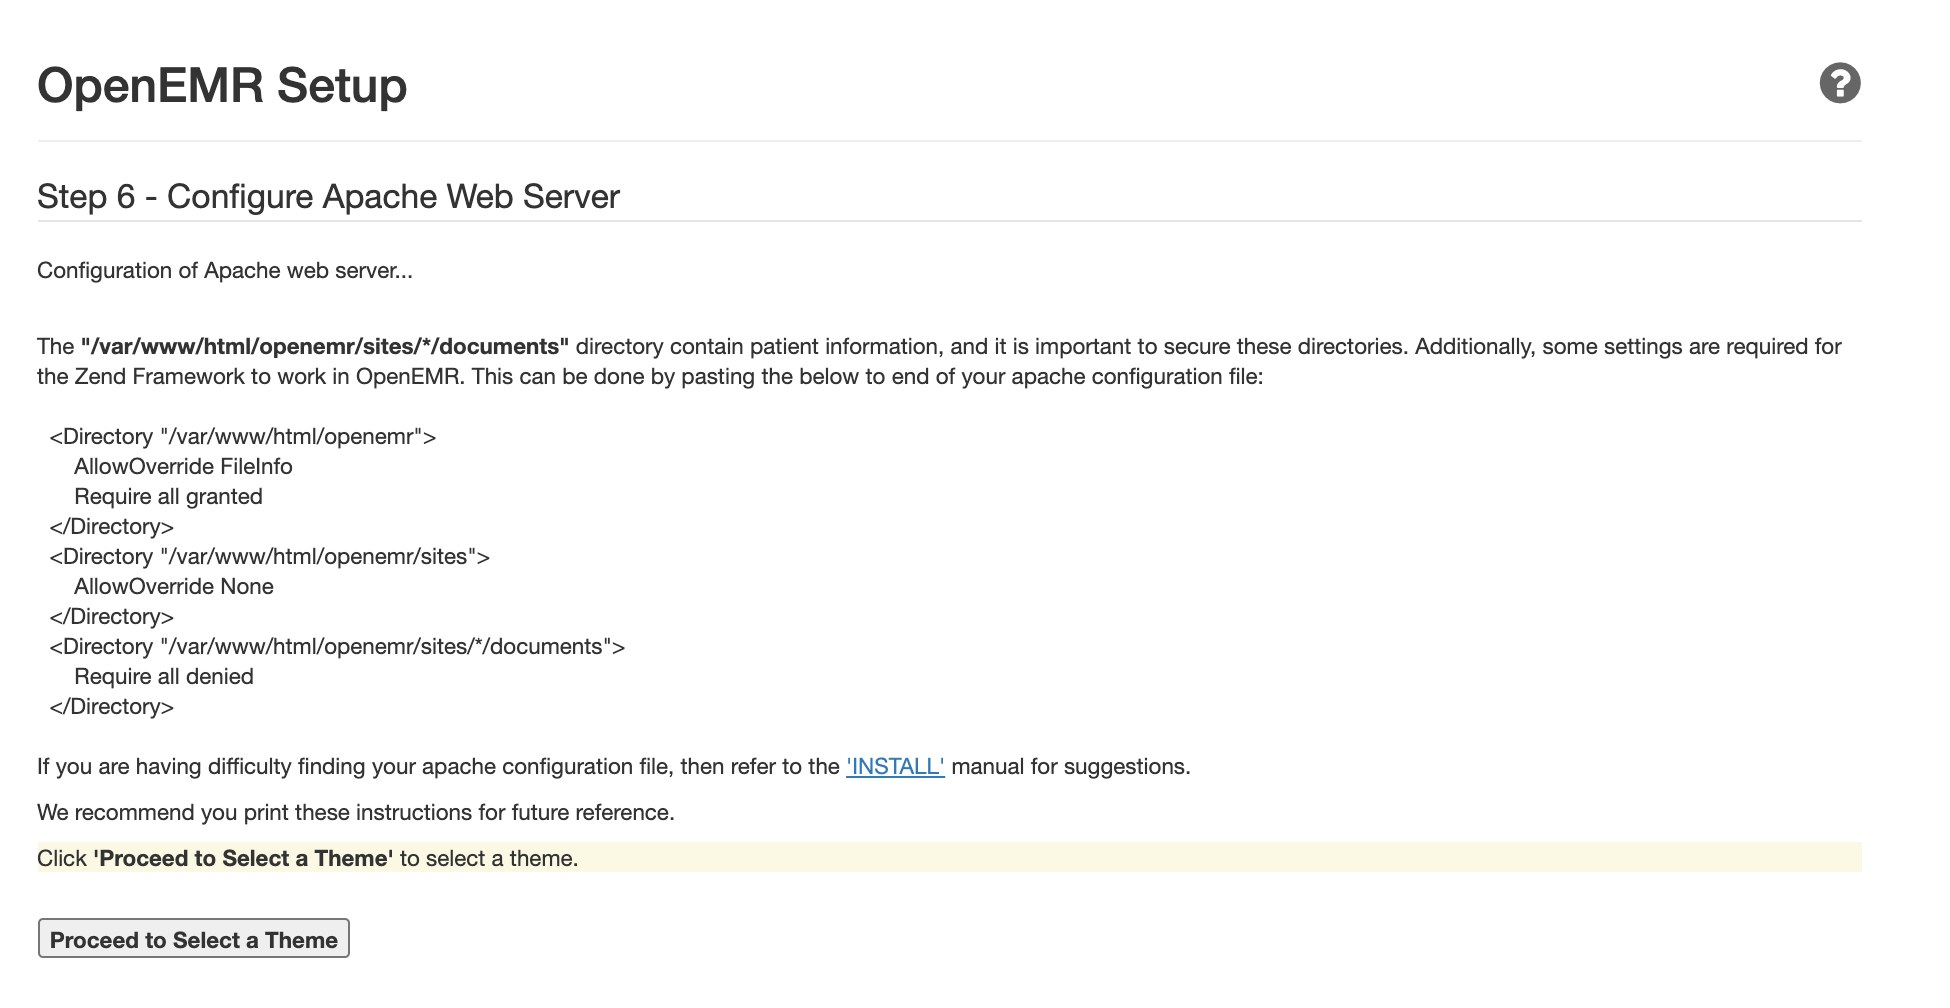
To configure the Apache Web Server for OpenEMR, create a new configuration file named openemr.conf. You can do that from your terminal using the nano editor:
- sudo nano /etc/apache2/sites-available/openemr.conf
Inside the file, paste the following directives:
 <Directory "/var/www/html/openemr">
      AllowOverride FileInfo
      Require all granted
  </Directory>
  <Directory "/var/www/html/openemr/sites">
      AllowOverride None
  </Directory>
  <Directory "/var/www/html/openemr/sites/*/documents">
      Require all denied
  </Directory>
Save and close the file. Then, restart Apache so that the changes are loaded:
- sudo systemctl restart apache2
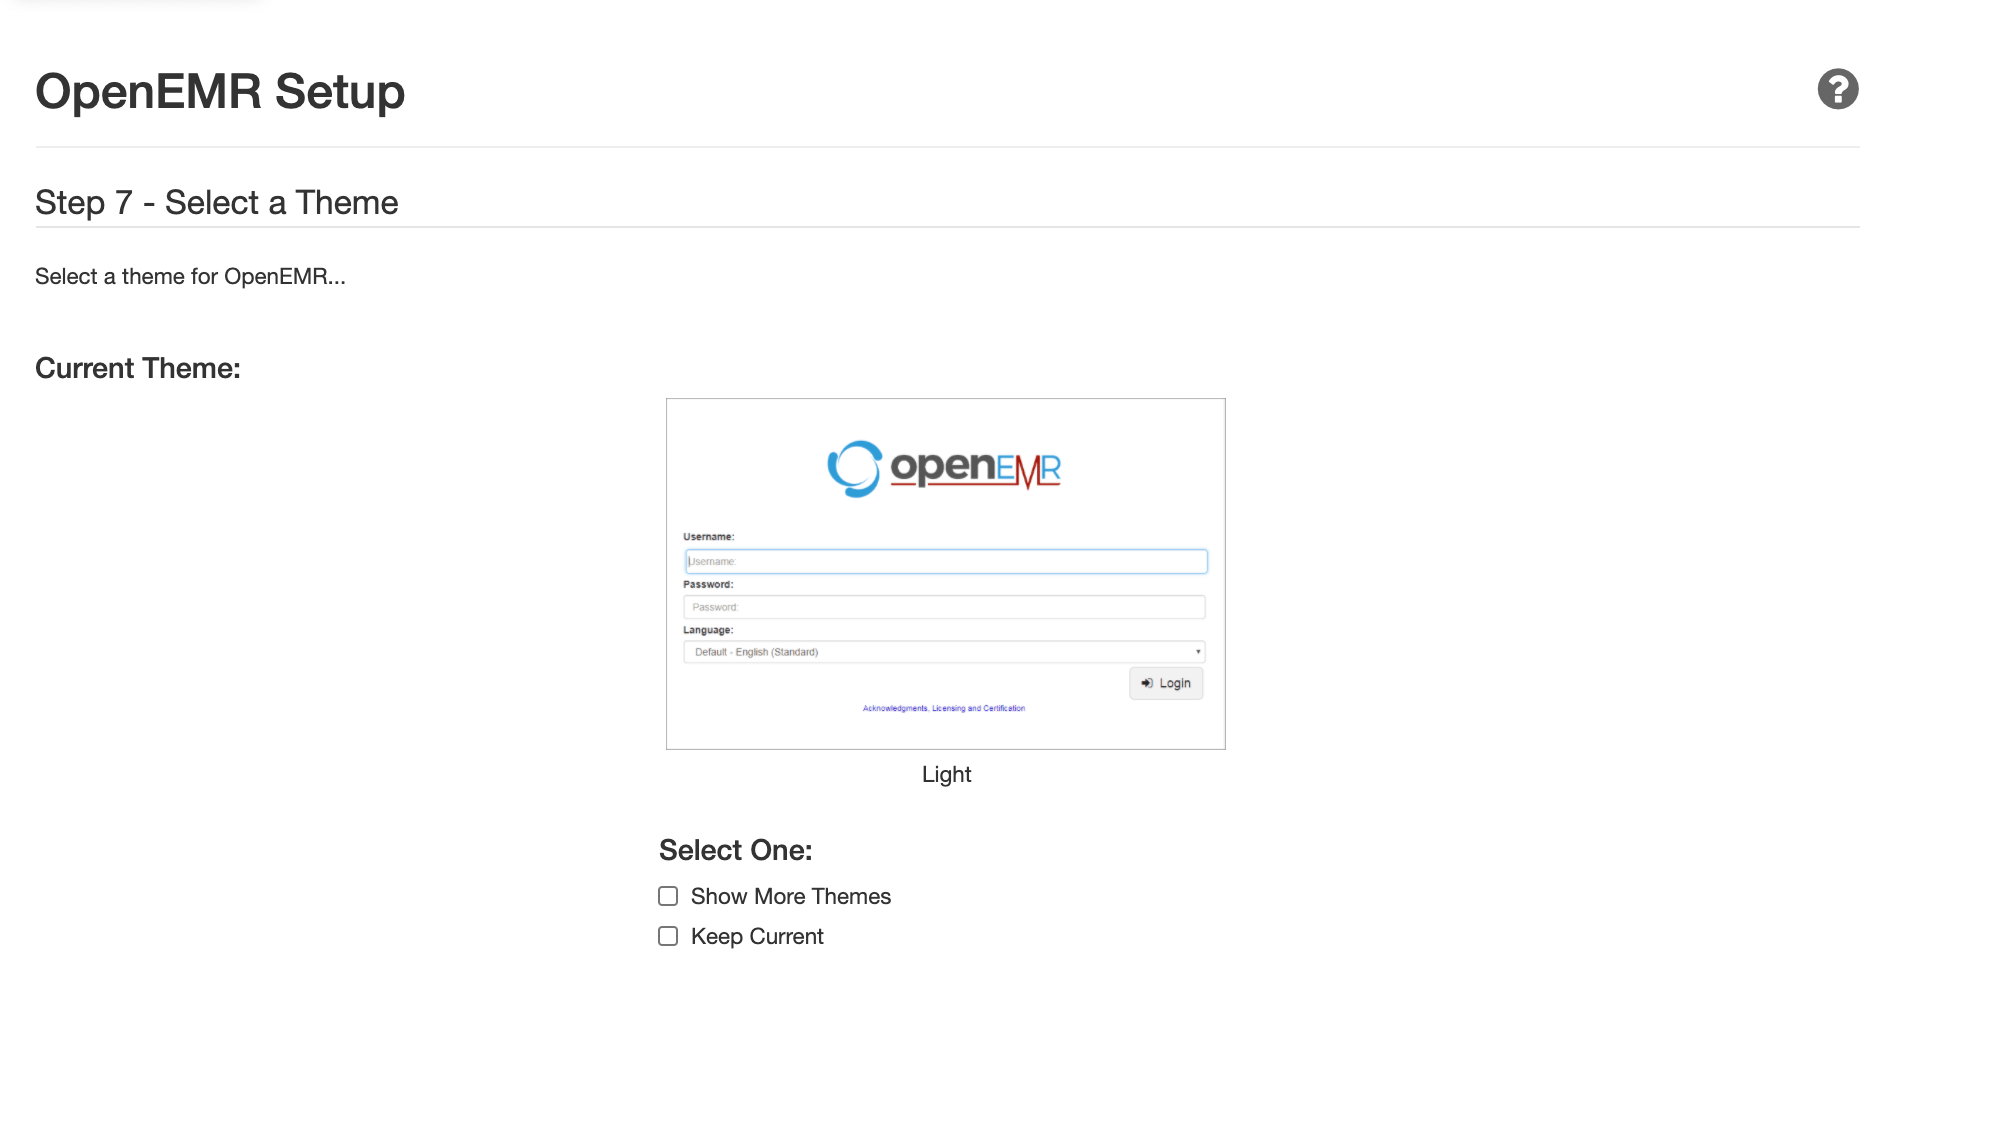
Next, return to the browser and click Proceed to Select a Theme. On the next page, select a theme and click Proceed to Final Step:
You should now be directed to the final setup page with confirmation details regarding your installation:
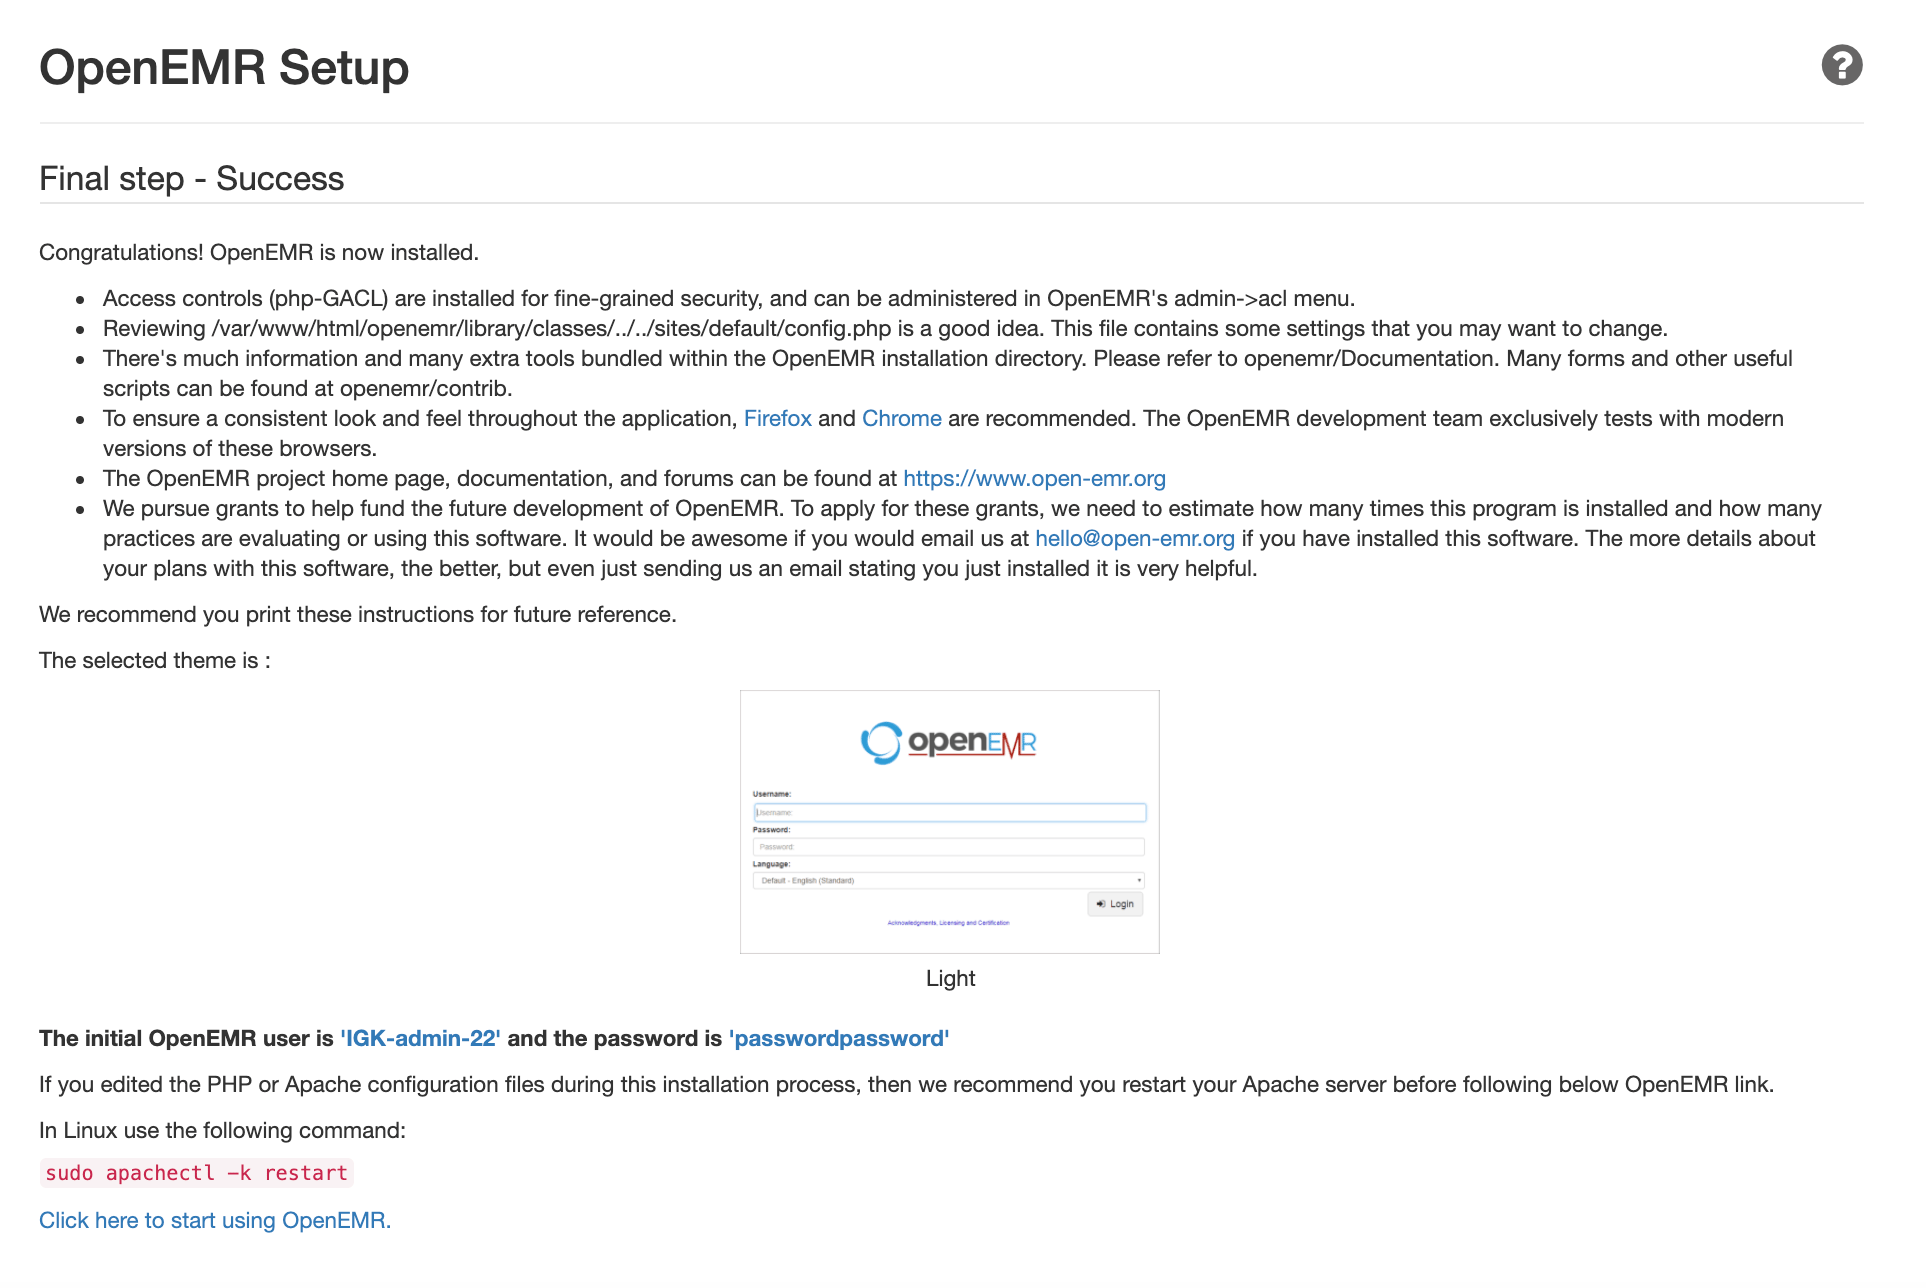
This page will also give the user name and password details for your initial user. Make sure to have these details available before you leave the page. When you are ready, click the link at the bottom to start using OpenEMR.
A window will pop up asking whether you want to register your installation. After making your choice, log in to OpenEMR with your initial user credentials. Once you are logged in, your browser should display the OpenEMR dashboard:
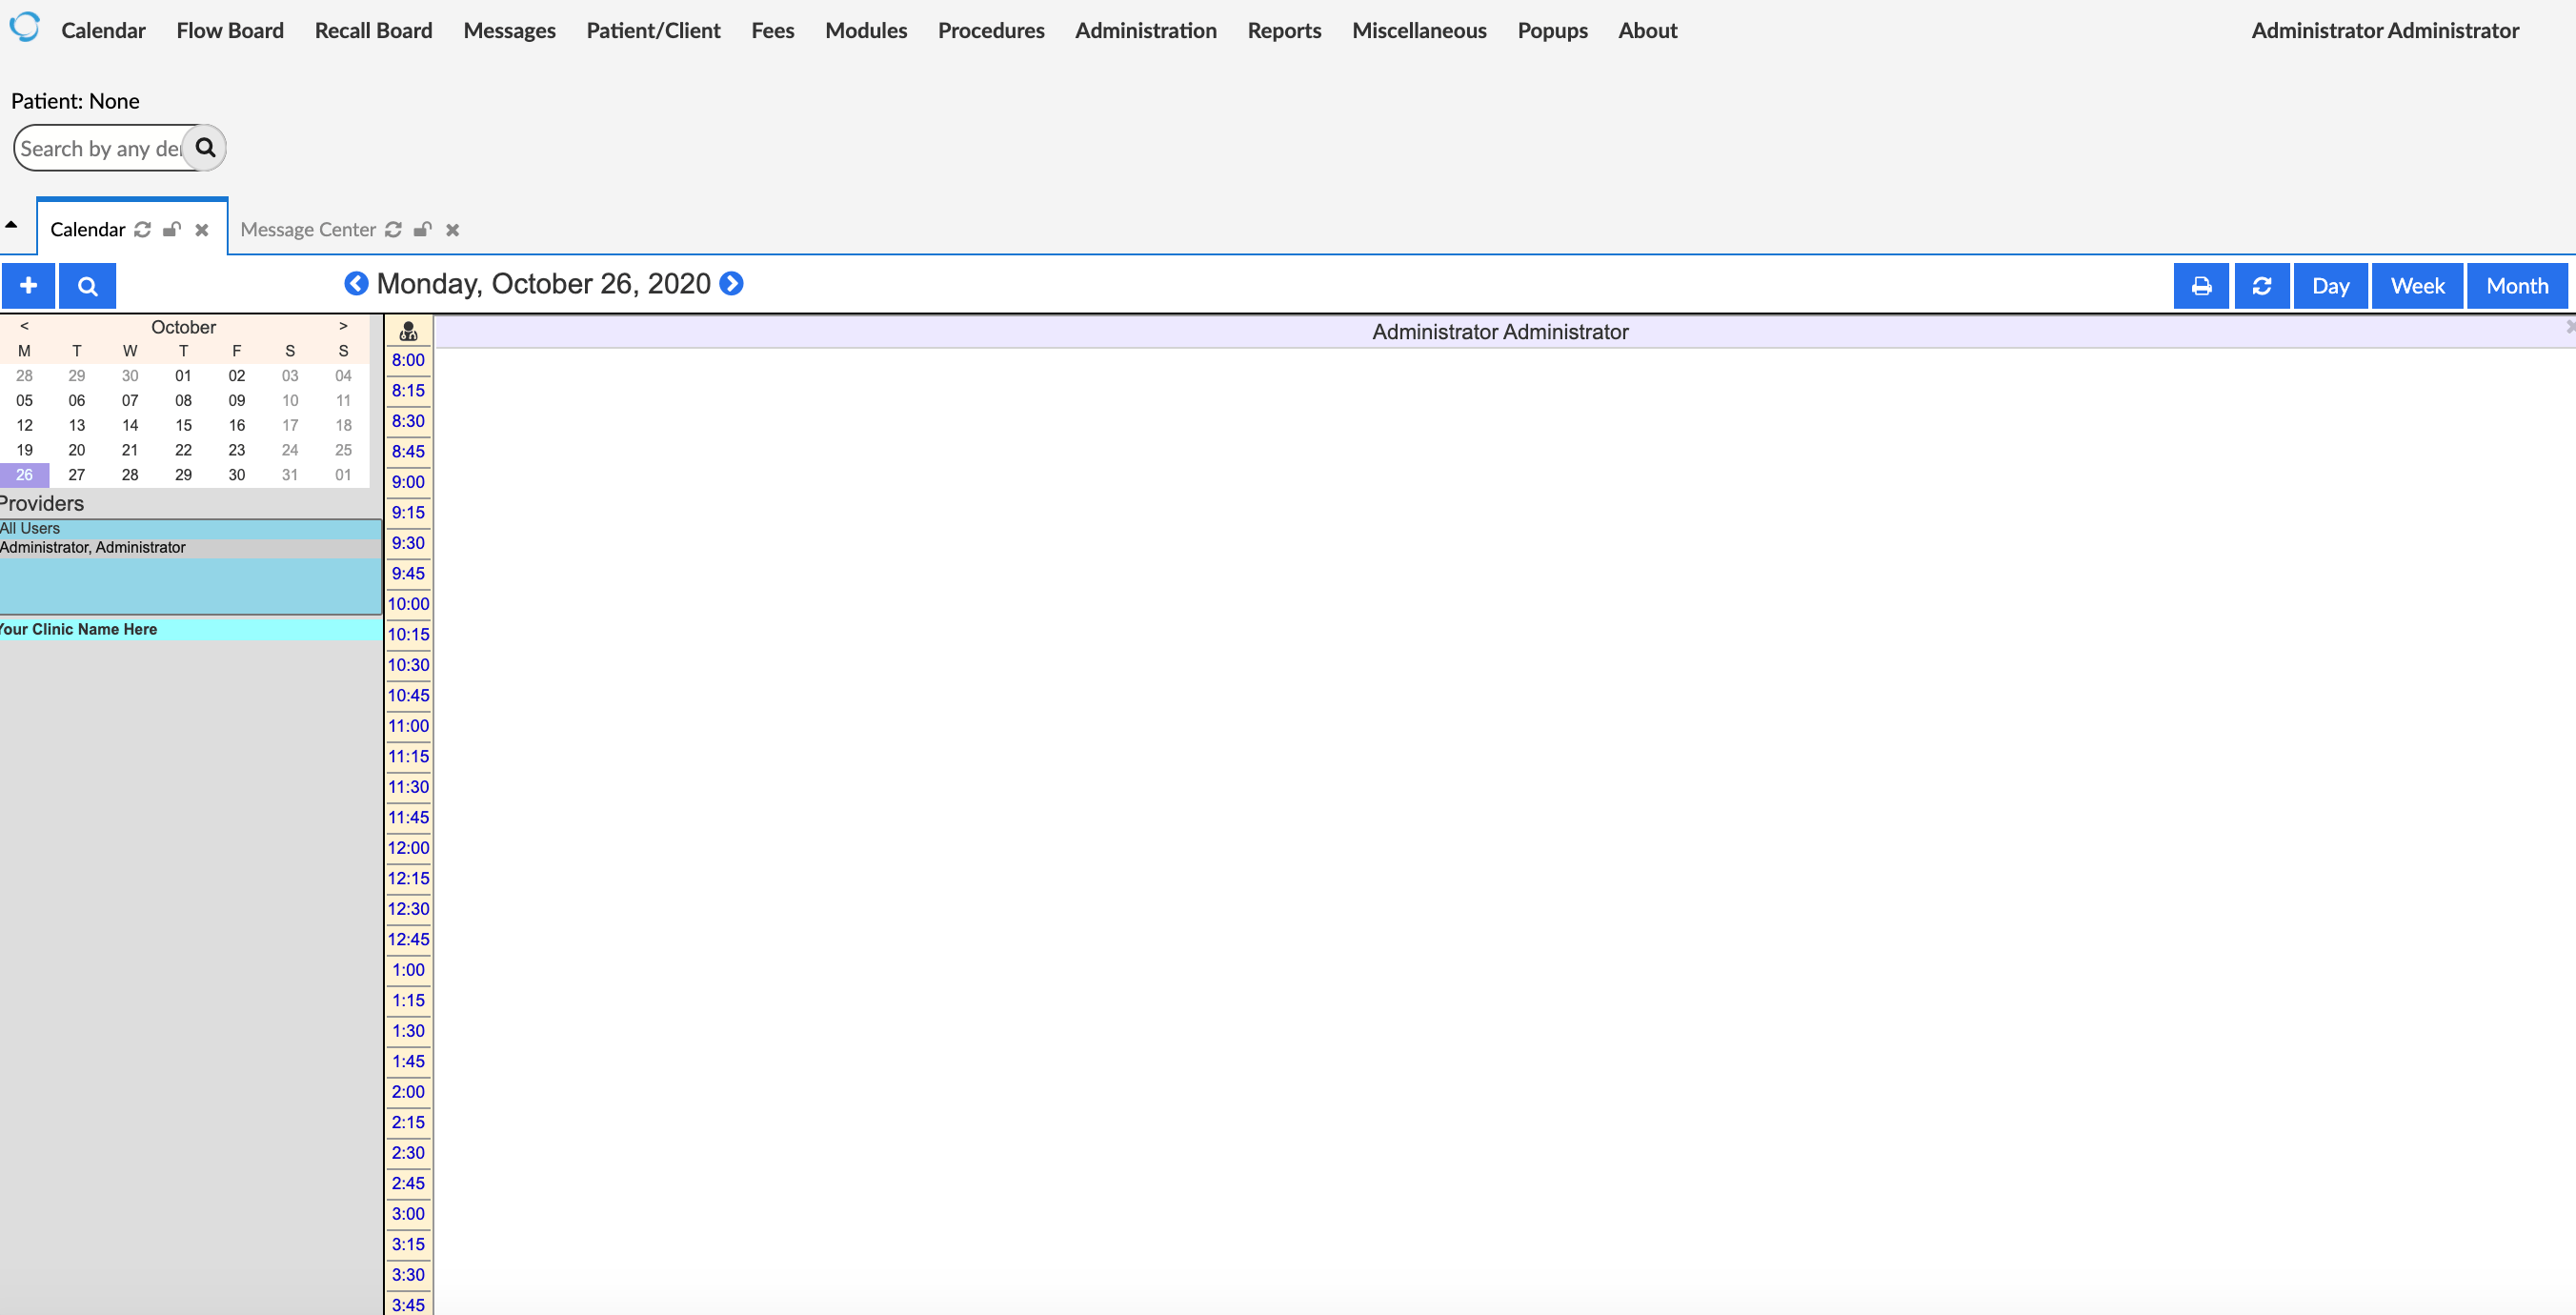
Before going any further, make sure to change the file permissions as indicated in the next step.
Step 5 — Changing FileSystem Permissions
To improve the security of the system, OpenEMR advises users to change permissions of several files after installation. In this step, you will change the permissions of these files to further restrict read and write access.
First, you will change the permissions of the sqlconf.php file whose permissions you modified in Step 3 to give the owner read and write access and group members only read access.
These permissions can be granted with the chmod command using 644 as the argument:
- sudo chmod 644 openemr/library/sqlconf.php
Next, you will change the permissions of several other files to allow only the file owner to read and write the file.
Grant these permissions by using the chmod command with the 600 argument on the following files:
- sudo chmod 600 openemr/acl_setup.php
- sudo chmod 600 openemr/acl_upgrade.php
- sudo chmod 600 openemr/setup.php
- sudo chmod 600 openemr/sql_upgrade.php
- sudo chmod 600 openemr/gacl/setup.php
- sudo chmod 600 openemr/ippf_upgrade.php
Your files should now have more secure permission settings.
In addition to changing file permissions, OpenEMR’s documentation strongly advises additional steps for securing each of OpenEMR’s components. These steps include deleting scripts in OpenEMR after installation, enforcing strong passwords, enabling HTTPS-only traffic, adjusting the firewall, and hardening Apache. Make sure to visit OpenEMR’s [security documentation] (https://www.open-emr.org/wiki/index.php/Securing_OpenEMR) to learn more about how you can best protect your OpenEMR installation.
Conclusion
You have now installed OpenEMR on an Ubuntu 20.04 server using Apache, MySQL, and PHP. For instructions on pointing a domain name to your server, you can follow our guide How To Point to DigitalOcean Nameservers From Common Domain Registrars. For OpenEMR documentation, you can visit the OpenEMR Wiki Page.
Thanks for learning with the DigitalOcean Community. Check out our offerings for compute, storage, networking, and managed databases.
About the author
Open source advocate and lover of education, culture, and community.
Still looking for an answer?
This textbox defaults to using Markdown to format your answer.
You can type !ref in this text area to quickly search our full set of tutorials, documentation & marketplace offerings and insert the link!
 This work is licensed under a Creative Commons Attribution-NonCommercial- ShareAlike 4.0 International License.
Become a contributor for community
Get paid to write technical tutorials and select a tech-focused charity to receive a matching donation.

DigitalOcean Documentation
Full documentation for every DigitalOcean product.

Resources for startups and AI-native businesses
The Wave has everything you need to know about building a business, from raising funding to marketing your product.
The developer cloud
Scale up as you grow — whether you're running one virtual machine or ten thousand.

Start building today
From GPU-powered inference and Kubernetes to managed databases and storage, get everything you need to build, scale, and deploy intelligent applications.
