By Koen Vlaswinkel and Hazel Virdó

Written in collaboration with Sandstorm
Introduction
Sandstorm is an open source platform for personal servers, which means that it can be used to install many different apps on one server with a easy to use interface. A few examples of the apps that can be installed using Sandstorm are WordPress, GitLab, MediaWiki, Apache Wave, and RoundCube webmail. For example, many people use Sandstorm as a self-hosted alternative to Google Docs.
In this article, we will install Sandstorm and then install three of the most popular apps as examples.
Prerequisites
To follow this tutorial, you will need:
-
One Ubuntu 14.04 Droplet. This tutorial was tested with Ubuntu 14.04, but Sandstorm should work with any Linux distribution.
-
A sudo non-root user, which you can set up by following this initial Ubuntu 14.04 server setup tutorial.
-
Optionally, an SMTP server or a mail provider service like Mailgun.
Step 1 — Installing Sandstorm
In this section, we will install Sandstorm.
To start Sandstorm’s installation wizard, just download and run the installation script. You can visit https://install.sandstorm.io in your favorite browser to view the script before running the command.
- curl https://install.sandstorm.io | bash
Sandstorm will start asking questions about your setup. Enter your password when prompted and press ENTER to accept the default answers to all of the questions except for the *What .sandcats.io subdomain would you like? question.
This question is asked because Sandstorm will give you a free subdomain for your Sandstorm installation if you’d like to use it. Your sandcats.io subdomain will also come with your own SSL certificate, making your Sandstorm installation secure by enabling HTTPS.
Alternatively, you can use your own domain, but if you do use a sandcats.io subdomain, you can always switch to your own domain in the future.
Follow the instructions in the appropriate section below, then move on to step 2.
Using a Free sandcats.io Subdomain
To use a sandcats.io subdomain, simply enter the name of the subdomain you’d like for the *What .sandcats.io subdomain would you like? question. For example, if you enter example here, you will be able to access your Sandstorm installation at example.sandcats.io. Choose a name that fits your goal for this Sandstorm installation.
Using Your Own Domain
In this section, we will configure the DNS settings if you want to use your Sandstorm with your own domain or subdomain. This is an advanced setup; for most uses, the sandcats.io service is fine, especially for testing.
If you want to use a custom domain, you will require a domain name with the following DNS records:
- A wildcard CNAME record redirecting to your Sandstorm IP (
*.example.com CNAME example.com.) - An A record pointing to your domain (
example.com. A your_server_ip).
You can find more information about setting up a domain name in this tutorial.
New Sandstorm apps are located on a subdomain. DNS records like *.111.111.111.111 don’t exist, so you can’t use your Droplet’s IP address; a domain name and wildcard DNS record are required. Alternatively, you can use the xip.io service which provides wildcard DNS for any IOP address; read more about xip.io in the Sandstorm documentation.
Once you have the DNS records set up, make sure to answer none to the question *What .sandcats.io subdomain would you like? [] during the installation process. Answer the URL users will enter in browser: [http://sammy:6080] with your domain name, such as http://example.com:6080. Make sure to put in the correct wildcard domain for the question Wildcard host: [*.example:6080]. This will usually be already correct because Sandstorm derives it from the previous question.
Step 2 — Setting Up Identity Providers
In this section, we will configure Sandstorm.
After installing Sandstorm, the setup wizard will provide you with a URL to access your server:
Your server is now online! It should work immediately if you use Chrome.
Visit this link to start using it:

  https://example.sandcats.io/setup/token/f19d0a6873f5dc5ad389a0977d832ee0fac14c5a

NOTE: This URL expires in 15 minutes. You can generate a new setup URL by running
'sudo sandstorm admin-token' from the command line.
Navigate to the URL by copying it from the terminal and pasting it into your browser. You will see a screen titled Welcome to Sandstorm!.

Click on Begin Standard Setup. You will see a screen titled Configure Identity Provider(s).
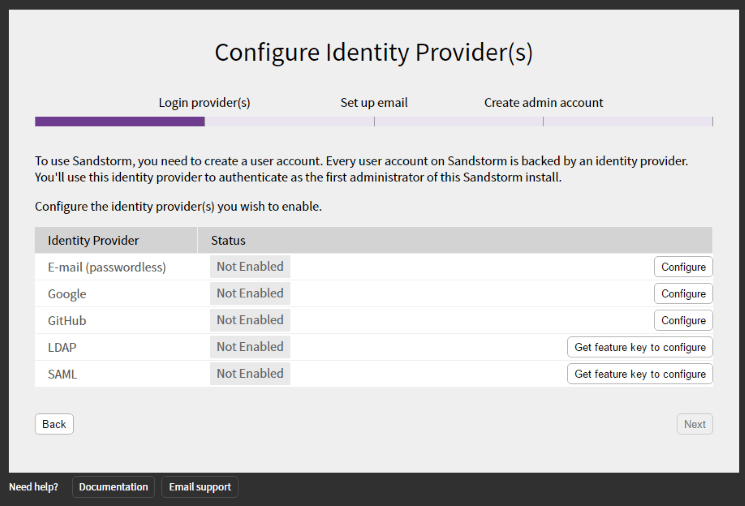
You can now configure one or multiple identity providers. Choose a identity provider (email, Google, or GitHub) and refer to the appropriate section below. Using Google or GitHub is recommended, because email will require you to set up an SMTP server.
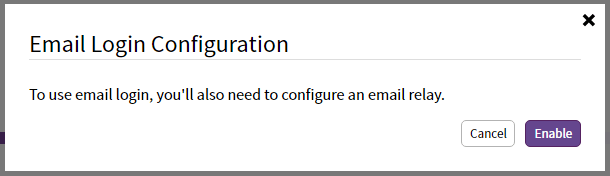
Email (passwordless)
Click Configure to the right of Email (passwordless), then click Enable in the prompt about an email relay.
However, note that Google and GitHub are generally easier to set up because they don’t require an SMTP server.
Click Configure to the right of Google. If you choose Google login, you will see instructions in Sandstorm, as shown here:
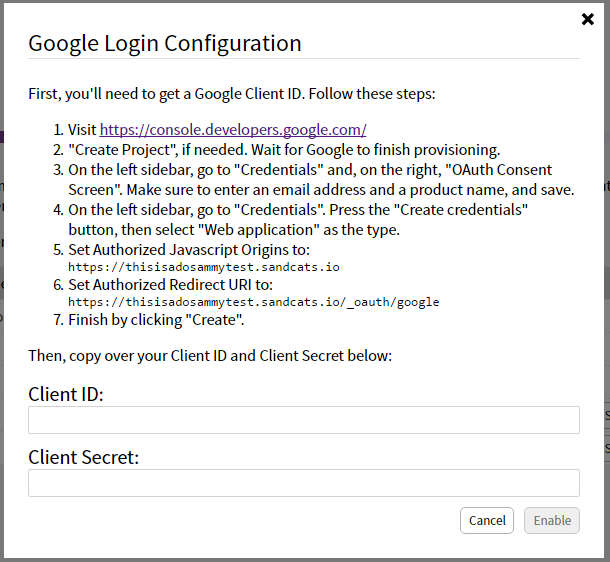
Follow these instructions and after you have filled in the Client ID and Client Secret, click Enable.
GitHub
Click Configure to the right of GitHub. If you choose GitHub login, you will see instructions in Sandstorm, as shown here:
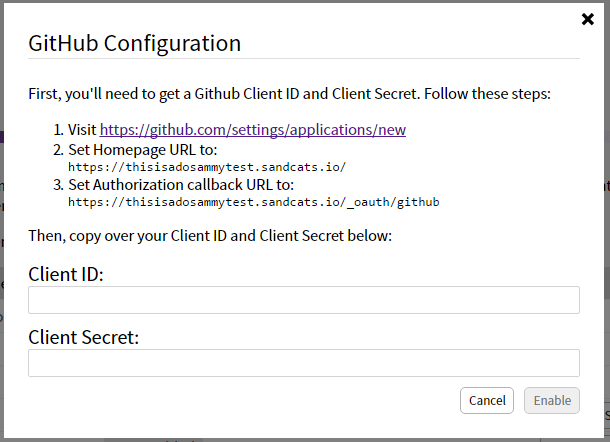
Follow these instructions and after you have filled in the Client ID and Client Secret, click Enable.
Step 3 — Completing the Setup Wizard
After configuring your identity providers, continue with the setup wizard by clicking Next in the bottom right. The next screen is titled Outbound Email Setup.
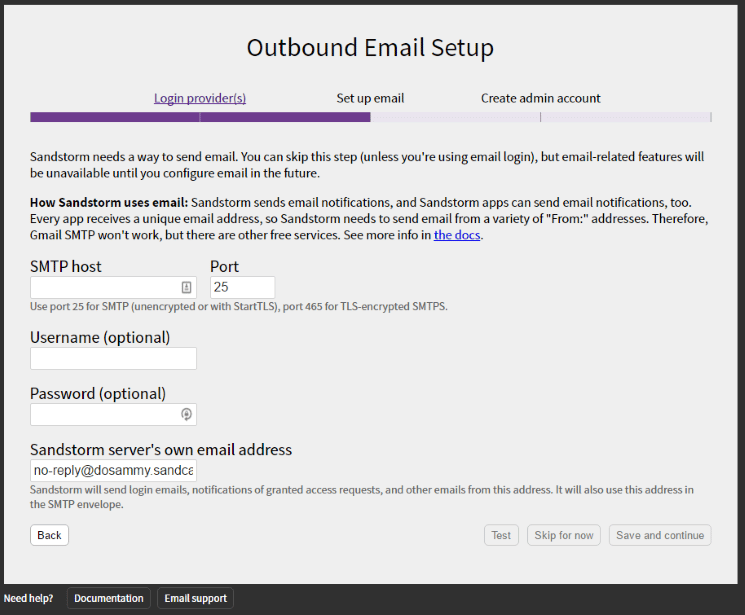
If you do not want to have the ability to send email, click Skip for now. It is always possible to add this data later. However, this step is required if you have set up the email identify provider, or if you want to use email notifications.
If you do want to set this up, add your SMTP info and make sure to click Test to test whether you have put in the correct data. After the test succeeds, click Save and continue.
The next step will ask you to create an admin account. Use one of the login options to create the admin account. The last step is to confirm your account by clicking Finish.
Your installation is now finished!
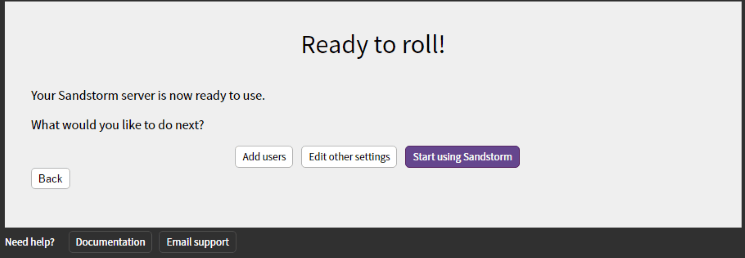
Click Start using Sandstorm to continue to Sandstorm.
Step 4 — Installing Apps (Optional)
For an example, we will go through the process of installing a few popular apps. For more specific descriptions, please see the examples (WordPress, MediaWiki, and EtherPad) below.
First, click Install… from App Market. The next screen will show you various apps that you can install, which include WordPress, GitLab, MediaWiki, Apache Wave, and Roundcube. When you click Install, Sandstorm automatically takes care of all installation steps and you will immediately get a completely working version of the app.
Click **Install ** next to any app you want to install. You will be redirected to your installation, which will show a progress page. After the app has been downloaded, click Install again. Then, you will be redirected to a screen with a button custom to the app you installed. For example, for WordPress it will say New WordPress Site. When you click that button, it will create a new site. When you now open that site, it will take a short amount of time to load it because Sandstorm will have to launch the WordPress code. For a more extensive instructions, please see the WordPress installation example. That’s it!
You can share edit permissions to a site by clicking Share access the top bar. When someone new arrives at your server and authenticates via your chosen login provider, Sandstorm prevents them from creating new grains or install apps by default. To give users more permissions, visit the Admin settings by clicking on your name in the top right-hand corner and assigning a new User Class in the Users tab.
To minimize how much RAM apps use, Sandstorm stops their processes during periods of inactivity. This means that when you visit a grain again after more than fifteen minutes, it can take a moment to start again, so keep this in mind.
Example: Installing WordPress
As an example, we will be installing WordPress. You could install WordPress if you wanted to publish a public blog, so long as you don’t need comments, since WordPress on Sandstorm does not support that. You could also use it to maintain a private blog, just for you, or shared with some friends. Note that even though you use WordPress to edit the site, Sandstorm is responsible for serving it to the world. Sandstorm acts like an aggressive HTTP cache, and in WordPress, you must click ‘Rebuild public site’ to update that cache. This means that the WordPress PHP code is never executed by untrusted, anonymous users. For more information, please visit the Sandstorm docs.
When you have signed in, you will be at the Home screen. Click Install… from App Market and find WordPress in the list. When you have found it, click Install. It will start downloading and unpacking the app. When that completes, click Install WordPress. After it has finished installing the app, you will arrive at a page like this:

To create a new WordPress site, click Create new site. When it has finished, you will see a fresh WordPress site. You can change the title that will display in Sandstorm by clicking on Untitled WordPress Site. You can also just start using the site directly; it functions the same as a normal WordPress site.
You can close the site by going back to the homepage by clicking Sandstorm in the upper left-hand corner.
Example: Installing EtherPad
For this example, we will be installing EtherPad, a collaborative document editor which is one of the most popular Sandstorm apps. In Sandstorm, every document is its own grain, which makes access control very effective.
On the home screen, click Install… from App Market and in the list, choose Install for EtherPad. After a few moments, click Install EtherPad after it has finished downloading. Now, you can create a new pad by clicking Create new pad. This will create a new document. It’s possible to share this document with other users by clicking Share Access at the top. This will show two options for sharing it: by sending invitations or by sharing a URL. It’s even possible to determine what permissions this user will have.
Example: Installing MediaWiki
For this last example, we will be installing MediaWiki. The MediaWiki app in Sandstorm does not have support for the Sandstorm static publishing system, so it cannot easily be used as a public wiki.
On the home screen, click Install… from App Market to begin installing the app. In the list, choose Install for MediaWiki. After it has finished downloading and unpacking the app, click Install MediaWiki. When it has finished, you can create a new MediaWiki by clicking Create new wiki. You will be able to change the title just as you could with WordPress sites. You could for example use this wiki as private documentation.
To add other people to this wiki, use the Share Access button at the top of the Sandstorm interface. If you want to make this wiki public, you can create a sharing link and distribute that it; keep in mind that Sandstorm sharing links have long, hard-to-remember URLs.
Conclusion
Sandstorm is useful for many different applications and is being actively developed. For more information and documentation about Sandstorm, visit their documentation.
Thanks for learning with the DigitalOcean Community. Check out our offerings for compute, storage, networking, and managed databases.
About the author(s)
Tutorial writer
former DO tech editor publishing articles here with the community, then founded the DO product docs team (https://do.co/docs). to all of my authors: you are incredible. working with you was a gift. love is what makes us great.
Still looking for an answer?
This textbox defaults to using Markdown to format your answer.
You can type !ref in this text area to quickly search our full set of tutorials, documentation & marketplace offerings and insert the link!
I realy don’t get it… :( When i install he tells me the domein is allready registerd, en he says http://example.com:6080 is http://Homan:6080
He does not let me chanche it, and after all that he askes for an Wildcare host, No idea what that is?! Please help me out on this one…
Just did this install. The docs above are correct – thank you for them. Before I could access the admin url though I had to open the firewall to allow traffic to port 6080. Command is:
ufw allow 6080
Actually it’s unnecessary to own a domain – you could start with a dynamic DNS provided by Sandstorm team, sandcats.io
Those interested in sandstorm should look into https://cloudron.io. Cloudron app integration allows you to install public facing apps (like blogs, forums) unlike sandstorm.
 This work is licensed under a Creative Commons Attribution-NonCommercial- ShareAlike 4.0 International License.
Become a contributor for community
Get paid to write technical tutorials and select a tech-focused charity to receive a matching donation.

DigitalOcean Documentation
Full documentation for every DigitalOcean product.

Resources for startups and AI-native businesses
The Wave has everything you need to know about building a business, from raising funding to marketing your product.
The developer cloud
Scale up as you grow — whether you're running one virtual machine or ten thousand.

Start building today
From GPU-powered inference and Kubernetes to managed databases and storage, get everything you need to build, scale, and deploy intelligent applications.
