By Colin Schoen and Etel Sverdlov

Status: Deprecated
This article covers a version of CentOS that is no longer supported. If you are currently operating a server running CentOS 6, we highly recommend upgrading or migrating to a supported version of CentOS.
Reason: CentOS 6 reached end of life (EOL) on November 30th, 2020 and no longer receives security patches or updates. For this reason, this guide is no longer maintained.
See Instead: This guide might still be useful as a reference, but may not work on other CentOS releases. If available, we strongly recommend using a guide written for the version of CentOS you are using.
Simple Machines Forum (SMF) is a widely used open source forum sofware.
Step 1
We need to create a new droplet running CentOS 6. Enter your desired hostname or domain name for your new forum. In this case we chose mynewforum.com.

Next, we need to choose the image that this droplet will be running. Choose CentOS 6.4 x64 and finally Create Droplet.
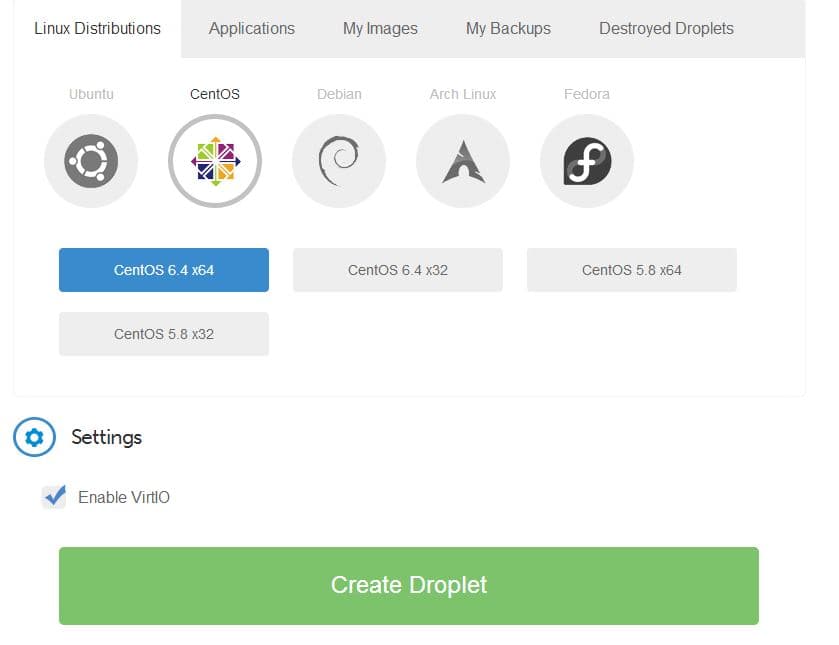
You will soon receive an email with the root credentials to login to your droplet. Keep this information in a safe place.
Step 2
Tunnel into your virtual machine using SSH with the root credentials that were emailed to you. If you are on OSX then you can use Terminal, if you are using Windows download Putty from http://www.chiark.greenend.org.uk/~sgtatham/putty/download.html
Step 3
Now to install Apache, PHP, and mySQL.
Note: If you are logged in with another user other than root, you will need to use the sudo command.
To install apache type yum install httpd and hit enter.
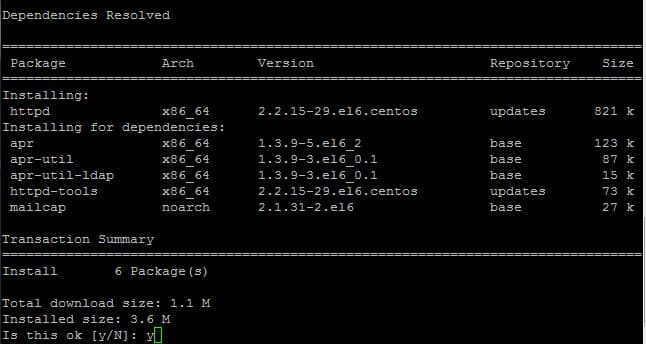
When prompted, as shown above, type y and hit enter.
Next, to install mySQL type yum install mysql-server and hit enter.
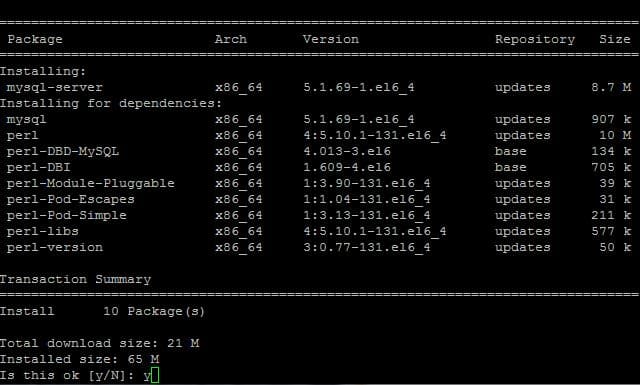
When prompted, as shown above, type y and hit enter.
We will need to start mySQL now to configure a root password.
Type service mysqld start and hit enter.
The following command will start the mySQL install wizard.
Type /usr/bin/mysql_secure_installation and hit enter.
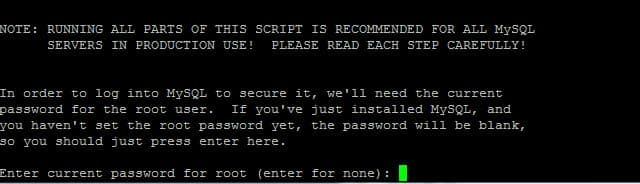
You are now prompted to enter your root password (as shown above). There is not a root password set yet, so just hit enter.

You are now asked whether to configure a root password (as shown above). Please type y and hit enter.

Now enter your desired mySQL root password and hit enter. Next, retype your password for confirmation purposes and hit enter.
Note: No characters will be displayed as you type.
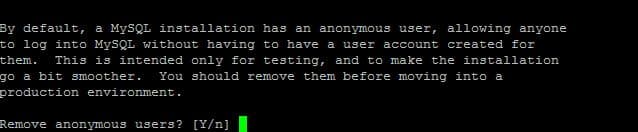
You will be prompted to remove anonymous users, as shown above. Type y and hit enter.

You will be promted to disallow remote login functionality, as shown above. Type y and hit enter.

You will be promted to remove the test database created during installation, as shown above. Type y and hit enter.

You will be promted to reload the privilege tables, as shown above. Type y and hit enter.
SMF uses PHP as a server-side scripting language.
To install PHP type yum install php php-mysql.
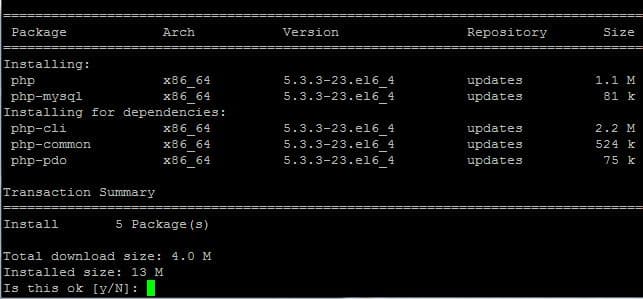
When prompted type y and hit enter.
Step 4
mySQL was already started in step 3, but Apache still needs to be started.
To start Apache type service httpd start and hit enter.
- To have Apache start on boot type
chkconfig httpd onand hit enter. - To have mySQL start on boot type
sudo chkconfig mysqld onand hit enter.
Step 5
SMF will need a mySQL database to store all of its application data.
To login to mySQL type mysql -u root -p and hit enter.

You will then be prompted to enter your password. Enter the password you created in step 3 when configuring mySQL.
Note: no characters will be displayed as you type your password.
When finished hit enter.
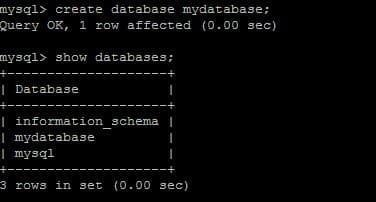
To create a mySQL database type CREATE DATABASE mydatabase; with mydatabase being the name of the database you want to use and hit enter.

To create a mySQL user for SMF type CREATE USER 'forum'@'localhost' IDENTIFIED BY 'forumdbpassword'; and hit enter. Replace forum with the database user you wish for SMF to use and forumdbpassword with the database password you wish for SMF to use.

We need to grant permissions to this new user to manipulate the database. Type grant all privileges on `mydatabase`.* to 'forum'@'localhost'; and hit enter. Replace mydatabase and forum with the database name and database username you chose.
To flush the mySQL permissions type FLUSH PRIVILEGES; and hit enter.
Finally escape from mySQL by hitting CTRL+C on your keyboard.
Step 6
With all the dependencies installed and configured, the next step is to download the Simple Machines Forum Software
Type cd /var/www/html/ and hit enter to change directory into the web root.
To download the newest package of SMF type wget http://mirror.ord.simplemachines.org/downloads/smf_2-0-6_install.tar.gz and hit enter.
The package is downloaded as an archive. Type tar xvfz smf_2-0-6_install.tar.gz and hit enter to extract the archive.
Since we have extracted the archive we can remove the old archived package. Type rm -f smf_2-0-6_install.tar.gz and press enter.
SMF requires some files to be writable by the server. Type chmod 777 attachments avatars cache Packages Smileys Themes and hit enter.
Step 7
SMF must be given a few pieces of information to connect to your database and set up your administrator account.
Point your web browser to the IP found in the droplet creation email. You should see the initial installation screen, show above.
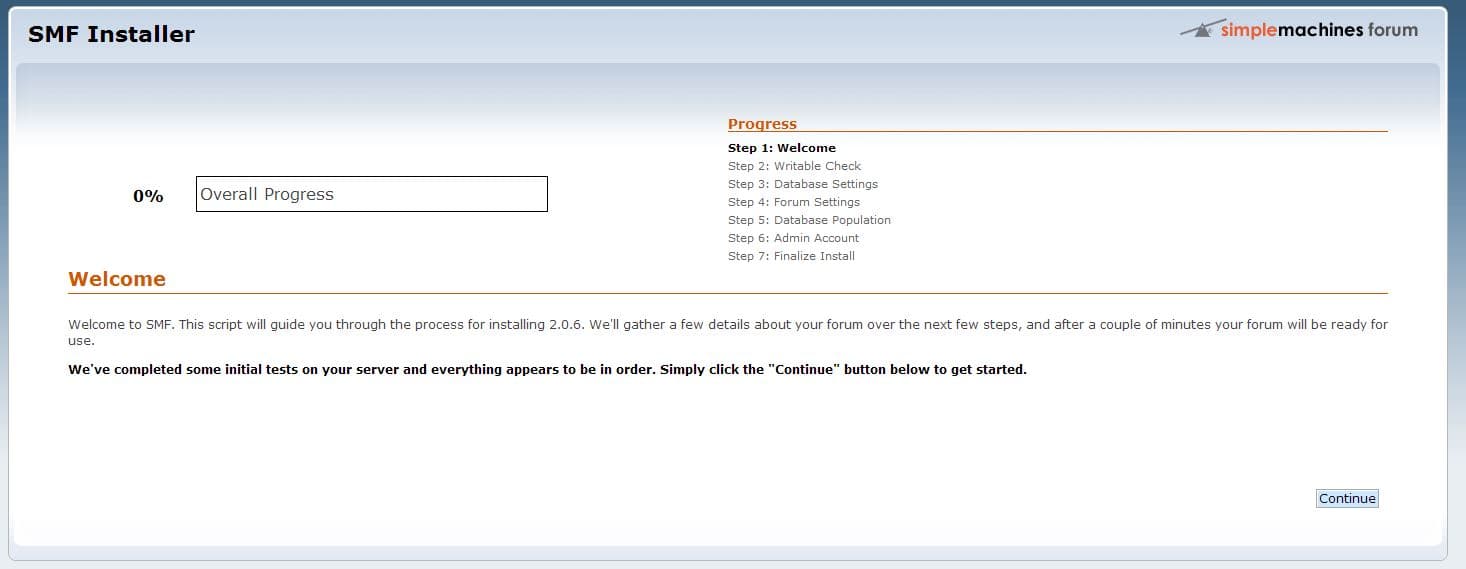
Simply click Continue.
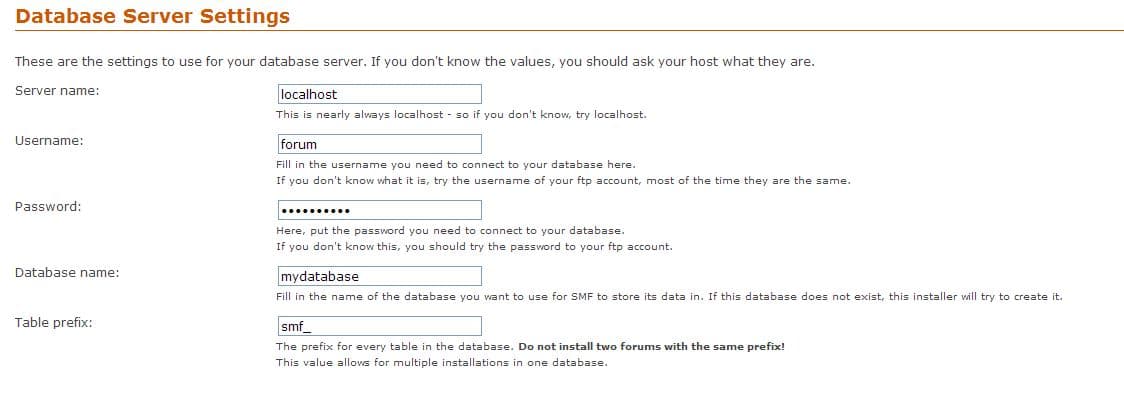
Server Name is localhost
Username is the database username you created in Step 5.
Password is the database user password you created in Step 5.
Database Name is the database you created in Step 5.
Table Prefix can be left as default (smf_).
When you are finished select Continue.
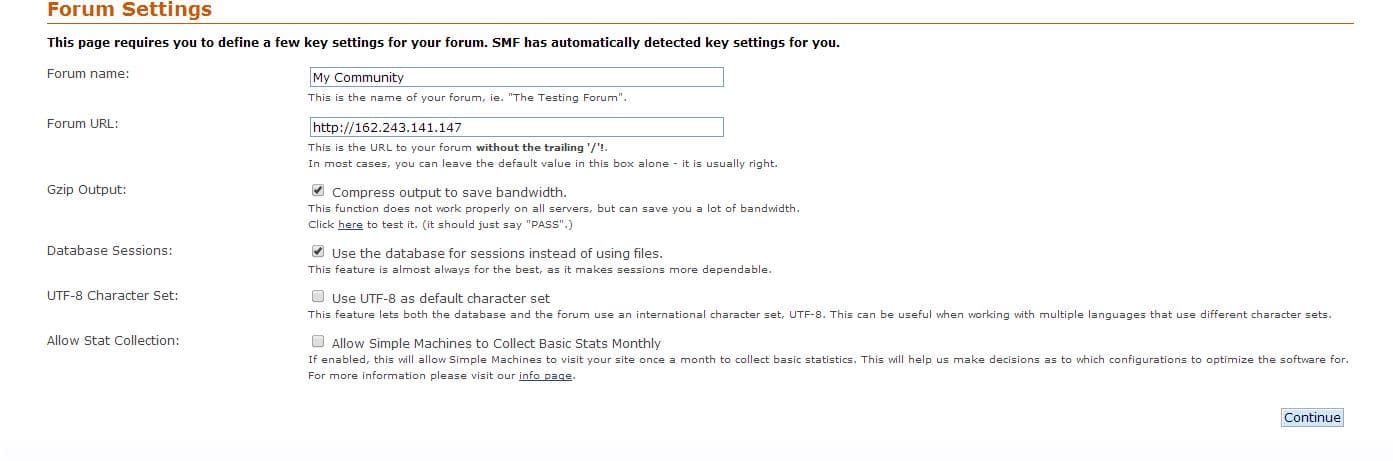
Forum Name is the name of your community that will be used as the Forum Header.
Forum URL if you wish to have your forum running on a domain rather than an IP, change this to the domain.
Note: you will have to configure the necessary nameservers and records for the domain to work with your droplet before hand.
Gzip Output Disregard the warning. Leave this checked, it will work on your droplet.
Database Sessions This is best left checked.
UTF-8 Character Set This is recommended to be checked as it will allow you to use multiple languages on your forum.
Allow Simple Machines to Collect Basic Stats Monthly These stats are non-personally identifiable and they help the organization better develop the software. If you are feeling generous, please check it.

SMF will take care of the hard work and populate the database with the necessary tables and fields. Simply click Continue.
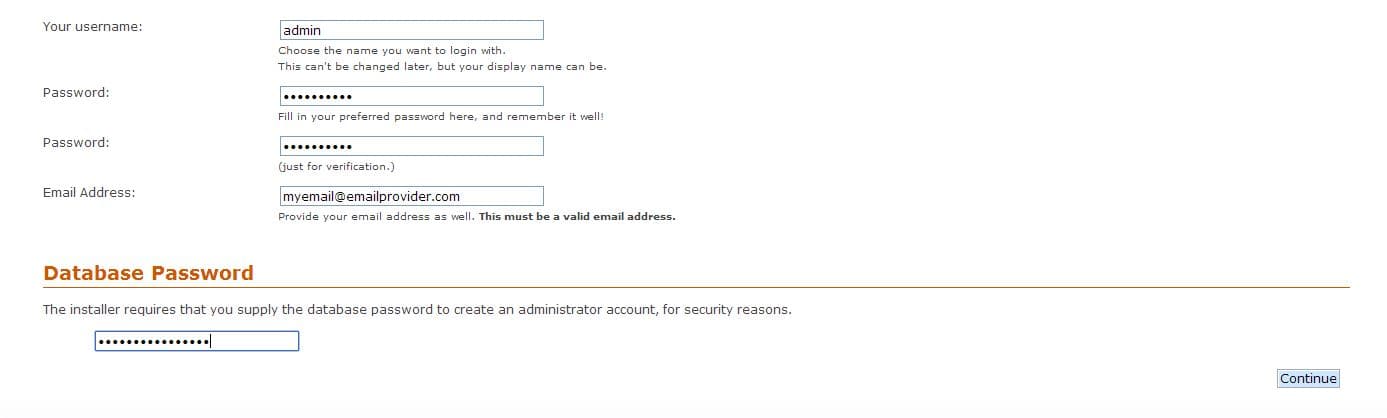
Your username is the username in which you will use to login to the forum.
Password is the password in which you will use to login to the forum.
Email Address is the email address that will be associated with your forum account.
Database Password is the database password you created in Step 5. This is asked twice for security purposes.

Note: “Click here to delete the install.php file now” will not work on your server.

Note, the next step will fix the error above.
Step 8
The last step is to remove the install.php file.
Go back to your terminal or putty application. If you logged out and are logging back in again then type cd /var/www/html/ and hit enter to change directory into the web root. If you left your SSH client up and connected then please omit that step.

To remove the install.php file type rm -f install.php and hit enter.
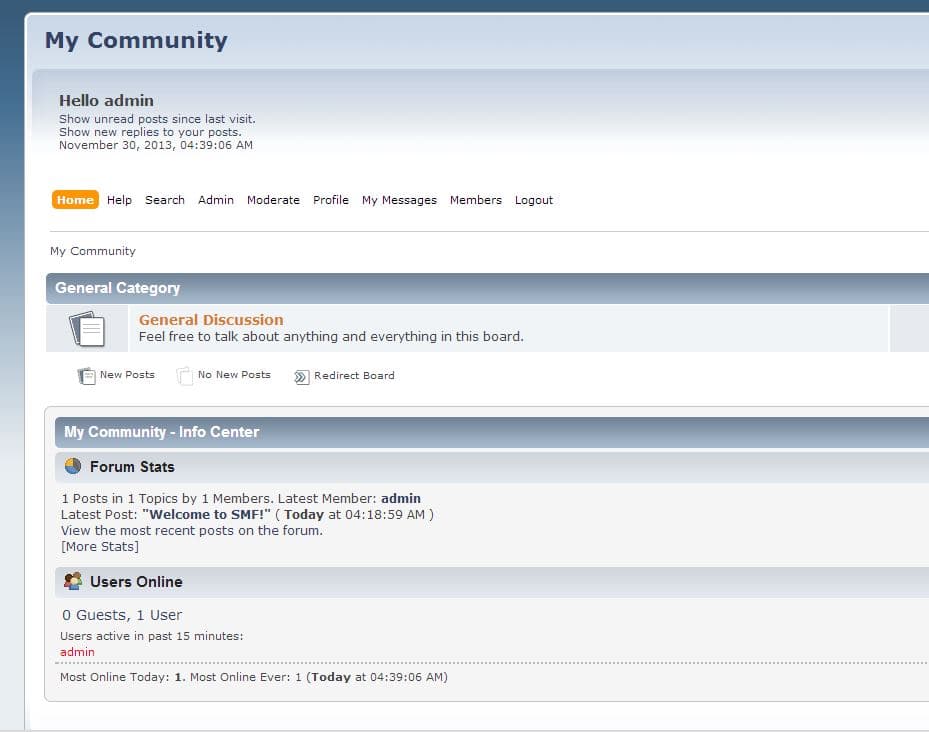
Finished
Congratulations, you have sucessfully installed your new Simple Machines Forum. You can visit it by either clicking “your newly installed forum” link in the final installation page or typing in the droplet IP found in the creation email.
<div class=“author”>Submitted by Colin Schoen</div>
Thanks for learning with the DigitalOcean Community. Check out our offerings for compute, storage, networking, and managed databases.
About the author(s)
Former Director of Community at DigitalOcean. Expert in cloud topics including LAMP Stack, CentOS, Ubuntu, MySQL, SSL certificates, and more.
Still looking for an answer?
This textbox defaults to using Markdown to format your answer.
You can type !ref in this text area to quickly search our full set of tutorials, documentation & marketplace offerings and insert the link!
Let me know if anyone has any questions or issues installing SMF. I am happy to help.
Very nice tutorial - thank you.
mysql now needs to be installed with
yum install mariadb-server mariadb
and you use
service mariadb start
to start it.
regards Christian
Installing Simple Machines Forum (SMF) on CentOS 6 involves several steps, including setting up a LAMP (Linux, Apache, MySQL, PHP) stack and configuring the necessary dependencies. Here’s a step-by-step guide to help you with the installation:
-
Prerequisites:
- Ensure you have a clean installation of CentOS 6 with SSH access.
- Make sure you have root access or sudo privileges.
-
Update CentOS:
-
Log in to your CentOS server via SSH and update the package list by running:
sqlCopy code
sudo yum update
-
-
Install Apache:
-
Install Apache web server using the following command:
Copy code
sudo yum install httpd
-
-
Install MySQL:
-
Install MySQL server and client:
Copy code
sudo yum install mysql-server mysql -
Start MySQL and set it to start on boot:
csharpCopy code
sudo service mysqld start sudo chkconfig mysqld on -
Run the MySQL secure installation script to set a root password and improve security:
Copy code
sudo mysql_secure_installation
-
-
Install PHP:
-
Install PHP and necessary modules:
Copy code
sudo yum install php php-mysql php-gd php-xml
-
-
Configure PHP:
-
Edit the PHP configuration file:
bashCopy code
sudo nano /etc/php.ini -
Change the following values in
php.ini:luaCopy code
date.timezone = "Your/Timezone" -
Save and exit the file.
-
 This work is licensed under a Creative Commons Attribution-NonCommercial- ShareAlike 4.0 International License.
Become a contributor for community
Get paid to write technical tutorials and select a tech-focused charity to receive a matching donation.

DigitalOcean Documentation
Full documentation for every DigitalOcean product.

Resources for startups and AI-native businesses
The Wave has everything you need to know about building a business, from raising funding to marketing your product.
The developer cloud
Scale up as you grow — whether you're running one virtual machine or ten thousand.

Start building today
From GPU-powered inference and Kubernetes to managed databases and storage, get everything you need to build, scale, and deploy intelligent applications.
