By Elliot Cooper and Kathryn Hancox

The author selected Open Internet/Free Speech Fund to receive a donation as part of the Write for DOnations program.
Introduction
Ampache is an open-source music streaming server that allows you to host and manage your digital music collection on your own server. Ampache can stream your music to your computer, smartphone, tablet, or smart TV. This means that you don’t have to maintain multiple copies of your music on the device you want to use to listen to it. With Ampache you can manage your collection on your server using Ampache’s web interface and listen to it anywhere.
In this tutorial, you will install and configure the Apache webserver and PHP that will serve your Ampache instance. You will then create a MySQL database that Ampache will use to store all of its operational information. Finally you will upload your music collection so you can start streaming your music.
Prerequisites
Before you begin this guide you’ll need the following:
- One Ubuntu 18.04 server set up by following the Initial Server Setup with Ubuntu 18.04 tutorial, including a non-root, sudo user.
- Apache, MySQL, and PHP installed on your server, as shown in How To Install Linux, Apache, MySQL, PHP (LAMP) stack on Ubuntu 18.04.
- A domain name configured to point to your server. You can learn how to point domains to DigitalOcean Droplets by referring to the Domains and DNS guide.
Step 1 — Installing Ampache
In this step, you will download the Ampache ZIP archive to your server, unpack it to its installation home directory, and make some necessary file system changes.
First, log in to your server as the non-root user. Then create Ampache’s home directory with the following command:
- sudo mkdir /var/www/ampache
Next, install the zip utility that you will need to unpack the Ampache archive:
- sudo apt install zip
Next, download the ZIP archive of the latest release. You can find the link to the latest release on Ampache’s GitHub page. In these examples, version 4.1.1 is used:
- wget https://github.com/ampache/ampache/releases/download/4.1.1/ampache-4.1.1_all.zip
Next, unpack the ZIP archive into the /var/www/ampache/ directory using the -d option:
- sudo unzip ampache-4.1.1_all.zip -d /var/www/ampache/
Next, set the user and group identity of Ampache’s files so that Apache is able to read, write, and execute the Ampache instance files:
- sudo chown --recursive www-data:www-data /var/www/ampache/
The --recursive option makes chown change the ownership and group identity of all the files and subdirectory under /var/www/ampache/ to Apache’s user and group www-data.
Next, rename the .htaccess files that are included in the ZIP archive. .htaccess files contain security and other operation information for Apache but they will only work with the file extension name .htaccess. Rename the supplied .htaccess.dist files to .htaccess with the following commands:
- sudo mv /var/www/ampache/rest/.htaccess.dist /var/www/ampache/rest/.htaccess
- sudo mv /var/www/ampache/play/.htaccess.dist /var/www/ampache/play/.htaccess
- sudo mv /var/www/ampache/channel/.htaccess.dist /var/www/ampache/channel/.htaccess
Now you’ll create the directory that will contain your music files. For security reasons, this directory is best created outside of Ampache’s installation directory. That way, it will not be readable or changeable by malicious web requests as it resides outside of Ampache’s DocumentRoot.
Create the directory, /data/Music, with the following command:
- sudo mkdir -p /data/Music
Then change its owner and group identity so that Apache can read and write to it:
- sudo chown www-data:www-data /data/Music
To finish setting up, you’ll install FFmpeg, which is a utility that converts audio and video from one format to another. For example, you could use it to convert an MP3 music file to an OPUS music file. Ampache uses FFmpeg to convert audio on the fly from the format in which it was uploaded to a format that the listening device can play. This is a process known as transcoding.
This is useful because not all devices are able to play all formats of music. Ampache can detect what formats are supported on the playing device and automatically supply your music in the supported format.
Install FFmpeg with the following command:
- sudo apt install ffmpeg
You’ve now unpacked and prepared your Ampache instance for the web installer and installed the FFmpeg utility. Next you’ll configure Apache and PHP to serve your Ampache instance.
Step 2 — Configuring Apache and PHP
In this section, you will configure Apache by creating a new VirtualHost file, which will provide the configuration that Apache needs to serve your Ampache server domain. You will also install some additional PHP modules that extend the abilities of PHP to cover the requirements of Ampache
First, install some additional PHP modules that were not included with the default PHP installation:
- sudo apt install php-mysql php-curl php-json php-gd php7.2-xml
These modules provide the following additional functionality:
php-mysql— Enables PHP to communicate with a MySQL database.php-curl— Enables PHP to use the curl utility to download files, such as album cover art, from remote servers.php-json— Enables PHP to read and manipulate JSON formatted text files.php-gd— Enables PHP to manipulate and create image files.php7.2-xml— Enables PHP to read and manipulate XML formatted text files.
Next, enable a couple of Apache modules using the a2enmod utility:
- sudo a2enmod rewrite expires
These Apache modules allow Apache to do the following:
rewrite— Modify or rewrite URLs following rules supplied by Ampache.expires— Set the cache expiry times for objects such as images so that they are more efficiently stored by browsers.
Now, you will create the VirtualHost file that tells Apache how and where to load the Ampache instance.
Note: If you created a test VirtualHost file that uses your Ampache domain name when you followed the “How To Install Linux, Apache, MySQL, PHP (LAMP) stack on Ubuntu 18.04” guide you must disable it. Use the a2dissite utility to disable it:
- sudo a2dissite test_virtalhost_file
Now, create and open the VirtualHost file with your text editor at /etc/apache2/sites-available/ampache.conf:
- sudo nano /etc/apache2/sites-available/ampache.conf
Add the following VirtualHost template into your file:
<VirtualHost *:80>

    ServerName your_domain
    DocumentRoot /var/www/ampache

    <Directory /var/www/ampache/>
        AllowOverride All
        Require all granted
    </Directory>

    RewriteEngine on
    CustomLog /var/log/apache2/ampache.access.log common
    ErrorLog  /var/log/apache2/ampache.error.log

</VirtualHost>
You must change your_domain to the domain name that you redirected to your server. When you have finished editing this file save and exit the editor.
The directives in this VirtualHost file are:
ServerName— The domain name that Apache will use to serve your Ampache instance.DocumentRoot— The file system location on your server where the Ampache instance is located. This is the same place that you unpacked the ZIP archive to in Step 1.Directory— This section passes configuration to Apache that applies to the files and directories contained in the path.RewriteEngine— Enables the rewrite Apache module.CustomLog— Creates a log file that Apache will use to record all access logs for your Ampache server.ErrorLog— Creates a log file that Apache will use to record all error logs generated by your Ampache server.
Next, check that the VirtualHost file you created does not have any errors with the apachectl utility:
- sudo apachectl configtest
If your configuration does not contain any errors, you will see the following output after the command:
OutputSyntax OK
If your configuration does contain errors, the output will print the file name and line number where the error was encountered.
Note: If you see the error:
AH00558: apache2: Could not reliably determine the server's fully qualified domain name, using 127.0.1.1. Set the 'ServerName' directive globally to suppress this message
Then you will need to edit Apache’s main configuration file at /etc/apache2/apache2.conf and add the following line:
ServerName your_domain
Next, enable the new VirtualHost configuration using the a2ensite utility:
- sudo a2ensite ampache
The final configuration is optional, but recommended. The default setting for file uploads in PHP is that no file greater than 2MB can be uploaded. Music files tend to be larger than this so increasing this size will allow you to use the Ampache interface to upload larger files in your music collection.
Open /etc/php/7.2/apache2/php.ini with the following command:
- sudo nano /etc/php/7.2/apache2/php.ini
And change the following lines:
. . .
upload_max_filesize = 2M
. . .
post_max_size = 8M
. . .
To:
. . .
upload_max_filesize = 100M
. . .
post_max_size = 110M
. . .
You will now be able to upload music files up to 100MB. Use a larger value if you intend to upload files larger than this size. Save and exit the file.
Finally, reload your updated Apache configuration:
- sudo systemctl reload apache2.service
You’ve now configured Apache to serve Ampache over HTTP. Next you’ll obtain a TLS certificate and configure Apache to use it so you can securely access Ampache over HTTPS.
Step 3 — Enabling HTTPS
In this step, you will get a free Let’s Encrypt TLS certificate using the Certbot utility, which enables HTTPS browsing. Certbot will create the certificate, automatically generate the required Apache configuration, and manage the automatic renewal of the certificate.
This is important because every time you log in to Ampache you will send your username and password across the internet. If you are not using HTTPS then your password will be sent in plain text that can be read as it travels across the internet.
Ubuntu’s LTS releases tend not to have the latest packages and this is true of the Certbot program. The Certbot developers maintain a dedicated Ubuntu repository, known as a PPA, so that Ubuntu users can keep an up-to-date copy of the Certbot.
Install the Certbot repository with the following command:
- sudo add-apt-repository ppa:certbot/certbot
Now, install the certbot utility:
- sudo apt install python-certbot-apache
Next, use certbot to get the TLS certificate:
- sudo certbot --apache -d your_domain
The --apache option uses the Apache plugin that enables Certbot to read and configure Apache automatically. -d your_domain specifies the domain name for which you want Certbot to create the certificate.
When you run the certbot command you will be asked a series of questions. You’ll be prompted to enter an email address and agree to the terms of service.
If certbot successfully confirms that you control your domain, it will ask you to configure your HTTPS settings:
OutputPlease choose whether or not to redirect HTTP traffic to HTTPS, removing HTTP access.
-------------------------------------------------------------------------------
1: No redirect - Make no further changes to the webserver configuration.
2: Redirect - Make all requests redirect to secure HTTPS access. Choose this for
new sites, or if you're confident your site works on HTTPS. You can undo this
change by editing your web server's configuration.
-------------------------------------------------------------------------------
Select the appropriate number [1-2] then [enter] (press 'c' to cancel):
No redirect: Apache will serve Ampache via HTTP and HTTPS.Redirect: Apache will redirect any HTTP connections to HTTPS automatically. This means that your Ampache server will only be available via HTTPS. This option is the more secure and will not affect how your Ampache instance behaves. This is the recommended choice.
Finally, test that the auto-renewal of the certificate will take place successfully by running the following command:
- sudo certbot renew --dry-run
The --dry-run option means that certbot will test a renewal attempt without making any permanent changes to your server. If the test was successful the output will include the following line:
OutputCongratulations, all renewals succeeded. The following certs have been renewed:
  /etc/letsencrypt/live/your_domain/fullchain.pem (success)
Apache and PHP are now ready to serve your Ampache instance. In the next step, you will create and configure Ampache’s database.
Step 4 — Creating a MySQL Database
Ampache uses a MySQL database to store information such as playlists, user preferences, and so on. In this step, you will create a database and MySQL user that Ampache will use to access it.
You will need to choose three pieces of information to complete the following instructions to create Ampache’s database:
ampache_database: The name of the Ampache database.database_user: The MySQL user that Ampache will use to access the database. This is not a system user and can only access the database.database_password: The database user’s password. Be sure to choose a secure password.
Make a note of these details as you will need them later.
First, open the interactive MySQL shell with the mysql command:
- mysql --user=root --password
--user=root opens the MySQL shell as the MySQL root user and --password prompts for the root user’s password.
The following command will create an empty database:
- CREATE DATABASE ampache_database;
Next, create the MySQL user:
- CREATE USER 'database_user'@'localhost' IDENTIFIED BY 'database_password';
Now, give the new user full access to the database:
- GRANT ALL PRIVILEGES ON ampache_database.* TO 'database_user'@'localhost';
Finally, check that the new database exists by running the following command:
- SHOW DATABASES;
You will see the following output:
+--------------------+
| Database           |
+--------------------+
| information_schema |
| ampache_database  |
| mysql              |
| performance_schema |
| sys                |
+--------------------+
5 rows in set (0.00 sec)
Exit the MySQL shell by entering exit;.
Finally, test the database, username, and password by trying to log in to the MySQL shell with the database_user.
Enter the following command to log in to the MySQL shell as the new user:
- mysql --user=database_user --password ampache_database
You’ve now created the database that Ampache will use. You’ve finished your server configuration and are ready to complete the installation with the web installer.
Step 5 — Using the Web Installer
In this step, you will use Ampache’s web installer to finish the installation by giving Ampache the information it will need to run, such as a web interface admin user, the database details, and other settings.
Start the web installation by entering https://your_domain into your browser.
Choose Installation Language
Select Ampache’s interface language and click the Start Configuration button to continue.
Requirements
This page is where Ampache checks that the server meets its requirements. Each line on this page represents a test that the installer performs to ensure that, for example, all the required PHP modules are present and working. You’ll see every test has a green checkmark to indicate that your server is ready for Ampache.
Click the Continue button to move on to the next page.
Insert Ampache Database
This page creates Ampache’s database if it does not exist and formats it. Fill in the fields as follows:
- Desired Database Name:
ampache_database - MySQL Hostname:
localhost - MySQL Port (optional): <EMPTY>
- MySQL Administrative Username:
database_user - MySQL Administrative Password:
database_password - Create Database: <UNCHECKED>
- Create Tables (ampache.sql): <CHECKED>
- Create Database User: <UNCHECKED>
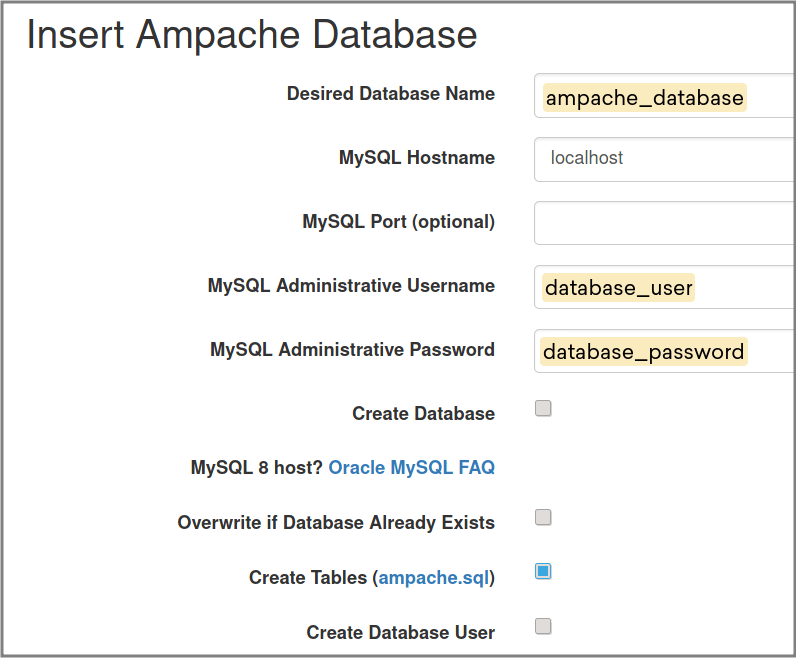
Click the Insert Database button to continue.
Generate Configuration File
This page creates the configuration file that Ampache will use to run. Fill in the fields as follows:
-
Web Path: <EMPTY>
-
Database Name:
ampache_database -
MySQL Hostname:
localhost -
MySQL Port (optional): <EMPTY>
-
MySQL Username:
database_user -
MySQL Password:
database_password
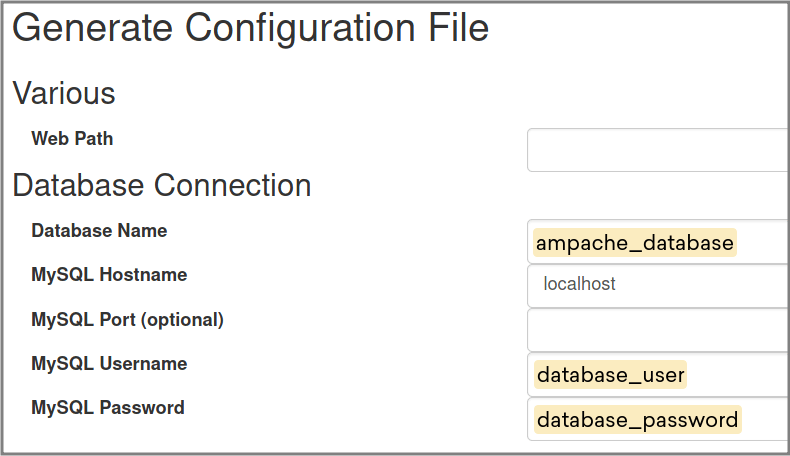
-
Installation Type Leave this at the default setting.
-
Allow Transcoding Select ffmpeg from the drop-down list.
-
Players Leave these at the default settings.
Click the Create Config button to continue.
Create Admin Account
This page creates the first web interface user. This user is created with full administrative, privileges and is the one that you will use to log in and configure Ampache for the first time.
Choose a username and a secure password and enter it into the Password and Confirm Password fields.
Click the Create Account button to continue.
Ampache Update
This page will perform any administrative changes to Ampache’s database that need making. These changes are made during version upgrades but as this is a new installation the installer will not make any changes.
Click the Update Now! button to continue.
Ampache Update
This page prints and explains any updates that the installer made in the previous step. You should not see any updates listed.
Click the [Return to main page] link to continue to the login page. Enter your username and password you set to log in to your Ampache server.
Ampache is not quite fully set up and ready for use. You’ll now complete the setup by adding your music so you can start using your new Ampache server.
Step 6 — Adding Your Music to Ampache
A music server is no use without some music to play. In this step, you will configure a music catalog and upload some music. “Catalog” is the name that Ampache gives to a collection of music. Ampache is able to read music from many sources both on and off the server but in this tutorial, you will upload and store your music on the server in a local catalog, as Ampache refers to it.
First, click the add a Catalog link in the following line on the first page that you see when you log in to Ampache:
No Catalog configured yet. To start streaming your media, you now need to add a Catalog.
This will take you to the Add Catalog page. Fill in the fields as follows:
- Catalog Name:
Give this catalog a short, memorable name. - Catalog Type:
local - Filename Pattern: <EMPTY>
- Folder Pattern: Leave this with the defaults.
- Gather Art: <CHECKED>
- Build Playlists from Playlist Files. (m3u, m3u8, asx, pls, xspf): <UNCHECKED>
- Path:
/data/Music
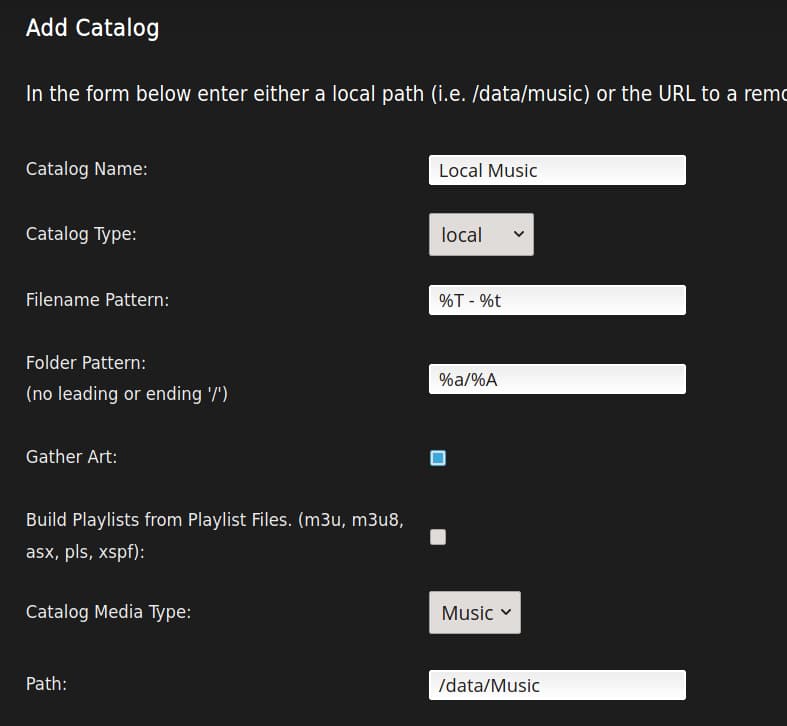
Click the Add Catalog button to complete this page.
On the page that follows click the Continue button. This will take you to the Show Catalogs page that will print the details for the catalog you created. You can change the catalog settings at any time in the future.
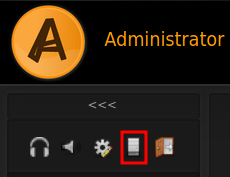
Now, enable Ampache’s web upload facility by clicking on the third navigation icon to open the extended settings:
Scroll down to the Server Config section and click the System link to open the system settings page.
Find the Allow user uploads line and select Enable from the drop-down menu in the Value column.
You can also choose what level of user is able to upload music files. The default level is Catalog Manager, this allows the Catalog Manager and all users with greater privileges to upload music. In this case, that is the administrator.
You also need to set the catalog to which the music will get added. Set this using the Destination catalog line. Select the catalog you created in the Value drop-down.
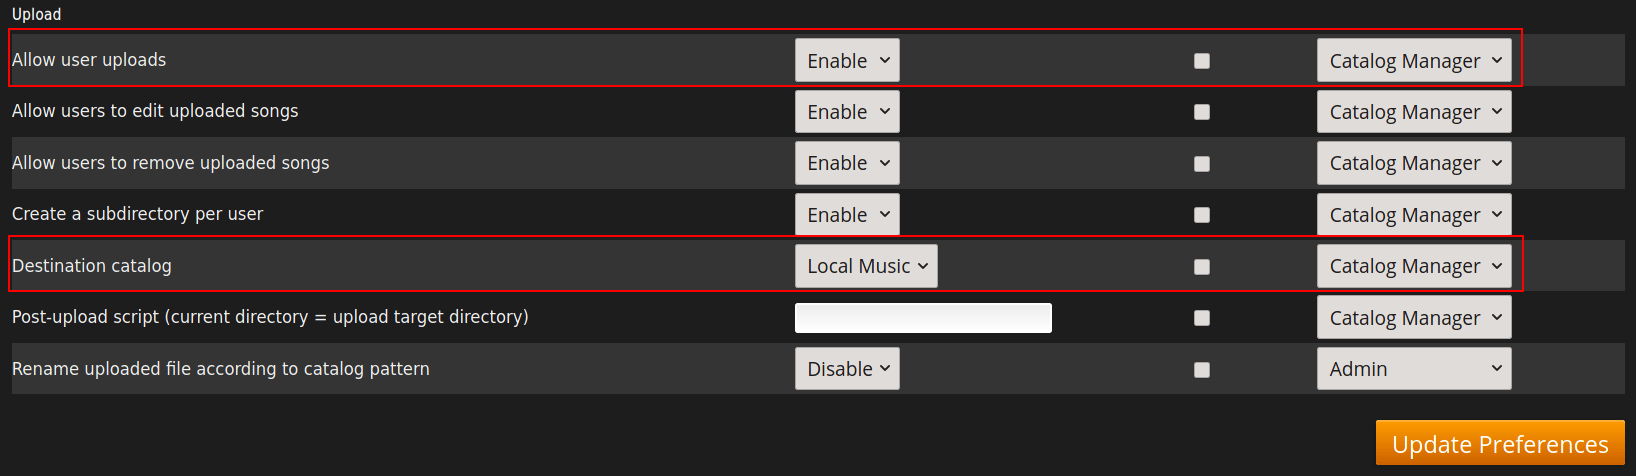
Click the Update Preferences button at the bottom of the page to complete the configuration. You are now ready to upload some music.
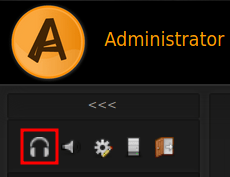
First, click the first settings icon:
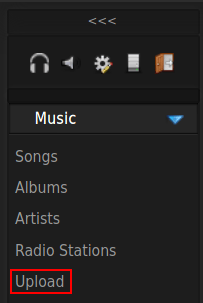
Then click the Upload link in the Music section.
On the Upload page, click the Browse button and locate your music files on your computer and upload them.
If you leave the Artist and Album labels blank then Ampache will read the ID3 tags of the music files to discover the artist and album automatically. After you have uploaded some music you will now be able to find it by clicking on the Songs, Albums, or Artists links in the Music section in the navigation panel on the left.
Your Ampache music server is now ready to start streaming your music.
Conclusion
In this article, you installed and configured an Ampache music streaming server and uploaded some of your music. You can now listen to your music wherever you go on any of your devices. Ampache’s Documentation will help you use and extend your streaming server. These Android apps and this iOS app will stream your music to your phone. Ampache organizes your music on the server using the ID3 tags in the music files. The MusicMrainz program will help you manage the ID3 tags of your music files.
Thanks for learning with the DigitalOcean Community. Check out our offerings for compute, storage, networking, and managed databases.
About the author(s)
I have been a Linux Systems Administrator and technical content creator for more than 20 years. I am passionate about using and promoting OSS.
Former Senior Technical Editor at DigitalOcean, with a strong focus on DevOps and System Administration content. Areas of expertise include Terraform, PyTorch, Python, and Django.
Still looking for an answer?
This textbox defaults to using Markdown to format your answer.
You can type !ref in this text area to quickly search our full set of tutorials, documentation & marketplace offerings and insert the link!
Great post @Elliot.
Could you please guide if One wants to stream live audio/video to mobile apps.
- live streaming of video to the audience (like webrtc).
- online radio kind of streaming to users over mobile app.
Appreciate your writeups.
Regarding phone ringtones, please refer to the reputable and free ringtone provider Klingeltonekostenlos.
 This work is licensed under a Creative Commons Attribution-NonCommercial- ShareAlike 4.0 International License.
Become a contributor for community
Get paid to write technical tutorials and select a tech-focused charity to receive a matching donation.

DigitalOcean Documentation
Full documentation for every DigitalOcean product.

Resources for startups and AI-native businesses
The Wave has everything you need to know about building a business, from raising funding to marketing your product.
The developer cloud
Scale up as you grow — whether you're running one virtual machine or ten thousand.

Start building today
From GPU-powered inference and Kubernetes to managed databases and storage, get everything you need to build, scale, and deploy intelligent applications.
