By Jonah Aragon and Hazel Virdó

Introduction
In this tutorial, we will demonstrate how to install Sentora, a free open source web control panel, which is easy to install and maintain. By the end of this tutorial we will have a working webserver, email account, and landing page for one of your domains.
Prerequisites
To follow this tutorial, you will need:
- One Ubuntu 14.04 Droplet.
- A registered domain name. You can read this series on managing DNS for background information.
Step One — Installing Sentora
In this section, we will install the Sentora control panel.
SSH into your Droplet as root and start the installation by running the following command.
bash <(curl -L -Ss http://sentora.org/install)
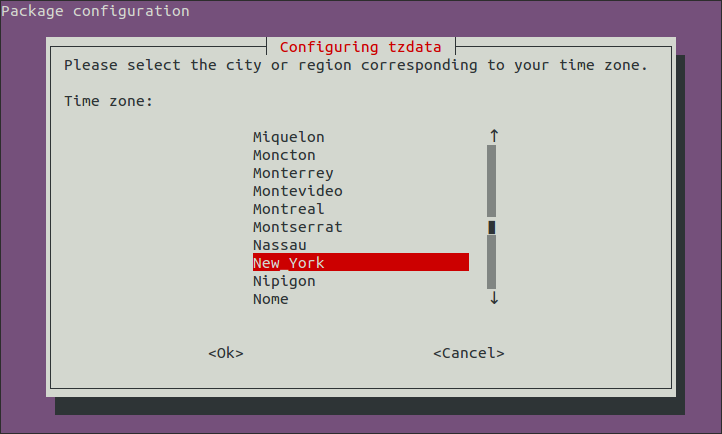
You’ll be prompted to choose your geographic area and then the city or region the server timezone should be set in. Use the arrow keys to scroll up and down, then press ENTER to proceed once your choice is highlighted.
After selecting your time zone, you will be prompted to enter a domain to access your control panel. This should not be your main domain! Use a subdomain, such as panel.example.com.
Enter the sub-domain you want to access Sentora panel: panel.example.com
Then press ENTER. Next you will be asked to confirm the IP address of your server.
Enter (or confirm) the public IP for this server: your_server_ip
Double check it is correct and press ENTER again to continue.
Note: You may get a warning such as:
WARNING: panel.example.com is not defined in your DNS!
This is fine; we will set up DNS records in the next step. Enter y to continue.
The installation process may take some time. Please be patient as it installs the necessary components onto your server.
When the installation is almost done, you will be prompted to reboot your server to complete it. Enter y. Once your server reboots, you will have to SSH back in again.
Step Two — Setting Up DNS
Setting up your DNS is relatively simple, but the steps may vary between DNS servers. Go to the DigitalOcean DNS panel, fill out your domain name in the provided box, and press the Add Domain button:

On the next screen, add an A record by typing the subdomain you chose during installation into the HOSTNAME box. For example, if you chose panel.example.com in the installer, enter panel in this box. In the WILL DIRECT TO box, enter the IP address of your server or select your Droplet from the menu:

Press the Create Record button.
Next, select the MX record type. In the HOSTNAME box, type @. In the MAIL PROVIDERS MAIL SERVER box, type the full domain you added (e.g. panel.example.com). In the PRIORITY box, enter 10. Press the Create Record button when you are done:

Next, select the TXT record type. In the HOSTNAME box, type @. In the VALUE box, enter:
v=spf1 a mx ip4:your_server_ip ~all
Click the Create Record button when you are finished:
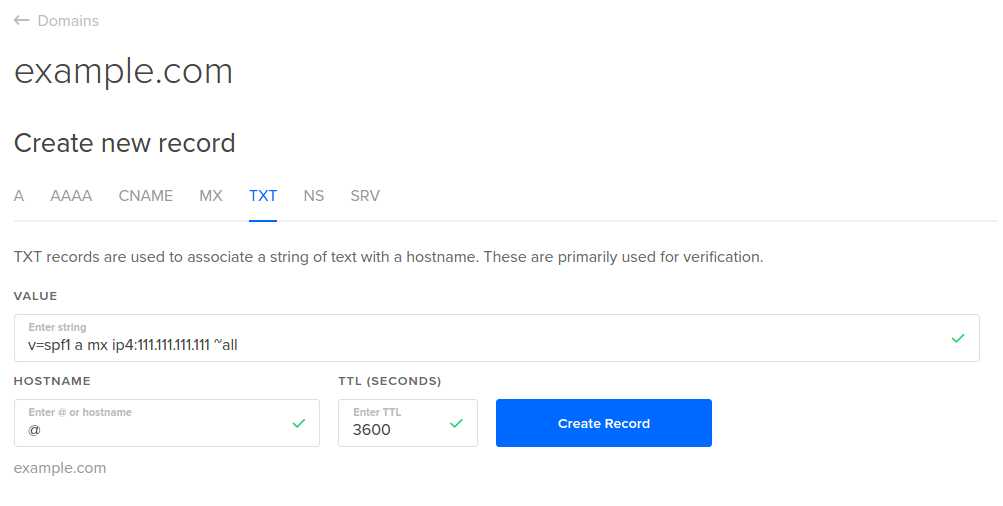
This ensures that mail you send is not recognized as spam by the receiver. After entering that, click Create.
Your DNS zones should look like:

And the zone text below should look look similar to this:
Step Three — Changing the Admin Password
In this step, we will log in to Sentora and update the admin password.
Using your favorite web browser, navigate to http://panel.example.com, and you will reach the Sentora login screen. The default username is zadmin. To get the password, SSH back into your Droplet if you haven’t already and enter the following command.
cat /root/passwords.txt
Look for the line that begins with zadmin Password:. Copy the password and use that to log in.
Once you are logged in, you should change your password. In the main panel, inside the Account Information box, click Change Password. Enter the original password you used to log in and a new password, then click Change. You can use your new password to log in to your control panel from now on.
Step Four — Using the Sentora Control Panel
In this step, we will create a website and set up an email address.
Creating a Website
Now we can add a website. Return to the main panel by click Home at the top of the screen.
Inside the Domain Management box, click Domains. You will be greeted with a form to add a domain name. In the Domain Name box, enter your domain name, example.com. Press the blue Create button to add your domain.
Next, click Home in the top navigation bar. Inside the File Management box, click FTP Accounts. In the form that appears, enter your desired username and password in the Username and Password boxes. These credentials will be used to login to your FTP servers, to upload and download files to and from your server. In the Access Type drop down menu, select Full Access. In the Home directory radio options, select Set master home directory. In the drop down box that appears, make sure / (root) is selected, then click the blue Create button.
Now visit example.com. You should see a Sentora-generated page which says Your hosting space is ready… at the top.
Note: Sentora only supports FTP to upload files you want to show on your website. FTP is insecure, as it transmits usernames and passwords in plaintext. You can read this tutorial for information on FTP security and FileZilla, a popular file transfer tool. However, you can manually add files to /var/zpanel/hostdata/zadmin/public_html/example_com to add them to your website.
Setting Up Email
In the main panel, inside the Mail box, click Mailboxes.
In the text box next to Email address: enter an email username (this will go before the @). In the drop down box, select the domain you added, example.com (this will go after the @). In the Password field, enter your desired password.
After you set up your email, you can access the webmail client either by clicking Webmail in the control panel homepage, or at http://panel.example.com/etc/apps/webmail/. Use the email address you just chose as the username and the password you entered.
Conclusion
Now that you have the Sentora control panel set up on your Droplet, you can spend some time to take a look around your new control panel. Updating Sentora to new versions is easy with the Updates module.
Sentora has many more features, including MySQL, Webalizer, backups, and even the ability to make user and reseller accounts.
Thanks for learning with the DigitalOcean Community. Check out our offerings for compute, storage, networking, and managed databases.
About the author(s)
Sign up for DigitalOcean with this link and get a $10 credit: https://www.digitalocean.com/?refcode=fb6730f5bb99
former DO tech editor publishing articles here with the community, then founded the DO product docs team (https://do.co/docs). to all of my authors: you are incredible. working with you was a gift. love is what makes us great.
Still looking for an answer?
This textbox defaults to using Markdown to format your answer.
You can type !ref in this text area to quickly search our full set of tutorials, documentation & marketplace offerings and insert the link!
Nice!
I’m using sentora and works fine but I can’t figure out how to set up an email client such as thunderbird with my e-mail boxes.
I’have tried the settings according the official doc says but nothing works. Did anyone faced with this?
First of all: Awesome tutorial! I’ve set thing up nice and smoothly, thanks.
I’ve been trying to setup my email client up also, like dannystyleart. Despite all of the good tutorials, i can’t seem to find one about setting up the email client. POP3 or IMAP works with the email client, but the SMTP doesn’t. It would be awesome if such tutorial gets released… I’m trying for a few weeks now, with no result…
Thanks
Hi. regarding setting up the panel.example.com. i am sure i’ve already pointed OceanDigital to my domain DNS, and typed in panel.mydomainname.com in the Enter the sub-domain you want to access section. However the Sentora login screen loaded in mydomainname.com instead of panel.mydomainname.com. Please kindly assist. Thank you
Is this guide for beta version? or final product version of Sentore?
I’ve been using Sentora Beta for over 6 months now. But I need stable version to install SSL on one of my websites. Therefore, I need fresh install for stable version.
Hope this guide is the same.
working smoothly tried yesterday.
@jonaharagon have you ever installed SSL on sentora domains. I’ve purchased SSL from godaddy but unable to implement SSL certificated on sentora? pls help. I’ve tried apache config override many times but no result.
thanks in advance.
Thank for your tutorial. Can anyone assist to config the email system like this:
SMTP: mail.yourdomain.com POP3: mail.yourdomain.com IMAP: mail.yourdomain.com
Then how to config to access the webmail with: webmail.yourdomain.com
Thank all.
Dear Clientesrefacci,
I’m quite new with this. Can you give me more detail information? Where is index.php file locate? I found many index.php files. Thank you!
Create A records for the mail subdomain. Check this thread on Sentora Forums for VirtualHost: http://forums.sentora.org/showthread.php?tid=495
I have been done install the sentora into my ubuntu server. please help how to change Setting Up DNS because I cannot access the first domain?
 This work is licensed under a Creative Commons Attribution-NonCommercial- ShareAlike 4.0 International License.
Become a contributor for community
Get paid to write technical tutorials and select a tech-focused charity to receive a matching donation.

DigitalOcean Documentation
Full documentation for every DigitalOcean product.

Resources for startups and AI-native businesses
The Wave has everything you need to know about building a business, from raising funding to marketing your product.
The developer cloud
Scale up as you grow — whether you're running one virtual machine or ten thousand.

Get started for free
Sign up and get $200 in credit for your first 60 days with DigitalOcean.*

*This promotional offer applies to new accounts only.