
Status: Deprecated
This article covers a version of CentOS that is no longer supported. If you are currently operating a server running CentOS 6, we highly recommend upgrading or migrating to a supported version of CentOS.
Reason: CentOS 6 reached end of life (EOL) on November 30th, 2020 and no longer receives security patches or updates. For this reason, this guide is no longer maintained.
See Instead:
This guide might still be useful as a reference, but may not work on other CentOS releases. If available, we strongly recommend using a guide written for the version of CentOS you are using.
Step 1 - Installation
yum -y groupinstall Desktop
yum -y install qt qt-devel SDL-devel tigervnc-server gcc make kernel-devel
export KERN_DIR=/usr/src/kernels/2.6.32-358.2.1.el6.x86_64
rpm -ivh http://download.virtualbox.org/virtualbox/4.2.10/VirtualBox-4.2-4.2.10_84104_el6-1.x86_64.rpm
/etc/init.d/vboxdrv setup
Step 2 - Set VNC Server
vncpasswd
Add these two lines to /etc/sysconfig/vncservers :
VNCSERVERS="0:root"
VNCSERVERARGS[0]="-geometry 1024x768"
If you do not want to run VNC as user root, and would like to create an encrypted tunnel, create a separate user, and add -localhost to VNCSERVERARGS above.
You would then have to create a tunnel using Putty or some other SSH client, and map localhost:port -> localhost:5901 tunnel, and restart vncserver service for changes to take effect.
Step 3 - Start VNC Server
service vncserver start
Step 4 - Download TightVNC Viewer and connect to your droplet's IP port 5900.
When connecting with TightVNC Viewer, remote host address would be in IP::PORT format:

Enter Your VNC Password from Step 2 above:

Step 5 - Upload your desired ISO Disk or Disk Image to be imported.
You can install any Linux / BSD / Windows OS with an uploaded ISO image.
If you have an existing Disk Image with filetypes such as VDI, VMDK, QCOW, or RAW, you can import them into VirtualBox.
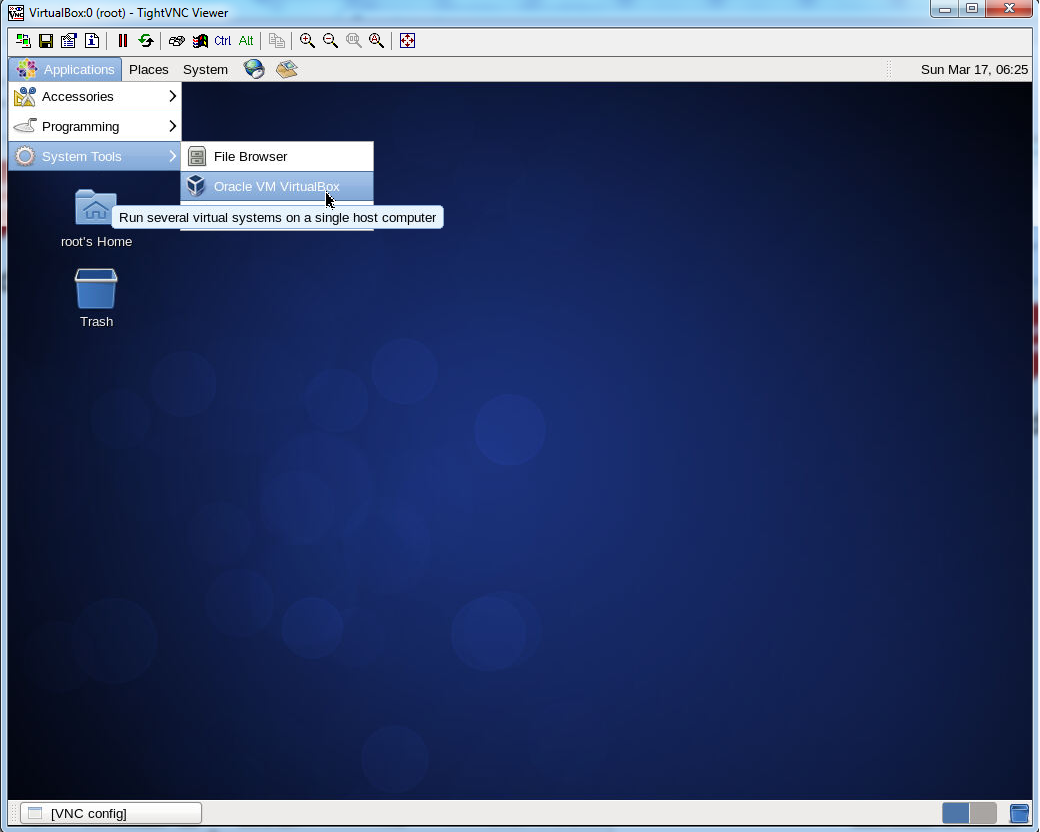
Step 6 - Launch VirtualBox and Install Virtual Machines
Once you are connected via VNC, click Applications -> System Tools -> Oracle VM VirtualBox
Using VirtualBox, you can even install Windows operating system, but they will be limited to 1 CPU Core.
Here is Windows XP running in VirtualBox:

Thanks for learning with the DigitalOcean Community. Check out our offerings for compute, storage, networking, and managed databases.
About the author
Still looking for an answer?
This textbox defaults to using Markdown to format your answer.
You can type !ref in this text area to quickly search our full set of tutorials, documentation & marketplace offerings and insert the link!
i was able to install the server but when try to install the iso it gave me error VERR_VMX_MSR_LOCKED_OR_DISABLED any recommendation
Hi, this is because you chose more than one CPU core. Since this is a Virtualbox running on a virtualized environment, you can only use 1 core with Windows VMs.
I suggest to everyone make a swap memory at least 2 GB, the performace will be increased a lot
How secure is this setup? Should you do anything to encrypt the VNC connection?
@pmarchant: You can make this more secure by doing what the last paragraph in Step 2 says.
Hi Guys, can I run CentOS (Minimal installation) and install Virtualbox on top? (A bit like ESXi) I would then have a minimal install on to which I could install my Windows 7 or XPenology Systems. Any pointers as to what a good way to do that would be appreciated? I have a rig with intel i7 and 28GB RAM lying around, I would like to have it RAID 5 too so that in case of disk failure I could swap one out.
You know what my ideal (and dream) server would be… a fully RAIDed (Virtualised Server) machine with the ability to switch between Windows 7, Ubuntu and XPenology all on the one screen withouth having to log in and out of different windows. Does something like that exist?
Hello,
I choosed CentOS 6.5 x64 to my droplet, and tried to install VirtualBox, the system show me a error after de command “/etc/init.d/vboxdrv setup” on the first step.
[root@mydroplet ~]# /etc/init.d/vboxdrv setup Stopping VirtualBox kernel modules [ OK ] Uninstalling old VirtualBox DKMS kernel modules [ OK ] Removing old VirtualBox pci kernel module [ OK ] Removing old VirtualBox netadp kernel module [ OK ] Removing old VirtualBox netflt kernel module [ OK ] Removing old VirtualBox kernel module [ OK ] Trying to register the VirtualBox kernel modules using DKMSError! echo Your kernel headers for kernel 2.6.32-431.1.2.0.1.el6.x86_64 cannot be found at /lib/modules/2.6.32-431.1.2.0.1.el6.x86_64/build or /lib/modules/2.6.32-431.1.2.0.1.el6.x86_64/source. [FAILED] (Failed, trying without DKMS)
I try change kernel headers to match, but not change, do you have any ideas ? Thanks
@mf.wagner: It’s trying to look for the kernel headers but is not able to find them. Try installing the kernel-headers-2.6.32-431.1.2.0.1.el6.x86_64 package. Does that fix it?
Hi Kamal,
Thanks for fast reply. Unfortunately not worked. The same result.
[root@mydroplet ~]# wget http://ftp.muug.mb.ca/mirror/centos/6.5/updates/x86_64/Packages/kernel-devel-2.6.32-431.1.2.0.1.el6.x86_64.rpm –2014-04-03 16:29:19-- http://ftp.muug.mb.ca/mirror/centos/6.5/updates/x86_64/Packages/kernel-devel-2.6.32-431.1.2.0.1.el6.x86_64.rpm Resolving ftp.muug.mb.ca… 130.179.31.46 Connecting to ftp.muug.mb.ca|130.179.31.46|:80… connected. HTTP request sent, awaiting response… 301 Moved Permanently Location: http://www.muug.mb.ca/mirror/centos/6.5/updates/x86_64/Packages/kernel-devel-2.6.32-431.1.2.0.1.el6.x86_64.rpm [following] –2014-04-03 16:29:19-- http://www.muug.mb.ca/mirror/centos/6.5/updates/x86_64/Packages/kernel-devel-2.6.32-431.1.2.0.1.el6.x86_64.rpm Resolving www.muug.mb.ca… 130.179.31.46 Reusing existing connection to ftp.muug.mb.ca:80. HTTP request sent, awaiting response… 200 OK Length: 9193792 (8.8M) [application/x-rpm] Saving to: `kernel-devel-2.6.32-431.1.2.0.1.el6.x86_64.rpm’
100%[===================================================================================================================================>] 9,193,792 7.55M/s in 1.2s
2014-04-03 16:29:20 (7.55 MB/s) - `kernel-devel-2.6.32-431.1.2.0.1.el6.x86_64.rpm’ saved [9193792/9193792]
[root@freshemail ~]# /etc/init.d/vboxdrv setup Stopping VirtualBox kernel modules [ OK ] Uninstalling old VirtualBox DKMS kernel modules [ OK ] Removing old VirtualBox pci kernel module [ OK ] Removing old VirtualBox netadp kernel module [ OK ] Removing old VirtualBox netflt kernel module [ OK ] Removing old VirtualBox kernel module [ OK ] Trying to register the VirtualBox kernel modules using DKMSError! echo Your kernel headers for kernel 2.6.32-431.1.2.0.1.el6.x86_64 cannot be found at /lib/modules/2.6.32-431.1.2.0.1.el6.x86_64/build or /lib/modules/2.6.32-431.1.2.0.1.el6.x86_64/source. [FAILED] (Failed, trying without DKMS) Recompiling VirtualBox kernel modules [ OK ] Starting VirtualBox kernel modules [ OK ]
 This work is licensed under a Creative Commons Attribution-NonCommercial- ShareAlike 4.0 International License.
Become a contributor for community
Get paid to write technical tutorials and select a tech-focused charity to receive a matching donation.

DigitalOcean Documentation
Full documentation for every DigitalOcean product.

Resources for startups and AI-native businesses
The Wave has everything you need to know about building a business, from raising funding to marketing your product.
The developer cloud
Scale up as you grow — whether you're running one virtual machine or ten thousand.

Start building today
From GPU-powered inference and Kubernetes to managed databases and storage, get everything you need to build, scale, and deploy intelligent applications.
