By Ben Johnson

Zimbra In Brief
Zimbra is an easy to use piece of unified collaboration software. Being one of the best free, open source collaboration software available, Zimbra includes email, calendaring, file sharing, activity streams, social communities and much more! Zimbra comes in two different forms: a free open source edition and a paid version.
Zimbra Install Notes
Zimbra runs on several different distributions of Linux. This makes it stable, scalable and secure. In this article, we’ll be using CentOS, specifically version 6.5 64-bit. The minimum system requirements for Zimbra are pretty high and will require a large droplet to be created. The system requirements are:
· A CPU of 1.5GHz.
· A minimum of 3GB or RAM (recommended 4GB RAM).
· 5GB free space for software and logs.
· Additional disk space for mail storage.
During testing, we couldn’t get Zimbra to install on a $5 or $10 VPS, most likely to due to the memory limitation. We started to get lucky on the $20 VPS; the system worked well, however, 2GB is below the minimum requirements. Therefore a $40 Droplet (4GB) is recommended when deploying Zimbra in a production environment.
When giving your Droplet a hostname, you’ll need to include a full FQDN, including the domain and tld. For example, I could call the droplet mail.example.com, if my main domain name was example.com (Obviously, you don’t have to call it mail if you don’t want to)!
Once you’ve created your Droplet, login via SSH with PuTTY.
Preparing CentOS For Use With Zimbra
First, we need to ensure that CentOS is up to date. Therefore, we’ll run the following command:
yum update –y
Next, we need to install some pre-requisites. Since there are 12 different applications required to install Zimbra, we can handle the installation in one single command:
yum install -y gmp libidn wget nano make nc sudo sysstat libtool-ltdl glibc perl ntp
Next, we’ll need to install check if postfix is running – if it is, disable it. Since we cannot have two different mail transfer agents running, postfix must go.
service postfix status
If postfix is running, we’ll need to disable it:
service postfix stop && chkconfig postfix off
Configuring DNS For Use On The Mail Server
Because Zimbra is a collaboration server, it includes a fully functional mail server. This means that we must configure the DNS for our domain name for use in Zimbra. There’s a few different ways of achieving this.
The firstly and easiest method is to use the DigitalOcean DNS tab in the control panel. What this requires is three name servers to be set in your domain panel. To setup DigitalOcean DNS for your domain, head over to the DNS tab in the DO control panel. Once there, add your domain.
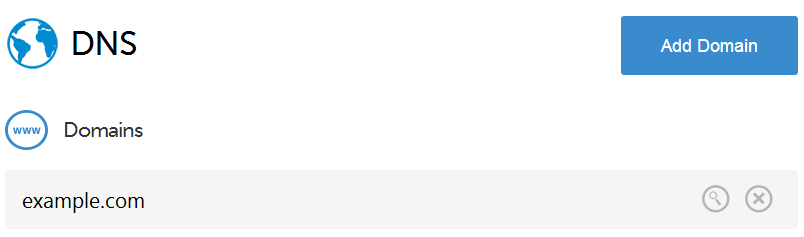
Once you’ve added your domain, add the following records to your DNS settings. In this example, the IP address 146.185.157.211 is used for my DigitalOcean Droplet. However, yours will be different, so set this value to your Droplet IP. The second value should point to mail.example.com (your Droplet FQDN) with a high priority (lowest number).

You should now make a note of the DigitalOcean name servers for your domain. They can be seen by the yellow NS markings in your domain DNS. Keep this information handy, as you’ll need to configure it in your CentOS installation shortly. Please remember that your changes may take up to 48 hours to propagate.

If you’re using your own DNS panel, the same method still applies, however you’ll have a different layout of control panel and different name servers. You should still make a note of the name servers, as you’ll need to configure them in your CentOS installation as above.
Obtaining A Copy Of Zimbra
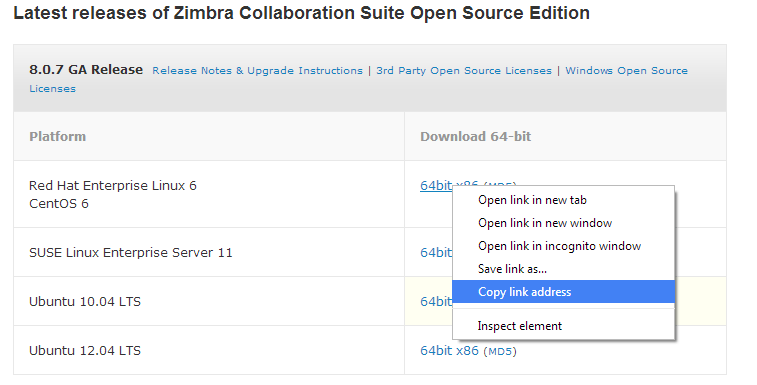
Next, we’ll need to visit the following URL to get a download link for the latest version of Zimbra. The version being used in this article is the 8.0.7 GA release. To find the latest version of the software, simply head over to the Zimbra website.
Once there, you’ll need to copy the link for the Red Hat and CentOS install file by right clicking and copying the link. Keep the link handy, you’ll need it next.
Now, we’ll need to download the file from the Zimbra website and store it on our Droplet. But first, we’ll need to create a folder to store it in.
mkdir zcsinstall
Next, enter that directory:
cd zcsinstall
And then fetch the file from the Zimbra website. You can use wget to achieve this. Obviously, you’ll need to place the URL you copied earlier into this command rather than using the link here.
wget http://files2.zimbra.com/downloads/8.0.7_GA/zcs-8.0.7_GA_6020.RHEL6_64.20140321160526.tgz
This will download the file from the Zimbra website, saving it into the zcsinstall folder we created.
Editing The Hosts File
Now we’ll need to edit the hosts file in CentOS to contain the IP address of the Droplet, the FQDN, and name of the server. We can do this by typing:
nano /etc/hosts
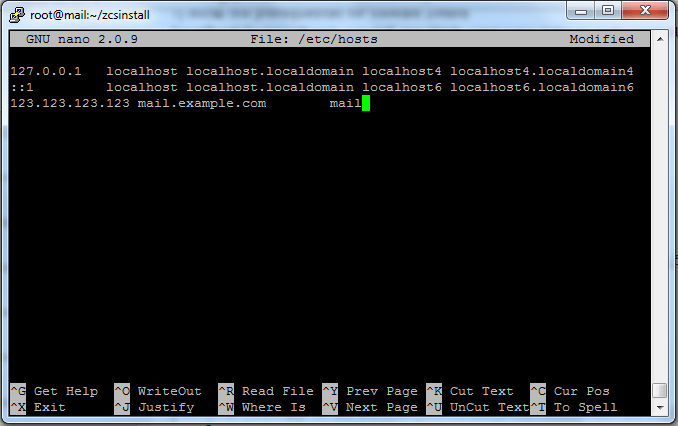
Once opened, the hosts file should look similar to the following:

You’ll need to edit the file to contain another row with your Droplet’s IP address, FQDN and name. The line should look like the following:
123.123.123.123 mail.example.com mail
You’ll need to ensure that you replace the above with the actual data values for your Droplet. You should also make sure that you use a tabbed space between each value. This means that you’ll have a host file looking something similar to:
Once done, press CTRL+O and then Enter to save. Then press CTRL+X to return.
Unpacking And Installing Zimbra
The next stage is to unpack the tgz file we downloaded earlier. To do this, we can execute the following command:
tar zxvf zcs-*.tgz
Next, change directory into the folder that the files were extracted into:
cd zcs-*
Finally, we can run the installer.
./install.sh --platform-override
Once the installer starts, you’ll need to accept the license agreements by pressing Y at each license prompt. When you reach the ‘select packages to install’ section, simply press enter at each of the options which will select the default value.
You may get the following error during installation:

This error is presented by Zimbra because it’s looking for an MX record for the domain ‘subdomain.example.com’. Instead, we want it to search for an MX record for ‘example.com’. This means that we should press `Y``, and change the domain name to just ‘example.com’.
If you get a port conflict error, you may need to exit the installer and resolve the issue before continuing.
You’ll soon reach the configuration page, similar to that below. First we should choose option 3 to allow us to enter the zimbra-store section.
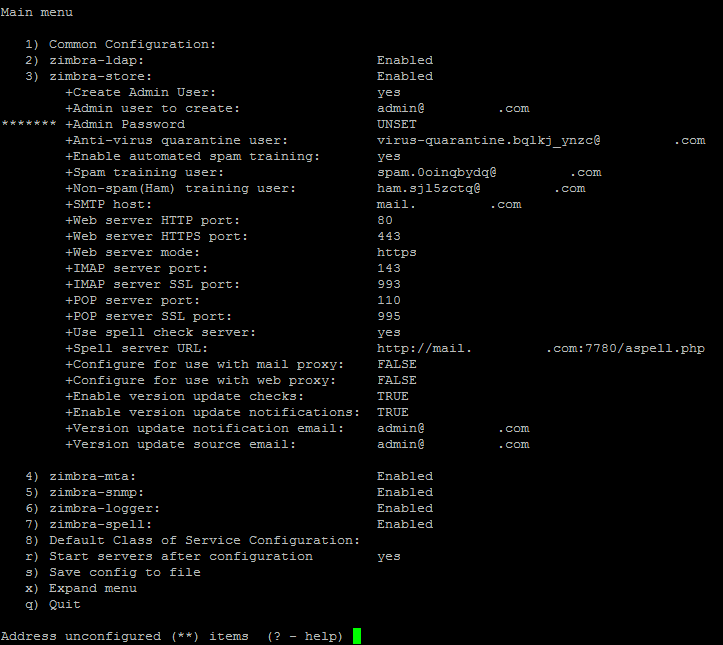
Address unconfigured (**) items (? – help) 3
Next, choose 3 again. This will allow us to configure the admin username and password.
Select, or 'r' for previous menu [r]  3

Create admin user: [admin@example.com] admin@example.com

Password for admin@example.com (min 6 characters): [_6ty6y8ui] password
Next, choose r to return to the previous menu.
Select, or 'r' for previous menu [r] r
Then, choose 1 to go to the common configuration section.
*** CONFIGURATION COMPLETE - press 'a' to apply

Select from menu, or press 'a' to apply config (? - help)   1
After this, choose 6 to edit the time zone.
Select, or 'r' for previous menu [r] 6
Here, you should choose the number relative to the time zone you’re in. For example, you could type 83 to get the Europe/London time zone.
Enter the number for the local timezone: [39] 83
Then choose ‘r’ to return and ‘a’ to apply the configuration. You should also choose the log the installation to a file, in case any errors arise.
Select, or 'r' for previous menu [r] r
*** CONFIGURATION COMPLETE - press 'a' to apply

Select from menu, or press 'a' to apply config (? - help) a
Save configuration data to a file? [Yes]  yes
Save config in file: [/opt/zimbra/config.7622] /root/zimbra-installation.txt
Saving config in /root/zimbra-installation.txt...done.
The system will be modified - continue? [No] yes
The system will then continue the installation. Setup of Zimbra should take about 20 minutes, depending on the Droplet size you selected.
Finally, you’ll be given the option of notifying Zimbra of the installation, which allows them to track the uptake of their products. You can either type ‘yes’ or ‘no’ here, either way, this is the final step of the installation. You can make sure that the installation was successful from the final confirmation message:
Configuration complete – press return to exit
It is recommended that you reboot your Droplet.
Accessing The Zimbra Admin Control Panel
The control panel can be easily accessed by visiting the following URL:
https://mail.example.com:7071/zimbraAdmin
Issues with installation
If there are any issues with your installation, please comment below.
<div class=“author”>Submitted by: <a href=" http://www.benstechtips.net/go/doarticle">Ben Johnson</a></div>
Thanks for learning with the DigitalOcean Community. Check out our offerings for compute, storage, networking, and managed databases.
About the author
Still looking for an answer?
This textbox defaults to using Markdown to format your answer.
You can type !ref in this text area to quickly search our full set of tutorials, documentation & marketplace offerings and insert the link!
The 2GB Droplet ($20) kernel paniced a few times on me running out of memory. I moved to the 4GB Droplet ($40) and have not had any issues.
Installed zimbra 8.07 on ubuntu 12.04 but i am failing to login into the admin console. It looks like the port 7071 is not being listened to and below are my parameters:
root@xx.xx.xx.xx:/# netstat -ntplu Active Internet connections (only servers) Proto Recv-Q Send-Q Local Address Foreign Address State PID/Program name tcp 0 0 127.0.0.1:10027 0.0.0.0:* LISTEN 5788/master tcp 0 0 0.0.0.0:587 0.0.0.0:* LISTEN 5788/master tcp 0 0 127.0.0.1:10028 0.0.0.0:* LISTEN 5788/master tcp 0 0 127.0.0.1:10029 0.0.0.0:* LISTEN 5788/master tcp 0 0 127.0.0.1:10030 0.0.0.0:* LISTEN 5788/master tcp 0 0 127.0.0.1:783 0.0.0.0:* LISTEN 834/spamd.pid tcp 0 0 127.0.0.1:10032 0.0.0.0:* LISTEN 5296/amavisd (maste tcp 0 0 0.0.0.0:80 0.0.0.0:* LISTEN 1803/nginx tcp 0 0 0.0.0.0:465 0.0.0.0:* LISTEN 5788/master tcp 0 0 127.0.0.1:8465 0.0.0.0:* LISTEN 5543/opendkim tcp 0 0 0.0.0.0:22 0.0.0.0:* LISTEN 594/sshd tcp 0 0 0.0.0.0:25 0.0.0.0:* LISTEN 5788/master tcp 0 0 127.0.0.1:7171 0.0.0.0:* LISTEN 3936/java tcp 0 0 0.0.0.0:7780 0.0.0.0:* LISTEN 5570/httpd tcp 0 0 xxx.xx.xxx.xx:389 0.0.0.0:* LISTEN 3534/slapd tcp 0 0 127.0.0.1:10663 0.0.0.0:* LISTEN 4949/zmlogger: zmrr tcp 0 0 127.0.0.1:10024 0.0.0.0:* LISTEN 5296/amavisd (maste tcp 0 0 127.0.0.1:9000 0.0.0.0:* LISTEN 1895/php-fpm.conf) tcp 0 0 127.0.0.1:10025 0.0.0.0:* LISTEN 5788/master tcp 0 0 127.0.0.1:10026 0.0.0.0:* LISTEN 5296/amavisd (maste tcp 0 0 127.0.0.1:7306 0.0.0.0:* LISTEN 5035/mysqld tcp 0 0 127.0.0.1:3306 0.0.0.0:* LISTEN 748/mysqld tcp6 0 0 :::1099 :::* LISTEN 2009/java tcp6 0 0 :::80 :::* LISTEN 1803/nginx tcp6 0 0 127.0.0.1:61617 :::* LISTEN 2009/java tcp6 0 0 :::22 :::* LISTEN 594/sshd tcp6 0 0 :::8090 :::* LISTEN 2009/java tcp6 0 0 :::35419 :::* LISTEN 2009/java tcp6 0 0 xxx.xx.xxx.xx:8092 :::* LISTEN 2009/java tcp6 0 0 127.0.0.1:8005 :::* LISTEN 2009/java tcp6 0 0 :::8009 :::* LISTEN 2009/java udp 0 0 0.0.0.0:44453 0.0.0.0:* 3936/java
vi /opt/zimbra/log/zmmailboxd.out has errors in it
Java HotSpot™ 64-Bit Server VM warning: .hotspot_compiler file is present but has been ignored. Run with -XX:CompileCommandFile=.hotspot_compiler to load the file.
JettyMonitor monitoring thread pool qtp58648533{10<=0<=0/250,-1} 2014-06-20 13:09:42.655:WARN:oejx.XmlConfiguration:Config error at <Call name=“open”/> java.lang.reflect.InvocationTargetException 2014-06-20 13:09:42.655:WARN:oejx.XmlConfiguration:Config error at <Ref id=“http_local”><Call name=“open”/></Ref> java.lang.reflect.InvocationTargetException
zimbra@xxxxxxx:~/bin$ zmprov gs localhost [] INFO: I/O exception (java.net.ConnectException) caught when processing request: Connection refused [] INFO: Retrying request ERROR: zclient.IO_ERROR (invoke Connection refused, server: localhost) (cause: java.net.ConnectException Connection refused)
I think the exception above usually occurs when there is no service listening on the port you are trying to connect to. A couple of things could be happening: You have not started your server. Your server is not waiting to accept connections. You are trying to connect to the wrong port number.
Anybody to identify where the problem could be coming from. thanx
I created the server and it working fine, but i want to use for other domains that are using another server.
How do i setup the correct dns records on the other server?
Thanks
@ourkollywood: You can replace the yum commands with:
sudo apt-get update
sudo apt-get install libgmp3-dev libidn11 wget nano make netcat sudo sysstat libtool libltdl3 build-essential libc6 perl ntp libperl5.14 libidn11-dev sysstat sqlite3 wget
You will need to remove AppArmor as well:
sudo apt-get purge apparmor
The rest of the tutorial should work properly on Ubuntu 12.04.
aptitude install libgmp-dev libidn11 wget nano make netcat sudo sysstat libtool libltdl7-dev build-essential libc6 perl ntp libperl-dev libidn11-dev sysstat sqlite3 wget libaio1 resolvconf unzip pax netcat-openbsd
The rest of the tutorial should work properly on Ubuntu 14.04 and Zimbra 8.6.
Hello,
I have setup correctly, but i am getting these errors on my webpanel. screenshot : http://gyazo.com/1a9e1da89c8a7f1a7885dd1b20fd36e2
please help me regarding this.
 This work is licensed under a Creative Commons Attribution-NonCommercial- ShareAlike 4.0 International License.
Become a contributor for community
Get paid to write technical tutorials and select a tech-focused charity to receive a matching donation.

DigitalOcean Documentation
Full documentation for every DigitalOcean product.

Resources for startups and AI-native businesses
The Wave has everything you need to know about building a business, from raising funding to marketing your product.
The developer cloud
Scale up as you grow — whether you're running one virtual machine or ten thousand.

Start building today
From GPU-powered inference and Kubernetes to managed databases and storage, get everything you need to build, scale, and deploy intelligent applications.
